Kraftpaket 136403 User manual

Fully automatic
Maintenance Battery
Charger
6V/12V 750mA
Part.no. 136403
Operating Manual

PRODUCT DESCRIPTION
Thank you for choosing Dino KRAFTPAKET 136403 full automatic maintenance battery charger.
This innovative maintenance battery charger is equipped with the latest maintenance charging techno-
logy and when batteries are charged with this device, their charging level remains constantly high.
This means that you can hold available the largest possible battery capacity, as well as have constant
access to sufficient power in order to start your vehicle or boat.
• The device automatically determines battery voltage and charge status, as well as how necessary it
is to start maintenance charging. aintenance charging begins as soon as the battery voltage falls
below 13 volts (for 12V batteries), or below 6.5 volts for 6V batteries.
• The device is suitable for keeping attached to your battery for long periods, e.g. over the winter, as
the charging process starts and stops automatically. The battery will not be weared by overcharging
nor weared from lasting in the outgassing stage.
• The attached comfortable connection cable for a fixed installation with the vehicle battery makes
operation significantly easier. Actually battery terminals can only be uncovered after considerable ti-
me has been spent doing so, and often it is only possible using tools. This is due to the position in
which they have been installed, as well as the fact that they are protected against cold. Once the fi-
xed comfortable connection cable has been installed, connecting the charger takes a matter of se-
conds.
• The item is equipped with protections against potential overloading due to polarity reversal, excessi-
ve current due to short-circuiting and temperatures during long periods of excessive work etc.
You can use this device in maintenance charging mode with all 6V and 12V batteries up a capacity of
240 Ah. It is suitable for all types of modern lead-acid batteries, such as AG , maintenance-free and
gel batteries.
WHAT’S INCLUDED:
• aintenance battery charger 6/12V 750 mA
• Handy cable with battery clamps
• Comfortable cable with eyelets (for fixed installation in the vehicle)
• Instruction manual
Pl as visit www.dino-kraftpak t.co.uk for acc ssori s and spar parts
2

IMPORTANT SAFETY AND USAGE INSTRUCTIONS WARNINGS
• Please read all the instruction manual carefully before using the device.
• Using the device for a purpose other than that intended may damage the battery or electronic sys-
tem connected.
• Before using the device, always make sure that the battery connected to that device has a minimum
voltage of 2 volts.
• Using the device for a purpose other than that intended may cause injury.
• Only use the device for its intended purpose: maintenance charging batteries whose design and
technical circumstances (rechargeable batteries) allow it.
• Only use the device in areas where the outdoor temperature is within the range specified.
• Do not charge frozen batteries.
• The act of charging batteries produces flammable gases. This may cause an explosion. Keep sour-
ces of ignition and open flames away from the battery and only charge the battery in well-ventilated
rooms, or outdoors.
• Only connect the clamps with the battery and the handy cable-plug when the device has been dis-
connected from the socket (avoids spark formation).
• If an accident occurs involving battery acid, thoroughly wash any affected body parts straight away
and consult a doctor. BATTERY ACID IS CORROSIVE!
• Please avoid bumping, hitting and dropping the device and always securely place on a horizontal and
non-slipping surface during the charging process.
• Please avoid squashing and kinking the cable as this may cause damage.
• Check the device for damage before each use. Never use the device if it is damaged. This may cau-
se electric shocks or injury.
• The charger is protected against jets of water and dust (protection class IP65). Please note: If the
device is being used outdoors, please use the appropriate power socket.
Please check from time to time in the maintenance charging process that the power socket has still
voltage and no one pull out the power plug from the socket.
3

INTENDED USAGE OF THE CHARGER
Only use this device to maintenance charge of standard and suitably designed12V/6V batteries which
are sufficiently charged. Do so up to a maximum capacity of 240 Ah and with the following types:
• aintenance-free lead-acid batteries
• Standard or low-maintenance lead-acid batteries, optional CA-CA technology (warning: only fill up
the water in the battery after charging)
• Gel batteries
• Absorbent glass mat (AG ) batteries
This device is not intended for commercial use. This device should not be used by individuals with re-
duced physical or mental abilities, nor should it be used by children. Faults and damage may arise if
this device is used improperly and the manufacturer shall not assume any liability whatsoever.
TECHNICAL DATA
odel: 136403 Dino KRAFTPAKET maintenance battery charger
Specifications: 6V and 12V max. 750 mA
Function: maintenance charging output between 13V-14.2V / 6.5V-7.1V
Power supply: 100-240 V, 50 Hz
Charging voltage: Nominal: 6V or 12V (automatic selection)
inimum operating voltage: 2 volts
Charging current: max. 750 mA
Ambient temperature
for device operation: -10°C – 40°C
Charger type: maintenance charger (it is not a fully-fledged charger)
Battery types: 6V and 12 V lead-acid batteries, low-maintenance,
maintenance-free, CA-CA, AG and gel batteries
Recommended battery capacity: 2-240 Ah, only maintenance charging
Protection class: IP65, protected from jets of water and dust
Protections: multiple electronical protections against overloading
4

PRODUCT DESCRIPTION
5
CONNECTING AND DISCONNECTING THE DEVICE TO/FROM THE BATTERY
WARNING: NEVER CONNECT OR DISCONNECT THE DEVICE WHEN THE PLUG IS IN THE SOCKET.
DISCONNECT THE PLUG FRO THE AINS BEFORE EVERY PROCEDURE
Charging th batt ry via th t rminal clamps
Connecting and disconnecting the battery with/from the charger via the terminal clamps:
1. ake sure that the device is not connected to a power supply.
2. Now insert the plug of the handy cable (with the clamps attached) into the handy socket of the de-
vice. ake sure that the connection is locked.
3. Start by securely connecting the red clamp with the battery “+” terminal. Check the sure contact.
Then securely connect the black clamp with the battery “–“ terminal. Check the sure contact.
4. Now insert the plug into the socket.
5. The device will now switch on and start the maintenance charging process.
6. If you no longer need to maintenance charge your battery, start by removing the plug from the plug
socket. Then remove the black clamp from the battery terminal, followed by the red clamp. ake
sure that the clamps do not touch each other.
Charging th batt ry via th comfortabl cabl with th 8mm y l ts
1. ake sure that the device is not connected to a power supply.
2. ake a secure and long-lasting connection between the eyelets and suitable parts of the battery as
follows: red eyelet with the plus terminal and black eyelet with the minus terminal.
3. Now insert the plug of the comfortable cable (with the eyelets attached) into the handy jack of the
device cable and make sure that the connection is locked.
4. Now insert the plug into the socket.
5. The device will now switch on and start the maintenance charging process.
6. If you no longer need to maintenance charging your battery, start by removing the plug from the
plug socket. Then remove the handy cable plug from the jack. Close the socket with the rubber plug
and store the free end in the engine compartment, cleanly and securely.

CHARGING PROCESS
6
WARNING: Always make sure that all connections are secure and stable. Always make sure that the
device is laying stable and cannot slip and fall down.
Protection against polarity reversal: If the clamps or eyelets have not been correctly connected to the
battery, this is signalled on the device with a flashing red LED. The plug should then be removed from
the power socket and the connection process should be reversed.
Always make sure that there are no electric consumers connected to the battery when the item is
maintenance charging. Shut off ignition of the car, lights etc..
Don’t open a battery terminal in modern cars. In modern cars the current to hold the memory in the
different electronic units is less than critical for our maintenance charger.
Pl as ch ck from tim to tim that th pow r sock t has still voltag and no on pull out th pow r
plug from th sock t.
CHARGING PROCESS FOR THE DEVICE
The device can be connected to a standard 6V or 12V car battery / starter battery / motorbike or
scooter battery. It starts the fully-automated maintenance battery charging process, including se-
lecting the charging voltage required depending on the type of battery being used (6V/12V) in a fully-
automated process.
Charging stag Minimum charging voltag D scription
aintenance Battery with minimum Device automatically enters
charging start 2 volts into maintenance charging mode
(for 6/12 V batteries) with max. 750 mA
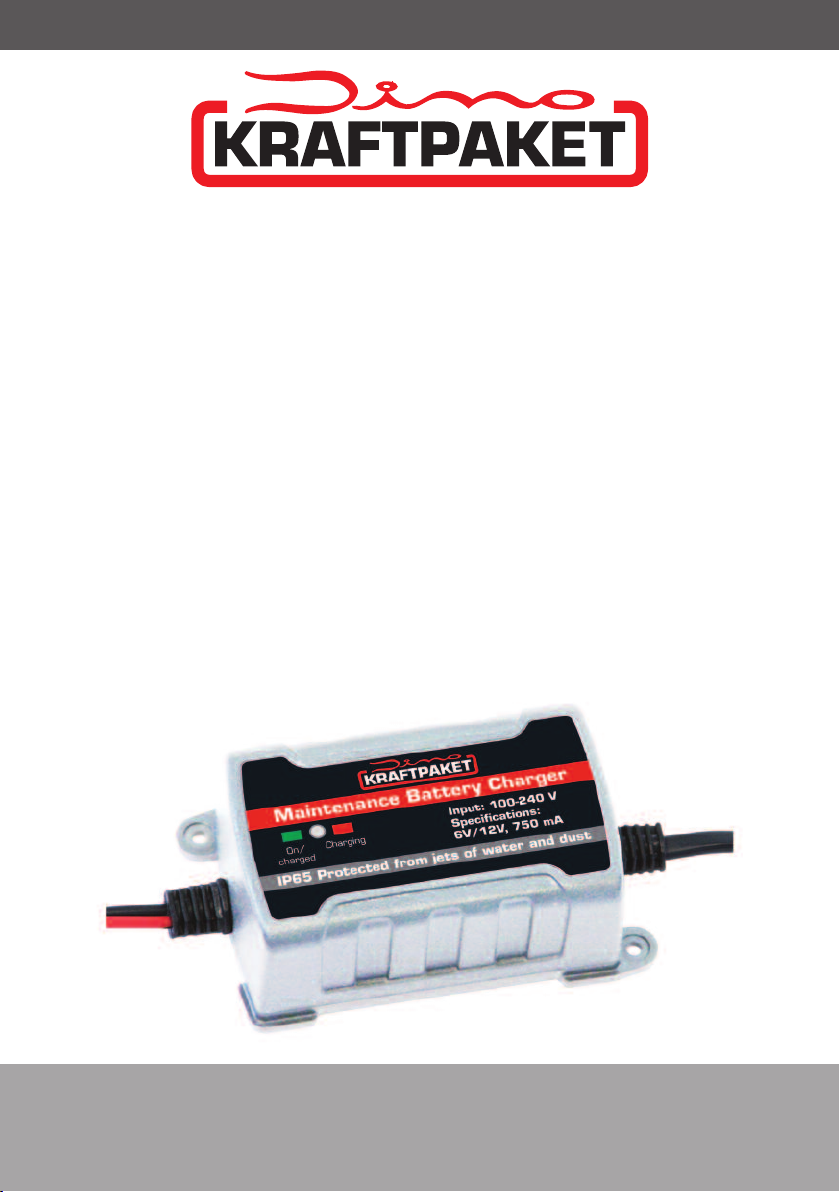
LED displays
No LED No voltage supply. Check wall power socket
Red LED is flashing: Device is not charging. Check clamps and contacts. Clean any dirty contact.
Or:
If polarity is reversed (+ with –), the clamps should be connected correctly.
Then first disconnect the plug from the power supply and start the connecti-
on process from the start as previously described.
Red LED is on: Device is maintenance charging the vehicle battery
Green LED is flashing: Battery is over 80% charged and usable for engine start.
Green LED is on: Battery is fully charged and usable for engine start. The maintenance battery
charger stops charging and waits until voltage fall down to 6,5V/13V (6/12V
battery). Then automatically starts maintenance charging again. This is run-
ning in the background and not visible.

SPARE PARTS
7
Spar parts availabl for this charg r can b found by visiting: www.dino-kraftpak t.co.uk
136304 Spare cable battery clamps with cable and handy connection port
136305 Spare cable eyelets for 8 with cable and handy connection port

R.D.I. D utschland
Autoteile + Vertriebs GmbH
Gahlenfeldstr. 36
58313 Herdecke, Germany
www.dino-kraftpaket.co.uk
WEEE-Reg.no. DE 47537000
Technical changes are possible without prior notice.
For misprints or operating errors and their
consequential damages no liability is accepted.
Dated 11.30.2018
This manual suits for next models
2
Table of contents
Popular Batteries Charger manuals by other brands

Ezviz
Ezviz CS-CMT-CHARGER quick start guide

Sears
Sears 200.71206 owner's manual

Gude
Gude V 621 C Translation of original operating instructions

Enelion
Enelion LUMINA installation guide

jobmate
jobmate ACG18LD3 Safety and operating manual

Studer
Studer Xtender XTH 5000-24 Installation and operating instructions