jobmate ACG18LD3 Installation manual

SAFETY AND OPERATING MANUAL
BATTERY CHARGER
A C G18 L D 3

2
PRODUCT SAFETY
GENERAL SAFETY WARNINGS
WARNING Read all safety warnings
and all instructions. Failure to follow the
warnings and instructions may result in electric
shock, fire and/or serious injury.
Save all warnings and instructions for future
reference.
This appliance can be used by children aged from 8
years and above and persons with reduced physical,
sensory or mental capabilities or lack of experience
and knowledge if they have been given supervision or
instruction concerning use of the appliance in a safe
way and understand the hazards involved. Children
shall not play with the appliance. Cleaning and user
maintenance shall not be made by children without
supervision.
If the supply cord is damaged, it must be replaced
by the manufacturer, its service agent or similarly
qualified persons in order to avoid a hazard.
ADDITIONAL SAFETY
INSTRUCTIONS FOR YOUR
BATTERY CHARGER
1. Before charging, read the instructions.
2. For charge Li-ion battery pack only.
3. After charging, disconnect the battery charger
from the supply mains. Then remove the chassis
connection and then the battery connection.
4. Do not charge a leaking battery.
5. Do not use chargers for works other than those
for which they are designed.
6. Before charging, ensure your charger is matching
the local AC supply.
7. For indoor use, or do not expose to rain.
8. The charging device must be protected from
moisture.
9. Do not use the charging device in the open.
10. Do not short out the contacts of battery or
charger.
11. Respect the polarity “+/-“ when charging.
12. Do not open the unit and keep out of the reach of
children.
13. Do not charge the batteries of other
manufactures or ill-suited models.
14. Ensure that the connection between the battery
charger and battery is correctly positioned and is
not obstructed by foreign bodies.
15.Keep battery charger slots free of foreign
objects and protect against dirt and humidity.
Store in a dry and frost free place.
16.When charging batteries, ensure that the
battery charger is in a well-ventilated area
and away from inflammable materials.
Batteries can get hot during charging.
Do not overcharge any batteries. Ensure
that batteries and chargers are not left
unsupervised during charging.
17. Do not recharge non-rechargeable batteries,
as they can overheat and break.
18.Longer life and better performance can be
obtained if the battery pack is charged when
the air temperature is between 18℃and
24℃. Do not charge the battery pack in air
temperatures below 4.5℃, or above 40.5℃.
This is important as it can prevent serious
damage to the battery pack.
19. Charge only battery pack of the same model
provided by manufacturer and of models
recommended by manufacturer.

3
SYMBOLS
Read the operator’s manual.
Warning
For indoor use only
RCM marking
Fuse
time lag fuse with rated current of 2 A
Positive terminal
Negative terminal
Double insulation
Waste electrical products must not be
disposed of with household waste. Please
recycle where facilities exist. Check
with your local authorities or retailer for
recycling advice.
ABN: Australian Business Number. By this number,
business information such as entity type, status, business
location etc. can be found at website http://abr.business.
gov.au.
ABN of Positec Australia Pty Limited is 14 101 682 357

4
Fig.A1 Fig.A2
Fig.A1 Fig.A2
1

5
COMPONENT LIST
1. Charger Base
2. Charge Indicator Light
3. Battery Pack
4. Optional accessories
* Not all the accessories illustrated or described are included in standard delivery.
TECHNICAL DATA
Charger voltage 100-240V ~ 50/60Hz
Output voltage 14.4V-20V
Output Current
3A
Charging time(3.0A charger)
1.5A h 40mins
2.0Ah 60mins
4.0Ah 120mins
Input Power 78W
Charge battery Li-ion
Protection class /II
Machine weight 0.25 kg
For the technical data of the types, the number of cells and the rated capacity of the batteries that can be
charged, please refer the nameplate of the battery pack supplied by the manufacturer.

6
CHARGING PROCEDURE
NOTE: Before using the tool, read the
instruction book carefully.
BEFORE PUTTING INTO OPERATION
A) CHARGING THE BATTERY
The battery charger supplied is matched to the Li-
ion battery listed in this manual. Do not use another
battery charger.
The Li-ion battery is protected against deep
discharging. When the battery is empty, the machine
is switched off by means of a protective circuit: The
tool holder no longer rotates.
In a warm environment or after heavy use, the
battery pack may become too hot to permit
charging. Allow time for the battery to cool down
before recharging.
When the battery pack is charged for the first time
and after prolonged storage, the battery pack will
accept a 100% charge after several charge and
discharge cycles.
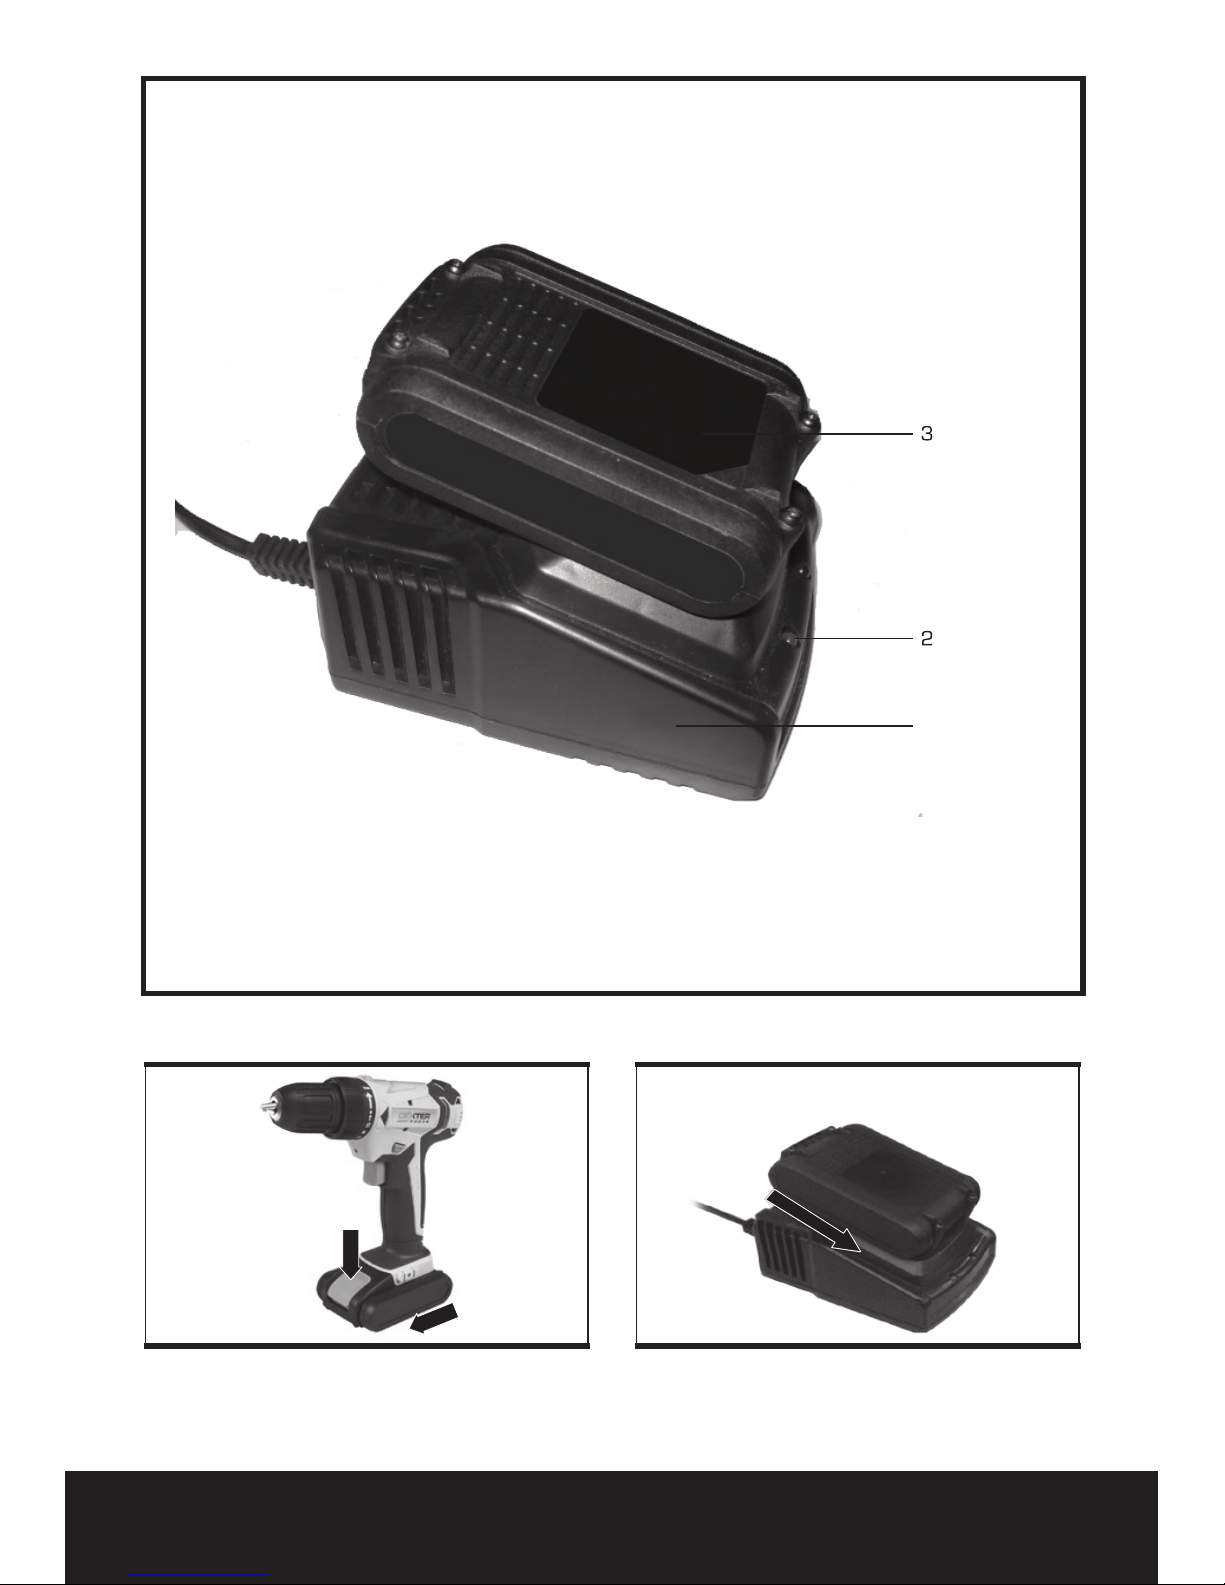
B) TO REMOVE THE BATTERY PACK (SEE FIG A1)
Depress the Battery Pack Release Button firmly first
and then slide the Battery Pack out from your tool.
C) HOW TO CHARGE YOUR BATTERY PACK (SEE
FIG A2)
CHARGING PROCEDURE
1)Plug the charger into an appropriate outlet. The
light will be green.
2)Slide the battery pack into the charger, the light
will turn to red to indicate the charging process has
started.
3)When charging is completed, the light will turn
to green. The pack is now fully charged, unplug the
charger and remove the battery pack.
Warning:
When battery charge runs out after
continuous use or exposure to direct sunlight or
heat, allow time for the tool to cool down before re-
charging to achieve the full charge.
CHARGING INDICATOR
This charger is designed to detect some problems
that can arise with battery packs. Indicator lights
indicate problems (see table below). If this occurs,
insert a new battery pack to determine if the charger
is OK. If the new battery charges correctly, then the
original pack is defective and should be returned to
a service center or recycling service center. If the
new battery pack displays the same problem as the
original Battery Pack, have the charger tested at an
authorized service center.
Light ON/OFF
flash Status
Red on Charging
Red flash - - - - - Defective Battery
Green on Fully Charged
Green
flash - - - - - - Hot/Cold Delay
MAINTENANCE
Always disconnect the charger before performing
any maintenance operation. Your charger requires
no additional maintenance.
There are no user serviceable parts in your charger.
Never use water or chemical cleaners to clean your
charger. Wipe clean with a dry cloth.
Always store your charger in a dry place. Keep
ventilation slots clean. Keep all parts free of dust.
TROUBLESHOOTING GUIDE –
Problems and Solutions
1. I CANNOT FIT THE BATTERY INTO THE BATTERY
CHARGER. WHY?
1) Check if the charger and the battery pack are
specifically designed for working together.
2. REASONS FOR DIFFERENT CHARGING TIMES
1) If the battery pack is only partly discharged it may
be re-charged in less than 3 hours.
2) If the battery pack and ambient temperature are
very cold then re-charging may take longer.
3) If the battery pack is very hot you must remove
your battery pack from the charger and allow your
battery pack to cool first to ambient temperature
and then recharging can be started.

7
NOTE: The charging time can be affected by many
reasons which do not indicate defects in your
product.
Remove the plug from the socket before carrying out
any adjustment, servicing or maintenance.
ENVIRONMENTAL PROTECTION
Waste electrical products must not be
disposed of with household waste. Please
recycle where facilities exist.
Check with your local authorities or retailer for
recycling advice.
WARRANTY
This product is warranted for a 2-year period for
home domestic use from the date of the original
purchase. If found to be defective in materials
or workmanship, the tool or the offending faulty
component will be replaced free of charge with
another of the same item. A small freight charge
may apply.
The battery and charger only have a 1 year
manufacturer’s warranty.
The warranty replacement unit is only made
available by returning the tool to the place of
purchase with a confirmed register receipt.
Proof of purchase is essential.
We reserve the right to reject any claim where
the purchase cannot be verified.
This warranty does not include damage or defects
to the tool caused by or resulting from abuse,
accidents, alterations or commercial or business use.

Table of contents