Krone Comprima F User manual

Q u i c k - S t a r t
Film Tying
Comprima F
Comprima F X-treme
Comprima V
Comprima V X-treme
Comprima CF
Comprima CF X-treme
Comprima CV
Comprima CV X-treme
(from serial no.: 950 920)
Order no.: 150 000 740 01 en
09.09.2016

Table of Contents
2
Pos: 1 /Überschrif ten/Überschrift en 1/F-J/Inh altsverzeichnis @ 31\mod_125 1969952727_ 78.docx @ 30216 5 @ 1 @ 1
1 Table of Contents
Pos: 2 /BA/Inhalts verzeichnis Spr achenneutr al @ 10\mod_ 1221574899104 _0.docx @ 1354 95 @ @ 1
1Table of Contents...................................................................................................................................2
2Operation.................................................................................................................................................3
2.1 Preparing Film Tying .......................................................................................................................... 4
2.1.1 Notes on Operation ........................................................................................................................ 4
2.1.2 Removing Paint Residues and Welding Residues Before Start-up ............................................... 5
2.1.3 Inserting Film ................................................................................................................................. 6
2.1.4 Checking the Stretching of the Inserted Film ............................................................................... 10
2.2 Setting Film Tying in the Terminal ................................................................................................... 11
2.2.1 Menu 1-1 “Number of Film Layers” .............................................................................................. 11
2.2.2 Menu 1-4 “Tying Start Delay” ....................................................................................................... 12
2.2.3 Menu 1-8 “Selection Type of Tying”............................................................................................. 13
2.2.4 Menu 10 “Manual Operation” ....................................................................................................... 14
2.3 Error Messages ............................................................................................................................... 16
3Important Settings for Film Tying.......................................................................................................18
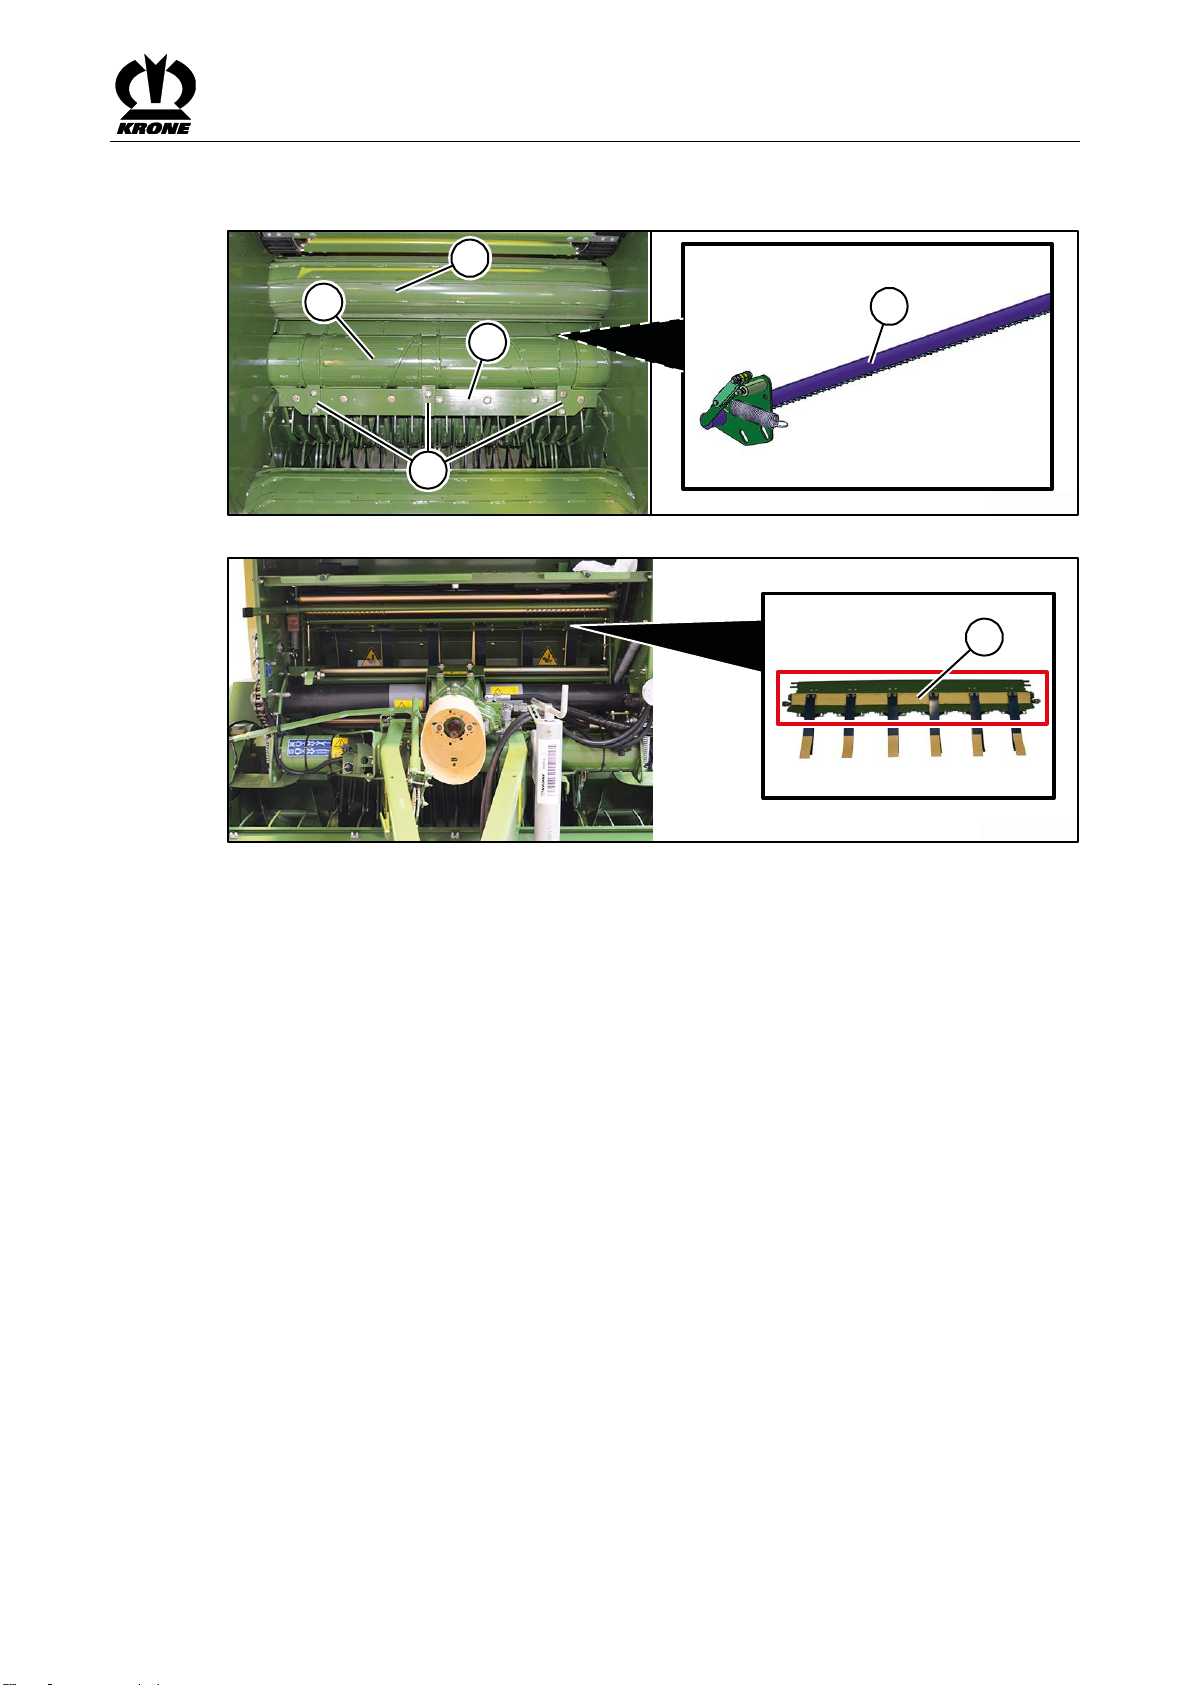
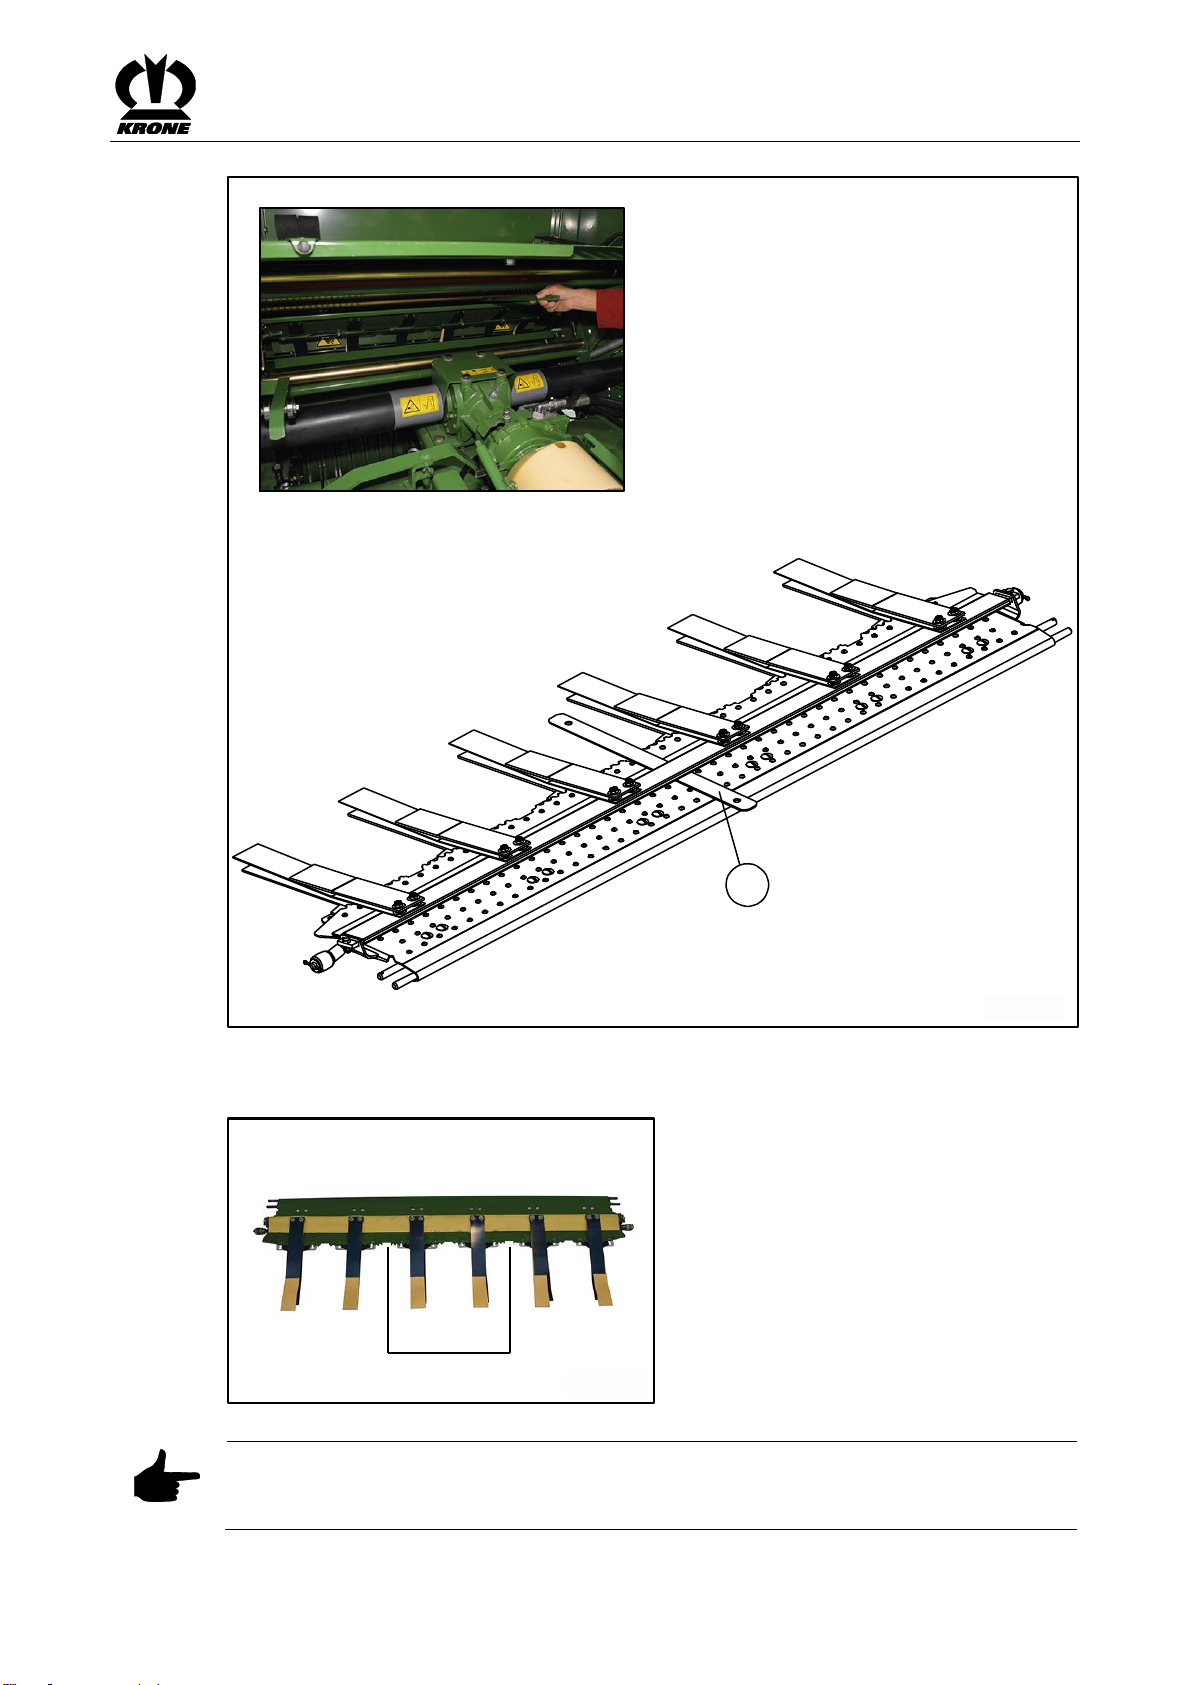
3.1 Setting the Retaining Comb for Film Tying ...................................................................................... 19
3.2 Checking the Retaining Comb for Film Tying .................................................................................. 20
3.3 Adjusting the film brake ................................................................................................................... 21
3.4 Checking and Setting Deceleration of Net Brake Discs .................................................................. 24
3.5 Setting Scraper to Spiral Roller ....................................................................................................... 25
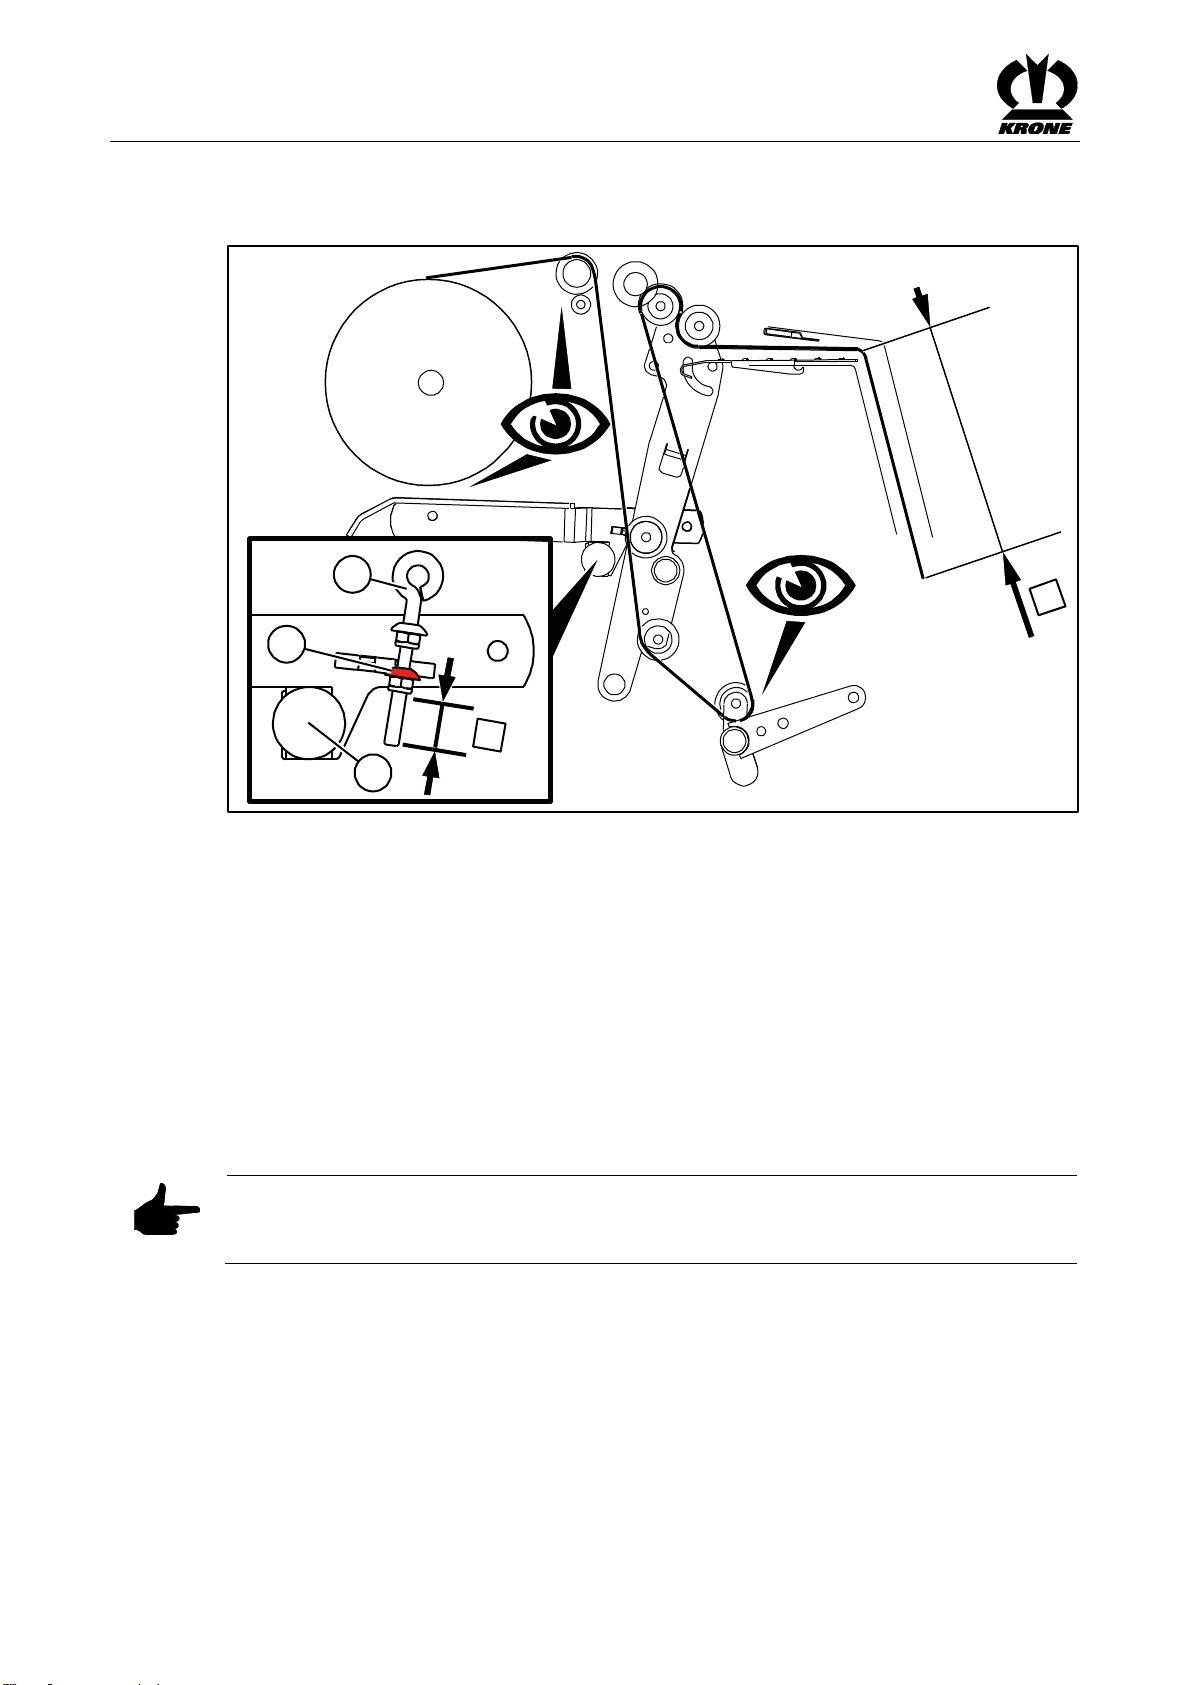
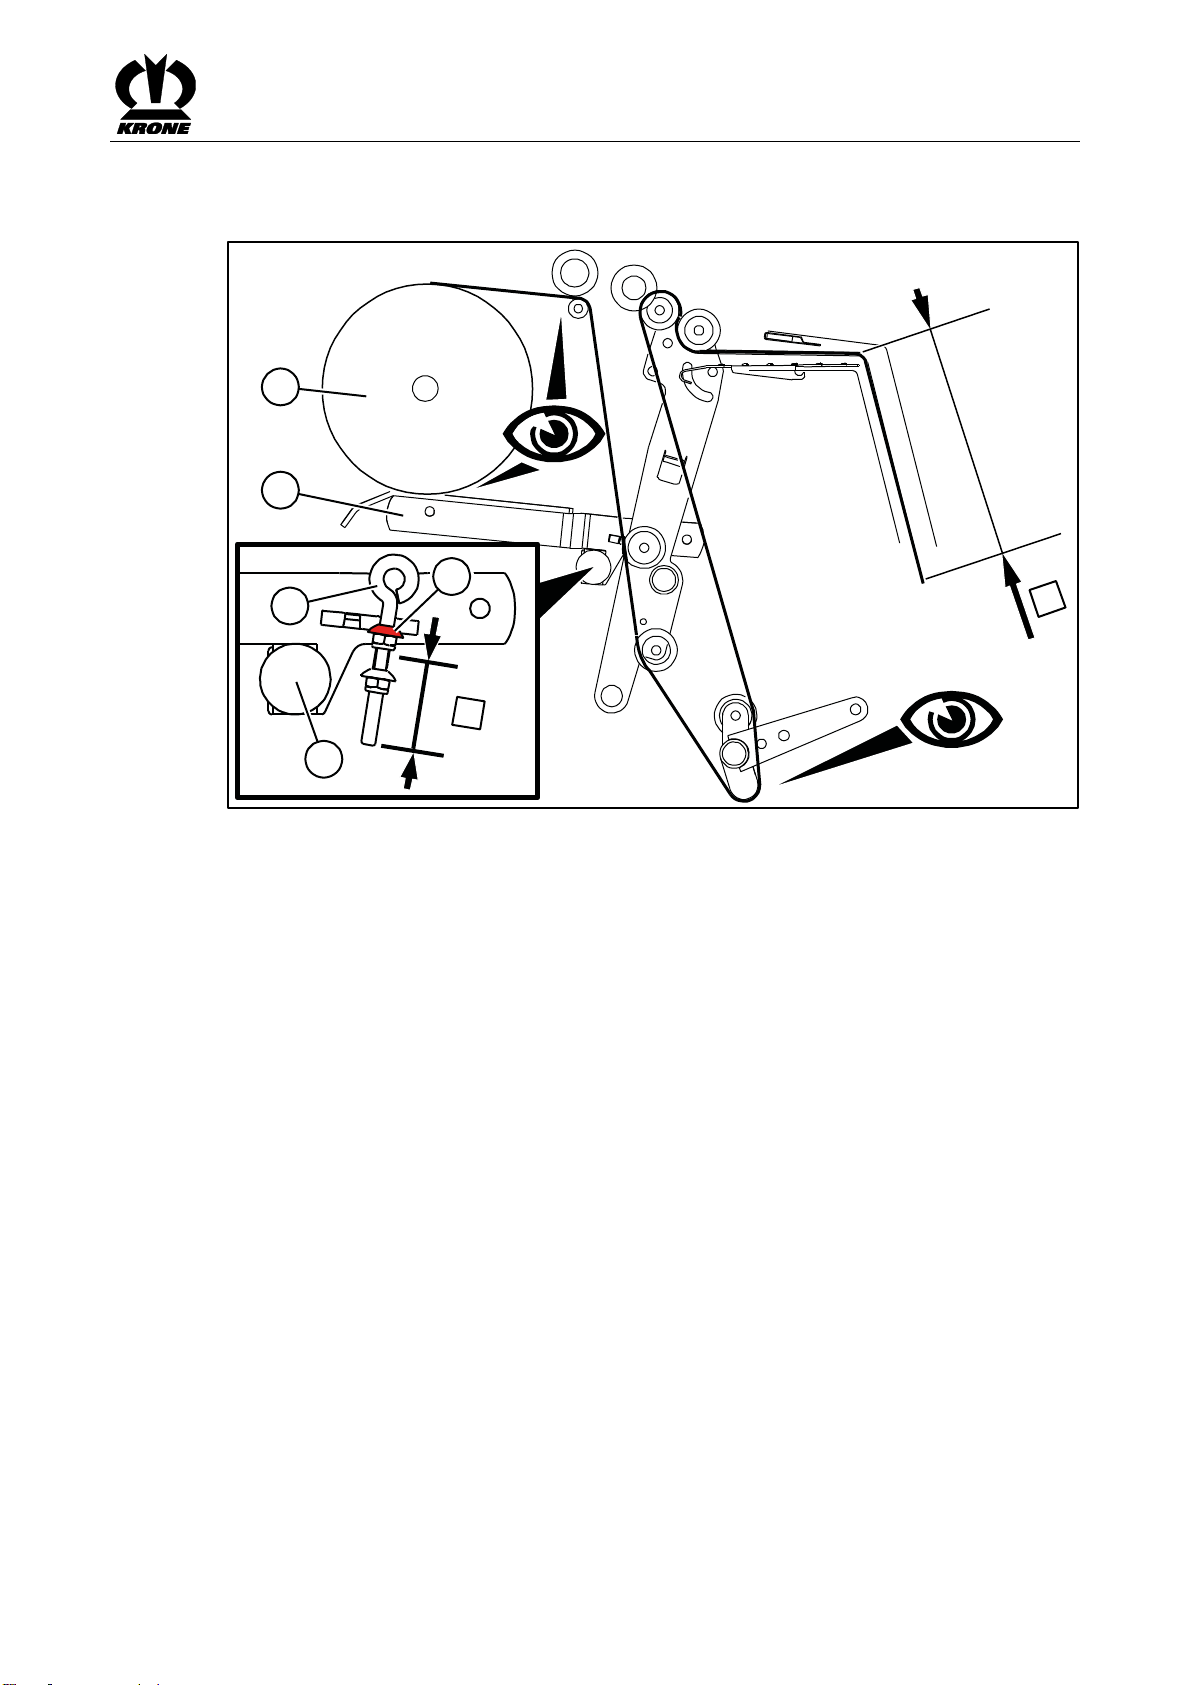
3.6 Checking the Position of the Net Rocker Arm ................................................................................. 27
3.6.1 Checking and Setting Feed Position ........................................................................................... 27
3.6.2 Checking and Setting End Position ............................................................................................. 28
3.6.3 Setting Sensor B3 Net Motor Position ......................................................................................... 29
3.7 Checking Locking Lever on Net Blade ............................................................................................ 31
4Index ......................................................................................................................................................32
Pos: 3 /Layout Mo dule /---------------Seitenumbruch---------------- @ 0\mod_1196175311 226_0.docx @ 4165 @ @ 1

Operation
3
Pos: 4.1 /Überschrift en/Überschrift en 1/A-E/ Bedienung @ 0\ mod_11997895 05403_78.doc x @ 34825 @ 1 @ 1
2 Operation
Pos: 4.2 /BA/Sic herheit/2. Vora ngestellte Warnhi nweise/WARNUN G - Nic htbeachtung der grundlegenden Sic herheitshin weise alte For m_fuer Dokume nte außerhalb BA @ 346\mod _14351401851 11_78.docx @ 2611865 @ @ 1
WARNING!
If the basic safety instructions are not followed, people may be seriously injured or
killed.
• To avoid accidents, the basic safety instructions in the Safety chapter of the machine
operating instructions must be read and followed.
Pos: 4.3 /BA/Sic herheit/2. Vor angestellte War nhinweise/WARNUN G - Nic htbeachtung der Sicherheitsrouti nen alte Form_f uer Dokumente außerhalb B A @ 346\mod _1435210033558 _78.docx @ 2612235 @ @ 1
WARNING!
If the safety routines are not adhered to, people may be seriously injured or killed.
• To avoid accidents, the safety routines in the Safety chapter of the machine operating
instructions must be read and followed.
Pos: 4.4 /BA/Sic herheit/Rundball enpresse/Unko ntrolliertes Be wegen der Rund ballen @ 298 \mod_141276 0657163_78. docx @ 2334147 @ @ 1
Warning!
Risk of injury from uncontrolled movement of round bales
• On slopes, always lay down round bales in such a way that they cannot move on their
own. On account of their weight and their cylindrical shape, they can cause severe
accidents if they have once started moving.
Pos: 4.5 /BA/Sic herheit/Hin weis_Diese Kurzanlei tung ersetzt nicht die Betriebs anleitung @ 391\mod_144 5864338940_78. docx @ 280 1615 @ @ 1
This brief instruction does not replace the operating instructions. For further information, refer to
operating instructions of the machine.
Pos: 4.6 /Layout Module /---------------Seitenumbruch---------------- @ 0\mod_1196175 311226_0.doc x @ 4165 @ @ 1

Operation
4
Pos: 4.7 /Überschrift en/Überschrift en 2/F-J/F/Foli enbindung vor bereiten @ 369\mod_144 1781613306_78.d ocx @ 2703 315 @ 2 @ 1
2.1 Preparing Film Tying
Pos: 4.8 /Überschrift en/Überschrift en 3/F-J/H /Hinweise zum B etrieb @ 325\m od_14256342 08642_78.doc x @ 2499811 @ 3 @ 1
2.1.1 Notes on Operation
Pos: 4.9 /Beip acks/Rundballe npressen/Folienbin dung/Modulgr uppen Folie einl egen / LED Lich tleiste/Beschrei bung: Hin weise zum Betrie b Folienbindu ng 1_alle Compri ma @ 399\ mod_14472455 26631_78.doc x @ 2827255 @ @ 1
– When starting film tying, it is necessary to pick up crops until the film is grasped by the
round bale and the film roll turns.
– If necessary, use one complete net roll for initial operation first and tie the round bale with
net. In this way, possible sharp edges or paint residues can be removed in advance.
– If there is no possibility to tie with net first, remove possible sharp edges by hand, refer to
chapter “Removing Paint Residues and Welding Residues Before Start-up”.
– KRONE recommends abstaining from tying straw bales with film. There is a danger that
condensation water forms and thus mould results.
– Make sure that the round bale is tied with the appropriate film stretching, refer to chapter
entitled “Checking the Stretching of the Inserted Film”.
– KRONE recommends 3.5 - 4 film layers to ensure an optimum film tying, refer to chapter
“Number of Film Layers”. The dryer the crops, the more film layers are required.
– A machine with film tying can also tie round bales with net. Make sure that the fixed axles
are used for better edge overlap when inserting the net (see label).
Pos: 4.10 /Abkürzu ngen /Abkürzu ngen sprach neutral/Rundballe npressen/Co mprima F/CF @ 3 99\mod_1 44724930328 2_0.docx @ 28275 85 @ @ 1
Comprima F/CF
Pos: 4.11 /Bei packs/Rundball enpressen/Folie nbindung/Mod ulgruppen Folie ei nlegen / LED Lic htleiste/Beschr eibung: Hinw eise zum Betri eb Folienbindung 2_alle Compri ma @ 477\ mod_1473414 840863_78.docx @ 3217996 @ @ 1
• Before applying the film, reduce driving speed and observe the maximum filling level. The
message must not appear on the terminal, see chapter "Error messages".
If appears:
• Start film tying at a lower baling pressure, e. g. 80 %, see chapter "Set baling pressure".
Pos: 4.12 /Layo ut Module /---------------Seitenumbruch---------------- @ 0\mod_119617 5311226_0.docx @ 4165 @ @ 1

Operation
5
Pos: 4.13 /Übersc hriften/Übersc hriften 3/F-J/F/F arbreste u nd Schweißrückstä nde vor Inbetrie bnahme entfer nen @ 396\m od_14467154 03667_78.doc x @ 2818711 @ 3 @ 1
2.1.2 Removing Paint Residues and Welding Residues Before Start-up
Pos: 4.14 /Bei packs/Rundball enpressen/Folienbi ndung/Modulg ruppen Folie ei nlegen / LED Lichtleiste/Beschr eibung: Far breste und Schw eißrückständ e entfernen_Bil der @ 351\mo d_143686468 9878_78.docx @ 2 630091 @ @ 1
COM00403
3
4
25
1
Fig.
1
COM00404
6
Fig.
2
Pos: 4.15 /Bei packs/Rundball enpressen/Folienbi ndung/Modulg ruppen Folie ei nlegen / LED Lic htleiste/Beschr eibung: Farbres te und Sch weißrückständ e entfernen_T ext @ 396\mo d_14467157040 38_78.docx @ 2 818741 @ @ 1
Before start-up with film tying, check on the following parts whether sharp paint residues,
welding residues and welding beads are available and remove them, if necessary:
– Net roller (1)
– Spiral roller (2)
– Scraper incl. scraper reinforcer (4)
– Bottom side of blade support (5) in feed position
– Surface of retaining comb (6)
Pos: 4.16 /Layo ut Module /---------------Seitenumbruch---------------- @ 0\mod_119617 5311226_0.docx @ 4165 @ @ 1

Operation
6
Pos: 4.17 /Übersc hriften/Übersc hriften 3/F-J/F/F olie einleg en_Folienbindu ng @ 339\mod_1 43098678359 5_78.docx @ 2 569835 @ 3 @ 1
2.1.3 Inserting Film
Pos: 4.18 /Bei packs/Rundball enpressen/Folienbi ndung/Modulg ruppen Folie ei nlegen / LED Lichtleiste/Hi nweise: KRONE Folie verwende n @ 396\m od_144672193423 6_78.docx @ 2819018 @ @ 1
Note
For trouble-free field operation, KRONE recommends KRONE excellent RoundWrap film. This
film can be ordered by stating material number 00 926 947*. The film has a length of 2000 m,
a width of 1280 mm and a thickness of 16 µm.
Pos: 4.19 /Bei packs/Rundball enpressen/Folienbi ndung/Modulg ruppen Folie ei nlegen / LED Lic htleiste/Beschr eibung 1: Foli e einlegen_ Beschädigung en an Folie entfer nen_Beipac kab2016 @ 470\ mod_14714975 59042_78.doc x @ 3177205 @ @ 1
• Before the film is inserted, check whether the film is damaged.
If the film is damaged:
• Unroll damaged film and cut it off.
• Cut away the lateral bulges.
Pos: 4.20 /BA/Bedi enung /Run dballenpresse/Folie nbindung/F olie einlegen_Net zschwinge nac h vorn fahren_bil d_alle Compri ma_Beipacka b2016 @ 4 75\mod_1473 085868453_78. docx @ 3210468 @ @ 1
COM00480
3
2
1
Fig.
3
Pos: 4.21 /BA/Bedi enung /Run dballenpresse/Folie nbindung/F olie einlegen_Netzsc hwinge nac h vorn fahren_t ext_alle Compri ma_Beipac kab2016 @ 475\mod_14 73085801678_78. docx @ 321 0437 @ @ 1
• Move the net rocker arm (3) forwards using the terminal until a distance of 5 cm between
the fixed deflection roll (2) and deflection roll (1) is established, see chapter Terminal –
Menus, "Menu 10 'manual operation'".
Pos: 4.22 /Bei packs/Rundball enpressen/Folienbi ndung/Modulg ruppen Folie ei nlegen / LED Lic htleiste/ZBBP 1802_2: Folie ei nlegen @ 4 70\mod_1471 440877689_7 8.docx @ 3177012 @ @ 1
ZBBP1802_2
1234
Fig.
4
Pos: 4.23 /Bei packs/Rundball enpressen/Folienbi ndung/Modulg ruppen Folie ei nlegen / LED Lic htleiste/Beschr eibung 1: Foli e einlegen_alle C omprima _Beipackab2016 @ 470\mod_ 1471497688883_ 78.docx @ 3 177236 @ @ 1
Inserting a film roll
• Insert the film roll (2) and align it centrally to the machine.
• Check whether the film roll (2) is centrally aligned by measuring to the side walls.
• Slide the adjusting ring (1) and (4) up to the inner cardboard roll (3) and secure it.
Pos: 4.24 /Bei packs/Rundball enpressen/Folienbi ndung/Mod ulgruppen Folie ei nlegen / LED Lic htleiste/ZBB P1798: Folie ei nlegen @ 317\ mod_142312 7669005_78.doc x @ 2454207 @ @ 1

Operation
7
ZBBP1798
12
Fig.
5
Pos: 4.25 /Bei packs/Rundball enpressen/Folienbi ndung/Modulg ruppen Folie ei nlegen / LED Lic htleiste/Beschr eibung 2: Foli e einlegen @ 32 7\mod_14 26081792447_7 8.docx @ 25064 53 @ @ 1
• Push the film between retaining comb and terminal strip by means of feed plate (12).
Pos: 4.26 /Bei packs/Rundball enpressen/Folienbi ndung/Modulg ruppen Folie ei nlegen / LED Lic htleiste/ZBBP 1804: Folie ei nlegen @ 317\ mod_142312 7835006_78.doc x @ 2454267 @ @ 1
ZBBP1804
Fig.
6
Pos: 4.27 /Bei packs/Rundball enpressen/Folienbi ndung/Modulg ruppen Folie ei nlegen / LED Lic htleiste/Hin weis 1: Folie einlege n @ 317\mod_14231 27889687_78.d ocx @ 245429 7 @ @ 1
Note
The film must in any case be above the surface of at least two net guidances and it must show
a length of approx. 250 mm.
Pos: 4.28 /Layo ut Module /---------------Seitenumbruch---------------- @ 0\mod_119617 5311226_0.docx @ 4165 @ @ 1

Operation
8
Pos: 4.29 /BA/Bedi enung /Run dballenpresse/Folie nbindung/D en Folienanfang wie folgt in di e Maschine einl egen_text vor bild @ 470\m od_1471501328 064_78.docx @ 3177267 @ @ 1
• Insert the start of the film into the machine as follows:
Pos: 4.30 /Bei packs/Rundball enpressen/Folienbi ndung/Modulg ruppen Folie ei nlegen / LED Lic htleiste/ZBBP 1797: Folie nverlauf @ 468\ mod_14697886 43716_78.doc x @ 3161484 @ @ 1
ZBBP1797_3
X
Y
1
2
3
Fig.
7
Pos: 4.31 /Bei packs/Rundball enpressen/Folienbi ndung/Modulg ruppen Folie ei nlegen / LED Lic htleiste/Beschr eibung 3: Foli e einlegen @ 47 0\mod_14 71437037800_7 8.docx @ 31768 30 @ @ 1
• Pay attention to the points along the path of the film that are identified with an eye.
• Make sure that the film overhang is at least X=250 mm.
• Hook the eyelet bolt (1) at the upper cone (2) into the support/holder on the clamping
lever.
The dimension Y=30 mm is set at the factory.
• Check whether the locking pin with the knob (3) is locked.
If the locking pin with the knob (3) is not locked, see chapter Settings, "Adjust film brake".
If film tying is started, the net rocker arm moves down and the film overhang X=250 mm is
conveyed from the first two rollers to the round baler. At this point, the film sticks to the round
bale and is pulled along with it.
Pos: 4.32 /BA/Bedi enung /Run dballenpresse/Folie nbindung/Hinw eis auf Ter minal "Auswahl Bi ndeart"_nurBA_C omprima @ 38 9\mod_14 45412274043 _78.docx @ 278 0185 @ @ 1
Note
Before starting with film tying, film tying must be selected in the terminal, refer to chapter
Terminal - Menus, “Selection of Type of Tying”.
Pos: 4.33 /Layo ut Module /---------------Seitenumbruch---------------- @ 0\mod_119617 5311226_0.docx @ 4165 @ @ 1

Operation
9
Pos: 4.34 /BA/Bedi enung /Run dballenpresse/Folie nbindung/Z um Vergleich zur F olienbindung hier die Netzbind ung @ 325\ mod_142563 7674318_78.doc x @ 250043 3 @ @ 1
For comparison, you can see a figure here as to how the net is inserted.
Pos: 4.35 /Bei packs/Rundball enpressen/Folienbi ndung/Modulg ruppen Folie ei nlegen / LED Lic htleiste/Bildüb erschrift + ZBBP 1932_2: Folie einlegen @ 468\mod_14 69793020845_7 8.docx @ 31616 04 @ @ 1
Path of net:
ZBBP1932_3
X
Y
34
5
1
2
Fig.
8
Pos: 4.36 /BA/Bedi enung /Run dballenpresse/Folie nbindung/Z usatzinfo_oberer K onus bei Netz bindung_Co mprima @ 470\ mod_14714 39953309_78.d ocx @ 3176981 @ @ 1
During net tying, the eyelet bolt (1) must be hooked in at the upper cone (2) in the
support/holder on the clamping lever.
The dimension Y=55 mm is set at the factory.
The locking pin with the knob (3) must be unlocked.
Pos: 4.37 /Layo ut Module /---------------Seitenumbruch---------------- @ 0\mod_119617 5311226_0.docx @ 4165 @ @ 1

Operation
10
Pos: 4.38 /Übersc hriften/Übersc hriften 3/A-E/D/D ehnung d er eingelegten F olie prüfen @ 351\ mod_143686 7745262_78.d ocx @ 2630 477 @ 3 @ 1
2.1.4 Checking the Stretching of the Inserted Film
Pos: 4.39 /BA/Bedi enung /Run dballenpresse/Folie nbindung/D ehnung der ei ngelegten Folie prü fen_Einleitung @ 351\mo d_143686805 0542_78.docx @ 2630800 @ @ 1
The round bale must be tied with suitable film stretching. KRONE recommends pre-stretching of
5-10 %. You can check as follows whether this pre-stretching of 5-10% was achieved.
Pos: 4.40 /BA/Bedi enung /Run dballenpresse/Folie nbindung/D ehnung der ei ngelegten Folie prü fen_Bild @ 4 75\mod_1473 082577933_7 8.docx @ 3210 066 @ @ 1
COM00405_1
X
1
2
Fig.
9
Pos: 4.41 /BA/Bedi enung /Run dballenpresse/Folie nbindung/D ehnung der ei ngelegten Folie prü fen_Text_BA_ alle Comprima @ 475\m od_14730836615 64_78.docx @ 3210277 @ @ 1
• Using a film pen, draw two horizontal lines (1) at a distance X=100 mm on the film.
• Cut out the piece (2) all around the two drawn lines. Make sure to cut out all film layers.
• Allow all film layers of the cut-out piece (2) to rest for at least 3 minutes.
• Measure the distance X between the drawn lines (1).
If the distance X is between 91 and 95 mm, the pre-strain is correctly set.
Measured value X
Pre-strain
Valuation
< 91 mm
> 10 %
Pre-strain is too strong. Reduce the brake
force on the film brake, see chapter
Settings – "Adjust film brake".
91 mm
10 %
correct
95 mm
5 %
correct
> 95 mm
< 5 %
Pre-strain is too weak. Increase the brake
force on the film brake, see chapter
Settings – "Adjust film brake".
Pos: 4.42 /Layo ut Module /---------------Seitenumbruch---------------- @ 0\mod_119617 5311226_0.docx @ 4165 @ @ 1

Operation
11
Pos: 4.43 /Übersc hriften/Übersc hriften 2/F-J/F/F olienbindung i m Terminal einst ellen @ 369\ mod_144178 4647612_78.doc x @ 2703518 @ 2 @ 1
2.2 Setting Film Tying in the Terminal
Pos: 4.44 /BA/Bedi enung /Run dballenpresse/Hi nweis_Kurzanleit ung Folienbin dung nur CF CV dargestellt @ 391\mod_1 44586374785 8_78.docx @ 280 1585 @ @ 1
Note
This brief instruction declares exemplarily for Comprima CF and CV from YOM 2015/16 on,
how film tying is operated and set on the terminal. The operation of terminal for Comprima F
and V from YOM 2015/16 has a similar structure. For further information, refer to operating
instructions of the machine.
Pos: 4.45 /Übersc hriften/Übersc hriften 3/K-O/M /Menü 1-1 "A nzahl Folienlag en" @ 369\ mod_14417851228 11_78.docx @ 2703559 @ 3 @ 1
2.2.1 Menu 1-1 “Number of Film Layers”
Pos: 4.46 /BA/In fo-Center/ALL E Terminals in ei nem - ISOBUS , Delta, BETA I I (ab BJ 15/16)/ ALLE Ter minals/Rundballen pressen/Menü 1-1 Anzahl Folienl agen_Bild_A LLE Terminals _Comprima CF CV _+X-treme @ 358\mod_1 438870215728 _78.docx @ 26 58826 @ @ 1
IBT000028
n
IBT000029
8,0
1,5
3.0
n
Fig.
10
Pos: 4.47 /BA/In fo-Center/ALL E Terminals in ei nem - ISOBUS , Delta, BETA I I (ab BJ 15/16)/ ALLE Ter minals/Rundballen pressen/Menü 1 Anzahl Folienlage n_Text1-V orauss_ALLE T erminals_Com prima CF CV_+X-tr eme @ 3 58\mod_1438870 419784_78. docx @ 26588 84 @ @ 1
Prerequisite
– Menu “Settings Baler” is called, refer to chapter entitled Terminal - Menus, menu 1
“Settings Baler”.
– Film tying is selected in menu 1-8 “Selection Type of Tying”, refer to chapter Terminal -
Menus, menu 1-8 “Selection Type of Tying”.
• Select
n
to open the menu.
The display shows menu 1-1 “Number of Film Layers”.
Pos: 4.48 /BA/In fo-Center/ALL E Terminals in ei nem - ISOBUS , Delta, BETA I I (ab BJ 15/16)/ ALLE Ter minals/Rundballen pressen/Menü 1-1 _1 Anzahl Foli enlagen_Te xt2-einstellen_AL LE Terminals _Comprima @ 3 82\mod_1444 141518480_7 8.docx @ 2752 912 @ @ 1
Setting the number of film layers
• Increase or reduce the value, refer to chapter entitled Terminal - Menus “Changing
Value”.
• Save value.
Note
KRONE recommends 3.5 - 4 film layers to ensure optimum film tying. The minimum required
film layers depend on the crop conditions.
Pos: 4.49 /Layo ut Module /---------------Seitenumbruch---------------- @ 0\mod_119617 5311226_0.docx @ 4165 @ @ 1

Operation
12
Pos: 4.50 /Übersc hriften/Übersc hriften 3/K-O/M /Menü 1-4 "Bin destartverzög erung" @ 369 \mod_144178519 5167_78.doc x @ 2703590 @ 3 @ 1
2.2.2 Menu 1-4 “Tying Start Delay”
Pos: 4.51 /BA/In fo-Center/ALL E Terminals in ei nem - ISOBUS , Delta, BETA I I (ab BJ 15/16)/ ALLE Ter minals/Rundballen pressen/Menü 1-4 _4 Bindestart verzögerung_Einl eitung_ALLE T erminals_Co mprima_Fortim a @ 357\mod _14388391816 74_78.docx @ 2657813 @ @ 1
Tying start delay is used to set the period of time that has to be passed between completion of
round bale in the bale chamber and triggering the tying process. The tying start delay is set in
seconds.
Pos: 4.52 /BA/In fo-Center/ALL E Terminals in ei nem - ISOBUS , Delta, BETA I I (ab BJ 15/16)/ ALLE Ter minals/Rundballen pressen/Menü 1-4 Bindestart verzögerung (Foli enbindung)_Bild _ALLE Ter minals_Compri ma CF CV_+X-tre me @ 367\ mod_14413482 02818_78.doc x @ 2696546 @ @ 1
IBT000028
n
IBT000215
1,0
0,0
0.0 s
Fig.
11
Pos: 4.53 /BA/In fo-Center/ALL E Terminals in ei nem - ISOBUS , Delta, BETA I I (ab BJ 15/16)/ ALLE Ter minals/Rundballen pressenMenü 1-4 Bindestart verzögerung (Folie nbindung)_T ext_ALLE Termi nals_Compri ma CF CV_+X-tre me @ 409\ mod_14502684 78634_78.doc x @ 2893588 @ @ 1
Prerequisite
– Menu 1 “Settings Baler” is active, refer to chapter Terminal - Menus, menu 1 “Settings
Baler”.
– Film tying is selected in menu 1-8 “Selection Type of Tying”, refer to chapter Terminal -
Menus, menu 1-8 “Selection Type of Tying”.
• Select to open the menu.
The display shows menu 1-4 “Tying Start Delay”.
Feature film tying
For film tying, the tying start delay is set automatically to 0.0 s. KRONE recommends this
setting.
At high driving speeds, the tying start delay for film tying can be set to a minimum:
• Increase or reduce the value, refer to chapter entitled Terminal - Menus “Changing the
Value”.
• Save value.
Pos: 4.54 /Layo ut Module /---------------Seitenumbruch---------------- @ 0\mod_119617 5311226_0.docx @ 4165 @ @ 1

Operation
13
Pos: 4.55 /Übersc hriften/Übersc hriften 3/K-O/M /Menü 1-8 "A uswahl Bindeart" @ 369\mod_ 144178552114 9_78.docx @ 2 703652 @ 3 @ 1
2.2.3 Menu 1-8 “Selection Type of Tying”
Pos: 4.56 /BA/In fo-Center/ALL E Terminals in ei nem - ISOBUS , Delta, BETA I I (ab BJ 15/16)/ ALLE Ter minals/Rundballen pressen/Menü 1-8 Auswahl Bin deart_Netz/Foli e_Bild_ALLE Ter minals_Compri ma CF CV_+ X-treme @ 36 7\mod_14413 52228698_78.d ocx @ 2696926 @ @ 1
IBT000030
n
IBT000218
Fig.
12
Pos: 4.57 /BA/In fo-Center/ALL E Terminals in ei nem - ISOBUS , Delta, BETA I I (ab BJ 15/16)/ ALLE Ter minals/Rundballen pressen/Menü 1-8 Auswahl Bin deart_Netz/Foli e_Text_ALL E Terminals_Co mprima CF CV_+ X-treme @ 367\mod_144 1352231084_78.d ocx @ 269695 3 @ @ 1
Prerequisite
– The menu level is called, refer to chapter entitled Terminal - Menus, “Calling the Menu
Level”.
• Select to open the menu.
The display shows menu 1-8 “Selection Type of Tying”.
Selecting type of tying
• Scroll through the both pages using and and select the desired type of tying.
• Save the selection.
The following types of tying can be selected:
Icon
Explanation
Net tying
Film tying
Pos: 4.58 /Layo ut Module /---------------Seitenumbruch---------------- @ 0\mod_119617 5311226_0.docx @ 4165 @ @ 1

Operation
14
Pos: 4.59 /Übersc hriften/Übersc hriften 3/K-O/M /Menü 10 "Ha ndbedienung" @ 369\mod_1 441785758666 _78.docx @ 27 03714 @ 3 @ 1
2.2.4 Menu 10 “Manual Operation”
Pos: 4.60 /BA/In fo-Center/ALL E Terminals in ei nem - ISOBUS , Delta, BETA I I (ab BJ 15/16)/ ALLE Ter minals/Rundballen pressen/Menü 1 0 Handbedienung N etz_Bild_A LLE Terminals_C omprima CF C V_+X-tre me @ 369\mod_ 144178724766 2_78.docx @ 2 703843 @ @ 1
IBT000002
IBT000209
R
0
1
2
3
4
Fig.
13
Pos: 4.61 /BA/In fo-Center/ALL E Terminals in ei nem - ISOBUS , Delta, BETA I I (ab BJ 15/16)/ ALLE Ter minals/Rundballen pressen/Menü 1 0 Handbedienung_T ext1-Vor auss_ALLE T erminals_Co mprima CF CV_+X-tre me @ 369\ mod_144179 8002913_78.doc x @ 2704270 @ @ 1
Prerequisite
– The menu level is called, refer to chapter entitled Terminal - Menus, “Calling the Menu
Level”.
• Select to open the menu.
The display shows menu 10 “Manual Operation”.
Pos: 4.62 /BA/In fo-Center/ALL E Terminals in ei nem - ISOBUS , Delta, BETA I I (ab BJ 15/16)/ ALLE Ter minals/Rundballen pressen/Menü 1 0 Handbedie nung_zwische n Seiten blättern_ ALLE Termin als_Comprima CF C V_+X-tr eme @ 370\mo d_144180819417 1_78.docx @ 2 705236 @ @ 1
The keys in menu 10 “Manual Operation” are arranged on two display pages.
• In order to browse between the display pages, select
1/2
,
2/2
.
Pos: 4.63 /Layo ut Module /---------------Seitenumbruch---------------- @ 0\mod_119617 5311226_0.docx @ 4165 @ @ 1

Operation
15
Pos: 4.64 /BA/In fo-Center/ALL E Terminals in ei nem - ISOBUS , Delta, BETA I I (ab BJ 15/16)/ ALLE Ter minals/Rundballen pressen/Menü 1 0 Handbedienung ( 3) Netz-/Foli enbindung_n urÜberschrift _ALLE Terminals _Comprima CF CV _+X-tre me @ 369\mod _1441804948625 _78.docx @ 2705109 @ @ 1
(3) Net and film tying (film tying for version with “Net and film tying”)
Pos: 4.65 /BA/In fo-Center/ALL E Terminals in ei nem - ISOBUS , Delta, BETA I I (ab BJ 15/ 16)/ALLE Ter minals/Rundball enpressen/Menü 1 0 Handbedienung Netz/Folie_T ext-tabelle-st atus_ALLE Ter minals_Com prima @ 389\m od_1445429110 041_78.docx @ 2782312 @ @ 1
The following status displays may appear in the display:
Icon
Explanation
Net motor (net/film) is in feed position.
Net motor (net/film) is in cutting position.
0
0
Net motor (net/film) is in tying position.
Position is not defined.
Pos: 4.66 /BA/In fo-Center/ALL E Terminals in ei nem - ISOBUS , Delta, BETA I I (ab BJ 15/16)/ ALLE Ter minals/Rundballen pressen/Menü 1 0 Handbedienung N etz/Folie_T ext-tabelle_A LLE Terminals_C omprima @ 3 89\mod_1445 429295676_78. docx @ 278 2343 @ @ 1
Use the keys on the sides of the terminal to operate the following functions via icons:
Icon
Explanation
Move net motor (net/film) to feed position.
Move net motor (net/film) to cutting position.
0
0
Move net motor (net/film) to tying position.
Pos: 4.67 /BA/In fo-Center/ALL E Terminals in ei nem - ISOBUS , Delta, BETA I I (ab BJ 15/16)/ ALLE Ter minals/Rundballen pressen/Menü 1 0 Handbedienung N etzmotor be wegen (Netz/F olie)_Text_A LLE Terminals_C omprima @ 389\mod_144 5429383342_ 78.docx @ 27823 74 @ @ 1
Moving net motor
• Select or and press it until the net motor is moved to feed position.
• Select or and press it until the net motor is moved to cutting position.
• Select
0
or
0
and press it until the net motor is moved to tying position.
Pos: 4.68 /Layo ut Module /---------------Seitenumbruch---------------- @ 0\mod_119617 5311226_0.docx @ 4165 @ @ 1

Operation
16
Pos: 4.69 /Übersc hriften/Übersc hriften 2/F-J/F/F ehlermeldung en @ 13\mod _1226558727 524_78.doc x @ 166264 @ 2 @ 1
2.3 Error Messages
Pos: 4.70 /BA/In fo-CenterWARNUN G-Person en-/Maschine nschäden Nichtb eachtung von Fe hlern! Verweis auf Fehlerm eldungen @ 450 \mod_1462 775781375_78.doc x @ 3064038 @ @ 1
WARNING!
Injury and/or machine damage due to failure to observe error messages!
When error messages are ignored by failing to correct the error, people may be injured and/or
the machine may be damaged seriously.
• If an error message is displayed, correct the error.
• For possible cause and remedy, refer to chapter “Error Messages.”
• Contact KRONE customer service if the error cannot be corrected.
Pos: 4.71 /BA/In fo-Center/CCI- ISOBUS-Termi nal/CCI-Rundb allenpressen/Ha uptmenüs/Alar mmeldungen/0 0_Hinweise und Fehlermeldu ngen_nur Einleitu ngssatz @ 47 7\mod_14734 14677143_78.d ocx @ 321 7965 @ @ 1
If the display shows error messages, a continuous horn signal sounds.
Pos: 4.72 /BA/In fo-Center/CCI- ISOBUS-Termi nal/CCI-Rundb allenpressen/Ha uptmenüs/Alar mmeldungen0 2_Hinweise u nd Alarmmeldu ngen_1.Teil_Folie nbindung_ALL E Terminals @ 439\mod_145 7619839934_7 8.docx @ 30 05560 @ @ 1
For film tying
No./icon
Malfunction
Possible causes
Remedy
5
Film has not
been pulled.
– Film is not
transported when
tying process is
started.
– The film roll is not
correctly inserted
into the reception
device and/or the
net brake discs
are not correctly
set.
– The film does not
overhang
sufficiently.
– The net motor is
defective.
– Insert film roll again, refer
to chapter Operation -
“Inserting Film Roll”.
– Check and set
deceleration of net brake
discs, refer to chapter
Maintenance - “Checking
and Setting the
Deceleration of the Net
Brake Discs”.
– Check the net motor.
6
Film stopped.
– Net tears off after
starting or during
tying.
– The cutting unit
has lowered into
the film.
– The cutting unit is
not engaged.
– The cutting unit is
too low.
– The rotational
speed is too high.
– Reduce the deceleration
of the net brake discs,
refer to chapter
Maintenance - “Setting
the Deceleration of the
Net Brake Discs”.
– Remove deposits from the
cutting unit.
– Check the setting of the
cutting unit.
– Check whether the cutting
unit engages/is tensioned
when feeding.
– Check the rotational
speed, it must not exceed
540 rpm.
7
Film running.
– Film overhangs
too much
– Check and set the
deceleration of net brake
discs, refer to chapter
“Maintenance - Setting
the Deceleration of Net
Brake Discs”.

Operation
17
9
Film was not
cut off.
– Film was not cut
off neatly.
– Dull cutting unit.
– The cutting unit is
not tensioned.
– Remove deposits from the
cutting unit.
– Replace the cutting unit.
– Set the cable to tension
the cutting unit.
– Set the position of the
rocker arm.
Pos: 5 /Layout Mo dule /---------------Seitenumbruch---------------- @ 0\mod_1196175311 226_0.docx @ 4165 @ @ 1

Important Settings for Film Tying
18
Pos: 6.1 /Überschrift en/Überschrift en 1/U-Z/ Wichtige Einst ellungen zur Foli enbindung @ 391\mo d_14458617023 31_78.docx @ 2 801461 @ 1 @ 1
3 Important Settings for Film Tying
Pos: 6.2 /BA/Sic herheit/2. Vora ngestellte Warnhi nweise/WARNUN G - Nic htbeachtung der grundlegenden Sic herheitshin weise alte For m_fuer Dokume nte außerhalb BA @ 346\mod _14351401851 11_78.docx @ 2611865 @ @ 1
WARNING!
If the basic safety instructions are not followed, people may be seriously injured or
killed.
• To avoid accidents, the basic safety instructions in the Safety chapter of the machine
operating instructions must be read and followed.
Pos: 6.3 /BA/Sic herheit/2. Vora ngestellte Warnhi nweise/WARNUN G - Nic htbeachtung der Sicherheitsrouti nen alte Form_f uer Dokumente außerhalb B A @ 346\mod _1435210033558 _78.docx @ 2612235 @ @ 1
WARNING!
If the safety routines are not adhered to, people may be seriously injured or killed.
• To avoid accidents, the safety routines in the Safety chapter of the machine operating
instructions must be read and followed.
Pos: 6.4 /Layout Module /---------------Seitenumbruch---------------- @ 0\mod_1196175 311226_0.doc x @ 4165 @ @ 1

Important Settings for Film Tying
19
Pos: 6.5 /Überschrift en/Überschrift en 2/P-T/R/R ückhalteka mm bei Folienbind ung einstellen @ 396\mod _144671451991 0_78.docx @ 28 18558 @ 2 @ 1
3.1 Setting the Retaining Comb for Film Tying
Pos: 6.6 /Beip acks/Rundballe npressen/Folienbin dung/Modulgr uppen Umbau 2015/ZBBP1971, ZBBP1998: Rüc khaltekamm montieren @ 475\mod_ 1473074436515_78. docx @ 320 9172 @ @ 1
ZBBP1971_1
AA
x y
Fig.
14
ZBBP1998_1
B
x y
Fig.
15
Pos: 6.7 /Beip acks/Rundballe npressen/Folienbin dung/Modulgr uppen Umbau 2015/ZBBP1999: Rückhalteka mm montieren @ 475\mod_ 14730748240 19_78.docx @ 32 09203 @ @ 1
ZBBP1999_2
zu
Fig.
16
Pos: 6.8 /Beip acks/Rundballe npressen/Folienbin dung/Modulgr uppen Umbau 2015/Beschreibung 3: Rückhalte kamm montier en @ 387\ mod_1445261 043920_78.doc x @ 2775004 @ @ 1
The trapezoidal rubbers (x) on the bottom side of the retaining comb are premounted with the
short side to the rear in direction of travel. (A)
If the blue strips (y) of the first net feed roller are taken along delayed or if they are not taken
along, turn the trapezoidal rubbers (x) (B). This will allow for additional support:
• Unscrew the hexagon head screws on all trapezoidal rubbers.
• Dismount the sheet strip on all trapezoidal rubbers.
• Turn all trapezoidal rubbers (x) so that the short side points towards the front (B) in
direction of travel.
• Mount sheet strip with hexagon head screws.
Mind the correct alignment of the sheet strips (z). The borehole (u) on the sheet strip (z) shows
in the direction of the retaining comb.
Pos: 6.9 /Layout Module /---------------Seitenumbruch---------------- @ 0\mod_1196175 311226_0.doc x @ 4165 @ @ 1

Important Settings for Film Tying
20
Pos: 6.10 /Übersc hriften/Übersc hriften 2/P-T/R /Rückhalte kamm bei Folienbin dung prüfen @ 396\mod_144 6714788786_7 8.docx @ 28 18619 @ 2 @ 1
3.2 Checking the Retaining Comb for Film Tying
Pos: 6.11 /Bei packs/Rundball enpressen/Folienbi ndung/Modulg ruppen Umbau 2015/ZBBP177 7, ZBBP1793: R ückhaltekam m montieren @ 339\mod _1430999054618_7 8.docx @ 25 70386 @ @ 1
ZBBP1777_2
2
Fig.
17
ZBBP1793_1
X
Fig.
18
Pos: 6.12 /BA/Bedi enung /Run dballenpresse/Folie nbindung/R ückhaltekam m prüfen_Text_Folie nbindung_Co mprima @ 39 3\mod_1446 206922502_78. docx @ 28092 96 @ @ 1
The retaining comb (2) is located at front on the machine in the twine box.
• Check whether the dimension x on the spring on right is 20 mm.
• In case of deviation, set the dimension x=20 mm by using the nut.
Pos: 6.13 /Layo ut Module /---------------Seitenumbruch---------------- @ 0\mod_119617 5311226_0.docx @ 4165 @ @ 1
This manual suits for next models
7
Table of contents
Other Krone Industrial Equipment manuals
Popular Industrial Equipment manuals by other brands

Festo
Festo CPX-AB-2-M12-RK-IB Assembly instructions

Sea-Fire
Sea-Fire 131-740 installation instructions

Barford
Barford SR124 Operator's manual & parts list

ABB
ABB Dodge Quantis BU383 manual

SCHUNK
SCHUNK PGH Series Assembly and operating manual

Bühler technologies
Bühler technologies GAS 222.35 Brief instructions