Krug-Baümen Principle User manual

2
www.krug-baumen.com
-

3
Style, design, diamonds, all in a day’s work at Krug-Baümen.
Version II Feb 2018

45
Established over 20 years ago Krug-Baümen timepieces encompass style, design
and timekeeping with affordable pricing for collectors and rst-time buyers.
Designed in the United Kingdom using high quality materials, accurate
movements and precious stones; these wrist watches provide classic and
authentic wrist jewellery for both men and women.
-Our thank you to you
We treasure your custom and we understand that there are plenty of other watch
brands that you can purchase, so we thank you for making Krug-Baümen your
timepiece of choice.
We are happy to hear any comments that you have, good or bad, as we strive to
improve and connect with our customers.
Please feel free to contact us at [email protected] or on facebook and we
will get back to you as soon as we can.
All the best from the team at Krug-Baümen.

7
6
3-HAND MOVEMENT WITH DATE**
TO SET THE TIME:
1. Pull the crown out to position 3
2. Turn the crown until the correct time is set
3. Return the crown to position 1.
TO SET THE DATE:
1. Pull the crown out to position 2
2. Turn the crown either clockwise or counter-clockwise to set the date. (The correct direction may vary between different watches)
3. Return the crown to position 1.
*For Chronograph models please do not adjust the date between the hours of 9:00 PM & 1:00 AM.
** Charleston, Regatta and Tuxedo.
123
There are 3 main types of watches - quartz, digital and automatic. Quartz or digital pieces will come
with batteries. Automatic watches are wound by either self-winding or mechanical movement.
For self-winding watches to set the correct time, gently shake your watch backwards and forwards
approximately 20 times, your watch will keep time once kept on the wrist. With the mechanical
movements you will need to hand wind the movement at least once a day. Turn the crown gently to
wind but take care not to over twist and break the spring.
Please note that automatic movements do not have batteries so once you stop wearing or winding
them they will stop until you wear them again. All automatic movements will lose or gain time.
DIFFERENT WATCH MOVEMENTS

8
PRINCIPLE
Second Hand: Chronograph
24 Hour Indicator
Minute Hand: Chronograph
Start/Stop Timer (A)
21 3
Split/Reset: Timer (B)
Crown
OPERATING INSTRUCTIONS
SETTING THE TIME
1. Pull the crown out to position 3
2. Turn the crown to set hour and minute hands
3. After the time has been set, push the crown back in fully to position 1.
SETTING THE DATE
1. Pull the crown put to position 2
2. Turn the crown counter-clockwise to set the date
3. After the date has been set, push the crown back in fully to position 1.
*If the date is set between the hours of around 9:00PM and 1:00am, the date
may not change the following day.
SETTING THE TIMER
1. Press top pusher to start/stop timer.
2. Press bottom pusher to split/reset timer.
9
Second Hand: Chronograph
24 Hour Indicator
Minute Hand: Chronograph
Start/Stop Timer (A)
21 3
Split/Reset: Timer (B)
Crown
OPERATING INSTRUCTIONS
ADJUSTING THE STOPWATCH MINUTE HAND POSITION
1. Pull out the crown to position 3
2. Press button (A) or (B) to reset the stopwatch second and minute hands to “0”position
· By pressing button (A) the hands move counter clockwise.
· By pressing button (B) the hands move clockwise.
3. Push the crown back in fully to position 1.
PRINCIPLE
Date Date

10
AIR EXPLORER
OPERATING INSTRUCTIONS
SETTING THE TIME
1. Pull the crown out to the 2nd click position
2. Turn the crown to set hour and minute hands
3. Push the crown back in fully to the working position.
The AM/PM position is determined by rotating the hands. If the date
changes when the hand passes the 12 o’clock position you are in AM mode
SETTING THE DATE
1. Pull the crown out to the 1st click position
2. Turn the crown counter-clockwise to set the date.
*If the date is set between the hours of around 9:00PM and 1:00am, the date
may not change on the following day.
11
OPERATING INSTRUCTIONS
ACTIVATE THE CHRONOGRAPH
Press button A to activate.
DEACTIVATE THE CHRONOGRAPH
Press button A again to stop the chronograph.
*To reset press pusher B once chronograph is stopped
A
Stopwatch Second Hand
24 Hour Hand
Stopwatch Minute Hand
Second Hand
1 2
Crown
B
Date
A
Stopwatch Second Hand
24 Hour Hand
Stopwatch Minute Hand
Second Hand
1 2
Crown
B
Date
AIR EXPLORER
TO SET WORLD TIME
Turn crown C until you match the correct city.
Note that this crown is not static so could move with hand movements. Time
difference is not adapted for summer and winter times.
C C

12
COUTURE
Stopwatch Second hand
24 Hour Hand
Second Hand
A
1 2
B
Crown
Stopwatch Minute Hand
OPERATING INSTRUCTIONS
SETTING THE TIME
1. Pull the crown out to the 2nd Click Position
2. Turn the crown to set hour and minute hands
3. Push the crown back in fully to the working position.
SETTING THE DATE
1. Pull the crown out to the 1st Click Position
2. Turn the crown clockwise to set the date
*If the date is set between the hours of around 9:00 PM and 1:00 AM,
the date may not change on the following day.
3. Push the crown back in fully to the working position.
USING THE STOPWATCH
This stopwatch is able to measure and display time in 1/1 second units up to
maximum of 30 minutes.
Stopwatch will stop automatically after running continuously for 30 minutes.
13
Stopwatch Second hand
24 Hour Hand
Second Hand
A
1 2
Crown
Stopwatch Minute Hand
MEASURING TIME WITH THE STOPWATCH
1. Press button “A” to start the stopwatch.
2. The stopwatch can be started and stopped each time button “A” is pressed.
3. Pressing button “B” resets the stopwatch and stopwatch minute and second
hands return to their zero positions.
STOPWATCH RESET (INCL . AFTER REPLACING BATTERY)
This procedure should be performed when the stopwatch second & minute
hand does not return to the zero position.
1. Pull the crown out to the 2nd Click Position
2. Press the button “A” to set the stopwatch second hand forward
Press the button “B” to set the stopwatch second hand back
* The stopwatch minute hand is synchronized with stopwatch second hand.
* The stopwatch second hand can be advanced rapidly by continuously pressing
button “A” or “B”.
3. Reset the time and return the crown fully to its working position.
Date
COUTURE
B
Date

14
AIR TRAVELLER
OPERATING INSTRUCTIONS
SETTING THE TIME
1. Pull the crown out to the 2nd click position
2. Turn the crown to set hour and minute hands
3. Push the crown back in fully to the working position.
The AM/PM position is determined by rotating the hands. If the date
changes when the hand passes the 12 o’clock position you are in AM mode
SETTING THE DATE
1. Pull the crown out to the 1st click position
2. Turn the crown counter-clockwise to set the date.
*If the date is set between the hours of around 9:00PM and 1:00am, the date
may not change on the following day.
15
OPERATING INSTRUCTIONS
ACTIVATE THE CHRONOGRAPH
Press button A to activate.
DEACTIVATE THE CHRONOGRAPH
Press button A again to stop the chronograph.
*To reset press pusher B once chronograph is stopped
A
Stopwatch Second Hand
24 Hour Hand
Stopwatch Minute Hand
Second Hand
1 2
Crown
B
Date
A
Stopwatch Second Hand
24 Hour Hand
Stopwatch Minute Hand
Second Hand
1 2
Crown
B
Date
AIR TRAVELLER

16
THIS RULE IS GOOD FOR:
- Multiplication
- Division
- Proportion
- Square Root
- Time Required
- Fuel Consumption
- Estimated Flight Time
- Other Flying Problems
NOTE
Use the calculations of this watch only as a guide.
These scales cannot place a decimal point.
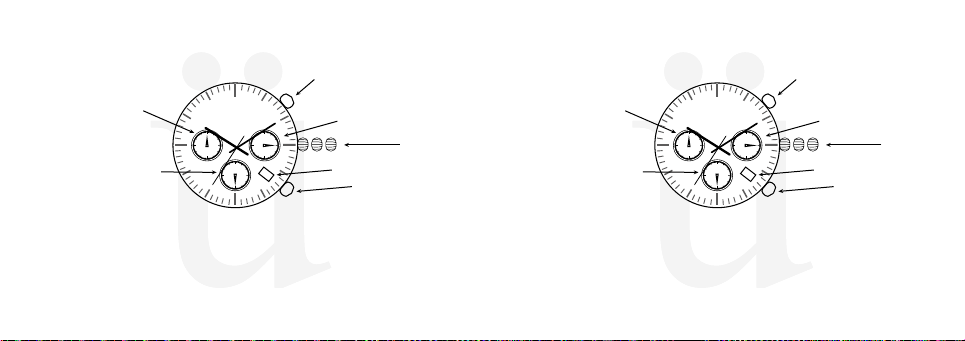
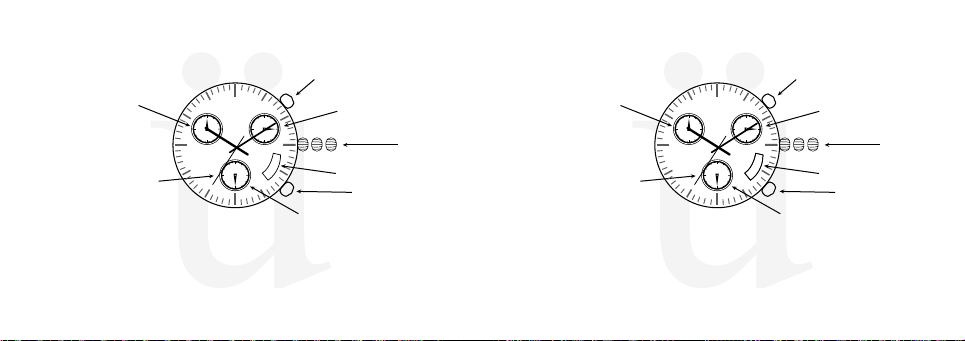
USING SLIDE RULE
Speed Index
Outer Scale
(Distance Scale) Inner Scale
(Time Scale)
17
The tachymeter scale can be used to compute many things, but it’s primary purpose is to compute the speed after
noting how long it takes to travel a xed distance (e.g. one mile or kilometer). The dial is a scale which computes the
function:
Tachymeter Dial = 3600 Elapsed time in seconds (or 1 hour)
The scale is valid for all elapsed times from 7.2 seconds to 60 seconds. If the duration of the event is outside this range,
then the answer on the dial is invalid.
HOW TO USE IT
For example, to measure the average speed a race car was traveling. After starting the chronograph function when the
car passes the starting line, and stopping it after the car travels exactly one mile, you note that the chronograph hand is
pointing at the 4 o’clock position (i.e. 20 seconds have elapsed). Looking beyond the 4 to the tachymeter dial reveals the
chronograph hand pointing at 180. This means that the average speed of the car would be 180 MPH.
For example, if you are measuring something much slower, like sailboat speed. In this case, you need to use a shorter
distance because the elapsed time must fall within the 7.2 - 60 seconds range. For this example, let’s say it took 36
seconds for your sailboat to travel 1/10 of a nautical mile. Reading the tachymeter dial gives a speed of 100 knots.
However, since we only traveled 1/10 of a nautical mile, the actual answer is 1/10 of that or 10 knots.
For example, if you wanted to measure the speed of an airplane: after traveling 10 kilometers, you noted that 10
seconds have elapsed. The tachymeter dial gives an answer of 360 but we traveled 10 Km. Therefore, the answer is
10X360, or 3600 km/hour.
To see more information please visit www.krug-baumen.com
TACHYMETER

18
AIR TRAVELLER AUTOMATIC
OPERATING INSTRUCTIONS
Before using the watch for the rst time, wind the crown approximately 20 times in a clockwise direction then place on wrist.
SETTING THE FUNCTIONS IS PERFORMED BY GENTLY PUSHING THE HIDDEN PUSHERS IN WITH A SMALL THIN OBJECT.
1. To set and change the time pull out the crown and turn clockwise and then push the crown back fully into place.
2. Button “A” adjusts the Date.
3. Button “B” adjusts the Month.
4. Button “C” adjusts the Weekday.
Button A Date Adjustment
Button B Month Adjustment
24 Hours
Month
Weekday
Button C
Weekday Adjustment
Crown
X
VIII
II
19
PRESTIGE
OPERATING INSTRUCTIONS
TO SET AND CHANGE THE TIME:
1. Wind the crown clockwise about 20 times or until you feel the pressure of the spring
2. To set or change the time pull out the crown and turn clockwise
3. Fully push the crown back into place.
Minute Hand
Hour Hand
Second Hand
Crown
XII
I
VI
VII
IV
V
IX
XI
III

20
MAJESTIC
OPERATING INSTRUCTIONS
Before using the watch for the rst time, wind the crown approximately 20 times in a clockwise direction then place on wrist.
SETTING THE FUNCTIONS IS PERFORMED BY GENTLY PUSHING THE HIDDEN PUSHERS IN WITH A SMALL THIN OBJECT.
1. To set and change the time pull out the crown and turn clockwise and then push the crown back fully into place.
2. Button “A” adjusts the Month.
3. Button “B” adjusts the Date.
4. Button “C” adjusts the Weekday.
Button B Date Adjustment
24 Hours
Date
Month
Weekday
Button C
Weekday Adjustment
Crown
Button A Month Adjustment
21
WATER-RESISTANT
The water-resistance of your watch cannot be permanently guaranteed. We therefore recommend that you have the water-resistance of your watch checked and
examined at an authorized service center every 12 months and every time you change the battery in a quartz watch.
The table below outlines general guidelines of the water-resistance you will receive from an accordingly rated watch.
NOTES:
No leather strap should come in contact with water.
When changing the time or date remember to insert the crown fully back into place to ensure head casing is airtight.
No watch is water-proof, these watches are water-resistant according to static pressure to a certain level, please see the case back of your watch and check
with the table above. If you are not sure do not use your watch near water.
3 ATM – Water-resistant 30 meters – 3 Bar Splash proof and water-resistant to small amounts of water. NOT suitable to be submerged in any
form of water.
5 ATM – Water-resistant 50 meters – 5 Bar Can be submerged in water such as light washing up. Suitable for swimming, but not guaranteed to be
resistant to jumping into the pool. No snorkeling and water-related work. NOT suitable for diving.
10 ATM – Water-resistant 100 meters – 10 Bar Suitable for swimming and snorkeling. NOT suitable for deep sea diving.

22 23
Push the folding clasp up by using a small
screwdriver taking care not to scratch the
strap or clasp
Choose suitable size Close folding clasp
Adjust the length
1
3
2
4
MESH STRAP CARE OF YOUR WATCH
LOOKING AFTER YOUR KRUG-BAÜMEN
- Protect your timepiece from falling and sharp objects.
- Keep your timepiece away from high temperatures including hot water and strong magnetic elds in order not to inuence the running
accuracy.
- When changing the time or date remember to push the crown in fully as to not let in any water.
- Leather straps must not be immersed in water.
- Check the water-resistant levels of your watch to determine what you can or can’t do with your watch in water.
- The battery in a quartz watch is inserted into the watch at origin and may not last the length of warranty and therefore is not covered
by the warranty.
- When needing to change your battery in a quartz watch remember to get the watch resealed correctly to maintain the water-resistant
level.
- To reduce or add links to your bracelet take the pins out in the direction of the arrows on the inside on the bracelet.
- We recommend that you should take your watch to a qualied watch repair centre to change the battery and change the bracelet size.
Any scratches on the bracelet are not covered by the warranty.
- Clean your watch with a soft damp cloth.
- After saltwater use, rinse under tap water and wipe dry.
- Metal watch bands should be washed periodically to keep them looking smart. Clean with a soft brush or cloth dipped in warm soapy
water, be sure to thoroughly wipe dry with a clean cloth.
- Remember to register your watch at www.krug-baumen.com for the 2-year warranty.

24 25
CONTACT DETAILS
POSTAL ADDRESS:
KB Time, PO BOX 2044,
Croydon,
CR90 9JZ,
United Kingdom.
EMAIL:
mail@krug-baumen.com
FOLLOW US:
/KrugBaumen
Register your warranty at
www.krug-baumen.com
where you can nd our full terms and conditions
as well as our contact details.
WARRANTY

26
SERVICE
This warranty covers the watch movement against manufacturing defects for 2 years from the date of purchase. Within this
period you may send your watch to the repair centre along with the handling & transportation fee of £24.95.
Krug-Baümen cannot accept responsibility for damage or loss caused in transit. We recommend that you send your watch
into us using a postal tracking ser vice, with the watch in a padded jiffy envelope with your full contact details and explana-
tion of work needed enclosed within.
IMPORTANT: Not Covered by Warranty
1. Batteries, Case, Crystal (Lens), Stones, Strap or Bracelet.
2. Damage resulting from improper handling, lack of care, accidents or normal wear and tear.
3. Water damage.
Your statutory right s are not affected.
The repair centre address:
KB Time, PO BOX 2044,
Croydon,
CR90 9JZ
United Kingdom
27

28 29
Stil, Design, Diamanten, alles in einem Arbeitstag am Krug Baümen. Gegründet vor über 20 Jahren Krug-Baümen Uhren umfassen, Stil, Design und
Zeitmessung mit günstigen Preisen für Sammler und Erstkäufer.
Entworfen im Vereinigten Königreich unter Verwendung hochwertiger
Materialien, präzise Bewegungen und Edelsteinen; Diese Armbanduhren bieten
klassischen und authentischen Handgelenk Schmuck für Männer und Frauen.
-

30 31
Unser Dank
Wir schätzen Ihr Vertrauen und wir verstehen, dass es viele andere
Uhrenmarken gibt, die Sie kaufen können, al so wir danken Ihnen für die
Herstellung von Krug-Baümen, Ihre Zeitmesser der Wahl.
Wir freuen uns, alle Kommentare zu hören, die Sie haben, gut oder schlecht,
wenn wir uns bemühen, zu verbessern und mit unseren Kunden verbinden.
Bitte zögern Sie nicht uns auf [email protected] oder auf Facebook zu
kontaktieren und wir kontakten Sie, sobald wir können.
Das Beste von das Team von Krug Baümen.
Es gibt 3 Arten von Uhren - Quarz, Digital und Automatisch. Quarz oder Digitale Stücke kommen
mit Batterien. Automatische-Uhren werden automtisch oder durch mechanische Bewegung
aufgezogen.
Für Automatik-Uhren, wird die richtige Uhrzeit eingestellt durch Ihre Uhr etwa 20 Mal rückwärts und
vorwärts zu schütteln, Ihre Uhr halten Zeit einmal am Handgelenk gehalten. Mit den mechanischen
Bewegungen müssen Sie die Bewegung mindestens einmal pro Tag selbst aufziehen. Drehen Sie
die Krone vorsichtig, fur aufziehen aber kümmern sich nicht zu viele zu drehen und der Frühling
zu brechen.
Bitte beachten Sie, dass automatische Bewegungen kein Batterien verfügen, also wenn Sie Ihre
Uhr nicht mehr tragen oder aufziehen es stoppt, bis Sie es wieder tragen. Alle automatische
Bewegungen werden Zeit verlieren oder gewinnen.
VERSCHIEDENE UHR
BEWEGUNGEN

33
32
UM ZEIT EIN ZU STELLEN:
1. Die Krone herausziehen zum Position 3
2. Drehen Sie die Krone bis wenn das korrekte Zeit ist eingestelt
3. Drücken Sie die Krone wieder in Position 1 .
DAS DATUM EINSTELLEN:
1. Die Krone herausziehen zum Position 2
2. Drehen Sie die Krone mit oder gegen den Uhrzeigersinn um das Datum ein zu stellen. (Die korrekte Richtung kan variieren pro Uhr)
3. Drücken Sie die Krone wieder in Position 1 .
*Für Chronographen Modelle bitte stellen Sie das Datum zwischen den Stunden von 21:00 und 01:00.
** Charleston, Regatta and Tuxedo.
123
3-ZEIGER BEWEGUNG MIT DATUM** PRINCIPLE
Sekunden Zeiger: Chronograph
24 Stunden Zeiger
Minuten Zeiger: Chronograph
Start/Stop Timer (A)
21 3
Teil/Reset: Timer (B)
Krone
BETRIEBSANLEITUNG
DIE ZEIT EINSTELLEN
1. DIe Krone herausziehen zum Position 3
2. Drehen Sie die Krone um Stunde und Minuten ein zu stellen
3. Nachdem die Zeit eingestellt haben, drücken Sie die Krone zurück in
voll auf position 1.
DAS DATUM EINSTELLEN
1. DIe Krone herausziehen zum Position 2
2. Drehen Sie die Krone gegen den Uhrzeigers in um das Datum ein zu stellen
3. Nachdem das Datum eingestellt zu haben, drücken Sie die Krone zurück in
voll auf position 1.
*Falls das Datum zwischen den Stunden von ca. 21:00 und 01:00 eingestellt ist,
kann das Datum nicht am folgenden Tag ändern.
DER TIMER EINSTELLEN
1. Drucken Sie die obere Knopf um der Timer zu starten/stoppen.
2. Drucken Sie die untere Knopf um der Timer zu teilen/resetten.
Datum

34
Sekunden Zeiger: Chronograph
24 Stunden Zeiger
Minuten Zeiger: Chronograph
Start/Stop Timer (A)
21 3
Split/Reset: Timer (B)
Krone
BETRIEBSANLEITUNG
DIE MINUTEN UND SEKUNDEN ZEIGER VON STOPWATCH EINSTELLEN
1. DIe Krone herausziehen zum Position 3
2. Drucken Sie Knopf (A) oder (B) um die Sekunden und Minuten Zeigern von Stopwatch zurück to setzen nach “0”position
· Durch eindrücken von Knopf (A) bewegen die Zeigern gegen den Uhrzeigers in.
· Durch eindrücken von Knopf (B) bewegen die Zeigern mit Uhrzeigers.
3. Drücken Sie die Krone zurück in voll auf position 1.
PRINCIPLE
Datum
35
AIR EXPLORER
BETRIEBSANLEITUNG
DIE ZEIT EINSTELLEN
1. Herausziehen Sie der Krone auf die 2. Klickposition
2. Drehen Sie die Krone um Stunden- und Minutenzeiger ein zu stellen
3. Drücken Sie die Krone zurück in voll auf funktionierend position.
Die AM/PM-Position wird bestimmt durch Drehen der Zeigern. Wenn das
Datum ändert, wenn die Hand die 12:00 Position geht, sind Sie im AM-Modus
DAS DATUM EINSTELLEN
1. Herausziehen Sie der Krone auf die 1. Klickposition
2. Drehen Sie die Krone gegen den Uhrzeigers in um das Datum ein zu stellen
* Falls das Datum zwischen den Stunden von ca. 21:00 und 01:00.
eingestellt ist, kann das Datum nicht am folgenden Tag ändern.
A
Stopwatch Sekunden Zeiger
24 Stunden Zeiger
Stopwatch Minuten Zeiger
Sekunden Zeiger
1 2
Krone
B
Datum
C

36
BETRIEBSANLEITUNG
DER CHRONOGRAPH STARTEN
Drücken Sie Knopf “A” um der Chronograph zu starten.
DER CHRONOGRAPH STOPPEN
Drücken Sie wieder Knopf “A” um der Chronograph zu stoppen.
*Zum Zurücksetzen drücken Sie Knopf B sobald Chronograph gestoppt wird
A
Stopwatch Sekunden Zeiger
24 Stunden Zeiger
Stopwatch Minuten Zeiger
Sekunden Zeiger
1 2
Krone
B
Datum
AIR EXPLORER
37
COUTURE
Stopwatch Sekunden Zeiger
24 Stunden Zeiger
Sekunden Zeiger
A
1 2
B
Krone
Stopwatch Minuten Zeiger
BETRIEBSANLEITUNG
DIE ZEIT EINSTELLEN
1. Herausziehen Sie der Krone auf die 2. Klickposition
2. Drehen Sie die Krone um Stunden- und Minutenzeiger ein zu stellen
3. Drücken Sie die Krone zurück in voll auf funktionierend position.
DAS DATUM EINSTELLEN
1. Herausziehen Sie der Krone auf die 1. Klickposition
2. Drehen Sie die Krone mit den Uhrzeigersinn um das Datum ein zu stellen
*Falls das Datum zwischen den Stunden von ca. 21:00 und 01:00,
eingestellt ist, kann das Datum nicht am folgenden Tag ändern
3. Drücken Sie die Krone zurück in voll auf funktionierend position.
DIE STOPWATCH
Diese Stopwatch ist in der Lage, Messung und Anzeige der Zeit in 1/1 Sekunde bis
zu maximal 30 Minuten.
Stopwatch stoppt automatisch nach 30 Minuten kontinuierlich Laufzeit.
Datum
C
WELTZEIT EINSTELLEN
Drehen Sie die Uhrenkrone C, bis die Stadt korrekt ist.
Bitte beachten Sie, dass die Uhrenkrone nicht statisch ist und sich daher mit
Handbewegungen bewegen kann. Die Zeitdifferenz ist nicht an Sommer- und
Winterzeiten angepasst.

38 39
Stopwatch Sekunden Zeiger
24 Stunden Zeiger
Sekunden Zeiger
A
1 2
Krone
Stopwatch Minuten Zeiger
ZEIT MESSEN MIT DIE STOPWATCH
1. Drücken Sie Knopf “A” um die Stopwatch zu starten.
2. Die Stopwatch können Sie starten en stoppen wenn Sie “A” eindrucken.
3. Knopf “B” eindrucken setzt die Stopwatch zurück und die Stopwatch
Minuten und Sekunden Zeigern werden zurück gesetzt nach
Null-positionen.
STOPWATCH ZURUCKSETZEN (INCL. NACH ERSATZ AKKU)
Dieses Verfahren sollte durchgeführt werden, wenn die Stopwatch Sekunden
und Minuten Zeiger nicht in die Nullstellung zurück geht.
1. DIe Krone herausziehen zum 2. Klick Position
2. Drücken Sie Knopf “A” um die Stopwatch Sekunden Zeiger nach vorn zu setzen
Drücken Sie Knopf “B” um die Stopwatch Sekunden Zeiger nach achtern
zu setzen
* Die Stopwatch Minuten Zeiger ist mit Stopwatch Sekunden Zeiger
synchronisiert.
* Die Stopwatch kann mit Sekunden Zeiger rasch vorgeschoben warden durch ,
kontinuierlich Knopf “A” oder “B”.ein zu drucken.
3. Setzen Sie die Zeit und retournieren Sie die Krone zuruck in voll auf functionierent
Position.
COUTURE
B
Datum
AIR TRAVELLER
BETRIEBSANLEITUNG
DIE ZEIT EINSTELLEN
1. Herausziehen Sie der Krone auf die 2. Klickposition
2. Drehen Sie die Krone um Stunden- und Minutenzeiger ein zu stellen
3. Drücken Sie die Krone zurück in voll auf funktionierend position.
Die AM/PM-Position wird bestimmt durch Drehen der Zeigern. Wenn das
Datum ändert, wenn die Hand die 12:00 Position geht, sind Sie im AM-Modus
DAS DATUM EINSTELLEN
1. Herausziehen Sie der Krone auf die 1. Klickposition
2. Drehen Sie die Krone gegen den Uhrzeigers in um das Datum ein zu stellen
* Falls das Datum zwischen den Stunden von ca. 21:00 und 01:00.
eingestellt ist, kann das Datum nicht am folgenden Tag ändern.
A
Stopwatch Sekunden Zeiger
24 Stunden Zeiger
Stopwatch Minuten Zeiger
Sekunden Zeiger
1 2
Krone
B
Datum
This manual suits for next models
6
Table of contents
Languages: