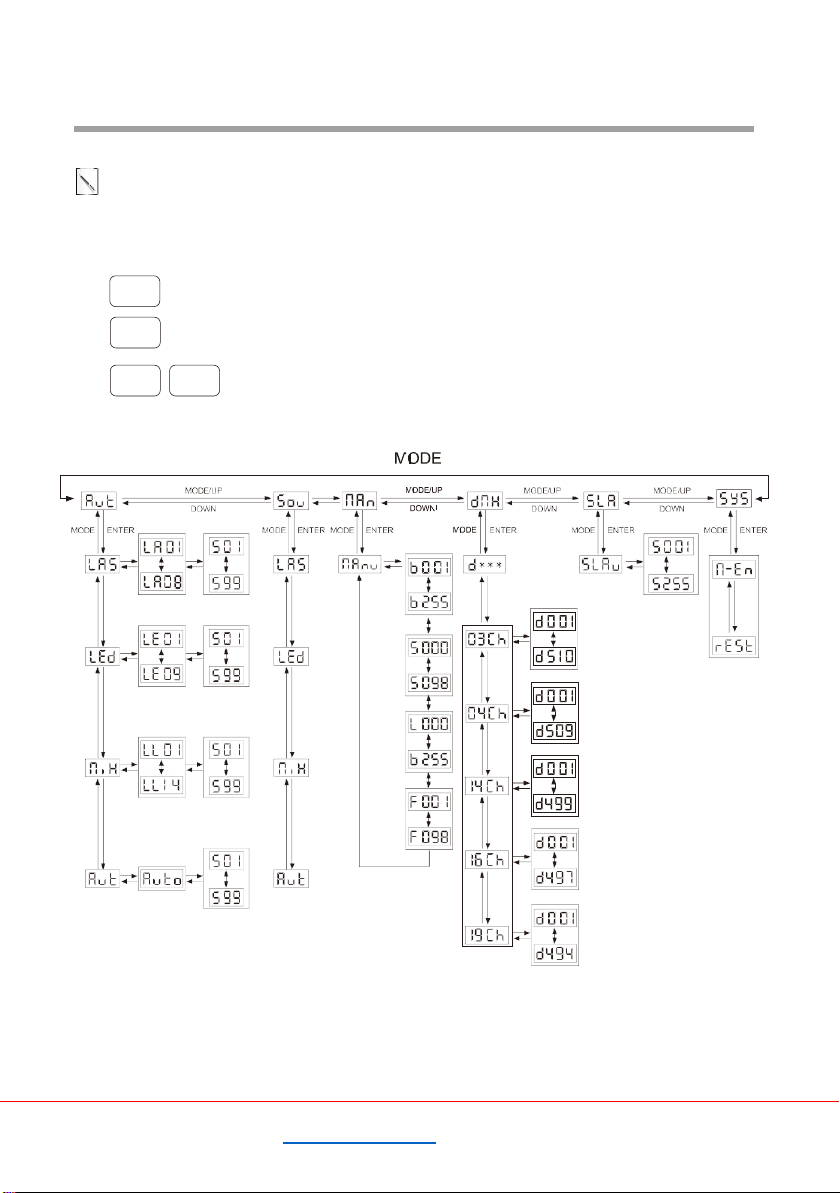
Kudux LBS 7B500 W3 User manual

WWW.KUDUX.COM 2
Thank you for purchasing our device.
We make every effort to ensure the best quality
of our products and to meet your expectations.
If you have any remarks or comments, please
share them with us.
We will be grateful for any suggestions that will
help us make products that are even better and
devices that satisfy your needs.
Kudux Team

WWW.KUDUX.COM 3
Unpacking InstructionsUnpacking Instructions
Read Manual before Operation
Dear user,
Thanks for choosing our LED device, believing this brand new product will bring you unlimited
marvel and happiness. Before operating this device, please read this manual thoroughly, and
retain it for future reference.
Warning Data
Please note the warnings in bold which will ensure the safe and smooth operation. These
warnings are important to a certain extent.
Attention! Indicates a skill or other useful information for special situations.
Important! Indicates important information to protect personnel from incident or injury.
Caution! Prevent damage or injury from incorrect operation.
Warning!
If the external flexible cable or cord of this luminaire is damaged, itshall be replaced by a special cord o r
cord exclusively available from the manufactureror his service agent. Shields, lenses or ultraviolet
screens shall be changed if they have become visibly damaged to such an extent that their
effectiveness is impaired, for example by cracks or deep scratches.
The lamps shall be changed if it has become damaged or thermally deformed.
Unpacking Instructions
As receiving a fixture, carefully unpacking the carton, checking contents to ensure that all parts
are in good condition. Informing the shipper immediately and retaining packing material for
inspection if any parts damaged from shipping or device damaged. Keeping packing materials
as
evidence for shipper’s confirmation.
Attention!
This unit is in perfect condition before delivery, please check all accessories when unpacking
the unit. User should follow this user manual to operate this unit, and make sure that you are
clear on all laser safety information and unit operation before power it on. Any wrong operation
will make this unit out of warranty.
Carefully moving after receiving it, checking whether there is any damage from shipping, and all
the accessories in it.
NAME
QTY
LED system
1
Power Cord
1
User manual
1
Packing Case
1

WWW.KUDUX.COM 4
effect or even cause fire!
Safety Instructions
Safety Instructions
To protect the environment, please try to recycle the packing material as much as possible. The
projector is for indoor use only, IP20. Use only in dry locations. Keep this device away from
rain and moisture, excessive heat, humidity and dust. Do not allow contact with water or any
other fluids, or metallic objects
Don’t throw this product away just as general trash, please deal with the product follow the
abandon electronic product regulation in your country.
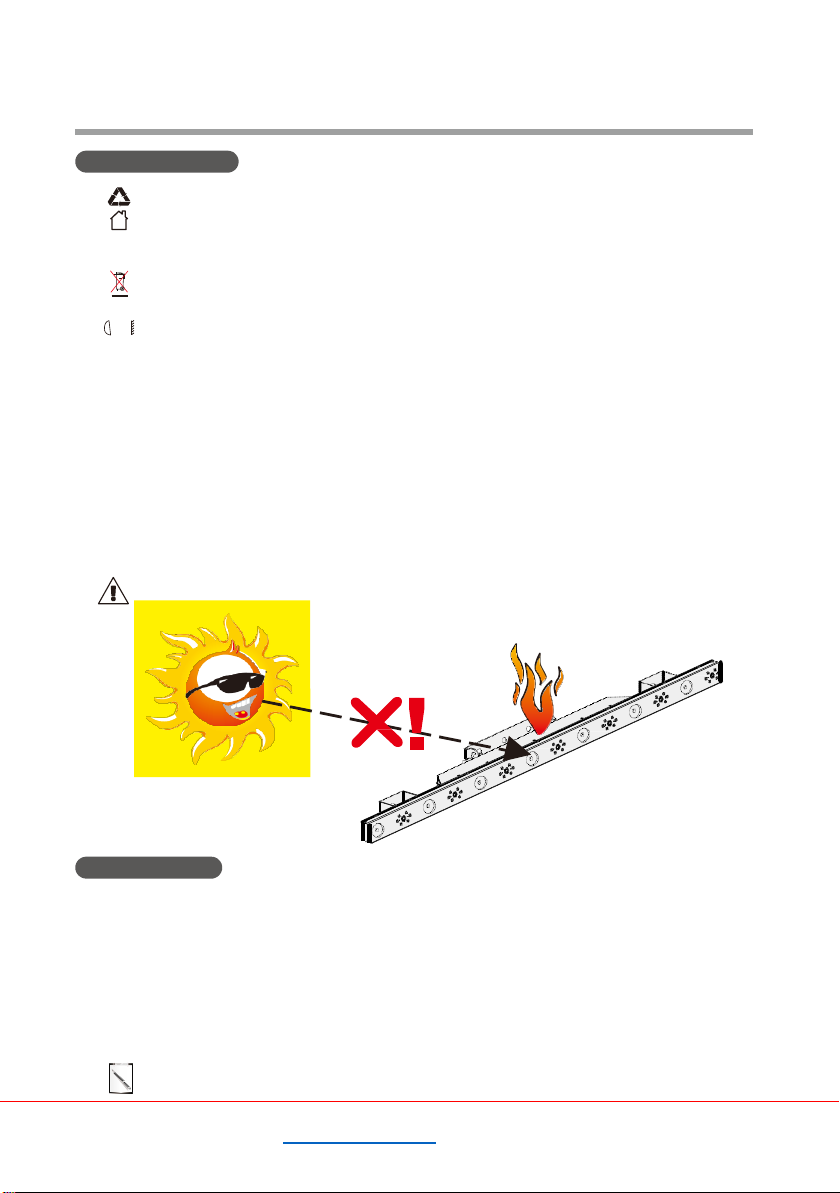
0.2m Locate the fixture in a well ventilated spot, away from any flammable materials and/or liquids.
The fixture must be fixed at least 20cm from surrounding walls
◆
To avoid condensation to be formed inside, allow this unit to adapt to the surrounding
temperatures when bringing it into a warm room after transport. Condense sometimes
prevents the unit from working at full performance or may even cause damages
◆
Don’t cover any ventilation openings as this may result in overheating.
◆
Don’t install it on flammable object.
◆
Don not use it when maximum ambient temperature is higher than 40 degree,
◆
Unplug the unit when it is not used for a longer time or before replacing the bulb.
◆
Don’t open the top cover to avoid unit damage.
◆
Please use the original packing when the device is to be transported.
Never expose the lens to direct sunlight, even for a short period, This may damage the light
Safety Warnings
◆
Always connect the product to a grounded circuit to avoid the risk of electrocution.
◆
Always disconnect the product from the power source before cleaning or replacing the fuse.
◆
Avoid direct eye exposure to the light source while the product is on.
◆
Make sure the power cord is not crimped or damaged.
◆
Never disconnect the product from power by pulling or tugging on the cord.
◆
If mounting the product overhead, always secure to a fastening device using a safety cable.
◆
Make sure there are no flammable materials close to the product when operating.
◆
Do not touch the product’s housing when operating because it may be very hot.
Keep this User Manual for future use. If you sell the product to another user, be sure to give
this document to the next owner.

WWW.KUDUX.COM 5
Overhead Rigging
Attention! The installation must be carried out by qualified service personal only. Improper
installation can result in serious injuries and /or damage to property. Overhead rigging
required extensive experience! Working load limits should be respected, Certified installation
materials should be used, the installed device should be inspected regularly for safety.
◆
Make sure the area below the installation place is free from unwanted persons during
rigging, de-rigging and servicing.
◆
Locate the fixture in a well ventilated spot, far away from any flammable materials and/or
liquids. The fixture must be fixed at least 20cm from surrounding walls
◆
The device should be installed out of reach of people and outside areas where persons may
walk by or be seated.
◆
The device should be well fixed; a free swinging mounting is dangerous and may not be
considered!
◆
Do not cover any ventilation opening as this may result in overheating
◆
Before the first time use, it must be inspected by professional staff to make sure safety,
inspection regularly every year.
Before rigging make sure that installation area can hold the 10 times weight of device. Using
the steel rope which can hold 12 times weight of device, through the eye-bolt for assisting
hang installment.
Clamp
Safety-rope AdjustAngle
AC Power
Please use the attached power, note that power voltage
and frequency are the same as the marked voltage and
frequency of device when connecting power. Every
device’s power should be connected separately, so that
device can be controlled individually.
L E N FUSE: 5×20mm
250V 1.6A slow
Cable spec:
Cable(EU)
Cable(US)
Pin
International
Brown
Black
Live
L
Light blue
White
Neutral
N
Yellow/Green
Yellow/Green
Earth

WWW.KUDUX.COM 6
Product Installation
DMX-512 connection
◆
Connection between lights and DMX must use the shied cable of diameter more than 0.5mm.
Please use the attached 3 pin XLR plug/socket to connect the DMX output/input interface. The
connection between socket and cable as below( note the plug/socket’s 3 pin number and position).
DMX-output
XLR mounting-sockets(rear view):
DMX-input
XLR mounting-plugs(rear view):
1-Shield
2 1
2
-
Shield
(-)
12
3-Shield(+)
3 3
◆
Note, XLR plug/socket’s 3pin can not be touched by inner hull, connection between pins is not
allowed. Except above connection, XLR plug/socket can not be connected with XLR control line.
Device receives international standard DMX512(1990) control signal.
◆
When using standard DMX512 control signal, the last device’s output interface must
be connected to a DMX plug. This plug is putting a 120 ohm resistance between
“canon” plug’s 2 pin and 3 pin. Showing as below pic. Sticking this plug into the last
device’s signal output interface, it will avoid the interference during the process of
signal transmission.
PIN3
PIN2
Polarized adjustment
Due to shake during transportation, the laser light beam may result deviation. It can be adjusted by
following ways. Operation as shown in diagram.
1 2
5 6
7 3 4 8
Adjust screw 1 alone, the beam will move down right.
Adjust screw 2 alone, the beam will move down left.
Adjust screw 3 alone, the beam will move up right.
Adjust screw 4 alone, the beam will move up left.
Adjust screw 5 alone, the beam will fine-tune to right.
Adjust screw 6 alone, the beam will fine-tune to left.
7 and 8 are meter screws. Normally, they do not need to adjust.
Adjust screw 1 and screw 2 simultaneously, the beam will move down.
Adjust screw 3 and screw 4 simultaneously, the beam will move up.
Warning! The polarization adjustment can only be adjusted by qualified professionals, operation, and to
ensure strict accord ance with the procedures described in this manual.

WWW.KUDUX.COM 7
Operation instructions
1
2
3 4 5 6 7 8
9
11 12
10
NO
Name
Function
1
LED aperture
3W Golden LED×7Pcs
2
Laser aperture
Red(638/200mW)×7Pcs
3
Power Input(Bule)
Blue neutrik power ouput socket
4
DMX Input
3PIN male XLR interface, for DMX communication
5
Fuse
250V 1.6A Slow blow
6
DMX Output
3PIN female XLR interface, for DMX communication
7
Safety eye
Attach the safety cable
8
Power output(White)
White neutrik power output socket,connect to next fixtrue
9
LED Display
For setting model
10
Hanging bracket
For hang and angle adjustment
11
Key switch
Make sure the professional person use
12
Urgent and safe switch
Switch off the laser manualy if error occcurs

WWW.KUDUX.COM 8
Menu operating instruction
Once after every power on the device, the VERSION and MANUFACTURE INFORMATION will
be shown in LED monitor of rear panel. When the device is powered on, LED monitor on rear
panel shows the current operating standalone mode or DMX address of DMX mode. With help of
LED control panel, is very easy to set and change the operating mode of. After every resetting
and saved, the new mode information will be shown on LED monitor at next power.
MODE Mode selection or back to the last function.
ENTER
Confirm, enter into the deeper menu. Press it to save the chosen model or
DMX initial add.
UP DOWN For changing DMX initial add or function value

WWW.KUDUX.COM 9
LED display
Functionaldescription
LASER Auto shows(LA01-LA08)
LED Auto shows(LE01-LE09)
MIX Auto shows(LL01-LL14)
Auto shows
Setting effect speed.01 is the slowest, 99 is the fast
LASER Sound shows(LA01-LA08)
LED Sound shows(LE01-LE09)
MIX Sound shows(LL01-LL14)
Sound shows
Manual
Choosing DMX channel modes
Setting channel address
Enter into slave mode
Master enable
Restore the factory intial setup
Note: In sound model, device will close light in 5 seconds automatically, if there isn’t any sound
signal. Light on until sound signal received.
Initial Setting
MENU
UP
DOWN
ENTER
AUT
SOU
MAN
-LAS
-LED
-MIX
-AUT
-LAS
-LED
-MIX
-SOU
MANU
LA01-LA08
LE01-LE09
LL01-LL14
AUTO
S. 01 to S. 99, speed from slow to fast
01 is slowest, 99 is fastest
B.000-B.255
(
LEDbrightness
)
S.001-S.098(LEDstrobe)
S.099:on S. 100: sound control strobe
L.000-B.255(laserstrobe)
F.001-F.098(LEDstrobe)
F.099:on F. 100: sound control strobe
Press ENTER to Save
Press ENTER to Save
ENTER
DMX
03CH( d001-d510) 04CH( d001-d509) 14CH( d001-d499)
16CH( d001-d497) 19CH( d001-d494)
dXXX d001-dxxx
choose channel mode
Press ENTER to Save
Set starting address
Press ENTER to Save
SLA SLAV S. 001 to S. 255 Press ENTER to Save
SYS
M-EN
REST
E
nable/disablemaster
Restore default settings
Press ENTER to Save
Press ENTER to Save

WWW.KUDUX.COM 10
DMX operation instructions
This device adopts large storage and high speed chip, which has been written lots of effect based on
DMX application. Before control other DMX channels, please be sure that the channel 1 was set in
proper mode (value).
3CH
Channel
Value
Description
CH1
000-009
Black out
010-039
MIXAuto
040-069
LASERAUTO
070-099
LEDAUTO
100-129
AUTO SHOWS
130-159
MIX SOUND
160-189
LASER SOUND
190-209
LED SOUND
210-255
SOUND SHOWS
CH2
MIXAUTO
SHOWS
000-019
MIXAuto#1
020-039
MIX Auto#2
040-059
MIX Auto#3
060-079
MIX Auto#4
080-099
MIX Auto#5
100-119
MIX Auto#6
120-139
MIX Auto#7
140-159
MIX Auto#8
160-179
MIX Auto#9
180-199
MIX Auto#10
200-255
MIX Auto#11
CH2
LASERAUTO
SHOWS
000-039
LASERAuto#1
040-079
LASERAuto#2
080-119
LASERAuto#3
120-159
LASERAuto#4
160-199
LASERAuto#5
200-255
LASERAuto#6
CH2
LEDAUTO
SHOWS
000-039
LED Shows#1
040-079
LED Shows#2
080-119
LED Shows#3
120-159
LED Shows#4
160-199
LED Shows#5
200-239
LED Shows#6
240-255
LED Shows#7
CH2 Auto shows
No used
Mix auto
CH3 Auto speed
0-255
Auto speed

WWW.KUDUX.COM 11
Channel
Value
Description
CH1
000-255
#1 LED light brightness
CH2
000-255
#2 LED light brightness
CH3
000-255
#3 LED light brightness
CH4
000-255
#4 LED light brightness
CH5
000-255
#5 LED light brightness
CH6
000-255
#6 LED light brightness
CH7
000-255
#7 LED light brightness
CH8
000-127
All LED light brightness
128-249
strobe slow to fast
250-255
sound control strobe
CH9
000-255
#1 Laser light brightness
CH10
000-255
#2 Laser light brightness
CH11
000-255
#3 Laser light brightness
CH12
000-255
#4 Laser light brightness
CH13
000-255
#5 Laser light brightness
CH14
000-255
#6 Laser light brightness
CH15
000-255
#7 Laser light brightness
4CH
Channel
Value
Description
CH1
000-255
led brightness
CH2
000-002
NO
003-249
strobe slow to fast
250-255
sound control strobe
CH3
000-255
one laser source control
CH4
000-002
NO
003-249
strobe slow to fast
250-255
sound control strobe
14CH
Channel
Value
Description
CH1
000-255
#1 LED light brightness
CH2
000-255
#2 LED light brightness
CH3
000-255
#3 LED light brightness
CH4
000-255
#4 LED light brightness
CH5
000-255
#5 LED light brightness
CH6
000-255
#6 LED light brightness
CH7
000-255
#7 LED light brightness
CH8
000-255
#1 Laser light brightness
CH9
000-255
#2 Laser light brightness
CH10
000-255
#3 Laser light brightness
CH11
000-255
#4 Laser light brightness
CH12
000-255
#5 Laser light brightness
CH13
000-255
#6 Laser light brightness
CH14
000-255
#7 Laser light brightness
16CH

WWW.KUDUX.COM 10
DMX operation instructions
Channel
Value
Description
CH16
000-127
All Laser light brightness
128-249
strobe slow to fast
250-255
sound control strobe
19CH
Channel
Value
Description
CH1
000-255
#1 LED light brightness
CH2
000-255
#2 LED light brightness
CH3
000-255
#3 LED light brightness
CH4
000-255
#4 LED light brightness
CH5
000-255
#5 LED light brightness
CH6
000-255
#6 LED light brightness
CH7
000-255
#7 LED light brightness
CH8
000-127
All LED light brightness
128-249
strobe slow to fast
250-255
sound control strobe
CH9
000-255
#1 Laser light brightness
CH10
000-255
#2 Laser light brightness
CH11
000-255
#3 Laser light brightness
CH12
000-255
#4 Laser light brightness
CH13
000-255
#5 Laser light brightness
CH14
000-255
#6 Laser light brightness
CH15
000-255
#7 Laser light brightness
CH16
000-127
All Laser light brightness
128-249
strobe slow to fast
250-255
sound control strobe
CH17
000-009
010-039
The channel 1-
16 can’t
control
040-069
070-099
100-129
130-159
160-189
190-209
210-255
CH18
With reference to 3 channel model of channel 2
CH19
Program broadcast speed

WWW.KUDUX.COM 11
170
Product parameter
Product parameter
Model
LBS 7B500 W3
Power
(R:200/G:100/B:500)mW×7pcs
Laser class
3B/4
Rate LED power
3W Golden LED×7pcs
LED Beam angle
7°
Connectors
3 Pin XLR DMX in/out
Power input
100-240V 50/60Hz 46W
Power linking
NeutrikPowerCon
ProductDimensions
1000×50×170mm
Weight
4.6Kg
1000
Contact:
Please check who is our dealer in your country at our website
www.kudux.com
Table of contents
Other Kudux Dj Equipment manuals
Popular Dj Equipment manuals by other brands

Varytec
Varytec 103340 manual

Stairville
Stairville Vintage Bowl 30 RGBA IR quick start guide

Martin
Martin MAC III Quadray Module Installation and control guide

EuroLite
EuroLite LED WMS 8-fold Set user manual

American DJ
American DJ LED Quest User instructions

Chauvet DJ
Chauvet DJ Duo Moon Quick reference guide