Kudux LM 2013 User manual

Pin Power Color Moving Head
User Manual

Important Safety Information
Instructions pertaining to continued protection against fire, electric shock, and injury to persons
are found in Appendix A. Please read all instructions prior to assembling, mounting, and
operating this equipment.
Symbols
The following international caution and warning symbols appear in margins in this manual
CAUTION: This symbol appears next to Caution messages.
Ignoring these messages could result in personal injury
and/or damage to equipment.
WARNING: This
symbol appears adjacent to high voltage
warning messages. Ignoring these messages could result
in serious personal injury.
This symbol indicates the minimum distance from a lighted
object
Warranty information
Limited Warranty
Unless otherwise stated, your product is covered by a one year parts warranty to be counted
from shipment date. The buyer must provide receipts or invoices for verification of purchase and
date. If purchase date cannot be proved, date of manufacture will be used to determine
warranty period.
Freight
All shipping costs will be paid by the purchaser. Under any circumstances freight collect
shipments will be accepted.
Warranty will be absolutely invalid if the product is damaged, modified in any way, or if the item
has been negligently repaired.

Table of Contents
Chapter 1
Product Overview!7
..............................................................................................Features 7
...................................................................................................Operation 7
...............................................................................................Construction 7
............................................................Related products and accessories 7
.......................................................................................Specifications 8
..................................................................................Physical specifications 8
.............................................................................Shipping dimensions & weight 8
...................................................................................Mounting information 9
.........................................................................Electrical/Optical information 9
...................................................................................................Operation 9
Chapter 2
Setup and Configuration!10
..........................................................................Unpacking the fixture 10
.................................................................Installing a power cable cab 10
............................................................................Mounting the fixture 10
........................................................................Mounting the fixture upright 11
....................................................................................................Safety Cable 11
............................................................................................................Clamp 11
..........................................................................................Mounting Procedure 11
..................................................................................Linking Fixtures 12
.......................................................................................Cable Connectors 12
...............................................................................Connecting to the Link 12
......................................................................Powering On the Fixture 13
.............................................................Setting the DMX Start Channel 13
...................................................................Shutting Down the Fixture 13
Chapter 3
The Menu System!14
.................................................................................Menu navigation 14
.........................................................................................Menu map 14
.....................................................................................Menu options 16
...........................................................................................The SET Menu 16
.................................................................................................Reset Machine 16
...............................................................................................Load Parameter 16
.................................................................................................Master / Alone 16
4

...................................................................................................Auto / Sound 16
.......................................................................................................Mic Sense 17
.......................................................................................................TC Switch 17
....................................................................................................Scan setting 17
..................................................................................................Dimmer curve 18
.................................................................................................Dimmer speed 18
......................................................................................................DMX Reset 19
................................................................................................................Fan 19
.....................................................................................................Information 19
..........................................................................................The DMX Menu 19
..................................................................................................DMX Address 19
.................................................................................................No DMX signal 19
.................................................................................................DMX Channels 20
......................................................................................The MACRO Menu 20
..................................................................................................Step quantity 20
.......................................................................................Program step number 20
.................................................................................Manual Dimmer Menu 20
Chapter 4
DMX Programming Basics!21
................................................................DMX Programming Overview 21
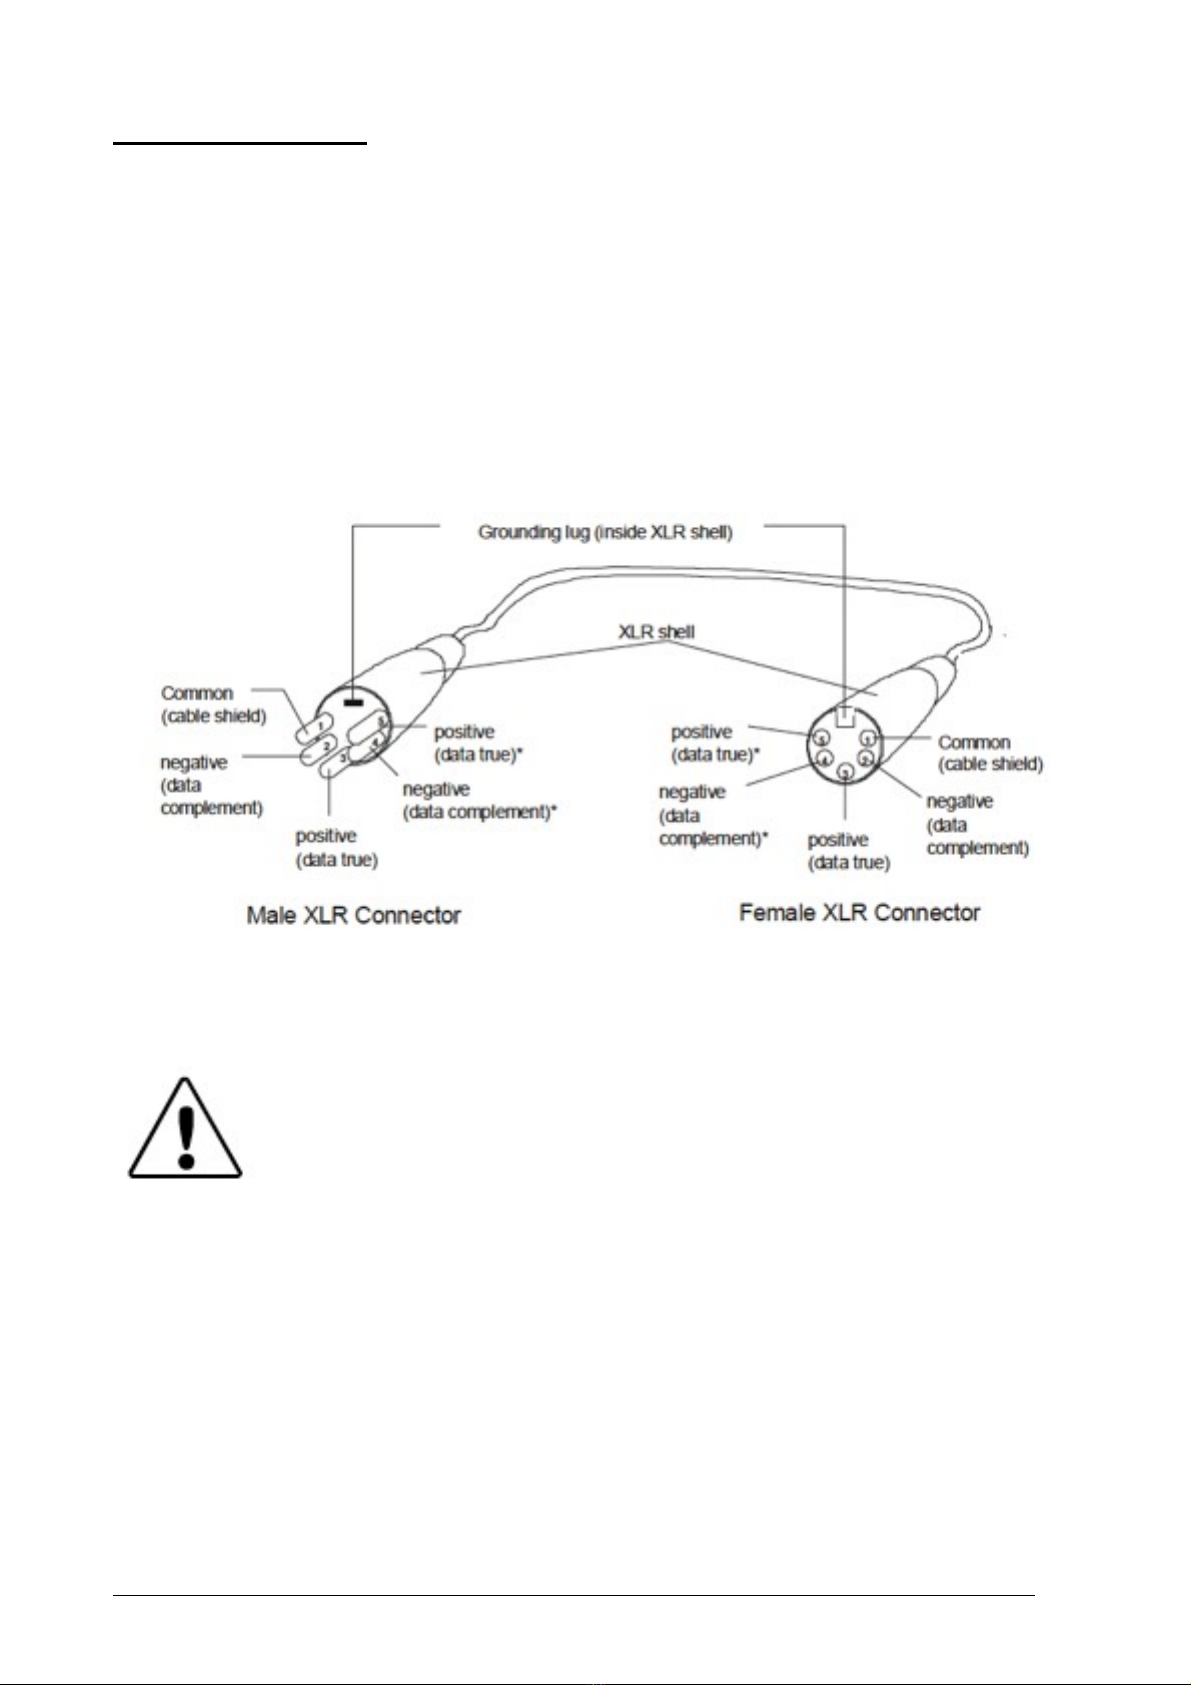
...........................................................................................DMX512 Links 21
..................................................................8-bit vs. 16-bit DMX Parameters 21
................................................................Determining a DMX Start Channel 21
...................................................................................Protocol modes 22
...........................................................................................DMX Protocols 22
.....................................................................................HSV mode: 7 channels 22
...................................................................................Stage mode 12 channels 22
....................................................................................Stage mode 9 channels 24
....................................................................................Stage mode 8 channels 24
....................................................................................Stage mode 5 channels 24
Chapter 5
Fixture control!25
........................................................................................Pan and Tilt 25
...........................................................................................Dimming 25
........................................................................................Color wheel 25
Appendix!26
...............................................................Important Safety Information 26
..............................................Warning: For Continued Protection Against Fire 26
................................Warning: For Continued Protection Against Electric Shock 26
...........................Warning: For Continued Protection Against Injury To Persons 26
...................................Apéndice : Información Importante De Seguridad 27
5

Chapter 1
Product Overview
The LM-2013 Pin Power Color Moving Head is a very small sized and very powerful LED
luminaire, only 3.6 kg. weight. Very narrow and bright beam; scan movement runs extremely
fast. It covers the full spectrum of RGB color mixing, and provides color wheel effects. Smooth
dimming from 0-100%; strobe with pulse and random effects. Due to its small size and light
weight it can be installed almost anywhere; has a very low power consumption; suitable for
both rental and installation applications. Easy set up and installation.
Features
Operation
•540º/630º pan and 240º tilt movement
•RGB color mixing
•Smooth dimmer from 0 to 100%
•Auto-switching power supply
•100-240 V AC power input
•CTC function, color wheel, strobe
Construction
•Neutrik PowerCon input & throughput
•5 or 3 pin XLR DMX connectors
•Thermo plastic housing (black, red, blue, silver & white)
Related products and accessories
! ! ! ! ! ! ! !7

Specifications
Physical specifications
Fixture Dimensions: 242 mm x 130 mm x 289 mm
Fixture Weight: 3.6 kg
Shipping dimensions & weight
Single fixture carton
Dimensions: 280 mm x 175 mm x 340 mm
Weight: 4.1 kg
Four fixtures carton
Dimensions: 595 mm x 365 mm x 360 mm
Weight: 18 kg
Flight case dimensions (8 pcs/case):
Dimensions: ??? mm x ??? mm x ??? mm
Weight: ?? Kg (Case + 8 Fixtures)
! ! ! ! ! ! !8

Mounting information
LM-2013 can be truss mounted using suitable clamps through the center hole on the
fixture base. Clamps and accessories for truss mounting installation should be ordered
separately. It can also stand upright on a suitable and stable surface.
Electrical/Optical information
•Power Input: 100-240 VAC; 50-60 Hz; 120 W
•Light Source: 36 pcs 3-watt RGB CREE XP-E LEDs
•Beam Angle: 8º
•Color Mixing: RGB
Operation
•Pan 540º or 630º (selectable); Tilt 240º
•Control: DMX 512
•Minimum distance to lighted object: 1 meter
•DMX connectors: 5-pin male and female XLR connectors
•Maximum ambient operating temperature: 40º C
•Minimum ambient operating temperature: -30º C
! ! ! ! ! ! ! !9

Chapter 2
Setup and Configuration
Use the following steps to set up and configure your fixture:
1. Unpack the fixture.
2. Install power cord cap for your location.
3. Mount the fixture upright or suspended from a standard truss.
4. Connect the fixture to a DMX controller via DMX cabling.
5. Connect the fixture to power.
6. Configure the fixture for DMX control.
Unpacking the fixture
The LM-2013 fixture is transported in a shipping box or flight case specifically designed to
protect the product during transportation. When unpacking, inspect the fixture for physical
damage of its components. Khroma Technologies Ltd. assumes no responsibility for products
that are damaged during transport. Always transport a product in its shipping box or flight
case.
Installing a power cable cab
The LM-2013 fixture is shipped without a power cable although it is ordered by customer.
When installing the power cord, be sure you chose Neutrik PowerCon input connector as main
power input and chose the correct cord cap for your area. Please note that our standard cores
in the mains lead are colored according to the following criteria:
•green and yellow = earth
•blue = neutral
•brown = live
Mounting the fixture
The KL-3036-PPC fixture can be mounted suspended from a support system (as a truss) or
freestanding on its base.
WARNING
This equipment is suitable for dry locations only. Do not
expose this equipment to rain or moisture.
CAUTION:
Always use a secondary safety cable when mounting this
fixture.This fixture must be installed and operated by
trained personnel only.
Mantain a minimum distance of 1 meter from a lighted
object
!!! !! !10

Mounting the fixture upright
To mount the fixture upright, place the fixture on a stable non-flammable surface that will
support more than the 3.6 kg weight of the fixture. If the surface is above floor height, use
safety cables to secure the fixture to the surface.Mounting the fixture on a truss
To mount the fixture upright, place the fixture on a stable non-flammable surface that will
support more than the 3.6 kg weight of the fixture. If the surface is above floor height, use
safety cables to secure the fixture to the surface.
Safety Cable
We strongly recommends that you use a safety cable when mounting any fixture. You must
supply your own safety cable and verify that the cable is capable of supporting the weight of
the fixture. You can order safety cables from your Conic Lighting Designs dealer/distributor.
(see Related Products and Accessories on page 5).
Clamp
You must supply your own clamps and verify the clamp is capable of supporting the weight of
the fixture. You can order C-clamps for truss mounting from your Conic Lighting Designs
dealer/distributor (see Related Products and Accessories on page 5).
Mounting Procedure
To mount fixtures on a truss:
1. Disconnect power to the fixture. If the fixture has been operating, allow the fixture to cool
before handling.
2. Always stand on a firm, stable surface when mounting a fixture to its support. The fixture
should be at a height where you can comfortably work on it, and should either be resting
on a stable surface, or held securely.
3. Attach suitable clamp through the center hole on the base of the fixture.
4. Tighten the clamps firmly to the fixture’s base and to the support.
5. Loop one or more suitable safety cables around the support, through the side holes in the
fixture’s base.
Holes for
attaching
clamps &
safety wires
! ! ! ! ! ! !11

Linking Fixtures
LM-2013 fixtures operate on a standard DMX512 link controlled by a DMX console. The
number of fixtures on a link will be determined by the combined number of channels required
by all the fixtures. A KL-3036-PPC fixture using Standard protocol requires a maximum of 12
channels on a DMX512 link. Attach the fixture to the link using data-grade cable and 5-pin XLR
cable connectors.
Cable Connectors
LM-2013 fixture accepts 5-pin XLR cable connectors. Cabling must have a male XLR
connector on one end of the cable and a female XLR connector on the other end.
Pin one is the common (cable shield), pin two is the data complement (negative), pin three is
the data true (positive). Pins four and five are not used, but they allow a secondary data link
to pass through the fixture.
Test each cable with a voltage/ohm meter (VOM) to verify correct polarity and to make sure
that the negative and positive pins are not grounded or shorted to the shield or to each other.
Connecting to the Link
To link one or more fixtures to a DMX controller:
1. Connect the male XLR connector of a DMX Data cable to the controller’s DMX Data Out
connector.
2. Connect the Data cable’s female XLR connector to the Data In connector of the first (or
next) fixture on the DMX link.
3. Continue linking the remaining fixtures connecting a cable from the Data Out connector of
each fixture to the Data In connector of the next fixture on the link.
CAUTION:
Do not connect anything to the ground lug on the XLR connectors.
Do not connect or allow contact between the common (cable
shield) and the fixture’s chassis ground. Grounding the common
could cause a ground loop and/or erratic behavior.
!!! !! !12

4. Terminate the link by
installing a 120 ohm, 1/4
watt (minimum)
terminator in the fixture’s
Data Out (female) cable
connector in the last
fixture on each DMX link.
A terminator on the last
fixture of the link
prevents data reflection, which can corrupt the data communication on the link.
Powering On the Fixture
To power on the fixture, simply connect it to a 100-230 V AC power source.
Once the fixture is connected to a power source, it automatically begins a homing procedure to
verify the major functions of the fixture.
Setting the DMX Start Channel
Each fixture requires a block of consecutive channels on a 512-Channel DMX link. The number
of channels depends on the protocol you are using.
To set the Start Channel on an fixture:
1. Access the LM-2013 fixture’s menu system via the display on the fixture’s head. For a
detailed description of the menu system, see Chapter 3: The Menu System.
2. Press and hold the Menu button until AddR appears on the display. Press the Enter button
to select.
3. The display will show the start channel currently assigned to the fixture.
4. Use the Up and Down arrow buttons to select a new DMX start channel. The display will
show a new option ready for selection.
5. Press the Enter button to store the new DMX Start channel. The display will stop flashing
when a new option is entered.
When setting the Start channel on a fixture, remember:
•A fixture’s physical location on the link does not have to coincide with the order of channel
range assignments in the link.
•The fixture’s channel range must not overlap any other device’s channel range on the link.
When two devices on the same DMX link have overlapping channel ranges, one or both
devices will be disabled or behave erratically. The single exception would be if two or more
fixtures need to respond to controller commands in exactly the same way. In that case, those
fixtures must be the same type and must share the entire channel range.
Shutting Down the Fixture
To shoot down a fixture you can simply disconnect it from power.
CAUTION:
Do not power on the fixture until verifying that the line cord
cap is suitable for the power source in your location. For
more information, see Installing a Power Cord Cap on page 8.
! ! ! ! ! ! !13

Chapter 3
The Menu System
Menu navigation
Access the menu system via the four menu navigation buttons on the fixture. The display will
show the menu items you can select from the menu map.
To access the menu system: press the corresponding button until desired menu
appears on the display.
To scroll the menu items: press the up and down buttons.
To return to the previous option without changing the value: press the <Set/
Esc> button.
Menu map
Level 1
Level 2
Level 3
Level 4
Description
SET
Reset Machine
ON
Resets the fixture
SET
Reset Machine
OFF
SET
Load Parameter
ON
Sets factory defaults ON
SET
Load Parameter
OFF
Sets factory defaults OFF
SET
Master / Alone
Master mode
Sets the fixture in Master mode
SET
Master / Alone
Alone mode
Sets the fixture in stand-alone mode
SET
Auto / Sound
Auto mode
Sets the fixture to Auto mode
SET
Auto / Sound
Sound Mode
Sets the fixture to Sound mode
SET
Mic Sense
00 to 99%
Sets the mic level sensitivity
SET
TC Switch
TC Switch Mask
ON
Enables self protection against over heat
SET
TC Switch
OFF
Disables self protection against over heat
SET
TC Switch
TC Switch Temp
Cap
Shows the current setting for temp value
SET
TC Switch
Set
Sets the temperature value for self-protection
SET
Scan Setting
Reverse Pan
ON
Sets reverse Pan ON
SET
Scan Setting
OFF
Sets reverse Pan OFF
SET
Scan Setting
Reverse Tilt
ON
Sets reverse Tilt ON
SET
Scan Setting
OFF
Sets reverse Tilt OFF
SET
Scan Setting
Pan degree
630
Sets the pan degree to 630º
SET
Scan Setting
540
Sets the pan degree to 540º
SET
Scan Setting
Scan Blackout
ON
The fixture will go to blackout when moving
SET
Scan Setting
OFF
The fixture will not go to blackout when moving
SET
Scan Setting
Feed back
ON
Fixture will auto recover XY position
SET
Scan Setting
OFF
Fixture will not auto recover XY position
SET
Dimmer curve
Square law
Sets dimming to a square law curve
SET
Dimmer curve
Inv. Square law
Sets dimming to inverted square law curve
SET
Dimmer curve
S-Curve
Sets dimming to a S-curve
SET
Dimmer speed
Dimmer Smooth
Sets dimming speed to smooth
SET
Dimmer speed
Dimmer Fast
Sets dimming speed to fast
SET
DMX Reset
Enabled
DMX reset is enabled
SET
DMX Reset
Disabled
DMX reset is disabled
! ! ! ! ! ! ! !14

Level 1
Level 2
Level 3
Level 4
Description
Fan
Regulated
Sets the cooling fan speed to auto regulated
Fan
Full
Sets the cooling fan speed to maximum
Information
Time
Sets the time
Information
Date
Sets the date
Information
Use time
Shows the fixture used time
DMX Menu
DMX Address
XXX
Changes the existing DMS start channel
DMX Menu
No DMX signal
Stop Run
Turns LEDs off after DMX data is lost
DMX Menu
No DMX signal
Hold Run
Keeps LED state until shutdown if no DMX data
DMX Menu
No DMX signal
Auto Run
Activates Auto mode if DMX data is lost
DMX Menu
No DMX signal
Sound Run
Activates sound mode if DMX data is lost
DMX Menu
DMX Channels
HSV Mode
Selects HSV protocol
DMX Menu
DMX Channels
STAGE Mode
12 Channels
Selects 12 channels protocol
DMX Menu
DMX Channels
STAGE Mode
9 Channels
Selects 9 channels protocol
DMX Menu
DMX Channels
STAGE Mode
8 Channels
Selects 8 channels protocol
DMX Menu
DMX Channels
STAGE Mode
5 Channels
Selects 5 channels protocol
Macro Menu
Step quantity
62
Sets number of steps of the macros
Macro Menu
Program Step
##
Change Color
Macro Menu
Program Step
##
Twinkling
Macro Menu
Program Step
##
Fade
Manual Dimmer
Light switch
ON
Manual Dimmer
Light switch
OFF
Manual Dimmer
Light Red
000
Manual Dimmer
Light Green
000
Manual Dimmer
Light Blue
000
Manual Dimmer
Light Strobe
000
Manual Dimmer
Scan Pan
128
Manual Dimmer
Scan Tilt
128
Manual Dimmer
Scan Pan Fine
000
Manual Dimmer
Scan Tilt Fine
000
! ! ! ! ! ! !15

Menu options
The sections below explain how to access the fixture options shown in the menu map.
The SET Menu
Reset Machine
When you set this menu item on, the fixture performs a reset.
Selecting the OFF option will have no effect. To reset the fixture:
1. Press <Set/Esc> until SET appears on the display. Press <Enter>
2. Scroll to the Reset Machine menu. Press <Enter>.
3. Scroll to ON to reset the fixture.
4. Press <Enter>.
Load Parameter
When you set this menu item on, all factory options return to their default settings. Conic
Lighting DesignsTM fixtures are shipped from the factory with the following default option
settings:
Reverse Pan: OFF
Reverse Tilt: OFF
Pan Degree: 540º
Dimming curve: Square law
Dimmer speed: Smooth.
DMX Reset: Enabled
Fan Speed: Auto regulated.
No DMX signal: Stop Run
DMX Channels: Stage 12 channels
The Load Parameter menu option displays On if all the factory options are at the factory
default settings. If any of the items listed above are not at the factory default setting, the
display reads OFF. Selecting the OFF option will have no effect. To restore the factory default
setting:
1. Press <Set/Esc> until SET appears on the display. Press <Enter>
2. Scroll to the Load Parameter menu. Press <Enter>.
3. Scroll to ON to restore the factory option defaults.
4. Press <Enter> to store.
Master / Alone
The Master/Alone menu option sets the fixture mode to master or stand alone. To set the
fixture to any of the two modes:
1. Press <Set/Esc> until SET appears on the display. Press <Enter>
2. Scroll to the Master/Alone menu. Press <Enter>.
3. Scroll to the desired mode.
4. Press <Enter> to store.
Auto / Sound
The Auto/Sound menu option sets the fixture mode to Auto run mode or to sound mode. To set
the fixture to any of the two modes:
! ! ! ! ! ! ! !16

1. Press <Set/Esc> until SET appears on the display. Press <Enter>
2. Scroll to the Auto/Sound menu. Press <Enter>.
3. Scroll to the desired mode.
4. Press <Enter> to store.
Mic Sense
The Mic.Sense menu option sets the fixture’s built-in microphone sensitivity level. To set the
fixture’s mic sensitivity:
1. Press <Set/Esc> until SET appears on the display. Press <Enter>
2. Scroll to the Mic.Sense menu. Press <Enter>.
3. Scroll to the desired value.
4. Press <Enter> to store.
TC Switch
Through the TC Switch menu option, user can set the fixture’s self protection behavior-in case
of over heat to adapt it to the ambient conditions. As this is a very important decision that can
damage the fixture, this option is protected by a password, that will be only given to the user
upon request. The submenus accessible are:
TC Switch Mask
It enables or disables the over-heat protection. To set Tc Switch Mask on:
1. Press <Set/Esc> until SET appears on the display. Press <Enter>
2. Scroll to the TC Switch menu. Press <Enter>.
3. Scroll to TC Switch Mask. Press <Enter>
4. Scroll to ON.
5. Press <Enter> to store.
TC Switch Temp
It sets the temperature value for the fixture to self-protect. To see the current settings
for temperature value:
1. Press <Set/Esc> until SET appears on the display. Press <Enter>
2. Scroll to the TC Switch menu. Press <Enter>.
3. Scroll to TC Switch Temp. Press <Enter>
4. Scroll to CAP. Press <Enter>.
To change the self protection temperature value: (password protected)
1. Press <Set/Esc> until SET appears on the display. Press <Enter>
2. Scroll to the TC Switch menu. Press <Enter>.
3. Scroll to TC Switch Temp. Press <Enter>
4. Scroll to Set. Press <Enter>.
5. Scroll to the desired temperature value.
6. Press <Enter> to store.
Scan setting
The Scan setting menu sets the behavior of the fixture scan movement. To access and change
the different scan settings and values:
Reverse Pan
1. Press <Set/Esc> until SET appears on the display. Press <Enter>
! ! ! ! ! ! !17

2. Scroll to the Scan Setting menu. Press <Enter>. Scroll to the Reverse Pan menu.
Press <Enter>.
3. Scroll to ON. Press <Enter> to store.
Reverse Tilt
1. Press <Set/Esc> until SET appears on the display. Press <Enter>
2. Scroll to the Scan Setting menu. Press <Enter>. Scroll to the Reverse Pan menu.
Press <Enter>.
3. Scroll to the Reverse Tilt menu. Press <Enter>.
4. Scroll to ON. Press <Enter> to store.
Pan degree
Through this option you can set the degrees for pan movement. You can chose between
540º or 630º. To set it:
1. Press <Set/Esc> until SET appears on the display. Press <Enter>
2. Scroll to the Scan Setting menu. Press <Enter>. Scroll to the Reverse Pan menu.
Press <Enter>.
3. Scroll to the Pan degree. Press <Enter>.
4. Scroll to the desired pan degree value. Press <Enter> to store.
Scan Blackout
When this option is set to on, the fixture will go to blackout during scan movement.
Otherwise, the behavior will be normal.
1. Press <Set/Esc> until SET appears on the display. Press <Enter>
2. Scroll to the Scan Setting menu. Press <Enter>. Scroll to the Reverse Pan menu.
Press <Enter>.
3. Scroll to the Scan blackout. Press <Enter>.
4. Scroll to ON. Press <Enter> to store.
Feed Back
Feed Back menu option enables/disables pan/tilt position feedback/correction system.
To enable it:
1. Press <Set/Esc> until SET appears on the display. Press <Enter>
2. Scroll to the Scan Setting menu. Press <Enter>. Scroll to the Reverse Pan menu.
Press <Enter>.
3. Scroll to the Feed Back. Press <Enter>.
4. Scroll to ON. Press <Enter> to store.
Dimmer curve
The fixture provides three dimming styles for user convenience. See Chapter 5 for detailed
information on dimming curves. To change the dimmer curve style:
1. Press <Set/Esc> until SET appears on the display. Press <Enter>
2. Scroll to the Dimmer curve menu. Press <Enter>.
3. Scroll to the desired value.
4. Press <Enter> to store.
Dimmer speed
This option swaps between smooth and fast dimming. To change speed:
1. Press <Set/Esc> until SET appears on the display. Press <Enter>
18

2. Scroll to the Dimmer Speed menu. Press <Enter>.
3. Scroll to the desired value.
4. Press <Enter> to store.
DMX Reset
When this option is enabled, you’ll be able to perform a reset from a lighting console. To
enable the DMX reset:
1. Press <Set/Esc> until SET appears on the display. Press <Enter>
2. Scroll to the DMX Reset menu. Press <Enter>.
3. Scroll to Enable. Press <Enter> to store.
Fan
Through this option you can choose the fan cooling speed. It can be auto regulated by
temperature control and maximum speed. To change fan behavior:
1. Press <Set/Esc> until SET appears on the display. Press <Enter>
2. Scroll to the Fan Speed menu. Press <Enter>.
3. Scroll to the desired value.
4. Press <Enter> to store.
Information
This option shows information on the fixture as date, time, working time, ...
The DMX Menu
To access DMX Menu press <Up>.
DMX Address
The DMX start channel identifies each fixture on a DMX link. You must assign a DMX start
channel to each fixture on the link.
The DMX Address menu allows you to change the DMX start channel that is currently assigned
to the fixture. Be sure you do not overlap fixture channel ranges when changing the DMX start
channel.
To change the DMX start channel:
1. Press <Up> until DMX Menu appears on the display. Press <Enter> to select.
2. Scroll the DMX menu until DMX Address appears on the display. Press <Enter> to
select.
3. Scroll to select a new DMX start channel.
4. Press <Enter> to accept the new DMX start channel.
No DMX signal
This option sets the behavior of the fixture in case of DMX data loss. To change to the desired
fixture behavior:
1. Press <Up> until DMX Menu appears on the display. Press <Enter> to select.
2. Scroll the DMX menu until No DMX signal appears on the display. Press <Enter> to
select.
3. Scroll the menu until the desired behavior appears on the display. Press <Enter> to
store.
You can choose between the following fixture behaviors in case of data loss
! ! ! ! ! ! ! !19

Stop Run: The fixture will stop running.
Hold Run: Last fixture state will be kept.
Auto Run: The fixture will be set to Auto Mode.
Sound Run: The fixture will be set to Sound Mode.
DMX Channels
Use this menu item to change the current protocol option:
HSV Mode
1. Press and hold <Menu> until DMX Menu appears on the display. Press <Enter> to
select.
2. Scroll the DMX menu until DMX channels appears on the display. Press <Enter> to
select.
3. Scroll the menu until HSV Mode appears on the display. Press <Enter> to store.
Stage Mode
You can choose between four stage modes: 12, 9, 8 and 5 DMX channels;
1. Press and hold <Menu> until DMX Menu appears on the display. Press <Enter> to
select.
2. Scroll the DMX menu until DMX channels appears on the display. Press <Enter> to
select.
3. Scroll the menu until Stage Mode appears on the display. Press <Enter> to select.
4. Scroll the menu until the desired number of channels mode appears on the display.
Press <Enter> to store.
The MACRO Menu
You can set up macros manually though this menu option. To access the Macro Menu press
<Up>
Step quantity
Sets the number of steps for the macro. Maximum steps is 62.
Program step number
Through the Program step number you select each step of the macro and set the effect to be
performed by the light.
1. Scroll <Macro Menu> to the desired step. Press <Enter>.
2. Scroll to the desired effect (Change color, Twinkling or Fade). Press <Enter> to store.
Manual Dimmer Menu
Manual dimmer menu provides manual control over the fixture. The items you can control
though manual dimmer menu are:
Light switch, Light Red, Light Green, Light Blue, Light Strobe, Scan Pan, Scan Tilt, Scan Pan
Fine, Scan Tilt Fine
!!! !! !20

Chapter 4
DMX Programming Basics
DMX Programming Overview
DMX512 Links
A lighting console typically uses a DMX512 protocol to communicate with automated lighting
fixtures and conventional dimmers. This protocol consists of 512 unique channels of control per
output link (universe). Typically a lighting fixture or device will use a channel for each
parameter’s function. Each channel consists of 256 values ranging from 0 to 255. The lighting
console is programmed to transmit a corresponding DMX value for the desired function of each
parameter. All DMX values are stored within in the lighting console, and typically are referred
to as cues, scenes, or presets. A lighting console locates a device on the link by it’s DMX Start
Channel.
8-bit vs. 16-bit DMX Parameters
Most parameters of an automated light use one channel of DMX providing 256 values of control
(0-255). This is known as 8-bit DMX. Although most parameters use 8-bit DMX, several require
a more accurate range of values than can be provided with a single DMX channel.
By utilizing two DMX channels for a single parameter, 65535 values become available for
controlling and adjusting parameter functions. This is known as 16-bit DMX. You can adjust 16-
bit DMX values in both coarse and fine increments. The first channel of the pair provides
coarse control changes of the DMX value in increments of 256. The second channel provides
fine control and changes of the DMX value in increments of 1.
Individual access of the two DMX channels used with 16-bit parameters varies by lighting
console. Most modern DMX consoles bind these two channels into a single 16-bit parameter to
accurately perform 16-bit crossfades. Consult your lighting console manual for further
information.
Determining a DMX Start Channel
The DMX Start Channel is the first channel of a device’s channel range on a DMX link. There
are 512 available channels on each DMX universe divided among all the devices in a particular
universe. A device must have a unique DMX Start Channel number in order to respond
independently to controller commands.
To determine each device’s DMX Start Channel, identify the footprint of every device on the
universe. The device’s footprint is the number of consecutive DMX channels a device requires
and is determined by the channels in the fixture’s protocol. The fixture’s DMX channel range
must not overlap any other device’s channel range on the link. When two devices on the same
DMX universe have overlapping channel ranges, one or both devices will be disabled or behave
erratically.
Select the protocol level in the fixture’s onboard menu system. The tables on the following
pages list the parameters included in each protocol mode.
21

Protocol modes
You can choose from several protocol modes for variable programming styles. Khroma
Technologies Limited is distributing the detailed DMX protocols as requested to console
manufacturers to ensure that the fixture libraries are created in a method that allows optimum
control of the fixture. The charts below provide only an outline of each channel's function. If
your console does not provide a library for Conic Lighting DesignsTM and/or Khroma
Technologies Ltd. fixtures, please contact the console manufacturer to have one created or
contact your dealer/distributor to get the latest version available for the luminaire you are
using.
DMX Protocols
HSV mode: 7 channels
Ch. #
Function
DMX Value
Description
1
Hue
000-255
0 to 100% Hue
2
Saturation
000-255
0 to 100% Saturation
3
Value
000-255
0 to 100% Value
4
Pan
000-255
Pan 0 to 540º/630º1
5
Pan
000-255
Pan fine
6
Tilt
000-255
Tilt 0 to 240º
7
Tilt
000-255
Tilt fine
Stage mode 12 channels
Ch. #
Function
DMX Value
Description
1
Strobe
000-019
020-064
065-069
070-084
085-089
090-104
105-109
110-124
125-129
130-144
145-149
150-164
165-169
170-184
185-189
190-204
205-255
Shutter open
Strobe1(fast to slow)
Shutter open
Strobe2:opening pulse(fast to slow)
Shutter open
Strobe3: closing pulse (fast to slow)
Shutter open
Strobe4:random strobe(fast to slow)
Shutter open
Strobe5:random opening pulse(fast to slow)
Shutter open
Strobe6: random closing pulse (fast to slow)
Shutter open
Strobe7:burst pulse(fast to slow)
Shutter open
Strobe8:random burst pulse (fast to slow)
Shutter open
2
Dimmer
000-255
0 to 100% intensity
3
Pan
000-255
Pan 0 to 540º/630º 1
4
Pan
000-255
Pan fine
5
Tilt
000-255
Tilt 0 to 240º
6
Tilt
000-255
Tilt fine
22
Other manuals for LM 2013
1
Table of contents
Other Kudux Dj Equipment manuals