Kuppersbusch ekv6800.1m User manual

ISTRUZIONI DI USO E DI MONTAGGIO
USE AND ASSEMBLY INSTRUCTIONS INSTRUCTIONS DE MODE D'EMPLOI ET D'ENTRETIEN BEDIENUNGS-UND MONTAGEANLEITUNG
INSTRUCCIONES DE EMPLEO Y DE MONTAJE
90000404005
EKV 6800.1M
EKV 6800.1M
Graphics and printing by: X TYPE ENGINEERING S.r.l
KÜPPERSBUSCH HAUSGERÄTE AG
Postfach 10 01 32, D-45801 Gelsenkirchen,Küppersbuschstr. 16, D-45883 Gelsenkirchen
Telefon: (02 09) 4 01-0, Telefax: (02 09) 4 01-3 03
www.Kueppersbusch.de
Küppersbusch Ges.m.b.H.
Eitnergasse 13, 1231 Wien, Telefon: 01 / 8 66 80-0, Telefax: 01 / 8 66 80 72
COPERTINA.qxp 24/04/2006 15.14 Pagina 1

NET WEIGHT 52 Kg 114 Lb
GROS WEIGHT 63 Kg 139 Lb
POWER 1800 W 1800 W
DIMENSIONS A 596 mm
A
23,47 inc
B462 mm
B
18,1 9 inc
C442 mm
C
17,4 inc
D 562 mm
D
22,13 inc
E445 mm
E
17,52 inc
F546,5 mm
F
21,52inc
G20 mm
E
0,08inc
35
EKV 6800.1M
UK
ENGLISH
Rel. 00 - 2006
Congratulations ,
upon the wise choice you have made by purchasing the EKV 6800.1M model.
Please read the information in this manual carefully before you operate the coffee machine.
Here you will find important indications regarding your safety and the care and maintenance of the appliance that will allow you satisfactory use over a
long term. Should any breakdown occur, first see the section entitled “Troubleshooting”. Often it is possible to repair small failures independently, there-
by avoiding the costs of repairs.
This machine has been built in conformity with the directives EEC 89/392, EEC 89/336, EEC 73/23, EEC 89/109 and subsequent amendments.
The quality and reliability of this product are guaranteed by the fact that it has been built according to the UNI EN ISO 9001: 2000 COMPANY QUAL-
ITY SYSTEM.
With best wishes.
Küppersbusch
TECHNICAL CHARACTERISTICS
2_Kuppersbusch_UK_35_68.qxp 24/04/2006 14.44 Pagina 35

36 EKV 6800.1M
UK
ENGLISH
TECHNICAL CHARACTERISTICS . . . . .35
1. DESCRIPTION . . . . . . . . . . . . . . . . . . . .37
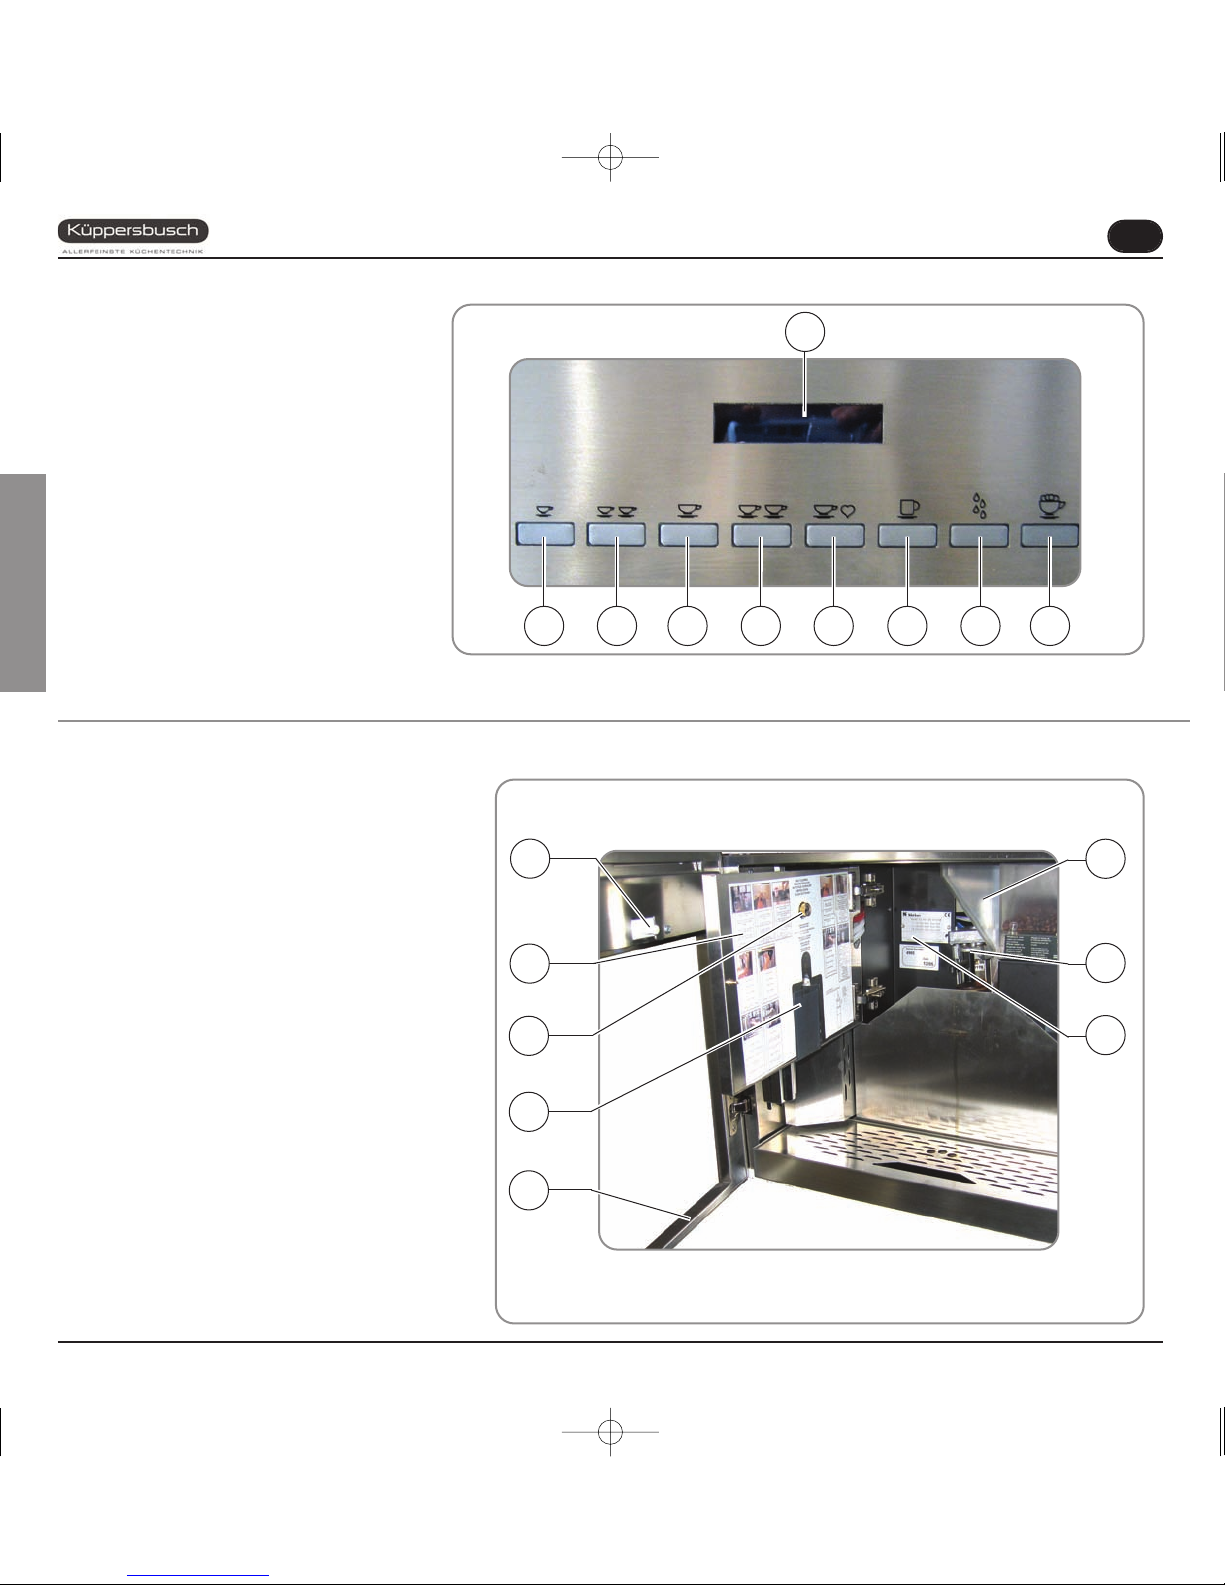
1.1 KEYBOARD DESCRIPTION (Standard configuration) . . .38
1.2 MICROBAR INTERNAL DESCRIPTION . . . . . . . . . . . . .38
2.
SAFETY INSTRUCTIONS . . . . . . . . . . . .39
3. TRANSPORT AND HANDLING . . . . . . . .41
3.1 MACHINE IDENTIFICATION . . . . . . . . . . . . . . . . . . .41
3.2 TRANSPORT . . . . . . . . . . . . . . . . . . . . . . . . . . . . . . .41
3.3 HANDLING . . . . . . . . . . . . . . . . . . . . . . . . . . . . . . . . .41
4.
PRELIMINARY OPERATIONS . . . . . . . . .42
4.1 FILLING THE APPLIANCE . . . . . . . . . . . . . . . . . . . .42
4.2 MACHINE INSTALLATION
(VERSION FOR DIRECT CONNECTION) . . . . . . . . . .42
4.3 SWITCHING ON . . . . . . . . . . . . . . . . . . . . . . . . . . . .43
4.4 SWITCHING OFF . . . . . . . . . . . . . . . . . . . . . . . . . . .44
5.
ASSEMBLY INSTRUCTIONS FOR
QUALIFIED PERSONS . . . . . . . . . . . . . . .45
5.1 INSTRUCTIONS FOR BUILT-IN ASSEMBLY . . . . . . . .45
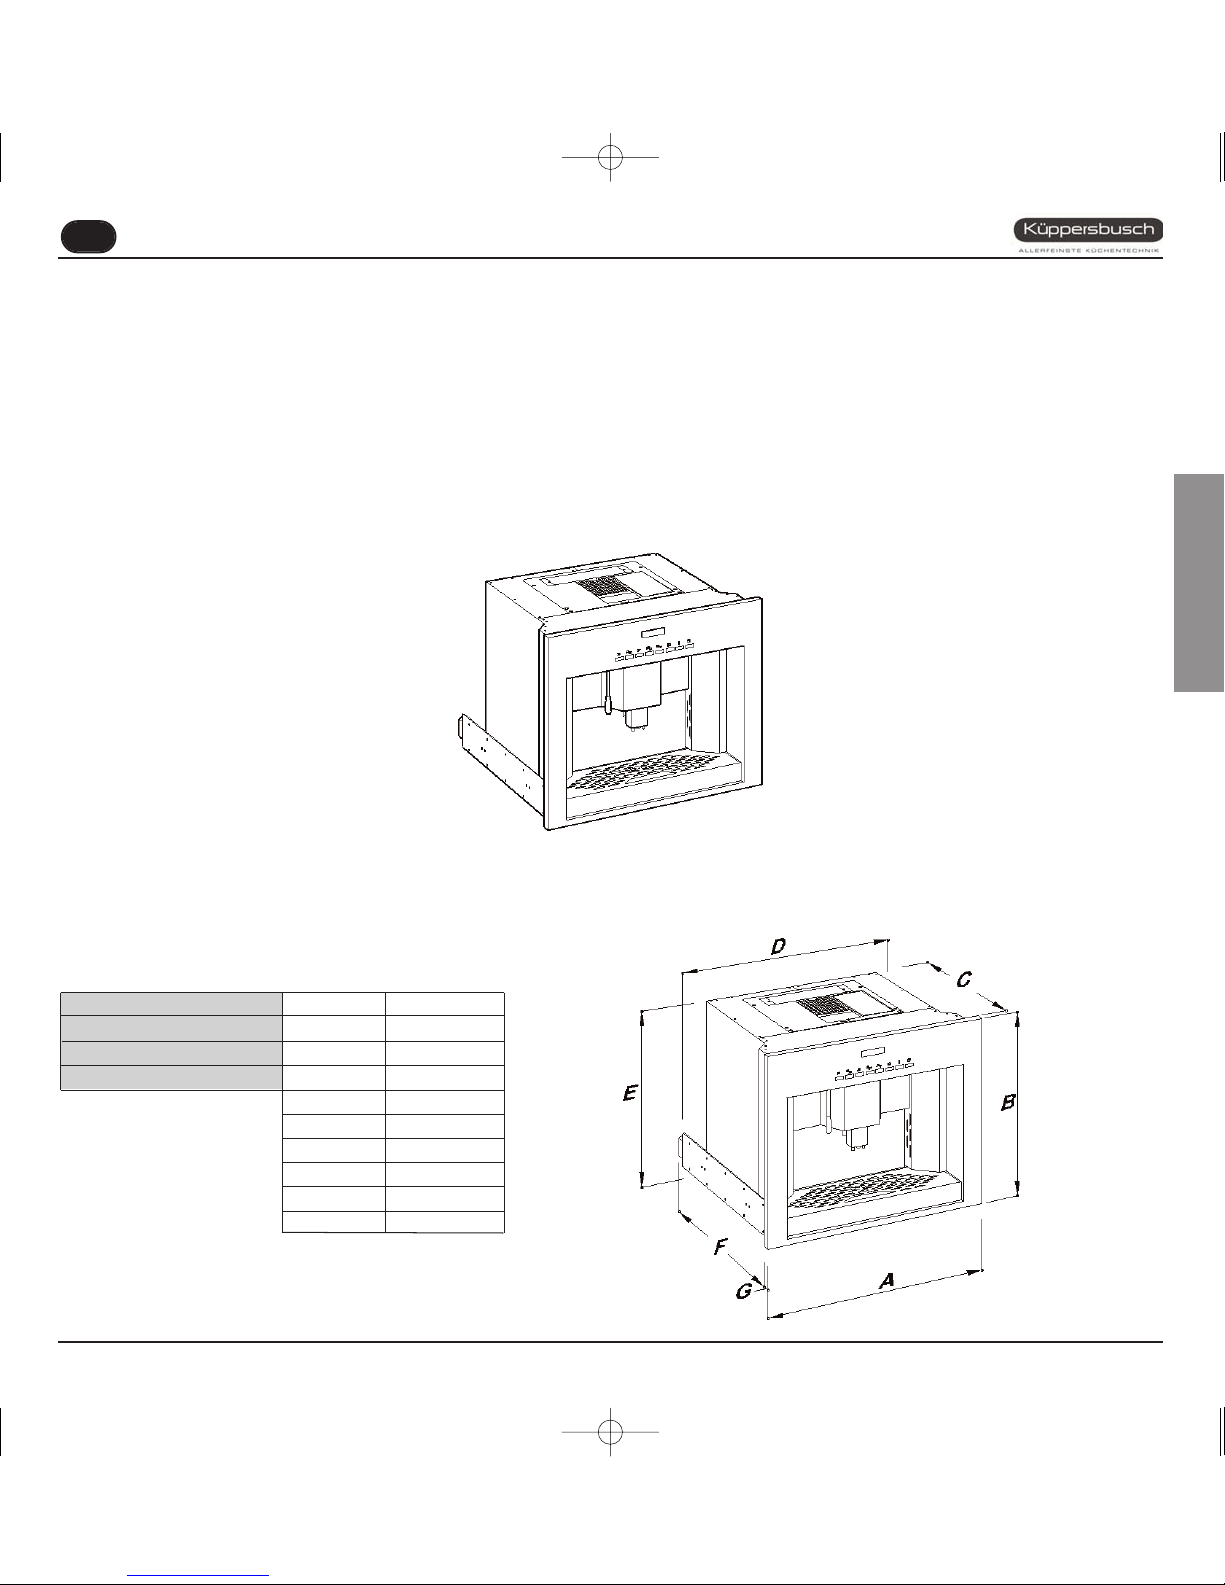
5.2 EKV 6800 .1M BUILT-IN UNIT DIMENSIONS . . . . . . .45
5.3 BUILT-IN INSTALLATION . . . . . . . . . . . . . . . . . . . . .45
5.4 NUMBER OF SPACER PLATES . . . . . . . . . . . . . . . . . .46
5.5 DISASSEMBLY . . . . . . . . . . . . . . . . . . . . . . . . . . . . . .46
5.6 TECHNICAL DATA . . . . . . . . . . . . . . . . . . . . . . . . . . .47
6.
ADJUSTMENTS TO BE MADE
BY A QUALIFIED TECHNICIAN ONLY . .48
6.1 GRINDING ADJUSTMENT . . . . . . . . . . . . . . . . . . . . .48
6.2 CAPPUCCINO MAKER AIR ADJUSTMENT
(foam amount and density . . . . . . . . . . . . . . . . . . . .48
6.3 MILK FLOW ADJUSTMENT
(Temperature adjustment) . . . . . . . . . . . . . . . . . . . .48
7.
USE . . . . . . . . . . . . . . . . . . . . . . . . . . . .49
7.1 STANDARD CONFIGURATION . . . . . . . . . . . . . . . . .49
7.2 SWITCHING ON . . . . . . . . . . . . . . . . . . . . . . . . . . . . .49
7.3 SWITCHING OFF . . . . . . . . . . . . . . . . . . . . . . . . . . . .49
7.4 HEIGHT-ADJUSTABLE COFFEE DISPENSER . . . . . . . .50
7.5 HOW TO MAKE COFFEE . . . . . . . . . . . . . . . . . . . . . .50
7.6 HOW TO MAKE 2 COFFEES . . . . . . . . . . . . . . . . . . .50
7.7 PREPARING DECAFFEINATED COFFEE IN POWDER 51
7.8 PREPARING LONG COFFEE . . . . . . . . . . . . . . . . . . . . .51
7.9 HOW TO MAKE CAPPUCCINO . . . . . . . . . . . . . . . . .51
7.10 DISPENSING HOT WATER . . . . . . . . . . . . . . . . . . . . . .52
8.
PROGRAMMING . . . . . . . . . . . . . . . . . . .53
8.1 LEGENDA . . . . . . . . . . . . . . . . . . . . . . . . . . . . . . . . . .53
8.2 PROGRAMMING . . . . . . . . . . . . . . . . . . . . . . . . . . . . .53
8.3
EXITING PROGRAMMING
. . . . . . . . . . . . . . . . . . . . .54
8.4 PROGRAMMING CYCLE
USER MODE . . . . . . . . . . . . . . . . . . . . . . . . . . . . . . . .54
8.5
PROGRAMMING CYCLE
TECHNICIAN MODE . . . . . . . . . . . . . . . . . . . . . . . . . . .56
9. SPECIAL MACHINE
SCALING FUNCTIONS . . . . . . . . . . . . . .60
9.1 RESETTING THE CLEANING FILTRE
LITRE COUNTER . . . . . . . . . . . . . . . . . . . . . . . . . . . .60
9.2 RESETTING WASHING CYCLES . . . . . . . . . . . . . . . .60
9.3 RESETTING MACHINE PARAMETRES . . . . . . . . . . .60
9.4
HANDLING MANUAL COFFEE DELIVERY GROUP
’. .60
10. CLEANING AND MAINTENANCE . . . . . .61
10.1 CLEANING THE OUTSIDE OF THE MACHINE . . . . . .61
10.2 CLEANING THE DELIVERY UNIT
AND THE MILK FOAMER . . . . . . . . . . . . . . . . . . . . . .62
10.3 REINSTATING AN INTERRUPTED
WASHING CYCLE . . . . . . . . . . . . . . . . . . . . . . . . . . .63
10.4 CLEANING THE MILK FOAMER . . . . . . . . . . . . . . . .63
11. STANDARD SETTING TABLE . . . . . . . .64
12. MACHINE FUNCTIONS MESSAGES . . . .65
13. MACHINE BLOCK
ALARM MESSAGES . . . . . . . . . . . . . . . .67
INDEX
2_Kuppersbusch_UK_35_68.qxp 24/04/2006 14.44 Pagina 36

Fig. 1
KEY
1Adjustment valve
2Milk suction tube
3Coffee dispenser
4Milk container compartment
5Removable coffee cup compartment
6Drip grille
7Drawer for coffee grounds
8Hot water pipe
9LED lighting key
10 ON/OFF key
11 Outer door release
12 Control panel
13 Display
14 Coffee bean container
15 Ground coffee container
16 Water tank
1. DESCRIPTION
37
EKV 6800.1M
UK
ENGLISH
16
14
13
12
15
4
1
2
3
5
6
7
810
911
2_Kuppersbusch_UK_35_68.qxp 24/04/2006 14.44 Pagina 37

38 EKV 6800.1M
UK
ENGLISH
Fig. 2
1.1 KEYBOARD
DESCRIPTION
(Standard configuration)
1.2 EKV 6800. 1M INTERNAL DESCRIPTION
KEY
1
1 Espresso key
22 Espressos key
31 White coffee key
42 White coffees key
5Decaffeinated coffee, Wash
cycle
6Long coffee
7Hot water dispensing
8Cappuccino
9LCD display
87654321
9
1
2
3
4
5
6
7
8
KEY
1Microswitch for outer door
2Inside door open
3Cappuccino maker air adjustment
4Cappuccino maker with tubes
5Outer door open
6Ground coffee conveyor
7Infusion group
8Rating plate
Fig. 3
2_Kuppersbusch_UK_35_68.qxp 24/04/2006 14.45 Pagina 38

39
EKV 6800.1M
UK
ENGLISH
Parts of the packaging can be harm-
ful to children. Danger of suffocation!
Keep packaging out of the reach of
children.
☞
After unpacking, make sure the appli-
ance is complete. In case of doubts,
do not use the appliance, but consult
a qualified technician.
☞
RISK OF POLLUTION
Before connecting the appli-
ance make sure the rating
plate data correspond with the
mains. This plate is on the front panel
at the top right hand side of the appli-
ance. The appliance must be
installed by qualified technicians in
accordance with current standards
and manufacturer’s instructions.
The manufacturer is not liable for any
damage caused due to failure to
ground the system. For the electrical
safety of the appliance, it is neces-
sary to equip the system with the
proper grounding. This must be car-
☞
In particular you must ensure that the
size of the wiring cables is sufficient
to absorb power input.
The use of adapters, multiple sockets
or extensions is strictly forbidden. If
they prove necessary, call a fully
qualified electrician.
☞
The machine must be installed
according to the local standards in
force with regard to plumbing sys-
tems. For this reason, the plumbing
connections must be carried out by a
qualified technician.
☞
This appliance must only be used as
described in this handbook. The
manufacturer shall not be liable for
any damage caused due to improper,
incorrect and unreasonable use.
☞
Fig. 4
Fig. 5
2. SAFETY INSTRUCTIONS
ried out by a qualified electrician who
must ensure that the electric power
of the system is sufficient to absorb
the maximum power input stated on
the plate.
Basic rules must be observed when
using any electric appliance.
In particular:
• do not touch the appliance when
hands or feet are wet;
• do not use the appliance when
barefoot;
• do not use extensions in bath or
shower rooms;
• do not pull the supply cord out of
the socket to disconnect it from
the mains;
• do not leave the appliance
exposed to atmospheric agents
(rain, sun, etc.);
• do not let the appliance be used
by children, unauthorised staff or
staff who have not read and fully
☞
CAUTION
RISK OF ELECTRIC SHOCK
Fig. 6
2_Kuppersbusch_UK_35_68.qxp 24/04/2006 14.45 Pagina 39

40 EKV 6800.1M
UK
ENGLISH
CAUTION
RISK OF POLLUTION
Do not dispose of the machine in the
environment: to dispose of the
machine, use an authorised centre,
or contact the manufacturer for rela-
tive information.
☞
To increase ventilation to the
machine, make an opening of at least
300 x 100 mm in the back of the hous-
ing.
☞
Once a machine wash cycle has been
started, do not interrupt it, as deter-
gent residues may then be left inside
the delivery group.
☞
CAUTION
RISK OF INTOXICATION
Use the steam nozzle with care and
never place hands below the jet of
steam. Do not touch the nozzle imme-
diately after use.
☞
CAUTION
RISK OF BURNS OR SCALDING
When adding coffee beans, the
machine operator must not place
his/her hands inside the container.
☞
CAUTION
RISK OF CUTTING
Fig. 8
Fig. 9
Before servicing the appliance, the
authorised technician must first
switch off the appliance and remove
the plug.
☞
To clean the appliance, set the
machine to the “0” energy level, that
is, “WITH THE MACHINE SWITCHED
OFF AND THE PLUG REMOVED
FROM THE MAINS” and follow the
instructions in this handbook.
☞
If the appliance breaks down or fails
to work properly, switch it off. Any
intervention is strictly forbidden.
Contact qualified experts only.
Repairs should only be made by the
manufacturer or authorized service
centres. Only original spare parts
must be used. Failure to observe the
above, could make the appliance
unsafe.
☞
For installation, the qualified electri-
cian must fit an omnipolar switch in
accordance with the safety regula-
tions in force and with 3 (0,12) or
more mm (in) between contacts.
☞
To avoid dangerous overheating,
make sure the supply cord is fully
uncoiled.
☞
Do not obstruct the suction and/or
dissipation grilles.
☞
The user must not replace the appli-
ance supply cord. If the cord is dam-
aged, switch off the appliance and
have a qualified technician change
the cord.
☞
If no longer using the appliance, we
recommend making it inoperative;
after removing the plug from the
mains electricity, cut the power sup-
ply cable.
☞
Fig. 7
understood the contents of this
handbook.
2_Kuppersbusch_UK_35_68.qxp 24/04/2006 14.45 Pagina 40

41
EKV 6800.1M
UK
ENGLISH
Always quote the machine serial number in all
communications to the manufacturer,
Küppersbusch.
The machine is transported on a pallet, inside
boxes which are secured to the pallet with ribs.
Prior to carrying out any transport or handling
operation, the operator must:
• put on work gloves and protective footwear,
as well as a set of overalls which must be
elasticated at the wrists and ankles.
The pallet must be transported using a suit-
able means for lifting (e.g., forklift).
CAUTION
RISK OF IMPACT
OR CRASHING
During all handling operations, the operator
must ensure that there are no persons,
objects or property in the handling area.
The pallet must be slowly raised to a height
of 30 cm (11,8 in) and moved to the loading
area. After first ensuring that there are no
persons, objects or property, loading opera-
tions can be carried out.
Upon arrival at the destination and after
ensuring that there are no persons, objects
or property in the unloading area, the prop-
er lifting equipment (e.g. forklift) should be
used to lower the pallet to the ground and
then to move it (at approx. 30 cm (11,8 in)
from ground level), to the storage area.
Before carrying out the following operation,
the load must be checked to ensure that it is
in the correct position and that, when the
supports are cut, it will not fall.
The operator, who must first put on work
gloves and protective footwear, will proceed
to cut the supports and to storing the prod-
uct. To carry out this operation, the techni-
cal characteristics of the product
must be consulted in order to know the
weight of the machine and to store it
accordingly.
CAUTION
RISK OF POLLUTION
Fig. 10
Fig. 11
3. TRANSPORT AND HANDLING
3.1
MACHINE
IDENTIFICATION
3.2
TRANSPORT
3.3 HANDLING
CAUTION
RISK OF IMPACT
OR CRASHING
Ftg-Nr 702 148 N 02 010000 22
2_Kuppersbusch_UK_35_68.qxp 24/04/2006 14.45 Pagina 41

42 EKV 6800.1M
UK
ENGLISH
CAUTION
RISK OF POLLUTION
Do not dispose of packaging in the environ-
ment.
Before carrying out any installation and
adjustment operations you must read and
fully understand the SAFETY INSTRUC-
TIONS of this handbook.
The company cannot be held responsible
for damage to things or injury to persons
caused by failure to comply with the safety
instructions and installation and mainte-
nance instructions contained in this hand-
book.
CAUTION
RISK OF SHORT CIRCUITS
Before connecting the machine to the mains
power supply, please check that the supply
voltage corresponds to the machine voltage.
Switch off the machine before filling or
removing the water tank.
• Partially remove the machine from its seat-
ing.
• Take the appliance out very slowly and in
order to guarantee maximum safety, make
sure that no people or things are below it.
• Pull the water tank up and especially the
first time, wash it with soapy water; then
rinse it carefully, taking care to remove all
soap residues.
• Fill the tank with water (this does not apply
to the version connected to the water mains)
• In the same way, open the coffee bean con-
tainer and pour in the coffee without reach-
ing the maximum level; then refit the coffee
container lid.
Fig. 12
Fig. 14
4. PRELIMINARY OPERATIONS
4.1
FILLING THE
APPLIANCE
4.2 MACHINEINSTALLATION
(VERSION FOR
DIRECT CONNECTION)
Fig. 15
The water hardness must be less then
4° - 6° fr (french degree).
The chlorine contents is max 100 mg per
litre (0.00000361 lb/cu in).
Otherwise the conditions of guarantee of
the machine will expire.
WARNING
WARNING
• Remove all parts from the box of acces-
sories (Teflon tubes Ø 4 mm, 1 pressure
reducing valve, 3 snap-on connectors, 1
pressure gauge, 1 fastening bracket, 2
threaded connectors and two gaskets). Fit
the pressure gauge and 2 connectors to the
pressure reducing valve, as illustrated in the
drawing here below.
• Use the relevant bracket to fit the previous-
ly assembled pressure reducing valve to the
nearest point to the water mains (see draw-
ing below).
Fig. 13
2_Kuppersbusch_UK_35_68.qxp 24/04/2006 14.45 Pagina 42

43
EKV 6800.1M
UK
ENGLISH
The LCD will then light up and read as follows:
To switch the machine on definitively, press the
“ENTER” key:
the machine automatically loads the heater with
water and begins heating operations. When the
desired temperature is reached the display will
show the following message:
NOTE: the starting time is about 3 minutes.
NOTA: The appliance is endowed with a secu-
rity system that will stop the machine
after about 1.5 minutes of constant
functioning of the pump (to avoid pump
overheating). In this case, switch off the
main switch of the machine and then
turn it on again.
The machine is now ready to be used.
NOTE: in case the following procedure should-
n't take effect, see the chapter on
"PROBLEMS AND SOLUTIONS".
After the preliminary operations:
• Press the machine’s main switch and turn it
to “ON”.
Fig. 16
Fig. 18
NOTE: The maximum outlet pressure from the
pressure reducing valve MUST NOT
exceed 1.5 bars.
4.3 SWITCHING ON
Fig. 19
WARNING
When installing the machine for the first
time or after water heater unit maintenance,
press the button to dispense hot water
before dispensing any coffee. repeat this
operation as required and until there is an
even flow of water from the nozzle.
The water hardness must be less then
4° - 6° fr (french degree).
The chlorine contents is max 100 mg per
litre (0.00000361 lb/cu in).
Otherwise the conditions of guarantee of
the machine will expire.
WARNING
• Connect one end of the Teflon pipe (diam. 4
mm) to the machine, inserting it firmly into
the snap-on connector. To make sure that
the connection has been made properly, pull
the tube outwards (see drawing).
• Cut the other end of the tube, first making
sure that the length is sufficient to connect it
to the pressure reducing valve.
• After finding the arrows that indicate the
direction of the water flow in the pressure
reducing valve, connect the tube to the
water outlet. Connect the remaining end of
the tube to the other connector (water inlet)
of the pressure reducing valve. After making
sure that you have shut off the stopcock,
proceed to install the connectors and the
relevant gaskets in the mains system.
Connect the free end of the tube to the pre-
viously fitted snap-on connector.
Fig. 17
2_Kuppersbusch_UK_35_68.qxp 24/04/2006 14.45 Pagina 43

EKV 6800.1M
UK
ENGLISH
4.4 SWITCHING OFF
To switch off the machine, proceed as follows:
• Hold the “ENTER” key down for 5 seconds
with the machine switched on:
• The LCD will read as follows:
• To switch the machine off fully, press the
main switch and turn it to the “OFF” position.
Fig. 20
44
2_Kuppersbusch_UK_35_68.qxp 24/04/2006 14.45 Pagina 44

45
EKV 6800.1M
UK
ENGLISH
The company supplying this machine cannot
be held liable for any damage arising from
incorrect installation, insufficient or lack of
maintenance, or improper use of the appliance.
• Legal standards and connection instructions
from the local electricity supplier must be
respected.
• Before making electrical connections, make
sure that the electrical capacity of the sys-
tem is suitable for the maximum power of
the appliance, as indicated on the rating
plate.
• When making connections or repairs, it is
necessary to disconnect the appliance from
the mains electricity.
• When the appliance is assembled, it must
not be possible to touch any insulated
cables enabling appliance operation.
• The appliance is equipped to be connected
to a single plug socket, which must be fitted
in full compliance with the standards in
force. Only a qualified electrician may install
a plug socket or replace the power cord,
which must be performed in full respect of
the standards in force.
• If, after connection, it is no longer possible
to reach the plug, a separator with more
than one pole and a contact distance of at
least 3 mm must be fitted in order to comply
with safety regulations.
• Remove the coffee machine from its pack-
aging and make sure that it is not damaged
in any way. Should the machine show any
signs of damage, do not proceed with instal-
lation and contact the retailer.
5. ASSEMBLY INSTRUCTIONS FOR QUALIFIED PERSONS
5.1
INSTRUCTIONS FOR
BUILT-IN ASSEMBLY
• The unit housing the built-in coffee machine
must be suitably fixed to the floor or wall in
the room.
• To guarantee safe machine use, the unit
housing the machine must be structurally
sound and its guide attachment points must
be able to sustain a weight of three times
that of the coffee machine during the
removal phase.
5.2 EKV 6800 .1M BUILT-IN
UNIT DIMENSIONS
A 600 mm A 23,62 Inc
B da 562 a 568 mm B 22,13 - 22,36 Inc
C 450 mm C 17,72 Inc
D da 16 a 19 mm D 063 - 075 Inc
5.3 BUILT-IN INSTALLA-
TION
• Place the metal plate in position in the top
part of the coffee machine housing so that it
meets with the back section of the unit.
Fig. 22
• Tighten the four screws.
• Place the two corner pieces with guides on
the flat surface in the unit, fixing them into
place exactly 90 mm from the unit’s front
edge.
Fig. 23
• Insert the screws into the holes of the corner
pieces, but do not tighten them.
Fig. 24
Fig. 21
2_Kuppersbusch_UK_35_68.qxp 24/04/2006 14.45 Pagina 45

46 EKV 6800.1M
UK
ENGLISH
• The machine is supplied with 6 metal plates
(thickness 1 mm) that are to be placed
between the guide and the sides of the unit.
This is to fill any excess space in the event
that the unit is more than 562 mm wide.
5.4 NUMBER OF SPACER
PLATES
• If necessary, insert the plates as described
above.
• Make sure that there is a distance (distance
B) of 558 mm between the corner pieces.
• Fix the guides to the coffee machine hous-
ing, tightening all of the screws.
• Make sure that the power cord comes out
from the rear of the housing.
To remove the coffee machine from its housing,
it is first of all necessary to disconnect it from
the mains electricity by unplugging it.
Then press the relevant joints(B) in the guides
and remove the appliance, being sure to sup-
port it on the bottom.
Fig. 25
• To prevent the machine from overheating,
make an opening in the back of the unit of at
least 300 mm x 100 mm, to allow air to cir-
culate.
• Insert the coffee machine into the unit, fitting
the guides on the machine level into the
guides previously fixed on the unit.
The guides should slide telescopically when
a light pressure is exerted on the front of the
coffee machine; if this is not the case, it is
necessary to check the distance between
the guides again.
• When fitting into the unit, the appliance will
automatically hook onto the points Aon the
guides.
Fig. 26
A
Open the lid in the top part; then remove and fill
the water tank and close the lid.
Fig. 27
Powdered
or decaf-
feinated
coffee
WARNING
Only pour coffee beans into the container.
Any other type of coffee - ready ground for
example – will damage the grinder.
5.5 DISASSEMBLY
Fig. 28
B
BUILT-IN HOUSING N°
PLATES
Width
(mm/inc)
Thick.
(mm/inc)
562 / 22,13 19 / 0,748 0
564 / 22,2 18 / 0,708 1+1
566 / 22,28 17 / 0,669 2+2
568 / 22,36 16 / 0,629 3+3
2_Kuppersbusch_UK_35_68.qxp 24/04/2006 14.45 Pagina 46

47
EKV 6800.1M
UK
ENGLISH
• Classification of the control device accord-
ing to protection against electrical shocks:
incorporated into Class I equipment.
• Control device pollution levels: suitable for
use in ordinary or normal pollution environ-
ments.
• Category (Immunity against excess voltage)
CATEGORY I.
• Class and structure of software CLASS A.
• Control unit printed circuit: 100x180 mm.
The card is built for use in temperature ranges
as indicated in the electrical characteristics.
Operation at temperatures over these levels is
not foreseen for the logic components in the
control unit and can therefore lead to malfunc-
tioning.
Operation at voltages outside this range cannot
be guaranteed.
5.6 TECHNICAL DATA
COFFEE MACHINE CLASS I
RATED VOLTAGE 230V
ELECTRICAL
INPUT 1800W
CONNECTION 1.8KW (ready for con-
nection)
POWER CORD 1.2m / 47,24 inc
APPLIANCE
DIMENSIONS
(L X D X H)
594X440X464mm
23,39X17,32X18,27inc
COMPARTMENT
DIMENSIONS
(L X D X H)
560X550X450mm
22,05X21,65X17,72inc
NET WEIGHT 52Kg / 114Lb.
GROSS WEIGHT 63KG / 139Lb.
AMOUNT OF
WATER 5 Lt / 1,321gal.
2_Kuppersbusch_UK_35_68.qxp 24/04/2006 14.45 Pagina 47

48 EKV 6800.1M
UK
ENGLISH
6. ADJUSTMENTS TO BE MADE BY A QUALIFIED TECHNICIAN ONLY
6.1
GRINDING
ADJUSTMENT
WARNING
Always remove the drip compartment
before opening the outer door!
Always close the outer door and push the
drip compartment all the way in! Otherwise
the door and hinges could become dam-
aged!
To adjust both the flow and the temperature of
the milk delivery, turn the adjusting tap as fol-
lows:
• Remove the left-hand compartment
• Insert the open milk carton and place the
milk suction tube inside it
NOTE: Always use normal pasteurised milk
with a fat content of 3.5%, or fresh milk.
• Turn the milk suction tap
CLOCKWISE/COUNTER-CLOCKWISE to
INCREASE/DECREASE the milk suction
and then DECREASE/INCREASE the tem-
perature.
• Turn the tap until the milk reaches the
desired temperature.
The amount of foam is factory set, but it can be
changed using the air adjustment dial on the
cappuccino maker. By making this adjustment,
which changes the density of the foam pro-
duced by the cappuccino maker, the result will
be a very creamy, a creamy or a slightly creamy
cappuccino.
• Open the outer door
• Open the inside door
• Turn the adjustment dial as shown on the
decal applied to the door to increase or
reduce air flow.
To reduce the amount of foam, turn the dial
anticlockwise, while to increase it, turn the dial
clockwise.
• Close the doors after making these adjust-
ments.
6.2 CAPPUCCINO MAKER
AIR ADJUSTMENT
(FOAM AMOUNT AND
DENSITY)
6.3 MILK FLOW ADJUST-
MENT (Temperature
Regulation)
Open the outer door and then the inside one:
Fig. 29
Use the Allen wrench (supplied) on the relevant
screw:
• turn clockwise for finer grinding or thicker
coffee;
• turn anticlockwise for coarser grinding or
more liquid coffee.
Close the doors after making these adjust-
ments.
Fig. 30
NOTE: this adjustment is possible even with
the machine switched on.
Fig. 31
Fig. 32
NOTE: this adjustment is possible even with
the machine switched on.
2_Kuppersbusch_UK_35_68.qxp 24/04/2006 14.46 Pagina 48

49
EKV 6800.1M
UK
ENGLISH
IMPORTANT: Keys 1-2-3-4-6 (see 'DIS-
PLAY' description), can corre-
spond to different drinks
according to taste and local
traditions (see PROGRAM-
MING and paragraph on
SELECTIONS CONFIGURA-
TION).
7. USE
7.1
STANDARD CONFIGURATION
1Dispenses 1 cup of espresso coffee
2Dispenses 2 cups of espresso coffee
3Dispenses 1 cup of white coffee
4Dispenses 2 cups of white coffee
5Dispenses 1 cup of decaffeinated coffee
6Dispenses 1 cup of long coffee
7Dispenses hot water
8Dispenses 1 cup of cappuccino
• When the desired temperature is reached
the display will show the following message:
NOTE: The starting time is about 3 minutes.
NOTE: The appliance is endowed with a secu-
rity system that will stop the machine
after about 1.5 minutes of constant
functioning of the pump (to avoid pump
overheating). In this case, switch off the
main switch of the machine and then
turn it on again.
The machine is now ready to be used.
NOTE: in case the following procedure should-
n't take effect, see the chapter on
"PROBLEMS AND SOLUTIONS".
After finishing the Preliminary Operations and
Installation processes:
• Press the main switch on the machine and
set it to “ON”. The LCD display will switch on
and read as follows:
• To switch the machine on definitively, press
the “ENTER” key:
The machine automatically loads the heater
with water and begins heating operations.
7.2 SWITCHING ON
7.3 SWITCHING OFF
To switch off the machine, proceed as follows:
• Hold the “ENTER” key down for 5 seconds
with the machine switched on:
• The LCD will read as follows:
• To stop the machine completely, press the
main switch and turn it to the “OFF” position.
Fig. 18
8765
4
3
2
1
2_Kuppersbusch_UK_35_68.qxp 24/04/2006 14.46 Pagina 49

50 EKV 6800.1M
UK
ENGLISH
• Position one cup under each nozzle.
• Press the desired coffee delivery key once.
The method of preparation is the same as for
espresso and white coffee.
• Position a cup under the nozzles.
The beverages always flow from both nozzles.
• The coffee is being made.
• According to the kind of coffee selected the
display will read.
O
Leave the cup beneath the nozzles until the
messages on the display disappear.
7.5 HOW TO MAKE THE
COFFEE
’
7.6 HOW TO MAKE TWO
COFFEES
• The coffee is being made.
• According to the kind of coffee selected the
display will read.
O
Fig. 34
Fig.35
• Press the desired coffee delivery key once.
Fig.36
Fig. 37
7.4 HEIGHT-ADJUSTABLE
COFFEE DISPENSER
To avoid spraying liquids, the height of the dis-
penser can be adjusted by hand to adapt it to
any type of cup. Carefully adjust to the required
position so as to limit the amount of space
between the dispenser and the cup.
Fig. 33
2_Kuppersbusch_UK_35_68.qxp 24/04/2006 14.46 Pagina 50

51
EKV 6800.1M
UK
ENGLISH
7.7 HOW TO MAKE DECAF-
FEINATED COFFEE
USING GROUND COFFEE
• Partly remove the coffee machine from the
unit.
• Open the ground coffee conveyor hatch.
Leave the cup under the dispensers until the
message appears on the display.
WARNING
Pour only ground coffee into the coffee
bean holder. Any other kind of coffee will
damage the coffee grinder.
Don't put caramelized, sugar coated, or sim-
ilarly coated coffee beans, or instant coffee
or other sugary beverages because they will
harm the appliance.
• Insert only 1 dose of decaffeinated ground
coffee.
• Press the decaffeinated coffee key once
Fig.38
The display will read:
Then press the key for the type of coffee
required and the display will read as follows
(example):
Leave the cup beneath the nozzles until the
message on the display disappears.
7.8 PREPARING A LONG
COFFEE
• Place the cup under the coffee dispensers.
Beverages will always come out of both dis-
pensers at the same time.
• press the dispensing key for the required
coffee once only.
• The display will read:
NOTE: Use a larger cup than the one used for
white coffee.
• The coffee is being made
Leave the cup under the dispensers until the
message appears on the display.
7.9 HOW TO MAKE
CAPPUCCINO
• Pull out the left-hand compartment and
insert the open milk carton.
• Place the milk suction tube inside the car-
ton.
• Use the valve on the tube to regulate the
amount of milk required.
• Place the cup under the coffee dispensers.
Beverages will always come out of both dis-
pensers at the same time.
• Press the cappuccino dispensing key once
only.
NOTE: Use a larger cup than the one used for
white coffee.
Fig. 39
2_Kuppersbusch_UK_35_68.qxp 24/04/2006 14.46 Pagina 51

52 EKV 6800.1M
UK
ENGLISH
• Press the hot water delivery key once:
• The display will read:
• Hot water will come out of the nozzle. When
you have the required amount, press the hot
water dispensing key again to interrupt hot
water delivery.
When hot water is being dispensed, never
allow the nozzle to come into contact with
parts of the body and never place your
hands under the nozzle. Always position the
nozzle so it is inclined downwards, towards
the cup grille.
• The display will read as follows:
• the beverage is being prepared.
Leave the cup under the dispensers until the
message appears on the display.
WARNING
Fig. 40
WARNING
RISK OF SCALDING
7.10 DDIISSPPEENNSSIINNGGHHOOTT
WWAATTEERR
This provides delivery of hot water for brewing
tea, chamomile-tea or herb teas.
Before starting this operation, make sure
that there is water in the tank.
Place a suitable container beneath the hot
water nozzle.
2_Kuppersbusch_UK_35_68.qxp 24/04/2006 14.46 Pagina 52

53
EKV 6800.1M
UK
ENGLISH
Functions that can “ONLY” be accessed from
the TECHNICIAN mode.
Additional functions that can be accessed from
the TECHNICIAN mode are:
10. PREINFUSION
11. TAMPING
12. GROUNDS NUMBER
13. MILK CLEAN WARN
14. CLEAN ALARM
15. SHUT DOWN CLEAN
16. GROUP SETTING
17. GRINDER SETTING
18. COFFEE TEMP.
19. STEAM TEMP.
20. PASSWORD
21. SMART CARD
22. WATER FILTER L
23. WATER HARDNESS SETTING
24 SCALE REMOVAL CYCLE
ENTER key: used to enter menus
and/or to confirm val-
ues and pass on to the
next step.
CURSOR keys: used to scroll through
the menus and to
increase / decrease
value settings.
RESET key: used to confirm and to
return to the previous
step.
LIST OF PROGRAMMABLE
FUNCTIONS
Functions that can be accessed from the USER
and TECHNICIAN modes.
1. TOT. COUNT
2. PRODUCT NAME
3. PROG. DOSES
4. PROG. GRINDER 1 S
5. MILK DOSE
6. DATE/TIME
7. PROGRAM. ON/OFF
8. ENERGY SAVING
9. LANGUAGE
Fig. 41
1
3
2
4
8. PROGRAMMING
8.1
LEGENDA
This operation may ONLY be per-
formed by a Specialist Technician.
Adjustments made by Unqualified
Technicians or other people may ren-
der the Guarantee null and void.
NOTE: Can be performed with machine on.
NOTE: Always remove the drip compartment
before opening the outer door!
Always close the outer door and push
the drip compartment all the way in!
Otherwise the door and hinges could
become damaged.
To enter the programming mode, proceed as
follows:
• Partly remove the machine from its housing.
• Open the front door using the relevant but-
ton on the left-hand side of the machine.
• The display will read as follows:
• Press the ENTER key.
8.2 PROGRAMMING
Entering the programming function gives
access to all of the USER and TECHNICIAN
mode functions.
4
3
2
1
• Shut the door again
• The display will read:
The infusion group will then be positioned in
standby and the display will read as follows:
2_Kuppersbusch_UK_35_68.qxp 24/04/2006 14.46 Pagina 53
This manual suits for next models
1
Table of contents
Other Kuppersbusch Coffee Maker manuals

Kuppersbusch
Kuppersbusch EKV 6200.0E User manual

Kuppersbusch
Kuppersbusch EKV 6800.0 M User manual

Kuppersbusch
Kuppersbusch EKV 6500 User manual

Kuppersbusch
Kuppersbusch EKV 6600.1 E User manual

Kuppersbusch
Kuppersbusch EKV6200 User manual

Kuppersbusch
Kuppersbusch CKV6550.0 Operation manual

Kuppersbusch
Kuppersbusch CKK6350.0 Operation manual

Kuppersbusch
Kuppersbusch cafe profi EKVW6600 User manual

Kuppersbusch
Kuppersbusch EKV 6800.0 M User manual

Kuppersbusch
Kuppersbusch cafe profi EKVW6600.1M-UL User manual