manuals.online logo
Brands
  1. Home
  2. •
  3. Brands
  4. •
  5. KUSSMAUL
  6. •
  7. Air Compressor
  8. •
  9. KUSSMAUL Auto-Pump 091-9B-1 User manual

KUSSMAUL Auto-Pump 091-9B-1 User manual

INSTRUCTION MANUAL
TEL: in NY 631-567-0314 TOLL FREE: 800-346-0857 FAX: 631-567-5826
1 YEAR WARRANTY
BOOK# 091-9B-1
Rev A: 12-14-04
file: 091-9b-1-reva
KUSSMAUL ELECTRONICS CO., INC.
170 CHERRY AVE., WEST SAYVILLE, N.Y. 11796
INPUT :120 volt, 60 Hz, 4.2 AMPS
OUTPUT: 100 PSI MAXIMUM
®
AUTO-PUMP
120VAC
AIR COMPRESSOR SYSTEM
MODEL #091-9B-1
INTRODUCTION
The 091-9B-1 Auto-Pump Air Compressor system is a 120 volt 60 Hz shaded pole A.C.
motor operating a single cylinder air compressor designed specifically for installation on vehicles
with air brakes . During long idle periods of the vehicle when even the slightest seepage
can cause an air brake system pressure to drop below the brake lockup pressure, the Auto
Pump automatically starts to maintain the pressure.
The Auto Pump motor is directly coupled to the compressor section eliminating all belts
and pulleys assuring long life and reliable operation . A heavy duty pressure switch is adjusted
to start the compressor when the system pressure drops below 70 psi and stops the compressor
when 90 psi is attained . The start up pressure is field adjustable - the pressure differential
between start up and stopping is fixed.
A moisture trap is mounted on the Auto Pump. This captures any condensate which results
from compressing the air. In addition, the moisture trap in combination with the check valve
and the unloader on the pressure switch permits the Auto Pump to start "unloaded". This
reduces the load on the motor and permits starting at the higher system pressures.
Please read and follow the installation instructions carefully . The Auto Pump requires no
routine maintenance . A careful installation will assure years of trouble free operation.
NOTE
THIS PUMP REQUIRES A MINAMUM OF 110 VOLTS FOR
OPERATIONAT LOWER VOLTAGES THE PUMP WILL NOT START
CAUTION
NO CONDENSATE OR
WATER MUST BE ALLOWED
TO ENTER OR ACCUMULATE
IN THE OUTPUT
OF THE AUTO PUMP.
ROUTE OUTPUT PRESSURE
LINE DOWNWARD FROM
AUTO PUMP TO PERMIT
MOISTURE TO DRAIN AWAY.
WATER IN THE PUMP
OUTLET WILL INDUCE
FAILURE !
WATER DAMAGE WILL
VOID WARRANTY
VEHICLE TUBING INSTALLATION
1. Mount all components in a suitable location, preferably in a high area above the air system .
Do not mount in engine compartment or near any source of heat or dirt . The system may be
connected to any point in the vehicle's air system .
2. Mount air compressor in the position as shown being certain that the compressor is above
airpressure tank.
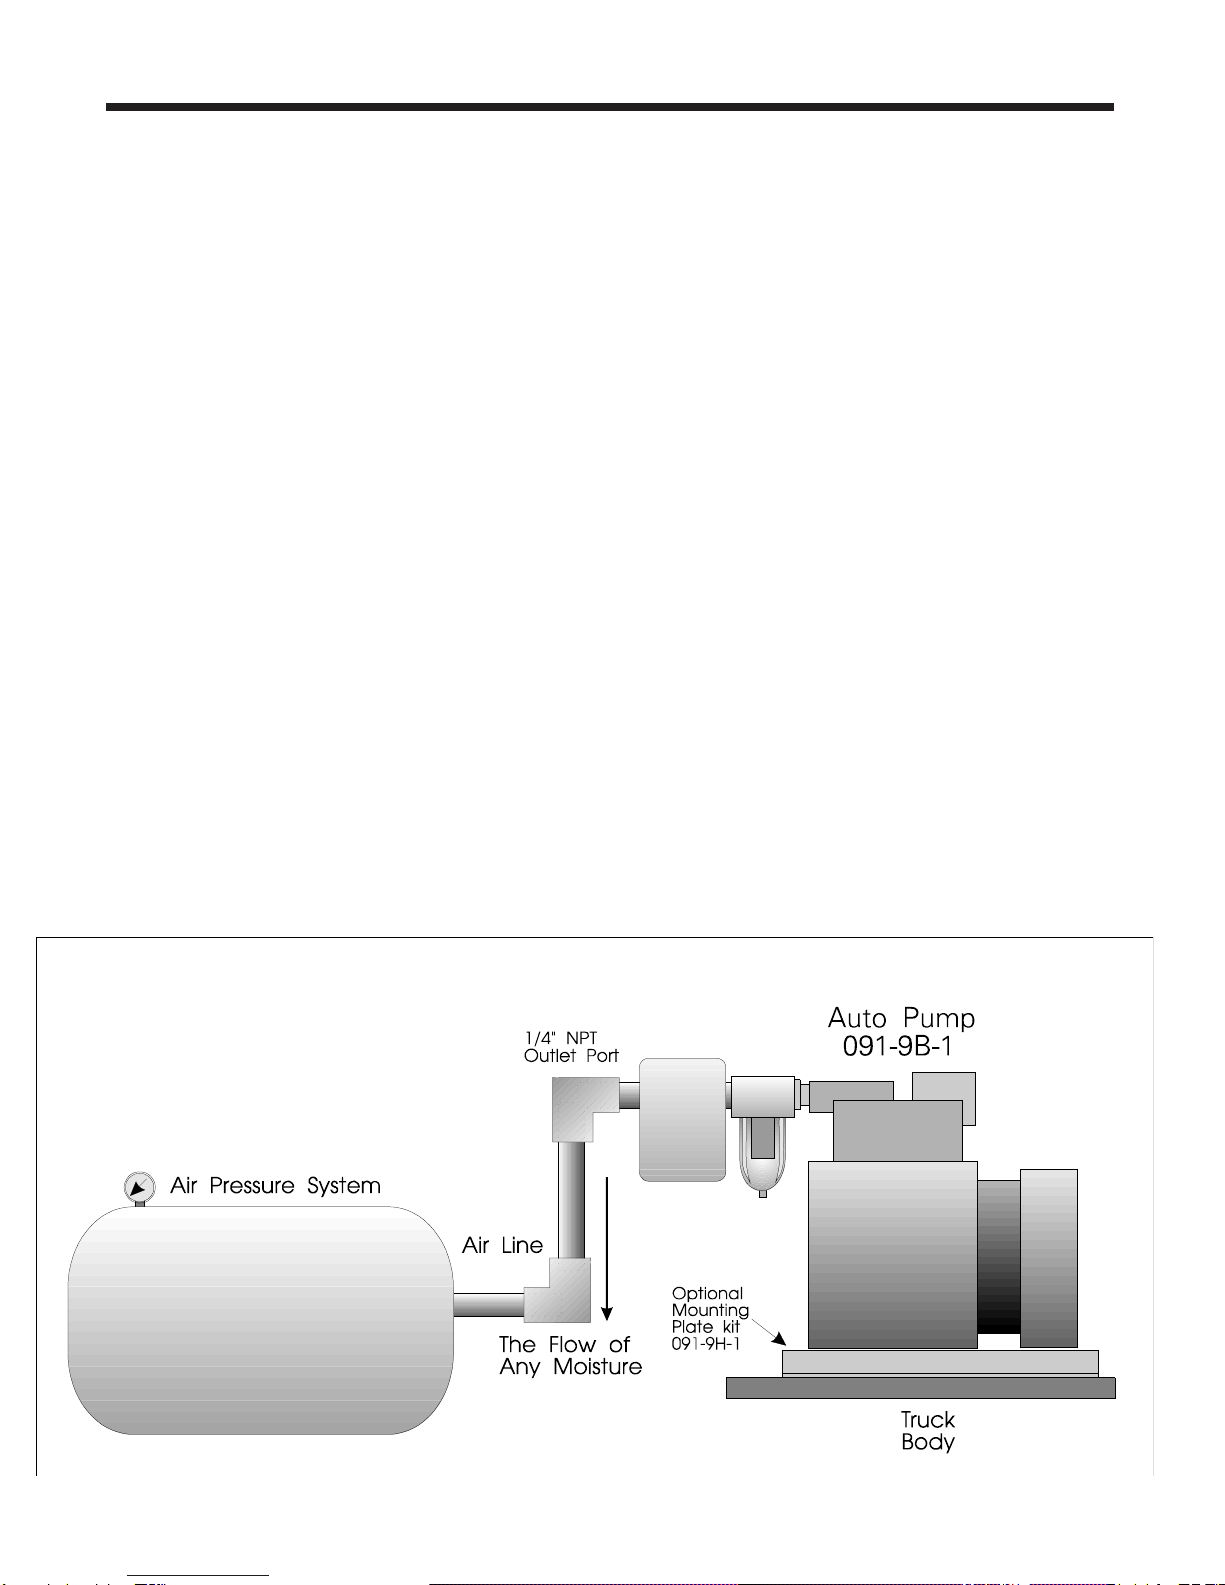
3. CAUTION no condensate or water must be allowed to enter or accumulate in the output of the
AutoPump. RouteoutputpressurelinedownwardfromAutoPumptopermitmoisturetodrain
away . Water in the pump outlet will induce failure .
4. All connection for air lines are 1/4" NPT . Use Teflon tape, or equivalent on all connections to
insure no leakage of air.
5. The recommended installation of the Auto Pump air compressor system is shown below.
6. Note that an external check valve is located beteen the compressor and the pressure switch.
no additional check valve is required.
7. Mount the air compressor. Connect a suitable piece of flexible tubing from the outlet port of
compressor to the air tank . (Tubing and connectors are not supplied .)
8. An optional Mounting Plate 091-9H-1 is available to reduce any vibration and noise from Auto
Pump and to simplify pump mounting.
NOTE: Compressor must be mounted above air
tank to assure that moisture will flow away from
compressor.
VEHICLE WIRING INSTALLATION
1. The Auto Pump is supplied with a 120 volt A.C. line cord and is ready to operate. The line
cord may be plugged into an available outlet or the cord may be cut and permanently wired to
the 120 volt A.C. system in the vehicle.
2. The compressor is calibrated to cut-in at 70 PSI and cut-out at 90 PSI . For higher cut-in
and cut-out, turn the range nut clockwise . To lower cut-in turn range nut counterclockwise .
Do not exceed 100 PSI .
COMPRESSOR OUTPUT IS 100 PSI MAXIMUM. DO
NOT EXCEED 100 PSI OR YOU WILL VOID
WARRANTY.
NOTENOTE
NOTENOTE
NOTE
THIS PUMP REQUIRES A MINAMUM OF 110THIS PUMP REQUIRES A MINAMUM OF 110
THIS PUMP REQUIRES A MINAMUM OF 110
VOLTS FOR OPERATIONAT LOWER VOLTAGESVOLTS FOR OPERATIONAT LOWER VOLTAGES
VOLTS FOR OPERATIONAT LOWER VOLTAGES
THE PUMPWILL NOT STARTTHE PUMPWILL NOT START
THE PUMPWILL NOT START
SPECIFICATION & OUTLINE AUTO PUMP
Input : 120 volts A.C. 60 Hz, 4.2 amps
Weight: 13 lbs
Motor Horsepower: 1/8 HP
Motor Type: Shaded pole A.C.
Compressor Output: 0.76 CFM Open Flow, 100 PSI Maximum.
Pressure Switch: Adjustable Set Point-Factory
set to 70 PSI Cut-in, 90 PSI Cut-out
Switch Differential: 20 PSI Nominal
Outlet Connection: 1/4 NPT, Female
TEMPLATE AUTO PUMP
3.50
4.75
7/32 DIA. HOLES
4PLACES
SPARE PARTS LAYOUT AUTO PUMP
WARRANTY
All Auto Pumps of Kussmaul Electronics Company Inc. are warranted
to be free of defects of material or workmanship. Liability is limited to
repairing or replacing at our factory, without charge, any material or defects
which become apparent in normal use within 1 year from the date the
equipment was shipped. Equipment is to be returned, shipping charges
prepaid and will be returned, after repair, shipping charges paid.
KussmaulElectronicsCompany,Inc.shallhavenoliabilityfordamages
of any kind to associated equipment arising from the installation and /or use
oftheKussmaulElectronics Company, Inc. products. The purchaser, by the
acceptance of the equipment, assumes all liability for any damages which
may result from its installation, use or misuse, by the purchaser, his or its
employees or others.
CAUTION: WATER IN THE PUMP OUTLET
WILL INDUCE FAILURE
WATER DAMAGE OR OPERATING AUTO
PUMP OVER 100 PSI WILL VOID WARRANTY
ACCESSORIES
FOR SIMPLIFIED MOUNTING
MOUNTING PLATE
MODEL # 091-9H-1

Other KUSSMAUL Air Compressor manuals

KUSSMAUL AUTO-PUMP 091-9B-4-AD User manual

KUSSMAUL

KUSSMAUL AUTO-PUMP 091-9B-4-AD User manual

KUSSMAUL Auto-Pump 091-9B-220 User manual

KUSSMAUL

KUSSMAUL Auto-Pump 091-9B-220 User manual

KUSSMAUL 091-9 AUTO-PUMP User manual

KUSSMAUL

KUSSMAUL 091-9 AUTO-PUMP User manual

KUSSMAUL AUTO-PUMP User manual

KUSSMAUL

KUSSMAUL AUTO-PUMP User manual

KUSSMAUL Auto-Pump 091-9HP User manual

KUSSMAUL

KUSSMAUL Auto-Pump 091-9HP User manual

KUSSMAUL AUTO-PUMP 091-9B-4 User manual

KUSSMAUL

KUSSMAUL AUTO-PUMP 091-9B-4 User manual

Popular Air Compressor manuals by other brands

Briggs & Stratton 203721GS Operator's manual

Briggs & Stratton

Briggs & Stratton 203721GS Operator's manual

AWELCO PLASMA 40 user manual

AWELCO

AWELCO PLASMA 40 user manual

TOOLMATE TMAC 160 OF instruction manual

TOOLMATE

TOOLMATE TMAC 160 OF instruction manual

Airbrush Heaven AS18-2 user guide

Airbrush Heaven

Airbrush Heaven AS18-2 user guide

Kompernass MINI COMPRESSOR operating instructions

Kompernass

Kompernass MINI COMPRESSOR operating instructions

Scheppach HC54 Translation of original instruction manual

Scheppach

Scheppach HC54 Translation of original instruction manual

GEA Bock HG22e Series Assembly instructions

GEA Bock

GEA Bock HG22e Series Assembly instructions

DeWalt D55168 instruction manual

DeWalt

DeWalt D55168 instruction manual

Scheppach HC60 instruction manual

Scheppach

Scheppach HC60 instruction manual

Becker T 4.40 DSK operating instructions

Becker

Becker T 4.40 DSK operating instructions

Parkside 89566 Original operating instructions

Parkside

Parkside 89566 Original operating instructions

King Canada 8439N instruction manual

King Canada

King Canada 8439N instruction manual

Scheppach HC120DC Translation of original instruction manual

Scheppach

Scheppach HC120DC Translation of original instruction manual

Sealey SAC42055B.V2 instructions

Sealey

Sealey SAC42055B.V2 instructions

Vixen Air VXO4863DC installation guide

Vixen Air

Vixen Air VXO4863DC installation guide

Vmac V300004 installation manual

Vmac

Vmac V300004 installation manual

Becker DT 4.16 operating instructions

Becker

Becker DT 4.16 operating instructions

MAYEKAWA 160 GR instruction manual

MAYEKAWA

MAYEKAWA 160 GR instruction manual

manuals.online logo
manuals.online logoBrands
  • About & Mission
  • Contact us
  • Privacy Policy
  • Terms and Conditions

Copyright 2025 Manuals.Online. All Rights Reserved.