KYNG Electric Skateboard User manual

Operaon Manual
Electric Skateboard

2
QUICK START GUIDE
1. Power-on
Turn on the POWER switch of skateboard first (on the cover plate at the
bottom of skateboard), and then turn on the power switch of remote control.
2. Inspect the speed mode
Inspect the speed display of the remote control. Press L/H button to toggle
through 4 speeds (Low, Med, High, H+). It is advised that a rider should put
the speed mode on Low or Medium during first use.
3. Stand on the board
Have a wide stance, bend your knees slightly, keep feet so they won’t touch
the wheels while turning. The front of the board has the crown logo; make
sure to face the correct direction for riding (goofy vs. regular foot).
4. Control forward acceleration
PLACE REMOTE STRAP SECURELY on your wrist. Push the throttle up-
ward to accelerate slowly. When accelerating, lean forward and put your
weight towards the front foot. Lean on your heels/ toes to turn left/ right.
5. Decelerate and braking
Before riding, inspect the brake sensitivity (B1,2,3,4) on the LED display.
Toggle modes by pulling back on the throttle and pressing LED button at the
same time, recommended to start on B1. While riding, pull the throttle down-
ward SLOWLY until you reach a full brake. DO NOT SLAM THE BRAKE
when you are going fast, this may cause you to fall.
6. Power-off
Turn off the power switch of the electric skateboard and remote control. If the
electric skateboard and remote control are not operated within 10 minutes,
they will shut down automatically.

3
SAFETY
ALWAYS RIDE WITHIN YOUR ABILITY. Skateboarding has potential
risks and it might cause injury. When riding the skateboard, the user might
fall due to loss of balance and get injured.
WEAR PROTECTIVE GEAR during use such as: helmet, kneepads,
elbow pads, and hand guards.
When you use the electric skateboard for the first time, ride on a safe open
area and practice basic movement such as standing on the board, accelerat-
ing, braking and riding on slow mode to avoid getting injured.
Do not ride on potholes, sand, gravel, muddy, uneven or slanted roads. Do
not ride on slippery roads, such as snowy/icy and wet roads to prevent
sliding out. Use caution when riding downhill.
The waterproofing grade of motor and remote control is IP54 (splash-
proof); if the skateboard is immersed in water and damaged, it will not be
covered within the scope of warranty.
Use caution when riding at night or in low visibility environments.
Minors shall be accompanied by parents when riding and should not use a
mobile phone or wear headphones when riding.
Tighten your shoelaces before riding and avoid contact between your
shoelaces and the wheels.
Pay attention to the standing posture of your feet when riding and do not
step on the front or rear wheels.

4
REMOTE CONTROL
1) Display Screen: Real-time speed display, remote control and skateboard
power display, remote control signal display, ODO skateboard cumulative and
real-time mileage display, speed level, and braking level.
2) Throttle: To move forward, slowly push up on the throttle. To use the
brake, pull the throttle back.
Inspect the brake sensitivity (B1,2,3,4) on the display. Toggle modes by
pulling back on the throttle and pressing LED button at the same time,
recommended to start on B1. The bigger the number, the stronger the
braking force.

5
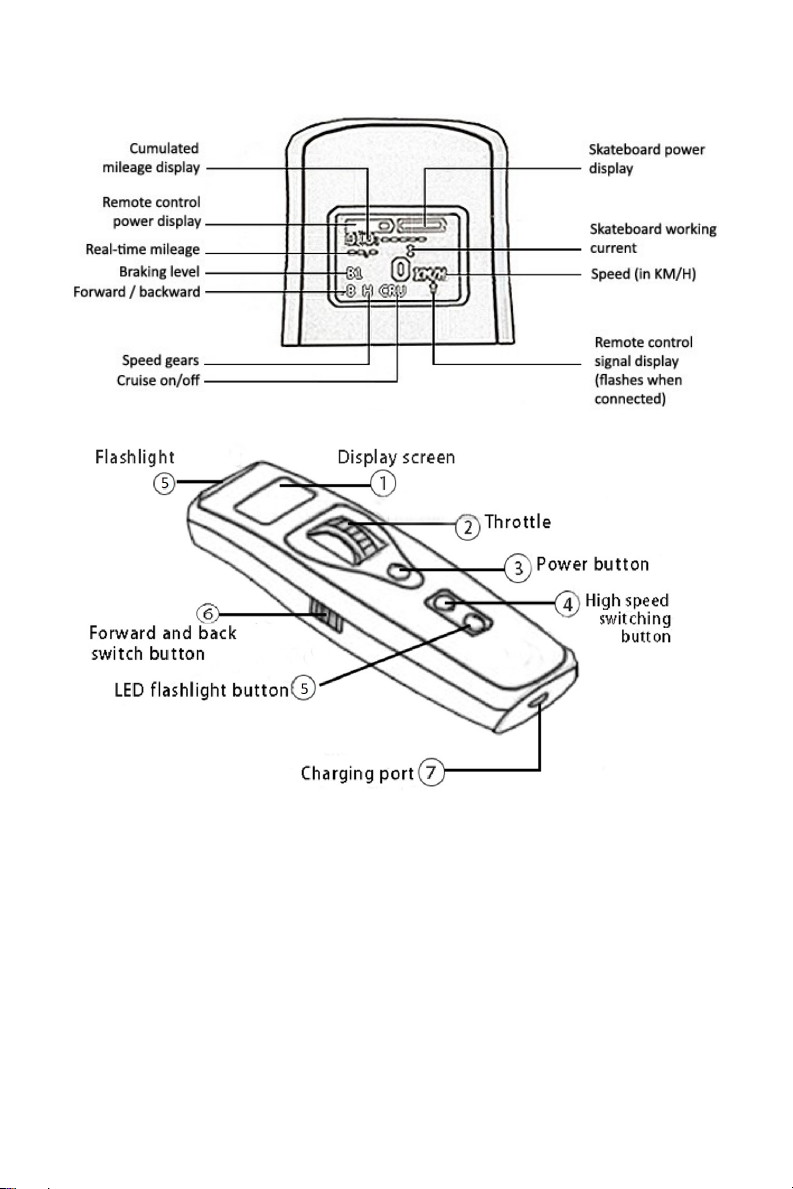
Fixed-speed cruising mode: Double-click the throttle after desired speed
has been reached (the cruising mode can be entered after the speed is
above 10 km/h), then release the throttle. Exit by pressing any button.
3) Power Button: Press and hold to turn ON, press again to turn OFF.
4) Speed button regulates the top speed (Low, Med, High, H+). Use on Low or
Medium when learning to ride the skateboard. High can reach speeds of 35 km/
h (22 mph).
5) Flashlight: press the LED button when the remote control is turned on, then
the remote control can be used as a flashlight. Always use the flashlight when
riding at night.
6) Forward/Backward switch: Push Forward (F) or Backward (B). Remote
makes a “beeping” sound when switching.
7) Remote control charging port: Insert the charging cable Micro/USB
connector of the remote control into the charging port of the remote control;
connect the other end to a 5V power supply (common for cell phones). When
the remote control has been fully charged, the power indicator of the remote
control is full, which means the charging is completed and the charger can be
unplugged.
Instructions for programming remote control code
The code program of each board and the supporting remote control is set when
the product leaves the factory, so users do not need to code again. However, if
you accidentally lose the remote control and need to replace it, the code must
be completed before use:
i. First turn on the power of the board.
ii. Long press the power button of the board for about 5-8 seconds and release
the button after the power indicator of the skateboard starts to flash.
iii. Turn on the power of the remote control.
iv. Use a paper clip to click on the remote control’s code key (small hole on
the bottom of remote); at this time, the power indicators of the board and
the remote control shall flash at the same frequency.
v. Repress power buttons to turn on the skateboard and the remote control,
and then it can be operated normally.

6
CHARGING THE SKATEBOARD
To protect the battery life, do not charge the skateboard immediately after
use. Instead, wait for 30 minutes and charge it when the temperature of the
internal battery and the remote control drops.
Do not charge the electric skateboard with charging equipment from other
brands rather than the original charger; otherwise, it might cause fire and
even explosions in serious cases.
Keep the electric skateboard far away from liquids, flammables, explosives
and other hazardous substances during charging. Do not cover its surface
with any objects, and ensure it is well ventilated.
Before charging, turn off the power switch of skateboard, and connect the
charging cable to the charging port of the skateboard. Connect the power
supply according to the sequence shown in the figure below. When the
skateboard has been fully charged, the indicator light on the power adapter
will turn green from red, which means charging is completed and the
charger can be unplugged.

7
MAINTENANCE
Bushings: The bushings are an indispensable and important part of skateboard,
and users can adjust its tightness according to their weight and riding habits.
Soft/loose bushings are easier for turning but it will make it unstable to ride at
high speeds; hard/tight bushings are difficult for turning, but it will make it
stable to ride at high speeds.
Battery maintenance: The lithium battery has no memory function, and it can
be charged whenever needed. To extend the battery life, fully charge the battery
every time after riding. If you don’t ride the skateboard for a while, store in a
cool and dry indoor place, fully charge the battery, and charge it at once every
two months.
Board maintenance: Regularly inspect the bridge nuts and truck bolts at front
and rear bridge component, and tighten if they are loose. Check whether the
rear drive wheels of skateboard are worn and replace if needed.

8
TECHNICAL SPECS
Remote Control
Skateboard
Max Range Up to 17km (11 miles) per battery cycle. Depends on
rider weight, average speed, incline, and road conditions
Battery Rechargeable Lithium Ion 36V / 3.5Ah / 126Wh
Motor Double-drive brushless hub motor 90*54mm SHR83A
PU rubber coating
Motor Output 480W*2 / 6Nm torque
Wheels High-elasticity PU wheel 90*54mm
Charger AC110V wall plug / 2-3 hours charge time
Brakes Electronic EBS braking system
Battery Capacity Rechargeable Lithium Ion 3.7V / 2200mAh
Charging Micro USB port / 1 hour charge time
Communication 2.4G / 10 meters (32 feet). Keep remote strapped to wrist
while riding to keep within range.
Dimensions 970*255*110MM (38*9*4.25 inches)
Wheelbase/ Weight 785MM / 6.2kg (31 inches / 13.5 lbs.)
Ground Clearance 80MM (3 inches)
Board Material 10-layer Canadian maple + 1-layer fiberglass
Maximum Load 100 kg (220 lbs.)
Top Speed 35km/hr (22 mph)

9
WARRANTY
Kyng Skateboards offers up to 1 year warranty depending on the part. If you
have any issues, please email [email protected].
Part Name Term of Service Service Content
Battery 6 months If the battery capacity is over 50%,
and it can not be charged, the battery
can be replaced within six months,
unless it is damaged due to immer-
sion in water.
Motors 1 year The motor hubs have a one-year
warranty; unless it is damaged due to
human factor or immersion in water.
Electronic control
(main board and
remote controller)
1 year If the performance fault can not be
recovered, they can be replaced,
unless they are modified, immersed
in water or damaged due to human
factors.
Wheels 6 months If a wheel is damaged and cracks or
the glue falls off due to a quality
issue, the wheel can be replaced with-
in 6 months, but normal wear is not
covered within the warranty.
Board deck 6 months Natural fractures of the board can be
replaced, but a board that collides by
human factors or is run over by a
vehicle will not be covered within the
warranty.
Bridge (trucks) 1 year A bridge that unsolders or fractures
naturally can be replaced. If the
bridge is damaged due to human
collision or unauthorized refitting, the
bridge will not be replaced.
Table of contents
Popular Other manuals by other brands

Zuwa
Zuwa DESCAL NIROSTAR 2000-A Original operating instructions

DBI SALA
DBI SALA BASIC Series Operator's manual

Honeywell
Honeywell IF2 manual

Phasemation
Phasemation EA-550 owner's manual

First Alert
First Alert 2087DF-BD installation guide

Torklift
Torklift A7200 Important owner-operator installation instructions