Kyocera RYOBI AJP-800 Operation manual

69800384-00 KAP
04-20
AJP-800

1
1
1
2
7
8
3
4
5
6
2 3 4
4
5
6
5
11
10
17
9
5
23
4
6

2
A
B
B
A
7
10
14
2
13
4
5
18 8
6
16
17
10
7
6
12
15
4
5
2
3
9
34
7 8 9
11
10 12
15
14
13
16

3
Preparation
Before starting up your machine, we advise you to carefully
read through this instruction manual. Follow all instructions
to minimize the risk of injuries when using the machine.
Prior to operation
Before starting up your machine, please check it carefully for
any defects. If you nd any, do not start up your machine and
contact your distributor.
Especially check:
The insulation of the electric cable should be faultless and
without any cracks. If the electric cable is damaged, it should
be replaced by our authorized distributor.
Mains power supply connection
The following should be observed when connecting the
machine to the electric installation:
• Check before operation that the local power supply is the
same as the specications on the rating label.
• This machine is equipped with universal motor with double
insulation. It is not necessary to have earth connection.
• The electric installation shall be made by a certified
electrician.
• It is strongly recommended that the power supply to the
machine should include a residual current device (RCD).
• Product protection degree:IPX5
General safety regulations and accident
prevention
It is essential that you read the safety regulations and
operating instructions in their entirety and follow the
information contained therein in order to eliminate the
possibility of an accident or potentially dangerous situation
from occurring while working with the machine.
• The power plug must be plugged into a properly installed
socket. The power supply should include a residual
current device for max. 30 mA.
• Always check the device, the mains cable and the plug
before using the machine. Only operate the device when
it is in good working order and has not been damaged in
any way. Damaged parts must be immediately replaced
by a qualied electrician.
• Always pull the power plug out of the socket outlet before
doing any work on the machine, before changing the
nozzle and whenever it is not being used.
• Warning! Inadequate extension cords can be dangerous.
• If an extension cord is used, it shall be suitable for outdoor
use, and the connection has to be kept dry.
• Only use suitable extension cable when working outdoors.
Extension cable must have a minimum cross-section of
1.5 mm2.
• Warning! This device was developed to be used with
cleaning agents supplied or recommended by the
manufacturer. The use of any other cleaning agents or
chemicals can negatively aect the safety of the device.
• Cable connections should be kept dry and o the ground.
Always uncoil the extension cable completely to avoid
heat damage to the cable.
• Warning! Do not use the device when other persons or
animals are in the near vicinity unless they are wearing
appropriate protective clothing.
Carefully read and understand these instructions
before operating this high pressure washer.
Package Contents (Fig.1)
1. Main unit
2. Variable nozzle lance
3. Mid nozzle lance
4. Spray handle
5. Spray handle hose (5m)
6. Water connector
7. Hose joint
8. Nozzle cleaning pin
9. Foam nozzle
Technical data
Power rating input 800 W
Rated pressure 60 bar (6.0 MPa)
Allowable pressure 90 bar (9.0 MPa)
Rated ow 4.8 L / min
Max. inlet water pressure 1.0 MPa
Max. temperature: 40℃
Adding water From a faucet
Weight 3.8 Kg
Sound pressure level
Uncertainty
LpA=76dB(A)
KPA=3dB
Sound power level LwA=92dB(A)
Vibration Value aH=1.8m/s2
Kah=1.5m/s2
Name of Parts:
1. Main unit
2. Variable nozzle lance
3. Mid nozzle lance
4. Spray handle
5. Spray handle hose
6. Water connector
7. Hose joint
8. Nozzle cleaning pin
9. Foam nozzle
10. Water supply hose (option)
11. Hose clamp (option)
12. Main switch
13. Safety lock button
14. Trigger
15. Power cord
16. Filter
17. Water inlet
18. Release button

4
• Warning! High pressure jets can be dangerous when the
machine is not use properly. Do not direct the jet toward
persons, animals, live electrical equipment or the device itself.
• Do not direct the jet against yourself or others in order to
clean clothes and footwear.
• Children should be supervised to ensure that they do not
play with the machine.
• This machine is not intended for use by persons (including
children) with reduced physical, sensory or mental capa-
bilities, or lack of experience and knowledge, “High pres-
sure cleaners shall not be used by children or untrained
personnel.”
• Warning! Spray handle hoses, ttings and couplings are
important components for the safety of the device. Only
use spray handle hoses, fittings and couplings that are
recommended by the manufacturer.
• In order to ensure the operational safety of the device,
only use genuine manufacturer’s replacement parts or
parts that have been approved by the manufacturer.
• Do not operate the device if the mains cable or other
important parts of device – e.g. safety related elements,
spray handle hose, spray pistol – are damaged.
• Do not pull or carry the electric tool by its mains cable.
Protect the mains cable from becoming damaged by oil,
solvents and sharp edges.
• Keep your place of work tidy.
• Ensure that the switch is turned o when connecting the
machine to the power supply.
• Wear the suitable work clothes.
• Check your machine to ensure that it is in good working
order. If it is not functioning properly, have it checked by
an our authorized distributor. Have all maintenance and
inspection work carried out only by our authorized dis-
tributor.
• The water jet that emerges from the high pressure nozzle
produces a ‘kickback’ on the spray handle. Therefore,
make sure that you have a solid footing and that you have
a rm hold of the handle grip. In order to protect yourself
from possible ying objects (that are released due to the
high pressure).
• The high pressure jet can damage vehicle tyres and tyre
parts. Keep a distance of at least 30 cm from the object
being cleaned.
• If there is a power failure while you are using the machine,
be sure to switch o the machine for safety reasons.
• The electric pump always must be able to draw on a
sufficient supply of water. Dry operation causes severe
damage to the seals.
• Disconnect from the power supply before carrying out
user maintenance.
• Only use genuine spare parts from the manufacturer or
approved by the manufacturer.
• If the supply cord is damaged, it must be replaced by our
authorized distributor in order to avoid a hazard.
• Never use the machine in an environment where there
could be a danger of explosion. If any doubt arises, please
contact our authorized distributor.
• It is not allowed to clean asbestos-containing surfaces
with high pressure.
• This machine must not be used at temperatures below 0℃
• The electric supply connection (for example, connection
the RCD or x wiring) shall be made by a qualied electri-
cian and comply with IEC60364-1: Low-voltage electrical
installations.
Safety devices
Safety lock on spray handle
The spray handle features safety lock button (13). When the
lock is activated, the spray handle cannot be operated.
Motor pump protection
The motor is equipped with a motor circuit breaker switch.
When the motor starts to run hot, it is cut out automatically
by this switch. Switch o the machine. Wait 5 ~ 10 minutes
before using the device again. Try to determine the cause
of the fault. If the problem repeats itself, please contact our
service center.
Operating instructions
Purpose
The machine is designed to clean vehicles, machines, build-
ings, facades, etc. in the private sector.
Areas of application
• Never use the machine in potentially explosive areas
under any circumstances!
• The operating temperature must be between 0℃and +40℃.
• The machine consists of an assembly with a pump, which
is encased in a shock absorbing housing. For an optimal
working position the machine comes with a lance and
a non-slip handle grip, whose shape and configuration
comply with the applicable regulations.
• Do not cover or modify the lance or the spray nozzles in
any way.
• The machine is designed to be used with cold or
lukewarm (max. 40℃); higher temperatures can damage
the pump.
• Do not use water that is dirty, gritty or contains any
chemical products, as these could impair operation and
shorten the life of the machine.
Assembly
*
Tools needed for assembly: Water supply hose, Hose
clamp, Phillips screwdriver
*The water supply hose must have an internal diameter
of at least 13mm (1/2 in.) and must be reinforced. The
water supply must be at least equal to the washer delivery
capacity.
1. Connecting the nozzle lance to the spray handle. (Fig.2)
Fit the nozzle lance (2 and 3) into the spray handle (4)
and rotating it until the two parts are completely locked.
Test the connection by pulling on the nozzle.
2. Connect the spray handle hose (5) to the spray handle
(4). (Fig.3)
WARNING! Water leakage may occur if the hose is not
secured properly or if the connectors are not free from
dirt and debris prior to connecting.
3. Connecting the spray handle hose to the water
discharge nozzle (Fig.4)
Secure the spray handle hose (5) directly onto the water
discharge nozzle and turn the hose link clockwise to
connect.
Turn the hose link until it is secure.
WARNING! Jiggling the spray handle hose to the right
or left when connecting, may cause water to leak from
the connection area.

5
4. Screw the water connector (6) onto the water inlet (17).
(Fig. 5)
5. Attach the water supply hose (10) to the faucet (Fig. 6)
WARNING! Remove dirt and debris from the faucet and
from the outside and inside of the hose.
Allow the water from the faucet to run for a short time
before attaching the hose.
Dirt or debris entering the unit may cause damage to the
pump.
WARNING! Be sure to use water directly from the
water faucet. Hot water (over 40℃) and water from hot
springs may damage the unit.
Attach the water supply hose (10) to the water faucet
with the hose clamp (11).
Tighten the clamp screw to secure the hose to the
faucet.
6. Attaching the hose joint to the water supply hose (Fig.7)
Loosen and remove the hose link from the hose joint
(7).
Insert the water supply hose (10) through the hose link.
Insert the end of the water supply hose securely into the
connecting portion of the hose joint.
Securely tighten the hose link onto the hose joint by
turning the hose link clockwise.
WARNING! There is a valve attached to the hose joint.
Water will not ow out of the hose until it is attached to
the water connector.
7. Connecting the hose joint to the water connector
(Fig.8)
Push the hose joint (7) onto the water connector (6) until
you hear a 'click' sound.
WARNING! Jiggling the water supply hose to the right
or left when attaching may cause water to leak from the
connection area.
Operating the Switch (Fig.9)
Turning the main switch (12) clockwise to the "ON" position
starts the unit. Returning the switch to the "OFF" position
cuts electrical power to the unit.
Using the Spray Handle (Fig.10)
Pulling the spray handle trigger (14) releases a highly
pressurized water ow. Releasing the trigger stops the ow.
The spray handle safety lock button (13) prevents accidental
operation.
When locked, the trigger cannot be depressed.
Nozzle Lance (Fig. 11)
Changing the spray diusion (narrow ⇔wide)
Change the spray diusion by turning the end of the variable
nozzle lance clockwise for narrow spray diffusion and
counterclockwise for wide spray diusion.
Narrow spray … Water is sprayed in a concentrated direct
ow. The narrow spray setting is useful for
removing stubborn grime.
Wide Spray …… Water is sprayed in a widely diffused
flow. The wide spray setting is useful for
removing dirt from large areas, washing
cars, etc.
Attaching the Foam Nozzle (Fig. 12)
1. Fill the foam nozzle container with manufacturer
recommended detergent.
2. Insert the foam nozzle (9) so that it ts securely into the
slotted mid nozzle lance (3).
3. Insert the foam nozzle completely into the mid nozzle
lance and turn the mid nozzle lance clockwise until it
stops.
4. Test the connection by pulling on the foam nozzle. Keep
hands clear of the nozzle when testing the connection.
Use the foam nozzle in the position shown in Figure 12.
Operating the Unit
1. Ensure that the main switch (12) is in the OFF position.
Plug in the power cord.
2. Turn on the water faucet to the full on position.
3. Release the spray handle safety lock button (13).
4. Water is sprayed from the nozzle when the spray handle
trigger is depressed.
Before turning the main switch to the ON position,
release all accumulated air from inside the hose and
pump by depressing the trigger.
WARNING! Failure to remove the accumulated air from
the hose and pump before turning on the main switch
may result in decreased pressure and/or damage to the
pump and motor.
5. Turn the main switch to the ON position after water
begins to ow smoothly from the nozzle while depressing
the spray handle trigger.
6. Operate the spray by depressing the spray handle
trigger.
The motor stops when the spray handle trigger is
released.
When the trigger is depressed, the motor resumes and
pressurized spray is ejected from the nozzle.
WARNING!
• Maneuver the spray handle hose carefully over rough
surfaces such as gravel, broken concrete, or crushed stone.
• Avoid excessive friction that could damage the spray
handle hose when moving around objects such as
fences, blocks, or bricks.
• Ensure that the spray handle hose is straight and free of
any kinks or twists before using.
• During initial use, the spray stream may be intermittent
and erratic while air is being dispelled from within the
pump and hose. When this occurs, continue to depress
the trigger until the spray stream stabilizes.
• Be sure to turn the main switch to the OFF position
when leaving the unit unattended.
• When spraying, ensure that the spray handle trigger
is always depressed and released for intervals lasting
longer than 2 seconds in duration.
Malfunction of the pressure switch may occur from spray
intervals lasting less than 2 seconds.

6
After Use
1. Turn the main switch to the OFF position.
2. Turn the water faucet o.
3. Depress the spray handle trigger until all water has
stopped owing from the nozzle.
4. Pull the hose joint coupler forward to release the water
supply hose from the water connector.
5. Depress the spray handle safety lock button to lock the
trigger.
6. Remove the spray handle hose from the main unit.
7. Remove remaining water from the main unit
Turn the main switch to the ON position for 1-2 seconds
to discharge excess water from the spray handle hose
connection port.
WARNING! Exercise caution as the released of excess
water is highly pressurized
WARNING! Leaving the main switch on for longer than 2
seconds may damage the unit. Be sure to turn the main
switch o immediately.
8. Unplug the power cord.
9. Remove the water supply hose from the faucet.
10. Press the release button (18) to remove the spray
handle hose (5) from the spray handle (4). (Fig. 13)
WARNING!
Remove all excess water from the main unit, spray handle
hose, spray handle and nozzles especially in cold weather.
Storing the unit in cold temperatures without removing all
excess water may damage the unit and cause malfunction.
Maintenance and storage
WARNING! Always disconnect the plug form the socket prior
to maintenance or cleaning.
To ensure a long and problem free working life, please take
the following advice:
• Wash o water hose, spray handle hose, spray lance and
accessories before mounting.
• Clean the connectors of dust and sand.
Any repair should always be made by our authorized
distributor with genuine spare parts.
Nozzle Cleaning and Maintenance (Fig.14)
• Use the nozzle cleaning pin (8) to regularly clean inside
the nozzle.
• Insert the nozzle cleaning pin (8) into the nozzle and
remove any foreign matter lodged in the nozzle by tapping
the nozzle onto a desk or table with the nozzle opening
pointed downward.
If the nozzle is clogged, low spray pressure and/or
malfunction of the pressure switch may result.
WARNING! Confirm that the nozzle is free of debris by
removing it from the spray handle and visually inspecting
inside the opening. Always clean the nozzle opening after
removing it from the spray handle.
Cleaning the Filter (Fig.15)
1. Loosen the water connector (6) and remove it from the
unit.
2. Remove the lter (16) in the water connector (6).
3. Rinse away any accumulated debris from the filter's
mesh.
4. Return the lter to its original position.
5. Reconnect the water connector to the unit.
Ensure that the water connector is threaded straight
onto the water connection port before gently rotating it
in a clockwise direction. (If the connector is not threaded
correctly onto the port, leaking may occur.)
Cleaning of machine vents
The machine should be kept clean so as to let cooling air
pass freely through air vents.
Storing the Unit
• The hoses, nozzles, and spray handle may be stored on
the main unit as shown in Figure 16.
Storage
Pump, hose and accessories should always be emptied of
water prior to storing as follows:
1. Long periods of nonuse: If the machine is going to be
stored for longer periods of time (i.e. over three months)
in a room where frost could develop, it is recommended
that the machine be filled with an antifreeze solution
(similar to the antifreeze solutions used for vehicles).
2. When the device is not used for an extended period of
time, lime deposits begin to form in the motor pump,
which in turn can lead to starting diculties.
NEVER START UP A FROZEN MACHINE.
Frost damages are not covered by the guarantee!
Environmental protection
Recycle unwanted materials instead of disposing
of them as waste. All tools, hoses and packaging
should be sorted, taken to the local recycling centre
and disposed of in an environmentally safe way.
WARNING: Do not use appliance without reading
the instruction sheet
Machine not suitable for connection to the potable
water mains
To reduce the risk of injury, user must keep all
bystanders at least 15m away.
High pressure jets can be dangerous if subject to
misuse. The jet must not be directed at persons,
live electrical equipment or the machine itself.

7
Troubleshooting
Fault Cause Remedy
The machine does not run when the
ON/OFF switch and spray handle lever
are pressed.
The plug is damaged.
There is insucient voltage.
The pump is locked.
The thermal relay has triggered.
Check the plug and fuses to see if they
are okay.
Manually turn over the motor.
Let the motor cool down.
The machine runs, however only weak
pressure is generated.
The intake lter is clogged.
Air is being drawn in at the connectors.
The inlet and outlet valves are clogged
or worn.
The diameter of the nozzle hole is too
large.
Clean the lter.
Check the intake connection tting and
the hose connectors.
Clean or replace.
Check and replace.
The operating pressure is irregular.
Air is being drawn in.
The valves are clogged and worn.
The seals are worn.
Check the intake connectors.
Clean and replace.
Check and replace.
The machine suddenly stops. The thermal relay has triggered due to
overheating.
Check the voltage.
Turn off the switch and let the motor
cool down for a few minutes.
Water drop from connect pars. The seals are worn. Check and replace (professional repair
shop)
There is a loss of pressure.
The nozzle is worn.
The valves are dirty or clogged.
The valve seals are worn.
The seals are worn.
The lter is clogged.
Change the nozzle.
Check, clean, exchange.
Check and /or exchange.
Check and /or clean.
There is excess noise.
Air is being drawn in.
The valves are worn, dirty or clogged.
The bearings are worn.
The water temperature is too high.
The lter is dirty.
Check intake lines.
Check, clean, exchange.
Check and /or exchange.
Lower the temperature to below 40℃.
Check and /or exchange.
Expelled water is mixed with oil. The sealing rings (water + oil) are worn. Check and /or exchange.
Water leaks from the pump head. The seals are worn.
The O-ring of the seal set is worn.
Exchange the seal.
Exchange the O-ring.
When the switch is pressed, the motor
hums but does not start.
The mains voltage is lower than that
specied.
The pump is blocked or frozen.
The extension cable is insucient (cross
section too small, cable too long)
Check to see that the extension cable
is sucient.
Exchange the extension cable for one
that is sucient.
Discarding the machine
Carry out the following safety measures immediately, if you are no longer going to use the machine:
• Pull out the plug and make the machine inoperable.
• Store the machine in an area that cannot be reached by children.
• Do not use any parts from the used machine as replacement parts.
• Disassemble the machine and discard the individual parts in accordance with the regulation neforced in your area.
SAVE THESE INSTRUCTIONS

8
Hati-hati membaca dan memahami petunjuk ini
sebelum menoperasikan Mesin Cuci Bertekanan
Tinggi.
Isi paket (Gbr 1)
1. Unit utama.
2. Variabel nozzle lance
3. Sambungan Tengah Nozzle
4. Gun
5. Selang (5m)
6. Konektor Air
7. Penyambung Selang
8. Pin pembersih Nozzle
9. Nozzle Sabun
Data Teknis
Daya Input 800 Watt
Rata-rata Tekanan 60bar (6.0 Mpa)
Maksimal Tekanan 90bar (9.0 Mpa)
Rata-rata Air Mengalir 4.8 L/Menit
Tekanan air masuk Maks. 1.0 Mpa
Maksimal Temperatur Air 40ºC
Menambahkan Air Dari Keran
Berat 3.8kg
Level Tekanan Suara
Uncertainty
LpA=76dB(A)
KPA=3dB
Level Kekuatan Suara LwA=92dB(A)
Nilai getaran aH=1.8m/s2
Kah=1.5m/s2
Nama Bagian
1. Unit utama.
2. Variabel nozzle lance
3. Sambungan Tengah Nozzle
4. Gun
5. Selang (5m)
6. Konektor Air
7. Penyambung Selang
8. Pin pembersih Nozzle
9. Nozzle Sabun
10. Selang Air
11. Klem Selang
12. Saklar
13. Pengaman Kunci Tombol
14. Pelatuk
15. Kabel Daya
16. Filter
17. Inlet Air
18. Tombol Melepaskan Selang
Persiapan
Sebelum memulai mesin Anda, kami menyarankan Anda
untuk hati-hati
Baca petunjuk ini. Ikuti semua petunjuk untuk meminimalkan
risiko cedera ketika menggunakan mesin.
Sebelum operasi
Sebelum memulai mesin Anda, silahkan cek dengan hati-
hati untuk setiap cacat. Jika Anda menemukan apapun,
Jangan mulai mesin Anda dan
Hubungi distributor Anda.
Pemeriksaan Utama :
Isolasi kabel listrik harus sempurna dan tanpa ada yang
retak. Jika kabel listrik rusak, itu harus digantikan oleh pusat
layanan resmi kami.
Sambungan Listrik
Berikut yang harus diperhatikan saat menghubungkan
mesin ke instalasi listrik:
• Memeriksa daya sebelum mengoperasikan agar sasuai
dengan spesikasi yang tertera pada label.
• Mesin ini dilengkapi dengan motor universal dengan
insulasi ganda. Hal ini tidak perlu menggunakan koneksi
bumi (Ground).
• Instalasi listrik sudah bersetikat.
• Sangat dianjurkan bahwa listrik mesin harus sudah
mencakup dengan perangkat saat ini(RCD).
• Level Keamanan Produk : IPX5
Peraturan Keselamatan Umum dan
Pencegahan Kecelakaan
Ini Penting bahwa Anda membaca peraturan keselamatan
dan instruksi pengoperasian secara keseluruhan dan
mengikuti informasi yang terkandung di dalamnya untuk
menghilangkan kemungkinan kecelakaan atau berpotensi
situasi berbahaya yang terjadi saat bekerja dengan mesin.
• Konektor daya harus dipasang ke soket diinstal dengan
benar. Kekuatan daya untuk perangkat saat ini max. 30
mA.
• Selalu periksa perangkat, kabel listrik dan steker sebelum
menggunakan mesin. Gunakan alat ini hanya dalam
keadaan dan tidak rusak dengan cara apapun. Bagian-
bagian yang rusak harus segera diganti oleh teknisi
distributor.
• Selalu menarik konektor daya dari stopkontak soket
sebelum melakukan pekerjaan pada mesin, sebelum
mengubah nosel dan setiap kali mesin tidak sedang
digunakan.
• Peringatan! Perpanjangan kabel yang tidak
direkomendasikan dapat berbahaya.
• Jika kabel digunakan, itu akan cocok untuk penggunaan
outdoor dan koneksi harus selalu disimpan tempat yang
kering.
• Hanya menggunakan kabel Sambungan yang cocok
ketika bekerja di luar ruangan. Kabel Sambungan harus
memiliki minimal berukuran 1,5 mm2.
• Peringatan! Perangkat ini dikembangkan untuk
digunakan dengan pembersihan bentuk yang disediakan
atau direkomendasikan oleh produsen. Penggunaan
lain pembersihan bentuk atau bahan kimia negatif dapat
mempengaruhi keamanan perangkat.
• Kabel sambungan harus disimpan kering dan dari tanah.
Selalu luruskan kabel sambungan yang benar-benar lurus
untuk menghindari kerusakan panas kabel akibat terlilit.
• Peringatan! Jangan gunakan perangkat ketika orang atau
hewan lain di sekitarnya kecuali mereka mengenakan
pakaian pelindung yang sesuai.
• Peringatan! Mesin dapat berbahaya ketika mesin tidak
digunakan dengan benar. Jangan hadapkan langsung
mesin terhadap orang, hewan, peralatan listrik hidup atau
perangkat itu sendiri.
• Jangan hadapkan langsung mesin terhadap diri sendiri
atau orang lain untuk membersihkan pakaian dan alas
kaki.

9
• Anak-anak harus diawasi untuk memastikan bahwa
mereka tidak bermain dengan mesin.
• Mesin ini tidak dimaksudkan untuk digunakan oleh
orang-orang (termasuk anak-anak) dengan keterbatasan
fisik, indera atau kecakapan mental, atau kurangnya
pengalaman dan pengetahuan, "High pressure cleaners
akan tidak dapat digunakan oleh anak-anak atau terlatih
personil."
• Peringatan! Selang Mesin, tting dan kopling merupakan
komponen penting untuk keselamatan perangkat. Hanya
menggunakan Selang Mesin, fitting dan kopling yang
direkomendasikan oleh produsen.
• Untuk memastikan keamanan operasional perangkat,
hanya menggunakan suku cadang asli produsen atau
bagian yang telah disetujui oleh produsen.
• Tidak beroperasi perangkat jika kabel listrik atau bagian
penting lain dari perangkat-misalnya keamanan terkait
elemen, semprot menangani selang, pistol semprot-
rusak.
• Tidak menarik atau membawa alat listrik oleh kabel listrik
nya. Melindungi kabel listrik dari kerusakan oleh logam,
pelarut yang tajam.
• Menjaga tempat kerja rapi.
• Memastikan bahwa saklar dimatikan saat
menghubungkan mesin.
• Mengenakan pakaian cocok saat bekerja.
• Periksa mesin Anda untuk memastikan bahwa itu adalah
dalam rangka kerja yang baik. Jika tidak berfungsi
dengan baik, segear diperiksa oleh pusat layanan resmi
kami. Memiliki semua pemeliharaan dan inspeksi bekerja
dilakukan hanya oleh pusat layanan resmi kami.
• Air jet yang muncul dari nozzle tekanan tinggi
menghasilkan 'kickback' pada pegangan semprot. Oleh
karena itu, pastikan bahwa Anda memiliki pijakan yang
kuat dan bahwa Anda memiliki memegang teguh dari
cengkeraman pegangan. Untuk melindungi diri dari
mungkin terbangnya objek (yang dirilis berkat tekanan
tinggi).
• Tinggi tekanan jet dapat merusak badan kendaraan dan
bagian kendaraan lainnya. Menjaga jarak minimal 30 cm
dari objek yang dibersihkan.
• Jika terjadi kegagalan daya ketika Anda menggunakan
mesin, pastikan untuk mematikan mesin untuk alasan
keamanan.
• Komponen Pompa listrik harus selalu dapat pasokan air
yang cukup. Komponen Pompayang kering menyebabkan
kerusakan parah pada komponen Pompa.
• Lepaskan dari catu daya sebelum melaksanakan
pemeliharaan Perangkat.
• Jika kabel rusak, itu harus diganti oleh pusat layanan
resmi kami untuk menghindari bahaya.
• Jangan menggunakan mesin dalam lingkungan dimana
dapat menjadi bahaya ledakan. Jika timbul keraguan,
silakan hubungi pusat layanan resmi kami.
• Hal ini tidak diperbolehkan untuk membersihkan
permukaan yang mengandung asbes dengan tekanan
tinggi.
• Mesin ini tidak boleh digunakan pada suhu dibawah 0ºC
• Sambungan pasokan listrik (misalnya, koneksi kabel
RCD atau memperbaiki) dilakukan dengan kualikasi dan
mematuhi IEC60364-1: instalasi listrik tegangan rendah.
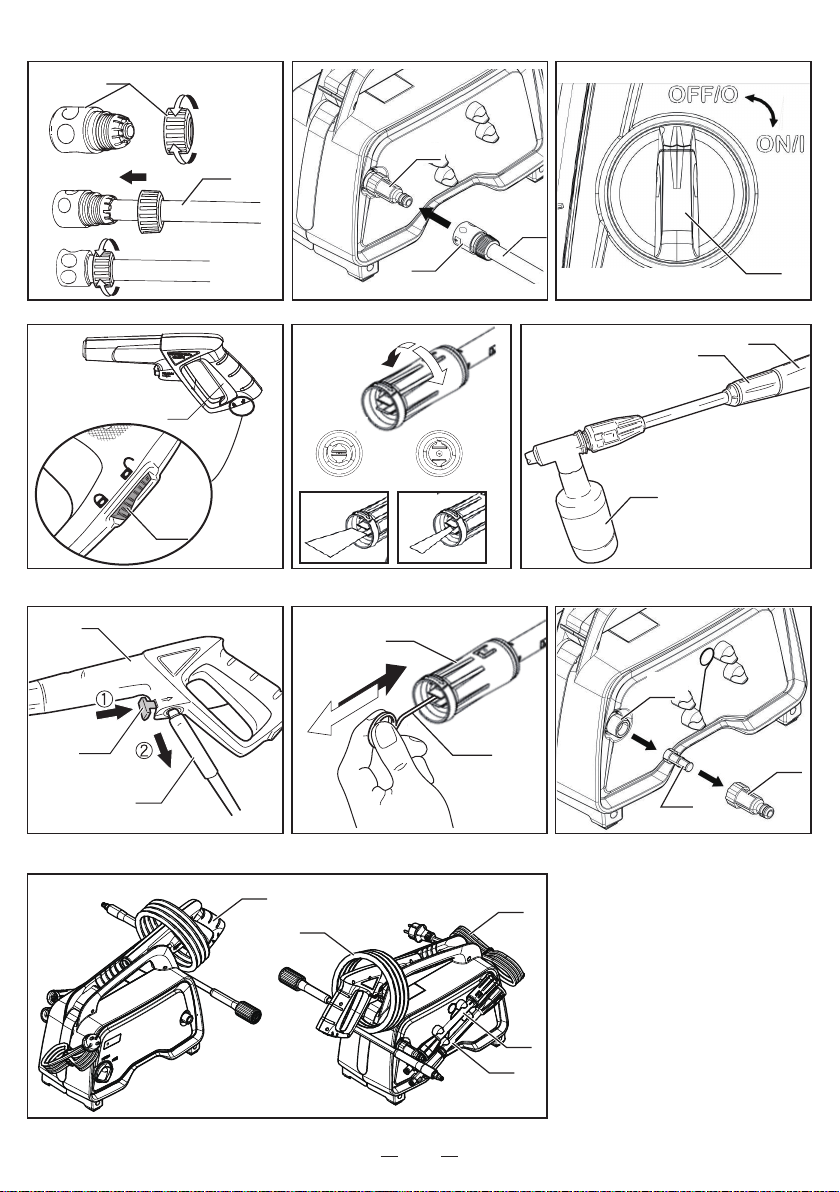
Keamanan Perangkat
Keamanan Kunci pada Penyemprot
Pada penyemprotan terdapat tur keamanan kunci tombol
(13). Apabila kunci diaktifkan, pegangan semprot tidak dapat
dioperasikan.
Perlindungan Motor Pompa
Motor dilengkapi dengan saklar motor circuit breaker. Ketika
motor mulai menjalankan panas, adalah akan mati secara
otomatis yang diputus oleh switch ini. Mematikan mesin.
Menunggu 5 ~ 10 menit sebelum menggunakan perangkat
lagi. Cobalah untuk menentukan penyebab kesalahan. Jika
masalah berulang dengan sendirinya, silakan hubungi pusat
layanan resmi kami.
Instruksi operasi
Tujuan
Mesin dirancang untuk membersihkan kendaraan, mesin,
bangunan, fasad, dll di sektor swasta.
Area Kerja
• Jangan pernah menggunakan mesin di daerah-daerah
yang berpotensi meledak dalam keadaan apapun!
• Temperatur operasi harus antara 0ºC dan + 40ºC.
• Mesin terdiri dari Komponen dengan pompa, yang
terbungkus busa sebagai peredam. Untuk posisi kerja
yang optimal mesin dilengkapi dengan karet pada tombak
dan pegangan non slip, bentuk dan konfigurasi yang
sesuai dengan persyaratan yang berlaku.
• Jangan menutup atau memodifikasi Nosel atau spray
Nozzle dengan cara apapun.
• Mesin ini dirancang untuk digunakan dengan suhu dingin
atau hangat (maks 40ºC); suhu yang lebih tinggi dapat
merusak pompa.
• Jangan menggunakan air yang kotor, berpasir atau
berisi produk kimia, hal ini bisa mengganggu operasi dan
mempersingkat masa pakai mesin.
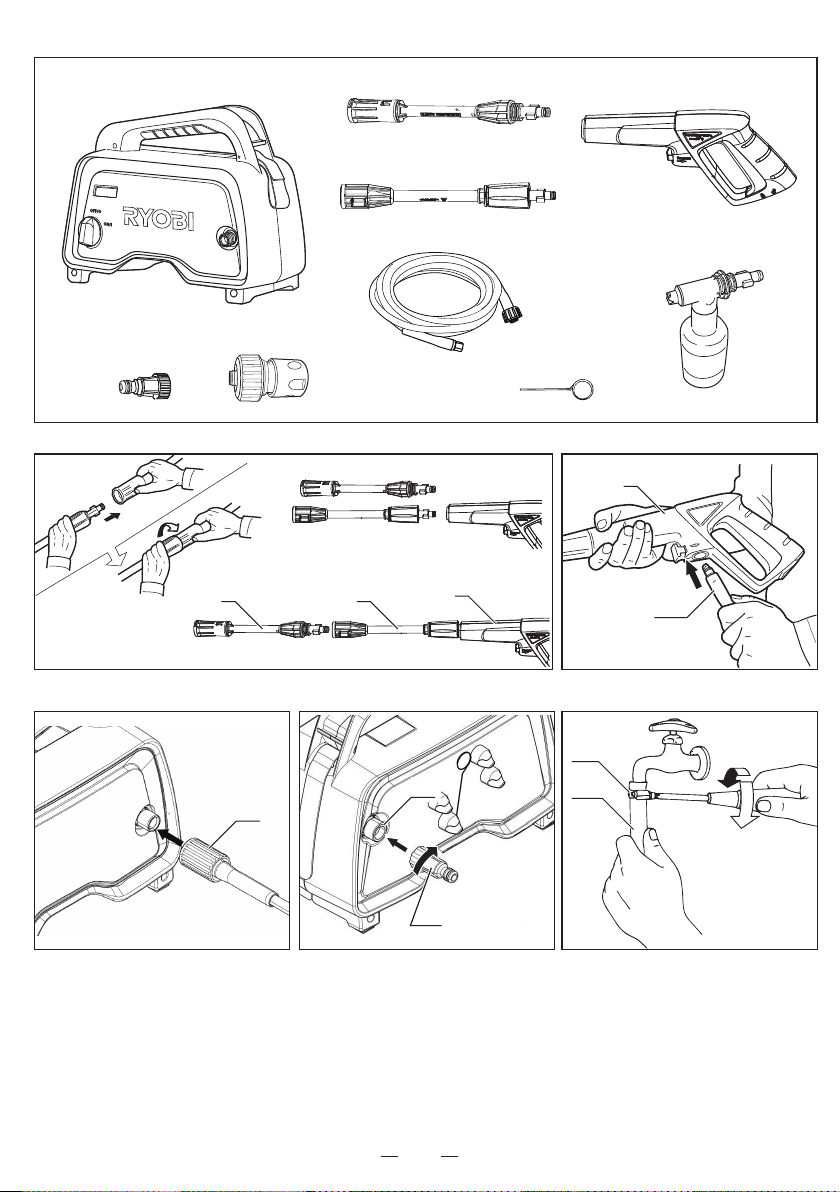
Perakitan
*alat yang diperlukan untuk perakitan: pasokan air selang,
Klem selang, obeng Phillips
*selang air harus memiliki diameter dalam setidaknya
13mm (1/2 in.) dan harus diperkuat. Pasokan air harus
sama dengan kapasitas penyampaian mesin.
1. Menyambung lance nosel semprot. (Gbr.2)
Sambungkan dengan lance nozzle (2 dan 3) dengan
sambungkan Semprotan (4) dan putar sampai dua
bagian benar-benar terkunci. Tes sambungan dengan
cara menarik nozzle.
2. Hubungkan selang semprot (5) untuk menangani
semprot (4). (Gambar.3)
Peringatan! Kebocoran air dapat terjadi jika selang tidak
diamankan dengan baik atau jika konektor tidak bebas
dari kotoran dan puing-puing sebelum menghubungkan.
3. Menghubungkan selang spray nozzle masuk air (Fig.4:
perubahan) Menghubungkan semprot selang (5)
langsung ke nozzle masuk air dan memutar baut selang
searah jarum jam untuk terhubung. Mengubah baut
selang sampai kencang.
PERINGATAN! Baut sealng kuarng kencang, dapat
menyebabkan air bocor dari daerah koneksi.
4. Pasang dan putar konektor air (6) ke dalam pipa
pemasukan air (17). (Gambar 5)

10
5. Sambungkan selang air bersih (10) ke keran (gambar 6)
Peringatan! Bersihkan selang dari kotoran dan puing-
puing dari keran dan dari luar dan dalam selang.
Biarkan air mengalir dari selang beberapa saat sebelum
menghubungkannya dengan selang. Kotoran yang
masuk mungkin akan menyebabkan kerusakan pada
unit.
PERINGATAN: pastikan menggunakan air langsung dari
keran. Air panas (lebih dari 40ºC akan menyebabkan
kerusakan pada unit). Sambungkan selang air bersih
(10) untuk keran air dengan selang penjepit (11).
Kencangkan klem selang untuk mengamankan selang
ke keran.
6. Pasangkan sambungan selang pada selang air
(gambar.7)
Kendurkan dan lepaskan selang dari sambungan (7).
Masukan selang air (10) melalui hose link. Masukan
ujung selang ke sambungan selang. Putar searah jarum
jam untuk mengencangkannya.
PERINGATAN! Ada sebuah katup yang melekat pada
alat peyambung selang. Air tidak akan mengalir dari
selang sampai itu melekat ke konektor air.
7. Hubungkan sambungan selang ke konektor air
(gambar.8)
Tekan sambungan selang (7) ke konektor air (6) sampai
Anda mendengar bunyi 'Klik'. PERINGATAN! hingga
terdengat bunyi “klik”.
PERINGATAN: mengoyangkan selang ke kiri dan
ke kanan waktu menghubungkannya mungkin akan
menyebabkan kebocoran dari area koneksi.
Menggunakan Saklar (gambar.9)
Putar saklar utama (12) searah jarum jam ke posisi “ON”
menandai mesin mulai menyala. Jika mengembalikan posisi
tombol saklar ke posisi “OFF” maka arus listrik ke unit akan
berhenti.
Menggunakan Spray Handle (gambar.10)
Tarik pemicu spray handle (14) akan mengeluarkan aliran
air bertekanan tinggi. Kalau pemicu (trigger) dilepaskan,
aliran air akan berhenti. Tombol kunci pengaman pada
spray handle (13) bisa mencegah kecelakaan pada saat
penggunaan. Bila terkunci, pemicu (trigger) tidak bisa
ditekan.
Nozzle Lance (Gambar 11)
Mengubah sebaran semprotan (menyempit – meluas)
Putar ujung variable nozzle lance searah jarum jam untuk
sebaran/semburan air yang menyempit dan berlawanan
arah jarum jam untuk semprotan air yang menyebar/
melebar.
Semprotan yang menyempit⇔Air disemprot dengan
aliran yang terkonsentrasi. Semprotan yang menyempit ini
berfungsi untuk melepaskan kotoran yang bandel.
Semprotan yang menyebar/melebar⇔Aliran air yang
disemprot menyebar, berfungsi untuk menghilangkan
kotoran di area yang luas, mencuci mobil, dll.
Pemasangan Deterjen Nozzle (Gbr. 12)
1. Isi wadah nozzle sabun dengan sabun pencuci yang di
rekomendasikan oleh pabrik.
2. Masukan nozzle sabun (9) ke dalam lubang sambungan
tengah nozzle (3) secara sempurna.
3. Masukan nozzle sabun ke dalam lubang sambungan
tengah nozzle secara sempurna kemudian putar searah
jarum jam hingga terhenti.
4. Lakukan test dengan cara menarik kedepan nozzle
sabun. Jauhkan tangan dari nozzle ketika melakukan
pengetest-an.
Gunakan nozzle sabun dalam posisi sebagaimana
ditunjukkan oleh gambar 12.
Mengoperasikan Unit
1. Pastikan saklar utama (12) dalam posisi OFF.
Sambungkan ke sumber listrik.
2. Hidupkan keran air dalam posisi penuh.
3. Lepaskan tombol kunci keamanan spray handle (13).
4. Air disemprot dari nosel saat spray handle trigger
ditekan. Sebelum memutar saklar utama pada posisi
ON, lepaskan semua udara yang ada dalam selang
dan pompa dengan menekan pemicu (trigger).
PERINGATAN: jika udara pada selang dan pompa tidak
dikeluarkan, akan mengakibatkan menurunnya tekanan
atau menyebabkan kerusakan pada pompa dan motor.
5. Putar saklar utama ke posisi ON ketika air mulai
mengalir dari nosel saat menekan spray handle trigger.
6. Operasikan semprotan dengan menekan spray handle
trigger. Motor akan mati ketika spray handle trigger
dilepas. Waktu trigger ditekan, motor kembali bekerja
dan air semprotan keluar dari nosel.
PERINGATAN!
• Operasikan selang semprotan dengan hati-hati di area
yang permukaannya kasar seperti kerikil,pecahan beton,
atau pecahan batu.
• Hindari gesekan berlebihan yang dapat merusak
semprot menangani selang ketika bergerak di sekitar
objek seperti pagar, blok atau batu bata.
• Memastikan bahwa semprot menangani selang lurus
dan bebas kinks atau liku sebelum menggunakan.
• Selama awal pemakaian, aliran semprot mungkin
intermiten dan tidak menentu sementara udara yang
terhalau dari dalam pompa dan selang. Ketika ini
terjadi, terus menekan pelatuk sampai aliran semprot
menstabilkan.
• Pastikan untuk menyalakan saklar utama ke posisi OFF
ketika meninggalkan unit tanpa pengawasan.
• Ketika penyemprotan, memastikan bahwa semprot
pegangan pelatuk selalu tertekan dan dirilis untuk
interval yang berlangsung lebih lama dari 2 detik dalam
durasi. Kerusakan tekanan switch dapat terjadi dari
interval semprot berlangsung kurang dari 2 detik.

11
Setelah Penggunaaan
1. Putar saklar utama ke posisi OFF.
2. Matikan keran air.
3. Tekan spray handle trigger sampai airnya habis.
4. Cabut konektor selang untuk melepaskan selang air dari
konektor.
5. Tekan tombol kunci pengaman spray handle untuk
mengunci trigger.
6. Lepaskan selang menangani semprot dari unit utama.
7. Keluarkan air yang masih tersisa di unit utama.
Putar saklar utama ke posisi ON selama 1-2 detik
untuk melepaskan kelebihan air dari koneksi selang
semprotan.
PERINGATAN: hati-sati saat melepaskannya, karena
airnya bertekanan.
PERINGATAN: meninggalkan saklar utama dalam posisi
ON selama lebih dari 2 detik mungkin menyebabkan
kerusakan pada mesin. Pastikan saklar utama OFF.
8. Cabut sambungan kabel ke listrik.
9. Lepaskan selang air dari keran.
10. Tekan tombol release (18) untuk melepaskan selang (5)
dari spray handle (4). (Gambar 13)
PERINGATAN
Buang air yang masih tersisa dari unit utama, selang,
spray handle, dan nosel, khususnya saat cuaca dingin.
Menyimpan unit pada area suhu dingin tanpa membuang
sisa airnya bisa menyebabkan kerusakan pada unit dan
membuat mesin tidak bisa digunakan.
PEMELIHARAAN & PENYIMPANAN
PERINGATAN: lepaskan unit dari sumber listrik sebelum
melakukan perawatan atau sebelum dibersihkan. Untuk
menjamin masa pake produk dan bebas dari masalah,
beberapa hal berikut perlu diperhatikan:
- Bersihkan selang air, selang, spray lance, dan aksesoris
sebelum disimpan.
- Bersihkan konektor dari debu dan kerikil.
Perbaikan harus dilakukan oleh pusat layanan resmi kami
dan menggunakan suku cadang yang asli.
Membersihkan Lance Nozzle (Gbr. 14)
- Gunakan pin pembersih nosel (8) untuk membersihkan
secara rutin bagian dalam nosel.
- Masukan pin pemberih (8) pada nosel dan keluarkan
material yang menyebabkan penyumbatan dengan
mengetuknya pada meja dan ujung noselnya ke bawah.
Jika nosel tersumbat, tekanan air akan rendah dan
mungkin akan menyebabkan kerusakan pada alat.
PERINGATAN: pastikan bahwa nosel selalu dalam
keadaan bersih. Selalu diperiksa setelah dilepaskan dari
spray handle.
Membersihkan Filter (Gbr.15)
1. Lepaskan konektor air dari mesin (6)
2. Lepaskan penyaring (16) pada konektor air (6)
3. Bersihkan penyaring
4. Pasang kembali lter pada posisinya.
5. Hubungkan kembali konektor air ke unit. Pastikan
posisinya sesuai lalu memutarnya searah jarum jam.
Jika tidak terpasang dengan baik, mungkin akan terjadi
kebocoran.
Membersihkan Ventilasi
Mesin harus selalu dalam kondisi bersih sehingga udara
dingin bisa lewat dengan bebas melalui ventilasi.
Menyimpan Unit.
Selang, nosel, dan spray handle disimpan pada unit utama
sebagaimana ditunjukkan pada gambar 16.
Penyimpanan
Pompa, selang, dan aksesoris harus dalam keadaan kering
sebelum disimpan:
1. Jika tidak digunakan untuk jangka waktu yang lama
(lebih dari 3 bulan) dalam ruangan yang sangat dingin,
disarankan agar mesin diisi dengan larutan antibeku
(mirip dengan larutan antibeku untuk kendaraan).
2. Jika tidak digunakan dalam jangka waktu yang panjang,
akan muncul endapan kapur pada mesin, yang akan
mengganggu saat menghidupkan mesin.
Jangan menghidupkan mesin yang membeku. Rusak
karena pembekuan tidak diberi garansi.
Keamanan Lingkungan.
Daur ulang material yang rusak di tempat pandauran
ulang dan buang yang tidak terpakai di tempat yang
aman.
Peringatan: jangan menggunakan alat ini sebelum
membaca petunjuk penggunaannya.
Jangan hubungkan perangkat ini langsung dengan
keran air
Untuk menghindari resiko kecelakaan, orang-orang
yang berada di sekitar area penggunaan perangkat
ini sebaiknya berada di jarak kurang lebih 15 meter.
Alat ini bisa bermasalah jika digunakan secara salah.
Jangan arahkan jet langsung ke orang, perangkat
listrik yang menyala, atau diarahkan ke mesin itu
sendiri.

12
Pemecahan Masalah
Masalah Penyebab Solusi
Mesin tidak berfungsi ketika On/Off
dan tuas spray handle ditekan
Steker rusak
Arus tidak mencukupi
Pompa terkunci
Relay termal terpicu
Periksa steker dan sekering apakah
kondisinya baik.
Hidupkan motor secara manual
Biarkan motor dingin.
Mesin jalan tapi tekanannya lemah Filter pipa masuk tersumbat
Udara bocor di bagian konektor
Katup saluran masuk dan keluar
tersumbat atau aus.
Diameter selang nosel terlalu besar
Bersihkan lter
Cek tting koneksi pipa saluran masuk
dan konektor selang.
Periksa atau ganti
Periksa atau ganti
Tekanan tidak beraturan Udara tertarik masuk
Katup tersumbat dan aus
Seal aus
Cek konektor pipa saluran masuk
Bersihkan dan ganti
Cek dan ganti
Mesin tiba-tiba mati Relay termal terpicu karena kelebihan
panas
Cek voltase
Matikan saklar dan biarkan motor
mendingin untuk beberapa saat.
Air menetes dari bagian sambungan Seal dalam kondisi aus Cek dan gantikan
Tekanan hilang Nosel aus
Katup aus, kotor atau tersumbat
Katup seal aus
Seal aus
Filter tersumbat
Gantikan nosel
Cek, bersihkan, ganti
Cek dan/atau ganti
Cek dan/ganti
Cek dan/bersihkan
Terlalu bising Angin tertarik ke dalam
Katup aus, kotor atau tersumbat
Bantalan aus
Temperatur air terlalu tinggi
Filter kotor
Cek intake lines
Cek, bersihkan, ganti
Cek dan/atu ganti
Temperatur lebih rendah dari 40ºC
Cek dan/atau ganti
Air yang dibuang bercampur dengan
minyak
Seal ring (air dan minyak) aus Cek dan/ganti
Air yang keluar dari pompa lemah Seal aus
O-ring dari seal aus
Ganti Seal
Ganti O-ring
Ketika saklar ditekan, motor
mendengung dan tidak bisa hidup
Voltase lebih rendah
Pompa diblok
Kabel ekstensi tidak cukup (cross
section terlalu kecil, kabel terlalu
panjang).
Cek apakah kabel ekstensi cukup.
Ganti kabel ekstensi yang sesuai
Mesin Tidak Terpakai.
Perhatikan hal-hal berikut jika Anda sudah tidak ingin mengunakan mesin.
• Lepaskan semua koneksi dan mesin jangan dioperasikan
• Simpan mesin di area yang tidak bisa disentuh anak-anak.
• Jangan gunakan bagian-bagian mesin yang sudah terpakai untuk penggunaan lain
• Bongkar mesin dan buang sesuai dengan aturan yang berlaku di wilayah Anda.
SIMPAN BUKU INSTRUKSI INI

13

14

Table of contents
Languages:
Other Kyocera Pressure Washer manuals
Popular Pressure Washer manuals by other brands

SNOWJOE
SNOWJOE SUNJOE SPX2000RM Operator's manual

North Star
North Star 157117 owner's manual

Hyundai power products
Hyundai power products HYW2500E instruction manual

SNOWJOE
SNOWJOE SUNJOE SPX220E-XT Operator's manual

Mytee
Mytee HP100 Grand Prix Instruction manual & safety guide

Campbell Hausfeld
Campbell Hausfeld CP5101 Operating and parts manual