L Lab Solderite SGS-2005L User manual

SGS-2005L SGS-2015L
Lead-free soldering system
User’s Manual

1
Welcome
Welcome to world of lead-free soldering.
We are honored that you have chosen the SGS-2000L series
lead-free soldering system.
L Lab
L Lab would like to share our idea with our friends. We make something unique
and bring the best product to customers. Our products now go to North, Central
and South America, West Europe and Southeast Asia, etc. we try hard to offer
the best service to customers and we want to share this happiness
with our customers.
Challenges in lead-free soldering
New Technology
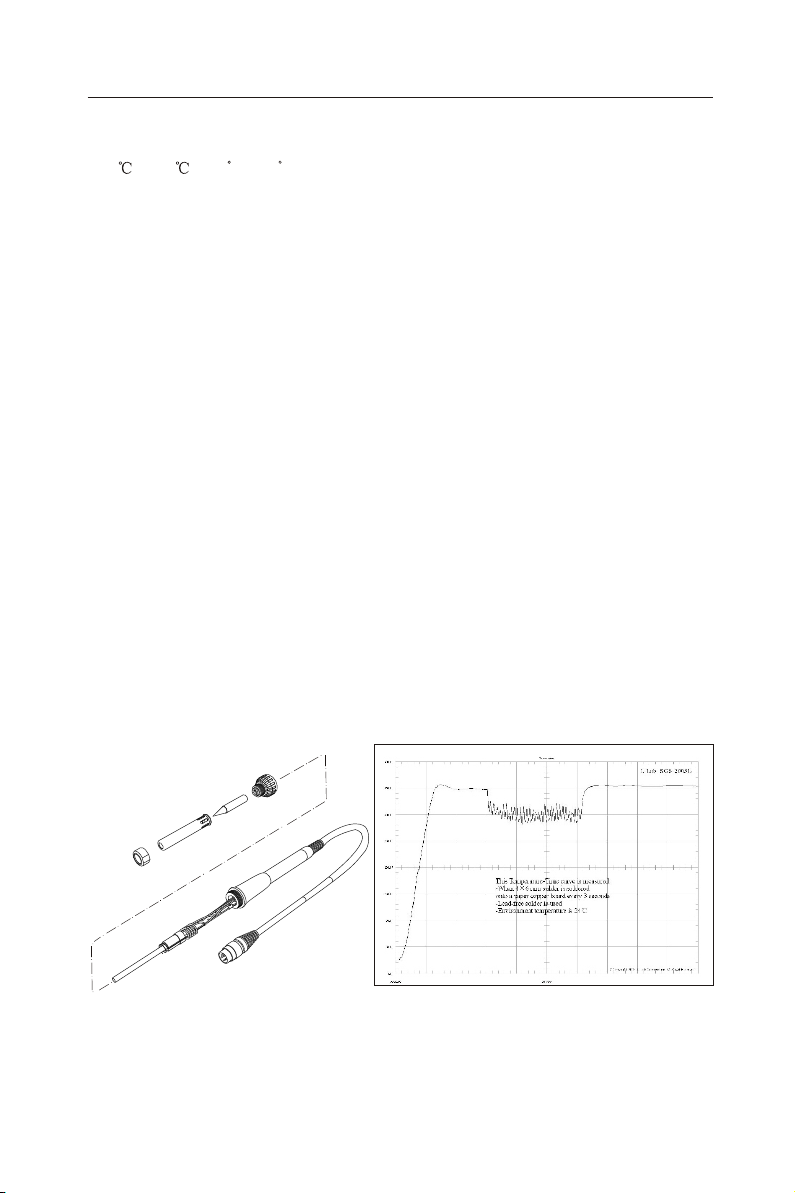
The challenges are primary the increased temperature for higher melting point
alloy than conventional tin-lead solders. A sharp fall in process temperature
during the soldering is also a trouble. These require not only a wide soldering
temperature range but also a real-time thermal recovery.
High cost
To solve above problem, the general ideal is choosing a composite tip and this
tip is a soldering tip in which a heating element and sensor are integrated with
ceramic, but this means a higher cost in frequent replacement of tip with a
heating element and sensor.
Our new technology in lead-free soldering
L Lab now are well prepared for above challenges.
Our products take switching power supply and aviation power technique as core
concept and fully make use positive temperature coefficient of traditional
ceramic heating element. Intelligent control system can make real-time
excellent thermal recovery for heat loss.
Low cost in Solderite lead-free soldering
Separated tip design brings a convenient tip replacement, and this comes true
the least cost of tip replacing.
A reliable quality system
The design and manufacturing process of the products are in accordance to
Europe EN-60335, EN-55014, EN-50366, China CCC Security Standard. A
stable operation is also provided.
Know about lead-free soldering
Lead-free soldering
The electronics industry is moving rapidly to lead-free soldering approach to
meeting the WEEE (Waste Electrical and Electronic Equipment) and RoHS
(Restriction of Hazardous Substance) challenges. Although relevant legislation
about lead-free product haven't been made by most of countries, with the
ongoing concern regarding environmental pollutants, lead-free is being a target
that a worldwide electronic assemble arena are aiming at.

Packing list..................................................................................................... 3
Feature...........................................................................................................4
Name of parts .................................................................................................5
Specification ..............................................................................................5-6
Setting up.....................................................................................................6-7
Operation.....................................................................................................8-9
Replacing Heating Element and Tip............................................................... 10
Trouble-shooting Guide..................................................................................11
Chart of Changeable Parts and Parts List..................................................12-13
Care and Maintenance of Tips.......................................................................13
Chart of Tip Shape and Size..........................................................................14
Table of contents
2
Before operation, please read the user s manual carefully!
To prevent damage to the unit and ensure a safe working environment,
be sure to comply with the following precautions.
1) Do not use the unit for applications other than soldering.
2) Do not turn on the power when the Soldering Iron is not connected to
the Control Station to prevent any damage to the unit.
3) Do not rap the Soldering Iron against any hard surface to shake off
residual soldering, or otherwise subject the iron to severe shock.
4) Do not modify the unit. Use only genuine solderite replacement parts.
5) Do not wet the unit or use the unit when your hands are wet.
6) The soldering process will produces smoke, so make sure the area is
well ventilated.
When the power is on, the Tip Temperature is between
250 C-500 C(482 F-932 F) Since mishandling may lead to burns or fire,
be sure to comply with the following precautions.
1) Do not touch the metal parts near the Tip.
2) Do not use the product near inflammable items and/or explosives.
3) Turn the power off while taking breaks and when finish using the unit.
4) Please cut off power and wait the temperature of Tip declined to room
temperature before replacing parts or installing Tip.
!CAUTION:

3
1) ...........................................................................................
2) ......................................................................................
3) ..................................................................................
4) .....................................................................................
5) ...............................................................
6) Iron Spanner .......................................................................................
7) .........................................................................................
8) Warranty Card......................................................................................
Iron Holder 1Pcs
User’s Manual 1Pcs
Cleaning Sponge 1Pcs
Control Station 1Pcs
Soldering Iron (tip contained) 1Pcs
1Pcs
Hex Wrench 1Pcs
1Pcs
9) Screwdriver..........................................................................................1Pcs
Packing List
Packing List
3
6
1
5
7
9
8
Note: *Please check articles listed above after unpacking. Contact with distributor
if any not packed inside!
2
User’s Manual
When seeking Tip replacement or other accessories, please select original
accessories of our company.
Accessories made by other manufacturer may affect soldering or damageHeating
Element even Control System.
We take no responsibility forany problem caused by using products or parts made
by other manufacturer.
!CAUTION:
4

Feature
(Fig 1) (Fig 2)
Temperature adjustment
The temperature adjustment brings a wide range of temperature from
250 -500 (482 F-932 F).
This temperature-controlled soldering iron fits any customers for
lead-free soldering.
The power saving function
The power consumption of single station is 20-30W less than other brands’.
Temperature calibration function
This function help you easy calibrate the temperature difference between
set temperature and tip.
ESD Safe design
ESD safe design to protect sensitive components.
Smart design
Simple but elegant design efficiently makes use of working space.
Low cost
Separated tip design is stationd on an advanced automatic control system and
switch power supply technology. Quick and easy operation makes least cost of
tip replacing come true.(See Fig1)
The advanced thermal recovery
Our product provide strong thermal recovery function, this help you easy doing
lead-free soldering.(See Fig2)
4

Name of parts
Output Voltage DC 0-30V
Temperature Range 482-932 F250-500
Overall Dimensions 150(L) x100(W) x40(H)mm
Weight 0.72 kg
Model SGS-2005L; SGS-2015L
Input Voltage SGS-2005L: AC180-240V, 50/60Hz
SGS-2015L: AC 90-125V, 50/60Hz
Power Consumption 20W; 105Wmax
J: Location Pin
K: Iron Cord receptacle
L: Control Staiton
M: Power Plug & Cord Assembly
N: Power Switch
O: Back Panel
P: ESD Socket
Specification
Fuse(5*20mm) SGS-2505 250V /T2A
SGS-2515 250V /T3A
Temperature stability 2 at idle temperature
Leak current 5mA
5
A
I
J
O
P
N
K
L
M
F
B
D
H
A
G
A: Soldering Iron
B: Cleaning Sponge Pool
C: Cleaning Sponge
D: Iron Holder
E: 5 Pin Connector
F: Control Knob
G: LED Indicator
H: Front panel
I: Calibrator
Temperature
C
E

2.Tighten the notch at the bottom of the station with location pin on the
control box.
Notch on
the Station
ESD SAFE Yes
Soldering Iron
Mode SGI-903S
Input Voltage DC 0-30 V
Tip to Ground Resistance Less than 2
Tip to Ground Potential Less than1.8 mV
Heating Element Ceramic Heater
1.Take the unit out from packing and place it in a suitable place.
Setting up
6

3.Dampen the Sponge with water and squeeze it dry and place it in the notch of
iron holder station.
Note: *The sponge, which is too wet or dry, will damage the electric iron
and make it unable to be tinned with, and eventually affect soldering.
4. Connect iron cord assembly to the receptacle.
7

Operation
System start
Twist the temperature control knob counterclockwise to the end. Press the
button on the back panel, the system start.
Temperature Calibration
1. Set the Temperature Control Knob to 350 .
2. Remove the CAL Pot Plug on the Front Panel and turn on the Power Switch.
3. Wait until the temperature stabilize. Use Screwdriver to do adjustment until
the Tip thermometer indicates the temperature to be 350 . (Turn the CAL
screw slightly clockwise, the displayed temperature value will increase; Turn the CAL
screw slightly counterclockwise, the displayed temperature value will decrease)
8
CAL screw
Clockwise
Counterclockwise
CAL Pot Plug
Front Panel
4. Reposition the CAL Pot Plug.
Checking
To avoid any unexpected hurting, before starting , you are suggested to
make sure:
The power button is turned off .
Twist the temperature control knob counterclockwise to the end.
The input is: SGS-2005L:AC 180-240V .
SGS-2015L: AC 90-125V .
50/60Hz
50/60Hz
Temperature
Control Knob
Temperature
Control Knob
If temperature system is , please
Fahrenheit
Celsius system obey the following steps;
If it is system, please obey the operation step on Page 9
Setting temperature
Twist the temperature control knob to the desired temperature .

If temperature system is Fahrenheit system, please obey the following steps:
Operation
System start
Twist the temperature control knob counterclockwise to the end. Press the
button on the back panel, the system start.
Temperature Calibration
1. Set the Temperature Control Knob to 662 F.
2. Remove the CAL Pot Plug on the Front Panel and turn on the Power Switch.
3. Wait until the temperature stabilize. Use Screwdriver to do adjustment until
the Tip thermometer indicates the temperature to be 662 F. (Turn the CAL
screw slightly clockwise, the displayed temperature value will increase; Turn the CAL
screw slightly counterclockwise, the displayed temperature value will decrease)
CAL screw
Clockwise
Counterclockwise
CAL Pot Plug
Front Panel
4. Reposition the CAL Pot Plug.
Checking
To avoid any unexpected hurting, before starting , you are suggested to
make sure:
The power button is turned off .
Twist the temperature control knob counterclockwise to the end.
The input is: SGS-2005L:AC 180-240V .
SGS-2015L: AC 90-125V .
50/60Hz
50/60Hz
Temperature
Control Knob
Temperature
Control Knob
Setting temperature
Twist the temperature control knob to the desired temperature .
9

1. Turn Nut (1) counterclockwise and remove the Tip Enclosure (2), the Tip (3).
2. Turn Nipple (4) counterclockwise, remove it from the Iron.
3. Pull both the Heating Element (5), Terminal Board (7) and the Cord Assembly
(11) out of the Handle (8). (Toward the Tip of the Iron).
Replacing Heating Element and Tip
Replace Heating Element
10
1) The resistance value of heating element is 3.5-4.5 ohms.
2) The resistance value of sensor is 43-58 ohms.
If above resistance value is abnormal, please replace a new heating element.
Measure when then Heating Element is at room temperature:
When you need to replace tip, please choose original accessories, Using Access-
ories made by another manufacturer mayaffect soldering performance or damage
Heating Element even Control System.
!CAUTION:
LED Indicator Condition
LED Indication
System Condition
Power on or System supplies heat
Temperature reaches set value Green
12
6
578910
11
34
Heating element Sensor
Orange

Trouble-shooting Guide
1
2
3
Problem
Check
Action
4
1. Replace for new five-pin-line or
heating element .
2. Reconnect five-pin-line.
3. Refer to “Replacing Heating
Element and Tip ”.
The LED indicator
is not lit up
Is the power line loose? Reconnect it.
1. Is the soldering iron
cord broken?
2. Is five-pin-line of tip well
connected?
3. Is heating element broken?
Tip can't heat up
The tip is not wet
1. Is the tip temperature
too high?
2. Is the tip clean?
1. Set an appropriate temperature.
2. Refer to “Care and Maintenance
of Tips” .
The tip temperat-
ure is too high or
too low
1. Is the tip temperature
calibrated correctly?
2. Is the tip deformed or heavily
eroded?
1. Refer to “Temperature
Calibration”.
2. Replace a new tip.
Note: *If any problem happened not listed as above turn off the power switch.
Wait for a minute and turn on the power switch again, if this operation does
no help please contact the service agent or send it back to manufacturer.
11
!
Quality Warranty will be not available if we find this unit is modified or repaired by
yourself, and each unit has its individual code on the label, do not remove or modify
this code so as to guarantee your benefit.
WARNING:
Replace Tip
!
1) When seeking tipreplacement, please select originalone of our company. The tip made by
another manufacturer mayaffect soldering performanceor damage Heating Element even
Control System.
2) We takeno responsibility for any problem caused by using the tip made byan other manufacturer.
CAUTION:

14
16
13
19
18
17
Usersm
anual
Chart of Changeable Parts and Parts List
1.Parts Chart
20
12
12
15
2
3
4
5
6
11
10
9
8
7
1

No Name Part NumberNo Name Part Number
1
2
3
4
5
6
7
8
9
10
11
12
13
14
15
16
Nut
Tip Enclosure
Soldering Tip
Nipple
Spring
Heating Element
Terminal Board
Handle
Handle Cover
Iron Cord Busing
Soldering Iron
Cord Assembly
Iron Holder
User’s manual
2. Parts List
SGI-931
SGI-936
SGI-943S
SGI-946
SGI-950
SGI-956
SGI-963S
SGI-973
SGI-978
SGI-983S
SGX-230
SGX-290L
SGX-220
Control station
18
Soldering Iron
19
20
17
13
Refer to
page 14
SGI-903S
Care and Maintenance of Tips
1. Before use or after use, set temperature back to 250 C(482 F). Clean and
coat the tip with fresh solder. This helps prevent Tip oxidation. Always keep
Tip tinned before returning to Holder, switching off or storing for any period of
time, wipe only before using.
2. If black oxides appear on the solder-plated portion of the tip, at first, set
temperature back to 250 C(482 F), then apply new solder (containing flux).
Wipe the tip on the Cleaning Sponge, repeat until the oxides are completely
removed. Coat with new solder.
3. If any oxide film does form, this can be cleaned by carefully rubbing with a
600-800 frit fine emery cloth, isopropyl alcohol or the equivalent, then wrap
rosin-core solder around the newly exposed surface and reheat, flood the
tinned area with rosin-core solder after wrapped rosin-core solder melted.
4. If the Tip is deformed or heavily eroded, replace with a new one.
Cleaning Sponge
SGX-250
SGX-362
Iron Spanner
SGX-292L
Warranty Card
Hex Wrench SGX-360
SGX-361
Screwdriver

Tip outside diameter 6.5mm
14
Chart of Tip Shape and Size

This manual suits for next models
1
Table of contents