MANUAL FOR USE AND MAINTENANCE LSC 006 REV. 01 9
REGULATION OF THE OPERATING TEMPERATURE OF THE MACHINE
1 When the machine is on, press the ON//OFF (27) button and keep it pressed for 3 seconds: the control
light(22)and the one concerningtheset temperature start flashing.Forexample, if the settemperature
is 105°C the control light (18) starts flashing.
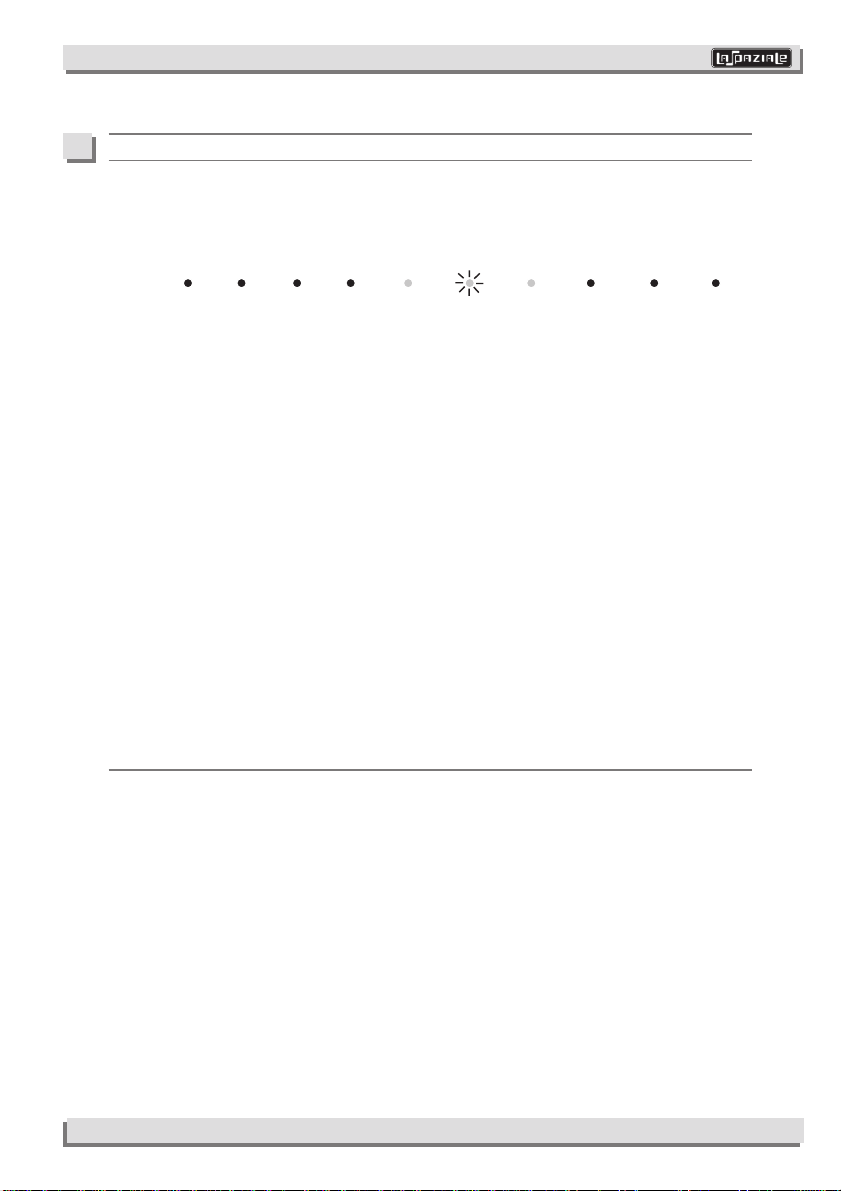
LIGHT N. 13 14 15 16 17 18 19 20 21 22
TEMP. 85 90 95 100 105 110 120 130 °C
2 In order to change the operating temperature, press and release the hot water delivery button (23); to
everypressureofthe button corresponds an increase ofthetemperatureof 5°C(with the flashing of the
correspondingcontrollight).Whenthemaximumtemperatureof130°C(controllight21)isreached,the
selection restarts from the minimum temperature of 85°C (control light 14) (cyclic mode).
3. Onceyouchoosethedesiredtemperature,inordertoconfirmthedatum,presstheON/OFF(27)button,
the machine will then go back to its standard operating phase.
Inordertohaveafinetuningtemperaturesettingof 1°Cincrementofthecoffeedeliverygrouptemperature
proceed as follows
:
• Switch the machine off pressing the ON/OFF button (27), the green control-light (22) from fixed turns to
flashing (STAND BY MODE).
• Press and keep pressed for about 3 seconds the button STOP (25A) or the 2 cup button (25) in the
automaticversion,theleds17and18turnontoindicatethatonehasenteredthefinetuningtemperature
setting of 1°C increment.
• Toeverypressureof the steam delivery button (26)theleds19,20, 21 turn on gradually whereeveryled
corrisponds to a 1°C increment of the temperature set, whereas to every pressure of the coffee button
(24 A) or the one cup button (24) in the automatic version, the leds 16,15, 14 gradually turn on and here
every led corresponds to a 1°C decrement of the temperature set. For example, if the set temperature
is 105°C and you proceed to turn on the leds 19 and 20, the new set temperature becomes 105 +2 =
107°C.
The value of the operating temperature of the machine can be changed only in order to improve the final
result in the cup, according to the coffee blend used.
3.1 DOSE SETTING (ONLY IN THE AUTOMATIC VERSION)
1. Whenthemachineison(controllight22onandfixed),presstheON//OFF(27)buttonandkeepitpressed
for about 3 seconds; the control light (22) and the one concerning the set temperature start flashing.
2. Fillwithgroundcoffeetheonecupfilterofthefilterholder(11),(usingthecoffeedoserprovided),making
sure not to leave coffee powder residues on the upper edge of the filterholder, and press it with the
suitable coffee tamper provided.
3. Fasten the filterholder (11) to the brewing group (10) and place a cup below the filterholder.
4. By pressing the one cup button (24) the delivery starts and the control lights 14-15-16 turn on to show
that the 1 coffee dose is being programmed.
5. Whenthecoffeeinsidethecuphasreachedthedesiredquantity,pressagain the button (24) tostopthe
delivery.
6. You automatically return to the initial visualization.
7. Fill with ground coffee the the two cup filter of the filterholder (11) (using the coffee doser provided),
makingsurenottoleavecoffeepowderontheupperedgeofthefilterholder,andpressitwiththesuitable
coffee tamper provided.
8. Fasten the filterholder (11) to the brewing group (10) and place two cups below the filterholder.
9. By pressing the two cup button (25) the delivery starts and the control lights 17-18-19 turn on to show
that the two coffee dose is being programmed.
10.
Whenthecoffeeinsidethecuphasreachedthedesiredquantity,pressagainthebutton(25)tostopthedelivery.
11.You automatically return to the initial visualization.
3