Lab:One Recordings ZPLANE User manual

Z
-
PLANE
Instruction Manual
V1.0
Rack Extension for Reason
Instruction Manual
MORPHING
FILTER

Page 2
Z
-
PLANE
Instruction Manual
V1.0
Contents
Page Subject
3: Thank You, cknowledgements & Dedications
4: Introduction
5: brief guide to ZPlane
9 : Working with ZPlane
11: Using the Dual Function Display
12: CV Inputs & controls
13: MIDI Implementation chart
14: How to ‘latch’ your own MIDI via Remote Overriding
16: Licence greement

Page 3
Z
-
PLANE
Instruction Manual
V1.0
TH NK YOU
We thank you for expressing your confidence by purchasing one of our effect units; in this case the
ZPlane Morphing Filter. This 2-channel high-quality effect unit was designed with our experience of
creating in the digital realm as well as the crafting of audio for all types of users; producers,
engineers and artists alike.
We hope you continue to enjoy using ZPlane in your projects for now and for future.
Lab:One Recordings © 2017
CKNOWLEDGEMENTS
Thanks to all of the Lab One lpha Team for all the testing, comments, suggestions and feedback, as
well as aiding us to bring our products to you.
Propellerhead Software (for Reason, the SDK and the concept of the Re)
Presets designed by:
DEDIC TIONS
This Re is dedicated to all the Propellerhead Reason users & forum threaders, friends, & colleagues
we have spoken to over the years.
DjFresha: Thanks goes out to my studio buddies; Dos aka Ocro, Dj EQ, for the support & feedback,
shouts go out to all who know me; Ben ‘Devious’, ndy ‘Ruthless’, Scott ‘Sniper’, the REBIRTH crew
and SCHTUM massive (Pete C, Kalist, ybee), and all who continue to work with and support us.
lso not forgetting my family for the support, and last but by no means least, my wife licia who
now enjoys the fact that we can bring products to your guys faster is now a happy bunny :D
Now let’s get into ZPlane….

Page 4
Z
-
PLANE
Instruction Manual
V1.0
In
InIn
Introduction
troductiontroduction
troduction
ZPlane is a dedicated rack unit, built as a Rack Extension for the Propellerhead Reason environment.
This device has a maximum of what would be 1U space in the real world – the classic 19in rack unit.
Being a Rack Extension (Re), this gives you various options of versatility within your projects.
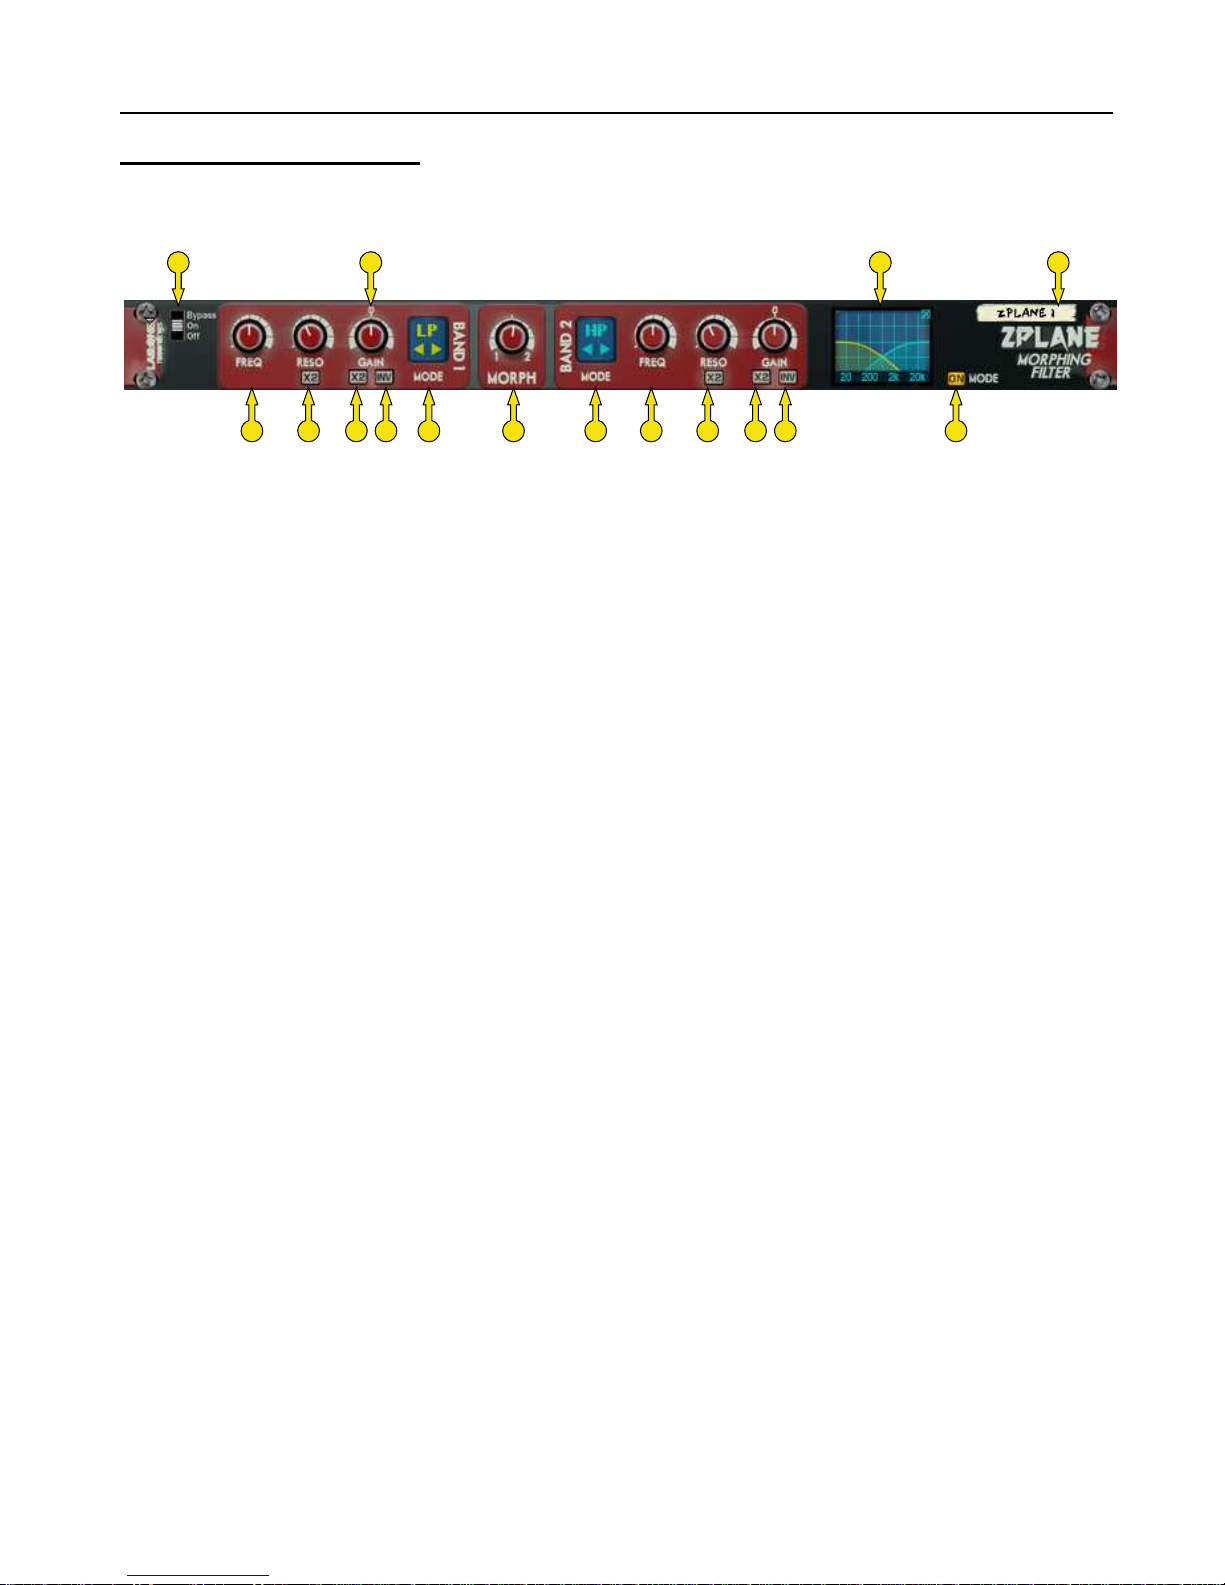
ZPlane features at a glance:
Two Full Frequency Range Filter bands
Independent Frequency controls
Independent Resonance controls (with tightness control)
Independent Gain controls (with double gain control)
Independent Invert Filter band (audio signal inversion)
Central Filter balance control (Morph / Mixing)
Mixing and Morphing modes
7 Independent Filter modes
Dual Function Display
‘Ears only’ mode to disable the display
ll these controls are adjustable to suit your application, and these settings can be stored as part of
a Combinator preset (when combined) as well as settings stored within your project. Due to the
minimal amount of controls needed, the need for presets is not required due to the efficiency and
speed you can dial in your settings.
ZPlane features two audio inputs and two audio outputs, which are processed independently; this
allows you to have two totally separate signals being processed together at the same time using
one set of controls. Mono operation is also an option (see ‘How to connect audio’ section).
For reference, the key groups of controls are:
FREQUENCY: To set the frequency of the chosen filter
RESON NCE (Q): To set the Q(uality) of the filter – higher resonance = more audible
‘spike’. Double resonance can create sonically loud frequency points.
G IN: To set the gain of the filter – only affects Shelving and EQ filter modes.
X2 mode allows for double gain level (from +-18dB to +-36dB)
MORPH: Balance between the two bands: Morphing incorporates filter frequency,
resonance and gain (where relevant) levelling. Mixing only balances
filter outputs and does not interpolate between frequency / resonance /
gain
MODE: Determines whether you are morphing or mixing the filters
FILTER TYPES: Selection of filters including Low Pass, High Pass, Band Pass, EQ, Band
Reject, Low Shelf and High Shelf modes.
Zplane is designed to be a transparent effect depending on the filter type in action. Shelving filters
as well as EQ filters set to zero dB gain should have no apparent effect on the audio signal and
would appear ‘dry’ to the user / listener.

Page 5
Z
-
PLANE
Instruction Manual
V1.0
brief guide of ZPlane
ZPlane is based on Red Queen 3-Mode 10-Band Equalizer’s Zplane function.
The Front Panel
] Bypass Switch (Bypass effect / Enable effect / Disable effect)
B] Frequency control
C] Resonance control trim & double resonance toggle
D] Gain control trim & double gain toggle
E] Invert phase of audio filter (to output)
F] Filter mode selector
G] Morph control
H] Dual Function Display (meters, filter curve plot)
K] Device Label
The folded front view includes the Bypass switch ( ) and the Device Label (K).
A D H K
B BC CD DE EGF F J

Page 6
Z
-
PLANE
Instruction Manual
V1.0
The filter frequency controls set the frequency centre of the filter – this can range from 20Hz to 22000kHz
– the full frequency spectrum of human listening (at most).
The filter resonance controls determine the ‘sharpness’ of the filter. Low resonance settings can create
‘smoother’ sounding filters that roll off gently making it a little harder to hear differences across small
frequency ranges (good for tonal shaping). Higher resonance can introduce ‘ringing’ at the frequency
centre (which may be desirable for riser effects). Experiment to find the right setting for you & your
sounds.
The gain controls are used to effect the shelf filters and the EQ filters (all other filters are not affected by
gain). djusting the gain will determine the amount of the shelf / EQ filter that will affect the processed
signal.
The INV toggles will take the result of the filtered audio and invert it. Reason for using this may be that
when morphing / mixing the filters you may find an inverted filtered audio sign combined with a regular
filtered audio signal can sound better / different from both being the same polarity. Experimentation is
key here to get the best results (there’s no right or wrong way, just ‘different’ methods).
The Morph control allows you to balance between Band 1 and Band 2. Used in conjunction with the Mode
control, you can decide if you want to mix the filters or morph between the filters. Used with the
previously mentioned filter controls you can create different types of effect purely with just the filters
themselves.
The Dual Function Display allows you to see the metering before and after filter processing, plus an
additional mode to view the two filter bands (depending on the separate filter controls as well as
the Morph control setting). Yellow indicates Band 1 filter curve, Blue indicates Band 2 filter curve.

Page 7
Z
-
PLANE
Instruction Manual
V1.0
The Back Panel
] State indicator
B] Frequency CV + trim controls
C] Resonance level CV + trim controls
D] Gain Frequency CV + trim controls
E] Morph CV + trim controls
F] Device Label
G] udio Input & Output sockets
The udio Inputs & Outputs [G] are used to connect ZPlane to various modules within the
Propellerhead Reason environment, in a form of either an insert or a send effect.
Connecting up the audio sockets can be done automatically by Reason, or can be manually done to
your own requirements. Mono devices, when connecting a new ZPlane to them, can automatically
route their mono signal in to the left channel, and the left output of ZPlane is connected to the
originally wired socket of the mono device, closing the audio loop. Stereo devices can automatically
connect their outputs to the left and right inputs of ZPlane, and ZPlane completes the audio chain by
connecting its outputs to the originally connected stereo pair sockets.
Each audio socket processes the audio separately from each other within ZPlane. Left and right
channels never mix within ZPlane. This ensures that if you have two separate mono devices
connected to ZPlane, the settings on ZPlane affect both channels at the same time with the same
amount of effect.
The State Indicator allows you to see if the unit is CTIVE (green), BYP SSED (red) or OFF (black, off).
This helps when cabling up what the signal chain is actually doing.
B BC CD DE G
F
A

Page 8
Z
-
PLANE
Instruction Manual
V1.0
How to connect audio
To connect ZPlane you can use Reason’s own auto-connection system, and Stim ZPlane ulant will
decide the best way to auto-wire; if you have a mono-output device (Subtractor, for example), and
you wish to add ZPlane to it, ZPlane will auto-connect the Subtractor output to the Left input, and
then continue to route the Left output of the ZPlane to the Left input of the mix-channel (or next
device in your processing chain).
You can do any of the following to create ZPlane;
a) right-click (Win) / CTRL-click (Mac) on the device, select ‘Create Device’, choose sub-menu ‘Studio
Effects’, and select ‘ZPlane Morphing Filter’ from the listing.
b) with the device selected, use the ‘Create’, select ‘Create Device’, choose sub-menu ‘Studio Effects’
and select ‘ZPlane Morphing Filter’ from the listing
c) using the Tool Palette in Reason (F8), select ‘Studio Effects’ when in the ‘Devices’ tab, and locate
the ‘ZPlane Morphing Filter’ device, click on the icon and drag it to the device you wish to add it to.

Page 9
Z
-
PLANE
Instruction Manual
V1.0
Working with ZPlane
ZPlane is designed to be a flexible device, allowing it to be used however you see best fit. Only
typical applications will be listed in this manual.
) Using ZPlane as an insert (mix channel setup).
In setup ( ), this would use ZPlane as an insert effect. This means that whatever control you adjust
on ZPlane, it will affect the total sound coming out of the sampler / synth module. If ZPlane is in
bypass mode, the audio playing would still sound ‘clean’ and unaffected.
Reason sampler /
synth module
Reason
Mix Channel
ZPlane
Right Input
ZPlane
Left Input
Right Output
Left Output
ZPlane
Right
Output
ZPlane
Left Output
Mix Channel
Right Input
Mix Channel
Left Input
Reason
Master Channel

Page 10
Z
-
PLANE
Instruction Manual
V1.0
B) Using ZPlane as a send effect (mix / audio channel setup).
In setup (B), this would use ZPlane as a send effect. This means that whatever control you adjust on
ZPlane, it will affect the sound coming from the Master Section at a set amount, determined by the
Send Effect dial on that specific Mix / udio channel. This means you can have a clean sound mixed
with an altered equalized sound. This is known as Parallel Processing, and may be desired in some
cases.
gain you can adjust ZPlane as mentioned in setup ( ) above, with the addition of the SEND dial
located on the Main Mixer in Reason. Full left setting of the SEND dial has no effect on the sound,
while full right setting of the SEND dial will send a maximum level possible to ZPlane. This means
you can have one ZPlane as a send device for all your audio channels. For best practice, enable
MONITOR mode, when used as a Send effect (to prevent ‘doubling’ of source audio).
lternative setups
For devices which have multiple outputs (ie NN-XT, Redrum, Thor, Spider udio), then if required
additional ZPlane units could be added as either mono-devices (only connecting left audio input &
output sockets), or as stereo devices. This in turn allows you to edit specific sounds within a preset if
you so wish (ie split zone instrument patches may have a bass guitar for one half of the keymap,
while a synth lead is using the other half, and you wish to effect the sounds independently). See the
next page for more examples of setups.
nother possible option would be to use one instance of ZPlane, and have 2 mono devices linked
into it (ie guitar lead and guitar bass), and process both inputs in parallel, and output the two
signals to two separate mixer channels. This may be desired to help use the same settings on two
mono devices at the same time.
Reason sampler / synth module
Reason
udio Channel 1
Mix channel 1
Right Input
Mix channel 1
Left Input
Right Output Left Output
ZPlane
Inputs
Reason Master Section
Reason
Mix Channel 1
ZPlane
Outputs
Return inputs
Send
Outputs
udio Clips
on sequencer

Page 11
Z
-
PLANE
Instruction Manual
V1.0
Using the Dual Function Display
ZPlane’s Dual Function Display allows you to see the metering before and after filter processing,
plus an additional mode view the filter curves that you are actively applying to the incoming audio
signal. Simply click the display to change views. Meters mode is always default upon creation.
Meters mode
Filter curve view mode
The Input and Output Meters can be used to assess initial audio signal levels, and processed final
output levels.
The Filter Curve view allows you to identify the corresponding band filter shape which will affect the
audio. Use the display as the ‘full process’ visual. By default, the Morph knob is set to Band 1 which
is a Low Pass Filter. The filter curve display should indicate the Yellow filter curve as a Low Pass
filter and affecting the controls on Band 1 will affect the filter curve visual, so you can determine the
shape you will be applying to your source signal. If you move the Morph knob to Band 2 from Band
1, you will see the outcome of Band 2’s filter curve. Depending on the Mode status (On = Morph, Off
= Mix), the filter curves will respond accordingly to the knob controls.
Filter explanations:
Low Pass Filter – attenuates high frequencies, all frequencies below the frequency value are left intact,
causing the effect of ‘muffled’ or ‘darker’ sounds.
High Pass Filter – opposite to Low Pass Filter, where all low frequencies are removed below the frequency
value. Great for EDM style riser effects (‘reach for the lasers’ just before the drop).
Band Pass Filter – alike the Low Pass and High Pass Filters but only let through a small range of sounds either
side of the frequency point (sort of like using a High Pass and a Low Pass in series when both frequencies are
at the same value).
Band Reject Filter – also known as a notch filter. The opposite of Band Pass Filter, this filter removes a small
range of signal either side of the set frequency value.
EQ Filter – a parametric filter that adds or removes a small range of signal either side of the set frequency
value. Great for correcting as well as enhancing.
Low Shelf / High Shelf Filters – these filters work similar to Bass / Treble controls on generic hifi and personal
sound systems. Low Shelf can effect bass signals (frequency value and all signal below that value), while High
Shelf can effect treble / high signals (frequency value and all signal above that value). Great for tonal effect as
these can sound more natural than Low Pass and High Pass filtering.

Page 12
Z
-
PLANE
Instruction Manual
V1.0

Page 13
Z
-
PLANE
Instruction Manual
V1.0
CV inputs and controls
ZPlane has a total of 7 CV inputs, with corresponding trim knobs (to scale CV input signals). The CV
input sockets are unipolar by design but can allow bi-polar signal. Each of the 7 CV sockets connect
to the 7 knob controls on the front of ZPlane, giving more creative use of the equalizer where the
user sees best fit.
Each CV input has a corresponding label to the parameter the CV may control.
To use the CV inputs, simply connect a CV output from another device. Default settings for CV trim
knobs are at maximum, so be aware of possible loud signals if using CV inputs whist in 18 or 24dB
modes.
In relation to the way CV works, polarities and inversions please see the illustration below
From the example above, we can see the effect of changing the polarity and bi-polar / uni-polar
modes has on CV input signals.
NOTE. CV signal patching will remain only within Mixer / udio Channel effect chains, or within a
Combinator, and of course your template rack setups.
0.5
0
-0.5
0.5
0
-0.5
1.0
0.5
0
1.0
0.5
0
BiPolar Normal
BiPolar Inverted
UniPolar Normal
UniPolar Inverted
0.5
0
-0.5
0.5
0
-0.5
1.0
0.5
0
1.0
0.5
0
BiPolar Normal
BiPolar Inverted
UniPolar Normal
UniPolar Inverted

Page 14
Z
-
PLANE
Instruction Manual
V1.0
MIDI Implementation table
Below is a listing of all MIDI Control Change (CC) numbers, which can be applied to your choice of
device.
MIDI
CC Controls
12 Band 1 Frequency
13 Band 1 Resonance
16 Band 1 Gain
17 Morph / Mix control
18 Band 2 Frequency
20 Band 2 Resonance
21 Band 2 Gain
15 Band 1 Resonance X2
14 Band 1 Gain X2
19 Band 1 Phase Invert
23 Band 2 Resonance X2
24 Band 2 Gain X2
25 Band 2 Phase Invert
22 Filter Mode (Morph / Mix)
26 Filter 1 Type
27 Filter 2 Type

Page 15
Z
-
PLANE
Instruction Manual
V1.0
How to ‘latch’ your own MIDI via Remote Overriding
Reason allows the user to re-define certain controls via MIDI devices by using the Remote Override
configuration. This means that a control on ZPlane can be mapped by any MIDI controller you have
connected to your D W. However, you can only map one specific control to any of the available
Remote ‘receiving’ controls on the Rack Extension. lso, Remote Override controls are only saved
within each independent Reason song file. Ideally, if you use a dedicated piece of MIDI equipment
for ZPlane, a template start-up file would be a better option, so that the Remote Override template
is pre-defined on each new song from the off.
ll the controls on ZPlane are Remote Override-able. To access the override editor, select from the
‘Options’ Menu ‘Edit Remote Overrides’. The Rack will now display the specific device selected, with
either pre-defined Remote control indicators (the Remote symbol), yellow Lightning bolts (over-
ridden Remote controls pre-defined) or blue arrows (unassigned Remote controls)
You can right-click one of the controls (except for the main EQ handles) and select ‘Edit Remote
override’. This will open a new popup window, with some available options, and to show you which
MIDI controller is currently set to that specific Remote Override.
By moving one of the controls on your MIDI device (already pre-
defined in Reason), you should then see MIDI activity indicator
display that a MIDI message was received. Note also the control
surface and the control itself on the MIDI device that was
adjusted relays to the new Remote Override.

Page 16
Z
-
PLANE
Instruction Manual
V1.0
Once you are happy with the control being set, you can click ‘OK’ to continue with the new setting,
or ‘C NCEL’ to abort the mapping. lso note that if you accept this mapping, the control (if already
linked to another) will be fixed to the new mapping. ny previously set mappings will be ‘moved’ to
the new mapped control. This should be used with care if you already have pre-defined Remote
Override mappings.
This Remote Overriding method can be handy if you don’t know how to set up your own MIDI
controller to the dedicated MIDI controls mentioned in the previous chapter. For speed, you can
simply double click a blue arrow, and the arrow with turn into a spinning yellow Lightning bolt,
indicating that Reason is awaiting a MIDI signal to that control. You can then adjust a MIDI control
on your MIDI device, and the control will map automatically without the need to use the popup
previously mentioned. Double-click each specific control you want to map to save time and to use
the mapping in a faster method.
ll Remote Overrides can then be used to record automation within Reason, which can be fine tuned
using the Sequencer and the clips (see the Reason Operating Manual for more information on how to
edit & record automation)

Page 17
Z
-
PLANE
Instruction Manual
V1.0
LAB:ONE RECORDINGS.
LICENSE AGREEMENT
YOU SHOULD CAREFULLY READ ALL OF THE FOLLOWING TERMS AND CONDITIONS BEFORE USING
THIS PRODUCT. INSTALLING AND USING THE PRODUCT INDICATES YOUR ACCEPTANCE OF THESE
TERMS AND CONDITIONS. IF YOU DO NOT AGREE WITH THEM, YOU SHOULD PROMPTLY RETURN
THE PRODUCT UNUSED AND YOUR MONEY WILL BE REFUNDED.
1. GRANT OF LICENSE. In consideration of payment of the license fee, Lab:One Recordings. (“LAB:ONE” or the
“Licensor”) grants to you, the Licensee, a nonexclusive license to have one person use the enclosed LAB:ONE software
product (the “Product”) on one personal computer at a time. If you want to use the Product on more than one personal
computer at a time, or if you want to network the Product, you must obtain separate licenses from LAB:ONE by
contacting them via info@lab-one-recordings.co.uk.
This license does not grant you any right to any enhancement or update to the Product. Enhancements and updates,
if available, may be obtained by you at LAB:ONE's then current standard pricing, terms and conditions.
2. OWNERSHIP OF THE PRODUCT. Portions of the Product incorporate certain material proprietary to third parties.
LAB:ONE and licensors of LAB:ONE own and will retain all title, copyright, trademark and other proprietary rights in
and to the Product. This License is NOT a sale of the Product or any copy of it. You, the Licensee, obtain only such
rights as are provided in this Agreement. You understand and agree as follows:
2.1. You may NOT make any copies of all or any part of the Product except for archival copies of the computer
software components of the Product as permitted by law,
2.2. You may NOT reverse compile, reverse assemble, reverse engineer, modify, incorporate in whole or in part in any
other product or create derivative works based on all or any part of the Product.
2.3. You may NOT remove any copyright, trademark, proprietary rights, disclaimer or warning notice included on or
embedded in any part of the Product.
2.4. You may NOT transfer the Product. If transferred, in whole or in part, the original and subsequent owners forfeit
all rights to use the software.
2.5 You may not use the documentation for any purpose other than to support your use of the SOFTWARE PRODUCT.
2.6 You may not perform engineering analyses of the SOFTWARE PRODUCT, including performance analyses,
or benchmark analyses, without the written permission of LAB:ONE.
3. INSTRUMENT CONTENT
3.1 The audio samples, recorded sounds, programs, MIDI patterns used by any instrument (“instrument content”)
included with the Product remain the property of Licensor and are licensed, not sold, to you for use on your computer.
3.2 The Licensee may modify the instrument content. LICENSEE MAY USE THE INSTRUMENT CONTENT FOR
COMMERCIAL PURPOSES WITHIN MUSICAL COMPOSITIONS.
3.3. This license expressly forbids resale, re licensing or other distribution of the instrument content, either as they
exist on these discs, or any modification thereof. You cannot sell, loan, rent, lease, assign or transfer all or any of the
enclosed sounds to another user, or for use in any competitive product.
4. DEMO or THIRD PARTY DEMO CONTENT RESTRICTIONS. Unless specified elsewhere in your product
package, the following restrictions apply to all digitally recorded sounds, MIDI or song files or
rhythm patterns, and printed or digitally reproduced sheet music contained in the product package (the “demo
content”): All demo content is protected by copyright and owned by LAB:ONE or other parties that have licensed these
works to LAB:ONE. Any duplication, adaptation, or arrangement of the demo content without written consent of the
owner is an infringement of UK. or foreign copyright law and subject to the penalties and liabilities provided therein.
You may not synchronize the demo content with any videotape or film, or print the demo content in the form of
standard music notation, without the express written permission of the copyright owner. The demo content may not be
used for broadcast or transmission of any kind. You may not resell or redistribute the demo content “as is”
(i.e., stand alone) in any way, including for use in sampling or sample playback units, or in any sound library product,
or in any radio or television broadcast, soundtrack, film or other commercial product in any media, whether the works
remain in their original form or are reformatted, mixed, filtered, re-synthesized or otherwise edited.
5. LICENSEE'S RESPONSIBILITIES FOR SELECTION AND USE OF THE PRODUCT. Lab One Recordings hopes the
Product will be useful to your business or personal endeavors. HOWEVER, Lab One Recordings DOES NOT WARRANT
THE OPERATION OF THE PRODUCT OR THE ACCURACY OR COMPLETENESS OF ANY INFORMATION
CONTAINED IN THE PRODUCT. You, and not LAB:ONE, are responsible for all uses of the Product.
6. WARRANTY.
6.1. Limited Warranty. Subject to the other provisions in Articles 4 and 5 of this Agreement, LAB:ONE warrants to
you, the original licensee, that the media on which the Product is recorded will be free of defects in material and workmanship
under normal use for a period of thirty (30) days from purchase, and that the Product will perform substantially
in accordance with the user guide for a period of thirty (30) days from purchase. LAB:ONE’s sole responsibility
under this warranty will be, at its option, (1) to use reasonable efforts to correct any defects that are reported to it
within the foregoing warranty period or (2) to refund the full purchase price. LAB:ONE does not warrant that the
Product will be error free, nor that all program errors will be corrected. In addition, LAB:ONE makes no warranties if
the failure of the Product results from accident, abuse or misapplication. Outside the United Kingdom, these remedies are
not available without proof of purchase from an authorized international source. All requests for warranty assistance
shall be directed to LAB:ONE at the following address:
Lab:One Recordings, 41 Sedbergh Road, Corby, Northants, NN18 0NT, UK
6.2. Limitations on Warranties. THE EXPRESS WARRANTY SET FORTH IN THIS ARTICLE 4 IS THE ONLY
WARRANTY GIVEN BY LAB:ONE WITH RESPECT TO THE ENTIRE PRODUCT; LAB:ONE MAKES
NO OTHER WARRANTIES, EXPRESS, IMPLIED OR ARISING BY CUSTOM OR TRADE USAGE, AND SPECIFICALLY
DISCLAIMS THE IMPLIED WARRANTIES OF NON-INFRINGEMENT, MERCHANTABILITY OR
FITNESS FOR ANY PARTICULAR PURPOSE. LAB:ONE SHALL NOT BE HELD RESPONSIBLE FOR THE
PERFORMANCE OF THE PRODUCT NOR FOR ANY LIABILITY TO ANY OTHER PARTY ARISING OUT OF
USE OF THE PRODUCT.
SOME COUNTRIES/STATES DO NOT ALLOW LIMITATIONS ON HOW LONG AN IMPLIED WARRANTY LASTS, SO THE
ABOVE LIMITATION MAY NOT APPLY TO YOU. THIS WARRANTY GIVES YOU SPECIFIC LEGAL
RIGHTS, AND YOU MAY ALSO HAVE OTHER RIGHTS WHICH VARY FROM STATE TO STATE.
7. LIMITATIONS ON REMEDIES. LAB:ONE’s liability in contract, tort or otherwise arising in connection with the
Product shall not exceed the purchase price of the Product. IN NO EVENT SHALL LAB:ONE BE LIABLE FOR
SPECIAL, INCIDENTAL, TORT OR CONSEQUENTIAL DAMAGES (INCLUDING ANY DAMAGES RESULTING
FROM LOSS OF USE, LOSS OF DATA, LOSS OF PROFITS OR LOSS OF BUSINESS) ARISING OUT OF
OR IN CONNECTION WITH THE PERFORMANCE OF THE PRODUCT, EVEN IF LAB:ONE HAS BEEN
ADVISED OF THE POSSIBILITY OF SUCH DAMAGES.
SOME COUNTRIES/STATES DO NOT ALLOW THE EXCLUSION OR LIMITATION OF INCIDENTAL OR CONSEQUENTIAL
DAMAGES SO THE ABOVE EXCLUSION OR LIMITATION MAY NOT APPLY TO YOU.

Page 18
Z
-
PLANE
Instruction Manual
V1.0
8. U.S. GOVERNMENT RESTRICTED RIGHTS. If you are a government agency, you acknowledge that the Product
was developed at private expense and that the computer software component is provided to you subject to
RESTRICTED RIGHTS. The rights of the government regarding its use, duplication, reproduction or disclosure by
the Government is subject to the restrictions set forth in subparagraph (c)(1)(ii) of the rights in Technical Data and
Computer Software clause at DFARS 252.227-7013, and (c)(1) and (2) of the Commercial Computer Software --
Restricted Rights clause at FAR 52.227-19. Contractor is Lab One Recordings.
9. TERMINATION. This License Agreement will terminate immediately if you breach any of its terms. Upon termination,
you will be required promptly to return to LAB:ONE or to destroy all copies of the Product covered by this
License Agreement.
19
10. MISCELLANEOUS.
10.1. Governing Law. The terms of this License shall be construed in accordance with the substantive laws of the
United States and/ or Commonwealth of Massachusetts, U.S.A.
10.2. No Waiver. The failure of either party to enforce any rights granted hereunder or to take any action against the
other party in the event of any breach hereunder shall not be deemed a waiver by that party as to subsequent
enforcement of rights or subsequent actions in the event of future breaches.
10.3. Litigation Expenses. If any action is brought by either party to this Agreement against the other party regarding
the subject matter hereof, the prevailing party shall be entitled to recover, in addition to any other relief granted,
reasonable attorneys' fees and litigation expenses.
10.4. Unenforceable Terms. Should any term of this License Agreement be declared void or unenforceable by any
court of competent jurisdiction, such declaration shall have no effect on the remaining terms hereof.
YOU ACKNOWLEDGE THAT YOU HAVE READ THIS LICENSE AGREEMENT, UNDERSTAND IT AND
AGREE TO BE BOUND BY ITS TERMS AND CONDITIONS. YOU FURTHER AGREE THAT IT IS THE
COMPLETE AND EXCLUSIVE STATEMENT OF THE LICENSE AGREEMENT BETWEEN YOU AND LAB ONE RECORDINGS
WHICH SUPERSEDES ANY PROPOSALS, OR PRIOR AGREEMENT, ORAL OR WRITTEN, AND ANY
OTHER COMMUNICATIONS BETWEEN YOU AND LAB ONE RECORDINGS RELATING TO THE SUBJECT MATTER
OF THIS LICENSE AGREEMENT.

Page 19
Z
-
PLANE
Instruction Manual
V1.0
Table of contents
Other Lab:One Recordings Recording Equipment manuals