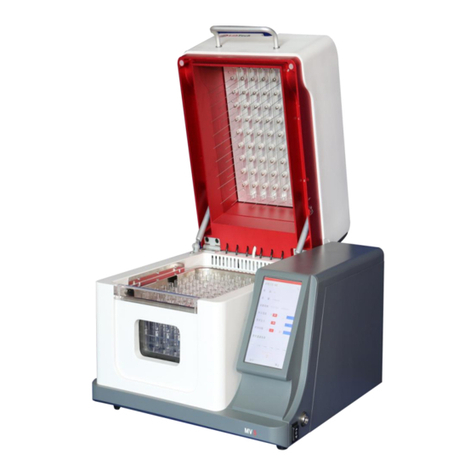
Labtech DigiBlock ED-S Series User manual

DIGIBLOCK
SAMPLE PREPARATION SYSTEM
USER MANUAL

DigiBlock – User Manual
2
Thank you for selecting our DigiBlock.
We are sure that you will be completely satisfied with the performance of
this new unit entering your laboratory. We invite you to read carefully this
user manual and to keep it close to the instrument for convenient and fast
consulting. For any possible clarification or any request for assistance
please contact either our local Representative or:
LabTech Srl
Via Fatebenefratelli, 1/5
24010 Sorisole (BG) Italy
Tel +39 035 576614
Fax +39 035 4729414
Website www.labtechsrl.com
E-mail marketing@labtechsrl.com
INDEX
1. INTRODUCTION .............................................................. 4
2. SAFETY RULES ................................................................. 5
3. INSTALLATION ................................................................ 7

DigiBlock – User Manual
3
4. SYSTEM SETTING ............................................................ 9
5. OPERATION PROCEDURE .............................................. 10
6. SOLVENTS TABLE .......................................................... 18
7. SERVICE ........................................................................ 19
The information contained in this document may be the object of patent applications by LABTECH.
The possession of this document does not confer any license rights in and to such patents.
The following names are LABTECH trademarks throughout the world:
LABTECH
DIGIBLOCK
All Reproduction Rights Reserved
1. INTRODUCTION
SPECIFICATION

DigiBlock – User Manual
4
2. SAFETY RULES
General Information
Model
Heating
Block
Max
Power.
Max.
Temp.
Temp.
Accuracy
Power Supply
ED-S
series
ED16S
Alluminium
alloy PTFE
coated
1000W
210°C
±0.2℃
230V±10%
50/60Hz±5%
ED36S
1400W
210°C
±0.2℃
ED54S
Graphite
PTFE
Coated
3000W
240°C
±1.0℃
EHD
series
EHD36S
Graphite
3000W
450°C
±0.1℃
Setting temp.
Temperature
Time
Temp. curve

DigiBlock – User Manual
5
Please read carefully this user manual before starting to use the instrument and follow its
prescriptions with the utmost care. This user manual is part of the delivery, hence must be
always kept together with the instrument on its working place.
It is imperative that every person operating with this system has read and fully understood this
manual. The non-observance of the instructions contained herein or improper use may involve
damages/injuries that are not covered by product liability.
Electrical safety
The instrument has to be used within the rated voltage. Prior to use, please check if the wire is
aged. In case of aged wires, please contact the after-sales service for inspection. It is
forbidden to disassemble the instrument and to connect internal circuit parts, in order
to avoid a short circuit or open circuit.
Fire safety
Numerous reagents are flammable and explosive. When the solvent vapor concentration
reaches a certain level, it would be flammable and could cause fire. The instrument
should be kept away from the sources of ignition and high temperature places. If there
is solvent pungent smell, carefully check whether there is gas or liquid leakage, and
turn off the power.
Chemical safety
The instrument is an instrument for organic chemical sample pretreatment. The involved
chemical solvents have harmful effects on the human health. Despite the instrument is
fully closed and features full vent design, it is recommended to pay attention to the
personal safety during the use. Regular check of liquid waste barrels as well as working
conditions of the vent fan are required to avoid the risk of leakage caused by corrosion and to
avoid the formation of organic solvent vapors affecting operators’ health. If there is a fault,
please contact the Labtech Service Team.
Please pay attention to the following notes when performing digestions.

DigiBlock – User Manual
6
(1) If your unit belongs to EHD series, you will see 5~10°C temperature pulse when the
temperature is lower than 150°C, so please carefully setup and adjust the temperature.
(2) The working temperature of polypropylene tube cannot exceed 130°C.
(3) The working temperature of PTFE tube cannot exceed 210°C.
(4) The working temperature of 18 positions heating rack with Teflon coating cannot exceed
210°C.
(5) Please carefully control temperature when using acid HClO4. The temperature should not
exceed 130°C if sample includes quite big organic components. It is appropriate to increase the
temperature above 180°C when the sample decomposition is basically finished.
(6) The digestion reaction will be very strong if the sample includes quite big organic
components. We recommend not to cover the tube.
(7) Glass vessels are not easy to uncap after heating. Let the tube cup cool down to ambient
temperature.
(8) For applications where an EHD unit has to work constantly over 12 hours, it is
recommended to set temperature not higher than 380°C.
3. INSTALLATION
Step 1: open the package and take out the unit. Place it on a stable laboratory bench. Handle
the unit carefully to avoid bumping it. The laboratory bench should be stable, reliable
and with no vibrations.
Step 2: connect the power supply cord. Take care the power switch is on the “O” position

DigiBlock – User Manual
7
before connecting the power supply cord.
Step 3: after the power supply cord is properly connected, switch ON the unit.
Optimized design has significantly improved the performance depending on installation
conditions of the unit. Adequately selected installation environment will certainly be helpful to
ensure longer service life and more efficient performance.
Avoid high temperature and high humidity
Never place the unit in a location where excessive heat, moisture or corrosive materials are
present. The unit should be located in a clean environment where ambient temperature is
between 15°C and 35°C and the humidity is between 45% and 80% respectively.
Avoid interference of strong electro-magnetic fields
Please keep the unit away from installations which release strong electro-magnetic field or
high-frequency waves.
Keep it away from corrosive gas
The unit should not be placed in a place with excessive corrosive gases such as chlorine,
hydrochloric acid, hydrogen sulfide, sulfurous acid gas, etc.
Place the unit on a stable platform
The installation platform must be horizontal and stable without vibration, capable of supporting
the total weight of the main unit and accessories. A distance at least 15 cm must be kept
between the left side of the instrument and the wall for undisturbed ventilation. Enough space
around the unit fan should be left for smooth ventilation.
Avoid sharing power socket with other electric appliances
An independent power socket should be prepared for the unit. The power socket should not be
shared with other electric appliances and th
e power supply should be grounded.
Do not place the unit in a place exposed to direct sunlight.
Do not place the unit in a dusty environment.
Attention Please: improper working environment may significantly affect the measurement
performance and reduce the life-span of the unit.
POWER SUPPLY
DigiBlock is available for power supply of 110V or 230V. The power supply of the unit should
correspond with the factory-set value before switching on, otherwise the unit will be damaged.
If the operator wants to change this value, please contact the Labtech Service Team.

DigiBlock – User Manual
8
The unit provides extra protection against the risk of electrical shock by grounding the
appropriate metal parts. The extra protection may not function unless the power cord is
connected to a properly grounded socket. It is the end user’s responsibility to guarantee a
proper ground connection is provided.
Main Components

DigiBlock – User Manual
9
Please pay attention to the maximum working temperature of different vessels:
• Polypropylene: 130°C
• PTFE: 210°C
• Borosilicate glass: 450°C
• Please make sure not to exceed respectively maximum temperatures
4. OPERATION PROCEDURE
CAL3300 built-in CONTROLLER
Change the Setpoint
Press and hold , the temperature of setpoint is displaying on LCD.
Press and hold , use or buttons to decrease or increase the temperature of setpoint.
How to Select Display resolution
The selected temperature display is 1°C or 0.1°C, and the operation as follows.
Press and together for 3 seconds to enter program mode.
Press one time and LCD will alternatively display LEUL and 1.
Press and hold and press one time to enter 2 and LEUL 2.
Press continually until indicated on the LCD. The LCD alternatively display
and 0.1.

DigiBlock – User Manual
10
Press and hold and press or to display resolution 0.1 or 1 degree. Once the
setpoint is adjusted, release the button.
Press and together for 3 seconds again to exit program mode.
How to Setup Program Ramping
Press and together for 3 seconds to enter program mode.
Press continually until indicated on the LCD. Press and hold and press
or to adjust the slope of temperature ramping 0~150℃/Hour (Temperature is
ramping).
Press continually until indicated on the LCD. Press and hold and press
or to .
Press continually until indicated on the LCD. Press and hold and press
or to adjust the keeping time (0~1440min) after reaching the setpoint.
Press and together for 3 seconds again to exit program mode.
When and real temperature display alternatively the setup is finished. When
and real temperature display alternatively the unit is running the set procedure. When
STOP and real temperature display alternatively means the temperature program ramp is
finished.
How to Unlock Parameters
Press and together for 3 seconds to enter program mode.
Press one time and LCD will alternatively display LEUL and 1.
Press and hold and press one time to enter 3 and LEUL 3.
Press continually until indicated on the LCD. The LCD alternatively display
and corresponding number.
Press and together for 10 seconds to enter LEUL 4.
When display on the LCD, press and hold and press or to .

DigiBlock – User Manual
11
Press and together for 3 seconds again to exit program mode.
The unlock procedure is finished.
Attention Please: It is prohibited to change any other parameters that are not indicated in user manual.
iTouch Separate CONTROLLER
LabTech iTouch controller operates by simply touching the keys on the screen.
Connect the iTouch controller to the back of DigiBlock main unit, switch ON the DigiBlock and
the iTouch screen is automatically ready for operations.
1. Temperature control range: room temperature to 210°/415°C (based on different DigiBlock
model).
2. Working time: from 1 to 15 heating steps. Each step can be set from -2 to 9999min.
“-2” Maximum heating speed to reach temperature setpoint
“-1” End the program
“0” Maintain previous step time setting
3. Temperature sensor mode: built-in K type sensor or optional PT100 external sensor.

DigiBlock – User Manual
12
Control Panel
1. Real-time status interface
1) Real-T °C: actual temperature
2) SetTemp °C:temperature setpoint of running heating step
3) Power %: Output power percentage
4) Curves: Switch to heating graph page
5) Setup: Switch to method setup page
6) Step A/B: A means the running step no. B means the total step no. in a method
7) Time A/B: A means actual running time of current heating step. B means set time of
current heating step
8) Total: Total running time of the method
9) : Method running status display
10) Ext. Temp: Display the external temperature (external sensor will be needed)
11) Run: Start selected method
12) Pause: Pause running method

DigiBlock – User Manual
13
13) Stop: Stop running method
2. Program heating graph
1) Purple curve: theoretical heating curve
2) Red curve: running heating curve
Operation
1. Method View Interface
1) Category selection: touch SETUP button and select desired category name located in
the left column (Soil, Food, Water, EPA and Customize).
2) Method selection: touch Method1 or Method2 buttons to select method 1 or 2.
3) Save: select a desired method to run
4) Exit: back to the main page without selecting any method
2. Method Setup Interface

DigiBlock – User Manual
14
1) Category selection: select desired method category located in the left column
2) Method selection: touch Method1 or Method2 buttons to select method 1 or 2
3) Step no.: Square min means temperature heating time (usually set to -2, that means
heat in max. heating speed); even number means temperature holding time.
Square °C means set temperature.
For last step of the program, please set to -1 to stop heating after time end. Max N°30
Steps.
4) Next: next page
5) Save: save modified parameters
Application
Edit a soil digestion method in Soil category, heat from room temperature to
100
℃
and hold in 100
℃
untill switch off the unit.
a) In home page, touch Setup to enter into method set interface.

DigiBlock – User Manual
15
b) Enter in to Method Edit interface, touch Soil and Method1
c) Step 01 : Touch the Temp. Text box, input 100 via the digital key. Then touch Time
text box to input -2 which means heat in max. heating speed (Normally, the
average heating speed is around 5℃/min).
Step 02 : Touch the Temp. text box and input 100 via the digital key. Then touch
Time text box to input 0 which means hold the temperature at previous step
setpoint.
Touch SAVE to save the method.
d) Touch Method Check to review the method.

DigiBlock – User Manual
16
e) Touch Soil then Method1 to check if the program heating curve you just set is
correct. Touch Save to quit the interface and select this program.
f) In home page, touch RUN to start the selected program.
Edit another soil digestion method in Soil category, heat from room
temperature to 100
℃
within 15min, hold 100
℃
for 60min, then increase the
temperature to 150
℃
within 8min, hold 150
℃
for 60min. End the program.
a) In home page, touch Setup to enter into Method Edit interface.
b) Touch Soil and Method2
Step 01 : Touch the Temp. Text box, input 100 via the digital key. Then touch
Time text box to input 15.
NOTE : Recommended temperature increasing Time is ‘-2’ (the average heating speed is around
5
℃
/min), thus the unit can heat in the max. heating speed.
Step 02 : Touch the Temp. text box and input 100 via the digital key. Then touch
Time text box to input 60 which means hold the temperature at previous step
setpoint for 60min.
Step 03: Touch the Temp. Text box, input 150 via the digital key. Then touch Time
text box to input 8 which means temperature increase from 100C to 150C within

DigiBlock – User Manual
17
8min.
Step 04: Touch the Temp. Text box, input 150 via the digital key. Then touch Time
text box to input 60 which means holding temperature at 150C for 60min.
Step 05: Touch the Temp. Text box, input 150 via the digital key. Then touch Time
text box to input -1 which means stop the program after step 04.
Touch SAVE to save the method.
c) Touch Method Check to view and check the heating graph.
d) Touch Soil then Method2 to check if the programm heating curve you just set is
correct. Touch Save to quit the interface and select this programm.
e) In home page, touch RUN to start the selected programm.
f) When finish all the steps, the unit stops and buzzer screaming. Touch any key to
stop the buzzer.
5. SOLVENTS TABLE

DigiBlock – User Manual
18
6. SERVICE

DigiBlock – User Manual
19
The LABTECH worldwide technical support network consists of highly
trained Field Service Engineers, Technical Support Specialists and Service
Coordinators who are ready to quickly assist customers with answers and
solutions to service needs and application questions.
For any possible clarification or any request for assistance please contact
either our local Representative or:
LabTech Srl
Via Fatebenefratelli, 1/5
24010 Sorisole (BG) Italy
Tel +39 035 576614
Fax +39 035 4729414
Website www.labtechsrl.com
E-mail service@labtechsrl.com
This manual suits for next models
5
Table of contents
Other Labtech Laboratory Equipment manuals
Popular Laboratory Equipment manuals by other brands

Noraxon
Noraxon Ultium 808 user manual

Ossila
Ossila Spin Coater user manual

Thermo Scientific
Thermo Scientific Orion Versa Star instruction sheet

Swan Analytical Instruments
Swan Analytical Instruments AMI Codes-II CC Operator's manual

Thermo Scientific
Thermo Scientific Orbitrap Fusion Lumos MS Getting connected guide

Ken A Vision
Ken A Vision Video Flex 5400 installation manual