BrandTech Scientific Macro User manual

macro-Pipettierhelfer
Macro Pipette Controller
Gebrauchsanleitung
Bitte Schritt für Schritt befolgen!
Operating Manual
Please follow step by step!
BrandTech Scientific, Inc. · 11 Bokum Road · Essex, CT 06426-1506 · USA
Phone: (860) 767-2562 · Fax: (860) 767-2563 · E-Mail: [email protected] · Internet: www.brandtech.com

- 3 -
Inhalt Seite
Sicherheitsbestimmungen 4
Einzelteile 6
Funktion 7
Einsatzbeschränkungen 7
Pipettieren 8
Saugbalg entlüften 8
Pipette aufstecken 8
Pipette füllen 9
Meniskus einstellen 10
Pipette entleeren 10
Nach dem Pipettieren 11
Reinigung / Dampfsterilisieren 12
Filter austauschen und Adapter reinigen 12
Ventilsystem austauschen 14
Dichtigkeit prüfen 15
Störung - was tun? 16
Zur Reparatur einsenden 18
Mängelhaftung 18
Bestelldaten / Ersatzteile 19
Contents Page
Safety Instructions 4
Components 6
Application 7
Operating Limitations 7
Pipetting 8
Compress the suction bellows 8
Attach the pipette 8
Fill the pipette 9
Adjust the meniscus 10
Dispense the pipette 10
After Pipetting 11
Cleaning / Steam sterilization 12
Replace the filter and clean the adapter 12
Replace the valve system 14
Leak Test 15
Trouble Shooting 17
Return for Repair 18
Warranty 18
Ordering Data / Spare Parts 19

Vor Benutzung sorgfältig lesen!
Sicherheitsbestimmungen
Dieses Gerät kann in Kombination mit gefährlichen
Materialien verwendet werden. Die Gebrauchsan-
leitung kann jedoch nicht alle Sicherheitsprobleme
aufzeigen, die hierbei eventuell auftreten. Es liegt in
der Verantwortung des Anwenders, die Einhaltung
der Sicherheits- und Gesundheitsvorschriften sicher-
zustellen und die entsprechenden Einschränkungen
vor Gebrauch festzulegen.
1. Allgemeine Gefahrenhinweise und Sicherheits-
vorschriften befolgen, z. B. Schutzkleidung,
Schutzbrille und Schutzhandschuhe tragen.
2. Angaben der Reagenzienhersteller beachten.
3. Jeder Anwender muss diese Gebrauchsanleitung
vor Gebrauch des Geräts lesen.
4. Stets so arbeiten, dass weder Benutzer noch
andere Personen gefährdet werden.
5. Gerät nur zum Pipettieren und nur im Rahmen
der Materialbeständigkeit einsetzen.
Read carefully before use!
Safety Instructions
This instrument may be involved with hazardous
materials. This Operating Manual does not purport
to address all of the safety problems associated
with its use. It is the responsibility of whoever uses
this instrument to consult and establish appropriate
safety and health practices and to determine the
applicability of regulatory limitations prior to use.
1. Follow the general instructions for hazard prevention
and safety regulations, e. g., wear protective
clothing, goggles and gloves.
2. Observe the reagent manufacturer’s information.
3. Every user must read this Operating Manual before
using the instrument.
4. Always work in a way which neither endangers the
user nor any other person.
5. Use the instrument only for pipetting, and within the
recommended limits of its chemical resistance and
mechanical properties.
- 4 -

- 5 -
6. Nie Gewalt anwenden.
7. Bei Störungen sofort aufhören zu pipettieren
und vor jeder weiteren Benutzung des Gerätes
Reinigungs- und Wartungshinweise befolgen
(➢S. 12 - 16). Ggf. an den Fachhändler wenden.
8. Nur Original-Zubehör und Original-Ersatzteile
verwenden.
6. Never use force when using this instrument.
7. In case of trouble, immediately stop pipetting. Clean
and repair the instrument according to the instruc-
tions before any further use of the instrument
(➢ pages 12 - 17) or contact the supplier.
8. Only use original manufacturer’s accessories and
spare parts.
- 6 -
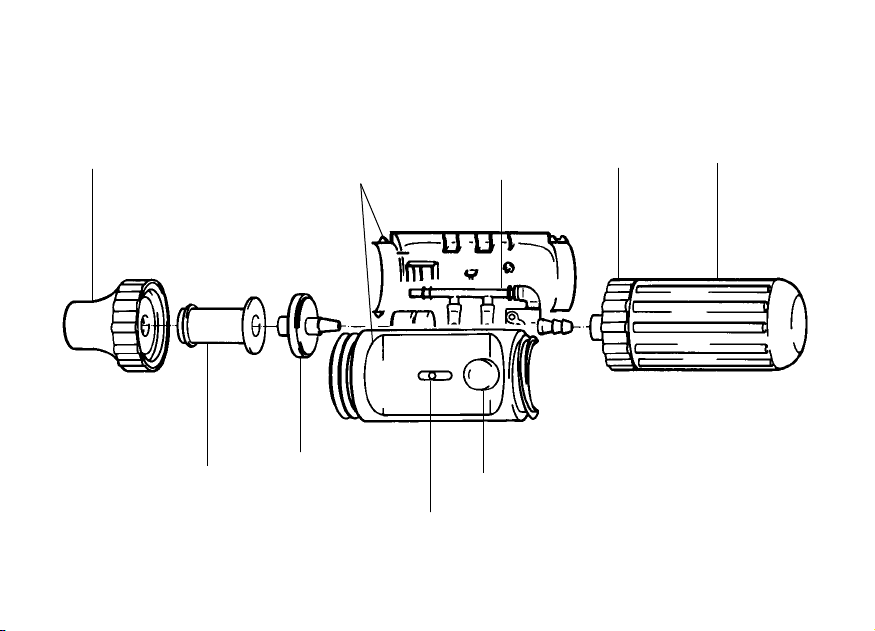
Einzelteile / Components
(SI)
Blow-out Blase
blow out bellows
Adaptergehäuse
adapter support
(PP)
Gehäuse
housing
(PP)
Ventilsystem
valve system
(PP, SI, PTFE)
Schraubring
locking ring
(PP)
Saugbalg
suction bellows
(SI)
(SI)
Adapter
adapter
(PP, PTFE)
Membranfilter
membrane filter
Pipettierhebel
pipetting lever

- 7 -
PP: Polypropylen
PTFE: Polytetrafluorethylen
SI: Silikon
PP: Polypropylene
PTFE: Polytetrafluorethylene
SI: Silicone rubber
Funktion
Das Gerät dient als Hilfe zum Pipettieren von Flüssig-
keiten mit Mess-, Voll- und Ausblaspipetten aus Glas
und Kunststoff im Volumenbereich von 0,1 ml bis
100 ml. Bei richtiger Handhabung kommt die pipet-
tierte Flüssigkeit nur mit der Pipette in Kontakt.
Einsatzbeschränkungen
Flüssigkeitsdämpfe kommen in Berührung mit PP,
PTFE und Silikon. Das Gerät darf daher nicht für
Flüssigkeiten eingesetzt werden, deren Dämpfe
diese Materialien angreifen.
Application
The instrument serves to facilitate the pipetting of
liquids with graduated pipettes, volumetric pipettes and
blow-out pipettes of either glass or plastic composition
within the volume range of 0.1 ml to 100 ml. If the in-
strument is correctly used, the liquid comes into contact
with the pipette only.
Operating Limitations
The instrument must not be used with vaporos liquids
that are incompatible with polypropylene, PTFE and
silicone.

- 8 -
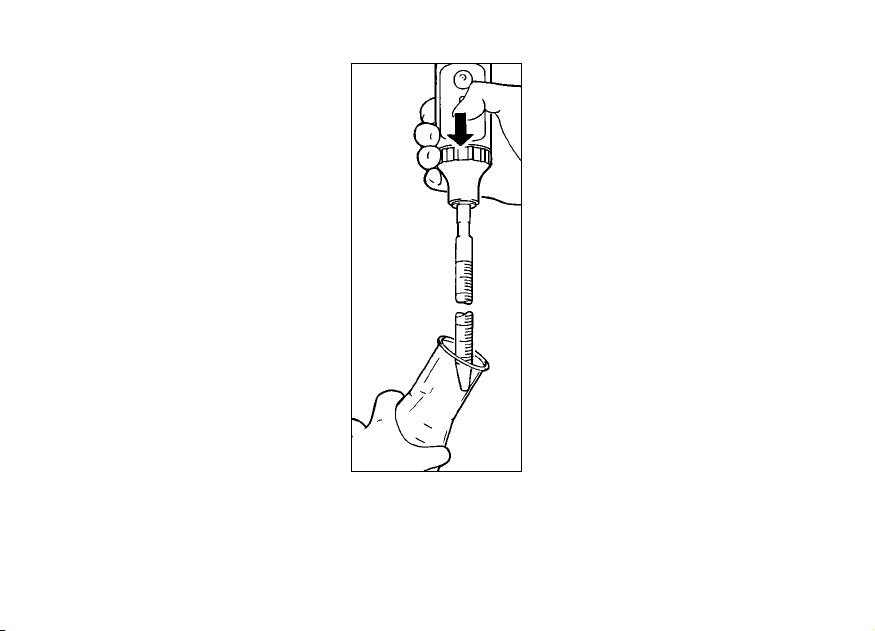
Pipettieren
Saugbalg entlüften
Vor dem Aufstecken der Pipette Saugbalg
zusammendrücken.
Pipette aufstecken
Pipette möglichst dicht am oberen Ende
halten und vorsichtig in den Adapter ein-
schieben, bis sie fest sitzt.
Achtung!
Nie Gewalt anwenden! Besonders bei
dünnen Pipetten besteht Gefahr von
Glasbruch! Verletzungsgefahr!
Gerät mit eingesteckter Pipette stets
senkrecht halten, Spitze nach unten.
Attention!
Never use force. Thin pipettes are
particularly liable to break. Avoid the
risk of injury!
Pipetting
Compress the suction bellows
Before attaching the pipette, squeeze the
suction bellows.
Attach the pipette
Hold the pipette as near to its upper end
as possible, and carefully insert it into the
adapter until it fits tightly.
Once the pipette has been securely at-
tached, always hold the instrument in a
vertical position, tip down.

- 9 -
Pipette füllen
Pipettenspitze in die Flüssigkeit ein-
tauchen. Pipettierhebel vorsichtig nach
oben drücken. Pipette etwas über die
gewünschte Marke füllen.
Achtung!
Bitte achten Sie darauf, dass keine
Flüssigkeit in das Gerät gelangt!
Die Funktion des Membranfilters wird
beeinträchtigt und die Saugleistung
lässt nach. In diesem Fall Membranfi l ter
auswechseln (➢S. 12 - 13).
Hinweis:
Je weiter der Hebel nach oben bewegt wird, desto
stärker die Saugwirkung, d.h. desto schneller steigt
der Meniskus!
Bei großen Pipetten (> 50 ml) reicht das im Saug-
balg befindliche Vakuum nicht aus, um die Flüssig-
keitsmenge auf einmal aufzuziehen.
In diesem Fall: Saugbalg erneut zusammendrücken
und weiter aufziehen.
Fill the pipette
Immerse the pipette tip into the liquid.
Press the pipetting lever slowly upwards.
Fill the pipette so that the level of liquid is
slightly above the required mark.
Attention!
Please take care that no liquid enters
into the instrument. This would impair
the filtering function and reduce the
suction capacity. If liquid does enter
the instrument, exchange the filter
(➢pages 12 - 13).
Note:
The further up the lever is pressed, the stronger
the suction becomes and the quicker the meniscus
rises.
In the case of large pipettes (> 50 ml) the vacuum
contained in the suction bellows is not sufficient to
draw in all the liquid at once. Therefore, squeeze
the suction bellows again and continue drawing up
liquid.
- 10 -
Meniskus einstellen
Pipettenspitze mit geeignetem flusen-
freien Tuch abwischen. Pipettierhebel
vorsichtig nach unten drücken, bis
Meniskus genau eingestellt ist.
Pipette entleeren
Auffanggefäß schräg halten. Pipettenspitze
an der Innenwand anlegen. Pipettierhebel
nach unten drücken.
➢ Bei Pipetten mit Wartezeit
(Aufdruck z. B. "Ex + 15 s"):
- Sobald Meniskus in der Pipette zum
Stillstand kommt, die auf der Pipette
angegebene Wartezeit (hier 15 sec.)
einhalten.
- Pipettenspitze einige Millimeter an der
Gefäßwand hochziehen.
Adjust the meniscus
Use suitable lint-free tissue to wipe the
pipette tip. Press the pipetting lever down
slowly, until precise adjustment of the
meniscus has been achieved.
Dispense the pipette
Hold the collecting vessel in an inclined
position. Place the pipette tip against the
inner vessel wall. Press the pipetting lever
down to dispense.
➢ In the case of pipettes with a wait-
ing time (Imprint e. g., "Ex + 15 s"):
- As soon as the meniscus in the pipette
comes to a standstill, start waiting time
as is indicated on the pipette.
- Wipe the pipette tip a few millimeters
upward along the wall of the vessel.

- 11 -
➢ Bei Ausblaspipetten
(Aufdruck "ausblasen - blow out"):
- Sobald der Meniskus in der Pipetten-
spitze zum Stillstand gekommen ist,
einmal den kleinen Ausblasbalg drücken.
- Pipettenspitze einige Millimeter an der
Gefäßwand hochziehen.
Nach dem Pipettieren
Pipette möglichst weit oben anfassen und
aus dem Adapter herausziehen.
➢ In the case of blow-out pipettes
(Imprint "ausblasen - blow out"):
- As soon as the meniscus in the pipette
tip comes to a standstill, press the small
blow-out bellows once.
- Wipe the pipette tip a few millimeters
upward along the wall of the vessel.
After pipetting
Hold the pipette as its extreme upper
end, and gently twist and pull it out of
the adapter.
- 12 -
Reinigung / Dampfsterilisieren
Gerät gelegentlich mit einem feuchten Tuch
abwischen. Zum Dampfsterilisieren Saug-
balg abschrauben.
Das Gerät ist dampfsterilisierbeständig
bei 121 °C, 2 bar abs. (
^
= 1 bar Über-
druck), Einwirkzeit nach DIN te= 20 min.
Die Wirksamkeit der Sterilisation ist vom
Anwender jeweils selbst zu prüfen.
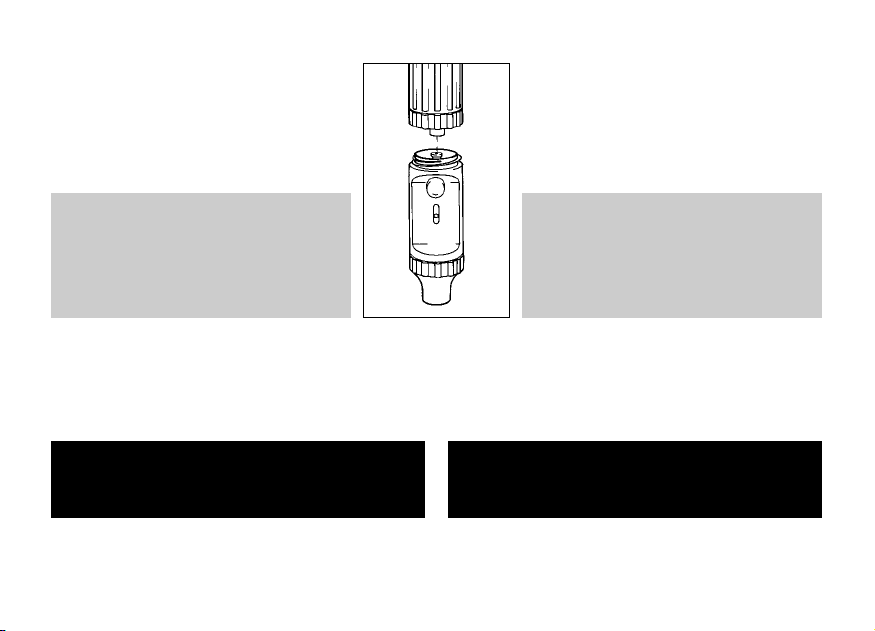
Filter austauschen und
Adapter reinigen
Achtung!
Schutzhandschuhe und Schutzbrille tragen,
Infektionsgefahr!
Wenn die Pipette überfüllt wurde oder die Saugleistung
beeinträchtigt ist, dann wie folgt vorgehen:
Cleaning / Steam sterilization
Occasionally wipe the instrument with a
damp cloth. For steam sterilization remove
suction bellow.
The instrument withstand steam steriliza-
tion at 121 °C, 2 bar absolute (
^
= 1 bar
above atmospheric pressure), exposure
time te = 20 minutes, according to DIN.
It is the user's responsibility to ensure
effective sterilization.
Replace the filter and
clean the adapter
Attention!
Wear protective gloves and chemical splash
goggles. Avoid the risk of infection!
If the pipette has been overfilled or the suction capacity
is impaired, proceed as described below:
- 13 -
1. Pipette herausziehen.
2. Adaptergehäuse des Gerätes abschrauben.
3. Benetzten Membranfilter nach unten ab-
ziehen und durch einen neuen ersetzen.
4. Silikonadapter nach oben aus dem
Adaptergehäuse herausdrücken.
Adapter sorgfältig mit einer Spritzflasche
ausspülen. Anschließend ausblasen und
austrocknen.
5. Neuen Membranfilter mit dem dickeren
Ende nach unten zuerst in den Adapter
setzen (konische Seite nach oben).
Hinweis: Nicht jeder Membranfi l ter ist
geeignet! Nur Original-Zubehör verwen-
den. Serienmäßig ist das Gerät mit Filtern
der Porenweite 3 µm ausgestattet. Der
Membranfilter ist bis zu 5 mal dampfsteri-
lisierbeständig bei 121 °C, 2 bar abs.
(1 bar Überdruck) und 20 min. Einwirk-
zeit (te) nach DIN. Die Wirksamkeit der
Sterilisation ist vom Anwender jeweils
selbst zu prüfen.
6. Gerät wieder zusammenschrauben.
7. Dichtigkeit prüfen (➢Seite 15).
1. Pull out the pipette.
2. Unscrew the adapter support.
3. Pull the membrane filter out and replace
it with an original new one.
4. Remove the silicone adapter out of the
housing by pulling it upwards. Use a wash
bottle to accurately rinse the adapter.
Blow out the liquid and allow to dry
completely.
5. Place the new membrane filter with the
thicker end down first into the silicone
adapter (with the smaller conical side up).
Note: Not every membrane filter is sui-
table. Use only genuine manufacturer’s
recommended accessories. Filters of a
pore size of 3 µm are a standard equip-
ment of the instrument. Up to 5 times,
the membrane filter can withstand steam
sterilization at 121 °C (2 bar absolute,
i.e. 1 bar above atmospheric pressure)
for 20 minutes. It is the user’s responsi-
bility to ensure proper sterilization.
6. Reassemble the instrument by
screwing its parts together.
7. For leak test (➢page 15).

- 14 -
Ventilsystem austauschen
Saugbalg und Adaptergehäuse
abschrauben.
Replace the valve system
Unscrew the suction bellows and the
adapter support.

- 15 -
Zum Austauschen Oberteil des
Gehäuses abnehmen. Vorsichtig
das Ventilsystem herausnehmen und
austauschen. Gerät wieder zusammen-
setzen.
Take off the upper part of the housing.
Carefully pull out the valve system and
replace it. Reassemble the instrument.
Dichtigkeit prüfen
Nach dem Einstellen des Meniskus darf
ohne Betätigung der Ventile die Flüssigkeit
nicht tropfen. Sollte dies jedoch nicht der
Fall sein, Gerät wieder auseinandernehmen
und korrekt zusammensetzen.
Leak test
Attach a pipette to the instrument. Aspirate
liquid. When the meniscus has been set,
liquid should not drip out of the pipette
until the valves are activated. If it drips,
dismantle the instrument once again and
reassemble it correctly.

- 16 -
Störung - was tun?
Hinweis:
Beim dem Gerät genügt häufig eine Sichtkontrolle,
um ein schadhaftes Teil zu erkennen, das dann
problemlos gegen ein Ersatzteil ausgetauscht
werden kann.
Die Vorteile der Selbst-Instandsetzung liegen auf
der Hand: Kosten- und Zeitersparnis.
Wenn Sie das Problem mittels obiger Störungs-
tabelle nicht lösen können, wenden Sie sich an
Ihren Fachhändler.
Störung Mögliche Ursache Was tun?
Saugleistung
beeinträchtigt
Filter verschmutzt oder
Ventilsystem defekt
Filter auswechseln,
➢Seite 12 - 13
Pipette tropft Filter sitzt nicht richtig oder
Ventilsystem defekt
Filter richtig einsetzen oder Ventil-
system austauschen, ➢Seite 14
Pipette hält nicht Silikon-Adapter beschädigt Unterteil des Gerätes abschrauben,
Silikon-Adapter auswechseln
Saugbalg belüftet
selbständig
Saugbalg oder Ventilsystem
defekt
Obere Verschraubung mit Saugbalg
oder Ventilsystem austauschen

- 17 -
Trouble Shooting
Note:
Often visual control of the instrument is sufficient to
discover a faulty device which can easily be replaced
by a spare part.
The advantages of do-it-yourself repair are obvious:
It saves time and money.
If recommendations in the Trouble Shooting do not
resolve current problems, contact your supplier.
Trouble Possible Cause Action to be taken
Suction capacity impaired Filter dirty or valve system damaged Replace filter,
➢page 12 - 13
Pipette drips Filter not properly positioned or valve
system damaged
Insert filter or replace valve system,
➢page 14
Pipette not held properly Silicone adapter damaged Unscrew the adapter support of the
instrument, replace silicone adapter
Compressed suction bellows
take in air automatically
Suction bellows or valve system
damaged
Replace the looking ring with the
suction bellows or the valve system

- 18 -
Zur Reparatur einsenden
BrandTech Scientific, Inc. will not accept instruments
that are not appropriately cleaned and decontaminated.
➢Therefore, contact BrandTech Scientific, Inc. and
obtain return authorisation before sending your
instrument for service.
Return for Repair
Achtung:
Der Transport von gefährlichem Material ohne
Genehmigung ist gesetzlich verboten.
BrandTech Scientific, Inc. wird keine Geräte annehmen,
die nicht ordnungsgemäß gereinigt und dekontaminiert
wurden.
➢ Bitte klären Sie mit BrandTech Scientific, Inc. die
Rücksendungs-Voraussetzungen bevor Sie das
Gerät zum Service einschicken.
Attention:
Transporting of hazardous materials without a permit
is a violation of federal law.
Mängelhaftung Warranty
As provided by law, any and all warranties are null
and void if the product has been misused, modified
or repaired by unauthorized personnel, if the defects
are caused by negligence (instruction manual, mainte-
nance) or by normal wear and tear. Use only original
manufacturer’s accessory/spare parts.
Abnutzung infolge des Gebrauchs sowie Defekte
oder Schäden, die auf unsachgemäßer Behandlung,
Modifikation oder nicht-autorisierte Reparatur auf
Nachlässigkeit (Nichtbeachtung der Gebrauchsan-
leitung, mangelnde Wartung) oder auf Einbau fremder
Zubehör- bzw. Ersatzteile beruhen, sind nach dem
Gesetz keine Sachmängel.

- 19 -
Bestelldaten / Ersatzteile
macro-Pipettierhelfer,
komplett, mit Filter Best.-Nr. 2 0260 02
Ersatz-Membranfilter 3 µm, unsteril
1 Stück in Blisterverpackung Best.-Nr. 260 52
Ersatz-Membranfilter 3 µm, unsteril
10 Stück im PE-Beutel Best.-Nr. 260 56
Adaptergehäuse,
PP, grau, Länge 49 mm Best.-Nr. 261 48
Silikon-Adapter,
Länge 44 mm Best.-Nr. 261 46
Saugbalg mit Verschraubung Best.-Nr. 260 37
Ventilsystem Best.-Nr. 261 28
Ordering Data / Spare Parts
macro pipette controller,
complete, with membrane filter Cat. No. 2 0260 02
Spare membrane filter 3 µm, non-sterile
1 pc. in blister pack Cat. No. 260 52
Spare membrane filter 3 µm, non-sterile
10 pcs., in PE-bag Cat. No. 260 56
Adapter support,
PP, grey, length 49 mm Cat. No. 261 48
Silicone adapter,
length 44 mm Cat. No. 261 46
Suction bellows with locking ring Cat. No. 260 37
Valve system Cat. No. 261 28

Hinweis:
Pipettenadapter und Adaptergehäuse sind um 11 mm
verlängert! Dies gewährleistet noch besseren Halt der
Pipetten. Daher bei Bestellung auf die neue Ersatzteil-
nummer für den Pipettenadapter achten (Der Pipetten-
adapter mit der Best.-Nr. 260 43, Gesamtlänge
33 mm, ist nicht mehr lieferbar!).
Die bisherigen macro-Pipettierhelfer können einfach
umgerüstet werden, indem der neue Pipettenadapter
zusammen mit dem neuen Adaptergehäuse bestellt
wird.
Please note:
Pipette adapter and adapter support are extended by
11 mm for optimized fit of pipettes! Please note the
new Cat. No. for further orders (The former adapter,
Cat. No. 260 43, length 33 mm, is no longer
available!).
To upgrade older macro pipette controllers, just order
the new pipette adapter together with the new adapter
support.
- 20 -
Table of contents
Other BrandTech Scientific Laboratory Equipment manuals


Popular Laboratory Equipment manuals by other brands

Auxilab
Auxilab Fugelab-GB10 user manual

SMC Networks
SMC Networks INR-244-780 Operation manual

W&H Med
W&H Med lina Instructions for use

MELAG
MELAG Vacuklav 41 B Plus Evolution Technical manual

Scientifica
Scientifica Multiphoton Scanhead Setup and operation manual

Altronix
Altronix NetWay112 Series installation guide


CPAC
CPAC SteriDENT 300 operating instructions

horiba
horiba ABX MICROS ES60 user manual

CASHIDO
CASHIDO 10 Second Machine Commercial OH6800 Series user manual

Terragene
Terragene IC10/20FRT Quick user guide

Binder
Binder APT.line FP 56 operating manual

Bruker
Bruker BioSpin NMR Fourier 300 Site Planning Manual