manuals.online logo
Brands
  1. Home
  2. •
  3. Brands
  4. •
  5. Lafayette
  6. •
  7. Indoor Furnishing
  8. •
  9. Lafayette Parasol Cellular Shade Operation manual

Lafayette Parasol Cellular Shade Operation manual

Fully recessed
Parasol ™ Cellular Shade
Standard Rectangular-Top Down-Top Down/Bottom-Up
Installation and Care Instructions
Thank you for choosing Parasol ™ Cellular Shades.
With proper installation and care, your new Parasol
shades will provide many years of beauty and
performance.
Tools Needed
Measuring Tape Phillips Screwdriver
Power Drill and Bits Scissors
Long Flat blade Screwdriver
In addition to the tools, you may need a supply of
fasteners to attach the shade mounting hardware. Sheet
metal screws will work with both wood and aluminum.
Wall anchors or expansion bolts are recommended for
non-solid surfaces such as drywall or lath and plaster.
The mounting hardware you received with your
Parasol shades was specified at the time the shades
were ordered, based upon your installation needs. The
hardware may include:
Installation Brackets Swivel Brackets
Specialty End Mount Brackets Spacer Blocks
Extension Brackets Hold Down Brackets
Installation Brackets are attached either inside or
outside the window casement, depending upon
whether the shade was ordered inside or outside
mount. On outside mounts, spacer blocks or extension
brackets can be used with installation brackets to allow
the shade to clear obstructions. Optional swivel
brackets can be used to inside mount shades within
shallow window casements. Specialty end mount
brackets are required when the shade’s headrail must
span an open space, such as under an arch. Hold down
brackets are optional and prevent the bottom of the
shade from swaying.
Your Parasol shade installation is organized into three
simple steps. Before you begin, make sure you have all
the tools and hardware you need to do the job
correctly. Please read these instructions all the way
through to acquaint you with the installation
procedure.
1. ATTACH THE INSTALLATION BRACKET
BRACKET SPACING
Spacing of standard installation brackets is the same for
both inside and outside mount. Two brackets are
positioned on the mounting surface so that their
centerline will be 2 ¼” in from the ends of the shade. If
more than two brackets are required (see chart),
additional brackets are spaced evenly between the two
end brackets. Measure and mark all bracket centerlines.
Note: When swivel brackets are used, measure 3” in
from the ends of the shade and position a bracket screw
hole at each end of those locations. When specialty end
mount brackets are used, the brackets are attached to
the sides of the opening at each end of the headrail.
INSIDE MOUNT APPLICATIONS
With inside mount applications, one mounting screw is
used to attach the top of each installation bracket to the
top sill of the window opening. Locate the screws on
the centerlines you marked and position the brackets so
that their front edges are aligned.
To attach the brackets, the flat surface of the sill must
be at least 1” deep. To fully recess the shade, the flat
surface must be at least 1 ½” deep for 3/8” please sizes,
or 2 ¼” deep for ¾” pleat sizes and double cell sizes.
Add to these minimums the dimensions of any
obstruction to the shade movement, such as a window
crank or handle.
SWIVEL BRACKETS
Swivel brackets require less mounting depth than
standard installation brackets. Bracket attachment
requires a solid mounting only ½” deep for 3/8” pleat
sizes, or 2” deep for ¾” pleat sizes and double cell
styles. Add to these minimum depths the dimension of
Installation
Bracket
Spacer
Block
Extension
Bracket
Swivel
Bracket
Hold
Dow
n
Specialty
End Mount
Bracket
Shade Width Brackets
Up to 31” 2
31” to 79” 3
79” to 127” 4
127” to 174” 5
3/8”
Pleat
¾”
Pleat
Double
Cell
Fully recessed
minimum de
p
th
Fully recessed
minimum de
p
th
any obstruction the shade movements, such as a
window crank or handle. Swivel brackets can be used
on inside mount applications only. A #6 x 1” Phillips
pan head screw is recommended for use with the swivel
bracket.
EXTENSION BRACKETS
Extension brackets can project the installation bracket
up to 2 ½” from the mounting surface. Position the
brackets on the centerlines you marked and use two
screws to attach them. Be sure to align the tops of the
brackets on the same level.
Connect the installation brackets with the machine
screw and speed nut which are included with each
extension bracket. Be sure to use the same hole on all
the extension brackets so that each installation bracket
projects the same distance from the mounting surface.
SPECIALTY END MOUNT BRACKETS
Specialty end mount brackets are used when the
shade’s headrail must span an open space and other
mounting methods will not work. End mount brackets
fit into the small grooves on the top of the headrail. Pull
the cordlock out about ½” to insert the bracket into the
grooves. On the other end of the rail, remove the end
cap temporarily to install the bracket. If an arch shade
shares the headrail with a standard shade, carefully
insert the brackets under the arch fabric.
After inserting the brackets, hold the shade assembly in
the window opening and mark where to drill holes for
the mounting bracket screws. Use a level to make sure
the headrail is perfectly horizontal. After marking and
drilling the mounting screw holes, again position the
shade assembly in the window opening. Gently pull
the fabric forward to install the mounting screws. Be
very careful not to damage or wrinkle the fabric during
the installation process.
To fully recess the shade, the window opening must be
1 ¼” deep for 3/8” pleat sizes, 1 7/8” for ¾” pleat sizes
and double cell styles.
When mounting swivel
brackets, locate the bracket
screw holes at the positions you
marked. Only one screw is
needed to attach each swivel
bracket. On the bracket for 3/8”
pleat sizes, the single screw hole
is offset from center. On the
bracket for ¾” pleat sizes and
double cell styles, there are two
screw holes offset from center.
Use the front hole if a mounting depth of at least 1” is
available. Use the rear hole only if the mounting depth
is between ½” and 1”. Caution: Do not attach a screw
through the swivel eyelet on the brackets.
OUTSIDE MOUNT APPLICATIONS
Mount the ends of the installation brackets on a flat
vertical surface at least 5/8” high for 3/8” pleat sizes or
at least 1” high for ¾” pleat sizes and double cell styles.
Two screws are used to attach each bracket. Center the
brackets on the centerlines you marked and attach
them with the appropriate fasteners. The tops of the
installation brackets should be perfectly horizontal and
aligned at the same height.
SPACER BLOCKS
Spacer blocks are used to project the installation
bracket away from the mounting surface when
additional clearance is needed. Each spacer block
increases clearance by ½”.
Use a maximum of three blocks per bracket, with the
solid sides facing the mounting surface. Check to be
sure your mounting screws are long enough for secure
installation.
Spacer
Block
Extension
Bracket
2. INSTALL THE SHADE ASSEMBLY
STANDARD INSTALLATION BRACKETS
Unwind the cord from around the shade assembly and
let it hang. With the cordlock facing the room side, slip
the headrail into the installation brackets. The front lips
on the brackets fit into the front groove on the top of
the rail.
Push on the rail until it snaps into place. Then, after
making sure that the fabric is not trapped between the
headrail and the tabs on the installation bracket, use a
screwdriver to tighten the tab screw on each bracket
until it is just snug. Do not over tighten.
SWIVEL BRACKETS
With the moveable tabs on the brackets positioned
outward, lift the shade into position so that the headrail
is up against the back and top of the brackets. Be sure
the cord is hanging freely and the front (colored) side of
the fabric is facing the room side. When the shade is
properly positioned, lock the headrail in place by
rotating the moveable tabs to the right. Check that the
shade is tightly secured at all bracket locations.
3. ADJUST THE SHADE
VERIFY SHADE LENGTH
•Raise and lower the shade several times.
•If the length is incorrect or the bottom rail is not
level, use the following steps to correct.
SHADE LENGTH ADJUSTMENT
Shade height and adjustments to the bottom rail can be
made by adjusting the cord on the underside of the
bottom rail.
Headrail
Tab Screw
TASSEL CORD LENGTH
The tassel cord length is usually
2/3 the length of the fully closed
shade. To shorten the tassel
cord, slide the tassel up the cord
to the desired location and knot
the cord. Trim the excess cord
below the knot.
OPTIONAL HOLD DOWN BRACKETS
With the shade at its full drop, place the pins on the
hold down brackets into the bottom rail end caps
and mark mounting hole locations. Attach the hold
down brackets with one screw through the side hole
or two screws through the end holes. Be sure both
bracket pins are aligned and level.
•Locate the ferrule which
is seated in a pocket on
the bottom rail.
•Remove the ferrule by
pulling on the excess
cord. If the cord has been
trimmed, use needlenose
pliers to access it.
•To shorten the cord,
hold the cord tight
under the ferrule. Then
slide the ferrule up
toward the pocket.
•To lengthen the cord,
hold the cord tight
under the ferrule. Then
slide the ferrule down.
•After adjusting, place
the ferrule fully back
into the pocket.
•Once you are certain of
the final adjustments,
trim the cord flush with
the ferrule and bottom
rail.
CHILD SAFETY
WARNING: keeps cords out of the reach of children.
There are three basic ways to implement this essential
precaution:
1. Cord Cleats
Attach two cord cleats 6” to 12” apart at the height where
they will be out of the reach of children. Be sure the cleats
are firmly secured. Mount the fasteners into studs, where
possible, or use wall anchors when mounting into
drywall. When planning the mounting height, take into
account that a childe may stand on a baby crib or other
furniture in an attempt to reach the cords. Once the cleats
are attached, simply wrap the excess cord around them
after each use of the shade.
2. Cord Clip
Clip the cord to itself using a cord clip or other clamping
device.
3. Tie
Wrap or tie the cord to itself.
CARE AND CLEANING
Because the Parasol fabric is anti-static, it requires
very little cleaning. A light sweep with your
vacuum cleaner brush attachment is all that is
needed to keep it dust-free. For a more thorough
cleaning, the entire shade assembly may be gently
wiped with a soft, damp cloth using lukewarm
water. Take special care when handling opaque
fabrics to avoid creasing and do not immerse in
water. Professional ultrasonic cleaning is another
option except for shades made with opaque fabrics.
Only mild cleaning solutions should be used.
WARNING: Young children can
become entangled and strangle in
cords. Keep all cords out of the reach
of children. Lafayette provides cord
cleats and we recommend their use.
2219-16-12 rev. 11/07
www.lafvb.com
Copyright 1998; Revised 10/24/03, Lafayette Venetian Blind, Inc.
Parasol is a trademark/re
g
istered trademark of Lafa
y
ette Venetian Blind
,
Inc.
OPERATION AND CARE
OPERATION
Keep the cord close to the plane of the fabric when
operating the shade. For best results, do not pull
the cord away from the shade more than 15°. To
disengage the locking mechanism, move the cord
toward the center of the shade approximately 30°
from the vertical position. Raise or lower the shade
while holding the cord at this angle. To engage the
locking mechanism, return the cord to the vertical
position.
Note: Standard and Top Down shades have one
operating cord. Top Down/Bottom Up and
Day/Nighter shades have two operating cords. 2-
on-1 Shades will have two cords, left shade on the
left side and right shade on the right side.

Other Lafayette Indoor Furnishing manuals

Lafayette Allure Series User manual

Lafayette

Lafayette Allure Series User manual

Lafayette parasol User manual

Lafayette

Lafayette parasol User manual

Lafayette parasol User manual

Lafayette

Lafayette parasol User manual

Lafayette Accu-Rise Operating System User manual

Lafayette

Lafayette Accu-Rise Operating System User manual

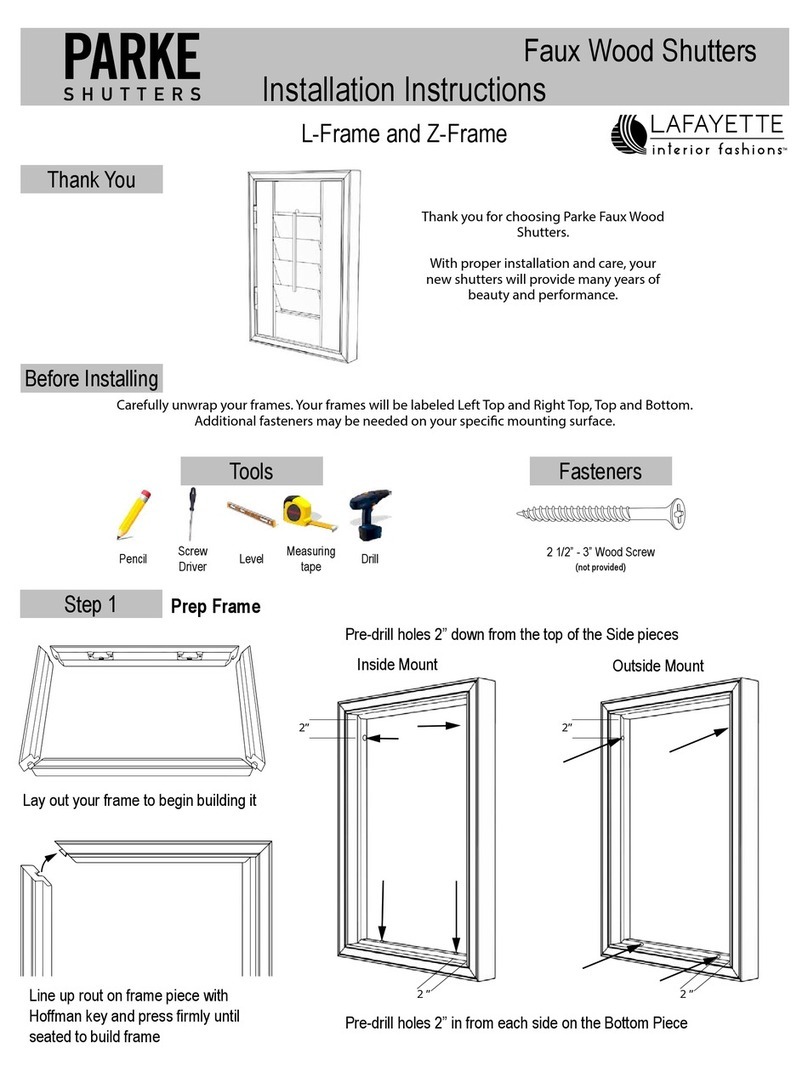
Lafayette PARKE Faux Wood Shutters User manual

Lafayette

Lafayette PARKE Faux Wood Shutters User manual

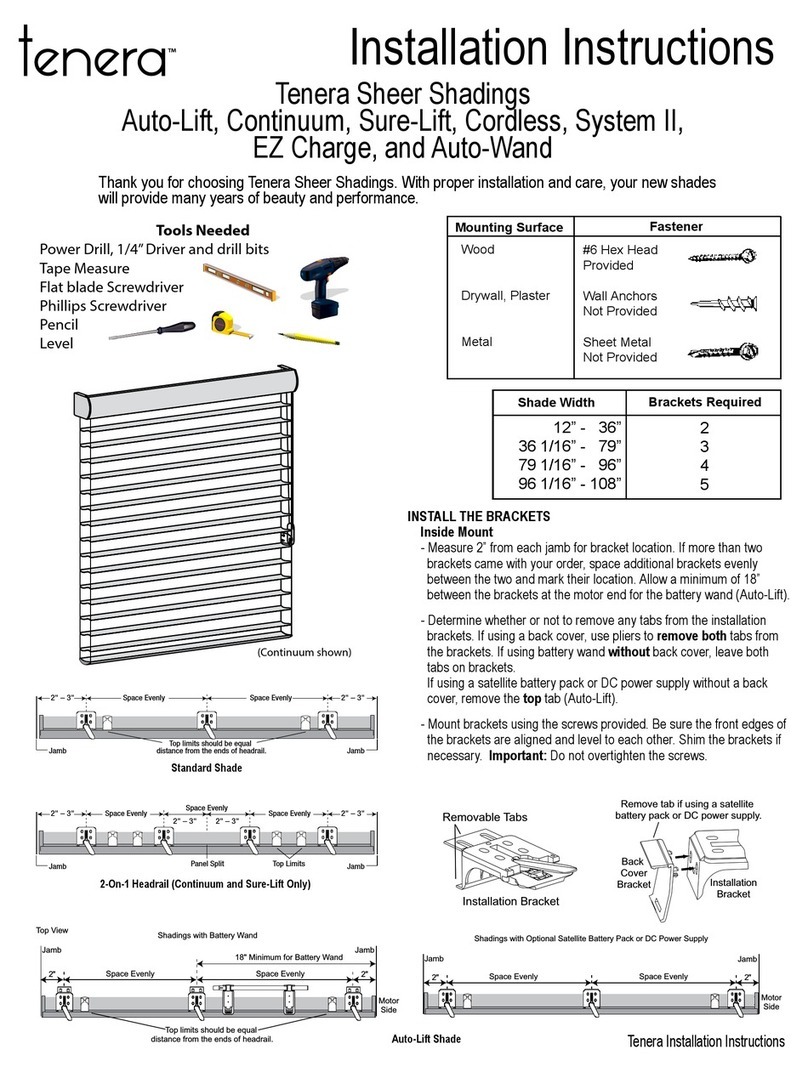
Lafayette Tenera Auto-Lift User manual

Lafayette

Lafayette Tenera Auto-Lift User manual

Lafayette Genesis series User manual

Lafayette

Lafayette Genesis series User manual

Lafayette Parasol Accu-Rise User manual

Lafayette

Lafayette Parasol Accu-Rise User manual

Lafayette Auto-Lift Parasol Cellular Shades User manual

Lafayette

Lafayette Auto-Lift Parasol Cellular Shades User manual

Lafayette Panel Drape with Decorative Wood Pole User manual

Lafayette

Lafayette Panel Drape with Decorative Wood Pole User manual

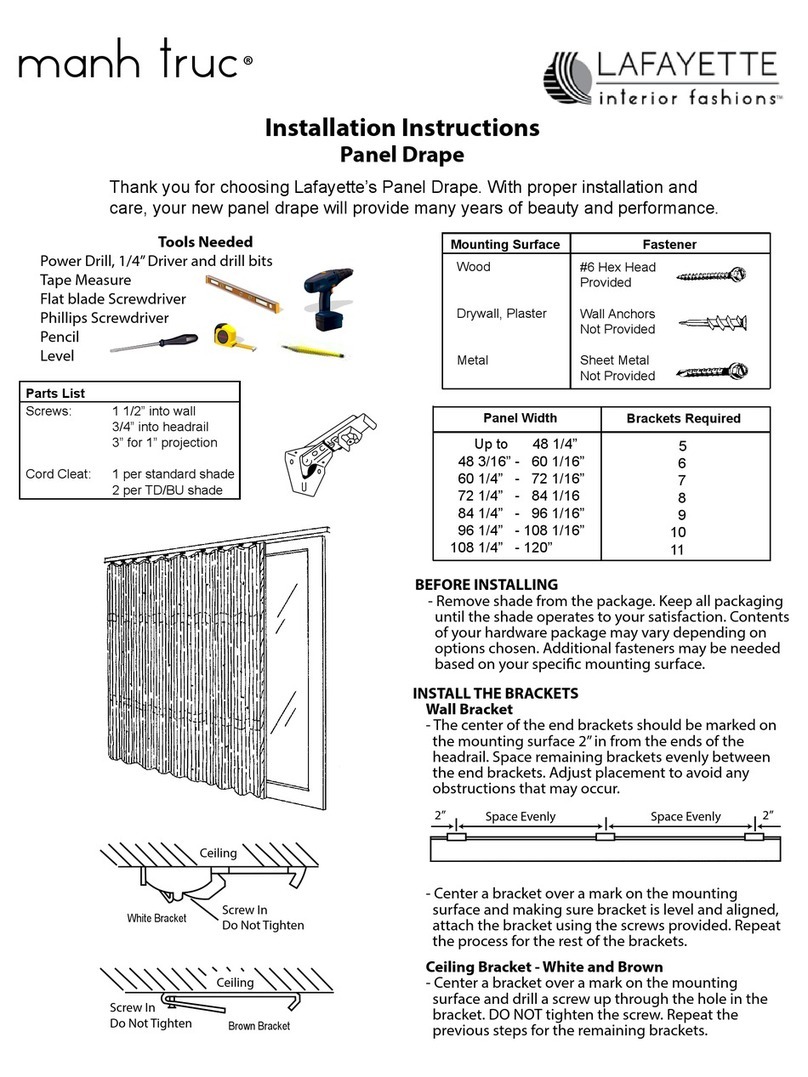
Lafayette Manh Truc User manual

Lafayette

Lafayette Manh Truc User manual

Popular Indoor Furnishing manuals by other brands

Init NT-C1112 Assembly instructions

Init

Init NT-C1112 Assembly instructions

GPM SHFURBL3O Assembly instructions

GPM

GPM SHFURBL3O Assembly instructions

Atlantic 35435725 Assembly instructions

Atlantic

Atlantic 35435725 Assembly instructions

DREAMS Wilson manual

DREAMS

DREAMS Wilson manual

Iron Age Office CARRUCA L-SHAPE Assembly instructions

Iron Age Office

Iron Age Office CARRUCA L-SHAPE Assembly instructions

Next FLEUR DOUBLE ROBE 956147 Assembly instructions

Next

Next FLEUR DOUBLE ROBE 956147 Assembly instructions

Costway JZ10042WH user manual

Costway

Costway JZ10042WH user manual

Maintal Nando Assembly instructions

Maintal

Maintal Nando Assembly instructions

knapp KOMBI K614 Construction manual

knapp

knapp KOMBI K614 Construction manual

Enwork Sliding Top Desk Installation instruction

Enwork

Enwork Sliding Top Desk Installation instruction

Hallowell HTL151548-1 Assembly instructions

Hallowell

Hallowell HTL151548-1 Assembly instructions

Furniture of America CM3781T Assembly instructions

Furniture of America

Furniture of America CM3781T Assembly instructions

Rauch 66739.8470 Assembly instructions

Rauch

Rauch 66739.8470 Assembly instructions

fantastic furniture COMO TALLBOY 6 DRW Assembly instructions

fantastic furniture

fantastic furniture COMO TALLBOY 6 DRW Assembly instructions

Combelle ALICE user manual

Combelle

Combelle ALICE user manual

Home Decorators Collection SUNBURY 2333FP-1 Use and care guide

Home Decorators Collection

Home Decorators Collection SUNBURY 2333FP-1 Use and care guide

ADIR 615 Assembly instructions

ADIR

ADIR 615 Assembly instructions

Julian Bowen COX003 Assembly instructions

Julian Bowen

Julian Bowen COX003 Assembly instructions

manuals.online logo
manuals.online logoBrands
  • About & Mission
  • Contact us
  • Privacy Policy
  • Terms and Conditions

Copyright 2025 Manuals.Online. All Rights Reserved.