Lafayette Auto-Lift User manual

Auto-Lift Remote Control Guide
For Parasol Cellular Shades and Tenera Sheer Shadings

Auto-Lift®Remote Control Guide 2
BACK
Control Like Never Before Getting Started
Remote
Install batteries
(2 x “AAA”) in the
Momenta remote.
This guide shows you how to set up and operate Momenta
motorized products using the remote control. In this guide, you’ll
learn the two methods to operate your window coverings. All
control features can be used with either method. Choose the
method that works best for you.
Two Methods of Operation
Infrared Control
• Line-of-sight operation (like
a flashlight)
• Control window coverings
individually
• One-button operation
Radio Control
• No aiming necessary (like
a garage-door opener)
• Control window coverings
individually or in groups
• Two-button operation
Group 1
Group 3
All
Groups
Indicator
Light
Group 2
Infrared
Channel
Selector
Group 4
OPEN
CLOSE
Master
Reset
Setup
Battery
Compartment
Front Back
NOTE: Momenta motorized window coverings cannot be operated
from a third party universal remote control. Only the provided remote
can be used for opening and closing these window coverings.
Contents
Getting Started ..................................... 2
Sensor Eye Locations ................................. 3
Basic Operation .......................................... 4
Radio Control .............................................. 5
Intermediate Stops ...................................... 6
Express Mode ............................................. 6
Parasol Cellular Shades ............................. 7
Tenera Sheer Shadings .............................. 8
Setting Top and Bottom Limits .................... 8
Troubleshooting .......................................... 9
Technical Information .................................. 11

Auto-Lift®Remote Control Guide 3
BACK
Sensor eyes can be found in the following locations
(depending on product and installation options
chosen):
In the Headrail
Below the Headrail
NOTE: The manual control button, used for operating a window
covering without a remote, is usually adjacent to the sensor eye.
In its default mode, the Momenta remote sends an
infrared signal:
1Aim the Remote at the Sensor Eye.
NOTE: For more information about the locations of sensor
eyes, see “Sensor Eye Locations”.
2Press and release the OPEN or
CLOSE button to operate the window
covering.
NOTE: Press and release the opposite or button to
stop a moving window covering.
Try Radio Control
In addition to the default method of operation, the
remote can be set up to use radio control. When
you want the convenience of radio control and
the ability to control multiple window coverings at
the same time, see “Getting Started with Radio
Control”.
Product-Specific Features
For more information about the features of your specific window
covering, see the appropriate product section.
Sensor Eye Location Basic Operation

Auto-Lift®Remote Control Guide 4
BACK
Radio Control
Getting Started with Radio Control
Radio control gives you the ability to operate
individual Window Covering or multiple Window
Coverings at the same time, even if they are in
anotherroom.
Group Assignment
To use radio control, each window covering must first be assigned
to a group. (A window covering can be a member of more than
onegroup.)
NOTE: If your remote has already been set up, skip to “Radio
Control Operation”.
There are four unique assignable groups to use. A group can be a
single window covering or multiple window coverings.
Before beginning, think about how you will group your window
coverings. For example, you might create a group for all window
coverings in a single room or a group for all window coverings on
one wall.
Note: It is recommended that only similar window coverings be
included in a group (e.g., Cellular Shades assigned to Group1 and
Sheer Shadings assigned to Group3) because of differences in
product features and operation.
Group Addition or Removal
Before you begin, operate the window covering using infrared
control to make sure that you are communicating
with only one window covering and that the window
covering is working properly.
TIP: Move the remote as close as possible (2" to 3")
to the sensor eye when assigning groups.
1. With a
paperclip,
press and release the recessed SETUP button on the back
of the remote. The Indicator Light on the front of the remote
flashes green for approximately 30seconds.
2. While the Indicator Light is flashing green, press the
groupbutton for the group to which you plan to assign the
window covering.
3. Point the
remote at the
sensor eye of
the window
covering and
press the
OPEN
button to add
the window
covering to the
group or the CLOSE button to remove the window covering
from the group. The window covering moves slightly (or “jogs”)
to indicate that it has been added to or removed from
thegroup.
4. Exit setup mode by pressing and releasing the SETUP button
a second time. The remote saves any changes made and the
Indicator Light stopsflashing.
1
2
1
4
3

Auto-Lift®Remote Control Guide 5
BACK
Radio Control Duplicate Remote Control
Radio Control Operation
Operating your window coverings using radio control is similar to
using infrared control, except that you can control multiple window
coverings at the same time, even if they are in another room, and
you do not have to aim the remote at the sensor eye.
1. Press the group button
assigned to the window
coverings.
2. Press the OPEN button to
open the window covering or
the CLOSE button to close
the window covering.
NOTE: To stop a window
covering while it is moving,
press the assigned group
button, then press the
opposite or button.
NOTE: To operate all window coverings assigned to the
remote, press the ALL button before pressing OPEN
orCLOSE .
NOTE: Operational distances using radio control may vary
depending on common household construction differences.
Product-Specific Operation
For more information about the operation of your specific window
covering, see the appropriate product section.
12
Setting Up a Duplicate Remote
If you want a backup for your primary remote, you
can quickly duplicate the current transmitter. When
this procedure is complete, any change made with
any of the transmitters also affects the operation of
the other remotes. Follow this procedure:
1. Mark the original remote.
2. Remove the battery cover from the duplicate remote.
3. With a paperclip,
press and hold the
MASTER RESET
button on the backup
remote for
approximately 10
seconds. The
Indicator Light on the
front of the remote
starts flashingred.
4. Place the marked original remote within 18" of the backup
remote and press the OPEN button on the marked original.
The Indicator Light on the backup remote stops flashing.
5. Replace the battery cover on the backup remote. It is now
ready for use.
MASTER
RESET
18" or Less

Auto-Lift®Remote Control Guide 6
BACK
Intermediate Stops Express Mode
Setting Intermediate Stops
An intermediate stop allows a window covering to be preset so
that it will stop at the same “intermediate” position each time it is
opened or closed.
1. Open and close the window covering fully, then move it to the
desired intermediate position.
2. Press and hold the ALL button
for 6 seconds. The Indicator
Light on the front of the remote
starts flashing green.
3. Point the remote at the sensor
eye and press the OPEN
button to set the intermediate
stop. The window covering
moves slightly (or “jogs”) to
indicate that the intermediate
stop has beenadded.
4. Press the ALL button to save the intermediate stop. The
Indicator Light stops flashing.
NOTE: One intermediate stop can be set for each window
covering. If you set a new intermediate stop, it replaces the
previous stop.
NOTE: Reset the window covering to clear an intermediate
stop. See ”Resetting a Window Covering”.
Why Set an Intermediate Stop?
Intermediate stops can be used to align opening height to mullions
or other architectural features of the window. They can also be
used to align the opening height of different window coverings
in the same room. In addition, with sheer shadings, intermediate
stops can be used to achieve a specific degree of vane tilt every
time the vanes are operated.
1
24
3
2
Express Mode
When the window covering is in any
position, you can open or close it fully
(bypassing the intermediate stop) as
follows:
1. Press the appropriate group
button.
2. Press and hold the OPEN or
CLOSE button for 2 seconds.
The window covering opens or
closes fully.
NOTE: With sheer shadings, in addition to bypassing the
intermediate stop, the express mode also bypasses the
shading’s “transition point.” The transition point is where the
shading is fully lowered with the vanes fully closed. Normally,
the shading stops automatically at this position; but with
express mode, when the shading is lowered, the vanes open
all the way before the motor stops.
The express mode can be used to bypass the shading’s
transition point even if no intermediate stop has been set.
12

Auto-Lift®Remote Control Guide 7
BACK
Parasol Shades
Radio Control Operation
See “Radio Control Operation” for information about
using the remote to operate a window covering.
Top-Down Shades
For shades with the Top-Down design option, only the middle rail
moves and the remote operation is reversed (e.g., to open a shade,
press the CLOSE button on the remote). Setup procedures are
the same as for standard shades.
Top-Down/Bottom Up and Duo-Lucent
Shades
Shades with the Top-Down/Bottom-Up and Duo-Lucent design
options have two moving rails; see the drawings below.
You can operate these shades as described in this section.
NOTE: The bottom rail must be in the fully lowered position to
operate the middle rail.
NOTE: The middle rail must be in the fully raised position to
operate the bottom rail.
Lower the Bottom Rail
1. With the middle rail fully raised, press the group button
assigned to the shade.
2. Press the CLOSE button to lower the bottom rail and cover
the window.
Lower the Middle Rail
1. With the bottom rail fully lowered, press the group button
assigned to the shade.
2. Press the CLOSE button to lower the middle rail while the
bottom rail remains in the fully lowered position.
NOTE: On a Top-Down/Bottom Up shade, the shade will
uncover the window. On a Duo-Lucent shade, the top fabric
panel will cover the window.
Raise the Middle Rail
1. With the bottom rail fully lowered, press the group button
assigned to the shade.
2. Press the OPEN button to raise the middle rail while the
bottom rail remains in the fully lowered position.
NOTE: On a Top-Down/Bottom Up shade, the shade will cover
the window. On a Duo-Lucent shade, the bottom fabric panel
will cover the window.
Raise the Bottom Rail
1. With the middle rail fully raised, press the group button
assigned to the shade.
2. Press the OPEN button to raise the bottom rail and uncover
the window.
Infrared Control
All features can be activated using either infrared
or radiocontrol. See “Basic Operation”for more
information about infrared control.
Duo-Lucent
Top-Down/Bottom Up
Bottom Rail
Middle Rail

Auto-Lift®Remote Control Guide 8
BACK
Tenera Sheer Shadings Setting Top and Bottom Limits
Radio Control Operation
See “Radio Control Operation” for information about
using the remote to operate a window covering.
Opening Vanes
1. When the shading is in the fully lowered position with the
vanes closed, press and release the assigned group button.
2. Press and release the CLOSE button. The shading remains
lowered while the vanes open to allow more light.
Closing Vanes
1. When the shading is in the fully lowered position with the
vanes open, press and release the assigned group button.
2. Press and release the OPEN button. The shading remains
lowered while the vanes close for increased privacy.
Adjusting Vanes
1. Press the assigned group button.
2. Press the OPEN or CLOSE button to start adjusting
thevanes.
3. Press the opposite or button to stop the vanes in the
desired position.
NOTE: Vane alignment between shadings may not be exact.
Infrared Control
All features can be enjoyed using either infrared
or radiocontrol. See “Basic Operation”for more
information about infrared control.
Parasol Cellular Shades and Tenera Sheer
Shadings
Due to the characteristic of the hardware, Tenera Sheer Shadings
and Parasol Cellular Shades will define both the top and bottom
limits automatic by itself.

Auto-Lift®Remote Control Guide 9
BACK
Troubleshooting
Problem The shade operates using the manual control
button, but does not operate using the remote
control in the infrared mode.
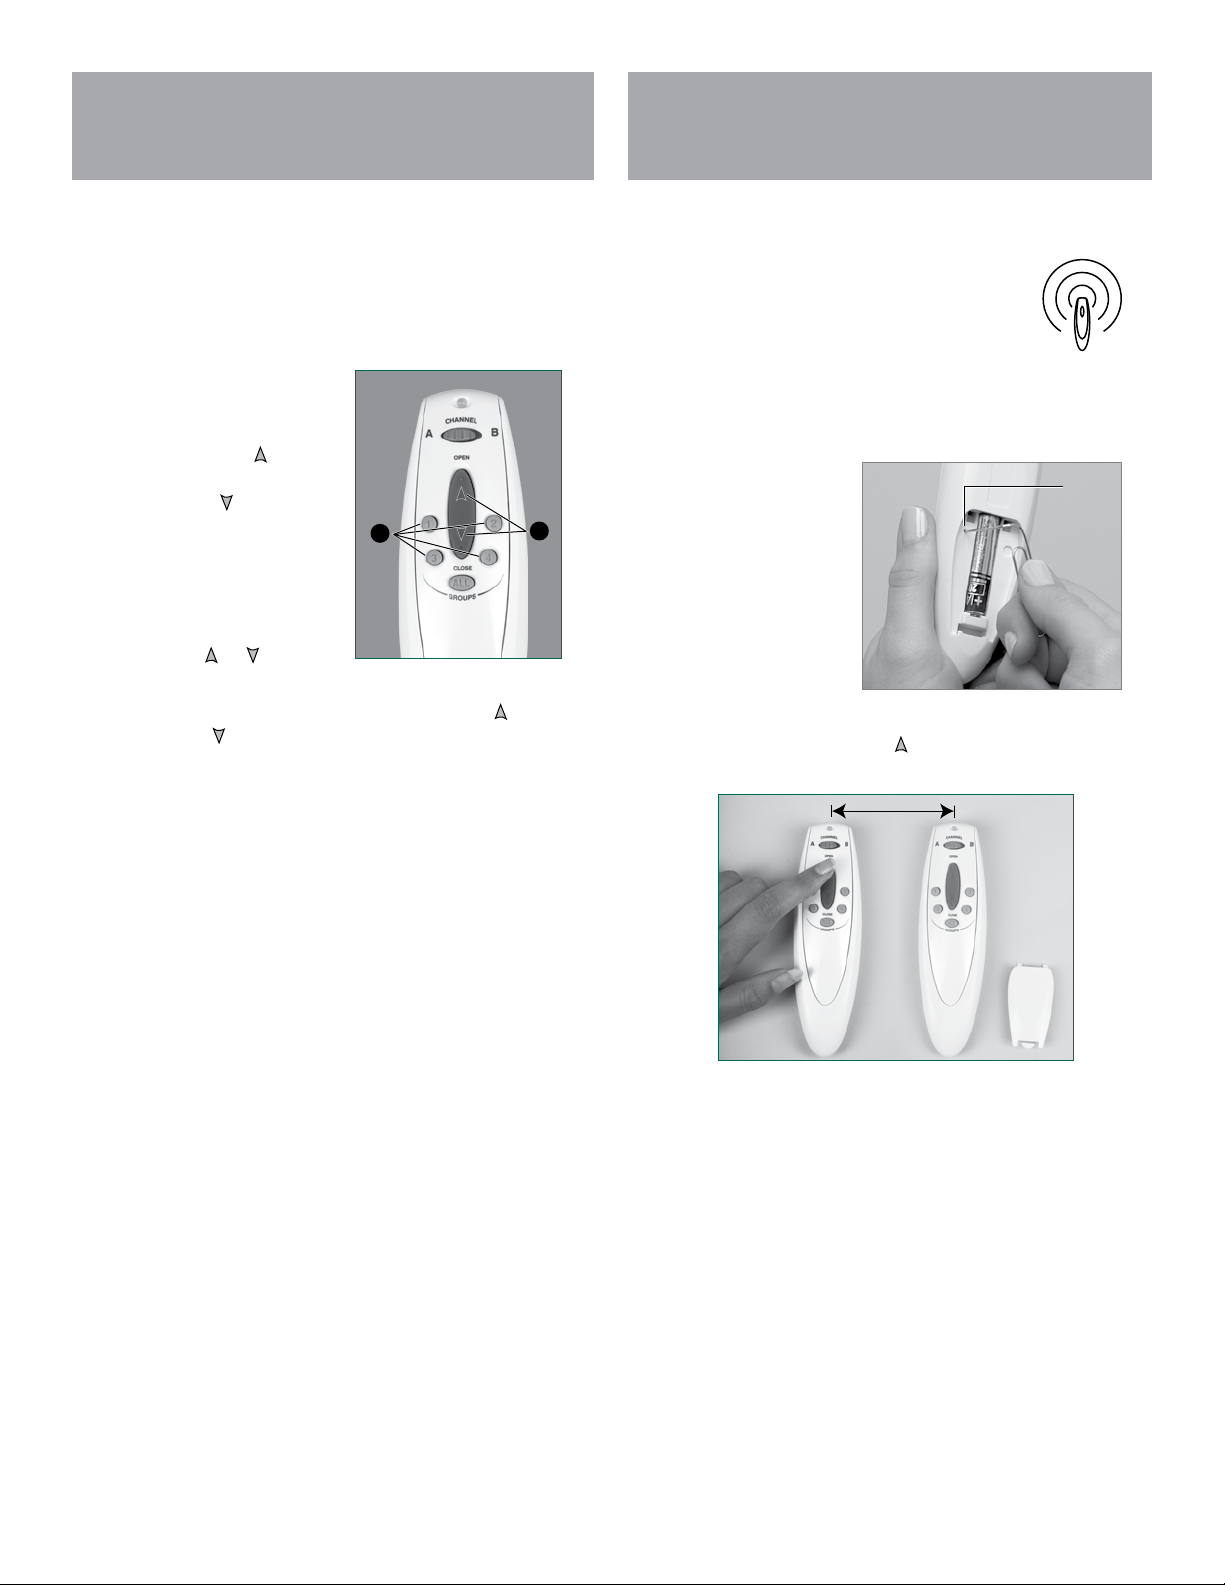
Solution If the LED on the remote does not light up when the
OPEN or CLOSE button is pressed, replace the
batteries in the remote.
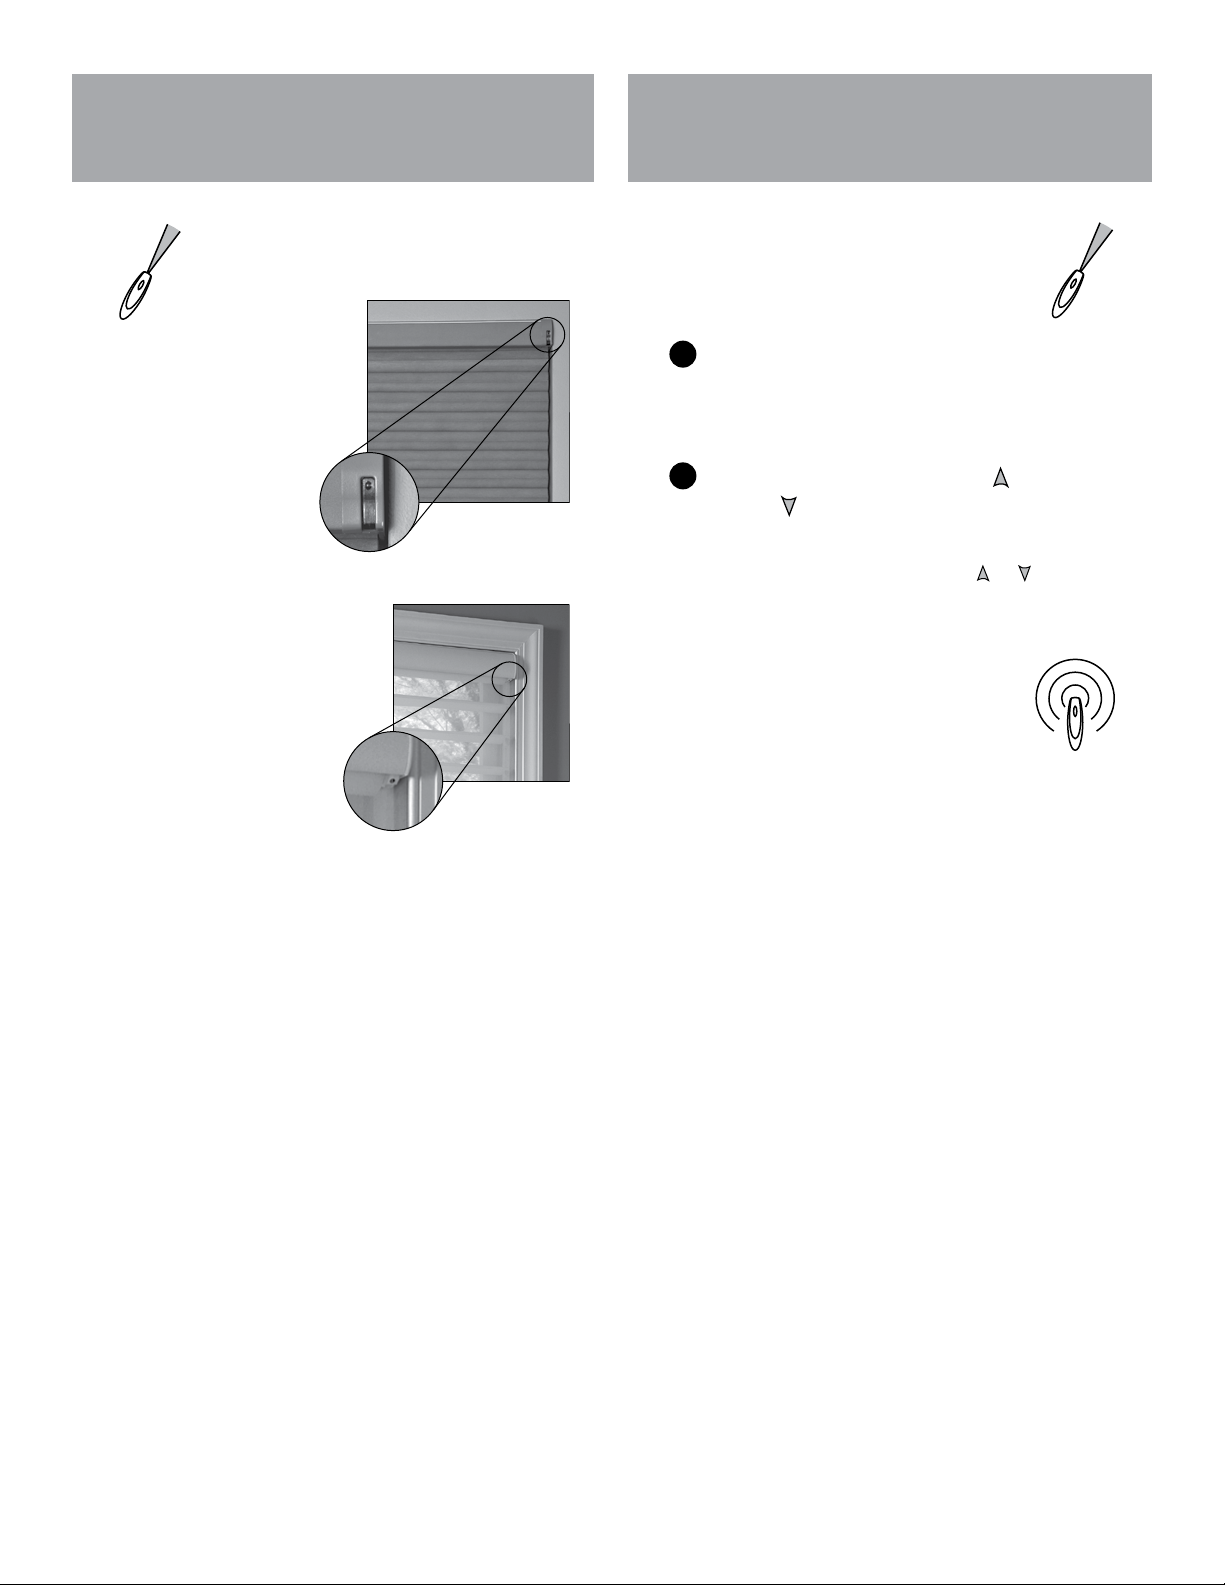
Check that you are pointing the remote control
directly at the infrared eye. Try moving closer to the
eye. Maximum operating distance from the remote
control is 30 feet.
Check that there are no obstructions interfering with
the signal from the remote to the satellite eye.
Check that there is no direct sunlight or bright,
focused light from halogen or florescent light fixtures,
track lighting, spotlights, or neon lights that could be
interfering with the signal.
Problem The shade operates using the manual control
button, but does not operate using the remote
control in the “Group” operating mode.
Solution Be sure the shade operates properly in the infrared
mode. The Group feature will not work correctly if the
infrared mode does not work correctly.
Make sure you press the OPEN or CLOSE
button within 5 seconds after choosing and pressing
a group button. After that time, the green Indicator
Light turns off and the remote reverts to infrared
control.
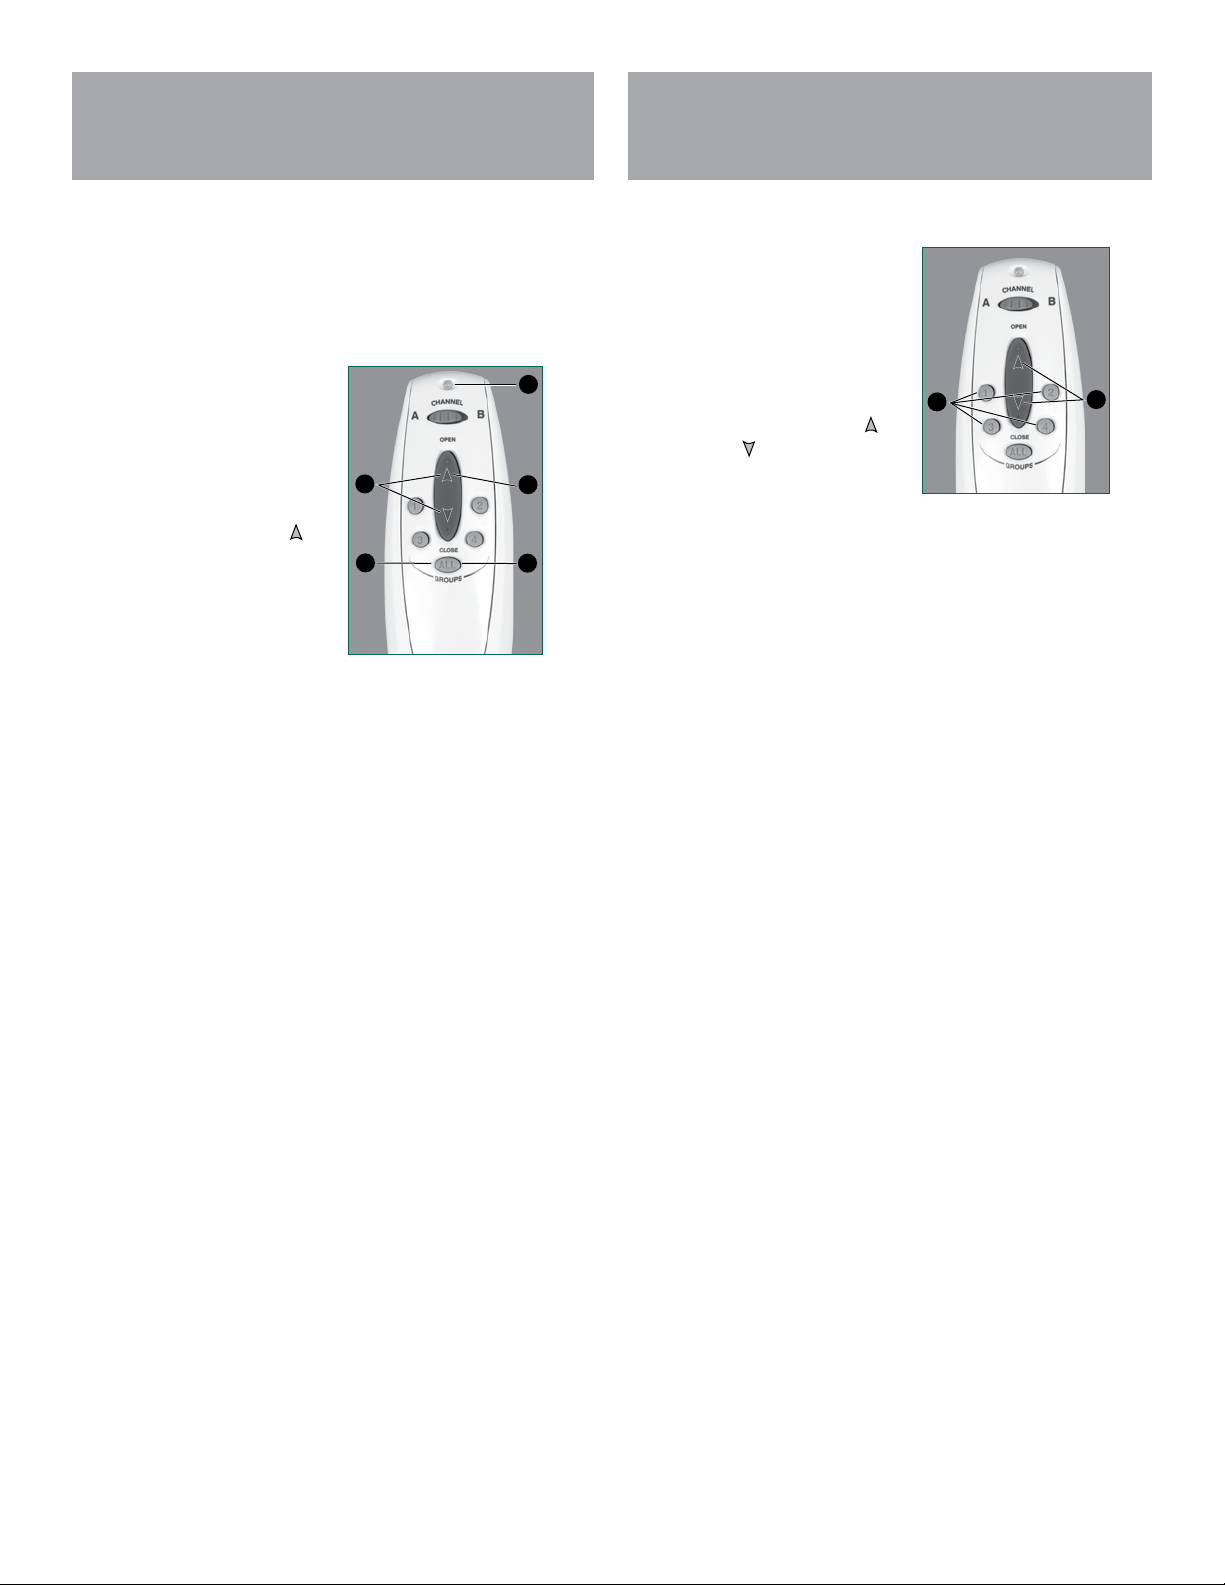
Be sure the shades have been correctly programmed
to the remote control you are using. If your remote
control has not been set up to operate your shade(s),
only the infrared mode will work. See “Radio Control
Operation” for more information.
Problem The shade does not operate using either the
remote control or the manual control button.
Solution Check to be sure the batteries in the shade and the
remote are new and are installed correctly.
Check that the battery wand or battery pack supply
is securely connected to the motor assembly. See
“STEP 3 — Connect the Power Source”.
Make sure the DC power supply is plugged in and
there is power to the outlet. Reset the shade by
holding the manual control button for 6 seconds.
Problem One shade does not consistently respond to the
“Group” or “All” command.
Solution Press the OPEN or CLOSE button a little longer
when operating shades. It can take longer for the
signal to reach one of the shades.
Use the remote at different areas of the room
(home). There could be dead spots or interference.
Try operating the remote closer or farther from the
shade.
Check to be sure the batteries in the shade and the
remote are new and are installed correctly. When
the batteries get old, the remote transmits a weaker
signal.

Auto-Lift®Remote Control Guide 10
BACK
Problem Window Covering operates when you do not want
it to operate.
Solution If the Indicator Light on your remote is red when
you press the OPEN or CLOSE button, go to
“Unexpected infrared operation” below.
If the Indicator Light on your remote is a steady green
when you press the OPEN or CLOSE button, go
to “Unexpected radio control operation” on page 14.
If you are not pressing the OPEN or CLOSE
button when the Window Covering is operating, make
sure no one else is using a backup remote to control
the Window Covering.
Problem Unexpected infrared operation.
Solution The infrared signal of the remote spreads and
reflects off of surfaces. If other sensor eyes are within
the area affected by the infrared signal, you might
control those Window Coverings unexpectedly. To
solve this problem:
Move closer to the sensor eye on the Window
Covering you intend to operate.
Aim the remote slightly away from the Window
Coverings you do not intend tooperate.
NOTE: If you still have problems with unexpected
operation, you can switch to radio control operation.
See “Getting Started with Radio Control”.
Problem Unexpected radio control operation.
Solution Make sure you have chosen the correct group to
operate. If you need to remove a Window Covering
from a group, see “Group Addition or Removal”.
If the Indicator Light on the remote is not a steady
green when you press the OPEN or CLOSE
button, the remote is using infrared. To make sure
you are using radio control, press a group button
not more than five seconds before you press the
OPEN or CLOSE button.
Problem Window Covering does not open or close fully or
has an intermediate stop that is no longer wanted.
Solution Make sure the operation of the window covering is
not obstructed.
Reset the window covering as described in
“Resetting a Window Covering”.
Problem The shade operation is slow.
Solution If using the battery wand or satellite battery pack,
remove the battery wand and replace the batteries.
If using the DC power supply, check that the shade is
not obstructed or pinched in bracket or cassette.
Troubleshooting

Resetting a Window Covering
To clear all stops and reset the window covering:
1. Open the window covering completely.
2. Aim the remote at the sensor eye on the window covering.
3. Press and hold the OPEN button for 6 seconds. The
window covering moves slightly (or “jogs”) to indicate that all
stops are nowcleared.
4. Close the window covering completely (this sets the CLOSED
motor limit).
5. Open the window covering completely (this sets the OPEN
motor limit).
The intermediate stop position is now cleared and the motor limits
are now reset.
Alternative Resetting a Window Covering
1. Open the Window Covering completely.
2. Aim the remote at the sensor eye on the Window Covering.
3. 3.Press and hold the OPEN button for 6 seconds. The
shading moves slightly (or “jogs”) to indicate that all stops are
now cleared.
4. Close the Window Covering completely (this sets the CLOSED
motor limit. See “Setting Top and Bottom Limits“ for more
detail).
5. Open the Window Covering completely (this sets the OPEN
motor limit).
The intermediate stop position is now cleared and the motor limits
are now reset.
Troubleshooting
Radio Frequency FCC Compliance
This device complies with Part 15 of the FCC Rules. Operation is
subject to the following two conditions: (1)this device may not cause
harmful interference, and (2) this device must accept any interference
received, including interference that may cause undesired operation.
This equipment has been tested and found to comply with the limits
for Class B Digital Device, pursuant to Part 15 of the FCC Rules. These
limits are designed to provide reasonable protection against harmful
interference in a residential installation. This equipment generates
and can radiate radio frequency energy and, if not installed and used
in accordance with the instructions, may cause harmful interference
to radio communications. However, there is no guarantee that
interference will not occur in a particular installation. If this equipment
does cause harmful interference to radio or television reception, which
can be determined by turning the equipment off and on, the user is
encouraged to try to correct the interference by one or more of the
following measures.
• Reorient or relocate the receiving antenna.
• Increase the separation between the equipment and receiver.
• Connect the equipment into an outlet on a circuit different from that
to which the receiver is connected.
• Consult the dealer or an experienced radio/TV technician for help.
Any changes or modifications not expressly approved by the party
responsible for compliance could void the user’s authority to operate
the equipment.
Remote Control
■Batteries: 2 AAA
■Operating Frequencies:
➤IR: 40 kHz
➤RF: 2.4 GHz
Technical Information
18-ALRC-23 September 2015 BACK
Table of contents
Other Lafayette Remote Control manuals