SAFETY & OPERATIONAL PRECAUTIONS
See Additional Safety Precautions included with the Electrical Control Box Installation Information
Always consider electrical shock hazard when working with and handling electrical equipment. If
uncertain, consult an Electrician. Electrical wiring should only be done by a qualified Electrician, per
Local and State Electrical Codes.
Manufacturer assumes no liability for the use or misuse of this unit.
Wear proper respiratory protection, protective clothing, gloves and eye-wear when working with chemicals.
Always direct the discharge away from electrical devices.
Carefully follow chemical manufacturer's safe handling instructions and recommended precautions/practices
especially when using flammable chemicals.
For proper performance do NOT modify electrical control box.
Disconnect electrical power to the control box prior to opening it.
Remove any packing material from inside the control box before operating.
SPECIAL CAUTION: This fogger atomizes chemical into the air. Ensure that the chemical is safe to be
around or the area to be fogged has been evacuated of all people and/or animals before starting fogging.
Upon completion of fogging, ensure that sufficient time has elapsed for all the fog to have dissipated
before returning to the area without proper respiratory protection.
TO INSTALL (REFER TO DIAGRAM ON NEXT PAGE)
1. Unpack and connect the 4-way fogger head to the nipples as shown in the drawing
2. (4) pick up tube ends are sticking out of the tank lid, push them over the 4 blue metering tip holders. Place the
same tube on the 2 foggers with the ball valves. This allows the unit to be used as a 2-way.
3. Test using water to familiarize yourself with the fogger before running chemicals through it.
SETTING THE TIMER
1. Make sure the system is not plugged in to a power source. Open the control box cover. The box contains one
timer with both "Delay & Run" adjustment knobs.
Delay: This mode allows you to set the length of time you want the unit to to be inactive for before fogging
begins. Set the timer by turning the knob to the amount of delay time that you require. (0-6 Hours)
Run: This mode allows you to set the length of time you want the fogger to run for after the delay period has
expired. Set the timer by turning the knob to the amount of run time that you require. (0-60 Minutes)
2. Close and lock the control box cover.
3. Plug the power cord into a 120 VAC power outlet. GFI recommended.
SWITCH SETTINGS (There are two lighted rocker switches on the front of the control box.)
1. The switch on the left is labeled "On/Off/Auto Ready". With the switch in the "Off" position there is no power to
the unit and there are no lights illuminated. Caution: If the switch is set to the "On" position, the green light
is illuminated and the unit will automatically start fogging. This is useful during setup and testing with
water. Otherwise this setting should be used with care.
2. When the timers have been adjusted to required settings, the switch should be set to "Auto Ready". The red light
illuminates and this provides power to the second switch on the right hand side of the control box.
3. The switch on the right is labeled "Auto Initiate". When you are ready to initiate the "Delay/Run" sequence, press
the top of the switch to "Auto Initiate". The green light on this switch is now illuminated. The fogger is now in
Delay mode and will perform according to preset times.
Note: If power is interrupted after timers have been set, the system stops all timer operations and needs to be reset.
SETTING AND ADJUSTING FOG DENSITY
1. Use a separate container of water to set and adjust the fog density. Place the pick-up tubes into the water.
2. Place the fogger in the center of the area to be fogged.
3. Loosen the "L"bolts on the slide brackets, raise the 4-way fogger assembly to preferred height, and tighten
4. Set the Delay Timer knob for a minimal amount of time (enough time for you to move away from the fogger) and
set the Run Timer knob for about 1 minute (enough time for you to observe the fog density.)
5. Connect your 1/2" minimum air line to the fogger. Turn on your air and electricity supply.
6. Set the rocker switches on the control box as described above.
7. Move away from the fogger and observe the fogger's performance. The fog should be consistent and uniform.
If it is sputtering and inconsistent you may need to partially close your airline ball valve to fine tune the
air volume/pressure. Best results are achieved at around 60 PSI.
8. You will have to experiment with the amount of time and solution required to achieve the desired result.
9. If fog is more dense than the application requires, optional metering tips are available for restricting the solution
volume to produce a lighter fog.
10. Once you are familiar with coverage, operation and air flow adjustments you are ready to fog.
TO OPERATE
1. Fill the tank with the desired amount of ready to use solution and insert the suction tubes in the tank.
2. With the fogger in the center of the area to be fogged and adjust fogger assembly to preferred height.
3. Set the timers to the desired Delay and Run times (see above).
4. Turn on your air and electricity supplies. Set the rocker switches as described above.
5. Turn air supply off when finished and ensure that the area is safe before returning
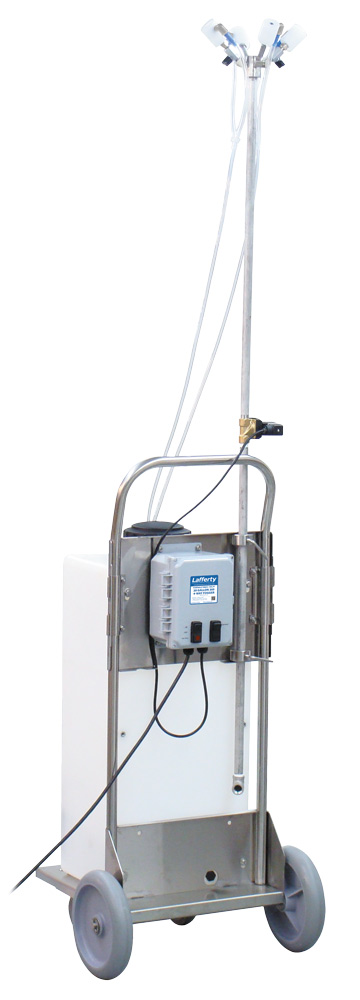
PORTABLE 305 4-WAY FOGGER
PROJECTS DAMP FOG/MIST UP TO 25'
COMPRESSED AIR FLOW (CFM)
PLUMES 60 PSI 80 PSI
4-Way 22.5 29.5
CHEMICAL SOLUTION DRAW RATE (FL-OZ/MIN)
DISTANCE 60 PSI 80 PSI
80" Above Chemical 31.6 39.5
60" Above Chemical 37.4 44.2
950721-TD • Portable Timed / Delay 20 Gallon 305 4-Way Fogger
- Page 2 -


