manuals.online logo
Brands
  1. Home
  2. •
  3. Brands
  4. •
  5. Lafferty
  6. •
  7. Insect Control Equipment
  8. •
  9. Lafferty 950735 Installation instructions

Lafferty 950735 Installation instructions

Lafferty Equipment Manufacturing, Inc.
Installation & Operation Instructions
Model # 950735 · Compact Precision Fogger With Compressor Kit
# 985100
# 981100
# 709082
REQUIREMENTS
Ready-to-Use Chemical Solution
Solution Temperature 120°F MAX
Electric 120V - Min.15 AMP Circuit
OPTIONS
Proportioning / Filling Options
1-Way Ball Valve Mixing Station (4
GPM)
1-Way Push Lever Mixing Station (4
GPM)
Additional Bottles
Bottle, 32oz (Includes Solid Lid)
www.laffertyequipment.com
501-851-2820
OVERVIEW
The Compact Precision Fogger With Compressor Kit is a complete disinfection setup that can be permanently installed or relocated as needed. The Compact
Precision Fogger uses compressed air to draw ready-to-use chemical solution from the attached bottle and project damp mist (fog) up to 15 feet. The adjustable
output can wet surfaces at close range or spray into the air to cover exposed surfaces and penetrate hard-to-reach areas. This kit includes a 120V compressor, air
hose, and Compact Fogger matched to the compressor specifications.
W AR N I N G ! R E A D A L L
I N S T R U C T I O N S B E F O R E
U S I N G E Q U I P M E N T !
Lafferty Equipment Manufacturing, Inc. • 5614 Oak Grove Road • North Little Rock, Arkansas 72118
SAFETY & OPERATIONAL PRECAUTIONS
Plug into a 15 amp circuit or larger. Do NOT use a light gauge extension cord!
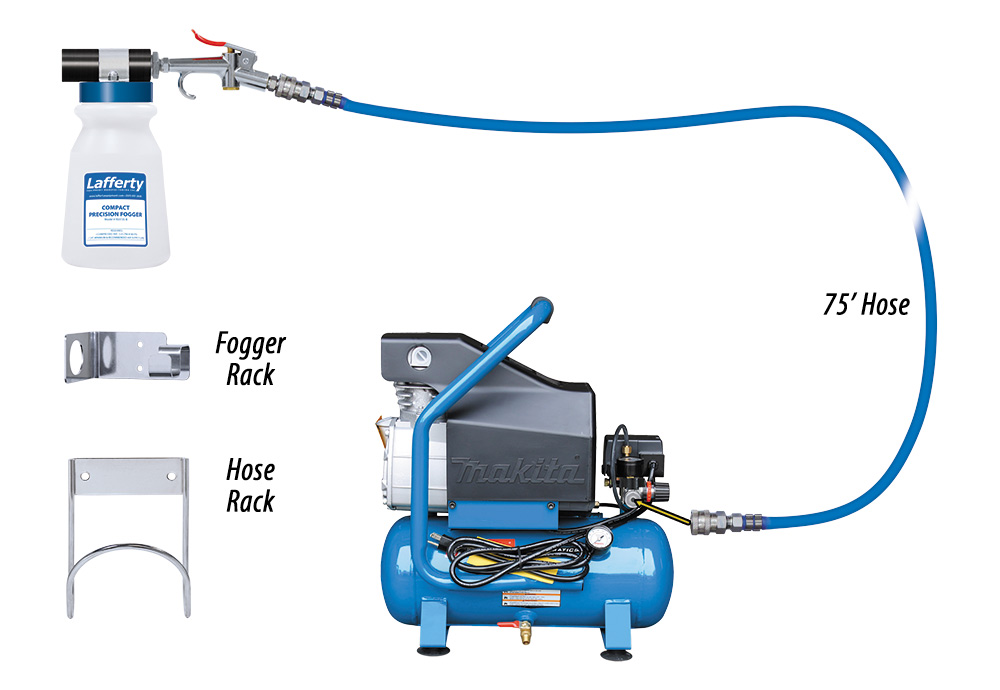
To avoid voltage drop, power loss, and overheating of the motor, use extra air hose instead of an extension cord.
Low voltage can cause damage to the motor.
If an extension cord must be used: Use only an approved 3-wire extension cord that has a 3-blade grounding plug
and a 3-slot receptacle that will accept the plug on the air compressor. Make sure the extension cord is in good
condition. Consult Compressor Manual for MINIMUM requirements.
For proper performance do NOT modify, substitute nozzle, hose diameter or length
Manufacturer assumes no liability for the use or misuse of this unit.
ALWAYS wear protective clothing, gloves and eye-wear when working with chemicals.
Always direct the discharge away from people and electrical devices.
Follow the chemical manufacturer’s safe handling instructions.
NEVER fog flammable materials through the fogger.
SPECIAL CAUTION: This fogger atomizes chemical into the air. Ensure that the area to be fogged has
been evacuated of all people without proper respiratory protection!
Compressed Air Inlet Pressure should be regulated to a maximum of 90 PSI.
TO OPERATE
Fill the air compressor with the included air compressor oil before operating.
Plug into a 120VAC 15 amp circuit or larger. The unit has been tested and, once filled with oil again, is ready to
operate. The compressor air pressure is preset, no adjustments are needed.
SPECIAL CAUTION: This fogger atomizes chemical into the air. Ensure that the area to be fogged has
been evacuated of all people without proper respiratory protection! Upon completion of fogging, ensure
that sufficient time has elapsed for all the fog to have dissipated before returning to the area without
proper respiratory protection.
To prevent chemical residue buildup, or if the unit will be out of service for an extended period, follow the
Preventive Maintenance steps on page 4 of the instructions.
1. Ensure that all the ball valve on the compressor is in the closed position.
2. Connect air hose to compressor.
3. Plug in and turn on air compressor and allow it to pressurize the tank. Compressor will cycle on and off
as needed.
4. Unscrew the fogger bottle, fill with ready-to-use chemical, and re-attach.
Don't over-tighten the bottle.
5. Connect Compact Fogger to air hose
6. Open the ball valve on the compressor
7. Direct the discharge in a safe direction. Press thumb gun lever to begin application.
8. When fogging is completed:
Release the thumb gun.
Return to the unit and close the air ball valve.
Press thumb gun, briefly, to relieve pressure in the hose.
Compressor can be left full or, if it will be out of service for a few days, drain the tank.
To Adjust Output
Foggers may produce more volume than needed. If fog is too dense (wet), install a metering tip to reduce
chemical usage and produce a lighter (drier) fog.
Test without metering tip.
METERING TIP SELECTION
METERING TIP COLOR FL-OZ PER
MIN
Brown 0.56
Clear 0.88
Bright Purple 1.38
White 2.15
Pink 2.93
Corn Yellow 3.84
Dark Green 4.88
Orange 5.77
Gray 6.01
Light Green 7.01
The fl-oz/min shown are approximate values. Due to chemical
viscosity, actual fl-oz/min may vary.
950735 • Compact Precision Fogger With Compressor Kit
- Page 2 -
950735 • Compact Precision Fogger With Compressor Kit
- Page 3 -
Troubleshooting Guide
Problem Possible Cause / Solution
Startup Maintenance
A) Fogger will not draw chemical or is sputtering
B) Fog is too wet
C) Air compressor will not turn on.
1, 2, 3, 4
1, 4
6, 7, 8
5
9
Possible Cause / Solution
Startup Maintenance
1. Air line too small, not enough air pressure or volume
See REQUIREMENTS, page 1.
2. Air pressure too high.
Slightly close the air supply valve to lower the pressure
by lowering the volume until the fogger smooths out.
The air compressor default factory setting is 90 PSI,
which can be adjusted using the compressor regulator.
3. Chemical tube kinked or not immersed in chemical or
chemical depleted.
Straighten tube / replenish chemical
4. Drawing too much solution
Install optional metering tip
5. Pin hole or cut in suction tube
Replace suction tube.
6. Chemical tube clogged up
Clean or replace
7. Metering tip or metering tip holder clogged
Clean or replace metering tip and/or metering tip holder.
8. Debris clogging the fogger inlet jets
Disconnect air supply, remove fogger bodies and
visually inspect; remove debris from fogger inlet.
9. Problem with air compressor
Refer to air compressor instruction manual.
Press the reset button. See manual.
PREVENTIVE MAINTENANCE: When the unit will be out of service for extended periods, place chemical tube(s) in water and flush the chemical out
of the unit to help prevent chemical from drying out and causing build-up. Periodically check and clean chemical strainer and replace if missing.
950735 • Compact Precision Fogger With Compressor Kit
January 30th 2021 - Page 4 -

Other Lafferty Insect Control Equipment manuals

Lafferty 950721-TD Installation instructions

Lafferty

Lafferty 950721-TD Installation instructions

Lafferty 950722-TD Installation instructions

Lafferty

Lafferty 950722-TD Installation instructions

Popular Insect Control Equipment manuals by other brands

White Kaiman Bulb Zapper instruction manual

White Kaiman

White Kaiman Bulb Zapper instruction manual

Nitecore EMR40 user manual

Nitecore

Nitecore EMR40 user manual

Quality MOSKITRAP GW001 instruction manual

Quality

Quality MOSKITRAP GW001 instruction manual

Hendi 270158 user manual

Hendi

Hendi 270158 user manual

Dynamic Dynatrap 3 owner's manual

Dynamic

Dynamic Dynatrap 3 owner's manual

Perel GIK12 user manual

Perel

Perel GIK12 user manual

Mosquito Magnet Defender Troubleshooting & Repair Guide

Mosquito Magnet

Mosquito Magnet Defender Troubleshooting & Repair Guide

Gardigo MOUSE AND ANT REPELLER DUAL instruction manual

Gardigo

Gardigo MOUSE AND ANT REPELLER DUAL instruction manual

Pessl iMETOS iSCOUT Color Trap user manual

Pessl

Pessl iMETOS iSCOUT Color Trap user manual

Longray 2680A2 user manual

Longray

Longray 2680A2 user manual

van Beek TURBO BOOST 3vB-14T user manual

van Beek

van Beek TURBO BOOST 3vB-14T user manual

MO-EL KYOTO 396A Use and maintenance

MO-EL

MO-EL KYOTO 396A Use and maintenance

Vector Fog DC20+ user manual

Vector Fog

Vector Fog DC20+ user manual

easymaxx GD19080 operating instructions

easymaxx

easymaxx GD19080 operating instructions

ARDES PP1603 Instructions for use

ARDES

ARDES PP1603 Instructions for use

Pessl iMETOS iSCOUT user manual

Pessl

Pessl iMETOS iSCOUT user manual

MV LINE IRENE DOUBLE Assembling instructions

MV LINE

MV LINE IRENE DOUBLE Assembling instructions

Andersen Windows & Doors 901724 installation guide

Andersen Windows & Doors

Andersen Windows & Doors 901724 installation guide

manuals.online logo
manuals.online logoBrands
  • About & Mission
  • Contact us
  • Privacy Policy
  • Terms and Conditions

Copyright 2025 Manuals.Online. All Rights Reserved.