Lafferty 925004 Installation instructions

Lafferty Equipment Manufacturing, Inc.
Installation & Operation Instructions
Model # 925004 · Pump Up Foamer Pro, 1.5 Gallon
# 709040
# 709040-E
# 985100
# 981100
# 180030
REQUIREMENTS
Ready-to-Use Chemical Solution
Temperature up to 120°F
Accepts Compressed Air up to 45 PSI
OPTIONS
Repair Kit
O Ring & Seal Repair Kit (Viton)
O-Ring & Seal Repair Kit (EPDM)
Proportioning / Filling Options
1-Way Ball Valve Mixing Station (4
GPM)
1-Way Push Lever Mixing Station (4
GPM)
Optional Zero Degree Nozzle (For Increased Range)
Nozzle, SS, 1/4" - 0030
WEIGHT & DIMENSIONS
Single Package
Shipping Weight 8 lbs.
Shipping Dimensions 11" x 11" x 21"
OVERVIEW
The 1.5 Gallon Pump-Up Foamer Pro is a portable foam applicator for applying foaming chemicals to any surface as high-quality, rich, clinging foam. This
professional model projects foam in a wide fan pattern for quick, but still precise, foam coverage. The 1.5 Gallon Pump-Up Foamer Pro features a heavy-duty hose,
trigger gun, and extension wand and combines the many advantages of foam cleaning with the familiar ease and portability of a typical pump-up sprayer.
W A R N I N G ! R E A D A L L
I N S T R U C T I O N S B E F O R E
U S I N G E Q U I P M E N T !

SAFETY & OPERATIONAL PRECAUTIONS
Manufacturer assumes no liability for the use or misuse of this unit.
Wear protective clothing, gloves and eye wear when working with chemicals.
Always direct the discharge away from electrical devices and people/animals (as appropriate)
Follow the chemical manufacturer's safe handling instructions.
SPECIAL PRECAUTIONS
This high density polyethylene unit is fitted with Viton seals. Chemicals and lubricants not compatible with polyethylene or Viton should not be used. (EPDM seals are available
for separate purchase.)
Do not alter pressure relief valve or plug valve hole.
Regularly lubricate pressure relief valve with a non-water-soluble grease (such as a silicone compound) and ensure proper operation, using water in the tank, prior to each use.
Regular lubrication of cap seal and threads with a non-water-soluble grease will help ensure proper sealing of cap.
Do not lift or carry by the hose or trigger gun.
Securely tighten pump: loose pump can be forcibly ejected.
Carefully follow chemical manufacturer's safe handling instructions and recommended precautions/practices when using flammable chemicals. Do not use hot liquids.
Do not exceed 45 psi pressure and do not inflate without liquid in the tank
Do not fill the tank over 3/4 full. Relieving pressure in an overfill condition can cause harmful venting of contents.
Never stand with face or body over the top of tank when loosening pump or relieving pressure.
After pumping, be sure the handle is in the locked down position
On completion of operation, with the tank in the upright position, relieve pressure in the tank by gently pulling up on the pressure relief valve on the side of the tank.
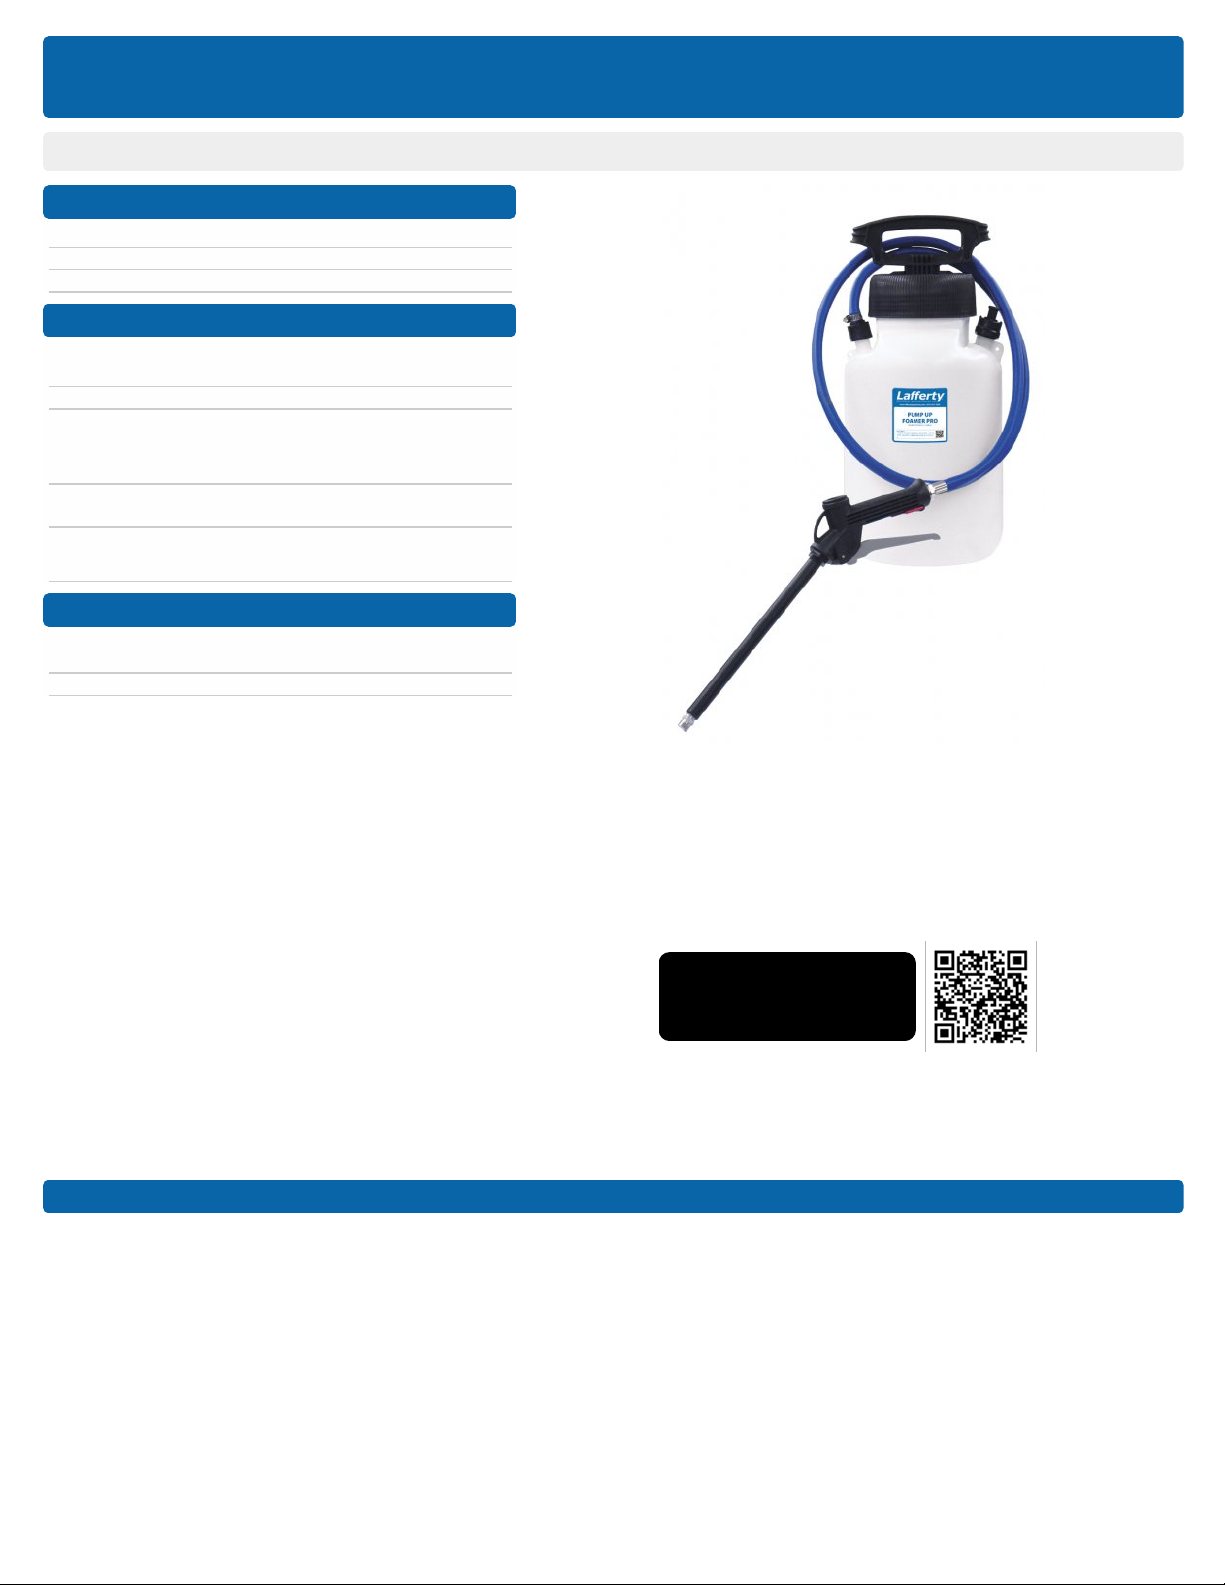
TO INSTALL (REFER TO DIAGRAM ON NEXT PAGE)
1. Turn the pump lid counterclockwise to remove pump and lid.
NOTE: Do not remove or tighten the lid using the handle. Rotational force on the handle can cause damage.
2. Add water and foaming chemical to the tank. You will have to experiment with each chemical to see how much of the concentrate you will need to add to the water to create
foam. Not all chemicals will foam.
3. Leaving extra "air space" in the tank and less chemical will give longer foaming time between re-pressurizing. A half-full tank is ideal. DO NOT FILL THE TANK OVER 3/4
FULL (75%) .
4. Securely tighten cap and pump for a good seal. (Regular lubrication of cap seal and threads will help ensure proper sealing and removal of cap).
5. Push the handle down and turn counterclockwise to unlock.
6. Pump the handle until resistance is felt, this will take several strokes.Continue pumping till the resistance is too hard to pump or pop-off valve starts to rise. Make CERTAIN the
handle is in the locked down position.
NOTE: It is a good idea to thoroughly rinse out the tank, fill with water, partially re-pressurize, and discharge to flush out the entire hose/nozzle assembly after use
and before storing foamer. When using aggressive or corrosive chemicals never leave chemical solution in the tank after use.
TO OPERATE
1. Pump foamer manually until the pressure relief valve starts to "relieve".
2. Pull the trigger to start foaming, release trigger to stop foaming. Re-pump up as foam begins to slow down.
3. On completion of foaming operation, with the tank in the upright position, relieve pressure in the tank by gently pulling up on the pressure relief valve on the side of the tank.
4. Prior to every refill of the tank pull up on relief valve to ensure it is depressurized before removing the lid and pump.
5. To store: Partially fill the tank with fresh water and pump it up. Pull the trigger and rinse the foamer out.
NOTE it is a good idea to thoroughly rinse out tank and re-pressurize and flush out entire hose/nozzle assembly after use and before storing foamer. When using
aggressive or corrosive chemicals never leave chemical solution in the tank after use.
NOTE: If a richer foam is desired then remove the foam nozzle and twist up and insert the brown "pad" in the nozzle. Replace nozzle.
925004 • Pump Up Foamer Pro, 1.5 Gallon
- Page 2 -

925004 • Pump Up Foamer Pro, 1.5 Gallon
- Page 3 -

Troubleshooting Guide
Problem Possible Cause / Solution
Startup Maintenance
A) Foamer sputtering or foam not acceptable
B) Foam is too wet
C) No foam output / unit will not foam
D) Tank will not pressurize and/or hold pressure
1, 2
1, 2
1
3, 4
3, 4
3
Possible Cause / Solution
Startup Maintenance
1. Not enough air pressure
Pump up the foamer several strokes
Less liquid in the tank will allow for more air pressure to
build and foam for longer without re-pumping (use a half
full tank for best results)
The air relief valve will rise when maximum pressure is
achieved
2. Solution too weak
Increase concentration of chemical solution
Ensure that the chemical foams naturally or use a
foaming additive (not all chemicals foam)
3. Air leaks due to loose lid, worn or damaged
components/fittings
Ensure lid is snug, but not overtight. Lubricate the lid
and pressure relief o-rings. Order repair kit and replace
damaged o-rings, gaskets, umbrella valve etc. See page
3 for part numbers
Refer to the Pump-Up O-Ring Replacement Guide
http://appequip.net/uploads/documents/pump-up-o-ring-
replacement.pdf
The o-ring on the piston (inside the shaft) creates
pressure and should be kept well-lubricated since it is
exposed to friction from pumping. Replace as needed.
The umbrella valve on the bottom of the piston shaft
holds pressure in the tank and needs to form a tight
seal. Do not scratch the valve seat! Replace as
needed.
Ensure that your chemical and lubricant are compatible
with the o-ring seals for this equipment. Incompatible
chemicals or lubricants can quickly degrade the o-rings.
4. Debris clogging foamer body
Relieve air pressure by gently pulling up on pressure
relief valve stem and remove the lid. Reach inside and
pull down on the chemical tube to remove it along with
the (grey) foamer body, visually inspect and remove
debris from the small ports in the foamer body. Replace
foamer body and tube.
5. Foam pads clogged
Remove foam pads from gun (see diagram) and rinse to
remove debris and/or chemical buildup before
replacing. Replace as needed.
PREVENTIVE MAINTENANCE: * Prior to storage, empty, clean and dry the foamer. * Lubricate o-ring in pressure relief valve and the piston/cylinder
with a compatible non-water soluble grease (such as a silicone lubricant) on a regular basis. * Lubricate tank cap threads and both sides of the gasket
to achieve a tight seal and to ease tightening and loosening. * Replace cracked or damaged seals before use.
925004 • Pump Up Foamer Pro, 1.5 Gallon
May 18th 2020 - Page 4 -
Table of contents
Other Lafferty Lawn And Garden Equipment manuals
Popular Lawn And Garden Equipment manuals by other brands

Billy Goat
Billy Goat PL25SPH owner's manual

ECOSURE
ECOSURE RAISED BEDS Assembly guide

Garden Gear
Garden Gear D9529 instruction manual

Garelick
Garelick 89621 Assembly instructions

Scheppach
Scheppach ZGONIC Yellow Garden Line NEW GENERATION... Translation from the original instruction manual

Elgo
Elgo Ready2Drip quick start guide