LAIA myTeam Sharer User manual

THE AI & IOT CAMERA COMPANY
myTeam Sharer
P/N: MTS-100SY
User manual
Concepted & designed in EU I Copyright © 2017 All rights reserved - www.laiatech.com
1Know your product
2 What’s in the box?
USB port
The USB port is used to update the myTeam Sharer software, pair the
transceiver to the base unit, connect a mouse to create/update Launcher
by pressing “Download”, hide SSID, PASS, Wi IP and Lan IP by pressing
“Info”, check the security level and control the source device when screen
sharing via the transceiver.
USB-C port
The USB-C port is used to pair the transceiver with the base unit.
Attachment points
The xing points are located on the bottom of the base unit.
myTeam Sharer is a device designed for presentations and remote work,
allowing you to connect cameras, microphone systems and speakers as
well as the screen to your own computer, completely wirelessly.
myTeam Sharer supports native mirroring protocols such as AirPlay,
Miracast or Chromecast, Plug&Play connection for USB-A and USB-C
dongle transceivers and Windows App for wireless connection (available
for Mac soon).
The device is compatible with leading video conferencing platforms
such as Zoom, goFacing or Microsoft Teams and is secure with its data
encryption and dual network.
1. Audio Output: 2-channel analog audio output, Connect a 3.5mm mini-
jack PC connector from this jack to the line-in jack of an audio system.
2. RS-232: 3-pin terminal (included) for receiving and sending RS-232
commands.
3. USB 3.0 type-C port: For connecting the USB camera and the USB
audio conferencing system, as well as for pairing the transceivers,
connecting a touch screen, a mouse and for local rmware update via USB
stick.
4. USB 3.0 type-A port: For connecting the USB camera and the USB
audio conferencing system, as well as for pairing the transmitters,
connecting a touch screen, a mouse and for local rmware update via USB
stick.
5. Reset: Reset to factory settings.
6. HDMI output: Connection for HD or 4K display with HDMI 2.0 port.
7. Ethernet Port 1: 100Mbps. Connection for Ethernet cable.
8. Ethernet Port 2: 1Gbps. Connection for Ethernet cable. Supports PoE.
9. Power socket: Connect the power adapter to this socket and to the
mains.
10. Antenna Attachment Point: Antenna connection (WLAN antennas
included)
Factory Reset
Turn on the device and when the main screen is displayed, press the reset
button on the back of the base unit for at least 2 seconds. Press the button
with a pointed object such as a paper clip until the “factory reset” page
appears. The device will reset after 3 seconds to the factory settings.
If the image does not appear, press and hold the reset button until the top
LED lights up, to execute the factory reset.
Note: Resetting the device will delete any previously set settings and
adjustments. These will be lost and you will need to recongure them
again. After resetting to factory settings, all transceivers must be paired
again with the base device.
3 Product features
4 Base unit
1. Front USB 2.0 type-A connector: USB port for transceiver pairing,
mouse control etc...
2. Front USB 2.0 type-C connector: USB-C port for transceiver pairing.
3. On/Off button: Turn on/off the device.
Note: Front USB-A and USB-C ports cannot be used simultaneously,
USB-C port is prior to USB-A port.
x1 Power
cable
x1 myTeam/
mini dongle
x3 Antennas
USB 2.0 Power
x1 Quick
guide
x2 Wall
mounting
supports + x4
xing screws
2
13
10
1 2 34 5 6789
10

THE AI & IOT CAMERA COMPANY
Concepted & designed in EU I Copyright © 2017 All rights reserved - www.laiatech.com
Default conguration
Ethernet
* Proxy: No / DHCP: Enabled
Wireless Network
* Frequency: 5GHz / Channel: Auto / Wi Password Generation: 5 minutes
Display and Audio
* HDMI resolution: Auto / HDMI CEC: Auto device shutdown: On / Auto base
unit shutdown: Off / Audio output: Minijack and HDMI / AirPlay quality: High /
Display name and password: Off / Display username: On
Moderator control
* Connected Device Preview: On / Real-time Preview: On
System settings
* Date and time: Auto / Standby: Off / Language: English
Security settings
* Level: Level 1 / Password: 4 digits (0000XXXX) / Password administrator:
admin (default)
Other settings
* Autocreate launcher: On / Clear history: Always
5Dongle type transceivers
myTeam/miniDongle (MTS-101DG) and myTeamDongle (MTS-102DG)
are transceivers to allow wireless connection between your computer and
myTeamSharer base unit.
MTS-101DG: Compact dual USB type A & C transceiver for connecting to
computer and screen sharing.
MTS-102DG: Full function USB-C with Display Port Alternate Mode
interface, which supports Audio and Video transmission. This PC’s type C
connector also requires full function type C connector for mirroring screen.
Optional accesory.
Main screen
1. Using Type C (DP) connector of the button can be plugged into a PC/
Laptop for sharing your screen.
2. Touch the sensor button to start displaying the content of the PC/Lap-
top’s screen on the main screen. Touch the button during the meeting will
toggle the sharing of the screen
3. LED ring Indicates the status of the button.
- Flashes green: initialization/connection establishment
- Permanently green: Ready for transfer
- Permanently red: Active transmission
6 Software interface
1. Wi indicator: Wi Direct mode: Internal access point activated.
Wi Infraestructure mode: “client-mode” the connection with the router has
been established and the icon shows the signal strength Connection
failure with router or not available.
2. ID: Device name of the access point to the base unit.
3. Pass: Password of the base unit.
4. Password-timer: Displayed if enabled until automatic change.
5. Change Wi password: Generate manual password to protect the Wi
network.
6. Time: Display the time if the LAN has access to a time server, even after
disconnecting the connection, the time is displayed until the device has
been disconnected from the power supply.
7. Security level: Level 1-3. The features are displayed by clicking the icon
but can only be changed by the administrator in the web menu.
8. Download button: Create and update launcher.
9. Info: Press to display ID and password.
10. Wi/LAN IP: Wi IP: Address of the base unit in wireless LAN / LAN IP:
Address of the base unit in LAN (N/A= no network connection)
11. External devices: It shows all the external devices (audio and video)
connected to base unit.
Audio & Video in One Device (Built-in Devices)
1. USB video soundbars
2. USB-PTZ system solutions incl. microphone and speakers and
integrated echo canceling (AEC)
Video only
3. USB-PTZ cameras
4. USB webcams (with microphone)
Audio only
5. Integrated audio room solution with AEC
6. Speakerphones
A combination of the “Video Only” and “Audio Only” solutions.
1
2
3
10
1
2
34
5
6
7
8
9

THE AI & IOT CAMERA COMPANY
Concepted & designed in EU I Copyright © 2017 All rights reserved - www.laiatech.com
How to connect separate audio?
Connect a 3.5mm jack audio cable to the base unit, then connect it to the
sound system in the room.
Base unit installation
The base unit can be installed by attaching it to a wall or a at surface.
The antennas are hinged so you can rotate them for better connection.
Installation as close as possible to the main screen is recommended to
avoid obstructions and interference.
Antenna positioning
The antennas should be oriented vertically, i.e. perpendicular to the ceiling
and parallel to the walls, at a sufcient distance (at least 50 cm) from
metal surfaces to avoid unwanted reections and at a sufcient distance
(at least 1 m) from other radio equipment operating in the same frequency
range, such as other Wi-Fi access points, cordless phones, microwave
ovens...
The most favourable situation is a direct line of sight between the
antennas and the dongles and/or mobile devices.
Due to the special radiation properties of the dipole antennas, do not
install the base directly above or below the transmitters (under/ceiling
mounting). The advised position for the antennas is at the side of the
meeting room.
Wiring diagram
Power supply
The base unit can be connected to the power supply with the external
power adapter. If the Ethernet LAN cable supports PoE, you can power
the base unit instead of using the external power adapter (The LAN2 port
of myTeam Sharer supports PoE).
Note: Once the base unit is powered on, use the power on/off button with
LED indicator to turn off the device.
Video Connection
Connect the device to a display via HDMI cable. Connect the base unit
to the power outlet and turn on the device. Once switched on, the home
page will be displayed.
PC/Mobile Sound
By default, it will mute the PC’s internal speaker and direct the audio to
the base unit, after the PC is correctly displayed the desktop to the main
screen, to avoid repeated audio.
When you press the button to stop sharing, the local speaker will return to
the previous state, you can adjust the volume on your PC.
Note: If you want to keep the PC’s internal speaker while routing audio to
the base unit, click on the audio mute icon in the status bar to turn on the
internal speaker.
LAN Connection
The Base Unit can be connected to a local network or directly to a PC.
For normal operation, a LAN connection is not required.
1.Connect a network cable with RJ-45 connector to the LAN port on the
Base Unit.
2.Connect the other side to the LAN. With PoE supported, you can power
myTeamSharer instead of using the external power adapter.
- Network integration of the Base Unit into the guest or company network.
- Telnet control of the Base Unit.
- Maintenance.
- Over-the-air-update (OTA) of the Base Unit rmware.
Use of touch screens
7 Installation
Audio connection
The transceiver can transmit the audio output of the device to redirect and
send it to the base unit together with the video signal. The audio will be
output at line levels from the 3.5 mm mini jack connector and through the
HDMI output connectors simultaneously.
It is up to the user whether or not to send the audio signal along with the
video signal.

THE AI & IOT CAMERA COMPANY
Concepted & designed in EU I Copyright © 2017 All rights reserved - www.laiatech.com
myTeamSharer transmits image and audio signals as well as touch
input to a display at the same time. myTeamSharer supports the USB-
HID protocol. For example, interactive touch displays, projectors or
whiteboards as well as a mouse can be connected to the base via USB in
order to:
1-take over the functions of a mouse, perform multi-touch
gestures*, work interactively, etc. The computer can be remotely
controlled, for example.B. from the touch screen.
2.- to use the moderator function.
3.- to use the integrated whiteboard app.
4.- Conrm onscreen messages.
*The specic range of functions depends on the range of functions of the
touch display, the selected connection and the operating system.
USB Mouse
Menu setup / press select / press to return to main screen.
Touch screen
Press select / long press to open menu or double click USB mouse.
Use of USB cameras and audio conferencing systems
myTeamSharer allows the use of USB cameras, USB speakerphones as
well as USB video soundbars etc... The USB cable to the rear USB 3.0
ports of the myTeamSharer base can be connected.
With the PC or notebook, these can now be used wirelessly thanks to
USB-over-WiFi for conferncing, as if they were directly connected and
start meetings with the any UC&C platform, Zoom, Teams, Skype...
Dongle or app
Before you start check the connection of the USB devices with myTeam
Sharer.
Install the virtual driver is required on Windows OS for the rst time
(for MAC OS is still under development) Once the driver is installed,
there will be two icons of the camera and microphone displayed on the
application user interface, white colour indicates that the USB camera and
speaker/microphone are connected, green colour indicates that the USB
camera and speaker/microphone are in use, e.g. by video conferencing
applications.
8Make a videoconference
For microphone and loudspeaker select “Virtual meeting audio”.
Launch the video conferencing application as Zoom from the desktop,
choose Settings>Video>Camera>Virtual Meeting Camera.
Select “Ready to share” to share the device screen.
Dongle
Before you start, check the connection of USB devices with myTeam
Sharer.
Note: When starting a video conference via the wireless transceiver, the
rst time it is used, it will be necessary to double-click on the “Sharer.
exe” application to run it, which is located in the CD drive of the computer,
as shown below. From the second time it is used, the software will
automatically run in the background of the Windows operating system (this
is a patent avoidance operation that can be ignored by the end user).
myTeam Sharer
myTeam Sharer
myTeam Sharer
myTeam Sharer

THE AI & IOT CAMERA COMPANY
Concepted & designed in EU I Copyright © 2017 All rights reserved - www.laiatech.com
Perform the same steps as if you were conguring myTeam Sharer/
miniDongle, and after selecting the audio settings, touch the transceiver to
start streaming to the display.
Note: If the application detects that the PC and the base unit are not on
the same network, it will automatically display a prompt to change the
network to that of the base unit. After a few seconds of connection, the
data from the camera, microphone and speaker will be transferred to
the PC, but please note that if the base unit does not have access to the
Internet, the video conference will be disconnected.
9 Web settings
Connect the base unit ID and password or LAN IP to the laptop to access
the Wi-Fi IP browser page and congure the base unit settings.
Note: After conguring the settings, you must wait at least one minute for
the settings to be saved and the device to reboot.
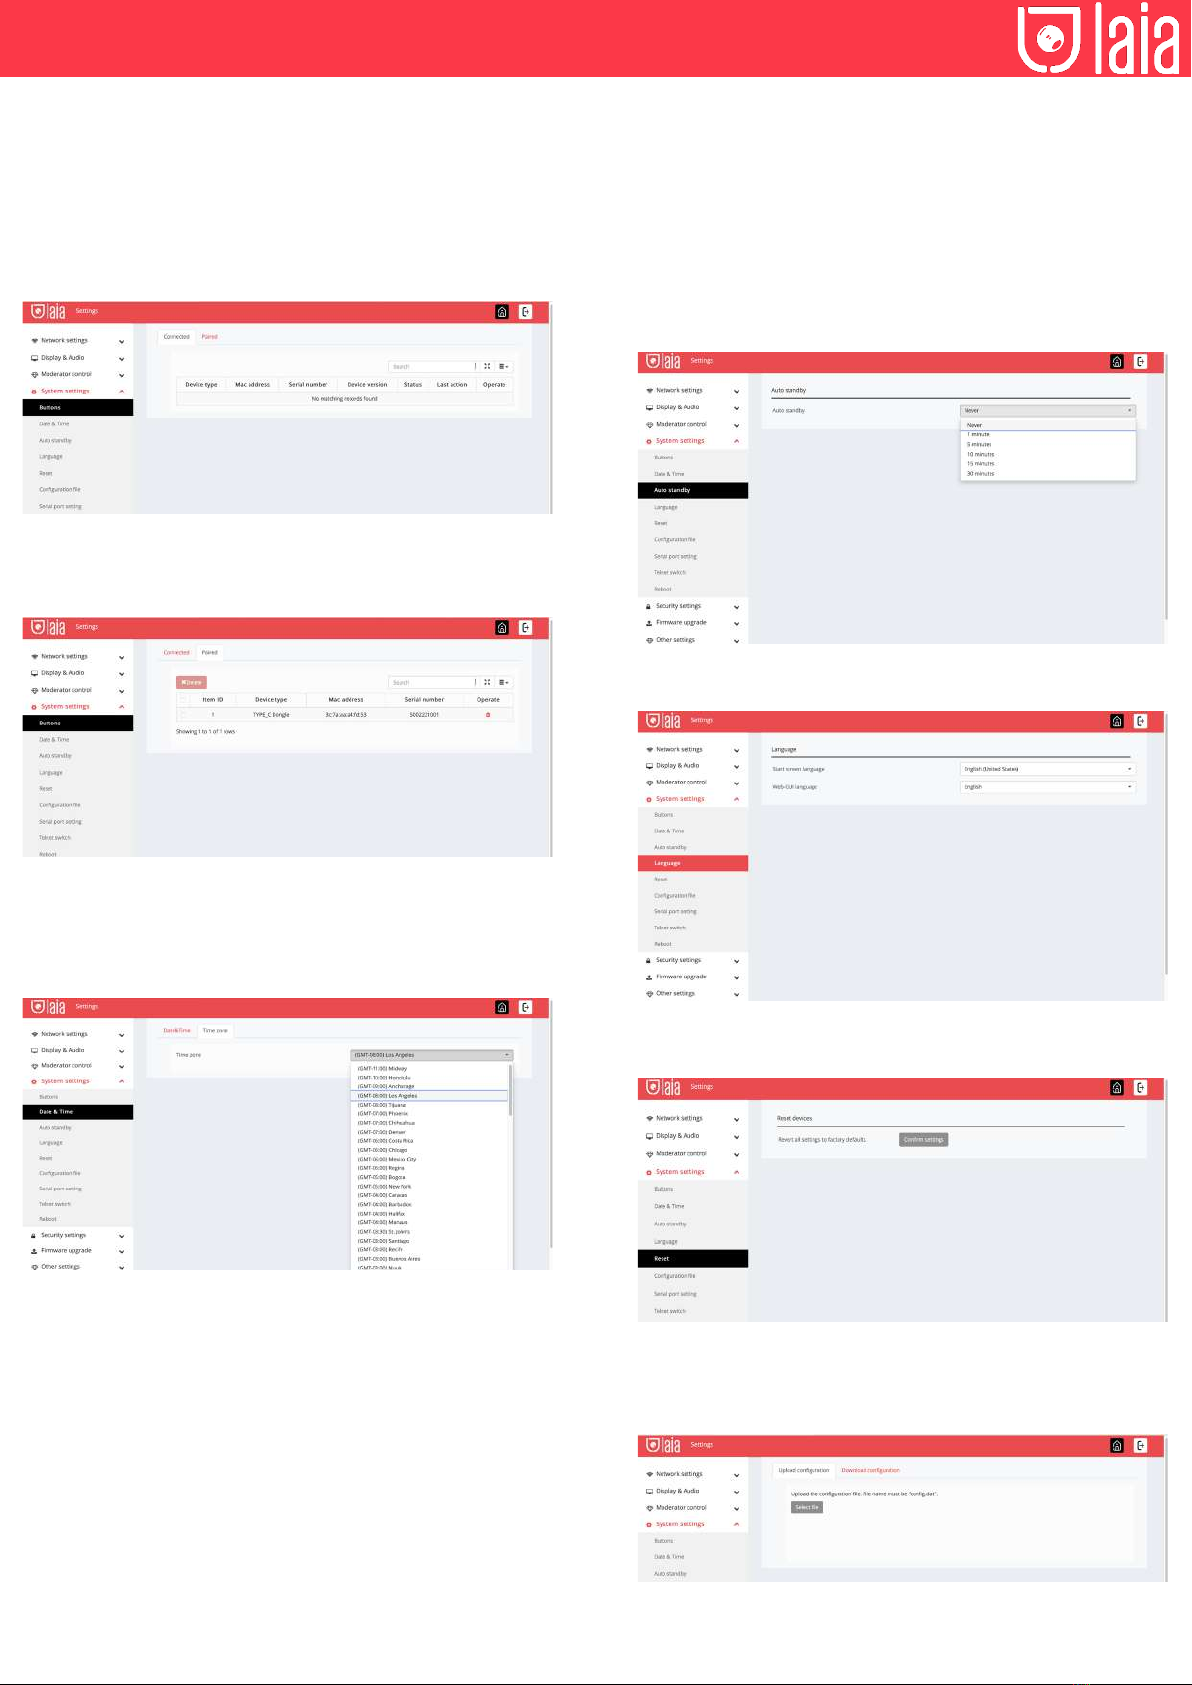
Select settings in the upper right corner. Enter the system password or
enter “admin” as the default. You can change the password below.
The settings interface includes: Network Settings, Display and Audio,
Moderator Control, System Settings, Security Settings, Firmware Update,
Other Settings and About Device.
10 Network settings
Wireless connection
To take full advantage of the device, myTeam Sharer must be properly
integrated into the network. This wizard allows the user to create a
custom conguration for integrating the device into the existing wireless
infrastructure.
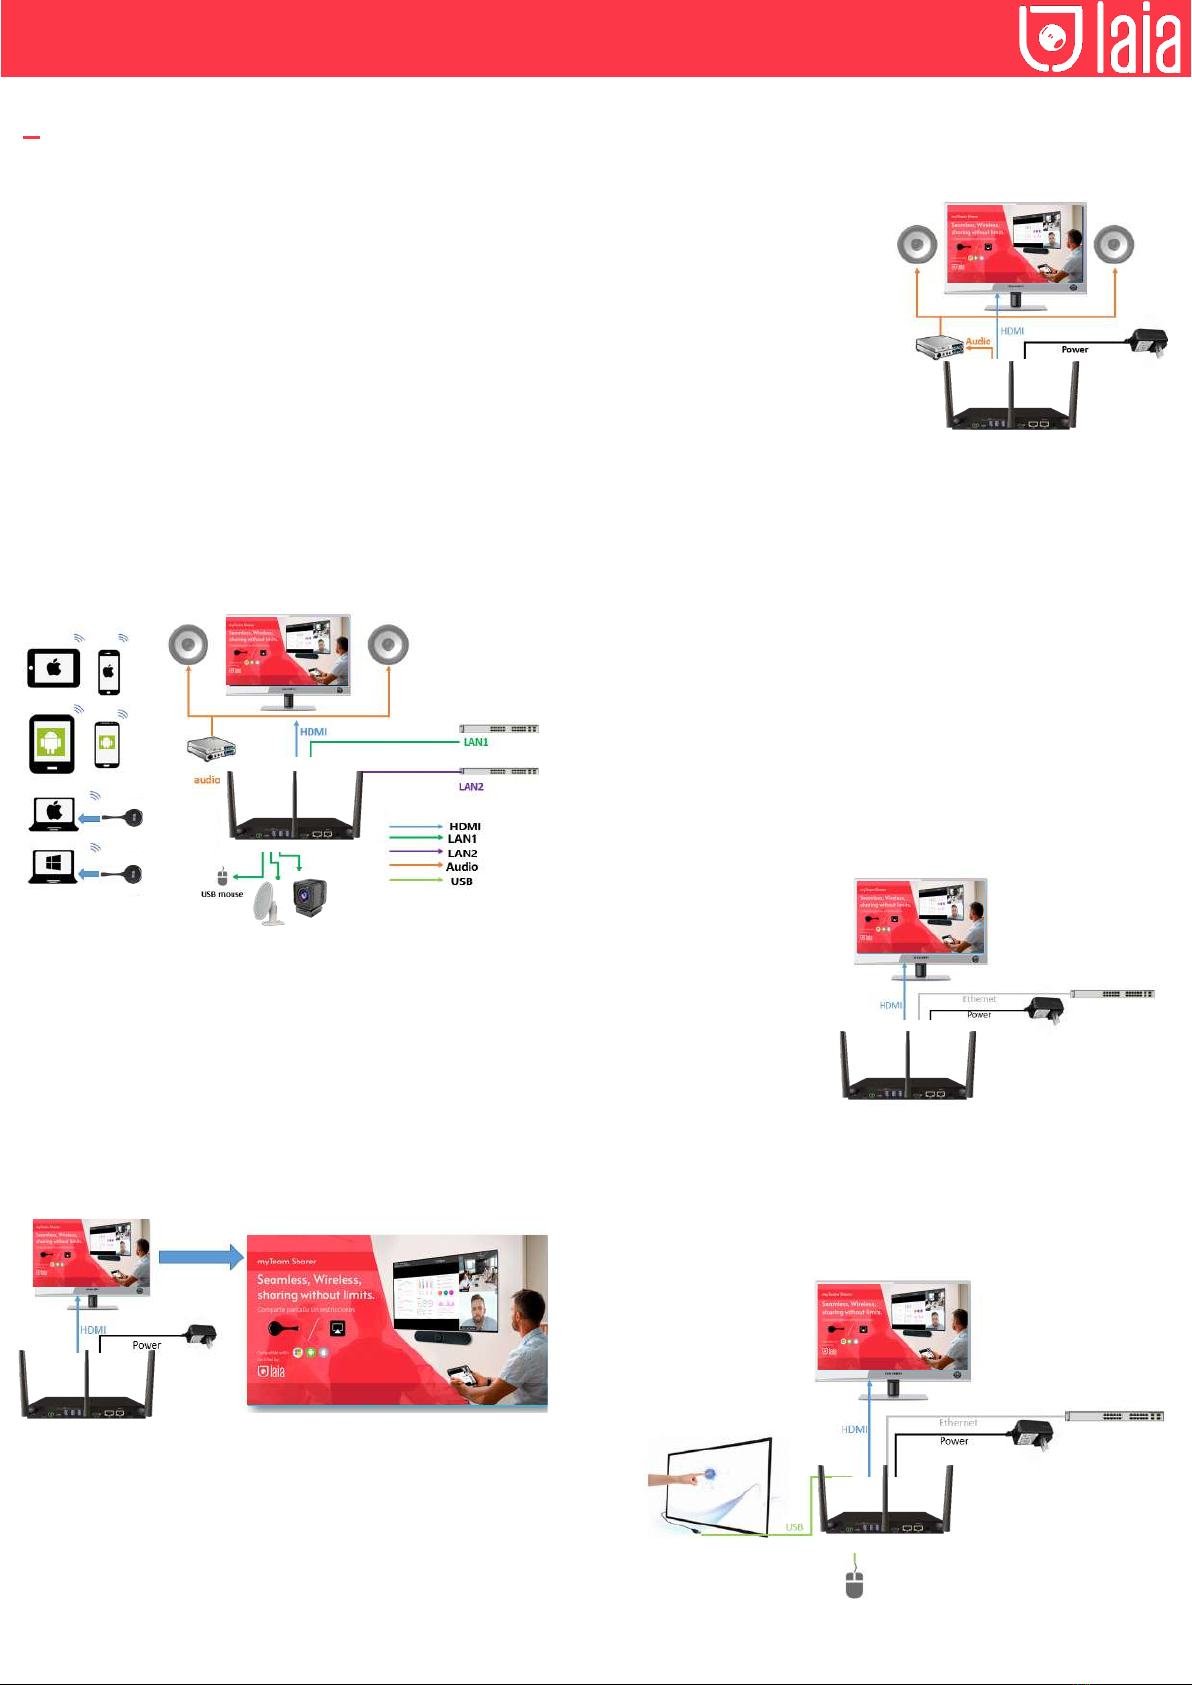
Dual Segmented Network, is to provide two routing paths to connect to
the base unit simultaneously and separately, including the wireless Wi
network (usually connected to the guest/untrusted network) and the wired
LAN network (usually connected to the trusted network).
A typical segmented dual network topology is shown below:
Wireless Network Setup Wizard
Enter a device name for the base unit. We recommend that you adopt a
descriptive name if you have more than one device installed.
device installed. The default name is “XXXX”.
Note: Only “a-z”, “A-Z”, “0-9”,”-_” and space are acceptable characters.
Select “Next step”. There are 3 methods available to connect the device:
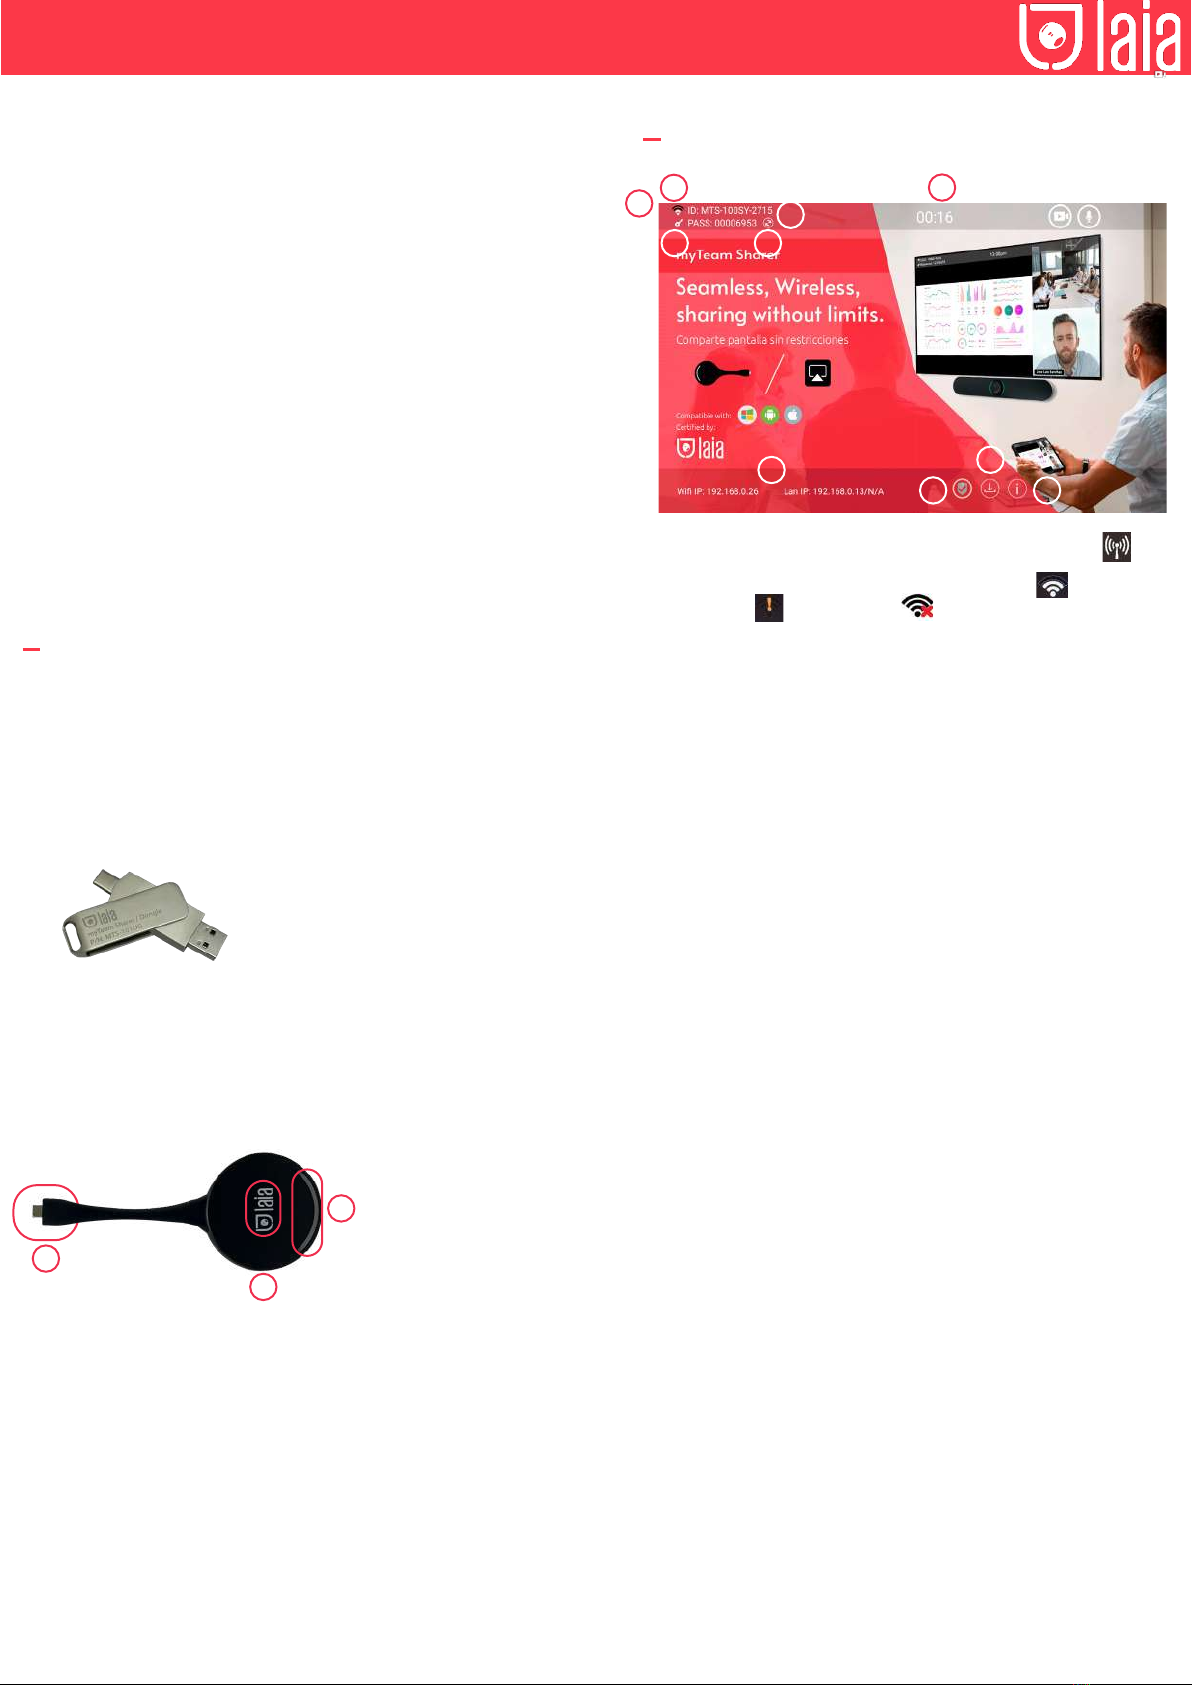
Wireless Mode
After the factory reset, myTeam Sharer starts in the default “Wireless
Direct Mode” conguration, where the base unit creates its own wireless
access point, which all transmitters use to connect. This is typical for quick
setup for small group meetings. The “Wireless Direct Mode” icon
is displayed in the top status bar of the home screen. Guests connect to
the myTeam Sharer access point, while others can also connect to the
base unit via Wi-Fi or via a LAN connection to their network.
Stand-alone connection
If the myTeam Sharer’s internal Wi-Fi access point is active, the
transceiver pairs directly to it. Users use the base unit’s internal Wi-Fi
access point. Internet access is not required. The myTeam Sharer’s
internal wi hotspot is active. The transceiver is paired directly with it.
Users use the base unit’s internal wi hotspot. Internet access is not
required.
The LAN port of the base unit is not connected. Computer users can
connect with or without transceiver using the PC driver (Windows or
MacOS). Android users can share their content by installing the free app
on their device and IOS users can use AirPlay.
Recommended environment
This option is best for temporary operation in small rooms, without network
access or networks that do not allow guests to access the connection for
security reasons.
In this mode, the transceiver will automatically pair with the wi hotspot
on the base unit when the transceiver is connected to the USB port for
pairing.

THE AI & IOT CAMERA COMPANY
Concepted & designed in EU I Copyright © 2017 All rights reserved - www.laiatech.com
You can start using the myTeam Sharer in this mode without any other
wireless network conguration.
Set wi access point
The wi access point conguration includes: frequency, channel and
password.
Frequency: Click to select 2.4 GHz or 5 GHz wi frequency. Default is 5
GHz.
Channel: Click to select the Wi-Fi channel. Default is 5 GHz.
If the wi channel is changed, no further pairing of the transceiver is
required.
2.4 GHz frequency band: channels 1, 2, 3, 3, 4, 5, 6, 7, 8, 9, 10, 11.
5 GHz frequency band: no need to choose 5G channel, the system will
choose the appropriate channel automatically. Default is 5 GHz.
Default channel (USA zone): 36,40,44,48 or 149,153,157, 161.
Four channels will be opened at the same time, the system will choose the
appropriate channel automatically.
Default channel (European zone): 36,40,44,48.
Default channel (China): 149,153,157,161.
Password: Click in the input eld to enter an 8-character password.
Click “Next step” to edit or change the network SSID. This information will
be displayed on the device’s home screen.
Note: To complete the conguration, select “Submit settings”. Then re-pair
the transceiver with the device.
There are 3 ways to connect the base unit to the Internet through the base
unit in “Wireless Direct Mode”.
Allow Internet access via LAN 1: You can connect to the Internet if LAN1
port is available.
Allow Internet access via LAN 2: You can connect to the Internet if LAN2
port is available.
Disable Internet access: You cannot connect to the Internet if you choose
this mode (for security reasons).
The device can be connected simultaneously to a wired network and a
wireless network. The base unit is rmly “connected to the network with
LAN. Users connect to the “Guest” wi access. The rest or “Staff” connect
to their usual access point on the corporate network, without having to
change the wi.
This is very useful for companies that have a “Guest” wireless network for
external visitors and a “Staff” wired network for their employees. myTeam
Sharer’s segmented Dual Network provides two separate ways to connect
to the base unit at the same time.
the base unit at the same time.
Dual Network Conguration
The transceiver connects to the network’s Wi-Fi hotspot, which in turn
connects to myTeam Sharer’s internal Wi-Fi hotspot. Mobile users
remain connected to their current network, have access to their normal
environment as well as access to the internet.
The actual signal strength received from the guest network is displayed on
the home screen.
Follow the instructions in the setup wizard for “Wireless Infrastructure
Mode”. When you pair the transceivers and plug them into the USB port of
the base unit, it will automatically pair with the associated access point.
Click “Next step” to congure the network to which the transceiver should
be paired.
Connect the transceiver via wireless network
Choose a wireless network separate from the company LAN for guest
users.
Select SSID: Choose a wireless network to connect to the guest base unit.
Password: Enter the password to connect the base unit to the guest
network.
Click “Next step” to edit or change the SSID of the guest network and the
SSID of the staff network.

THE AI & IOT CAMERA COMPANY
Concepted & designed in EU I Copyright © 2017 All rights reserved - www.laiatech.com
Connecting the transceiver via LAN
Choose a LAN network that is used for company staff users.
Select SSID: Choose a wireless network to connect to the guest base unit.
Password: Enter the password to connect the base unit to the guest
network.
Select Transceiver SSID: Choose the same LAN network to which the
base unit is connected to pair the transceiver.
Password: Enter the password for the LAN network.
Click “Next step” to edit or change the SSID of the guest network and the
SSID of the staff network.
Click “Next step” to edit or change the SSID of the guest network and the
SSID of the staff network.
Note: Select “Submit settings” to save the settings and re-pair the
transceiver again.
LAN infrastructure mode
In this conguration, the myTeam Sharer’s built-in Wi-Fi access point is
disabled.
The transceiver and/or mobile devices can connect to the secure wireless
access point of the network. The myTeam Sharer base unit is wired via
LAN to the Ethernet network.
Employee users connect to their usual access point on the company
network, without the need to change the wi.
Follow the instructions in the setup wizard for “LAN infrastructure mode”.
When pairing the transceivers, by connecting to the USB /Type C port on
the base unit, it will automatically pair to the staff access point, and not to
the base unit.
Click “Next step” to choose a LAN network that is used for the company’s
staff users and pair the transceiver on this network.
Click “Next Step” to edit or change the SSID of the guest network and the
SSID of the staff network.
Note: Select “Submit settings” to save the conguration and re-pair the
transceiver again.
Ethernet
Congure the Ethernet settings. myTeam Sharer has 2 LAN ports, if the
base unit is connected with 2 LAN cables, it can be congured from the tab
below.
Automatic password generation
The password remains unchanged for all meeting participants as long as
at least one transceiver or a wi network of a mobile device is connected
to the base unit. After the user disconnects, a congurable time elapses
until a new password is generated.
The password is generated when connecting a transceiver to the PC/
laptop or when connecting a mobile unit to the base unit’s wi, and will
continue to alternate for 15s after disconnecting the last transceiver or
disconnecting the mobile device’s wi.
The user does not need to re-pair the transceiver again, if only the
password is changed. A smart mobile device has to enter the correct SSID
and password to connect to the base unit’s access point and be able to
access all functions.
Note: We recommend setting to automatically change the wi password to
a random number from time to time.

THE AI & IOT CAMERA COMPANY
Concepted & designed in EU I Copyright © 2017 All rights reserved - www.laiatech.com
Display and audio
HDMI
The user can congure the resolution of the HDMI interface, as shown in
the picture:
Note: If the display only supports Full HD, 4K resolution will not be
displayed in the list.
HDMI CEC
The controller supports CEC function if the connected display also
supports CEC function.
Note: If HDMI CEC does not work, check whether the monitor supports
CEC function or not, as some monitor models do not support CEC.
Automatic device shutdown:
On (Default): When the dock enters standby mode, it will send commands
through the HDMI cable so that the connected monitor will also enter
standby mode. If “Auto Device Power Off” is disabled, no commands will
be sent to put the connected monitor into standby mode.
Power Off: The display will not turn off automatically when the base unit is
turned off.
Automatic shutdown of the base unit when the display is turned off:
When the monitor enters standby mode, it will send commands through
the HDMI cable so that the connected base unit will also enter standby
mode. The options menu allows you to enable/disable the automatic
shutdown of the base unit.
On: The base unit will also automatically turn off when the display is turned
off.
Off (default): The base unit will not automatically turn off when the display
is turned off.
Audio
User selectable audio output:
Jack: 3.5 mm mini-jack audio output only.
HDMI: HDMI audio output only.
Jack&HDMI (default): Jack and HDMI audio output.
Volume
The user can set the volume on a 1-100 scale.
AirPlay quality
The user can set the quality when using AirPlay from their Apple device.
Home screen
Show device name and password when mirroring: The wi name (ID) and
password can be shown or hidden in the top status line of the main screen.
Home screen background image
When myTeam Sharer is turned on, the home screen will be displayed.
The user can change the background image of the home screen.
start-up screen. Select the image (jpg, bmp, png, gif with 1920x1080p
resolution) from the appropriate directory and activate the checkbox. You
can return to the standard start screen every time.
Moderator control
You can add a sub-window bar to preview the connected devices. Check
the icon and once the devices are connected to the base unit, the following
sub-window will be displayed.

THE AI & IOT CAMERA COMPANY
Concepted & designed in EU I Copyright © 2017 All rights reserved - www.laiatech.com
If the icon is checked, the preview window will show a real-time preview, if
it is not checked, the preview window will only show a static image.
System settings
Buttons
Displays the device name, MAC address, serial number, device version,
device status, last action, and item operation.
You can also make adjustments to already paired transceivers.
Date and time
Includes automatic date and time, set date, set time and select time zone.
Automatic standby
If the automatic standby mode is activated, the device will automatically
switch to power saving mode, a selectable time after the last transceiver
was connected, the wi network of a mobile unit was disconnected, or
there is no operation in the system. The time is selectable from never to
30 minutes. In standby mode, the green LED on the top of the base unit
ashes and the HDMI output is turned off.
When a transceiver is plugged in and connected or a mobile unit is
connected, the standby mode is deactivated.
Mouse movement on the USB input of the base unit also disables the
standby mode.
Language
Select the desired language for the device.
Reset
Select “Conrm settings” to reset the device to factory settings.
Conguration le
The conguration le is a packaged le containing all myTeam Sharer
conguration settings, which can be downloaded and copied to multiple
devices that need to use the same conguration.

THE AI & IOT CAMERA COMPANY
Concepted & designed in EU I Copyright © 2017 All rights reserved - www.laiatech.com
Port settings
For conguring the telnet command and RS-232 command.
Telnet switch
Activate or deactivate the telnet function.
Security settings
Security level
Depending on user requirements, three different security levels can be set
in the device menu. A security level is a predened set of settings. Click on
the corresponding menu entry if you want to adjust the respective security
features. The default setting is level 1.
Level 1: Normal security; maintains security in normal, everyday use for
any organisation, such as classroom, normal meeting room, etc.
Level 2: superior security; provides higher security for businesses,
organisations, government agencies etc... through strong encryption of
audio and video data; other security features include limiting “AirPlay”
streaming by entering a password.
Level 3: used for strict security requirements.
This level contains all the security measures of “Level 2”; in addition, all
mobile applications such as the Android app as well as AirPlay and the
web browser (WebUI) of the base unit are blocked. In addition, a rmware
update is not possible.
Access password
Change the administrator password to access the web server conguration
menu. The default password, or after a reset, is “admin”. You can change
the password as you wish. You can also deactivate the password entry, put
the corresponding check mark and “Conrm settings”.
Login Password
Two types of password format can be chosen to be displayed on the home
screen:
4-digit password, starting with 0000.
8-digit password.
Firmware update
You can upload local update les to update the controller.
Automatic update
Check to choose to update from OTA via the Internet or from local les.

THE AI & IOT CAMERA COMPANY
Concepted & designed in EU I Copyright © 2017 All rights reserved - www.laiatech.com
Other settings
Automatic Launcher
When a USB memory stick is used in a USB port of the base unit, the
launcher will be automatically copied to the USB memory stick. Check or
uncheck the box.
Delete history
Pictures, videos and music from the devices will be stored in the memory
of the base unit. This memory can optionally be cleared at the end of a
meeting when the transceiver is removed from the handheld.
The settings are:
About the device
Check the rmware version of the base unit and the version of the web
server.
A rmware update can be useful to take advantage of new myTeam
Sharer features or to correct problems and bugs. Two update methods are
included. Update via USB stick and web server.
After updating the base unit, always check if the other parts are still
working or if they need to be updated as well.
There are up to three different areas for the update: Firmware of the
controller, Firmware of the transceiver and Launcher for pc or Mac. All
software is stored in the base unit, for manual transfer to the different
devices.
Check current rmware information
Base unit: Open the “console” menu of the web server / About the device.
Windows
Transceiver/rmware : the rmware version can be viewed on the
programme icon in the Windows status bar by right-clicking on the icon
and selecting “About”, as shown below.
Select “About” to get the transceiver and rmware information.
11 Firmware update
MacOS
Transceiver/rmware : the rmware version can be viewed on the program
icon in the MacOS status bar by right-clicking on the icon and selecting
“About” as shown below.
UCC Device Manager
When the user connects a video, audio or both device to any of the
myTeam Sharer USB inputs, it is necessary to verify that it works correctly.
USB Camera
It shows the type of connected camera and its live image
USB Audio
Shows the type of audio device connected (Speaker and microphone)
Allows you to congure the volume and perform tests to verify its correct
operation.

THE AI & IOT CAMERA COMPANY
Concepted & designed in EU I Copyright © 2017 All rights reserved - www.laiatech.com
Upgrading the rmware of the controller
There are two ways to update the base unit:
First method to update the base unit:
The base unit device can be updated via a USB drive as follows.
1. Copy the update le “update.img” to the root directory of the USB drive.
2. Connect the USB drive to any of the USB ports on the controller.
Note: The USB port can only support a maximum of 500ma. Please use
a small memory drive such as a USB. Do not disconnect the power during
the upgrade, otherwise it will damage the rmware of the unit.
3. The unit will automatically reboot after completing the 100% upgrade, as
shown below:
Note: During the update, the screen may temporarily go black.
4. Perform “Factory Reset” when the rmware upgrade is complete.
The second method for upgrading the controller:
The base unit can be upgraded via the web server console menu by
selecting an “update.img” le to upgrade to the target version.
Upgrade and Pair Transceiver
1. Connect the transceiver to either of the two USB ports on the myTeam
Sharer you wish to update. A message will automatically appear to indicate
if the transceiver’s installed rmware is old and needs to be updated.
2. Pairing” with the base unit is performed automatically, as shown below.
The upgrade progress starts automatically with the progress bar, as shown
below.
Update Launcher rmware
After updating the base unit and transceiver, the launcher must be written
with the current launcher program for Windows, MAC and mobile apps:
There are 2 methods to update the USB stick / launcher:
Via USB: Plug the USB drive into any of the USB ports on the base unit
and select download. The Launcher “writes” to the USB stick, an OSD
window shows the progress. When ready, disconnect the USB stick.
Via wi: Connect the PC to the myTeam Sharer SSID and enter
the password on the home page. Open in your browser the wi IP
192.168.43.1 and click to access the download page. Choose and click
on the Windows or MAC luncher to download, copy it to the desktop (it
is recommended to copy to the desktop for fast execution) and run the
program to start sharing.
Two methods to run the launcher for the rst time user:
1. copy the program to the PC and click to run it and share the PC screen.
2. Connect the transceiver to the PC, click to run the program from the
USB drive and share the screen.
12 Recommended wi settings
Check the wi setting on the controller
Please use a wi analysis software to place it in the same place as the
controller to check the wi environment, in order to select the clean or
unused wi frequency between 2.4GHz and 5Hz.
2.4GHz: 1, 2, 3, 4, 4, 5, 6, 7, 8, 9, 10, 11
5GHz: 36, 40,44, 48,149, 149, 153, 157, 161
Check WIFI RSSI on the dongle or mobile phones
Use a wi analysis software and place it in the same place as the dongle
or mobiles to measure the wi RSSI (received signal strength indicator).
We recommend that the RSSI be higher than -70dB to maintain stable
signal transmission.
Select “About” to get the transceiver and rmware information.
Firmwares do NOT match
When the rmware of the transceiver or the rmware of the device are
older versions, or in other words, do not match the version of the controller,
the warning message “CAUTION” appears in the OS or MAC OSX
window, as shown below:

THE AI & IOT CAMERA COMPANY
Concepted & designed in EU I Copyright © 2017 All rights reserved - www.laiatech.com
13 Troubleshooting

THE AI & IOT CAMERA COMPANY
Concepted & designed in EU I Copyright © 2017 All rights reserved - www.laiatech.com

THE AI & IOT CAMERA COMPANY
Concepted & designed in EU I Copyright © 2017 All rights reserved - www.laiatech.com
14 Technical characteristics
Windows 10 / 11 device connections MTS-series Dongle wireless Transmitters / myTeamSharer App for Windows / Miracast / Chromecast
macOS device connections MTS-series Dongle wireless Transmitters / myTeamSharer App for macOS / AirPlay / Chromecast
Mobile device connections Android App / AirPlay / Miracast / Chromecast
Maximum Video Input Resolution
(wireless)
1080p60. Via MTS-series Dongle wireless Transmitters, myTeamSharer App for Windows&macOS asn Airplay for
IOS devices.
HDMI Output & Resolution 1× HDMI 2.0 | 3840×2160@60/30 Hz, 1920×1080@60Hz, 1280×720@60Hz
HDCP version HDCP 1.4, HDCP 2.0
Simultaneous Ethernet connections
(RJ45) / WLAN
Up to 30 | Up to 16
Splitscreen 4 + 14. Up to 4 simultaneously (4 main windows+14 thumbnail windows), adjustable layout
Audio input MTS-series Dongle wireless Transmitters | myTeamSharer App | AirPlay | Miracast | Chromecast | USB
SpeakerPhone
Audio output (analog) 1× 3.5 mm stereo jack
WIFI Band / Bandwith / Estándar 2.4 / 5 GHz | up to 1200 Mbit/s | IEEE 802.11b/g/n/ac
WIFI antennas 2×2 MIMO + 1×1 MIMO (Miracast)
Safety standard WiFi: WPA PSK, WPA2 PSK
Video transmission encrypted with AES-256 bit + RSA1024 bit
USB 2.0 ports (Type C) 1× (front), (Type A) 1× (front)
USB 3.0 ports (Type C) 1x (rear), 5V / 1.5 A max. (max. 20 Watt via all USB 3.0 connections)
(Type A) 3x (rear), 5V / 1.5 A max. (max. 20 Watt via all USB 3.0 ports)
Touch-back / USB-HID support Yes, e.g. for use in conjunction with interactive displays (touchscreens), whiteboards or projectors
LAN ports 1 × 1000 MBit/s with PoE+. RJ45 / 1× 100 MBit/s. RJ45
PoE Standard PoE+ - IEEE802.3at
Control ports Network: Web GUI, Telnet / RS232: 1× 3-pin euroblock (rear)
Compatible transceivers MTS-101DG Dual USB-A/C minidongle and MTS-102DG USB-C Touch&Play dongle
DC Power voltage 12V | PoE+
Power consumption max. 30 W
Dimensions (W x D x H) mm 220 x 120 x 41. Incluidng antenna: 220 x 120 x 145
Weight 1Kg
Supply accesories 1 × MTS-101DG, Dual USB-A/C minidongle | 1 x AC-DC adaptor, 12V-3Amp, with exchangeable plugs (Euro AV,
UK) | 3 x antennas | 1 x Phoenix 3 pin terminal | 2 x wall mounting brackets + 4 x xing screws
Other manuals for myTeam Sharer
1
This manual suits for next models
1
Table of contents
Popular Transceiver manuals by other brands

Technisonic Industries Limited
Technisonic Industries Limited TiL-91-DE/8.33 Installation and operating instructions

Swann
Swann Astro 150 Owner's operation manual

Kenwood
Kenwood TM-241A instruction manual

Kenwood
Kenwood TS-830S instruction manual

Kenwood
Kenwood TK-7100H Service manual

Kenwood
Kenwood TM-251A instruction manual