Lakeland 26920 User manual

INSTRUCTION BOOKLET
DUAL AIR FRYER
Model: 26920

2
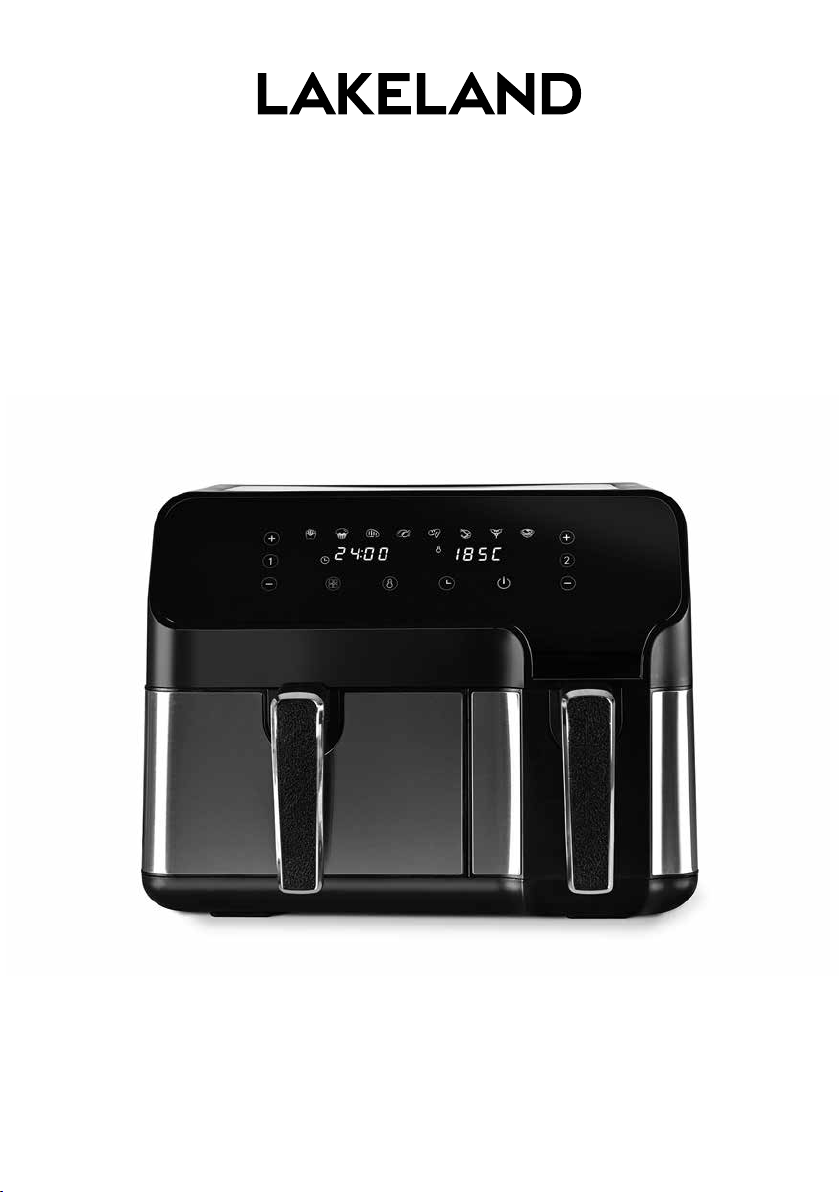
LAKELAND DUAL AIR FRYER
Thank you for choosing the Lakeland Dual Air Fryer.
Please take a little time to read this booklet before getting started and keep it in a safe
place for future reference.
Our Dual Air Fryer helps you cook your favourite food the healthier way, using little or no
oil. Versatile, quick and convenient, the top grill circulates hot air to cook your food evenly
from all directions, so you can cook meat, sh, poultry, seafood and baked goods, at the
touch of a button, to perfection.
Fantastic for frozen foods like French fries and scampi too, and you can fry up to
500 grams of crisp, delicious, guilt-free home-made chips with little or no oil. There’s no
messy oil to change and less of the odours associated with traditional deep fat fryers.
It’s simple to use with an LED touchscreen control panel, and a clear countdown timer
helps you keep track of progress. The dual option allowing you to create a perfect meal.
Here at Lakeland, our award-winning family-owned business still offers the same
excellent quality, value for money and exceptional customer service as when we founded
the company back in the 1960s.
Our products are hand-picked and thoroughly tested so you can be sure that everything
you purchase will be a pleasure to use for many years to come.
CONTENTS
Product features ...............................................................................................................................3
Control panel ..................................................................................................................................4-7
Safety cautions .............................................................................................................................8-9
Using your Dual Air Fryer for the rst time .............................................................................. 10
Instructions for use...................................................................................................................11-14
Checking your food ........................................................................................................................ 15
A guide to ingredients and hints and tips .................................................................................. 16
A guide to cooking times .............................................................................................................. 17
Recipes .......................................................................................................................................18-20
Frequently asked questions ........................................................................................................ 21
Care and cleaning .......................................................................................................................... 22
Technical information ................................................................................................................... 23
Electrical connections .................................................................................................................. 23
Recycling your electricals ............................................................................................................ 23

3
PRODUCT FEATURES
1. Air vents
2. Cord and plug
3. Control panel
4. Air intake
5. Large crisper drawer
6. Large crisper drawer handle
7. Small crisper drawer
8. Small crisper drawer handle
9. Large non-stick tray
10. Small non-stick tray
11. Cooking cavity and heating element
1.
4.
9.
10.
6.
7.
5.
2.
3.
8.
11.
11.

4
CONTROL PANEL ICONS
1. On/off power
2. Preset
3. Larger crisper drawer
4. Small crisper drawer
5. Large crisper drawer increase
6. Large crisper drawer decrease
7. Small crisper drawer increase
8. Small crisper drawer decrease
9. Temperature function
10. Timer function
11. Large crisper drawer display
12. Large crisper drawer temperature indicator
13. Large crisper drawer time indicator
14. Small crisper drawer display
15. Small crisper drawer temperature indicator
16. Small crisper drawer time indicator
17. Fries function
18. Cake function
19. Steak/meat function
20. Poultry function
21. Chicken wings function
22. Fish/Seafood function
23. Sausage function
24. Pie function
17. 18. 19. 20. 21. 22. 23. 24.
8. 1.2. 9. 10.
3.
5.
12. 15.
6.
4.
7.
8.
11. 14.
13. 16.

5
1. On/off power
The on/off power icon will be illuminated, when the appliance is plugged in and
switched on at the socket and the crisper drawers are in place. Select the on/off
power icon to put the appliance into standby mode.
After selecting the correct crisper drawer to be used and function, press the on/off
power icon a second time will start the cooking process.
Press and hold the on/off power icon for 2 seconds to stop the entire device during
cooking. The display for the corresponding crisper basket will show ‘OFF’.
Note: During cooking, you can touch the on/off power icon to control the pause and
start of cooking.
2. Preset
Selecting the preset icon enables you to scroll through the 8 preset heating
functions (17-24). Once selected, the predetermined time and cooking temperature
shows on the control panel.
3. Large crisper drawer
Press the icon if you are using the large crisper drawer on the left, this will then
be illuminated. The control panel will default to the Fries function. The Fries icon will
be illuminated and ash, the control panel will show default temperature and time
for the function and alternate between the two. When the temperature is displayed,
the temperature indicator on the upper left of the display will be on. When the time is
displayed, the time indicator on the lower left of the display will be on. If you press
the icon for 2 seconds, you can cancel the selection of the large crisper drawer
and the product enters standby mode.
4. Small crisper drawer
Press the icon if you are using the small crisper drawer on the lright, this will then
be illuminated. The control panel will default to the Fries function. The Fries icon will
be illuminated and ash, the control panel will show default temperature and time
for the function and alternate between the two. When the temperature is displayed,
the temperature indicator on the upper left of the display will be on. When the time is
displayed, the time indicator on the lower left of the display will be on. If you press
the icon for 2 seconds, you can cancel the selection of the small crisper drawer
and the product enters standby mode.

6
5. and 6. Large crisper drawer increase and decrease icons
The increase and decrease icons enable you to increase or decrease cooking
temperature in 5°C intervals. If the icon is held down it will go through the temperature
range quickly. Temperature range: 80°C to 200°C.
These icons also allow you to increase or decrease cooking time for the large crisper
drawer on the left, 1 minute at a time. If the icon is held down, it will go through the time
range quickly. Time range: 1 to 60 minutes.
7. and 8. Small crisper drawer increase and decrease icons
The increase and decrease icons enable you to increase or decrease cooking
temperature in 5°C intervals. If the icon is held down it will go through the temperature
range quickly. Temperature range: 80°C to 200°C.
These icons also allow you to increase or decrease cooking time for the small crisper
drawer on the right, 1 minute at a time. If the icon is held down, it will go through the
time range quickly. Time range: 1 to 60 minutes.
9. Temperature function
Press the temperature icon on the corresponding crisper drawer which is selected,
the display will show the temperature and you can adjust the temperature you need
using the corresponding increase and decrease icons.
10. Time function
Press the time icon on the corresponding crisper drawer which is selected, the
display will show the time and you can adjust the time you need using the corresponding
increase and decrease icons.
11. Large crisper drawer display
This will illuminate when the large crisper drawer is selected or in use.
12. Large crisper drawer temperature
When this is illuminated it will show the large crisper drawer selected temperature.
13. Large crisper drawer time
When this is illuminated it will show the large crisper drawer time remaining to run.
14. Small crisper drawer display
This will illuminate when the small crisper drawer is selected or in use.

7
15. Small crisper drawer temperature
When this is illuminated it will show the small crisper drawer selected temperature.
16. Small crisper drawer time
When this is illuminated it will show the small crisper drawer time remaining to run.
17-24. Presets
Quick preset functions with the temperature and time preset.
17. Fries function
18. Cake function
19. Steak/meat function
20. Poultry function
21. Chicken wings function
22. Fish/Seafood function
23. Sausage function
24. Pie function

8
SAFETY CAUTIONS
Carefully read all the instructions before using the appliance and keep in a safe place
for future reference. Always follow these safety cautions when using the appliance to
avoid personal injury or damage to the appliance. This appliance should be used only as
described in this instruction book.
• This appliance can be used by children aged from 8 years and
above and persons with reduced physical, sensory or mental
capabilities or lack of experience and knowledge if they have
been given supervision or instruction concerning use of the
appliance in a safe way and understand the hazards involved.
Children shall not play with the appliance. Cleaning and user
maintenance shall not be done by children unless they are older
than 8 and supervised.
• Make sure your electricity supply matches the voltage shown on the appliance.
• Ensure all packaging materials and any promotional labels or stickers are removed
from the appliance before the rst use.
• Always inspect the appliance before use for noticeable signs of damage. Do not use if
damaged or has been dropped. In the event of damage, or if the appliance develops a
fault contact the Lakeland customer care team on 015394 88100.
• Do not use this appliance if the lead is damaged. Contact the Lakeland customer care
team on 015394 88100.
• Always use the appliance on a dry, level, heat resistant surface.
• Unplug from the mains when not in use and before cleaning. To disconnect, turn the
socket to "off" and remove the plug from the mains socket.
• Do not use any accessories or attachments with this appliance other than those
recommended by Lakeland.
• To protect against re, electric shock or personal injury, do not immerse cord, plug or
lid in water or other liquids.
• Do not leave the lead hanging over the edge of a kitchen table or worktop. Avoid
contact between the lead and hot surfaces.
• For indoor use only.
• For domestic use only.
• This appliance should be used for preparation of food as described within the
instructions for use that accompany it.
• Always ensure that your hands are dry before removing the plug from the mains
socket. Never pull the plug out of the mains socket by its lead.
• To avoid injury or possible re, do not cover the appliance when in use.
• Do not connect this appliance to an external timer or remote control system.

9
• An extension cable may be used with care. The electrical rating of the cable should be
at least as great as the appliance. Do not allow the cable to hang over the edge of the
worktop or touch any hot surfaces.
• This appliance complies with the basic requirements of Directives 2014/30/EU
(Electromagnetic Compatibility) and 2014/35/EU (Low Voltage Directive).
• WARNING: A cut off plug inserted into a 13 amp socket is a serious safety (shock)
hazard. Ensure the cut off plug is disposed of safely.
• CAUTION: The plastic bags used to wrap this appliance or the packaging may
be dangerous. To avoid risk of suffocation, keep these bags out of reach of
babies and children. These bags are not toys.
• Keep the Dual Air Fryer, plug and lead away from hot ovens, ames and other hot
surfaces.
• The Dual Air Fryer must be used in a well ventilated area, at least 15cm away from
walls and other surfaces to allow sucient airow.
• DO NOT operate the Dual Air Fryer empty and never ll beyond half full.
• DO NOT ll the basket with oil or any other liquid to avoid a re hazard.
• If dark smoke is coming out of the appliance, unplug immediately. Wait for the smoke
to stop before removing the crisper drawer.
• DO NOT place food directly into the cooking cavity, or allow food to come into direct
contact with the heating element. Never add food to the basket without the tray
being in place, always cook food in the crisper drawer.
• DO NOT leave the Dual Air Fryer unattended during use.
• The Dual Air Fryer, crisper drawer and tray will remain hot for some time after use,
switch off and unplug the Dual Air Fryer and let it cool completely before moving,
cleaning or storing.
• All surfaces marked with this symbol
will get very hot during use.
• To prevent injury, DO NOT TOUCH.
• Switch off and unplug the Dual Air Fryer and
let it cool completely before touching these
surfaces.
• Be careful when removing the crisper drawer
and tray as burning hot steam can escape, and
hot fat can spit and burn, always use the crisper
drawer handle. Use oven gloves.
• During use, hot steam is released through
the air vents - keep your hands and face
at a safe distance.
WARNING – HOT SURFACES

10
USING THE DUAL AIR FRYER FOR THE FIRST TIME
• Unpack the Dual Air Fryer and remove all the packaging materials.
• Before rst use, wipe the main unit with a clean damp cloth.
TO REMOVE A CRISPER DRAWER FROM THE COOKING CAVITY
• Pull the crisper drawer out from the cooking cavity using the crisper drawer
handle and place on a dry level surface.
• Wash the crisper drawers and trays with hot, soapy water, rinse and dry
thoroughly.
• Make sure that all parts are clean and dry before assembling the product.
• Lower the tray into the crisper drawer,
with the ridges upper most until it is
sat on the lip.
Never use the crisper drawer without
the tray in it.
• Slide the crisper drawer back into the cooking cavity.
• The Dual Air Fryer is now ready to use.

11
INSTRUCTIONS FOR USE
• PLEASE NOTE: This is an oil free fryer that works on hot air DO NOT ll the crisper
drawer with oil or any other liquid. DO NOT ll beyond half full, when putting your
ingredients into the crisper drawer.
• Place the Dual Air Fryer on a at heat
resistant surface near a socket.
The Dual Air Fryer must be used in
a well ventilated area, at least 15cm
away from walls and other surfaces
to allow sucient airow.
• When using the Dual Air Fryer for
the rst time you may notice a
slight burning smell. This is normal
for a new heating element and will
disappear after a few uses.
POWER ON MODE
• Plug in and switch on the Dual Air Fryer at the socket, the appliance will beep, the
digital display will briey illuminate and the on/off power icon will illuminate and
the appliance will enter into a power on mode.
STANDBY MODE
• Press the on/off power icon to activate the appliance, there will be a beep. The
large crisper drawer icon and small crisper drawer icon will appear and remain
on.
• If no icons on the control panel are touched after 3 minutes, it will go back to power
on mode. Likewise, if you have paused or opened the crisper drawer and there is no
operation within 3 minutes, it will go back to power on mode.
USING THE LARGE CRISPER DRAWER MODE
1. Press the icon, the default function of fries will appear on the control panel and
will ash.
2. The default temperature and time will appear alternately on the large crisper drawer
display.
3. When the temperature is displayed, the temperature indicator will be on.
4. When the time is displayed, the time indicator will be on.
5. If you press and hold the icon, you can cancel the selection of the large crisper
drawer and the appliance enters standby mode.
6. When the icon is ashing you can touch the preset icon to change to the
desired preset function to use, as you press the icon it will move through the preset
functions and circle back to the beginning.

12
7. Press the temperature indicator icon, the display will show the temperature of the
current preset function and it will be permanently on the display.
8. Press the or icons to adjust the temperature, each time you press, the
temperature will change by 5°C intervals. You can press and hold the icon, the
temperature will increase or decrease continuously.
9. The temperature can be adjusted from 80°C to 200°C.
10. Press the time indicator icon, the display will show the time of the current preset
function and it will be permanently on the display.
11. Press the or icons to adjust the time, each time you press, the time will change
in 1 minute intervals. You can press and hold the icon, the time will be continuously
increasing or decreasing continuously.
12. The time range can be adjusted from 1 to 60 minutes.
14. After setting the desired working function, temperature and time, touch the on/off
power icon.
15. The large crisper drawer will start working. The display will alternate between the
selected temperate and the time. The time will start counting down the time, showing
the remaining time left to cook.
16. The large crisper drawer icon will be illuminated.
17. At the end of the cooking time, the appliance will beep 5 times and the word ‘OFF’ will
appear on the display.
18. The large crisper drawer display will then enter into standby mode.
USING THE SMALL CRISPER DRAWER MODE
1. Press the icon, the default function of fries will appear on the control panel and
will ash.
2. The default temperature and time will appear alternately on the small crisper drawer
display.
3. When the temperature is displayed, the temperature indicator will be on.
4. When the time is displayed, the time indicator will be on.
5. If you press and hold the icon, you can cancel the selection of the small crisper
drawer and the appliance enters standby mode.
6. When the icon is ashing you can touch the preset icon to change to the desired
preset function to use, as you press the icon it will move through the preset functions
and circle back to the beginning.
7. Press the temperature indicator icon, the display will show the temperature of the
current preset function and it will be permanently on the display.
8. Press the or icons to adjust the temperature, each time you press, the
temperature will change by 5°C intervals. You can press and hold the icon, the
temperature will increase or decrease continuously.
9. The temperature can be adjusted from 80°C to 200°C.
10. Press the time indicator icon, the display will show the time of the current preset
function and it will be permanently on the display.

13
11. Press the or icons to adjust the time, each time you press, the time will change
in 1 minute intervals. You can press and hold the icon, the time will be continuously
increasing or decreasing continuously.
12. The time range can be adjusted from 1 to 60 minutes.
14. After setting the desired working function, temperature and time, touch the on/off
power icon.
15. The small crisper drawer will start working. The display will alternate between the
selected temperate and the time. The time will start counting down the time, showing
the remaining time left to cook.
16. The small crisper drawer icon will be illuminated.
17. At the end of the cooking time, the appliance will beep 5 times and the word ‘OFF’ will
appear on the display.
18. The small crisper drawer display will then enter into standby mode.
ADJUSTING THE TEMPERATURE OR TIME DURING THE COOKING PROCESS
1. If you need to adjust the temperature or time during the cooking process, press the
corresponding crisper drawer icon or .
2. Press the function icon or the function icon, the display will show the
temperature or time, then press or according to which crisper drawer you are
altering to adjust the corresponding temperature and time.
3. The appliance will continue to work throughout and return to a normal display after
3 seconds if nothing is pressed.
ADJUSTING THE PRESET FUNCTION DURING THE COOKING PROCESS
1. If you need to reset the menu during the cooking process, lightly press the on/off
power icon once to enter the pause mode, the heater and motor will stop working.
2. Press the corresponding crisper drawer icon or and the display will ash,
alternating between temperature and time.
3. Press the preset icon to adjust the working function, as well as the temperature
and time according to your needs.
4. Then press the on/off power icon to start the cooking process again.
OPENING THE CRISPER DRAWER DURING THE COOKING PROCESS
1. Slide the crisper drawer out of the Dual Air Fryer using the crisper drawer handle.
2. On the side which you have removed the crisper drawer from the digital display will
show ‘OPEN’.
3. Add your food to the crisper drawer or turn food over, do not exceed beyond half full.
4. Never add food to the crisper drawer without the tray in place, always cook food
in the crisper drawer. Excess oil from your food is drained through the tray into the
bottom of the crisper drawer.
5. The Dual Air Fryer will go into a pause mode, gently shake your ingredients. When the
crisper drawer is replaced, the Dual Air Fryer will continue to the cooking cycle.

14
TO POWER OFF THE DUAL AIR FRYER DURING THE COOKING PROCESS
1. Select the crisper drawer or to be turned off.
2. To turn off the appliance during cooking, press and hold the on/off power icon
for 2 seconds to turn off the Dual Air Fryer.
3. The display will show the word ‘OFF’, then beep once.
4. The Dual Air Fryer will then go into standby mode.
DUAL CRISPER DRAWER WORKING MODE
1. Select the corresponding crisper drawer or you wish to select the working
function, temperature and time for.
2. Once set, select the other crisper drawer or and select the working function,
temperature and time.
3. Press the on/off power icon, the dual crisper drawers will start working at the
same time. The crisper drawer and preset function will ash together and then
change to the other crisper drawer.
4. Each crisper drawer display will show and alternate between the temperature and
time, counting down the time as it goes.
5. When the function is complete for a crisper drawer, the appliance will beep 5 times
and show ‘OFF’ on the corresponding display.
6. You can change the temperature and time on either of the crisper drawers, by
selecting the correct crisper drawer or and then adjust the temperate or time
as in ‘Adjusting the Temperature or Time During the Cooking Process’.
7. You can enter the pause mode for either of the crisper drawers or by pressing
the on/off power icon. To resume, press the on/off power icon.
MEMORY FUNCTION
1. The appliance has a memory function e.g. if you were using small crisper drawer
with the chicken wings function, the temperature is set to 190°C, the time is set
to 22 minutes.
2. After the cooking cycle, if the appliance is not powered off, when you next use it and
select small crisper drawer, and it will automatically display the chicken wings menu,
the temperature is 190°C, the time is 22 minutes.
3. The memory function disappears when the appliance is powered off for 1 hour.
4. If an hour has passed and the appliance is turned on again to select small crisper
drawer, it will display the initial default setting.
POWER OFF MEMORY
• If the appliance is being used and accidentally powered off, the appliance will return
to the operating state it was at before the power failure, as long as the power is
reapplied within 30 minutes.
NOTE: Preheat the Dual Air Fryer with NO food in the crisper drawer for 3 minutes at the
required temperature to warm up.

15
CHECKING YOUR FOOD
• We recommend checking your food during cooking and shaking ingredients gently
halfway through to prevent unevenly cooked food.
• Slide the crisper drawer out of the Dual Air Fryer using the crisper drawer handle.
• On the side which you have removed the crisper drawer from the digital display will
show ‘OPEN’.
• The Dual Air Fryer will go into a pause mode, gently shake your ingredients. When the
crisper drawer is replaced, the Dual Air Fryer will continue the cycle.
Tip: If you set the timer to halfway through the cooking time, you hear the timer beep
ve times when you have to shake the ingredients. However, this means that you have
to set the timer again to the remaining cooking time after shaking.
• Do not use metal utensils with the crisper drawer and tray, this will damage the
non-stick coating, use heat resistant plastic or wooden utensils if you need to turn
your food.
• When checking ingredients, place the crisper drawer on a heat resistant surface.
• Temperatures and timings can be altered during the cooking cycle if your food needs
longer.
• You can change the time or temperature during the air frying process using the
and icons. You cannot adjust the time and temperature while the process is
paused and the crisper drawer is open.
• When the cooking has nished, the Dual Air Fryer will beep ve times and the control
panel will show ‘OFF’ on the display, depending on the side you are using.
• Check your food is ready. If not, slide the crisper drawer back into the cooking cavity
and set the time for an additional 5 minutes.
• When removing food, DO NOT turn the crisper drawer upside down as any hot oil
residue which has drained into the bottom of the crisper drawer will spill onto your
food.
• Depending on the type of food you have cooked, hot steam may escape from the
crisper drawer.
• Place the crisper drawer on a heat resistant surface, remove the your food onto a
plate with tongs.
• The motor fan may continue to run until the appliance has cooled down. When the fan
has stopped, switch off and unplug at the socket.
• Allow the appliance to cool down completely before moving, cleaning or storing,
approximately 30 minutes.

16
A GUIDE TO INGREDIENTS AND HINTS AND TIPS
• Do not cook extremely oily or greasy food, such as sausages, in the Dual Air Fryer.
Hot oil can spit onto the heating element and cause the appliance to smoke.
• You can cook snacks that would normally be cooked in an oven in the Dual Air Fryer.
• You can use the Dual Air Fryer to reheat ingredients, set the temperature to 150°C for
10 minutes.
• Cut food into even sizes for even cooking.
CHIPS
We recommend Maris Piper and King Edward potatoes for making chips. Store them in
a dark cellar or in a cool cupboard away from light.
When you have peeled your potatoes, wash them thoroughly before cutting, and wash
again once they have been cut - this will remove the starch.
Dry the chips using a highly absorbent clean tea towel or kitchen towel.
For crisper chips, coat your chips in oil and cook within a few minutes.
PLEASE NOTE: This is an oil free fryer that works on hot air DO NOT ll the crisper
drawer with oil or any other liquid.
The thinner the chips, the crispier they will be. The thicker the chips, the uer on the
inside they will be.
Change the cooking time according to the thickness of your chips. If you prefer chips to
be crispy, try cooking for a couple more minutes.
To add a different taste to your chips, you can coat them in different types of oil.
You can also cook frozen chips in the Dual Air Fryer, as they are pre-cooked there is no
need to add oil.
FOOD DEFAULT
TEMPERATURE
SMALL CRISPER
DRAWER TIME
LARGE CRISPER
DRAWER TIME
Frozen Fries 200°C 25 mins 25 mins
Cake 150°C 25 mins 25 mins
Steak/Meat 200°C 15 mins 15 mins
Poultry 200°C 30 mins 30 mins
Chicken Wings 190°C 22 mins 22 mins
Fish/Seafood 190°C 12 mins 12 mins
Sausage 160°C 15 mins 15 mins
Pie 170°C 20 mins 20 mins

17
A GUIDE TO COOKING TIMES
Here is a guide to cooking times for different types of food.
This is a guide only, times will vary depending on whether the food is in season, its size,
thickness and your preference on how well you like your food cooked (e.g. steak).
For frozen food, use the cooking times and temperatures on the packet.
Whilst you are getting to grips with cooking times, monitor your food and cook for a
couple more minutes if needed.
Ensure food is thoroughly cooked before serving.
FOOD AMOUNT
(g)
TIME
(min)
TEMP
(°C)
SHAKE?
ADDITIONAL INFORMATION
MEAT
Steak 225-450 10 180 No Use tongs to turn halfway
through.
Pork Chops 225-450 10-14 180 No
Burger 225-450 7-14 180 No
CHIPS AND FROZEN FOOD
Sweet potato
wedges
225-450 10-15 200 Yes Mix in a bowl with 1-2 tsp of
oil, salt, pepper and paprika
(optional).
Home-made
chips
225-450 25-30 180 Yes Cut potato into 1cm chips.
Mix in a bowl with 1-2 tsp
of oil.
Thin frozen
chips
450 20 180 Yes
Do not add oil.
Thick frozen
chips
450 25 180 Yes
Frozen chicken
nuggets
225-450 10-15 200 Yes
POULTRY
Drumsticks 225-450 20-25 200 No Use tongs to turn halfway
through.
Chicken breast 225-450 20-25 200 No
To reheat ingredients, set the temperature to 150°C for up to 10 minutes.

18
RECIPES
Please note that all spoon measurements are standard metric, so 1 tsp is 5ml and 1 tbsp
is 15ml. We recommend using a set of measuring spoons for accurate results.
CRISPY SPICED CHICKPEAS
Ingredients Quantity
Extra-virgin olive oil 2 tsp
Ground cumin 1 tsp
Sesame seeds 1 tsp
Chili powder 1 tsp
Dried thyme ½ tsp
Garlic powder ¼ tsp
Sea salt ¼ tsp
Chickpeas 1 can (420g) drained, rinsed and patted dry
WHAT YOU DO
Temperature: 190°C. Time: 18 to 20 minutes.
In a medium bowl, combine the olive oil, cumin, sesame seeds, chili powder, thyme,
garlic powder, and salt.
Toss with the chickpeas to coat. Discard any skins that come off.
Transfer the chickpeas to the Dual Air Fryer rack and cook at 190°C, shaking the basket
every 5 minutes, until crispy, 18 to 20 minutes.

19
COURGETTE FRITTERS – Makes 2-3
Ingredients Quantity
Courgette 1 medium, peeled and grated
Parmesan cheese 50g, freshly grated
Egg 1 large egg, beaten
Sea salt ½ tsp
Freshly ground black pepper ¼ tsp
Garlic clove 1, crushed
Spring onion 1, large, white and green parts,
nely chopped
Breadcrumbs 60g
Olive oil cooking spray
WHAT YOU DO
Temperature: 200°C. Time: 7 minutes.
In a medium bowl, combine the courgette, Parmesan, egg, salt and pepper and mix until
combined.
Mix in the garlic and chopped spring onion, then fold in the breadcrumbs.
Scoop about 2 tablespoons of the mixture into the palm of your hand. Roll into a ball,
then atten into a pancake about 6mm thick. Repeat with the remaining mixture.
Place the fritters in the basket of the Dual Air Fryer, leaving space between each one.
Spray on all sides with olive oil cooking spray.
Air fry at 200°C until golden, about 7 minutes.

20
TERIYAKI SALMON
Ingredients Quantity
Light soy sauce 3 tbsp
Water 1 tbsp
Brown sugar 1 tbsp
Stem ginger ½ inch (1.3 cm),
peeled and nely grated (about 1 tsp)
Garlic 1 clove, nely grated
Salmon llets 2, roughly 160g
WHAT YOU DO
Temperature: 190°C. Time: 10 to 15 minutes.
Place the soy sauce, water, brown sugar, ginger, and garlic in a small saucepan and
gently simmer until the sugar dissolves and the mixture is slightly syrupy, about 2
minutes.
Line the Dual Air Fryer rack with parchment paper. Brush the salmon pieces with the
sauce and transfer to the prepared rack.
Cook at 190°C until the sh is opaque throughout, 10 to 15 minutes.
Table of contents
Other Lakeland Fryer manuals