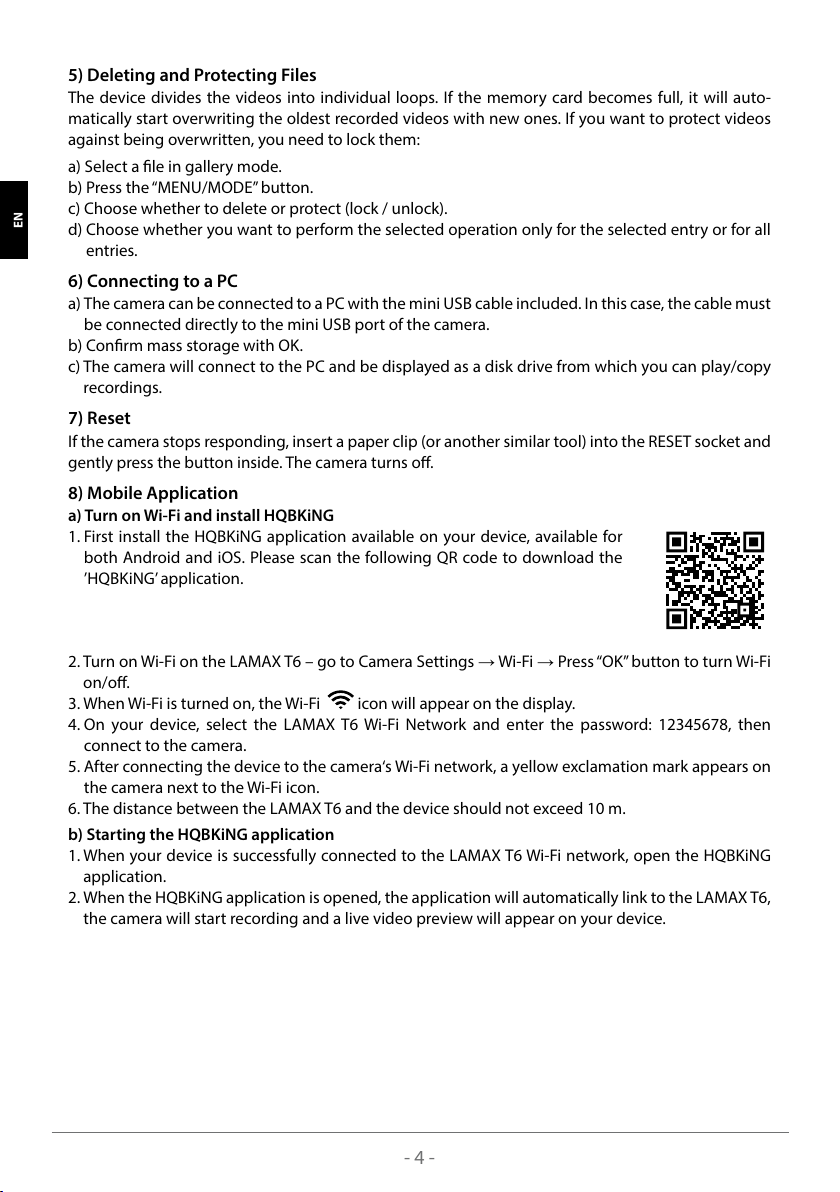
Lamax Electronics T6 User manual

LAMAX T6
EN USER MANUAL
Dashcam with Wi-Fi,
GPS and Magnetic Holder

- 2 -
1. PACK CONTENTS
– LAMAX T6 dashcam
– GPS holder with 3M adhesive pad
– 2× spare 3M adhesive pad
– Car charger
– Mini USB cable 0,7 m and Mini USB cable 3 m
– Manual and Safety Instructions
– Cloth carry bag
– Microbre cloth
2. PRODUCT LAYOUT
1. MENU/MODE button
2. UP button
3. DOWN button
4. OK button
5. Speaker
6. ON/OFF button (power)
7. Microphone
8. LED
9. USB charging port
10. RESET
11. MicroSD card slot
12. Mini USB interface
13. Display
14. Lens
15. GPS holder
16. 3M adhesive pad
SLO HR LT FR HU SK CZ PL DE EN

- 3 -
3. DEVICE INSTALLATION
1) Route the car cigarette lighter power cable around the windscreen so that it does not obstruct the
driver‘s view and fasten it securely. Attach the device ideally between the glass and the rear-view
mirror.
2) Do not install the device in a position that would obstruct or distract the driver.
3) When using the device for the rst time, the battery may be low on charge. If the device cannot
turn on due to low power, connect the external power cable manually and charge the battery.
4) The device uses microSDHC memory cards up to 128 GB. Use branded cards of class 10 or higher.
The memory card needs to be formatted directly in the camera before use (see Camera Settings).
Insert and remove the card only when the camera is o.
Attention:
For proper functioning of the LAMAX T6 and GPS module, it is necessary for the power cable to lead
to the mini USB port of the GPS holder (not directly into the mini USB port of the camera).
4. USING THE LAMAX T6 DASHCAM
1) Charging
a) The camera can be powered by a USB cable from a PC, an AC adapter or a car cigarette lighter
charger (included).
b) The camera is designed for a permanent power supply. The integrated battery cannot be removed
or replaced.
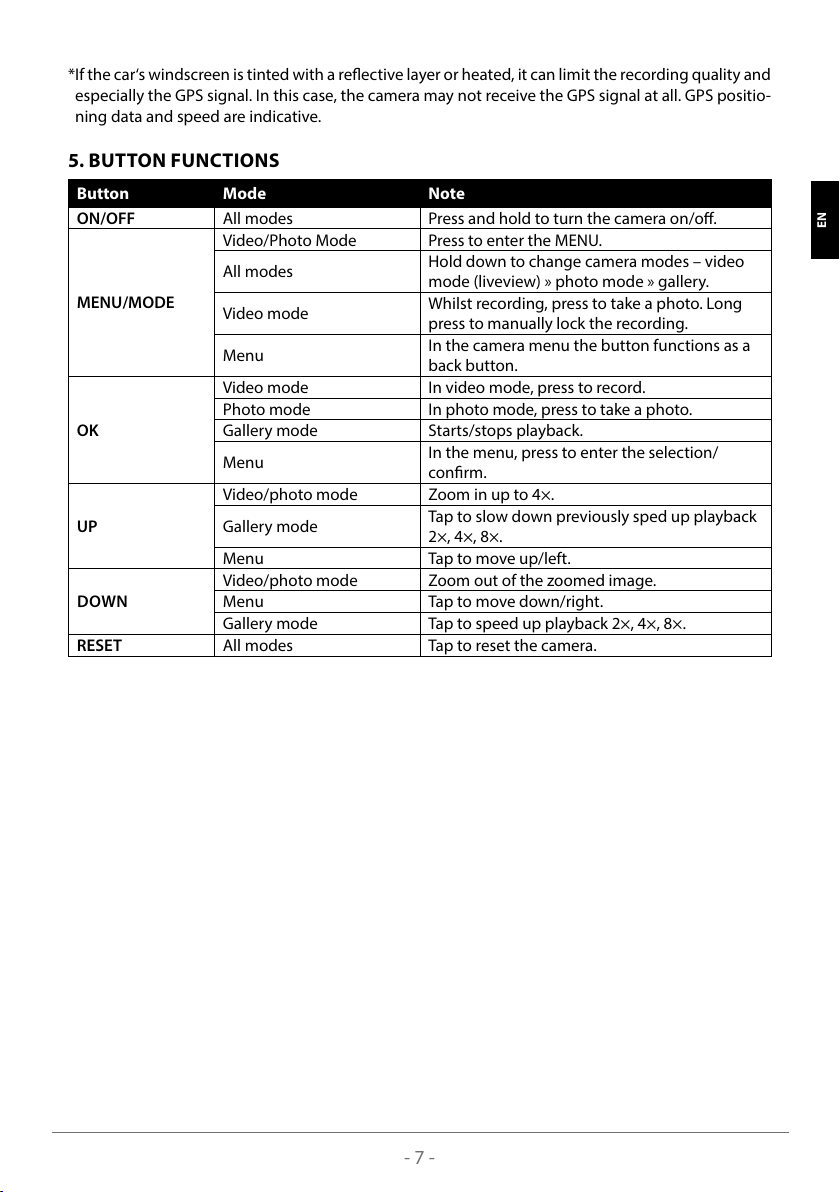
2) Turning the Camera On/O
a) The camera will turn on automatically when connected to the power supply.
b) Hold the“ON/OFF”button for 3-5 seconds to turn the camera on/o.
c) The camera will turn o automatically when disconnected from the power supply.
3) Switching Modes and Navigating Menus
a) Hold down the “MENU/MODE” button to switch between: video mode (live view) » photo mode »
gallery mode.
b) Press the“MENU/MODE”button in the respective mode to enter the menu. The camera menu con-
sists of two separate sections: video/photo settings » camera settings. Use the „UP“ and „DOWN“
arrows to navigate between the sections. Use the„OK“ button to enter the menu. Then move ver-
tically using the„UP“ and„DOWN“ arrows under each menu section and press„OK“ to conrm.
c) Only the respective mode can be accessed in the video settings / photo settings menu. Thus, video
settings can only be accessed from video mode and photo settings from photo mode.
d) Use the„MENU/MODE“ button to go back one level.
4) Video / Photo / Gallery
a) Start a recording or take a photo by pressing the“OK” button in the respective mode.
b) Auto recording – the auto recording feature is permanently on. Automatic recording starts when
the camera is plugged in. If the vehicle’s cigarette lighter is ignition dependent, the camera turns
on and starts recording after starting the engine.
c) Auto-stop recording and shutdown – the camera automatically stops recording and shuts down
after a power is stopped, i.e. when the engine is turned o. Some cars have a continuous lighter
power supply. In this case, be sure to remove the power cord from the cigarette lighter.
d) Gallery mode displays a list of recorded videos and captured photos. Use the “UP” and “DOWN”
arrows to navigate between the recordings and images. Press the„OK“ button to start and stop a
recording.
SLO HR LT FR HU SK CZ PL DE EN

- 4 -
5) Deleting and Protecting Files
The device divides the videos into individual loops. If the memory card becomes full, it will auto-
matically start overwriting the oldest recorded videos with new ones. If you want to protect videos
against being overwritten, you need to lock them:
a) Select a le in gallery mode.
b) Press the“MENU/MODE” button.
c) Choose whether to delete or protect (lock / unlock).
d) Choose whether you want to perform the selected operation only for the selected entry or for all
entries.
6) Connecting to a PC
a) The camera can be connected to a PC with the mini USB cable included. In this case, the cable must
be connected directly to the mini USB port of the camera.
b) Conrm mass storage with OK.
c) The camera will connect to the PC and be displayed as a disk drive from which you can play/copy
recordings.
7) Reset
If the camera stops responding, insert a paper clip (or another similar tool) into the RESET socket and
gently press the button inside. The camera turns o.
8) Mobile Application
a) Turn on Wi-Fi and install HQBKiNG
1. First install the HQBKiNG application available on your device, available for
both Android and iOS. Please scan the following QR code to download the
’HQBKiNG’application.
2. Turn on Wi-Fi on the LAMAX T6 – go to Camera Settings →Wi-Fi →Press“OK”button to turn Wi-Fi
on/o.
3. When Wi-Fi is turned on, the Wi-Fi icon will appear on the display.
4. On your device, select the LAMAX T6 Wi-Fi Network and enter the password: 12345678, then
connect to the camera.
5. After connecting the device to the camera‘s Wi-Fi network, a yellow exclamation mark appears on
the camera next to the Wi-Fi icon.
6. The distance between the LAMAX T6 and the device should not exceed 10 m.
b) Starting the HQBKiNG application
1. When your device is successfully connected to the LAMAX T6 Wi-Fi network, open the HQBKiNG
application.
2. When the HQBKiNG application is opened, the application will automatically link to the LAMAXT6,
the camera will start recording and a live video preview will appear on your device.
SLO HR LT FR HU SK CZ PL DE EN

- 5 -
9) Application Controls
a) Live Video View
Live view
Start/Stop recording
Full screen
Take a photo
Settings
Album
b) Settings
WiFi password
Audio On/O
G-Sensor
Video loop
Resolution
Device information
Format SD card
Default setting
SLO HR LT FR HU SK CZ PL DE EN

- 6 -
c) Download Files
Locked les
Download Delete
Photo
Videos
Videos
Edit
Back
10) Software player – GPS player
The LAMAX T6 dashcam provides a smart and highly useful software application to view captured
video, map routes, GPS coordinates and speed data all on one screen.
The installation le for this player can be downloaded from
www.lamax-electronics.com, under the LAMAX T6 tab » Download
SLO HR LT FR HU SK CZ PL DE EN

- 7 -
*If the car‘s windscreen is tinted with a reective layer or heated, it can limit the recording quality and
especially the GPS signal. In this case, the camera may not receive the GPS signal at all. GPS positio-
ning data and speed are indicative.
5. BUTTON FUNCTIONS
Button Mode Note
ON/OFF All modes Press and hold to turn the camera on/o.
MENU/MODE
Video/Photo Mode Press to enter the MENU.
All modes Hold down to change camera modes – video
mode (liveview) » photo mode » gallery.
Video mode Whilst recording, press to take a photo. Long
press to manually lock the recording.
Menu In the camera menu the button functions as a
back button.
OK
Video mode In video mode, press to record.
Photo mode In photo mode, press to take a photo.
Gallery mode Starts/stops playback.
Menu In the menu, press to enter the selection/
conrm.
UP
Video/photo mode Zoom in up to 4×.
Gallery mode Tap to slow down previously sped up playback
2×, 4×, 8×.
Menu Tap to move up/left.
DOWN
Video/photo mode Zoom out of the zoomed image.
Menu Tap to move down/right.
Gallery mode Tap to speed up playback 2×, 4×, 8×.
RESET All modes Tap to reset the camera.
SLO HR LT FR HU SK CZ PL DE EN

- 8 -
6. ICON KEY
3
WDR
14:25:30
F
1080FHD
50 KMH
1
2
3
12
13
14 15
9 8
16 17
11
10
4
5
6
7
1Remaining recording time (depending on memory card space)
21080FHD Camera resolution
3Current speed
4GPS icon (when blue, camera is connected to GPS satellite)
5Microphone on / o
6Memory card inserted
7Battery power / status indicator (if not powered)
814:25:30 Time
9Date
10 G-Sensor
11 Exposure value
12 FMotion detection
13 3Loop recording length setting
14 Recording mode
15 A blinking red dot indicates that the device is currently recording
16
WDR
WDR function turned on
17 Wi-Fi on
SLO HR LT FR HU SK CZ PL DE EN

- 9 -
7. MENU
Menu Item Setting Options Description
Basic Settings
Video Resolution FHD 1080p / HD 720p Sets the video resolution.
Loop Recording O / 1 min / 3 min /
5 min / 10 min
Sets the loop length of the video.
WDR O / On Wide dynamic range nds the ideal
compromise between the lightest and
darkest parts in the video.
Brightness +2.0; +5/3; +4/3; +1.0;
+2/3; +1/3; 0; -1/3; -2/3;
-1.0; -4/3; -5/3; -2.0
The„+“ value increases the brightness
of the recording. The“-”value lowers the
brightness so the recording becomes
darker.
Motion Detection O / On Sets the motion detection function.
Audio Recording O / On Sets audio recording.
Timestamp O / On Sets the timestamp on the video/photo.
G-Sensor O / Low / Medium /
High
Sets the G-Sensor sensitivity.
Settings in Photo Mode
Image Mode Instant shot / 2s / 5s /
10s timer
Sets the image mode. Allows you
to delay taking a photo by up to 10
seconds.
Image Size 12MP / 8MP / 3MP Sets the photo resolution.
White Balance Auto / Daylight
/ Cloudy / Bulb /
Fluorescent
Set to“Auto” by default. If the camera
does not capture natural colours, select
the setting manually according to the
lighting conditions.
ISO AUTO / 100 / 200 / 400 Species the sensitivity when taking a
picture.
Colour Colour / Black and
White / Sepia
Selects the colour mode of the image.
Quick Preview O / 2s / 5s Allows 2s / 5s to preview after image
creation.
Stabilization O / On Enables/disables image stabilization.
Quality Fine / Normal / Low Sets the photo quality.
Sharpness High / Normal / Low Adjusts the sharpness of the photo.
Settings in
Playback Mode
Delete Delete Current /
Delete All
Deletes les.
Protect Lock Current / Unlock
Current / Lock All /
Unlock All
Locks/unlocks the le.
Slideshow 2 sec / 5 sec / 8 sec Sets the slideshow speed.
SLO HR LT FR HU SK CZ PL DE EN

- 10 -
Advanced settings
Wi-Fi Press OK to turn Wi-Fi on/o.
Date/Time YY/MM/DD Sets the date and time.
Driver Name - - - - - - Use the arrow keys to select A-Z,
0-9. Press OK to conrm the selected
character and press OK to conrm.
Auto-o Delay O / 10s / 20s / 30s Allows you to delay immediate
shutdown after the camera is
disconnected from the power supply.
This feature is useful, for example, for
cars with start/stop systems.
Operating Sounds O / On Set to turn o/on camera sounds.
Screensaver O / 1 min / 2 min /
3 min
Sets the screensaver.
Speedometer O / 1 min / 2 min /
3 min
Sets the speedometer function as a
screensaver.
Time Zone UTC+12 – UTC-12 Sets the time zone.
Speed Units KMH / MPH Sets the unit of speed.
Frequency 50Hz / 60Hz Sets the video frequency.
Language English / French /
German / Russian /
Polish / Czech / Slovak /
Hungarian / Lithuanian
Sets the device language.
Format Cancel / OK Formats the data on the memory card.
Factory Settings Cancel / OK Restores the camera factory settings
Version xxxx Displays the installed FW settings.
SLO HR LT FR HU SK CZ PL DE EN

- 11 -
8. TECHNICAL PARAMETERS
Video resolution 1920×1080 30FPS, 1280×720 30FPS
Shot angle 140°
Screen size 1,5“
Memory type Micro SD Class 10, max 128 GB
Video format MP4
Time stamp Yes
GPS Yes
G-Sensor Yes
Connectivity Wi-Fi / mini USB
System MS Windows / MAC OS
Input voltage 5 V
Night mode Yes
Battery capacity 180 mAh
Operating temperature -5°C ~ 40°C
Note: Specications may change by replacing any part of the device or updating the software. Please
note that some European Union countries have specic laws regarding dashcam recording. There-
fore, we recommend that you inform yourself about the local legal regulations, ideally at local car
clubs, before travelling abroad.The camera can be used as evidence, even when dealing with a police
ocer. Again, we recommend studying the legislation in each country. Please note that such material
may also be used against the author of such a record. LAMAX Electronics is not responsible for the
illegal use of cameras or material recorded by these cameras.
Manufacturer
elem6, s.r.o., Braškovská 308/15, 16100 Prague 6
www.lamax-electronics.com
Printing errors and changes in the manual reserved.
SLO HR LT FR HU SK CZ PL DE EN

- 12 -
SLO HR LT FR HU SK CZ PL DE EN

LAMAX T6
DE BENUTZERHANDBUCH
Autokamera mit WLAN,
GPS und Magnethalterung

- 2 -
1. VERPACKUNGSINHALT
– Autokamera LAMAX T6
– GPS Halterung mit 3M Aufkleber
– 2× 3M Ersatzaufkleber
– Kfz Ladegerät
– Mini USB Kabel 0,7 m und Mini USB Kabel 3 m
– Handbuch und Sicherheitsanweisungen
– Stobeutel für die Kamera
– Mikrofasertuch
2. PRODUKTSKIZZE
1. Taste MENÜ/MODUS
2. Taste NACH OBEN
3. Taste NACH UNTEN
4. Taste OK
5. Lautsprecher
6. Taste EIN/AUS (Power)
7. Mikrofon
8. LED
9. USB Ladeeingang
10. RESET
11. Micro SD Karten Slot
12. USB Schnittstelle
13. Display
14. Linse
15. GPS Halterung
16. 3M Aufkleber
SLO HR LT FR HU SK CZ PL DE EN

- 3 -
3. INSTALLATION DES PRODUKTES
1) Führen Sie das Ladekabel zum Zigarettenanzünder entlang der Frontscheibe, damit es nicht die
Sicht des Fahrers behindert und befestigen Sie es sicher. Befestigen Sie das Gerät am besten zwis-
chen der Scheibe und dem Rückspiegel.
2) Installieren Sie das Gerät nicht an einer Stelle, an der es die Sicht des Fahrers beeinträchtigen und
diesen ablenken könnte.
3) Wenn Sie das Gerät zum ersten Mal verwenden, kann die Batterie nur schwach geladen sein. Wenn
das Gerät wegen der zu geringen Energieversorgung nicht eingeschaltet werden kann, verbinden
Sie es mittels des Kabels mit der externen Stromversorgung und laden Sie die Batterie auf.
4) Mit dem Gerät können SDHC Speicherkarten mit bis zu 128 GB verwendet werden. Verwenden Sie
nur Markenspeicherkarten der Klasse 10 und höher. Die Speicherkarte muss vor der Verwendung
direkt in der Kamera (Beschreibung in den Kameraeinstellungen) formatiert werden. Die Speicher-
karte sollte bei ausgeschalteter Kamera eingeschoben und herausgezogen werden.
Wichtiger Hinweis:
Damit die Autokamera LAMAX T6 und das GPS Modul richtig funktionieren, muss dasVersorgungska-
bel mit dem Mini USB Port der GPS Halterung verbunden sein (nicht direkt mit dem USB Port der
Kamera).
4. VERWENDUNG DER LAMAX T6 AUTOKAMERA
1) Stromversorgung
a) Die Kamera kann über das USB Kabel von einem PC, über einen Adapter von einer Steckdose und
vor allem mit Hilfe des Kfz Ladegerätes (Bestandteil der Verpackung) mit Strom versorgt werden.
b) Die Kamera ist für eine dauerhafte Stromversorgung bestimmt. Die integrierte Batterie kann we-
der herausgenommen noch ausgetauscht werden.
2) Ein- und Ausschalten der Kamera
a) Die Kamera schaltet sich automatisch ein, sobald sie an eine Stromversorgung angeschlossen wird.
b) Sie können die Kamera durch gedrücktes Halten derTaste EIN/AUS für die Dauer von 3-5 Sekunden
ein-/ausschalten.
c) Die Kamera schaltet sich automatisch aus, wenn sie von der Stromversorgung getrennt wird.
3) Wahl der Betriebsarten und Bewegung im Menü
a) Durch gedrücktes Halten der Taste„MENU/MODUS“ können Sie zwischen den Betriebsarten wäh-
len: Video (live Ansicht) » Foto » Galerie.
b) Um in das Menü zu gelangen drücken Sie die Taste„MENÜ/MODUS“ in der zugehörigen Betrieb-
sart. Das Menü der Kamera besteht aus zwei getrennten Teilen: Einstellungen Video/Foto » Kame-
raeinstellungen. Zwischen den einzelnen Abschnitten bewegen Sie sich mit Hilfe der Pfeiltasten
„NACH OBEN“ und„NACH UNTEN“. Um das Menü zu betreten drücken Sie die„OK“ Taste. In jedem
einzelnen Bereich des Menüs bewegen Sie sich in weiterer Folge vertikal mit Hilfe der Pfeiltasten
„NACH OBEN“ und„NACH UNTEN“, die Auswahl bestätigen Sie durch Drücken der Taste„OK“.
c) Der getrennte Abschnitt der Video/Foto Einstellungen kann nur über den zugehörigen Modus
betreten werden. Zu den Videoeinstellungen gelangt man also nur über den Video Modus. Zu den
Fotoeinstellungen gelangt man wiederum nur über den Foto Modus.
d) Um eine Ebene zurück zu gelangen muss die Taste„MENÜ/MODUS“ gedrückt werden.
4) Aufnahme / Fotograeren / Ansicht der Galerie
a) Um eine Aufnahme/ein Foto zu machen, muss die Taste „OK“ im zugehörigen Modus gedrückt
werden.
b) Automatische Aufnahme – die Funktion der automatischen Aufnahme ist dauerhaft eingeschaltet.
SLO HR LT FR HU SK CZ PL DE EN

- 4 -
Die automatische Aufnahme startet nach dem Anschluss der Kamera an die Stromversorgung.
Wenn der Zigarettenanzünder zur Stromversorgung erst durch das Starten des Motors aktiviert
wird, beginnt die automatische Aufnahme erst dann.
c) Automatisches Ende der Aufnahme und Ausschalten der Kamera – die Kamera beendet die auto-
matische Aufnahme und schaltet sich aus sobald die Stromversorgung unterbrochen wird, also
nachdem der Motor abgestellt wurde. Bei einigen Fahrzeugen wird die Stromversorgung des Zi-
garettenanzünders nicht unterbrochen. In diesem Fall sollten Sie nicht vergessen das Stromkabel
aus dem Zigarettenanzünder herauszuziehen.
d) Nach dem Umschalten in den Modus der Galerie wird eine Liste der aufgenommenen Videos und
der gemachten Fotos angezeigt. Um zwischen den einzelnen Aufnahmen und Fotos zu wählen
dienen die Pfeiltasten „NACH OBEN“ und „NACH UNTEN“. Um die Aufnahme zu starten oder zu
beenden dient die Taste„OK“.
5) Löschen und Schutz der Aufnahmen
Das Gerät macht die Videoaufzeichnungen in einzelnen Schleifen. Wenn die Speicherkarte voll ist,
wird die älteste Aufnahme automatisch überspielt. Wenn Sie bestimmte Videos aufheben wollen,
müssen diese geschützt werden:
a) Suchen Sie die Aufnahme im Galerie Modus aus.
b) Drücken Sie die Taste„MENÜ/MODUS“.
c) Wählen Sie, ob Sie die Aufnahme löschen oder schützen wollen (sperren/freigeben).
d) Wählen Sie, ob Sie die gewählte Operation nur für die ausgewählte Aufnahme oder für alle Aufna-
hmen durchführen wollen.
6) Anschluss an einen PC
a) Die Kamera kann mit Hilfe des Mini USB Kabels mit einem PC verbunden werden, das Bestandteil
der Verpackung ist. Dazu muss das Kabel direkt mit dem Mini USB Port der Kamera verbunden
werden.
b) Bestätigen Sie die Auswahl Mass storage mit der OK Taste.
c) Die Kamera wird mit dem PC als Speichereinheit verbunden und Sie können die Aufnahmen ab-
spielen/kopieren.
7) Reset
Wenn die Kamera nicht reagiert, schieben Sie eine Büroklammer (oder einen ähnlichen Gegenstand)
in das RESET Buchse. Die Kamera wird ausgeschaltet.
8) Mobile Applikation
a) WLAN einschalten und Installation der Applikation HQBKiNG
1. Installieren Sie zuerst die Applikation HQBKiNG in Ihrem Gerät, die sowohl für
Android als auch für IOS erhältlich ist. Scannen Sie bitte den nachfolgenden
QR Kode ein um die Applikation herunter zu laden„HQBKiNG’’.
2. Schalten Sie WLAN an der LAMAXT6 Kamera ein– gehen Sie zu den Kameraeinstellungen →WLAN
→Mit der„OK“ Taste schalten Sie WLAN ein/aus.
3. Nachdem Sie WLAN eingeschaltet haben wird auf dem Bildschirm das WLAN Symbol ange-
zeigt.
4. Wählen Sie im Gerät das WLAN LAMAX T6 und geben Sie folgendes Passwort ein: 12345678, dana-
ch erfolgt die Verbindung mit der Kamera.
5. Nachdem sich das Gerät mit dem WLAN der Kamera verbunden hat, wird neben dem WLAN Sym-
bol ein gelbes Rufzeichen angezeigt.
SLO HR LT FR HU SK CZ PL DE EN

- 5 -
6. Die Entfernung zwischen der LAMAX T6 Kamera und dem Gerät sollte nicht größer als 10 m sein.
b) Start der Applikation HQBKiNG
1. Wenn Ihr Gerät erfolgreich mit dem WLAN der LAMAX T6 Kamera verbunden ist, starten Sie die
Applikation HQBKiNG.
2. Nach dem Start der Applikation HQBKiNG verbindet sich diese automatisch mit LAMAX T6, die
Kamera beginnt mit der Aufnahme und auf Ihrem Gerät wird das Livebild angezeigt.
9) Steuerung der Applikation
a) Livebild
Livebild
Aufnahme Start/Stopp
Voller Bildschirm
Schnelles foto
Einstellungen
Album
b) Einstellungen
WLAN Passwort ändern
Mikrofon Ein/Aus
G-Sensor
Länge der Schleife
Videoauösung
Geräteinformationen
Speicherkarte formatieren
Werkseinstellungen zurücksetzen
SLO HR LT FR HU SK CZ PL DE EN

- 6 -
c) Dateien herunter laden
Gesperrte Dateien
Herunterladen Löschen
Fotos
Aufgenommene Schleifen
Ändern
Zurück
10) Softwareplayer – GPS player
Die Autokamera LAMAX T6 bietet die Möglichkeit der Verwendung der smarten und nützlichen Soft-
wareapplikation, dank der Sie auf einem Bildschirm das aufgenommene Video, die Fahrtstrecken auf
einer Karte, die GPS Koordinaten und Geschwindigkeitsangaben sehen können.
Die Installationsdatei für diesen Player können Sie auf der Webseite
www.lamax-electronics.com, im Bereich LAMAX T6 » Download herunterladen
SLO HR LT FR HU SK CZ PL DE EN

- 7 -
*Wenn die Frontscheibe des Fahrzeuges mit einer reektierenden Schicht versehen ist oder beheizt
wird, kann dies die Aufnahmequalität und vor allem das GPS Signal beeinträchtigen. In so einem
Fall muss die Kamera auch überhaupt kein GPS Signal empfangen. Die GPS Positionsdaten und die
Geschwindigkeitsangaben dienen nur der Orientierung.
5. TASTENFUNKTIONEN
Taste Modus Anmerkung
EIN/AUS Alle Modi Gedrückt halten um die Kamera ein-/
auszuschalten.
MENÜ/MODUS
Video/Foto Drücken um zum MENÜ Angebot zu gelangen.
Alle Modi Durch gedrücktes Halten ändern Sie die Modi
der Kamera -Video (Liveansicht) » Foto » Galerie.
Video
Während der Aufnahme machen Sie durch
Drücken ein Foto. Durch langes gedrücktes
Halten sperren Sie die Aufnahme.
Menü Im Menü der Kamera hat die Taste die Funktion
zurück.
OK
Video Im Videomodus drücken um aufzunehmen.
Foto Im Fotomodus drücken um ein Foto zu machen.
Galerie Startet/stoppt die Wiedergabe.
Menü Im Menü drücken um zur Auswahl/Bestätigung
zu gelangen.
NACH OBEN
Video/Foto Die Aufnahme bis zu 4× heran zoomen.
Galerie Durch kurzes Drücken gehen Sie bei der
Videowiedergabe 2×, 4×, 8× schneller zurück.
Menü Durch kurzes Drücken nach oben/links.
NACH UNTEN
Video/Foto Durch kurzes Drücken zoomen Sie das heran
gezoomte Bild weg.
Menü Durch kurzes Drücken nach unten/rechts.
Galerie Durch kurzes Drücken gehen Sie bei der
Videowiedergabe 2×, 4×, 8× schneller vor.
RESET Alle Modi Durch kurzes Drücken führen Sie ein Reset der
Autokamera durch.
SLO HR LT FR HU SK CZ PL DE EN
Table of contents
Languages:
Other Lamax Electronics Dashcam manuals

Lamax Electronics
Lamax Electronics N4 User manual

Lamax Electronics
Lamax Electronics DRIVE C7 User manual

Lamax Electronics
Lamax Electronics DRIVE C7 User manual

Lamax Electronics
Lamax Electronics S7 Dual User manual

Lamax Electronics
Lamax Electronics LAMAX C9 User manual

Lamax Electronics
Lamax Electronics S9 DUAL User manual

Lamax Electronics
Lamax Electronics Drive S5 Navi Plus User manual