Lamona HJA8702 Troubleshooting guide

User & installation Guide
HJA8702
Integrated
Washer-Dryer

2
Contents
1. Precautions for safety and use
3
2. Installation instructions
6
3. Description of controls
9
4. Using the appliance for washing
10
5. Using the appliance for drying
17
6. Cleaning and maintenance
20
7. Troubleshooting
22
8. assembly of décor-door
24
Product Guarantee Details
27
This appliance is tagged in accordance with European Directive 2002/96/EC on Waste Electrical and
Electronic Equipment - WEEE.
This directive contains the regulations governing the collection and recycling of decommissioned appliances
throughout the European Union.
The symbol of the rubbish bin with a line through it on the appliance or its packaging indicates that the prod-
uct must be disposed of separately from other waste at the end of its life cycle. The user is thus obliged to
consign scrapped appliances to the special electronic and electrotechnical waste disposal centres, or return
them to the dealer on purchase of a similar new appliance, on a one-to-one basis.
Consignment to the appropriate facility for environmentally responsible recycling, treatment and disposal
helps to prevent any negative effects on the environment and health, and encourages the reuse and/or recy-
cling of the appliance’s component materials.
Illegal dumping of the appliance by the user will be subject to prosecution under the relevant law.

EN
3
READ THE INSTRUCTIONS
Attention!
You are advised to read all the instructions in this manual carefully; it will inform you about
the right conditions for the proper, safe use of your washer-dryer
It is very important to keep this instruction manual with the appliance for future reference.
In the event of sale or transfer, ensure that the manual always accompanies the appli-
ance, to provide the necessary information about its use.
1. PRECAUTIONS FOR SAFETY AND USE
Attention!
These precautions are detailed for reasons of safety.
This section must be read carefully before installation and use.
Disposing of packaging
Never leave packaging residues unattended in the home. Separate waste packaging materials by
type and consign them to the nearest recycling centre.
Packaging materials (plastic bags, polystyrene, etc.) must not be left within reach of children.
Disposing of old appliances
Once no longer in use, appliances must be rendered unusable: permanently disarm the
lock on the door (this will prevent children risking their lives by locking themselves inside
during play) and cut the power supply lead after removing the plug from the socket.
The appliance must be delivered to a recycling facility.
Environmental protection
Use the whole of the maximum recommended capacity. Never exceed the maximum permitted
load.
Do not use the prewash function for lightly or normally soiled items.
Follow the manufacturer's recommendations on detergent usage.
Use the highest spin speed permitted for the fabric type. Fast spins reduce the drying time and
thus energy consumption.
Safety instructions
This appliance is intended for domestic use only and is compliant with Directives 72/23/EEC and
89/336/EEC (including Directives 92/31/EEC and 93/68/EEC) currently in force.
Read all the instructions in this manual carefully before installation and use.
Check that the drum assembly has been released before use (see instructions). Failure to release
the drum assembly may cause damage to the washer-dryer and the surrounding furniture or appli-
ances during the spin cycle.
This Instruction Manual is an integral part of the appliance: it must always be kept intact with the
appliance. Installation must be carried out by qualified staff in compliance with the relevant regula-
tions. The appliance is built to provide the following functions: washing and drying of clothes or
fabrics stated to be suitable for machine washing by the producer on the relevant label. All other
uses are to be considered improper. The manufacturer declines all liability for uses other than
those stated above.
The nameplate with the technical data, serial number and mark is in a visible position in the part in
view after the door has been opened. The nameplate must never be removed.
The electrical and plumbing works required to install the appliance must only be carried out
by skilled staff.
The appliance must be connected to earth in compliance with electrical system safety regulations.
The manufacturer declines all liability for direct or indirect injury or damage deriving from a
non-existent or defective earth connection.
In the event that the appliance is not connected by means of a plug, an omnipolar circuit-breaker
device with contact gap of at least 3 mm must be provided.
The plug to be connected to the power supply lead and the relative socket must be of the same
type and comply with the relevant regulations. Check that the mains voltage and frequency are the

EN
4
same as the values marked on the nameplate. The use of adapters or junctions is not recom-
mended. Never disconnect the plug by pulling on the power supply lead.
The appliance is only disconnected from the electricity supply if the plug has been removed
from the socket or the electrical system master switch has been turned off. The power plug
must be accessible after the appliance has been installed.
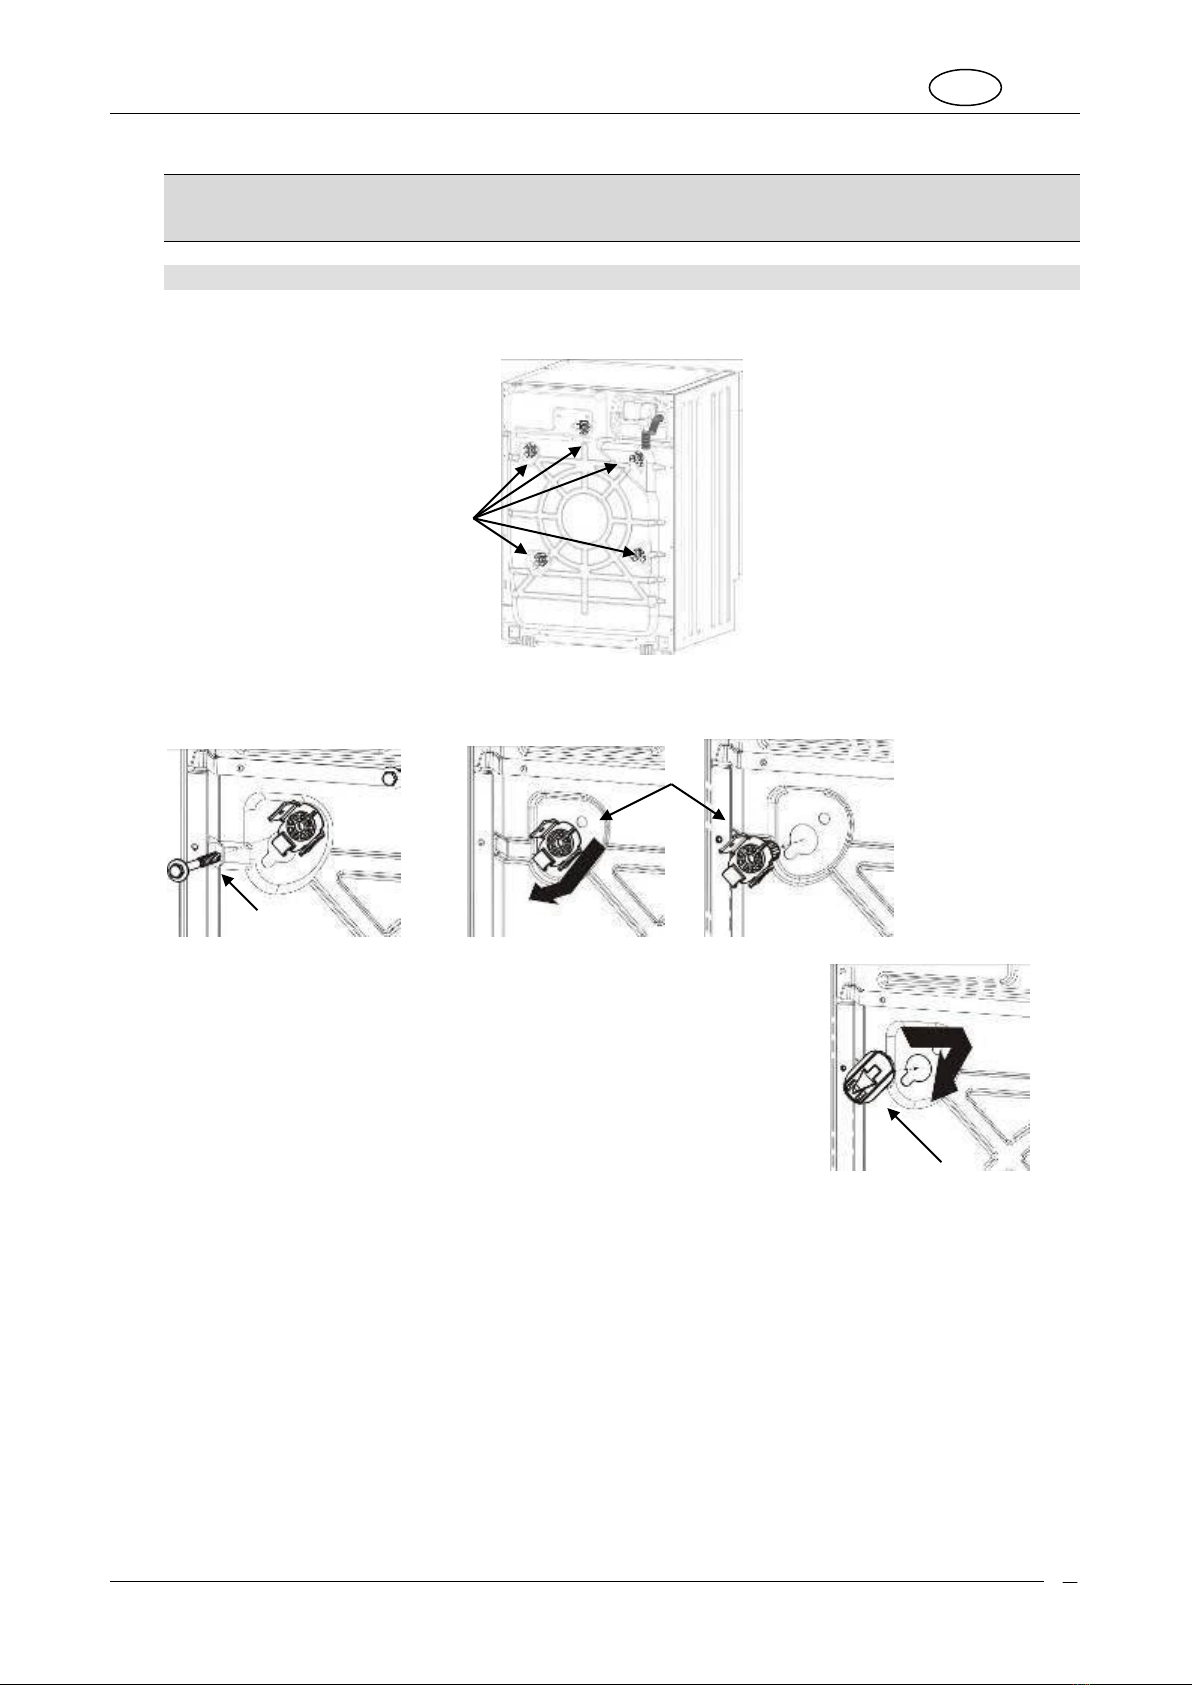
The appliance must be installed using new sets of hoses (supplied with the appliance). Old hose
sets should not be reused.
Take care that the appliance is not standing on the power supply cable.
The washer-dryer must never be used on vehicles, on board ships or planes, or in environments
with hazards, such as explosive or corrosive environments (powders, vapours and gases) or ex-
plosive and/or corrosive liquids,
Do not install the washer-dryer in places with a risk of frost. Frozen pipes may burst under the
pressure.
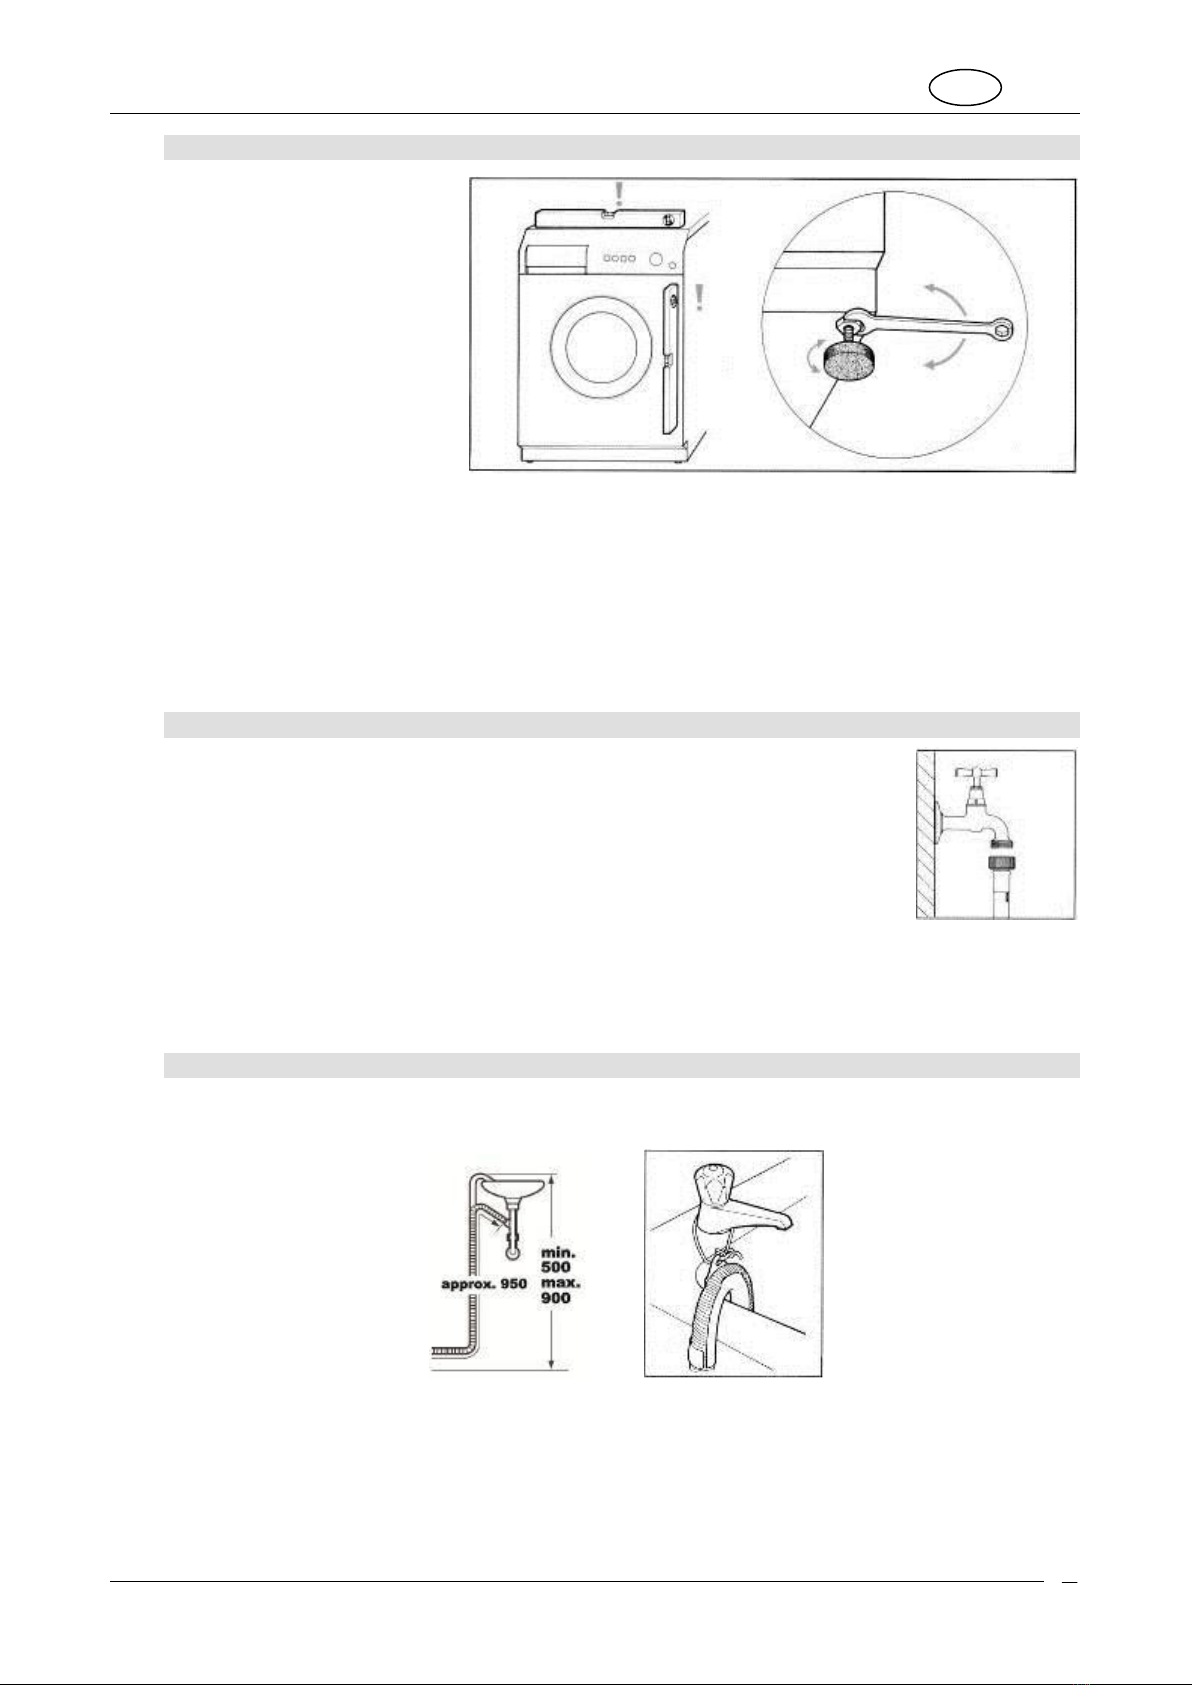
If the drain hose is connected to a sink: make sure that the drain hose connected to the sink is se-
curely fastened and cannot move.
If it is not fixed in place, the repulsive force of the water might thrust it away from the sink, causing
the risk of flooding.
If connecting the hose to a sink also check that the water drains from it quickly, as otherwise
the sink may overflow.
Do not overload the appliance.
Never use detergents which contain solvents or chemicals for washing in the washer-dryer. They
might damage the appliance and form poisonous vapours. These fumes might also catch
fire and explode.
Garments soaked in petroleum products must not be washed in the washing machine. Before
washing, check that garments do not contain inflammable devices (e.g. cigarette-lighters, matches,
etc.)
If volatile cleaning fluids are used, ensure that these substances have been removed from the
garments before they are placed in the appliance.
Before loading garments for washing, check that the pockets are empty, buttons secure and zips
fastened.
Do not wash frayed or torn garments.
During washing at high temperatures, the glass in the door will become very hot.
Check that all water has been drained from the appliance before opening the door.
If there is water inside, pump it out before opening the door. If in doubt, read the instruction manu-
al.
The water in the appliance is not suitable for drinking!
Swallowing washing machine detergents may injure the mouth and throat.
Before removing the garments from the washer-dryer check that the drum is at a standstill.
Switch the appliance off after each use to avoid wasting electricity.
Leave the door ajar between washes to keep the gasket in good condition.
In the event of a malfunction never attempt to repair the appliance yourself. Disconnect the ap-
pliance from the electricity supply and turn off the water tap. Then contact a qualified engineer.
Repairs must only be carried out by qualified staff.
The appliance is intended for use by adults. Do not allow children to tamper with the washer-
dryer's controls or play with it and do not keep children in the vicinity while the programme is
in progress.
Young animals or small children might climb into the washer-dryer .
Always check the inside of the drum before use and do not allow children to play with the ap-
pliance.
Keep children away from the appliance when the door or the detergent drawer is open; the appli-
ance might contain detergent residues which may cause permanent injury to the eyes, mouth and
throat, or even cause death by suffocation.
The appliance is not intended for use by persons (including children) with reduced physical, senso-
ry or mental capabilities, or lack of experience and knowledge, unless they have been given su-
pervision or instruction concerning use of the appliance by a person responsible for their safety.
That the tumble dryer is not to be used if industrial chemicals have been used for cleaning
That lint must not be allowed to accumulate around the tumble dryer
Do not dry unwashed items in the tumble dryer
Items that have been soiled with substances such as cooking oil, acetone, petrol, kerosene, spot
removers, turpentine, waxes and wax removers should be washed in hot water with an extra
amount of detergent before being dried in the tumble dryer

EN
5
Items such as foam rubber (latex foam), shower caps, waterproof textiles, rubber backed articles
and clothes or pillows fitted with foam rubber pads should not be dried in the tumble dryer
Fabric softeners, or similar products, should be used as specified by the fabric softener instruc-
tions.
The final part of a tumble dryer cycle occurs without heat (cool down cycle) to ensure that the
items are left at a temperature that ensures that the items will not be changed
Never stop a tumble drier before the end of the drying cycle unless all items are quickly removed
and spread out so that the heat is dissipated
Do not store flammable fluids near the appliance.
Lengthy periods out of use.
If the appliance is not to be used for a lengthy period it should be disconnected from the electricity
and water supplies and the door should be left ajar to prevent unpleasant smells from building up
inside.
Important!
This appliance is easy to use.
However, for the best results it is important to read this manual carefully and follow all the instructions
before putting it into operation.
The manual provides the correct instructions for installation, use and maintenance, as well as giving
useful advice.
For Great Britain only
Warning: this appliance must be earthed.
Fuse replacement
If the mains lead of this appliance is fitted with a
BS 1363A 13amp fused plug, to change a fuse in
this type of plug use an A.S.T.A. approved fuse to
BS 1362 type and proceed as follows:
1. Remove the fuse cover (A) and fuse (B)
2. Fit replacement 13A fuse into fuse cover
3. Refit both into plug
Important:
The fuse cover must be refitted when changing a
fuse and if the fuse cover is lost the plug must not
be used until a correct replacement is fitted.
If the appliance is connected to the mains without using a plug:
It is necessary to install in the fixed wiring an all-pole disconnection device having a gap be-
tween contacts of at least 3,5mm. After installation the disconnection device has to be easy to
reach.
The connection to the mains must be carried out by a qualified technician in accordance to the
scheme shown below and the regulations in force
L= brown
N= blue
= yellow-green
In the event of damage to the supply cord, it has to be replaced by the manufacturer or an au-
thorized technical service centre in order to avoid any risk.
The manufacturer declines all responsibility for injury or damage caused by failure to
comply with the above regulations or deriving from tampering with even just one part of the
appliance and the use of non-original spare parts.

EN
6
2. INSTALLATION INSTRUCTIONS
Important!
The appliance must be installed by suitably qualified person in compliance with the relevant regulations.
The washer-dryer is heavy. Take care when lifting it.
2.1 UNPACKING
There are screws fitted to protect the machine from being damaged in transit. These screws must be removed
before connecting or operating the machine.
1.Undo all the screws with a 10 mm spanner
2.Remove all the screws (A) from the rear
3.Remove all the plastic spacers (B)
4.Fit all the plastic plugs (C) provided,to prevent water splashes etc. from
getting into the appliance.
Warning!
Do not turn the appliance upside-down or place it on its sides.
All the transport retainer fittings should be kept in a safe place; they must be fitted again if the appliance has to
be transported in the future.
A+B
A
B
C

EN
7
2.2 POSITIONING AND LEVELLING
1. Place the appliance in the
chosen position.
2. Level the appliance carefully
in all directions with the aid of
a spirit level, adjusting the
height of the feet if necessary.
Once done, fix the feet in
place with the locknuts pro-
vided.
The water intake and drain hoses can be fitted pointing to the left or right for effective installation.
Warning!
This operation must be carried out with care to prevent the washer-dryer from vibrating, moving or
generating excessive noise during use.
If the appliance is installed on a carpeted floor, take care to ensure that the openings in the bottom of
the washer-dryer are not obstructed.
Also check that during operation the washer-dryer is not resting against walls, kitchen units, etc.
The appliance must not be installed behind a door with lock, a sliding door, or a door with hinge on the oppo-
site side.
2.3 CONNECTING TO THE WATER SUPPLY
1. Check that the water supply pressure is in the following range: 0,5-9bar. With higher
pressures, use a pressure reducer.
2. Connect the cold water supply hose (blue screw collar) to the cold water tap with ¾
standard threaded connector, taking care to tighten firmly to prevent leaks. The water
supply hose must not be kinked or crushed and must not be changed or cut. Threaded
connections must only be tightened by hand.
Warning!
If the connection is made to new pipelines, or lines which have been out of use for a long time, allow a con-
siderable amount of water to flow out before connecting the intake hose. This prevents any sand or other dirt
from fouling the filters installed in the appliance to protect the water intake valves.
The new intake hose supplied with the appliance must be used, and the old water supply hose must not be
used.
2.4 CONNECTING TO THE DRAIN
1. Insert the end of the drain hose into a drain pipe having inside diameter of at least 4 cm, at least 50 to 90 cm
above floor level, or connect it securely (using the plastic fitting on the elbow in the hose) to a sink or bathtub.
2. In all cases, check that the end of the drain hose is securely fixed to prevent the repulsive force of the water
from pushing it out of place.
Warning!
Avoid kinks or restrictions to ensure effective drainage.
Any drain hose extensions must be no more than 1 metre long, must be of the same diameter and must be
free from restrictions of all kinds.
The end of the drain hose must never be submerged in water.

EN
8
2.5 ELECTRICAL CONNECTION
Before connecting the plug to the power socket ensure that:
1. The electrical system voltage is the same as that stated on the rating plate on the front of the appliance,
in the zone visible when the door is open. The rated power supply and the fuses required are specified
on the rating plate.
2. The meter, safety breakers, power supply line and power socket are rated to withstand the maximum
load required, stated on the rating plate.
3. The power supply socket and the plug fitted to the appliance are compatible without the use of reduc-
tions, multiple sockets, adapters and extension leads which might cause overheating or scorching.
If the power supply socket is not compatible with the plug supplied, replace the socket with one of the
appropriate type.
Warning
The power plug must be accessible after the appliance has been installed.
It is absolutely essential to connect the appliance to earth. Connect the plug to a socket with an earth
connection in good working order.
The manufacturer declines all liability for direct or indirect injury or damage deriving from a non-existent
or defective earth connection. Correct electrical connection guarantees conditions of maximum safety.
This appliance is compliant with the requirements of EEC directive 89/336 of 3.5.89 (including the amend-
ment directive 92/31/EEC) concerning the elimination of radio-frequency disturbance.
If the power supply lead is damaged, it must only be replaced with an original spare, available from the After-
Sales Service.
Do not connect/disconnect the power supply plug from the socket with wet hands
Only disconnect the power supply plug from the socket by taking hold of the plug itself, never by
pulling on the lead.

EN
9
3. DESCRIPTION OF CONTROLS
3.1 CONTROL PANEL
All the appliance's control and monitoring devices are placed together on the front panel.
Programme Selector
For switching the washer-dryer
on and off and selecting pro-
grammes. Can be turned in ei-
ther direction.
Do not turn while programmes
are in progress (see 4.14).
Start/Pause button:
For starting and stopping
working cycles.
Display: shows the settings (spin speed, cycle status, flexi time, maximum recommended weight,
drying levels, child lock and dryer cleaning programme). The settings can be modified using the but-
tons underneath.
Buttons (from left to right):
Spin speed selection
Option selection
Confirm option
Delay Timer
Drying

EN
10
4. USING THE APPLIANCE FOR WASHING
4.1 PREPARING THE ITEMS FOR WASHING
1. Subdivide the items for washing by fabric type and colour fastness.
2. Wash white and coloured items separately. New coloured items should be washed separately the first time.
Normally, items carry labels with washing instructions. The following is a short description of the symbols
used on these labels.
WASHING
BLEACHING
Machine wash at max. 90°C
Bleaching allowed
Do not bleach
Machine wash at max. 60°C
IRONING
Machine wash at max. 40°C
Hot iron
Warm iron
Cool iron
Do not iron
Machine wash at max. 30°C
DRY CLEANING
Machine wash, delicate cycle
at max. 60°C
Any solvent
Any solvent ex-
cept trichloroe-
thylene
Petroleum
solvent and
R113
Do not dry clean
Machine wash, delicate cycle
at max. 40°C
Machine wash, delicate cycle
at max. 30°C
DRYING
Hand wash
High tem-
perature
Less than 60°C
Do not tumble dry
Do not wash
Warning!
Do not wash unhemmed or torn items as they may fray.
Unrelated items in the wash may damage the garments or parts of the washer-dryer. So: empty pockets and
turn them inside-out, and remove hooks from curtains or wrap them in a mesh bag.
Wash very small items (belts, handkerchiefs, socks, padded bras, etc.) in a white canvas bag. Fasten press-
studs and zips and sew on loose buttons.
The use of modern detergents and the correct washing temperature is generally sufficient to remove stains
from fabrics. However, some difficult stains such as grass, fruit, egg, blood, rust, ballpoint pen, etc. should be
dealt with before washing. Depending on the type of fabric, there are a large number of commercial
stain removers on the market. In all cases, stains should be cleaned or diluted at once, since the old-
er they are, the harder they are to remove.
Failure to comply with washing guidance symbols may result in damage to the items washed.
Wool –Only wool marked as pure new wool, with the mark, or labelled "shrink-proof, machine-washable"
can be washed in a washing machine on the specific programme; other types of wool should be hand-washed or
dry-cleaned.
4.2 OPENING THE DOOR
The appliance is fitted with a safety device which prevents the door from being opened while the programme is in
progress.
1. Check that all the water has been drained from the drum and the drum is at a standstill.
Warning!
If the washing programme is interrupted, it will be from 3 to 15 minutes before the door can be opened, de-
pending on the temperature reached inside the appliance.
Warning!
The water may still be boiling hot if the wash was at high temperature.
Do not open the door if there is still water in the drum!
4.3 WASHLOADS
As far as possible, to save electricity, it is more economical to wash complete loads of the various types of
fabric. Shake out the laundry before loading, and alternate large and small items. It is best to weigh the load the
first few times, after which you will be able to rely on your experience.

EN
11
4.4 LOADING THE ITEMS FOR WASHING
1. Open the door and load the laundry, distributing it evenly over the drum, with items opened out and not
bundled together; if possible, large and small items should be well mixed.
2. The washing machine covered by this manual can be loaded with up to 7kg of laundry for each wash. If
this weight is exceeded, the washing results will be poor and the appliance may malfunction.
3. To save energy it is more economical to wash full loads of the various types of fabric, following the
guidance on quantities provided in the "Programmes Table" supplied in this manual.
4. Close the door by pressing against the frame until you hear it click shut. Take care not to trap items of
laundry between the door and the rubber gasket.
Warning!
If the door is not properly closed, a safety device prevents the washer-dryer from starting.
Do not exceed the maximum load: overloading adversely affects washing results.
4.5 ADDING DETERGENT AND ADDITIVES
The internal tray comprises three compartments, marked with the symbols
prewash detergent
main wash detergent
for fabric conditioner, starch, additives, etc. (e.g. treatment products). The additives are added to
the washing drum automatically during the final rinse.
The main wash detergent compartment has a tongue allowing the use of liquid detergent. To insert it, pull it to-
wards the front and then lower it. Following the recommendations in the "Programmes Table" supplied
with this manual, place the detergent and any additives in the drawer
before the start of the programme.
Never fill with liquids above the maximum level marked; otherwise
the trays will empty too quickly.
Before pouring dense additives into the container, dilute with a little
water to ensure they do not clog the outlet.
Use only low-foam detergents suitable for use in a washer-dryer.
The amount of detergent must be decided in relation to the hard-
ness of the water, the type and quantity of items loaded, and their
degree of dirt.
This will provide the desired result with optimal detergent consump-
tion.
On detergent packs the recommended dose is indicated for 4 levels of water hardness and for loads of 4-5 kg of
laundry with average dirt levels.
Request information about the water's hardness from your water supply company.
Water hardness
Level of hardness
French degrees fH
Soft
Up to 15°
Medium
15° - 25°
Hard
25° - 40°
Very hard
More than 40°

EN
12
4.6 POWDER DETERGENT DOSES
Laundry with normal dirt
1. Choose a programme without prewash.
2. Pour the total amount of detergent shown on the pack into the main wash compartment of the detergent
drawer.
Very dirty laundry
1. Choose a programme with prewash.
2. Place ¼ of the recommended amount of detergent in the prewash compartment of the detergent drawer and
¾ of the detergent in the wash compartment.
Warning!
If no recommended doses are provided, for delicate items in synthetic fibre use from ½ to 2/3 of the recom-
mended dose for washing tough cotton fabrics.
Only neutral detergents recommended for wool should be used on the wool programme.
Use the doses recommended by the detergent producer.
4.7 LIQUID DETERGENT DOSES
1. Pour the dose required into the measuring cap supplied with the bottle of liquid detergent and place it in the
drum, or use the main wash compartment of the detergent drawer, fitting the insert provided.
2. The scale on the red insert is intended as an aid when deciding the dose of liquid detergent.
Warning!
Liquid detergents can be used, at the doses recommended by the producer, only for the main wash, i.e. in
all programmes without prewash.
4.8 DESCALERS
Descalers can be added to the prewash and main wash compartments as recommended by their producers.
Place the detergent in the compartments first, followed by the descaler.
4.9 PROGRAMMES AND FUNCTIONS
For advice on selecting programmes in relation to the type of fabric, refer to the "Programmes Table",
supplied with this manual (Inside the bag of accessories).
4.10 SWITCHING ON THE APPLIANCE AND SELECTING THE WASHING PROGRAMME
To switch on the appliance and select the programme, proceed as follows:
1. Turn the programmes knob in either direction. This switches on the washer-dryer.
2. Select the washing programme. The time left to the end of the programme and the maximum recommended
weight for the selected programme alternate on the display. The symbols on the display light up to identify the
information shown.
3. The default spin speed values are shown. The initial settings can be modified using the button underneath the
sequence of spin speeds.
4. If spin speed is set, there will be no spin cycle and the appliance will stop with the drum full. If this val-
ue is set the appliance does not perform the final spin and the washing programme ends with water in the
drum.
Delay Timer
Max recommended weight
Spin Speed selection

EN
13
4.11 SELECTING AND CONFIRMING OPTIONS
1. The Option Selection button can be used to select the following options in sequence (from the top down):
Prewash: adds a stage before the main wash, lasting about 20 minutes at a temperature of 35°C. Suita-
ble for loads of particularly dirty items.
Intensive: the max. temperature is changed to 60°C and the washing stage is extended to increase the
effectiveness of the enzymes in the detergents. Suitable for delicate but dirty items.
Easy iron: produces items which are less creased and easy to iron.
Extra rinse: this option adds a rinse to the selected washing programme.
Flexi Time: reduces the duration of the cycle. The symbol is completely illuminated with the initial dura-
tion of the selected programme. Once the option has been selected the cycle duration can be further re-
duced to an intermediate setting and a minimum setting and then returned to the initial duration by re-
peated pressing of the Set button
Buzzer: sets whether or not the buzzer will sound at the end of the cycle. The appliance comes with the
buzzer function "on".
2. To confirm the selected option, simply press the Confirm options button and the LED of the option re-
mains on.
3. To delete an option selection, simply return to the option with the Selection button and press the Confirm
options button. To cancel all the options previously selected in a single operation, simply hold down the
Confirm options button for 4 seconds.
4. The Buzzer option retains its "on" or "off" status for subsequent cycles. It is only automatically switched
to "off" if the Night Wash programme is chosen.
Option selection
Confirm option
Options
Start Pause

EN
14
4.12 TIME REMAINING
1. The Delay Timer can be pressed repeatedly to select the time after which the washing programme will
end. The time left before the end of the cycle calculates the initial duration of the washing/drying cycle,
the settings made (temperature, spin speed and options) which may shorten or lengthen the cycle's initial
duration, and the delay time the user wishes to add before the cycle starts.
2. After the Delay Timer function has been set, the symbol on the display remains on.
3. To cancel the Delay Timer function, keep pressing the button repeatedly until the display shows 0.
4. The Start Pause symbol flashes on and off until the cycle starts. After the cycle starts, the symbol re-
mains constantly lit.
4.13 STARTING THE WASHING PROGRAMME
1. To start the washing programme after making your personal settings, press the Start Pause button.
2. Once the cycle has started, the display shows the time remaining before the end of the cycle and the
Start Pause symbol on the display is constantly on.
3. During performance of the washing/drying programme, the symbols which identify the various phases
light up:
Delay Timer button
Delay Timer symbol
Start Pause
Start pause symbol
Cycle phase symbols: Prewash, wash, rinses, final spin and dry.

EN
15
4.14 INTERRUPTING OR CHANGING THE WASHING PROGRAMME
The washing programme in progress can be interrupted at any moment:
1. press the “Start/Pause” button for about 3 seconds: the display shows the word PAUS (for 1 second) al-
ternating with the time remaining until the end of the cycle (for 1 second). The Start/Pause light flashes
on and off.
Programmes can also be interrupted by turning the programme/temperature setting knob while the cycle
is in progress.
2. To change the washing programme, simply turn the programme knob to select the new programme;
there is no need to set the appliance in pause status. The new cycle will be carried out completely, be-
ginning from the start. If the drum had already been filled with water during the previous cycle, the water
intake phase will be omitted from the new programme.
3. To restart the cycle, press the Start-Pause button again.
4.15 PROGRAMME END
Washing/drying programmes are completed automatically. The word END appears on the display and the "Time
remaining" light goes out.
1. Switch the appliance off by turning the programmes knob to OFF
2. Unload the laundry from the drum.
3. Leave the door ajar to allow the interior of the washer-dryer to dry out.
4. Turn off the water intake tap.
If during the initial spin speed setting stage, the "no spin" mode (spin speed set as 0) was selected, at the
end of the washing programme the word STOP appears on the display, alternating with ---- (spin speed of 0) and
the spin light is on.
To proceed with the pump-out and spin, press the spin selection button twice. The appliance restarts the cycle
with the pump-out and spin. To select the spin speed required, press the button until the chosen speed is dis-
played. To pump out the water from the drum without performing the spin, press the spin selection button until the
display indicates speed of 0: the pump-out will be run without spin.
4.16 CHILD LOCK
1. When this function is activated, the modification of options, temperatures, spin speed and the wash-
ing/drying cycle is not possible while the cycle is in progress.
2. To activate the Child Lock, press the Option selection button and hold it down. Also press the Confirm
options button within 3 seconds.
3. The Child Lock symbol lights up to show that the function has been activated.
4. Repeat the same procedure to deactivate the function.
Child Lock Symbol
1
2

EN
16
4.17 OPENING THE APPLIANCE IN AN EMERGENCY
In the event of a power failure, the door is opened using the
mechanical release device activated by means of the lever in
the bottom of the appliance:
Turn the knob to Off and disconnect the power
supply plug from the socket.
Drain off the water (see point 6.3)
Pull the lever down and open the door.
Warning, scolding hazard: before opening the door, check
that the appliance does not contain boiling hot water and de-
tergent which may pour out and cause injury when the door is
opened.
Warning: do not open the door using the emergency release
lever while the drum is turning.

EN
17
5. USING THE APPLIANCE FOR DRYING
5.1 GENERAL
During drying cycles, the water tap must be turned on and the drain hose correctly positioned.
This appliance can be set to perform wash only, dry only and wash-and-dry programmes.
In the wash-and-dry programme, the appliance switches from washing to drying automatically, with no need to use
the controls (at the end of the wash) to obtain the complete cycle.
Attention
Only dry laundry or garments washed in an aqueous solution and suitable for tumble drying.
Do not dry fabrics which have been dry cleaned or had stains removed with chemical solvents, wool or
wool blend fabrics which will be shrunk by the heat, very delicate fabrics such as silk and synthetic cur-
tains, fabrics which may easily lose threads such as woollen yarn, padding and loose-pile mats, or arti-
cles which contain foam rubber or similar elastomers.
Loads of laundry placed in the washer-dryer for drying must not exceed 4 Kg in weight. The
washer-dryer is constructed to give the best results with loads which do not exceed 4 kg of dry weight of
laundry.
When wash programmes for resistant fabrics are set, drying automatically takes place at 90°C (normal
drying).
In wash programmes for delicate fabrics, drying automatically takes place at 60°C (gentle drying). There-
fore, in automatic wash-and-dry programmes, the drying programme will depend upon the wash pro-
gramme selected.
In drying only programmes, the laundry must first have been washed and spun-dried.
After drying particularly fluffy items such as new terry towels, the "Rinse" program should be carried out
to ensure that any deposits left by the fabric are removed, and are not deposited on the clothes in the
next wash.
Important –Do not dry delicate fabrics that will not withstand a temperature of 60°C or any fabrics which will not
withstand the selected temperature.
5.1.1 EXTRA DRYING
If the laundry is still too damp at the end of the programme, set a short timed drying programme.
Warning!
Do not over-dry as this may cause creases or shrinkage of garments.

EN
18
5.2 WASH-AND-DRY PROGRAMME
Automatic washing and drying can be carried out in the cottons fabrics (cotton and colours) and synthetic/delicate
fabrics programmes. If the wool wash programmes are selected, automatic drying after the wash cannot be set.
For automatic washing and drying, the load of laundry must not exceed 4 kg of cotton or 2 kg of synthetic fab-
rics.
Therefore, if the load for washing and drying exceeds the quantities stated above, a wash+dry programme is not
recommended; the load will have to be halved after washing and dried in two lots.
To set a wash-and-dry programme proceed as follows:
1. Select the washing programme and make any changes to the default parameters;
2. Press the dry button to set the drying time required. The display initially shows the maximum time which can
be set (2h:40’), which is then gradually reduced to 0h:00’
Whether drying will be at the normal temperature (90°C) or the delicate fabrics temperature (60°C) depends
on the washing programme set previously.
Once a drying time has been set, the symbol on the display flashes; it remains constantly on once the cycle
enters the drying stage.
5.3 DRY ONLY PROGRAMME
1. Turn the appliance off by turning the washing/drying programmes selector knob to OFF.
2. Turn the knob to the drying programme required: Intensive drying: for normal drying (90°C), or Gentle drying:
for delicate fabrics (60°C). To find out which symbol identifies each drying programme, refer to the pro-
grammes table supplied with the appliance.
3. Press the Dry button repeatedly to set the drying time required (see previous point).
4. Press the "Start-Pause” button to start the drying programme. The display shows the time remaining and the
drying symbol LED lights up.
Attention
Since no washing programme has been set previously, there are no constraints on selection of the drying
programme (normal or gentle). Remember that normal drying is recommended for cotton and coloureds, and
gentle drying for synthetic and delicate items.
For good drying results, the load of laundry must not exceed 4kg of cotton or 2kg of synthetic fabrics.
5.4 INTERRUPTING OR CHANGING THE DRYING PROGRAMME
1. The drying programme can be interrupted by the same procedures as the washing programme.
2. To end the programme and remove the laundry, it is best first to cool the load. Use the selector button to set
a drying time of 20 minutes. Restart the appliance as described above and the laundry will be ready for re-
moval.
Drying symbol
Drying button

EN
19
5.5 CLEAN PROGRAMME
To keep the appliance operating at peak efficiency over time, it has a CLEAN programme for regular
cleaning of the drying circuit to remove any fluff deposits.
1. After a given number of drying cycles, the CLEAN symbol lights up on the display to warn that this pro-
gramme needs to be run. The warning light remains on until the CLEAN programme is carried out. The light
goes out at the end of the programme.
2. To perform the CLEAN programme, proceed as follows:
a. Make sure that the drum is completely empty and close the door.
b. Turn the knob to the CLEAN programme (see programmes table for the exact position on the knob)
c. Press the START/PAUSE button
The CLEAN programme can also be carried out even if the light on the display is not on.
CLEAN programme symbol

EN
20
6. CLEANING AND MAINTENANCE
Important –Before carrying out any cleaning or maintenance procedure, the plug must be disconnected
from the power supply socket.
6.1 CLEANING THE OUTSIDE OF THE APPLIANCE
Regular, thorough cleaning will keep your appliance looking good.
Clean the exterior of the appliance with soap, water & a damp cloth, then dry thoroughly with a soft cloth.
The plastic parts should just be wiped with a damp cloth.
Do not scrape with pointed objects, or use solvents or products containing abrasive substances because
they damage the surfaces.
For reasons of safety, never spray the washer-dryer with jets of water.
6.2 CLEANING THE DOOR GASKET
Check regularly that there are no coins, buttons, nails or pins in the folds of the door gasket.
6.3 CLEANING THE DRAIN PUMP
The drain pump only needs cleaning if it has been blocked by buttons, coins or similar objects and the water is not
being pumped out.
In this case, proceed as described below.
1.Remove the mains plug to disconnect the appliance from the electricity supply.
2.Proceed as follows:
use a small screwdriver as a lever to remove the
plugs shown here, turn the plinth downwards and ac-
cess the pump.
3.Extract the drain hose ”A” - (Have a small towel/cloth ready in case of spills)
Warning!
If the hose is hot, the water is hot or boiling hot. Place a shallow container on
the floor and remove the plug “B” to drain off the water.
Depending on the amount of water in the appliance, the container may have
to be emptied several times.
When no more water is coming out, close the hose again by pushing the plug
“B” firmly back into place.
Table of contents
Other Lamona Washer Dryer manuals
Popular Washer Dryer manuals by other brands

Zanussi
Zanussi WD1010 user manual

Electrolux
Electrolux EWX 127410 W user manual

AEG
AEG Oko Lavamat 1480 owner's manual

Crosley
Crosley CLCG500FW5 installation instructions

Bosch
Bosch XQG100-WJUL45000W User manual and installation instructions

Hotpoint
Hotpoint AQUALTIS AQD1170F 697 E Instructions for installation and use