Lancaster BBG019 087P User manual

Please mention model#VMBBG019_087P_V1
Assembly Instructions
MODEL
BBG019_087P
VM Innovations
www.vminnovations.com
877-852-8164

English
This product is covered by a limited warranty that is effective for 90 days from the date of purchase. If, during the limited
warranty period, a part is found to be defective or breaks, we will offer replacement parts at no cost to you, the customer.
The only exceptions to the warranty include mainframes, table tops, playing surfaces, batteries or tools.
The above warranty will not apply in cases of damages due to improper usage, alteration, misuse, abuse, accidental
damage or neglect.
This Limited Warranty gives you specific legal rights and you may also have other rights which vary from one State
(province) to another.
A PURCHASE RECEIPT (or other proof of purchase) will be required before any warranty service is initiated. For all
requests for warranty service, please feel free to contact our Consumer Service Department at :
TOLL FREE: 877-852-8164
www.vminnovations.com
Please be aware of your product’s Limited Warranty for the return/refund policy from the store, We, at LANCASTER, can
not handle the product which is out of product’s limited warranty since we only provide available parts. Thank you!
PLEASE CONTACT US BEFORE RETURNING THE PRODUCT TO THE STORE!
LIMITED 90 DAYS WARRANTY
Please Contact
Customer Service Toll Free
For additional resources and Frequently Asked Questions,
please visit us at
LANCASTER
877-852-8164
www.vminnovations.com
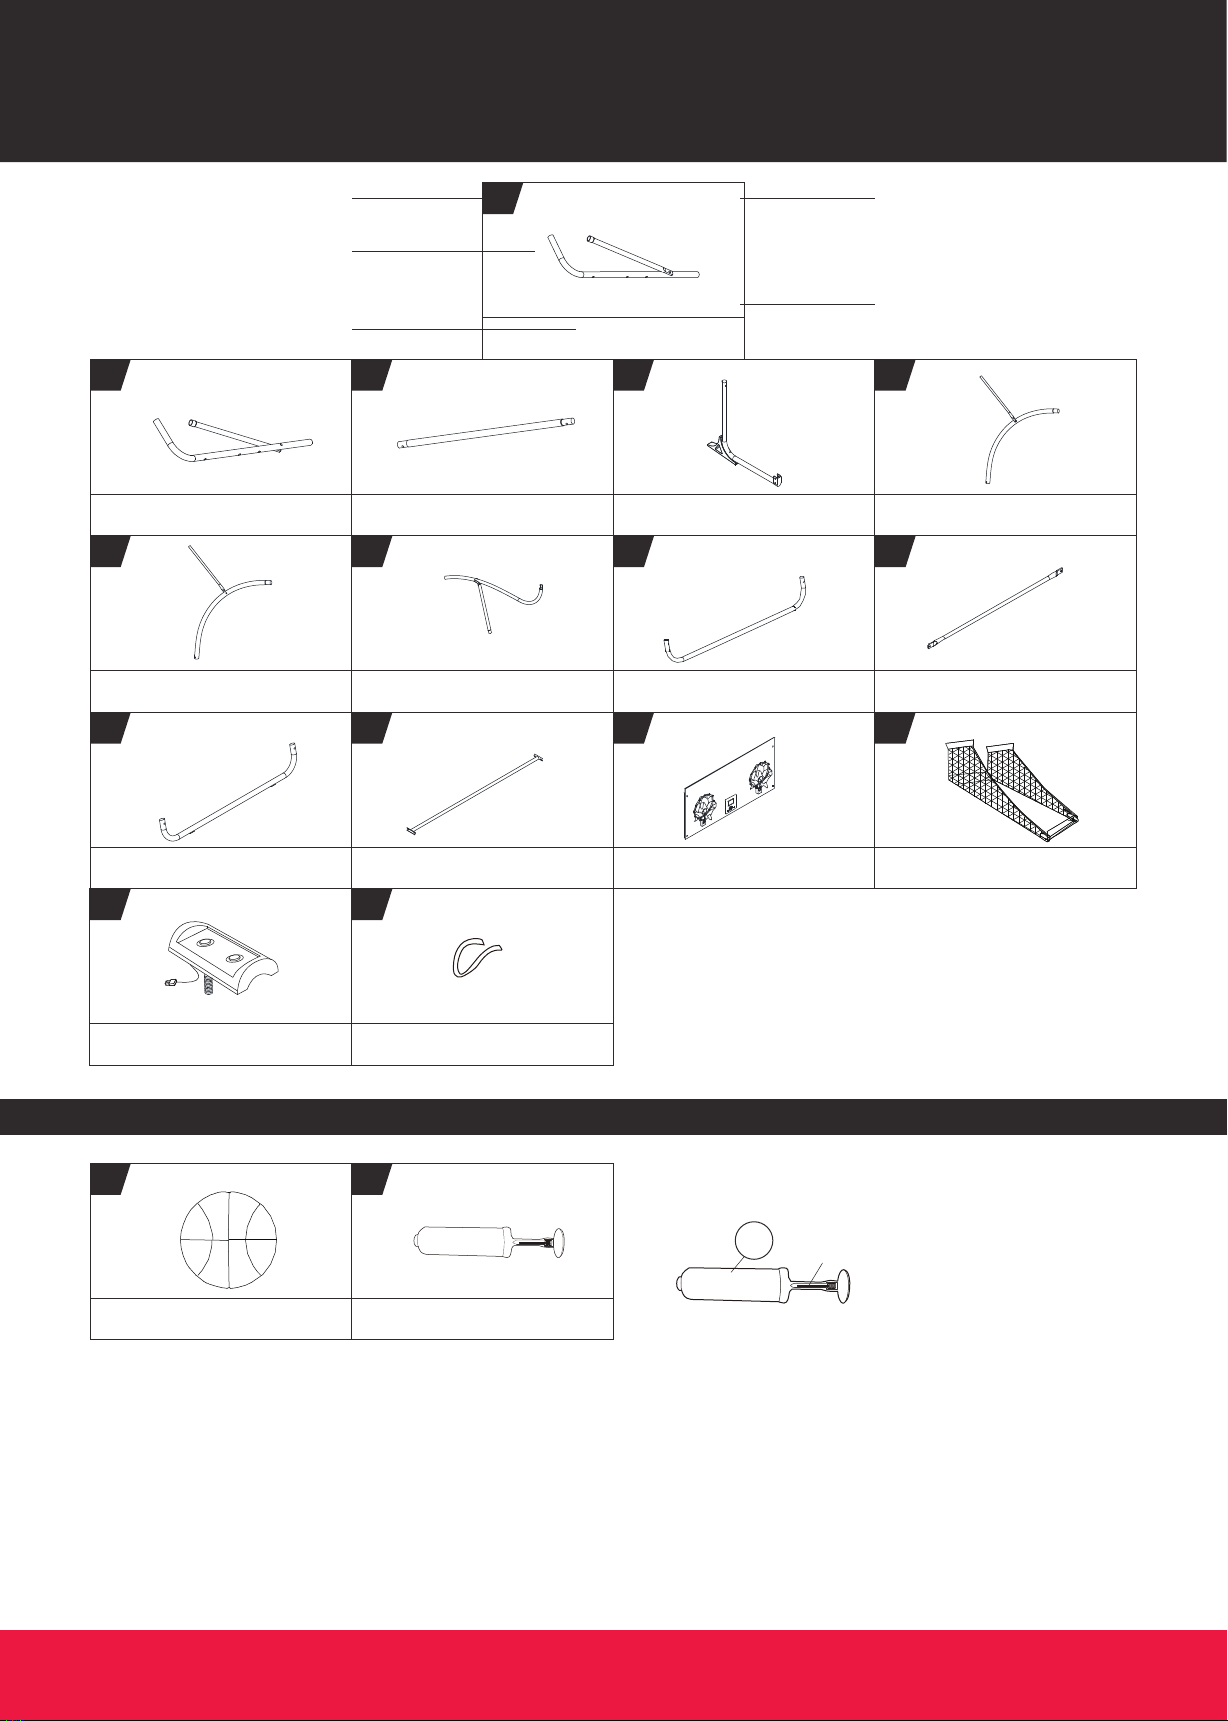
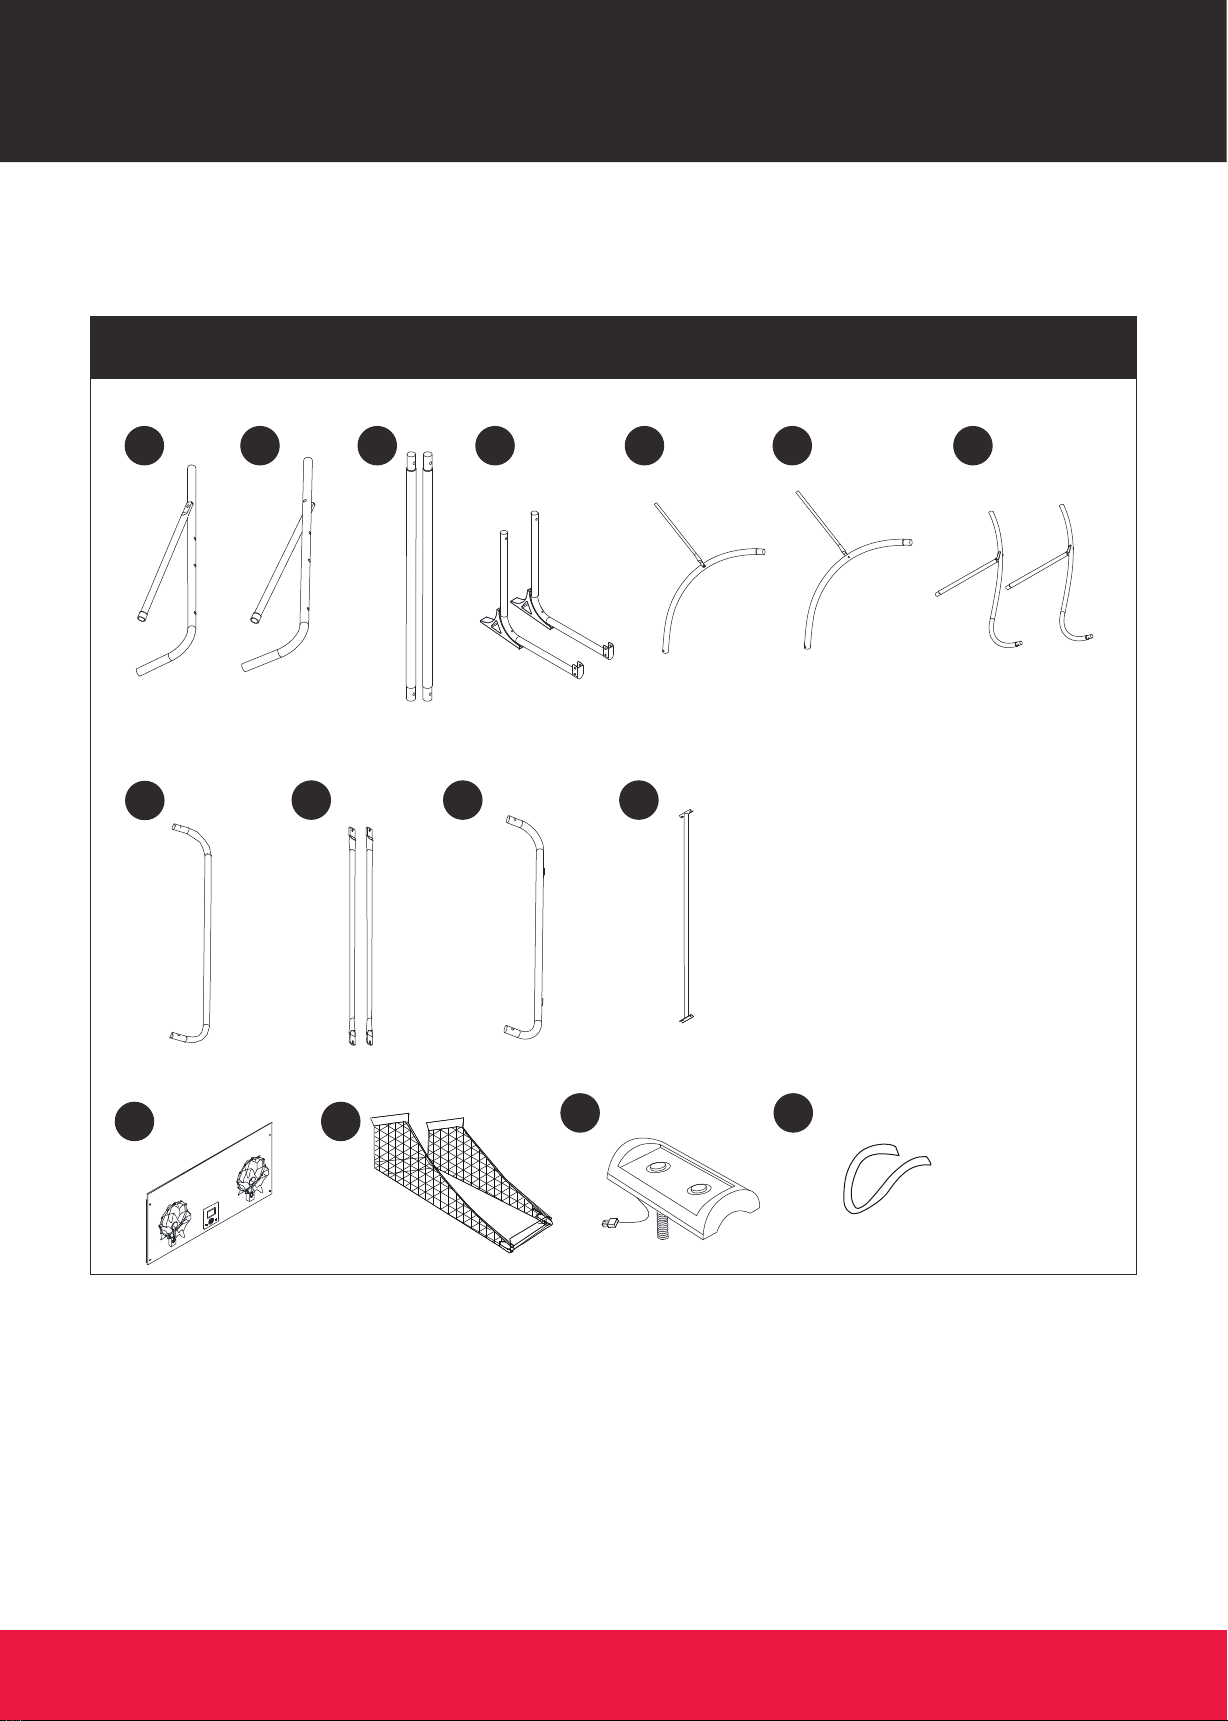
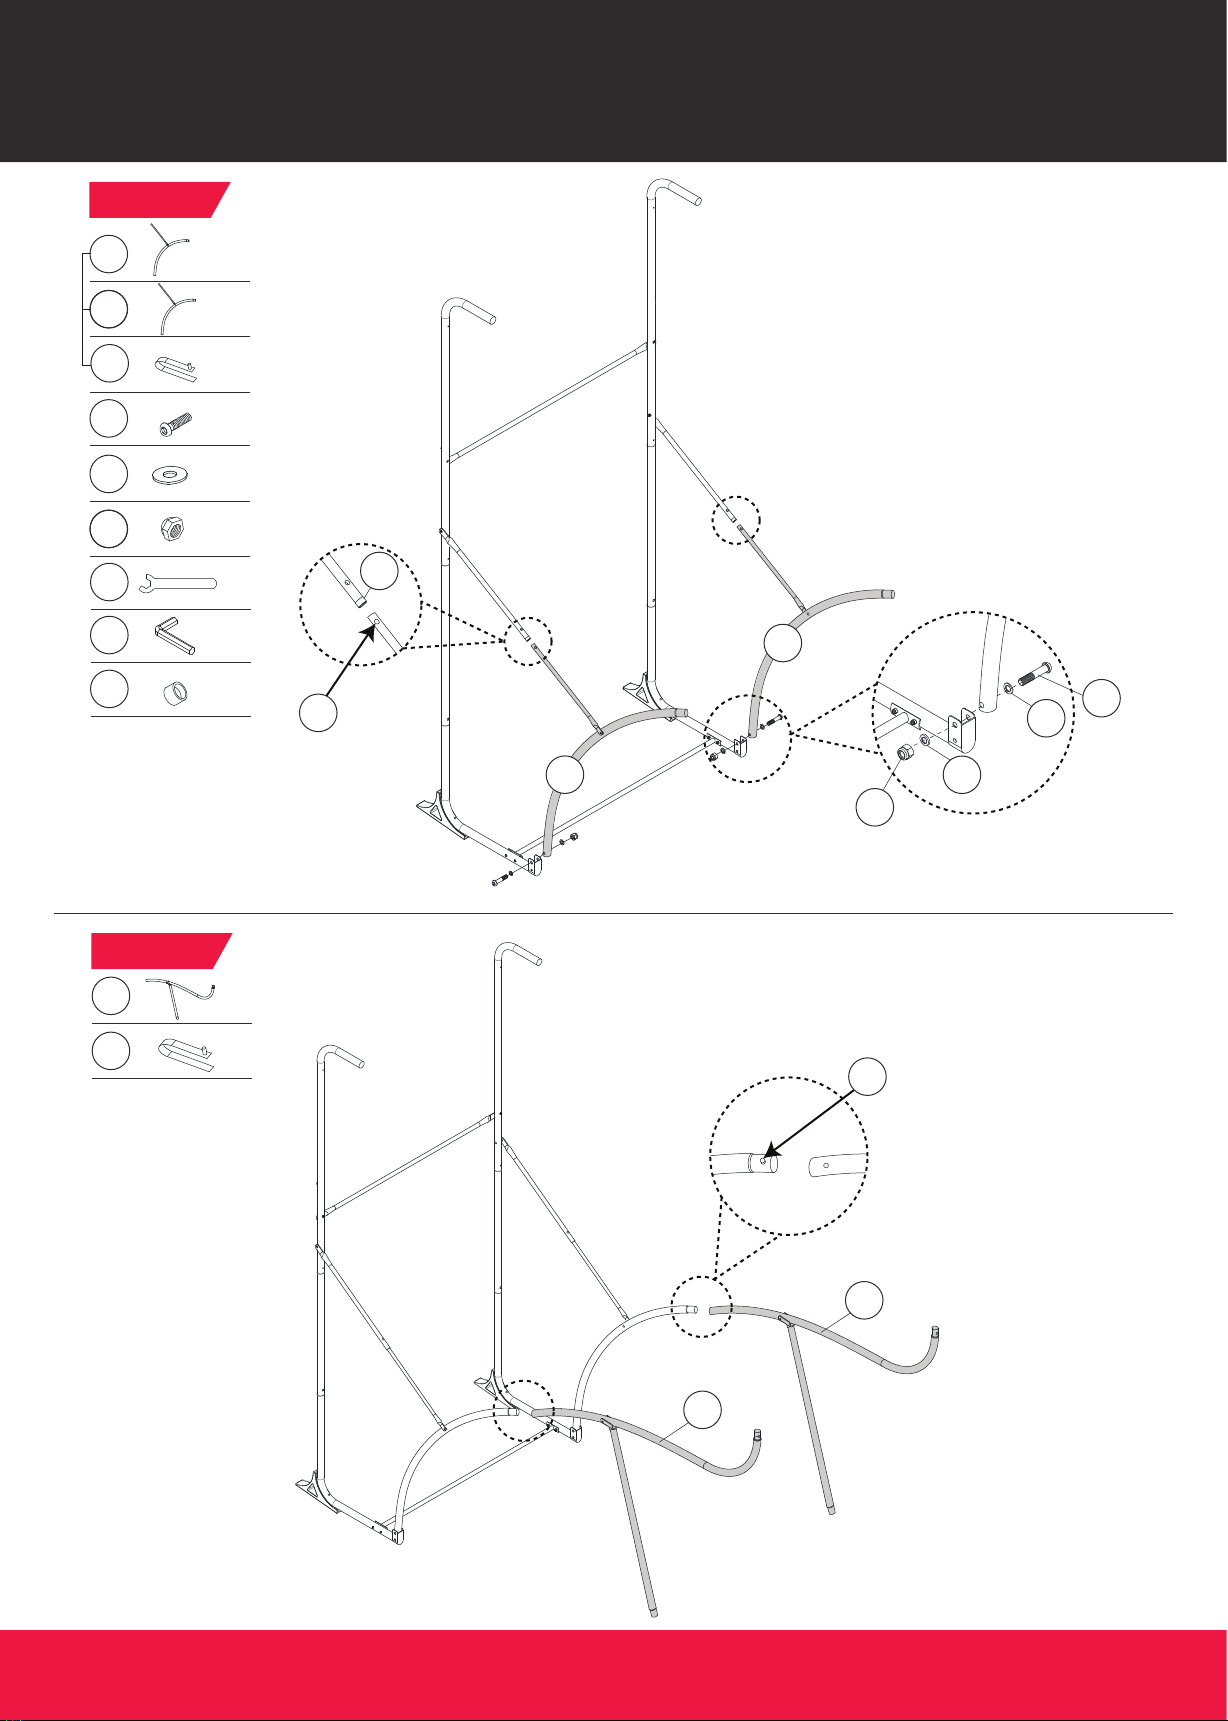
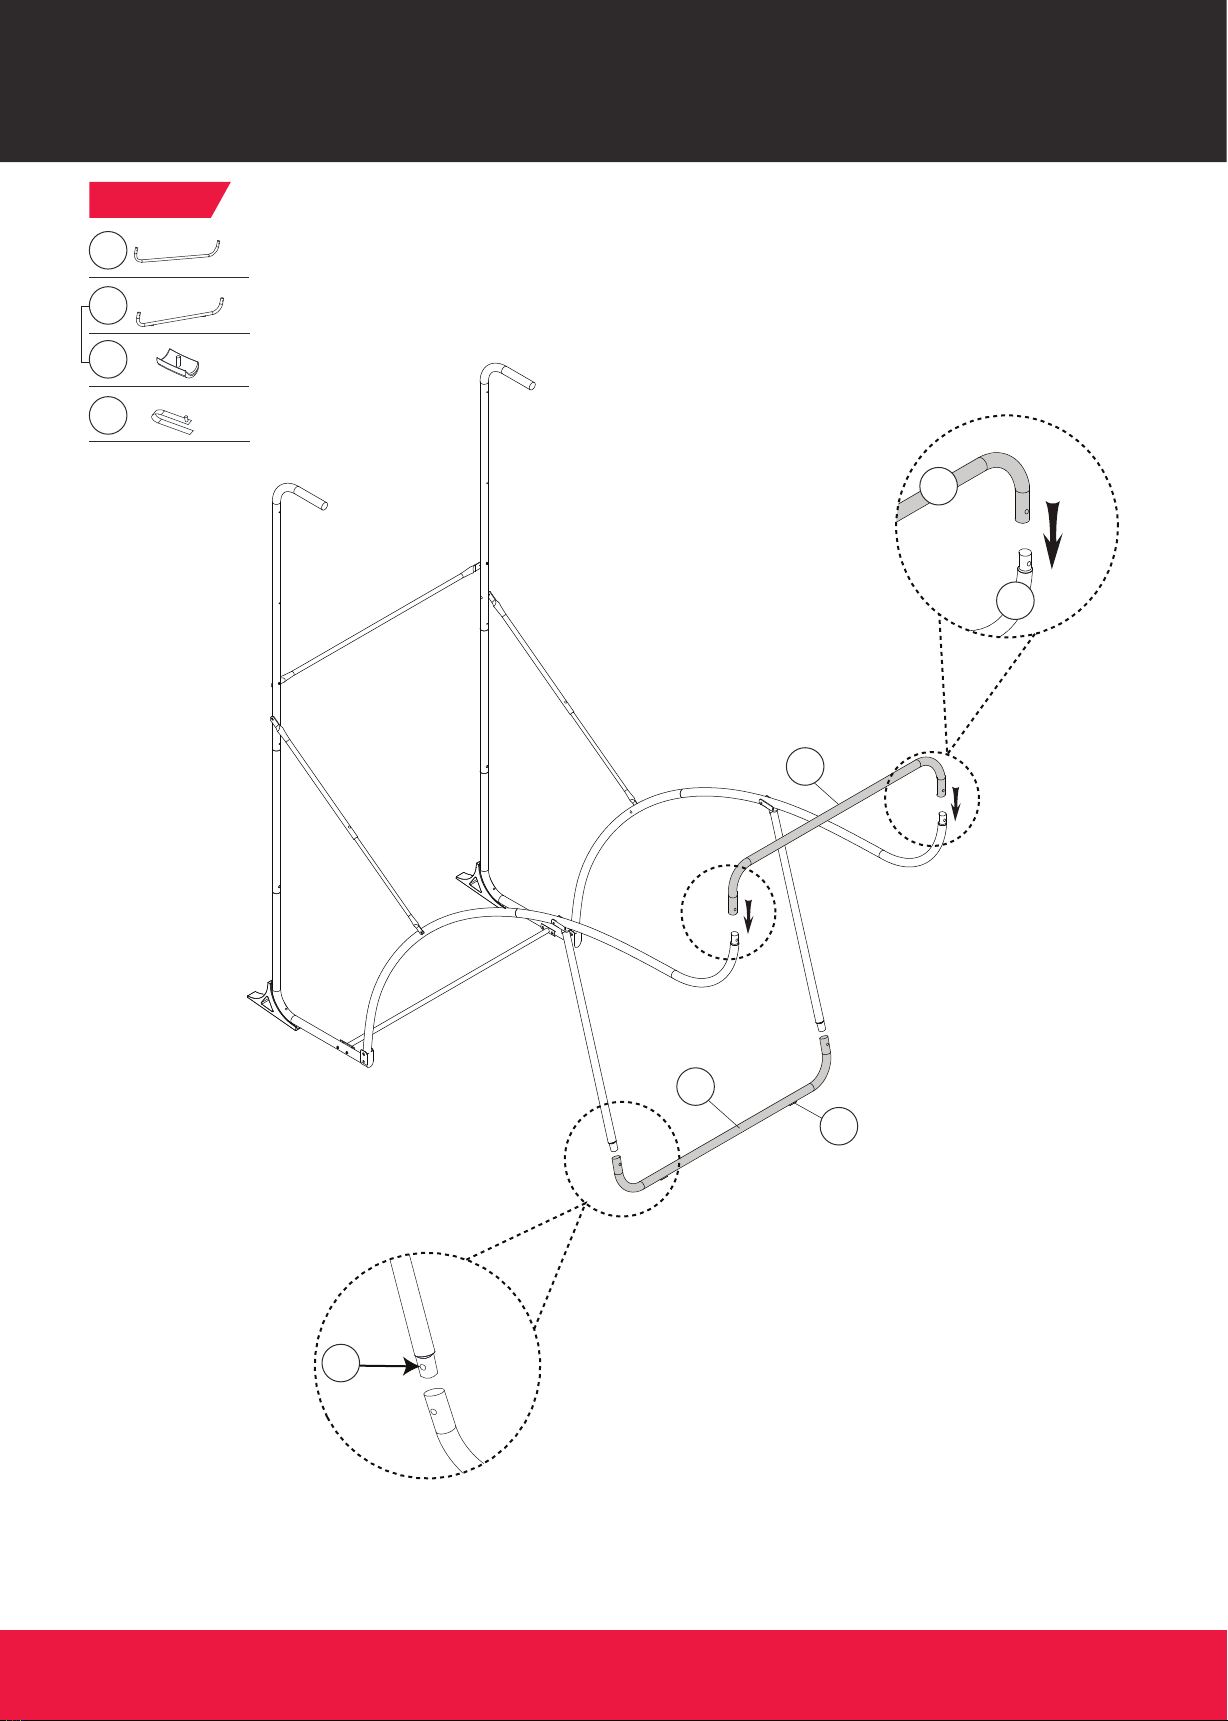
BBG019_087P www.vminnovations.com1(Continued on the next page.)
WE ARE READY
TO HELP
DO NOT RETURN TO STORE

Do not use or keep
product outdoors. For
indoor use only. No
wet/humid conditions.
Keep away from pets in
assembly area
No Children in Assembly
Area
At least 2 Adults Needed
This product is intended for INDOOR use only.
Please do not sit, climb or lean on the product.
Please do not drag the product when moving it in order to avoid damaging the legs.
Please only use spray furniture polish to clean the exterior surfaces of the product.
This is not a child's toy, adult supervision is required for children playing this game.
1.
2.
3.
4.
5.
English
TOOLS REQUIRED
- Not Included
- Not Included
- Included
- Included
Adult Assembly Required.
CHOKING HAZARD - This item contains small parts or / and small balls. Not suitable for children under 3 years.
RECOMMENDED
Power Tools: Set to Low Torque
High Torque: Over Tightened
IMPORTANT NOTICE!
WARNING
Phillips Screwdriver
Standard (Flat Head Screwdriver)
Wrench
Allen Key
Electric Screwdrivers may be helpful during assembly; however, please set a low torque and
use extreme caution.
BBG019_087P www.vminnovations.com2(Continued on the next page.)

ACCESSORIES
Control Box
14
x1
FOR FIG. 12
BBG019_087P www.mdsports.com3(Continued on the next page.)
English
PARTS IDENTIFIER
Self - Stick Strap
15
x1
FOR FIG. 12
Tube - 9
9
x2
FOR FIG. 4,10
Tube - 10
10
x1
FOR FIG. 7
Tube - 11
11
x1
FOR FIG . 1
Backboard
12
x1
FOR FIG . 8
Tube - 5
5
x1
FOR FIG. 5
Ball Return Net
13
x1
FOR FIG. 9
Tube - 6
6
x1
FOR FIG. 5
Tube - 7
7
x2
FOR FIG. 6
Tube - 8
8
x1
FOR FIG. 7
Tube - 2
2
x1
FOR FIG. 3
Tube - 3
3
x2
FOR FIG. 2
Tube - 4
4
x2
FOR FIG. 1
Tube - 1
1
x1
FOR FIG. 3
PART NUMBER FIG NUMBER
QUANTITY
PART
PART NAME
Basketball
16
x3
Air Pump
17
x1
Needle
17
ON/OFF
START
SELECT
SOUND ON/OFF

M6x30mm Bolt
A1
x8
FOR FIG. 1,4,10
M6x32mm Bolt
A2
x2
FOR FIG. 5
M6x42mm Bolt
A3
x4
FOR FIG. 8,11
M6 Nut
A5
x14
FOR FIG. 1,4,5,8,10,11
Allen Key
A7
x1
Wing Nut
A8
x1
Wrench
A6
x1
M6 Washer
A4
x28
FOR FIG. 1,4,5,8,10,11
FOR FIG. 12
Rim with Paddle
P1
x2
FOR FIG. 8
Rim Net
P2
x2
FOR FIG. 8
Electronic Scorer
P3
x1
FOR FIG. 8
PRE-INSTALLED PARTS
BBG019_087P www.mdsports.com4(Continued on the next page.)
English
HARDWARE
Push Button
P4
x10
FOR FIG. 2,3,5,6,7
Plastic Pole Insert
P5
x2
FOR FIG. 3
Pole Holder
P6
x2
FOR FIG. 7
End Cap
P7
x2
FOR FIG. 5

Find a clean, level place to begin the assembly of your Product.
Verify that you have all listed parts as shown on the part list pages. If any parts are missing, call our customer service.
1.
2.
BEFORE ASSEMBLY
BBG019_087P www.mdsports.com5(Continued on the next page.)
BEFORE ASSEMBLY
Please inspect and layout all the POLES and parts
English
1
14 15
2
9 10 11
12 13
5
3 4 6 7
8
ON/OFF
START
SELECT
SOUND ON/OFF

x1
A6
x1
A7
FIG. 1
FIG. 2
BBG019_087P www.mdsports.com6(Continued on the next page.)
x2
4
4
4
ASSEMBLY
English
x8
A4
x1
11
11
x2
3
3
3
Pre-installed
x2
P4
P4
x4
x4
A1
A5
A4
A4
11
A1
A5
4

FIG. 4
x1
9
x4
A4
x2
A1
x2
A5
ASSEMBLY
BBG019_087P www.mdsports.com7(Continued on the next page.)
English
FIG. 3
x1
1
1
x2
P4
P4
x2
P5
P5
P5
x1
2
2
Pre-installed
Pre-installed
x1
A6
x1
A7
9
A1
A4
A5
A4

FIG. 6
x2
7
x2
P4
FIG. 5
BBG019_087P www.mdsports.com8(Continued on the next page.)
ASSEMBLY
English
x1
x1
x2
5
6
A2
x4
x2
A4
A5
x1
A6
x1
A7
x2
P7
Pre-installed
x2
P4
P7
P4
5
6
A2
A5
A4
A4
7
7
P4

BBG019_087P www.mdsports.com9(Continued on the next page.)
ASSEMBLY
English
FIG. 7
8
10
x1
x1
Pre-installed
Pre-installed
P6
P4
x2
x2
10
P6
P4
8
8
7

Note: With the help of another
adult, attachthe Backboard (#12)
to the Top Tubes - 1, 2 (#1, #2).
BBG019_087P www.mdsports.com10(Continued on the next page.)
ASSEMBLY
English
12
12
P3
P1
Note: DO NOT overtighten bolts.
Pre-installed
Pre-installed
Pre-installed
x1
x2
x1
x2
FIG. 8
12
P2
P3
P1
x2
x2
x1
x4
A3
A5
A6
x1
A7
A4
P2
A4
A4
A5
A3
1
2
Note: Please do not use any bolts
on the Backboard at this step.
The Bolts will be added later for
the Ramp Tab (See FIG. 11).

Note: Slide in the elastic straps
onto Tubes - 1, 2 (#1, #2), then
slide the sleeves of the Ball
Return Net (#13) onto tubes at
the top.
BBG019_087P www.mdsports.com11(Continued on the next page.)
ASSEMBLY
English
x1
13
FIG. 9
Connect Velcro
Strap here.
1
2
13
13
Note: To secure the Ball Return
Net (#13) to Tubes - 1, 2 (#1, #2),
attach the elastic straps over
the nuts as shown in FIG. 9.

Note: After the elastic straps are bound to
Tube 8 (#8), slide Tube - 9 (#9) into the sleeve
of the Ball Return Net, then attach it to
Tube - 8 (#8) as shown in FIG. 10.
Fasten the Bolt (#A1) with the Allen Key to
finish this step.
BBG019_087P www.mdsports.com12(Continued on the next page.)
ASSEMBLY
English
x1
x4
x2
x1
x1
9
13
A4
A5
A6
A7
FIG. 10
x2
A1
A1
A4
A4
8
9
A5
9
13

Ramp Tab
x2
x2
x1
x1
A3
12
121
A3
A5
A6
A7
x4
A4
A4
A4
BBG019_087P www.mdsports.com13(Continued on the next page.)
ASSEMBLY
English
FIG. 11 Back View
A5
13
13
Note: At each bottom hole of the
backboard, attach the ramp tabs
on Ball Return Net (#13) using
Bolts (#A3), Washers (#A4) and
Nuts (#A5) as shown in FIG. 11.

FIG. 13
12
BBG019_087P www.mdsports.com14(Continued on the next page.)
ASSEMBLY
English
x1
14
FIG. 12
x1
15
x1
A8
Note: Run the rest of the Control Wire through
the loops on the Ball Return Net (#13). Place the
Control Wire on the Tube - 8 (#8) using the
Self-Stick Straps (#15) as shown in FIG. 12.
ON/OFF
START
SELECT
SOUNDON/OFF
Control Wire
ON/OFF
START
SELECT
SOUND ON/OFF
8
ON/OFF
START
SELECT
SOUND ON/OFF
14
A8
Control Wire Electronic Scorer
Sensor wire
Sensor wire
14 P3
P1
P1
15

BBG019_087P www.mdsports.com15(Continued on the next page.)
HOW TO FOLD THE GAME FOR STORAGE
English
STEP 1
STEP 3 STEP 4
STEP 2
Fold parts (#10)
as shown.
Fold parts (#8)
as shown.
Note: Release the tubes
by pressing the push
button (#P4) as shown.
P4
WARNING
Two Adults Required
WARNING
Do NOT trap your fingers
when folding the game.
8
10

Press the “ON/OFF” button; the display will show G1.
Press the “SELECT/ SOUND ON/OFF” button to change game modes, from 01 to G8.
To switch between game modes after the game is turned on, press the“SELECT/ SOUND ON/OFF” button.
Once the game mode is selected, for example G1, press the “ON/OFF/START” button to begin play.
To turn the sound off, press and hold the “SELECT/ SOUND ON/OFF” button for approximately 3 seconds. To turn the
sound back on, repeat.
Battery Box: Unscrew the bolt using a screwdriver and open the Battery Box, insert 3 pcs “AAA” batteries (not included) in
the order of polarity as shown inside the Battery Box. And then screw on the cover by using a screwdriver.
Batteries must be installed according to the correct polarization (+ and -) required.
If the game will not be used for a long period of time, we recommend that the batteries should be removed.
Please clean the battery contacts and also those of the devices prior to battery installation.
a.
b.
c.
BATTERY INSTALLATION
CONTROL BOX OPERATION
REMINDING:
Timer OR Game
Mode Display
Player 2
Score
Player 1
Score
SELECT
SOUND ON/OFF
ON/OFF
START
Control Box
Electronic Scorer
Requires 3 “AAA” batteries (not included).
Do not mix old and new batteries.
Do not mix alkaline, standard (carbon zinc),
or rechargeable (nickel-cadmium) batteries.
1.
2.
3.
WARNING
English
ELECTRONIC SCOREBOARD INSTRUCTIONS
BBG019_087P www.mdsports.com16(Continued on the next page.)

Player must score on HOME or VISITOR hoop.
2 points are counted for every shot made on either hoop.
Unlimited time , Maximum score: 100
•
•
•
G2.SINGLE PLAYER, ANY HOOP
Player must score on alternating hoops. For example: score on HOME, score on VISITOR, score on HOME, score on
VISITOR, etc.
2 points are counted for every shot made on the correct hoop.
Unlimited time , Maximum score: 100
•
•
•
G3.SINGLE PLAYER, ALTERNATING HOOP
Each player must score on their own hoop - HOME or VISITOR.
2 points are counted for every shot made.
Time is preset to one minute.
The winner is the player who scores the most points in one minute on their own hoop.
•
•
•
•
G4.TWO PLAYER, COUNT UP
G5.TWO PLAYER, COUNT DOWN
G1. SINGLE PLAYER, ONE HOOP
Player must score only on the Home hoop.
2 points are counted for every shot made on the Home hoop only.
Unlimited time , Maximum score: 100
•
•
•
Each player must score on their own hoop - HOME or VISITOR.
Each player starts with 20 points and 2 points are deducted for every shot made in their own hoop.
There is no time limit.
The winner is the player who gets to zero, or scores 10 shots, first.
•
•
•
•
There are 20 games in a match. Each game lasts for 5 seconds.
Each player must score on their own hoop - HOME or VISITOR.
The player that scores first on their own hoop during each 5 second game receives 2 points.
Only one score is counted for each 5 second game.
The winner is the player with the most points at the end of the 20 game match.
•
•
•
•
•
G6.TWO PLAYER, MATCH PLAY
There are 12 games in a match. Each game lasts for 5 seconds.
Each player must score on their own hoop - HOME or VISITOR.
In games 1-3 and 7-9, the player that scores first on their own hoop receives 2 points. Only one score
is counted per game.
In games 4-6 and 10-12, the player that scores first on their own hoop receives 3 points. Only one score
is counted per game.
The winner is the player with the most points at the end of the 12 game match.
•
•
•
•
•
G7.TWO PLAYER, PRO-MATCH PLAY
Time limit is 99 seconds.
Maximum score is 10 points.
Each player scores 2 points on either the Home or Visitor hoops.
Player 1 plays until either 10 points have been scored or 99 seconds have elapsed, then Player 2 starts their game.
The player to have scored 10 points in the quickest time is the winner.
The Electronic System goes into sleep mode after 3 minutes of inactivity.
•
•
•
•
•
G8.TWO PLAYER, ANY HOOP, 10 SCORES IN 99 SECONDS.
English
GAME OPTIONS
BBG019_087P www.mdsports.com17(Continued on the next page.)

Changes or modifications not expressly approved by the party responsible for compliance could void the user’s authority
to operate the equipment.
WARNING
This equipment has been tested and found to comply with the limits for a Class B digital device, pursuant to Part 15 of
the FCC Rules. These limits are designed to provide reasonable protection against harmful interference in a residential
installation. This equipment generates, uses and can radiate radio frequency energy and, if not installed and used in
accordance with the instructions, may cause harmful interference to radio communications. However, there is no
guarantee that interference will not occur in a particular installation. If this equipment does cause harmful interference
to radio or television reception, which can be determined by turning the equipment off and on, the user is encouraged
to try to correct the interference by one or more of the following measures:
This device complies with the part 15 of the FCC rules. Operation is subject to the following two conditions:
(1) This device may not cause harmful interference, and (2) This device must accept any interference received, including
interference that may cause undesired operation.
NOTE
Reorient or relocate the receiving antenna.
Increase the separation between the equipment and receiver.
Connect the equipment into an outlet on a circuit different from that to which the receiver is connected.
Consult the dealer or an experienced radio/TV technician for help.
•
•
•
•
BBG019_087P www.mdsports.com18(The last page)
DISCLAIMER
English

www.vminnovations.com
Table of contents
Other Lancaster Game manuals
Popular Game manuals by other brands

Fundex Games
Fundex Games War User instructions

Spartan
Spartan TURBO CHARGER 4.0 instruction manual

Tiger Electronics
Tiger Electronics 9-051-9 instruction manual

Playskool
Playskool Pick Up 'n Play Golf Set instruction manual

Halex
Halex Titan BTX owner's manual

Radica Games
Radica Games 75015 instruction manual

Hasbro
Hasbro Poppin' Bedbugs Pinball 06102 instruction manual

Foxpro
Foxpro Dead Bone Operator's manual

Hasbro
Hasbro Alarm Clock Game instruction manual

Bandito SPORT
Bandito SPORT SPEEDFIGHTER 5278.01 Assembly instructions

Crivit
Crivit 275755 Playing and user instructions

Radica Games
Radica Games fliptop Solitaire I7004 instruction manual