Lantheus Medical Imaging VIALMIX User manual

®
VI A L M I X
AC T I VAT I O N D E V I C E F O R D E F I N I T Y®
V I A L F O R (P E R F L U T R E N L I P I D M I C RO S P H E R E )
I N J E C TA B L E S U S P E N S I O N
U S E R ’SG U I D E
■■■■■■■■■■■■■■
5 1 5 3 7 0 - 0 8 1 0
Lantheus_VIALMIX_Final_manual_v2_20Aug10 8/20/10 2:45 PM Page 1

Technical Service Reference:
If you need technical assistance or have questions aboutVialmix®,
call Lantheus Medical Imaging Technical Services at
1-800-362-2668.
Customer Service Reference:
For customer orders, please call Lantheus Medical Imaging Customer
Services at 1-800-299-3431.
Caution: The only intended use ofVialmix®is for the activation of
Definity® Vial for (Perflutren Lipid Microsphere) Injectable Suspension.
CAUTION: US Federal law restricts this device to sale by or on the order
of a licensed medical practitioner.
Distributed in USA by:
Lantheus Medical Imaging
331 Treble Cove Road
North Billerica, Massachusetts 01862 USA
Distributed in Canada by:
Lantheus MI Canada, Inc
Montréal, Canada
Distributed in México by:
Ralca S. A. de C.V.
Edo. de México
Distributed in Korea by:
Boo Kyung S.M. Co., Ltd.
Seoul, Korea
Distributed in Singapore by:
QT Instruments Pte. Ltd.
Distributed in Australia by:
Lantheus Medical Imaging Australia Pty. Ltd.
Lantheus_VIALMIX_Final_manual_v2_20Aug10 8/20/10 2:45 PM Page 2

■■■■■■■■■■■■■■■■
1 Q U I C K -S TA R TI N S T R U C T I O N S 1.1
2 I N T R O D U C T I O N
Safety Precautions 2.1
System Features Overview 2.2
Set-up 2.3
3 O P E R AT I O N
Powering On/Off 3.1
Loading theVial 3.2
Activating theVial 3.3
Removing theVial 3.4
4 S A F E T Y F E AT U R E S
Cover Shut-off Switch 4.1
CANCEL Button 4.2
Thermal Sensor Shut-off Switch 4.3
5 L E D A L E R TM E S S A G E S 5.1
6 T R O U B L E S H O O T I N G 6.1
7 C L E A N I N G 7.1
8 M A I N T E N A N C E 8.1
9 S P E C I F I C AT I O N S 9.1
T E C H N I C A L S E R V I C E 10.1
C O N T E N T S
1 0
5 1 5 3 7 0 - 0 8 1 0
Lantheus_VIALMIX_Final_manual_v2_20Aug10 8/20/10 2:45 PM Page 3

S E T-U P
■Re m ove packaging, including red transport collar from base of vial carri e r.
■PlaceVialmix®on a flat surface and verify voltage compatibility.
■Connect Vialmix®to the main power source using enclosed power
cord. Non-grounded plug adaptors should never be used.
■Power on Vialmix®by moving switch to “1.”
■LED display briefly shows “88,” then “45.”
O P E R AT I O N
I N S E RT I N G V I A L A N D A C T I V AT I N G D E F I N I T Y ®V I A L F O R
(P E R F LU T R E N L I P I D M I C R O S P H E R E ) I N J E C T A B L E S U S P E N S I O N :
1Press lever downward and to the left to open the carrier.
2Hold Definity®vial between thumb and fingers and load vial
by first placing the top of the vial in the left cup of carrier;
position vial between the two cups.
3Release the lever; then close the Vialmix®cover.
4Press START and countdown from “45” to “00” will begin.
R E M O V I N G V I A L :
1When the full 45-second cycle is complete, openVialmix®cover.
2Press lever downward and to the left to open the carrier.
3Remove vial.
4Close the cover.
P O W E R I N G O F F V I A L M I X®
Vialmix®should be powered off at the end of the day by moving the switch
on the back of the unit to “0.”
■■■■■■■■■■■■■■■■
NOTE:
Vialmix
®
will
not operate with
cover open.
Do not open
cover while Vialmix
®
is operating.
Wait 7 minutes
between
activations.
If the cycleis
interrupted for any
reason, the Defin i t y
®
vial is unusable.
Retain vial
and contact
Lantheus Medical
Imaging Technical
Services.
(See pg. 10.1)
Keep cover closed
when not in use.
Q U I C K S TA RT
I N S T R U C T I O N S
1.1
5 1 5 3 7 0 - 0 8 1 0
Lantheus_VIALMIX_Final_manual_v2_20Aug10 8/20/10 2:45 PM Page 4

■■■■■■■■■■■■■■■■
IMPORTANT:
Read this section
carefully before
plugging in and
operating the unit.
The unit must be
used in strict
accordance with
these instructions.
We have no liability
for any damage
arising from any
other use of
this unit.
S A F E T Y P R E C A U T I O N S
■Before the unit is put into operation,make sure that the operating
voltage indicated on the type plate is the same as the supply voltage
available. Incorrect voltage may damage the unit.
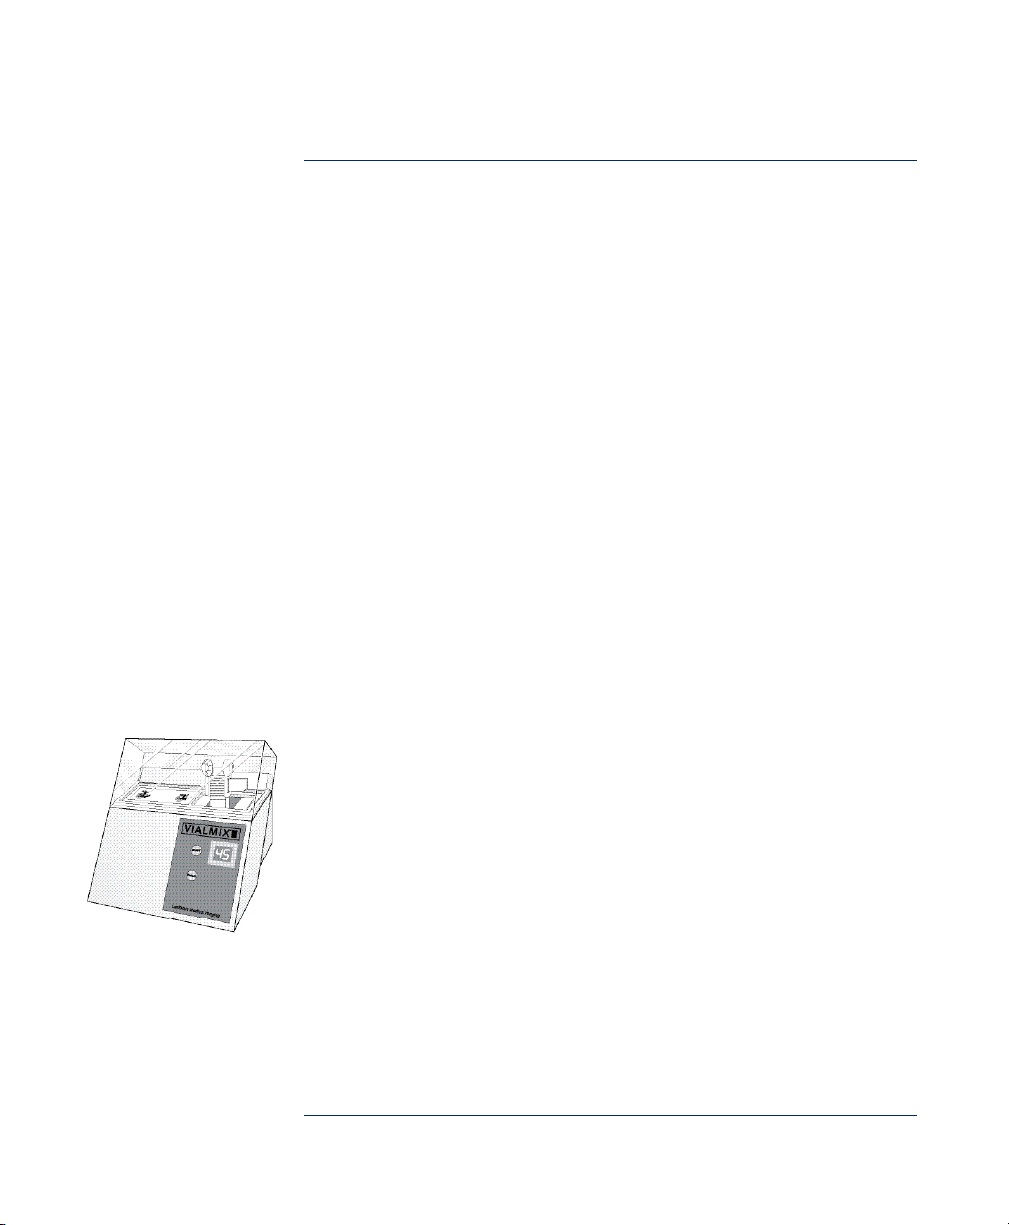
■This unit must only be operated with the lid closed and intact.
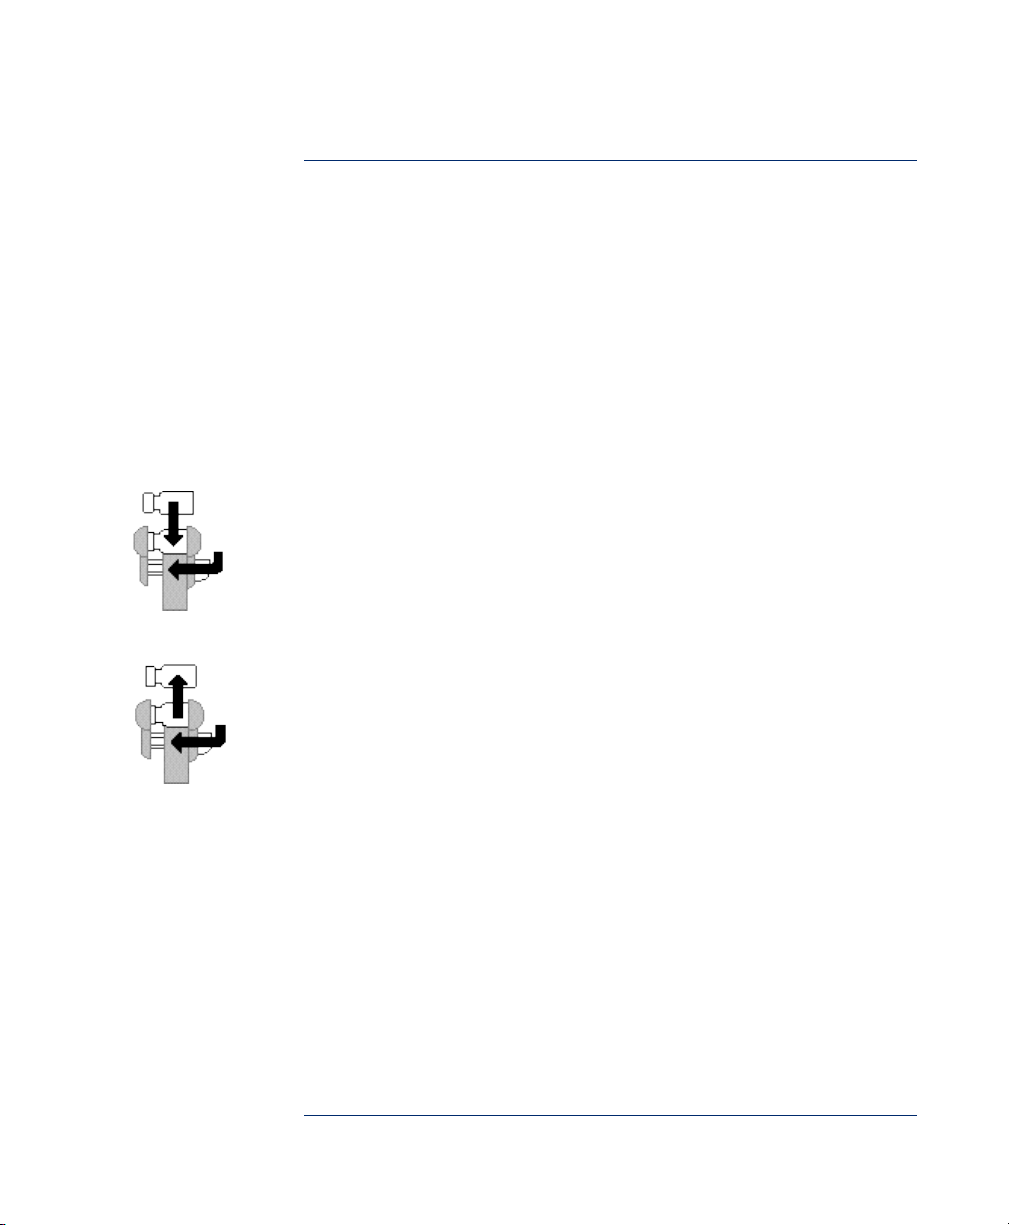
■During operation, the Definity®vial must be the only object placed
under the cover.
■The unit must be placed on a level surface.
■A dangerous condition can result from condensation build-up. Before
using the unit, allow the unit to reach room temperature, particularly
when moving it from a colder to a warmer environment.
■To safely operate the unit, insert the main plug only into an appropriate
outlet with a grounded conductor. If an extension cord is used, make
sure that the grounded conductor is not broken.
■Turn off and unplug the unit from the power outlet befo re changing fuses.
■Use only correct fuses.Do not use rep aired fuses or bypass the fuse holder.
■In order to avoid electrical shock,DO NOT INSERT ANY OBJECTS INTOTHE UNIT.
■If , for any re a s o n , it is possible that the safety of a unit has been
co mp rom i s e d, that unit must be re m oved from operation and identified
in such a way that it is not inadver te nt ly operated again by a third
p a rt y. For example, do not use unit if it does not work as specified or
is visibly damaged.
■Keep solve n t s, inflammable liquids and powerful heat sources aw ay from unit.
■Do not allow cleansers to get into unit during cleaning; an electrical
s h o rt or a dangerous malfunction may occur. Do not immerse unit in
any liquid.
■Except for fuse repl a ce m en t , all repairs should only be done by
Lantheus Medical Imaging approved personnel. Do not open unit housing.
I N T R O D U C T I O N
2.1
5 1 5 3 7 0 - 0 8 1 0
Lantheus_VIALMIX_Final_manual_v2_20Aug10 8/20/10 2:45 PM Page 5

S Y S T E M F E AT U R E S O V E RV I E W
Vialmix® is the activation device designed specifically for Definity®Vial
for (Perflutren Lipid Microsphere) Injectable Suspension, an intravenous
ultrasound contrast agent. Definity®is supplied as a liquid-filled glass
vial and requires shaking in order to create the lipid-encapsulated
microbubbles.The shaking rate and duration are controlled byVialmix®
to ensure reproducible activation of Definity®.
F E AT U R E S O F V I A L M I X ®I N C L U D E:
■Proper Activation of Definity®
A number of LED messages inform the user of successful activation. In
the event that the activation cycle is stopped short of the 45 seconds of
required shaking time, or the shaking rate deviates from the acceptable
range, the user is alerted via LED messages and an audible alarm.
■Simple Operation
Vialmix®has only two operational buttons, one for starting the cycle,
and another for canceling the cycle, if necessary.Vialmix®allows for
easy loading of the Definity®vial into the vial carrier. Vialmix®has a
fixed shaking rate and cycle time. Only one possible activation cycle is
available.The cycle duration (45 seconds) is displayed as the default
value after turning the power on.
■Safe Operation
Vialmix®contains features that ensure safe operation.These include:
■An automatic shut-off switch which is activated if the cover is
opened during operation.
■A CANCEL button to allow the user to terminate shaking and a
thermal sensor shut-off to prevent the motor from overheating.
■■■■■■■■■■■■■■■■
I N T R O D U C T I O N
2.2
IMPORTANT:
Shaking the
Definity
®
vial by
hand will not
activate the agent
adequately. Using
Vialmix
®
to shake
Definity
®
will ensure
proper activation
of the agent and
consistent product
performance.
Cycle Duration:
45 seconds
5 1 5 3 7 0 - 0 8 1 0
Lantheus_VIALMIX_Final_manual_v2_20Aug10 8/20/10 2:45 PM Page 6

■■■■■■■■■■■■■■■■
I N T R O D U C T I O N
2.3
IMPORTANT:
Vialmix
®
must be at
room temperature
before use.
S E T-U P
Vialmix®is packaged with a power cord and this User’s Guide. Upon
receipt ofVialmix®, and prior to use with Definity®, the user must
perform the following steps.
1Remove Vialmix®from the package, and remove the styrofoam inserts.
2Remove the red transport collar from the base of the vial carrier.
3Before pluggingVialmix®into an electrical outlet, verify that the voltage
on the type plate on the back ofVialmix®corresponds to the local
power line voltage.
4PlaceVialmix®on a flat surface.
5ConnectVialmix®to the main power source using the enclosed
power cord.
5 1 5 3 7 0 - 0 8 1 0
Lantheus_VIALMIX_Final_manual_v2_20Aug10 8/20/10 2:45 PM Page 7

■■■■■■■■■■■■■■■■
P O W E R I N G O N V I A L M I X®
With V i a l m i x ®prop er l y connected to the main powe r, the unit can be
po we red on by moving the switch on the back of the unit to the “1”
po si t io n.
During power-on, the LED will display “88” briefly.This will change to “45,”
representing the cycle time in seconds.The display will remain at “45” until
an activation cycle is initiated.
P O W E R I N G O F F V I A L M I X®
Vialmix®should be powered off at the end of the day.This is done by
moving the switch on the back of the unit to the “0” position.
O P E R AT I O N
3.1
5 1 5 3 7 0 - 0 8 1 0
Lantheus_VIALMIX_Final_manual_v2_20Aug10 8/20/10 2:45 PM Page 8

■■■■■■■■■■■■■■■■
IMPORTANT: To
ensure cleanliness
of the Definity
®
vial septa, load the
vial with the flip-top
seal in place.
IMPORTANT: Do
not operate Vialmix
®
without a vial in
the carrier.
L O A D I N G T H E V I A L
With the cover open, the vial carrier is easily accessed for vial loading.
Complete the following steps to load the Definity®vial:*
1The vial carrier is spring loaded and opens to accommodate the
Definity®vial by means of the release lever. Press the lever downward
to unlatch the vial carrier; then press the lever to the left to open the
carrier for vial loading.
2Holding the Definity®vial between your thumb and fingers, load the vial
by placing the top of the vial in the left cup of the carrier.The cups of
the vial carrier are molded to best accommodate the vial when the top
of the vial is placed in the left cup. Either position (i.e., the top of the
vial in either cup) is possible and will allow for acceptable activation
of Definity®.
3Release the lever and the spring action of the carrier will hold the vial
securely. Make sure that the vial is evenly supported by both cups of
the carrier.
4Close theVialmix®cover.
*NOTE: Refer to the illustration on theVialmix®unit, to the left of
the vial carrier for the loading procedure.
O P E R AT I O N
3.2
5 1 5 3 7 0 - 0 8 1 0
Lantheus_VIALMIX_Final_manual_v2_20Aug10 8/20/10 2:45 PM Page 9

■■■■■■■■■■■■■■■■■ ■■■■■■■■■■■■■■■
IMPORTANT:
Vialmix
®
will not
start the activation
cycle with the cover
in the open position.
IMPORTANT: Unless
there is a safety
concern, do not
open the Vialmix
®
cover during the
shaking cycle.
Doing so will
render the Definity
®
vial unusable
since acceptable
activation is
achieved only with
an uninterrupted
shaking cycle.
A C T I VAT I N G T H E V I A L
With V i a l m i x ®powe red on, the vial in place, and the cover closed, the user
is ready to activate Definity®.The cycle time of 45 seconds appears on the
Vi al m ix®LED display. If it does not appe ar, see Section 6,“ Tro u b le s h o ot in g .”
Press the START button to begin the activation cycle.
Definity®is ready for use if:
■Vialmix®shakes the vial for the full 45 second activation cycle.
■Vialmix®stops shaking when the LED display shows “00” seconds
remaining.
If the vial is not shaken for the full duration or at the acceptable rate,
activation is not considered successful; an LED message will be displayed
and an audible alarm will sound to alert the user. Refer to Section 5 for
a list of LED messages and the conditions they indicate.
NOTE: After completion of an activation cycle, allow a minimum of 7
minutes before beginning another cycle.This allows the Vialmix®motor
to cool.
O P E R AT I O N
3.3
5 1 5 3 7 0 - 0 8 1 0
Lantheus_VIALMIX_Final_manual_v2_20Aug10 8/20/10 2:45 PM Page 10

■■■■■■■■■■■■■■■■
IMPORTANT: For
safety and mainte-
nance reasons, the
cover should be
closed when
Vialmix
®
is not in
use.
R E M O V I N G T H E V I A L
After successful activation of the Definity®vial (as indicated by the LED
display of “00”), the vial can be removed for use.To remove the vial, open
the cover and follow these steps:*
1Press the lever down to unlatch the vial carrier, then press the lever
to the left to fully open the carrier.
2Remove the vial from the carrier.
3Release the lever and the spring action will close the carrier.
4Close the cover.
NOTE: The LED display changes from ”00” to “45” when the cover
is opened.
*NOTE: Refer to the illustration to the left of the vial carrier for the
removal procedure.
O P E R AT I O N
3.4
5 1 5 3 7 0 - 0 8 1 0
Lantheus_VIALMIX_Final_manual_v2_20Aug10 8/20/10 2:45 PM Page 11

■■■■■■■■■■■■■■■■■■■■■■■■■■■■■■■■
C O V E R S H U T-O F F S W I T C H
Vialmix®is equipped with an automatic shut-off switch that prevents the
user from coming into contact with the rapidly moving shaking arm.The
shut-off switch is triggered in the following situations:
■When the cover is open, the shut-off switch will prevent the activation
cycle from beginning. Should the START button be pressed while the
cover is open, the motor will not start; consequently, the activation
cycle will not begin.
■If the cover is lifted during operation, the shut-off switch will cause the
activation cycle to stop.
The following table shows the LED message for each of the above
situations, the associatedVialmix®response, likely cause of the message,
and the action required of the user:
S A F E T Y F E AT U R E S
4.1
LED
Message
Associated
Vialmix®
Response
Likely Cause
of Message
Action
Required by
User
“CO” for 5
seconds
Emits a brief
audible alarm Cycle initiation
attempted while
cover is open
Opening the
cover during
the activation
cycle
Power off the unit.
Do not use the
Definity ®vial
since it was
not acceptably
act i vat e d. Re tain
the vial and call
Technical Serv i c e s.
(See pg. 1 0 . 1 )
Close the cover
and re-start the
cycle.
Stops shaking,
emits an
audible alarm
“EE” alterna-
ting with “CO”
5 1 5 3 7 0 - 0 8 1 0
Lantheus_VIALMIX_Final_manual_v2_20Aug10 8/20/10 2:45 PM Page 12

■■■■■■■■■■■■■■■■
C A N C E L B U T T O N
Vialmix®is equipped with a button that allows the user to terminate the
activation cycle. By pressing the CANCEL button after the shaking cycle
is initiated, the motor shuts down and the shaking cycle stops.
The CANCEL button is available in the unlikely event that the activation
cycle must be stopped for safety reasons (for example, should the vial
become dislodged or a mechanical failure ofVialmix®occur).
The following table shows the LED message when the CANCEL button is
pressed, the associated Vialmix®response, the likely cause of the message
and the action required of the user:
S A F E T Y F E AT U R E S
4.2
LED
Message
Associated
Vialmix®
Response
Likely Cause
of Message
Action
Required by
User
CANCEL
button was
pressed during
operation.
Power off the
unit . Do not
use the Definity®
vial since it was
not acceptably
acti v a t e d. Reta i n
the vial and
callTec h n i c al
S e rv i c e s .
(See pg. 1 0 . 1 )
Stops shaking,
emits an audible
alarm
“EE” alternating
with “CL”
IMPORTANT:
Pressing the
CANCEL button
will terminate the
activation cycle
and render Definity
®
unacceptable for
use. Retain the
vial and call
Technical Services
for assistance.
(See pg 10.1)
5 1 5 3 7 0 - 0 8 1 0
Lantheus_VIALMIX_Final_manual_v2_20Aug10 8/20/10 2:45 PM Page 13

■■■■■■■■■■■■■■■■■■■■■■■■■■■■■■■■
T H E R M A L S E N S O R S H U T-O F F S W I T C H
Vialmix®is equipped with a sensor that monitors the motor temperature.
In the unlikely event that the motor overheats, the sensor triggers the
motor to shut down.The LED message (“EE” alternating with “LO”) and
an audible alarm alert the user that the motor has overheated.
Under this condition,Vialmix®will not allow a cycle to begin until the
motor has cooled. Should the START button be pressed prior to
sufficient cooling, the user is alerted by the LED message,“CO,” and
an audible alarm.
S A F E T Y F E AT U R E S
4.3
5 1 5 3 7 0 - 0 8 1 0
Lantheus_VIALMIX_Final_manual_v2_20Aug10 8/20/10 2:45 PM Page 14

■■■■■■■■■■■■■■■■
See table on
following page.
In order to ensure acceptable activation of Definity®,Vialmix®is
programmed to display LED messages that alert the user in the event
that the shaking cycle is outside the required duration or rate.
The table on the following page shows the LED message, the associated
Vialmix®response, the likely cause(s) of the message, and the action
required of the user.
L E D A L E RT
M E S S A G E S
5.1
5 1 5 3 7 0 - 0 8 1 0
Lantheus_VIALMIX_Final_manual_v2_20Aug10 8/20/10 2:45 PM Page 15

■■■■■■■■■■■■■■■■■■■■■■■■■■■■■■■■
5.2
L E D A L E RT
M E S S A G E S
LED
Message
Associated
Vialmix®
Response
Likely Cause
of Message
Action
Required by
User
Mechanical
failure of Vialmix®
affecting the
shaking rate
Low line voltage
The motor has
overheated.
Power off the
unit . Do not use
the Definity®
vial , since it was
not acceptably
acti v a t e d. Reta i n
the vial and call
Technical Serv ices
for assistance.
(See pg 10.1)
Stops shaking,
emits an
audible alarm
“EE” alter-
nating with
“LO.”
The shaking rate
is unacceptable
since it is below
the lower limit.
Mechanical
problem with
Vialmix®
Power off the unit.
Do not use the
Definity®vi al,
since it was
not acceptably
act i vat e d. Re t ain
the vial and call
Technical Serv i c e s
for assistance.
(See pg 10.1)
Stops shaking,
emits an
audible alarm
“EE” alter-
nating with
“HI.”
The shaking rate
is unacceptable
since it is above
the upper limit.
“LO”
alternating
with seconds
remaining
in cycle.
Shaking is
acceptable.
Continues
shaking and
counting down
to “00”
Low line voltage
The shaking rate
is approaching
the lower limit.
Definity®vial is
ready for use,
since activation
is acceptable.
ContactTe c h nical
Ser vices for
assi st an ce .
(See pg 10.1)
■
■
■
■
■
5 1 5 3 7 0 - 0 8 1 0
Lantheus_VIALMIX_Final_manual_v2_20Aug10 8/20/10 2:45 PM Page 16

■■■■■■■■■■■■■■■■
IMPORTANT:
Do not attempt to
repair Vialmix
®
. All
repairs to Vialmix
®
must be performed
by Lantheus Medical
Imaging approved
technical personnel.
Contact Technical
Services if there
are any problems
with the unit.
(See pg 10.1) Do
not open the
Vialmix
®
housing.
To avoid electrical
shock, do not insert
any objects into
the main body of
Vialmix
®
. .
In the event thatVialmix®does not respond as expected, the guide on
the following page is given to aid the user in troubleshooting the problem.
If the guide does not cover a particular problem,please call Technical
Services for assistance. (See pg 10.1)
Do not use the unit if it does not work as specified or is visibly damaged.
Contact Technical Services for aVialmix®replacement. (See pg 10.1)
T R O U B L E S H O O T I N G
6.1
5 1 5 3 7 0 - 0 8 1 0
Lantheus_VIALMIX_Final_manual_v2_20Aug10 8/20/10 2:45 PM Page 17

■■■■■■■■■■■■■■■■■■■■■■■■■■■■■■■■
IMPORTANT:
If you need
assistance, or have
technical questions
about Vialmix
®
, call
Technical Services.
(See pg 10.1)
T R O U B L E S H O O T I N G
6.2
LED
Message Likely Cause Corrective Action Required
Close the cover.
Allow the motor to cool down .
Cover is open.
Motor is
overheated.
Motor does not
operate after
START button
is pressed.
Do not attempt to use Definity®
vial since it was not acceptably
acti v a t e d. Retain the vial and call
Technical Serv i c e s . (See pg 10.1)
Do not open the cover during
acti v a t i on.
Do not use the Definity®vial since
it was not prop e r ly activated.
Retain the vial and callTec h n ical
S e rv i c e s . (See pg 10.1)
Do not use the Definity®vial since
it was not prop e rly activated.Reta i n
vial and callTechnical Services for
a s s i s t a n c e.(See pg 10.1) See page
8.1 for instructions to change fuse.
A l l owmotor to cool down. Do
not use the Definity®vial since it
was not pro p e r lyactivated. R e tain
vial and callTechnical Services for
a s s i s t a n c e.(See pg 10.1)
Cover has been
opened.
Vialmix®stops
shaking during a
cycle.
LED display does
not operate
when power
switch is on.
No main power Check power supply and power
cord connection.
Fuse is blown.
Unit deviated
from acceptable
shaking rate.
Fuse is blown.
Motor is
overheated.
Contact Technical Services for
a s s i s t a n c e,or refer to page 8.1 fo r
instructions to change the fuse.
5 1 5 3 7 0 - 0 8 1 0
Lantheus_VIALMIX_Final_manual_v2_20Aug10 8/20/10 2:45 PM Page 18

■■■■■■■■■■■■■■■■
IMPORTANT:
Do not allow
cleansers to get
into Vialmix
®
during cleaning;
an electrical short
or a dangerous
malfunction may
occur. Do not
immerse Vialmix
®
in any liquid.
All plastic parts ofVialmix®should be cleaned with a soft cloth and, if
necessary, with a mild cleanser. Under no circumstances should any
solvents or abrasive detergents be used since these can damage the plastic.
The use of isopropanol to clean Vialmix®is not recommended since over
time it may cause the plastic housing to become brittle.
C L E A N I N G
7.1
5 1 5 3 7 0 - 0 8 1 0
Lantheus_VIALMIX_Final_manual_v2_20Aug10 8/20/10 2:45 PM Page 19

All bearings inVialmix®are maintenance-free.Therefore, maintenance
of any internal components of the unit is not required.
C H A N G I N G T H E F U S E
■Use only the correctly-rated fuse to replace the blown fuse. Refer
to the type plate for correct replacement fuse (as listed on back of
Vialmix®or equivalent).
■Do not use repaired fuses or bypass the fuse holder.
■To avoid electrical shock, do not insert objects into the main body
of the unit.
If the fuse blows, take these steps to change the fuse:
1Turn the power off. Disconnect the power cord.
2The fuse is located on the back of the unit next to the power switch.
Place a screwdriver behind the small flap of the fuse box and gently
pry it open.
3Slide the fuse box out of the unit.
4Lift the ratchet upward and pull the fuse clamp out of the fuse box.
Remove the fuse and replace it with a new one.
5Press the fuse clamp back into the fuse box until you hear the ratchet
snap into place. Put the fuse box back into the unit.
IMPORTANT: The fuse is the only part of Vialmix®which may be replaced
by the user. All other repairs must be performed by Lantheus Medical
Imaging approved technical personnel. ContactTechnical Services
if there are any problems withVialmix™®. (See pg 10.1)
■■■■■■■■■■■■■■■■■■■■■■■■■■■■■■■■
SAFETY
PRECAUTIONS:
Prior to changing
the fuse, power
off Vialmix
®
and
disconnect the
power cord from the
back of the unit.
M A I N T E N A N C E
8.1
5 1 5 3 7 0 - 0 8 1 0
®
Lantheus_VIALMIX_Final_manual_v2_20Aug10 8/20/10 2:45 PM Page 20
Table of contents
Languages:
Other Lantheus Medical Imaging Medical Equipment manuals