LAOWA D-Dreamer F2.0 User manual

ֵ⭞ᢁ߂
Instruction Manual
服务热线:400-066-1316
Email: [email protected]
电话Tel:(+86)0551-69107990
地址:合肥市庐阳区天水路与太和路交口庐阳中科大校友创新园5号楼
Add:Building 5, USTC Alumni Innovation Park, Crossing of Tianshui
and Taihe Road, Luyang District, Hefei City, Anhui Province, China
www.laowalens.com
ᆿᗳ䮵ᓐݿᆜ〇ᢶᴿ䲆ޢ
微信公众账号 FACEBOOK
LAOWA FFII 15mm F2.0
D-Dreamer

真诚地感谢您选购LAOWA老蛙FFⅡ 15mm
F2.0 D-Dreamer无反全画幅相机镜头。为
了让您充分理解本产品的使用方法和注意
事项,请您在使用前仔细阅读本说明书。
前言
ѰҼᬃ֒рⲺᆿޞθֵ⭞ᵢӝࢃ䈭ࣗᗻ䈜㓼䰻䈱ֵ⭞ᢁ߂ф⌞ᝅӁ亯θᒬሼᢁ߂
᭴൞䴶㾷ᰬᇯ᱉ᗍⲺ൦ᯯȾྸ䙽ࡦу㜳䀙ߩⲺ䰤从䈭䙐䗽⭫䈓㧭ᢶᵥ᭥ᤷȾ

注意事项主要特色
切勿自行拆解、修改或改装。当产品由于外力原因破损,切勿触碰外露部
分或破损边缘处。
切勿放置于直射阳光下、封闭车辆中或其余高温处,否则过高的温度会使
镜片和其他部件产生伸缩变形。
不使用镜头时,请将镜头前盖盖上或置于没有阳光照射处。凸透镜反射出
的光线可能会聚集在附近物体上,导致发生火灾。
在逆光拍摄时,切勿将太阳置于画面中心,应该使太阳充分偏离画角,否
则阳光会在相机内部聚集并导致火灾或灼伤眼睛。
在使用相机内置闪光灯拍摄时,由于镜头本身会遮挡光线而产生渐晕,因
此建议您使用外设闪光灯拍摄。
安全注意事项
LAOWA老蛙 FFⅡ15mm F2.0 D-Dreamer镜头针对无反全画幅相机设计,可
以拍摄全画幅110°超广角视野。
镜头采用了2枚双面非球面玻璃,具备了高性能、近似零畸变、小巧轻便的
特色和优势。
镜头的机械结构全部采用金属部件,确保了镜头的组装精度和耐用性。
镜头体积小巧,仅约500g的重量,节省了背包空间,减轻了使用者的负担。
镜头每块镜片均采用低反射多层镀膜,尽可能的消除了鬼影和眩光,且前端
镜片采用蛙眼仿生镀膜FEC(Frog Eye Coating),使水滴、赃物不易附着。
为解决超广角大光圈带来的色散问题,此镜头采用了3枚超低色散镜片(ED
Glass),有效的降低了色散像差。

长期使用保养注意事项
注意事项
避免触摸镜头表面,应用专用镜头布或气吹去除镜头表面的尘埃,不
使用镜头时,应将镜头盖盖上。
使用镜头纸或镜头布清洁时,以螺旋的方式从中间向外擦拭镜头上的污
垢以及指印。
镜头从寒冷的环境突然转移至温暖的环境时,镜头的外部以及内部镜
片将会凝结水雾,所以在转移时应采取防潮保护措施。
各部件名称
①遮光罩
③滤光镜安装螺纹 ④对焦环
⑤距离刻度 ⑥景深指示刻度 ⑦光圈环 ⑧光圈刻度
⑨镜头安装标记 ⑩光圈有级和无级切换开关
②遮光罩安装标记

使用说明使用说明
镜头安装
镜头拆卸
取下镜头后盖。将镜头卡口上的安装标记⑨对准相机座圈上的对应标
记,随后将镜头插入机身座圈,根据所购买卡口的安装方向旋转镜头,直
至咔嚓声锁紧镜头。安装时请不要用力过猛,以免导致卡口损伤。
将遮光罩上的安装标记②对准镜头上的遮光罩安装点,然后顺时针旋转
遮光罩,直至锁紧末端为止。
如要拆卸遮光罩,按相反方向旋出即可。(示意图)
安装遮光罩可减少强光并保护镜头前部元件。
安装某些滤光镜后,您可能无法再使用遮光罩。
若不使用遮光罩时,可将遮光罩反向安装于镜头上。
利用闪光灯拍摄时。遮光罩可能遮挡住光线而造成影像上的渐晕现象。所
以在使用相机闪光灯或使用高度不够的外置闪光灯时,请拆卸遮光罩后
再进行拍摄。
关机后按住相机上的镜头释放按钮,依照所购买卡口的安装方向反向
旋转镜头,随后将镜头从座圈中拔出。
装上镜头后,请尝试旋转镜头确认是否已将其固定在相机上。
由于此为非CPU镜头,无法提供数据信息,所以请在相机内开启“无镜
头释放快门”功能。
遮光罩装卸

使用说明
对焦
此款镜头是全手动对焦镜头,合焦时,缓慢旋转对焦环④,直至合焦。
不要过猛过快地旋转对焦环,避免用力过度损坏对焦环部件。
镜头上的距离刻度⑤与景深刻度⑥是出于指导目的。实际焦点与景深
可能同刻度标记稍有不同。
如需要非常精确的对焦,请在固定好相机位置的情况下使用最大光圈
对焦,对焦完成后再旋至所需要的光圈值。
为了对焦的方便性,请开启相机内的峰值对焦功能(视所使用相机功能
而定)。
规格表
光圈在镜头上调节,根据拍摄环境和与所需要的景深,转动光圈环⑦来
选择对应的光圈。
可以调节转换开关⑩,切换转动光圈环时的有级或无级状态。
由于此镜头无CPU数据,所以暂时无法记录光圈参数。
由于光圈为手动调节,无法较好的使用快门优先模式,但可以使用光圈
优先模式(测光准确度视相机型号而定)。
光圈使用
LAOWA老蛙FFⅡ 15mm F2.0 D-Dreamer
画幅
焦点距离
光圈
视场角
镜头结构
光阑叶片
最近摄影距离(物像距离)
最大放大倍率
合焦驱动方式
滤镜直径
镜头尺寸(长/直径)
重量(不含罩子)
卡口
全画幅
15mm
2.0
110°
9组12片(含2枚非球面玻璃,3枚异常分散玻璃)
5片
15cm
0.25倍
手动(MF)
Φ72mm
约82mm×Φ77.2mm
约500克
索尼FE卡口、佳能RF卡口、尼康Z卡口

Thank you for choosing LAOWA FFⅡ 15mm
F2.0 D-Dreamer mirrorless full frame lens.
Tototally understand the use method and
precautions of this product.
Please read this manual carefully before using.
For operational safety, be sure to read the manual book and precautions
carefully before using this product, and keep the manual in a place
that is easily available when needed. If you encounter a problem that
cannot be solved, please contact with our technical support.
Introduction

Notes & CautionsProduct Features
Do not disassemble, modify and reassemble it by yourself. When the product
is damaged due to external force, do not touch the exposed part or the da-
mage edge.
Do not place it in direct sunlight, in a closed vehicle, or at other high temper-
ature environment, as excessive temperature can cause distortion of the
lens and other components.
When not using the lens, cover the lens front cover or place it in a place
where there is no sunlight. Light reflected from the convex lens may collect
on nearby objects and cause a fire.
When shooting in backlighting, do not place the sun in the center of the
screen. The sun should be sufficiently offset from the corners, otherwise
the sun will collect inside the camera and cause fire or burns to the eyes.
When shooting with the camera's built-in flash, it is recommended that
you use the peripheral flash to shoot because the lens itself obscures the
light and produces vegetating.
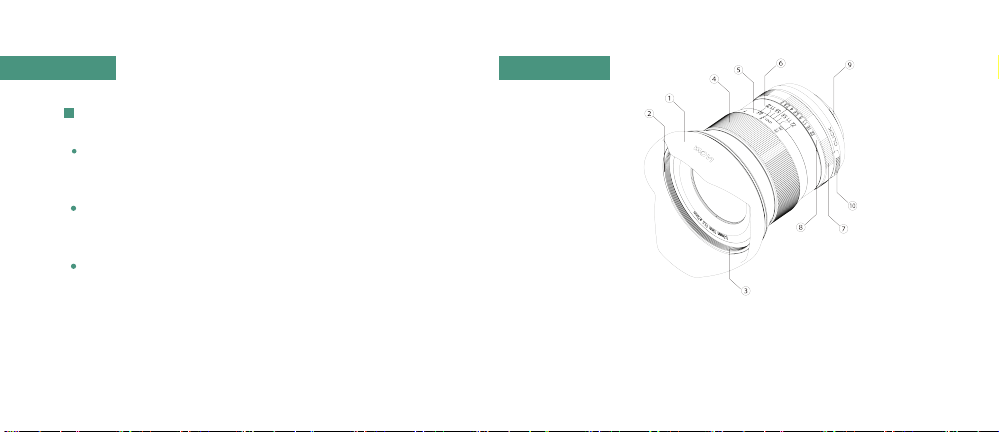
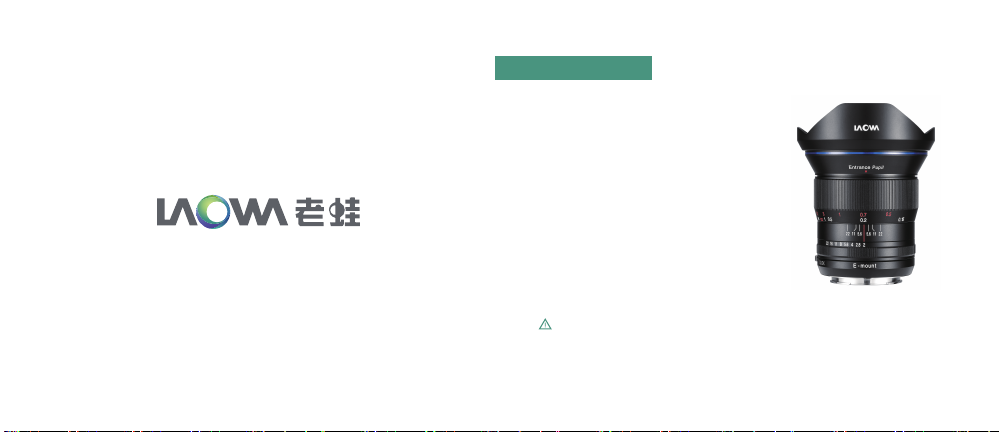
LAOWA FFⅡ 15mm F2.0 D-Dreamer lens is designed for mirrorless full
frame camera. It can shoot a full frame view of ultra-wide angle 110°.
The lens uses two double-sided aspherical glasses, featuring advantages
such as high performance, near zero distortion, compactness and
lightweight.
The mechanical structure of the lens is entirely made of metal parts,
ensuring the assembly precision and durability of the lens.
Small and compact, the lens is only about 500g in weight, thus it saves
the space of the backpack and reduces the burden on the user.
Each lens of the lens adopts low-reflection multi-layer coating to eliminate
ghosting and glare as much as possible, and the front lens adopts Frog
(Frog Eye Coating), which makes water droplets and dirt difficult to
adhere to.
In order to solve the dispersion problem caused by the ultra-wide-angle
large aperture, this lens uses three ultra-low dispersion lenses (ED
Glass), which effectively reduces the dispersion aberration.

Long-term Maintenance
Notes & Cautions
Avoid touching the lens surface, apply a special lens cloth or air-blow-
ing to remove the dust on the lens surface. When not using the lens,
cover the lens cover.
When cleaning with lens paper or lens cloth, wipe the dirt and fingerprints
on the lens from the center spirally.
When the lens suddenly shifts from a cold environment to a warm environm-
ent, there will be water mist condensed on the outside of the lens and
the internal lens, so moisture-proof actions should be taken when
transferring.
④Focusing ring⑤Distance scale ⑥Depth of field indicator scale ⑦Aperture ring
⑧Aperture scale⑨Lens installation mark
⑩Aperture switch: switching between click-less and clicked aperture
Parts and Components
①Lens hood ②Lens hood installation mark ③Filter installation thread

Installation Instructions Installation Instructions
Lens installation Lens hood installation and removal
Remove the lens back cover. Align the installation mark⑨ on the lens
mount with the corresponding mark on the camera seat, then insert
the lens into the camera seat, and rotate the lens according to the
mounting direction of the purchased mount until the lens is locked
with a click. Do not use excessive force during installation to avoid
damage to the mount.
Align the installation mark ② on the hood with the hood installation
point on the lens, then turn the hood clockwise until it locks the end.
To remove the hood, unscrew it in the opposite direction. (Schematic diagram)
Installing a hood reduces glare and protects the front components of the
lens.
After installing some filters, you may no longer be able to use the hood.
If the hood is not used, the hood can be attached to the lens in reverse.
When shooting with the flash, the hood may block light and cause
vegetating on the image. Therefore, when using the camera flash or
using an external flash with insufficient height, remove the hood before
shooting.
Lens removal
After turning off the camera, press and hold the lens release button on
the camera, rotate the lens in the opposite direction according to the
mounting direction of the purchased mount, and then pull the lens out
of the seat.
After installing the lens, try rotating the lens to see if it is fixed on the
camera.
Since this is a non-CPU lens, data information cannot be provided, so
turn on the “Lens-free release shutter” function in the camera.

Installation Instructions
Focus
This lens is a full manual focus lens. When focusing, slowly rotate the
focus ring ④ until it is in focus.
Do not over-boom the focus ring too quickly to avoid excessive damage
to the focus ring.
The distance scale ⑤ and the depth of field ⑥ on the lens are for
instructional purposes. The actual focus and depth of field may be
slightly different from the tick mark.
For very precise focus, when the camera position is fixed, use the
maximum aperture to focus, and then rotate to the desired aperture
value after the focus is complete.
For the convenience of focusing, turn on the peak focus function in the
camera (depending on the camera you use).
Aperture
The aperture is adjusted on the lens, and the aperture ring ⑦ is
rotated to select the corresponding aperture according to the
shooting environment and the required depth of field.
The switch ⑩ can be adjusted to switch between a clicked or click
less state when the aperture ring is rotated.
Since this lens has no CPU data, the aperture parameter cannot be
recorded temporarily.
Since the aperture is manually adjusted, the shutter priority mode
cannot be used well, but the aperture priority mode can be used (the
measuring accuracy depends on the camera model).

Frame Compatibility
Focal Length
Max.Aperture
Angle of View
Lens Structure
Aperture Blades
Min.Focusing Distance
Max. Magnification
Focusing
Filter Thread
Dimensions
Weight
Mounts
Full Frame
15mm
f/2.0
110°
5
15cm
0.25X
Manual Focus (MF)
Φ72mm
82mm×Φ77.2mm
About 500g
Sony FE、Canon RF、Nikon Z
SPECIFICATIONS
12 elements in 9 groups
( 2 pcs of Aspherical Elements + 3 pcs of Extra-low Dispersion Elements) ޏӫ۞xޏЩૠ
4K]/JKG4K],[T
LAOWA FFⅡ 15mm F2.0 D-Dreamer
Other LAOWA Lens manuals