Laser 6803 User manual

www.lasertools.co.uk
Part No. 6803
Battery Tester
12 volt
Instructions

3
Controls
2
www.lasertools.co.uk
Technical Parameters Standard Measuring Range
CCA 100-2000
BCI 100-2000
CA 100-2000
MCA 100-2000
JIS 26A17-N200z
DIN 100-1400
IEC 100-1400
EN 100-2000
SAE 100-2000
GB 30Ah-220Ah
Introduction
The Laser 6803 Car Battery Tester quickly and accurately measures the cold
cranking amps (CCA) capability of the vehicle starting battery, measures
battery health and assists in pinpointing common faults in the vehicle
starting and charging systems.
• Tests all automotive starting batteries, including lead-acid, AGM
(absorbed glass mat) flat plate, AGM spiral wound, GEL batteries, and
EFB (enhanced flooded battery)
• Detects bad cells
• Reverse polarity protected — will not damage battery tester or vehicle
• Tests fully charged or partly discharged batteries
• Multi language
• Test data can be printed out via PC or Laser 6804 Thermal Printer
Battery Test
Analyses battery health status to calculate actual cold cranking capability of
the battery; advises whether to charge or replace battery if necessary. Can
identify a faulty battery before actual failure.
Cranking Test
Identifies fault or potential faults in the starting circuit including the starter
motor itself by measuring increases in starting load torque.
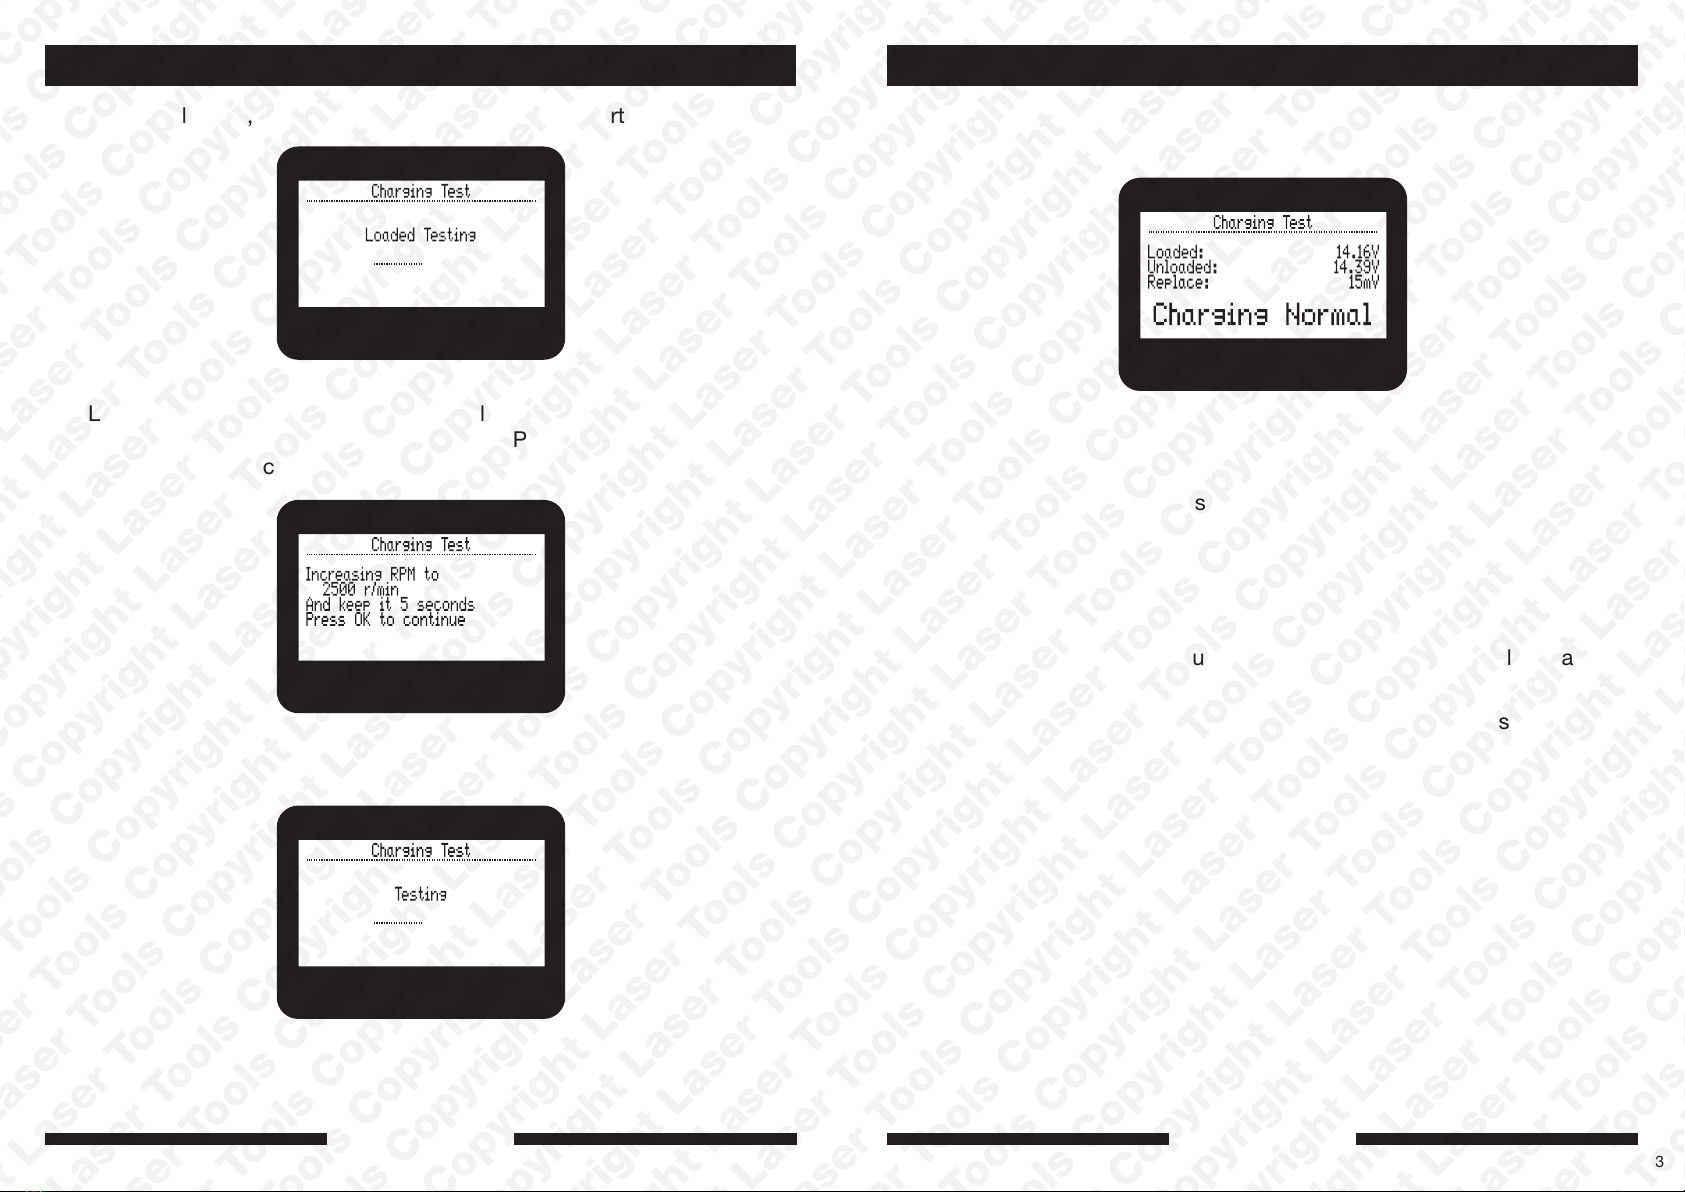
Charging Test
Checks and analyses the charging system, determines if output of generator
or alternator is to normal parameters, detects under or over-charging.
www.lasertools.co.uk
Cold cranking amps measuring range:
Voltage measuring range: 8-30V DC
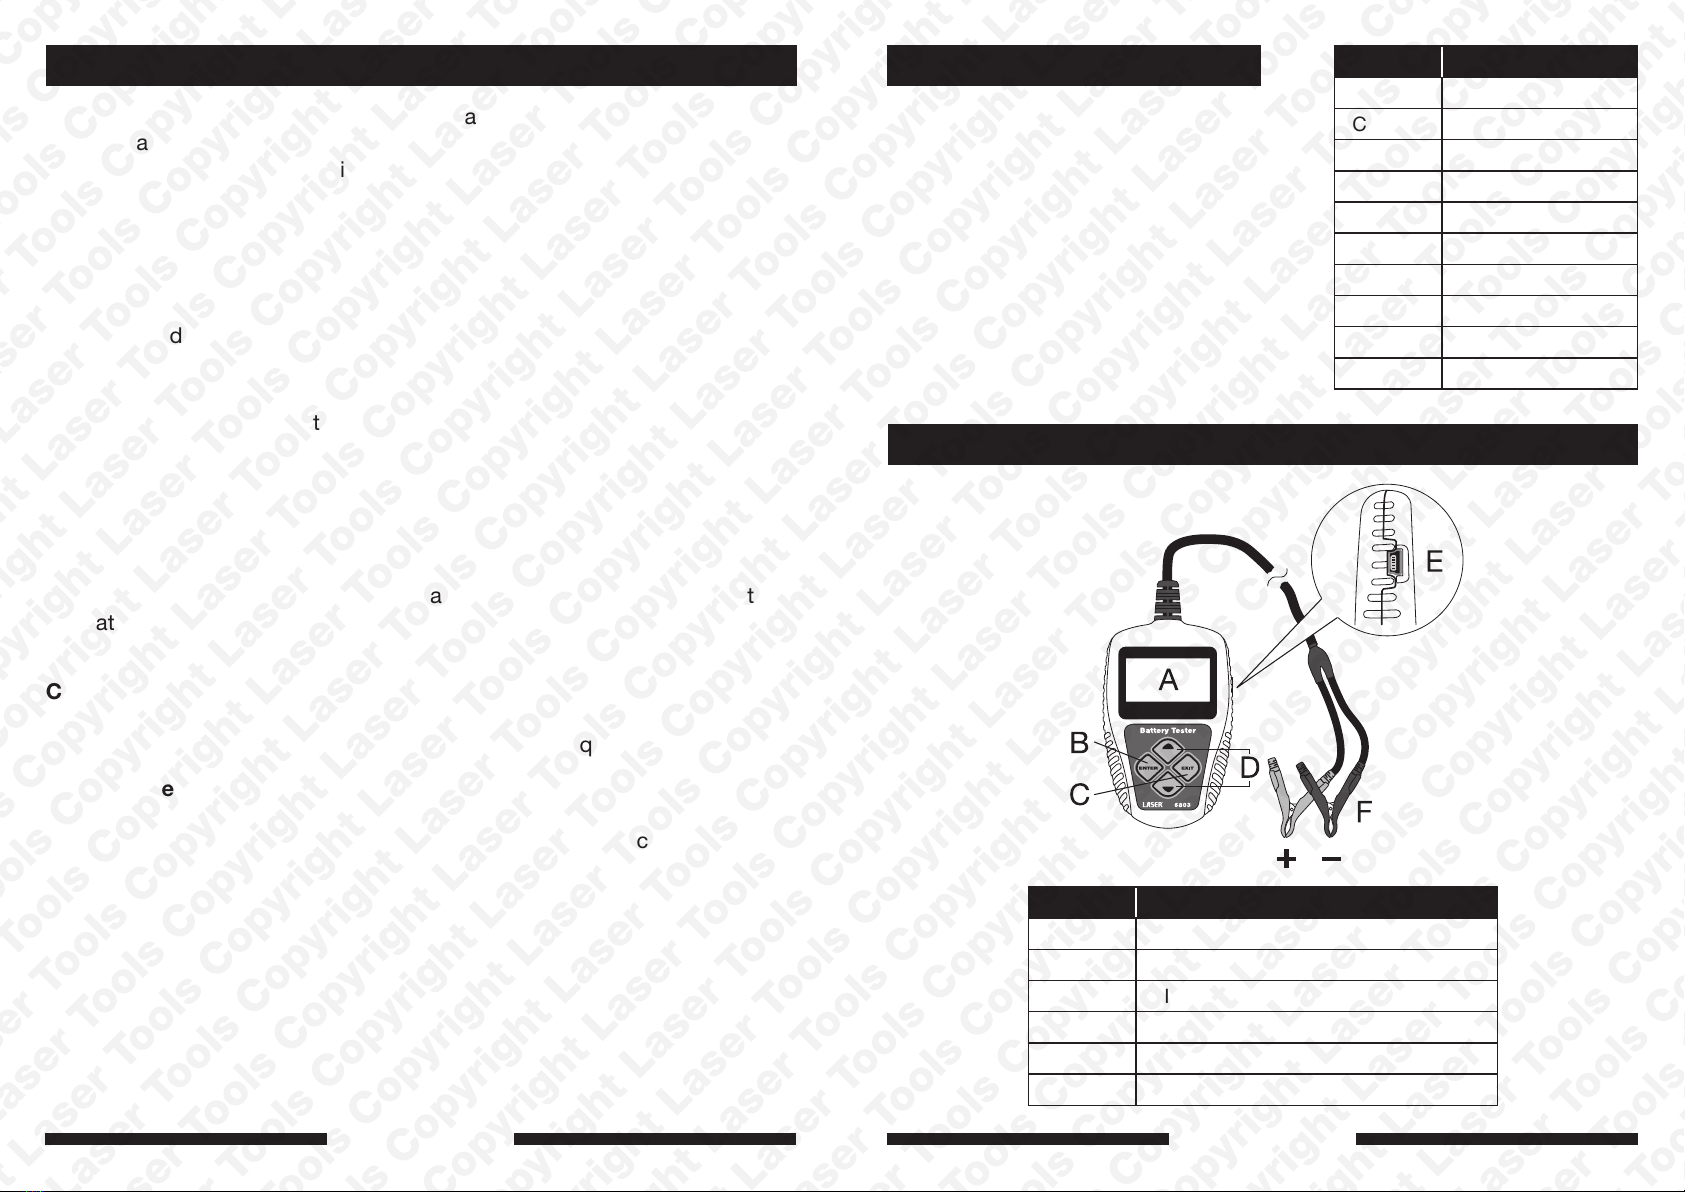
Ref. Component
A LCD display screen
B ENTER key
C EXIT key
D UP / DOWN keys
E Mini-USB socket
F Battery Crocodile clips (+ red & - black)

4
www.lasertools.co.uk
Product Setup
Select Language.
Adjust LCD screen contrast by using UP and DOWN keys.
Select Tool Information.
www.lasertools.co.uk
Instrument can be powered up by (a) connecting to vehicle battery via the
crocodile clips (F), red to positive (+), black to negative (-), or (b) via the
supplied USB cable to a PC.
From the startup screen press the ENTER key (B) to display the main menu.
Then scroll down by
pressing the DOWN
key (D) to 6.System
Setup.
The System Setup screen enables the selection of Language, Screen
Contrast or the Tool Information (current software and hardware versions).
Product Setup
5

Quick Test
This test very quickly determines the battery status including voltage, CCA,
electronic resistance, charge percentage value, state of health and test
result.
From the startup screen press the ENTER key (B) to display the main menu.
Testing the Vehicle Battery
Then scroll down
by pressing the
DOWN key (D) to
1.Quick Test.
Press ENTER to select Quick Test. At the next screen enter the rated
battery capacity (using the UP and DOWN keys) for the battery being tested
(this can be read from the information label on top of the battery). This is the
amp/hour (Ah) figure.
Now press the ENTER key to start the Quick Test. One of five results will be
displayed:
1.
Good Battery —
Test passed with
no problems found.
www.lasertools.co.uk
Testing the Vehicle Battery
2.
Good, but
Recharge —
current is low,
recharge before
using.
3.
Replace — the
battery has reached
(or is very near) the
end of its useful life.
Replace with new
battery before using
vehicle.
4.
Bad Cell — Replace
— One or more cells
damaged, replace
battery.
5.
Charge and
Retest — an
unstable battery
can be recharged
and tested again to
avoid error.
If the same result (or Replace result) is displayed after charging and
retesting, then the battery is damaged and should be replaced.
www.lasertools.co.uk
76

www.lasertools.co.uk
Full Test — Battery in Vehicle
Testing the Vehicle Battery
Now select
1.Battery Test from
the Test in Vehicle
menu.
Select
2.Battery in Vehicle
from main menu.
If the instrument detects a surface charge condition in the battery, the
following screen is displayed:
Follow the instructions displayed, then press the ENTER key to continue.
www.lasertools.co.uk
Testing the Vehicle Battery
Select battery type
(info on battery label).
Now choose the measuring range for the battery; again, this information is
displayed on the label on top of the battery. Cycle up or down to choose the
correct measuring standard; for example EN, SAE or CCA.
Press ENTER to select the measuring rate.
If the battery label
indicates 500 CCA,
then choose CCA.
If the battery label
indicates 500 CCA,
then choose 500.
The screen will display ‘TESTING’ for a few seconds. When the test is
completed, one of five results will be displayed (refer to previous Quick Test
section for descriptions and diagrams for these results).
98

www.lasertools.co.uk
Now select
2.Cranking Test
from the Test in
Vehicle menu.
Testing the Vehicle Battery
The tester will now
prompt the operator
to start the engine.
After the engine
starts, the screen
shows:
Then the test result
is displayed, which
includes the actual
cranking voltage and
the actual cranking
time:
www.lasertools.co.uk
If Cranking Test is
abnormal, Replace
(battery) will be
displayed with the
results:
Testing the Vehicle Battery
Now select
3.Charging Test
from the Test in
Vehicle menu.
Keep the engine running for this test; make sure all electric accessories are
switched OFF. Turning on or off any electric accessories during the test will
affect the accuracy of the test result.
The instrument will run the following tests in sequence. For the Ripple Test
(excessive ripple means that one or more of the alternator diodes is failing,
allowing alternating current to be passed into the battery), the instrument
will display the real time ripple and then the ripple volt and charging volt
values:
1110

www.lasertools.co.uk
After the Ripple Test, the instrument will automatically start the Loaded
Voltage Test:
Testing the Vehicle Battery
The Loaded Voltage Test takes approximately 3 seconds, then you will be
advised to bring the engine speed up to 2500 RPM and hold for 5 seconds.
Then press ENTER to continue:
The instrument starts the Charging Volt Test after the increasing engine revs
are detected:
After the test has been completed, the screen displays the effective
charging voltage and charging test results:
Testing the Vehicle Battery
www.lasertools.co.uk
Charge Test Results
Charging Normal: No problems detected.
Charging Low: Charging voltage is low; check alternator drive belt and/
or the alternator and battery connections. If no faults are found, refer to the
manufacturer’s documentation for charging system fault-finding.
Charging High: Alternator output voltage is too high; it is likely that the
alternator’s internal voltage regulator is faulty. Overcharging will damage the
battery and drastically shorten its life.
No Volt Output: No output from the generator or alternator has been
detected — refer to ‘Charging Low’ instructions above.
1312

www.lasertools.co.uk
Test — Battery Out of Vehicle
Out of Vehicle means that the car battery is not connected to the vehicle’s
electrical system, i.e. the battery terminals are not connected or the battery
is being bench tested.
Testing the Vehicle Battery
In this mode, only the Battery Test can be carried out — follow the Battery
Test instructions from the ‘Test in Vehicle’ section.
Review Data
To view the last
tested battery
result, choose
4.Review Data
from the Main
Menu.
The data will be
displayed:
www.lasertools.co.uk
The Laser 6803 Car Battery Tester can print out the test results via a PC or
with the Laser 6804 Thermal Printer.
To Print from PC
1. Connect the 6803 Car Battery Tester to the PC via the USB cable
supplied. The tester will power up.
2. Insert the Mini-CD supplied into the PC CD drive.
3. Locate the USB Driver folder.
4. Install the USB driver (follow instructions on screen).
Print Data
1514

www.lasertools.co.uk
5. When the PC confirms that the USB Driver software has been installed
correctly, locate the Print Software folder.
6. Run the print software.
7. The software will confirm that it is connected to the battery tester. If
there is any information displayed from a previous session, click on the
‘Clear’ button.
Print Data
8. On the main menu of the battery tester select 5.Print Data:
9. The data from the battery tester will be sent to the PC:
10. Click on the ‘Print’ button to send to the printer connected to the PC.
Print Data
www.lasertools.co.uk
1716

www.lasertools.co.uk
• Only for use with automotive 12 volt systems.
• Always refer to instructions before use.
• Observe standard workshop safety procedures when using the tester.
• Danger of sparking: (explosion risk) if vehicle battery has recently been
charged, ensure area is well ventilated and ensure eye protection is
worn before connecting up the battery tester.
• Danger of sparking: do not connect up the battery tester if there are any
fuel leaks or fuel vapour present.
• Always take extreme care when connecting the battery tester to the
vehicle battery. Always connect red cable clamp to the positive terminal
of the battery first. When disconnecting, always remove the black cable
clamp from the negative battery terminal of the battery first.
• When working with or near a lead-acid battery make sure to remove
personal metal items such as watch straps, rings, bracelets, necklaces,
etc. A short across the battery terminal from one of the above could
cause severe burns.
• Protect the battery tester from prolonged exposure to humid or damp
conditions.
• Ideal storing and operating temperature: 0˚C to +50˚C.
• Do not let the tester get wet or use in damp or wet conditions.
• Please keep away from children at all times.
Precautions - please read
19
www.lasertools.co.uk
18

Our products are designed to be used correctly and with care for the purpose
for which they are intended. No liability is accepted by the Tool Connection for
incorrect use of any of our products, and the Tool Connection cannot be held
responsible for any damage to personnel, property or equipment when using the
tools. Incorrect use will also invalidate the warranty.
If applicable, the applications database and any instructional information provided
has been designed to offer general guidance for a particular tool’s use and while
all attention is given to the accuracy of the data no project should be attempted
without referring first to the manufacturer’s technical documentation (workshop or
instruction manual) or the use of a recognised authority such as Autodata.
It is our policy to continually improve our products and thus we reserve the right to
alter specifications and components without prior notice. It is the responsibility of
the user to ensure the suitability of the tools and information prior to their use.
www.lasertools.co.uk
9 February 2017 9:39 AM
Table of contents