LaserLight LL-SLL2560-MB User manual

LL-SLL2560-MB
Professional Stage Lighting Laser show

2
Thank you for purchasing this product. To optimize the
performance of this product, prior to use, please read these
operating instructions carefully to familiarise yourself with the basic
operation of this unit. Please keep the manual in safe price for future
reference.
This unit has been tested at our factory before being shipped to you,
there is no assembly required.
Once after received this product , please take and put carefully. And
check cautiously that whether the product was damaged or not
during the transportation.
Checking Parts
Please check if the following parts are included:
1 x Laser
1 x Power cable
1 x User manual
Danger Laser Radiation!
Avoid direct eye exposure!
Laser radiation can cause eye damage or skin damage
All protective measures for a safe operation of this laser must
be applied.
Installation

3
1. Please check the voltage whether is the same with the one
showed on the equipment or not.
2. It must ask for the technical person and set the light safety when
installation. And let the light beam at the suitable angle.
3. When install this equipment please make sure there's no
flammable surfaces (decorated things, etc) within at least 2.5M and
maintain minimum distance of 0.5M from the equipment to the walls.
4. Please make sure that there's no other equipment or decorating
materials obstructed the exhaust fan and the vent-pipe.
5. Products should be install immobility.
6. In case of safety, it's very important that to connect the earth with
line.
Attention
1.Please do not open the bottom cover yourself without permission.
Operate it accord the user manual. Call the technician when the
machine breaks down.
2.Please do not see the laser beam directly to avoid any damage.
3.Before connect or disconnect the power, please adjust the
luminance of the laser diode to the least to avoid any damage to the
laser diode.
4.This unit should be keep dry, do not use in the rain and dusty
environment. It can be use in the outdoor with the water-proof cover
protector.
5. Set the light immobility and try to avoid strong shake or hit.
6.Prevent dust into the equipment to avoid problems.

4
7.Please keep that there's no other equipment or decorating
materials obstructed the exhaust fan and the vent-pipe when the
equipment was working.
8.Before connect power, check the plug is immobility or not, power
line should be connect well.
9.Please do not open or close the equipment frequently that's to
avoid any affect to the life span of the laser diode, and try the best to
avoid the long time working.
10.Due to the characteristic of the laser diode, after four hours
working, it should be close at least 25 minutes until the laser diode
cooling then work again.
11.Don't touch the light or draw the power line when your hand was
wet. And do not pull the electronic power line.
12.Maintain the distance at least 3M above from the equipment to
the object.
13.This equipment does not have any parts can repair for the users,
please do not open the equipment.
14.When the laser diode became dim or damaged please contact the
dealer timely.
15.When you want to retransfer the products, you'd better use the
original package to shockproof.

5
TFT setting:
Mode
TFT DISPLAY
1
Sound
2
Auto
mode(1-8effect)ca
n choice either of 8
effects
3
DMX512 control
mode,two mode
(8CH/19CH)can
choice either of
8CH/19CH.
1. DMX Setting:
Input dmx singal, and the link the dmx controller and the lights
by the control line as the following picture, you can control the
lights by the controller.
1. Master-slave setting:

6
Link the lights as the following picture (the light which does not
receive signal, only output signal, will be the master light),
master-slave set as 19CH:
TFT display panel, as following:
1. Touch keys and TFT menu display, menu operation is simple and easy to
use. Boot wait for system restoration automatic loading system software.
2. Through the UP and DOWN buttons to select the need of function。
3. Determined by the selected function ENTER and MENU button, return to
the last level menu。
Using before please must be check power supply link with

7
earth wire correctly or not.
The specification of the front and rear panel:
1. Power input to the socket
2. Power switch button
3. Fuse 2A
4. DMX IN/ DMX OUT:DMX signal output and input
5. TFT display
LE Technical Specifications

8
Menu introduction
Menu structure chart
main
menu
secondary menu
running mode
DMX512 mode(8 channel+19 channel)
auto mode(auto 1-auto 8)
Sound
address
setting
address setting(1-512)
Language
setting
Chinese
English
advanced
settings
X axis reserve (on/off)
Y1 reserve (on/off)
Y2 reserve (on/off)
X axis adjust (0-255)
Y1 adjust (0-255)
Y2 adjust (0-255)
SPIDER MOVING LASER BEAM
Power Supply: AC100 ~ 240V 50 / 60Hz
Consumption: 150W
Laser: 2x Red-200mW / 4xVerde-80mW / 2xAzul-500mW
Bread: 540 °
Tilt: 270 °
Working mode: AUTO / SOUND / MASTER-SLAVE / DMX
DMX: 8CH / 19CH configurable
Diplay: LCD Dispaly
Net weight: 8 kg
Gross weight: 9.5 kg
Packing: carton 53x37x30cm

9
Signal link(on/off)
push rod delay (on/off)
ID code(0-25) invalid
temperature set(50°-85°)invalid
temp protect (on/off) invalid
screen protect(on/off)
screen rotating (on/off)
LOGO(on/off)
system reset(enter?)
laser bright (default 255)
factory reset ( enter ?)
system
testing
X axis motor (0-255)
Y1 axis motor (0-255)
Y2 axis motor(0-255)
laser bright (0-59 OFF, 60-255 ON)
system
information
address code
run mode
on time (on the run time)
run time (use of total time)
Temperature (invalid)
software version LF05
main menu
Through the buttons control the cursor, press "ENTER " button
to enter setup.
secondary menu

10
Secondary menu include of running mode, address setting,
Language setting, advanced settings, system setting, system
information and so on.
1) running mode, at the same time only can run one mode,
select the DMX mode or automatic mode, press the
"ENTER" button can also choose different control mode
channel or automatic mode effect.
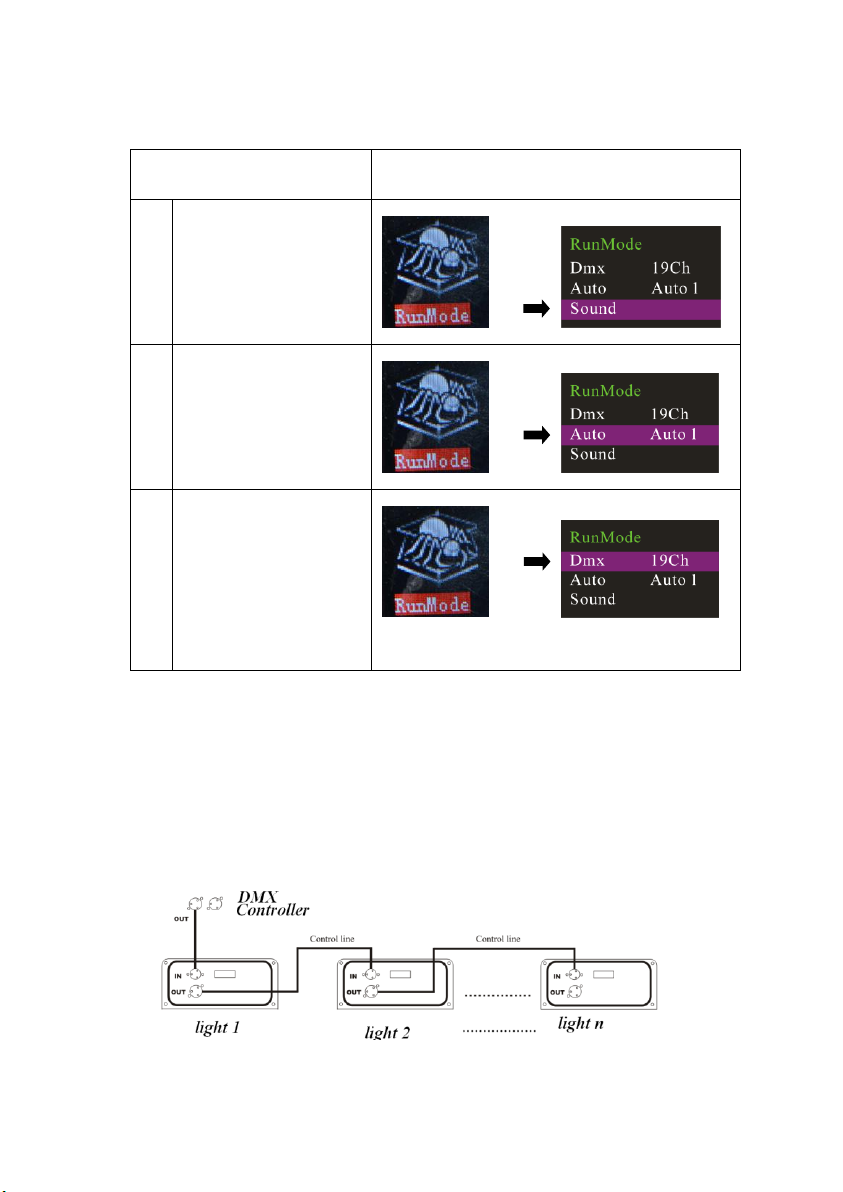
DMX mode can at the same time for master-slave mode, if
link the DMX signal, it is DMX model, if is the master signal,
can be used as master -slave mode.
Auto mode,Auto mode at same time as master mode.
when it’s music mode as master mode
2) Address setting, setting after need press “enter” save
address code, then back to main menu. if u press “return”
means no save address code.
3) Language setting, menu language can setting Chinese and
English.
4) advanced settings
x axis forward-inverse (on/off)
Y1 axis forward-inverse (on/off)
Y2 axis forward-inverse (on/off)
X axis fine adjust set (0-255)
Y1 axis fine adjust set (0-255)
Y2 axis fine adjust set (0-255)
Signal link--- after open signal link, When disconnect control

11
signals in a posture of disconnected before the control signals.
Push rod delay---putting delay after opening, accused of
dimming soft push rod. The push rod delay can choose
whether to start in control.
ID code----invalid
temperature protect----invalid
screen protect---can setting of off/on. When off, after screen
play, clean screen. after enter screen protect ,will display this
mode or logo.
Screen rotating---can let screen upside down 180°.
LOGO----display LOGO or not
Motor reset----- Manual reset motor.
Modulation signal voltage----Adjust the laser output bright.
factory setting----- please Parameter setting as factory setting
of initializes.
5) Testing mode, testing mode is a special mode, only when
into testing mode of display can use it, return it, will back to
before running mode. when at testing mode can adjust X
axis motor,Y1 axis motor and Y2 axis motor of position and
W color of bright.
6) system information
Display system information
address code
running mode, system now at running mode.
boot time (on the run time)

12
running time (use of total time)
Temperature--invalid
Software version, currently used program version.
DMX-512 Channel introductions:
1. 19CH mode as following:
Channel
Value
control function
1
0-255
X motor
2
0-255
Y1 motor
3
0-255
Y2 motor
4
0-255
X fine tuning (16Bit)
5
0-255
Y fine tuning(16Bit)
6
0-255
XY motor speed from fast to slow
7
0-255
total light-dimmer open(0-59OFF,60-255ON)
8
0
no strobe
1-255
strobe from slow to fast
9
0-255
1 light-dimmer from dark to bright
10
0-255
2 light-dimmer from dark to bright
11
0-255
3 light-dimmer from dark to bright
12
0-255
4 light-dimmer from dark to bright

13
13
0-255
5 light-dimmer from dark to bright
14
0-255
6 light-dimmer from dark to bright
15
0-255
7 light-dimmer from dark to bright
16
0-255
8 light-dimmer from dark to bright
17
0-5
invalid
6-30
jump change(motor by 512 control)
31-55
gradual change (motor by 512 control)
56-80
pulse change(motor by 512 control)
81-105
music 1(motor by 512 control)
106-130
music 2 (motor by 512 control)
131-155
jump change (motor auto )
156-180
gradual change (motor auto )
181-205
pulse change (motor auto )
206-230
music 1(motor by 512 control)
231-255
music 2 (motor by 512 control)
18
0-255
jump change, gradual change, pulse change,
from slow to fast
chiang change
19
0-128
invalid
129-255
X motor Y1 motor Y2 motor reset(value
above 129,and Stay for 6 S motor reset

14
2. 8CH Mode as following:
Channel
Value
Control function
1
0-255
X motor
2
0-255
Y1 motor
3
0-255
Y2 motor
4
0-255
total light-dimmer
open(0-59OFF,60-255ON)
5
0
no strobe
1-255
strobe from slow to fast
6
0-5
invalid
6-30
jump change(motor by 512 control)
31-55
gradual change (motor by 512 control)
56-80
pulse change(motor by 512 control)
81-105
music 1(motor by 512 control)
106-130
music 2 (motor by 512 control)
131-155
jump change (motor auto )
156-180
gradual change (motor auto )
181-205
pulse change (motor auto )
206-230
music 1(motor by 512 control)
231-255
music 2 (motor by 512 control)
7
0-255
jump change, gradual change, pulse
change, from slow to fast
8
0-128
invalid
129-255
X motor Y1 motor Y2 motor reset(value
above 129,and Stay for 6 S motor reset)

15
Maintenance
Maintenance should be performed every 15-day period, by using a
sponge which is dipped with alcohol, rather than wet cloth or other
chemical liquid, to clean the mirror.
Always disconnect from the mains when the device is not in use or
before cleaning it.
Warning
Power must be disconnected before maintenance or repair. Do not
look at the light source directly
Note
Don't separate laser machine from laser power and repair them by
yourself , otherwise no good repair service will be supplied.
Declaration
This device has left our premises in absolutely perfect condition. In
order to maintain this condition and to ensure a safe operation, it is
absolutely necessary for the user to follow the safety instructions and
warning notes written in this user manual.
We cannot be made liable for damages caused by incorrect
installations and unskilled operation!

16
Table of contents
Other LaserLight Lighting Equipment manuals
Popular Lighting Equipment manuals by other brands

Vision & Control
Vision & Control LDLF60x420-B470/24V Instructions for use

JONATHAN Y
JONATHAN Y JYL2007A instructions

Selecon
Selecon Rama Fresnel Series Operation manual

LIGMAN
LIGMAN AA-70077 Installation and service manual

INNLED
INNLED T4 user manual

brennenstuhl
brennenstuhl MULTI HL 3000 operating instructions

B-K lighting
B-K lighting INTEGRAL DENALI Series Installation

B.K.Licht
B.K.Licht BKL1508 Mounting instructions

Equinox Systems
Equinox Systems TRINITY BEAM user manual

Fiessler
Fiessler TLCT operating manual

Philips
Philips Disney Softpal Mickey instructions

Traxon
Traxon Allegro Media Tube Lite installation guide