Lavex 457LAVEXDM15 User manual

457LAVEXDM15
DUAL MOTOR HEPA UPRIGHT
VACUUM CLEANER

IMPORTANT SAFEGUARDS
When using an electrical appliance, basic precautions should always be followed,
including the following:
READ ALL INSTRUCTIONS BEFORE USING THIS VACUUM CLEANER.
WARNING - To re uce the risk of fire, electric shock, or injury:
2
Do no use ou doors or on we surfaces.
Do no use wi h damaged cord or plug. If vacuum cleaner is no working as i should, has been
dropped, damaged, lef ou doors, or dropped in wa er, re urn i o a service cen er before using.
This vacuum cleaner has no user serviceable par s.
Close supervision is necessary when any appliance is used by or near children.
Use only as described in his manual. Use only manufac urer’s recommended a achmen s.
Do no allow vacuum cleaner o be used as a oy or o run una ended a any ime.
Keep hair, loose clo hing, fingers, fee and all par s of body away from openings, ro a ing agi a or
and moving par s.
Do no opera e cleaner in bare fee or when wearing open oe shoes or sandals.
Do no pick up any hing ha is burning or smoking, such as cigare es, ma ches, or ho ashes.
Avoid picking up hard, sharp objec s wi h he cleaner. They may damage he cleaner and he bag.
Do no use wi hou dus bag in place. Shake bag frequen ly when picking up very fine ma erials
such as powder.
Use ex ra care when cleaning s airs.
Do no pu any objec in o openings. Do no use wi h any opening blocked; keep free of dus , lin ,
hair, or any hing ha may reduce air flow.
Do no pull or carry by cord, use cord as a handle, close door on cord or pull cord around sharp
edges or corners. Do no run appliance over cord. Keep cord away from hea ed surfaces.
Always disconnec cord from elec rical ou le before servicing he cleaner. Unplug cleaner when
no in use. Turn off all con rols before unplugging. Do no unplug by pulling he cord. To unplug,
grasp he plug, no he cord.
Never handle plug or appliance wi h we hands.
This machine is equipped wi h an au oma ic hermal pro ec ion device. If he mo or ge s oo ho ,
he hermal device will open and au oma ically rese af er he mo or cools down.
SAVE THESE INSTRUCTIONS
For Household and Commercial Use
GROUNDING INSTRUCTIONS
This appliance must be grounded. If it should malfunction or break down, grounding
provides a path of least resistance for electric current to reduce the risk of electric shock.
This appliance is equipped with a cord having an equipment-grounding conductor and
grounding plug. The plug must be inserted into an appropriate outlet that is properly
installed and grounded in accordance with all local codes and ordinances.
WARNING - Improper connection of the equipment-grounding conductor can result in a risk
of electric shock. Check with a qualified electrician or service person if you are in doubt as
to whether the outlet is properly grounded. Do not modify the plug provided with the
appliance. If it will not fit the outlet, have a proper outlet installed by a qualified electrician.
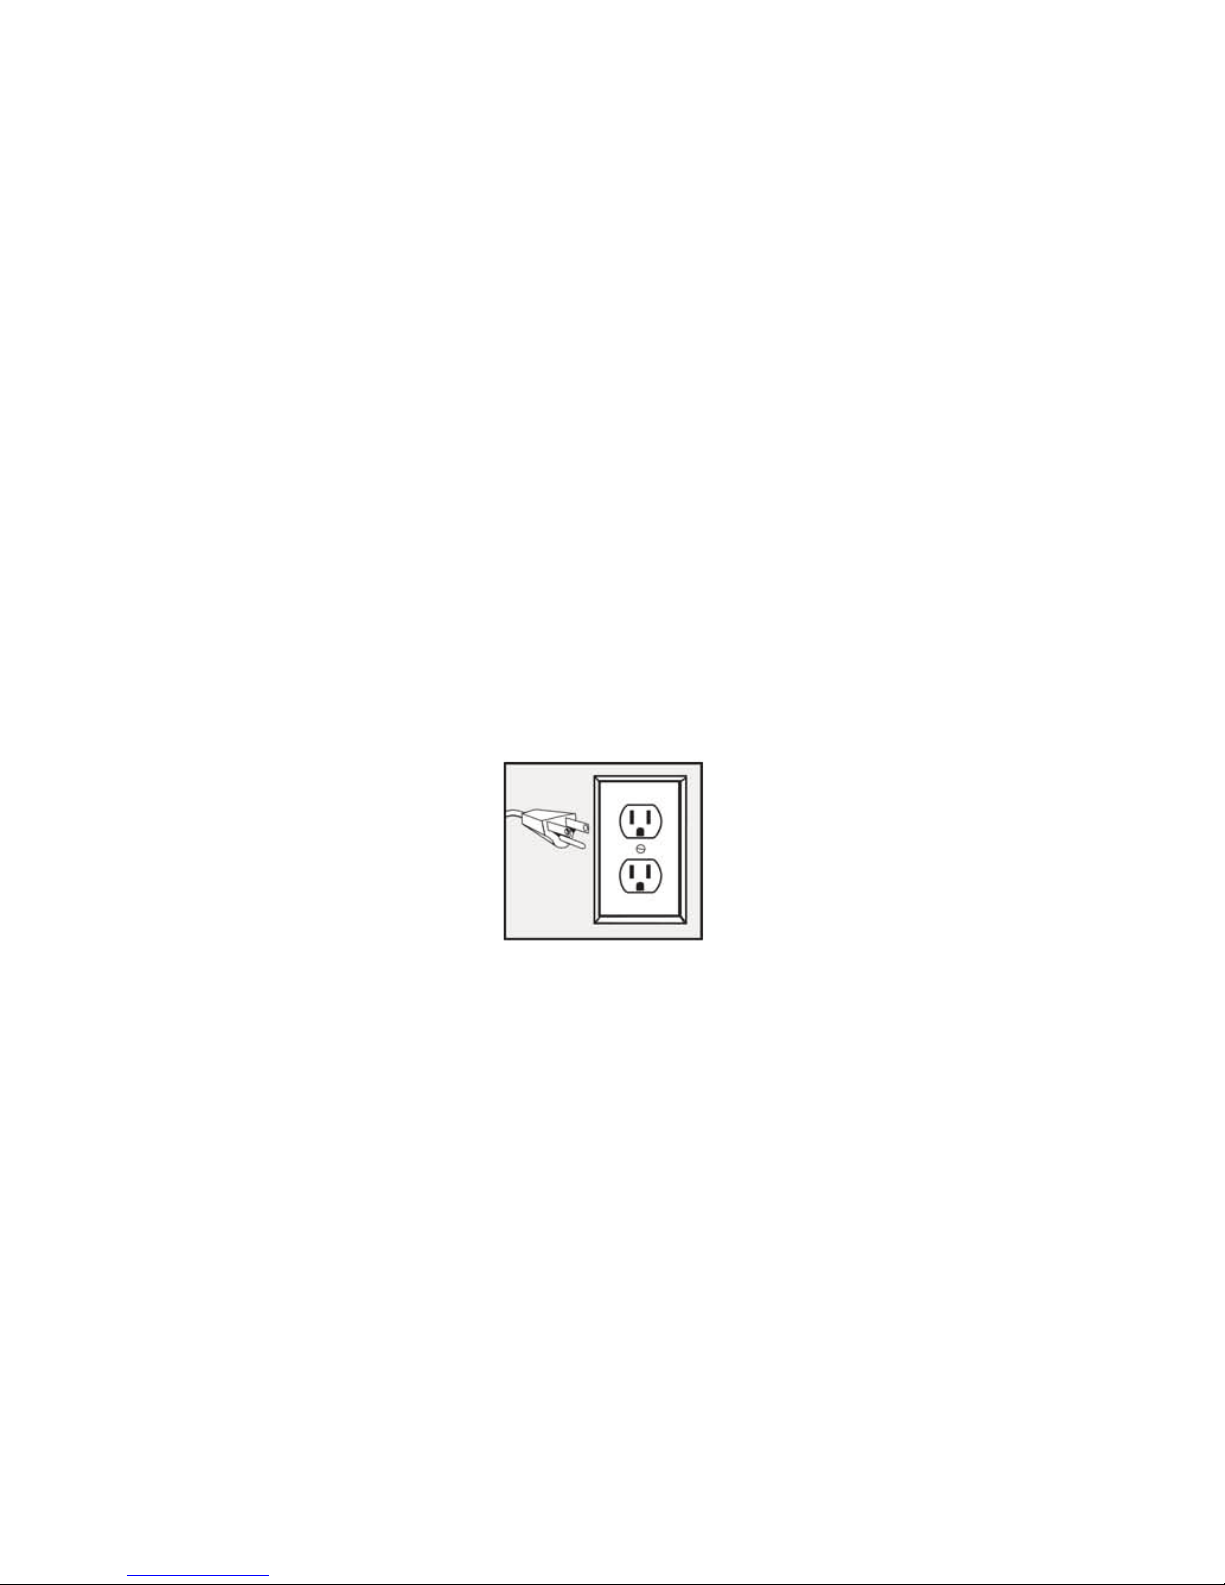
This appliance is for use on a nominal 120-volt circuit and has a grounding attachment
plug that looks like the plug illustrated. Make sure that the appliance is connected to
an outlet having the same configuration as the plug. o adapter should be used with this
appliance.
3

HOW TO ASSEMBLE THE LAVEX JANITORIAL VACUUM
AUnpack the enclosed packet
Enclosed in the packet is One Handle Bolt -- One Carry Handle
1Take handle and align to back of vacuum --
Make sure metal guide is aligned in handle receptacle
2Push handle bolt through carry handle
3Align with hole in center of vacuum handle and push through into vacuum bag
housing. Tighten bolt with screwdriver until it is completely secured.
6Attach cord holder to short machine cord and 50 foot cord
5Attach hose to vacuum by screwing plastic machine end into bag housing
4Attach plastic wand to hose by pushing plastic wand into
open hose cuff. Push until hose cuff and raised ring on wand meet
4

BThe power switch is located on the back of the unit.
This power switch is a three way switch
OOff Position
ISuction motor only --
This selection is for using the vacuum attachments only
II This selection runs both suction motor and brushroll motor.
This selection is used for all cleaning of carpets and/or floors
CReset Switch
Reset switch is located on top of the vacuum hood
If brushroll gets jammed from any type of debris,
brushroll motor will automatically shut off. Simply unplug
the unit and clean out the blockage.
Reconnect the vacuum to the power outlet and turn on
the unit. Press the RED reset switch on top of the
vacuum hood and the brushroll motor will restart.
DThe LAVEX JA ITORIAL vacuum self adjusts to any floor or carpet. There are no
knobs or levers to press or turn. Turn on vacuum and just push back and forth on
any surface.
The L-shaped base makes cleaning easy around tables and furniture.
The handle goes all the way down so you can vacuum under beds and any small
or tight areas where height restrictions are an issue.
HOW TO USE LAVEX JANITORIAL VACUUM
The LAVEX JA ITORIAL Vacuum is designed to be used on many types of carpets and bare floors.
You can go from carpet to floors easily with the self-adjusting vacuum head.
5

ACCESSORIES
1Stretchable Hose -- Hose stretches from 3 ft. to 6 ft.
2Plastic Wand -- Used for hard to reach spaces such as ceilings, high areas, etc.
3Combo Dust Brush / Upholstery Tool -- Used for furniture, shelves, table tops, lamps,
chair rails, etc. Upholstery tool is used for draperies, cushions, sofas beds, etc.
4Crevice Tool -- Used for tight spaces, corners, vents, etc.
5Carry Handle -- The carry handle is used to support vacuum while
transporting from location to location
Pull the wand up and out of the bag housing of the vacuum. Attach the combo dust
brush / upholstery tool or crevice tool to the end of the wand. Support the vacuum with
one hand while cleaning with the accessories. When finished, remove tools and replace
wand into vacuum.
1
2
4
3
6
Your LAVEX JANITORIAL
Vacuum comes with:
1 -- Stretchable Hose
2 -- Plastic Wand
3 -- Combo Dust / Upholstery Tool
4 -- Crevice Tool

FILTERS
Change Filters frequently to keep your LAVEX JA ITORIAL Vacuum running at optimal efficiency.
PROTECT YOUR MOTOR!
KEEP YOUR FILTERS CLEAN FOR OPTIMAL EFFICIENCY
AFILTER BAG
1Make sure that vacuum is unplugged and in the OFF position.
2To open bag cover, press the release button on top of the bag cover and open cover.
3Remove used filter bag from vacuum and discard. DO OT re-use the bag.
4Insert EW filter into vacuum.
5Close cover and snap into place.
Safety feature -- If no bag is put into the machine, the vacuum will not turn on.
This saves the vacuum from unnecessary damage due to no bag filter in the unit.
BMOTOR INTAKE FILTER
1Make sure vacuum is unplugged and in the OFF position.
2Remove filter bag and then lift motor intake filter from the bag housing.
3Wash filter or replace with a new filter. Wash in warm soapy water, rinse and let air dry.
4Replace filter and put in bag filter.
5Close cover and snap into place.
CCHANGING HEPA FILTER
1Remove HEPA Filter by pushing down lightly on cover and pull away from unit.
2Remove any excess foam tape from filter area.
3Insert the EW HEPA Filter by pushing lightly on the filter until the tabs snap into place.
7
8
24
33A
29
2 PK
WIRE
HAR ESS
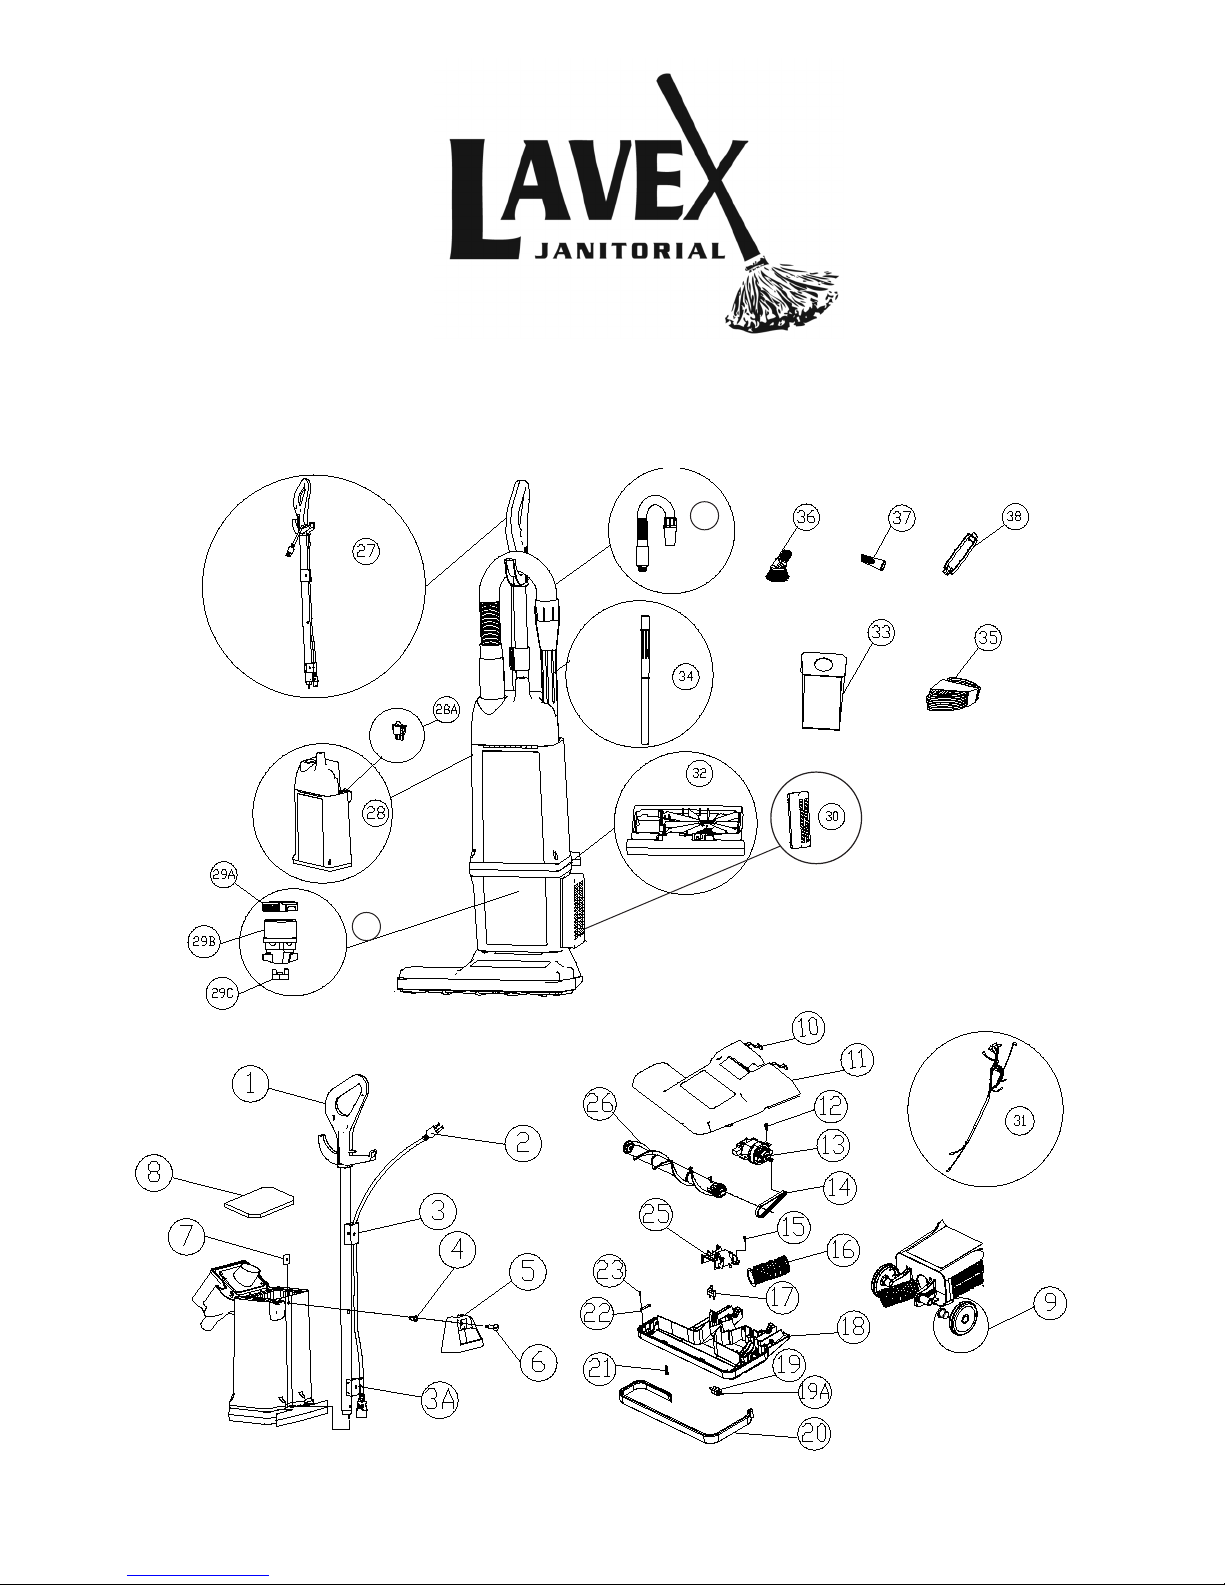
DUAL-MOTOR UPRIGHT PARTS

9
PART NO. DESCRIPTION
1 DM1 HA DLE GRIP
2 DM2 POWER CORD
3 DM3 UPPER CORD HOLDER WITH SCREW
3A DM3A LOWER CORD HOLDER WITH SCREW
4 DM4 SLEEVE FOR HA DLE BOLT
5 DM5 CARRY HA DLE
6 DM6 HA DLE BOLT
7 DM7 SQUARE HA DLE UT
8 DM8 FOAM FILTER BELOW BAG
9 PP 60 REAR WHEELS WITH SLEEVE BEARI G -
2 PCS EA./PACK
10 DM10 DETE T SPRI G
11 DM11 P HOOD WITH DETE T SPRI GS
12 DM12 SCREW-P MOTOR
13 PP 17 BRUSH ROLL MOTOR
14 16-1982 BRUSH ROLL BELT
15 PP 14 DUCT HOSE TOP COVER SCREW
16 DM16 DUCT HOSE WITH CUFF ASSEMBLY
17 DM17 CIRCUIT BREAKER 1.6A WITH SPACER
18 DM18 BASE ASSEMBLY - COMPLETE WITH BUMPER
A D ROLLER GUIDE
19 PP 22 FRO T ROLLER WHEEL
19A PP 23 FRO T ROLLER AXLE
20 PP 79 BUMPER
21 DM21 BOTTOM BASE SCREW
22 DM22 BRUSH ROLL RETAI ER
23 DM23 SCREW-RETAI ER
24 DM24 ATTACHME T HOSE
25 DM25 DUCT HOSE COVER
26 PP 7 BRUSH ROLL COMPLETE
27 DM27 HA DLE ASSEMBLY COMPLETE
28 DM28 TOP BAG HOUSI G COMPLETE WITH LID
28A DM28A O /OFF SWITCH
29 LUXMH LOWER MOTOR HOUSI G
29A DM29A SUCTIO E D MOTOR HOUSI G GASKET
29B DM29B SUCTIO MOTOR
29C DM29C COMMUTATOR E D GASKET
30 DM30 HEPA FILTER
31 DM31 WIRE HAR ESS COMPLETE
32 DM32 BULKHEAD WITH ELECTRICAL RECEPTACLE
33 10-1032 100 PK UPRIGHT BAG
33A 10-1154 12 PK UPRIGHT BAG
34 DM34 PLASTIC WA D ASSEMBLY
35 DM35 50 FT - 18/3 EXTE SIO CORD
36 DB4705 COMBO DUST BRUSH / UPHOLSTERY TOOL
37 DM37 CREVICE TOOL
38 DM38 CORD CO ECTOR ASSEMBLY

10
CLEARING THE BRUSHROLL --
Make sure vacuum is unplugged and in t e OFF position
Obstructions such as carpet fibers, strings, hair, throw rugs etc., may shut off brush roll
motor. Turn vacuum over where the underside of the unit is facing you. Pull out or cut away
obstructions from the brushroll area. Stand vacuum back upright. Plug in unit and turn on
switch. Press reset button on top of vacuum hood to restart brushroll motor.
CLEARING THE HOSE AND WAND --
Make sure vacuum is unplugged and in t e OFF position
Remove hose with wand from vacuum by unscrewing the hose from the bag housing.
Look into hose and wand for any obstruction. Shake or insert a broom handle to clear
any visible debris. Replace hose and wand on vacuum.
PICKING UP FINE POWDERS, SUBSTANCES, CARPET FRESH POWDERS,
CAN CLOG THE FILTER BAG. --
Please remember to change bags often so that vacuum cleaner can operate at
optimal efficiency.
THE INSTRUCTIONS GIVEN IN THIS BOOKLET SERVE AS A GUIDE TO
ROUTINE MAINTENANCE. TO AVOID UNNECESSARY SERVICE CALLS,
CHECK THE BAG, FILTER AND BRUSHROLLS OFTEN.
MAINTENANCE
Warning: Avoid injury. Keep loose clothing, hair, fingers, and all other parts of body away
from any moving part (such as the revolving brush). Disconnect vacuum from electrical
outlet before attempting to service it in any manner.

11
THE LAVEX JANITORIAL
LIMITED WARRANTY
WHAT THIS WARRANTY COVERS
Your LAVEX JA ITORIAL cleaner is warranted to be free from all defects in mate-
rial and workmanship in normal use FOR A PERIOD OF O E YEAR. The warranty
is granted only to the original purchaser of the cleaner. The warranty is subject to
the following provisions.
WHAT THIS WARRANTY DOES NOT COVER
Parts of the cleaner that require replacement under normal use,
such as bumpers, bags, brush rolls, and belts.
Damages or malfunctions caused by negligence, abuse, or use not in
accordance with the Owner’s Guide.
Defects or damages caused by unauthorized service or the use of other
than LAVEX JA ITORIAL parts.
WHAT LAVEX JANITORIAL WILL DO
LAVEX JA ITORIAL will, at its option, repair or replace a defective cleaner or
cleaner part that is covered by this warranty. As a matter of warranty policy,
LAVEX JA ITOIRAL will not refund the consumer’s purchase price.
LAVEX JA ITORIAL does not recognize internet sales, the warranty is null and
void if the unit is purchased on a non authorized internet site.
The warranty is null and void if the user does not use original LAVEX JA ITORIAL
original paper bags as well as any parts.
C
US
Table of contents
Other Lavex Vacuum Cleaner manuals

Lavex
Lavex 457PRO16GAL User manual

Lavex
Lavex 457LAVBP6QT User manual

Lavex
Lavex PRO Series User manual

Lavex
Lavex 944BJ1235G User manual

Lavex
Lavex 944BJ16233G User manual

Lavex
Lavex 457PRO9GAL User manual

Lavex
Lavex 457LAVBP8QT User manual

Lavex
Lavex PRO Series User manual

Lavex
Lavex 457VC8002BL User manual

Lavex
Lavex 944BJ14121G User manual


