Lavex PRO Series User manual

INSTRUCTION
MANUAL
LAVEX JANITORIAL PRO SERIES STICK
VACUUMS USER MANUAL
457VC8006BL • 457VC8006GY
READ ENTIRE MANUAL BEFORE USE
Lavex Janitorial • 2205 Old Philadelphia Pike • Lancaster, PA 17602
11/2021

INSTRUCTION MANUAL • 2
1. SAFETY WARNING
Read all instructions in this guide before assembling or using your vacuum cleaner.
IMPORTANT:Please read the following safety warnings before using
this product. Please take all safety measures when operating to avoid
malfunctions caused by accidental operation.
1. Safety Warning .............. 2-3
2. Package Content & Assembly .. 3-4
2.1 Packing List ................... 3
2.2 Accessories .................. 3
2.3 Product Assembly ............. 4
3.Charging......................4
3.1 Charging...................... 4
3.2 Power Indicator ............... 4
4. Product Review.............. 5-6
4.1 Brush Introduction ............. 5
4.2 How to Use................... 5
4.2.1 Preparing ................... 5
4.2.2 Battery Install & Remove . . . . . . .6
4.2.3 Operating.................. . 6
4.2.4 Foldable Aluminum Alloy Tube. . 6
5. Maintenance ................ .7-8
5.1 Main Body Cleaning . . . . . . . . . . . . .7
5.2 Dust Box Cleaning ..............7
5.3 Brush Roller Cleaning .......... 8
6. Troubleshooting ...............8
7. Customer Service ..............9
8. Warranty ....................10
TABLE OF CONTENTS
1. This Lavex Janitorial appliance is not intended for use by children without proper
parental supervision.
2. This appliance should only be used in dry locations. Do not use or store outdoors or
on wet surfaces. Do not handle any part of the battery, plug, or appliance with wet
hands.
3. Do not use the appliance in the event there is damage.
4. Always turn o the appliance before charging.
5. Do not vacuum anything that is burning or smoking, such as cigarettes, matches, or
hot ashes.
6. Do not use without filters or dirt cups to aviod damaging the motor and
contaminating the air.
7. FIRE HAZARD: Do not place this appliance on or near any flammable machinery or
hot surface.
8. Unplug the charger from the power outlet before performing routine cleaning or
maintenance.
9. Battery leaks may occur under extreme conditions. If any liquid gets on your skin,
wash quickly with soap and water. If liquid gets into your eyes, rinse with water for at
least 15 minutes immediately. Seek medical attention immediatly.

INSTRUCTION MANUAL • 3
10. Always charge the appliance with the charger provided in your initial purchase.
11. Avoid using this product to vacuum hard, sharp objects, as this may cause damage.
12. Do not expose the appliance to freezing temperatures to encourage longer lasting
battery charge.
Note: This appliance has state of the art thermal protection technology. The machine
will power down in the event the item is over-heated. Please do not force start the
machine if this takes place and allow the machine to rest until cool.
Please confrim you have recieved all parts according to the below sheet with
your initial purchase.
2.1 PACKAGE LIST
(1) Main Body
(1) Foldable Aluminum Alloy Tube
(1) Electric Brush Head
(1) Crevice Tool
(1) Dust Brush
(1) Wall Mount
(1) Charger
(1) Battery
Dust bin release button
Dust bin
Tube Release Button
Battery Release Button
Detachable Battery
Charging Spot
Foldable Aluminum Alloy Tube
Crevice Tool
Dust Brush
Charger
2. PACKING CONTENT & ASSEMBLY
2.2 ACCESSORIES
Main Body Release Button
ON/OFF Switch
Suction Mode Switch
Battery Power Indicator
Brush Head Release Button
Electric Brush Head
Wall Mount

INSTRUCTION MANUAL • 4
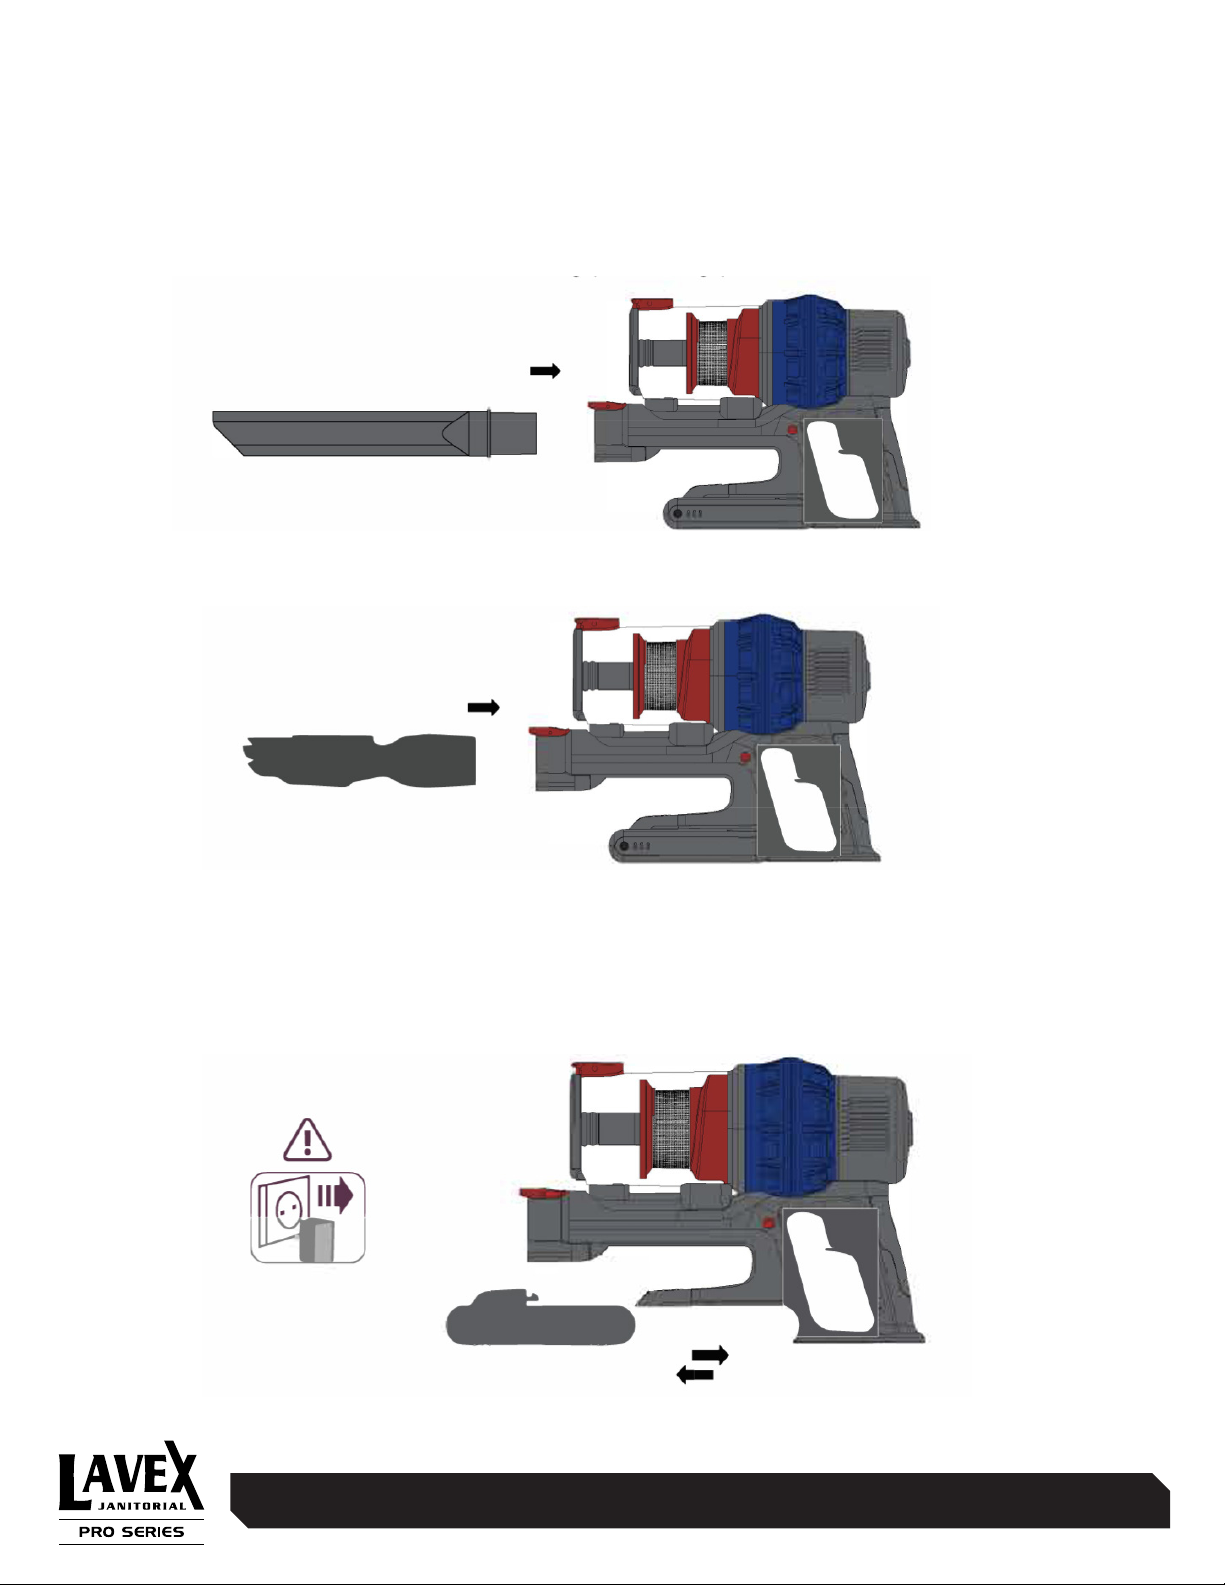
2.3 PRODUCT ASSEMBLING DIAGRAM
3. CHARGING
3.1 CHARGING
3.2 POWER INDICATOR
Attention: Ensure that the battery is
fully charged before powering up
the appliance the first time. Ensure
the appliance has been run out of
charge entirely upon first use before
recharging to help extend the
product life.
INSTRUCTION MANUAL • 5
4. PRODUCT REVIEW
4.1 BRUSH INTRODUCTION
CREVICE TOOL
Removes dust on hard-to-reach areas including window gaps, tables, chairs, and
corners. Read all instructions in this guide before assembling or using your
vacuum cleaner.
DUST BRUSH
Removes dust and hair on carpets, couches, and furniture with ease.
4.2 HOW TO USE
BATTERY INSTALL & REMOVE
Press the release button and pull the battery to remove it. Press the release
button and push the battery to install it.

INSTRUCTION MANUAL • 6
4.2 HOW TO USE (CONTINUED)
OPERATING
Switch On/O and Change Suction Mode
FOLDABLE ALUMINUN ALLOY TUBE
Press the button to fold the tube. Bend the tube back into place until a
"click" is heard to return upright.
Press the min/max button
to switch between the
three varying levels of
suction.
Press the ON/OFF trigger
one time to turn on the
appliance. The appliance
will start in 'low' suction
mode. Press the trigger a
second time to power o
the appliance.
INSTRUCTION MANUAL • 7
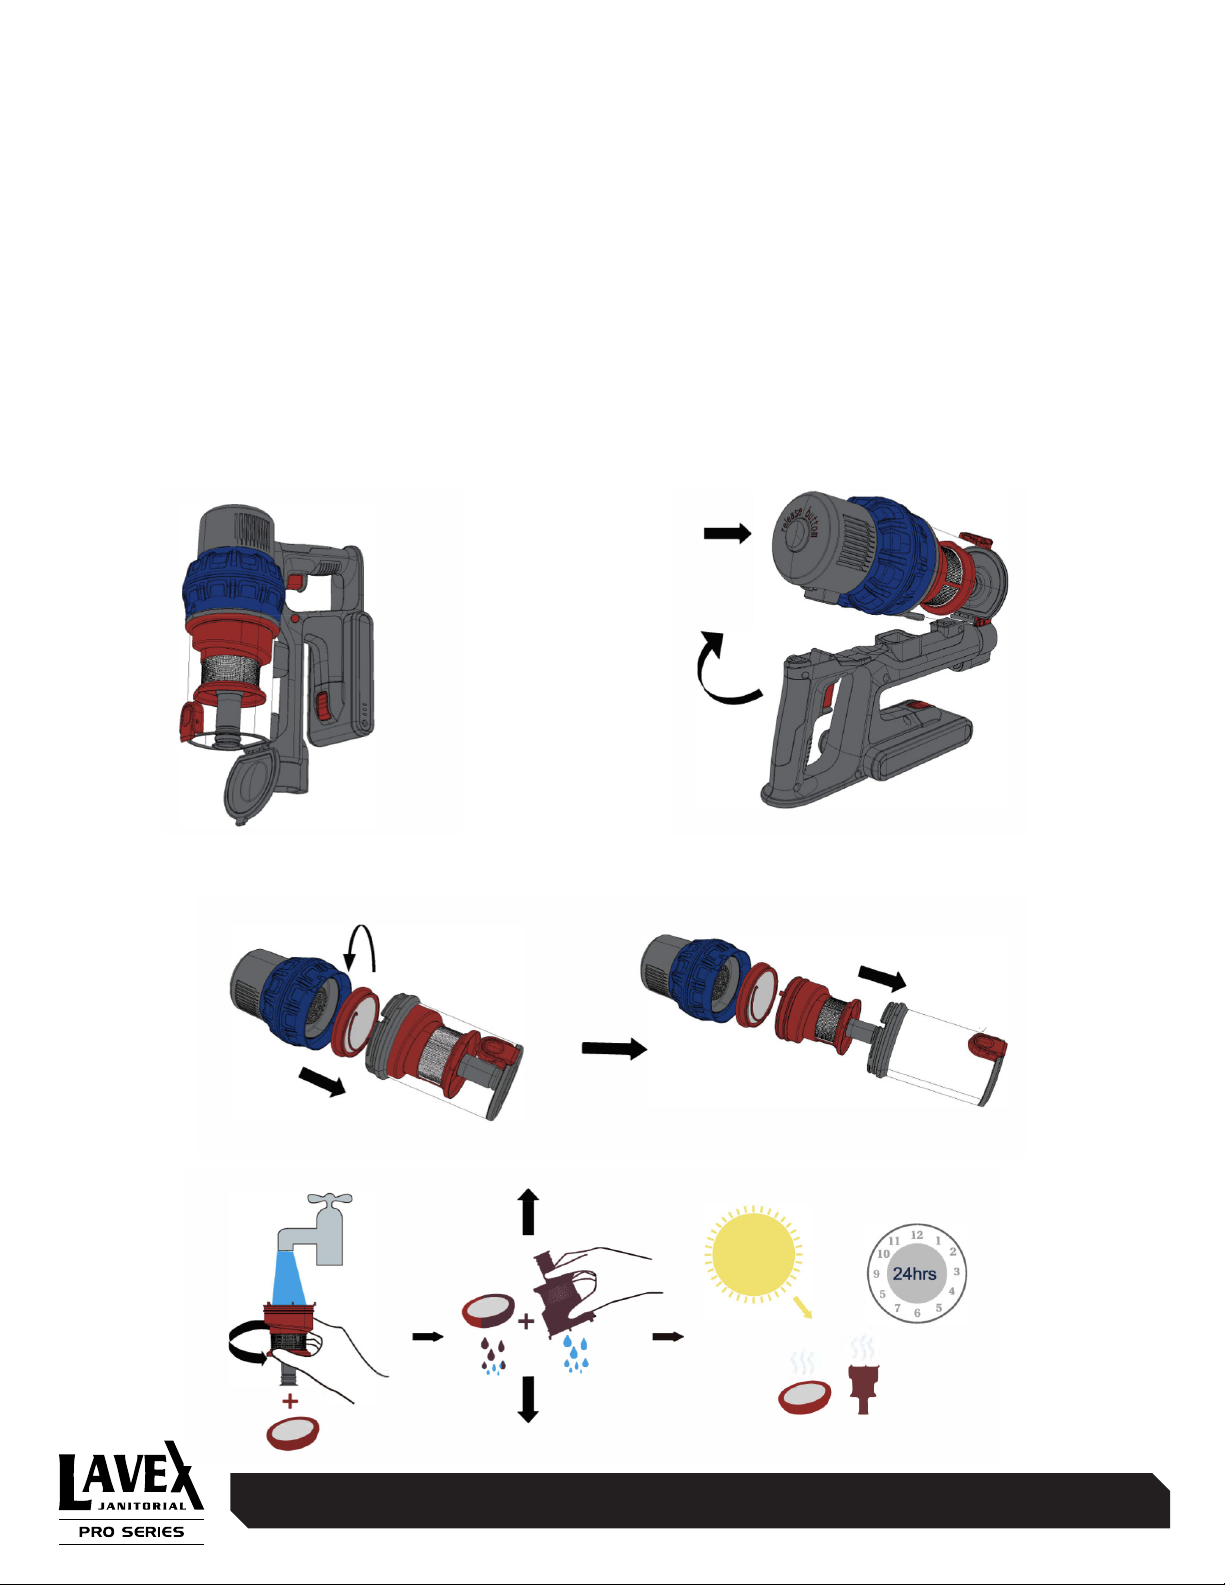
3. Twist the dust bin counterclockwise to remove the dust bin and expose the filter.
Remove the filter from the appliance.
4. Clean the filter and dust bin with or without water and dry it.
5. MAINTENANCE
Clean the vacuum regularly to prolong its life.
5.1 MAIN BODY (HAND-HELD, NON-WASHABLE PARTS)
CLEANING:
1. Turn o the power before cleaning the body
2. Use a neutral detergent and wipe the body with a damp cloth
3. Avoid sun exposure and store in a cool, dry place
5.2 DUST BIN CLEANING
1. Press the release button to open
the dust bin lid, dump out any and all
dust as shown below.
2. Press the main body release
button to remove the main body.
INSTRUCTION MANUAL • 8
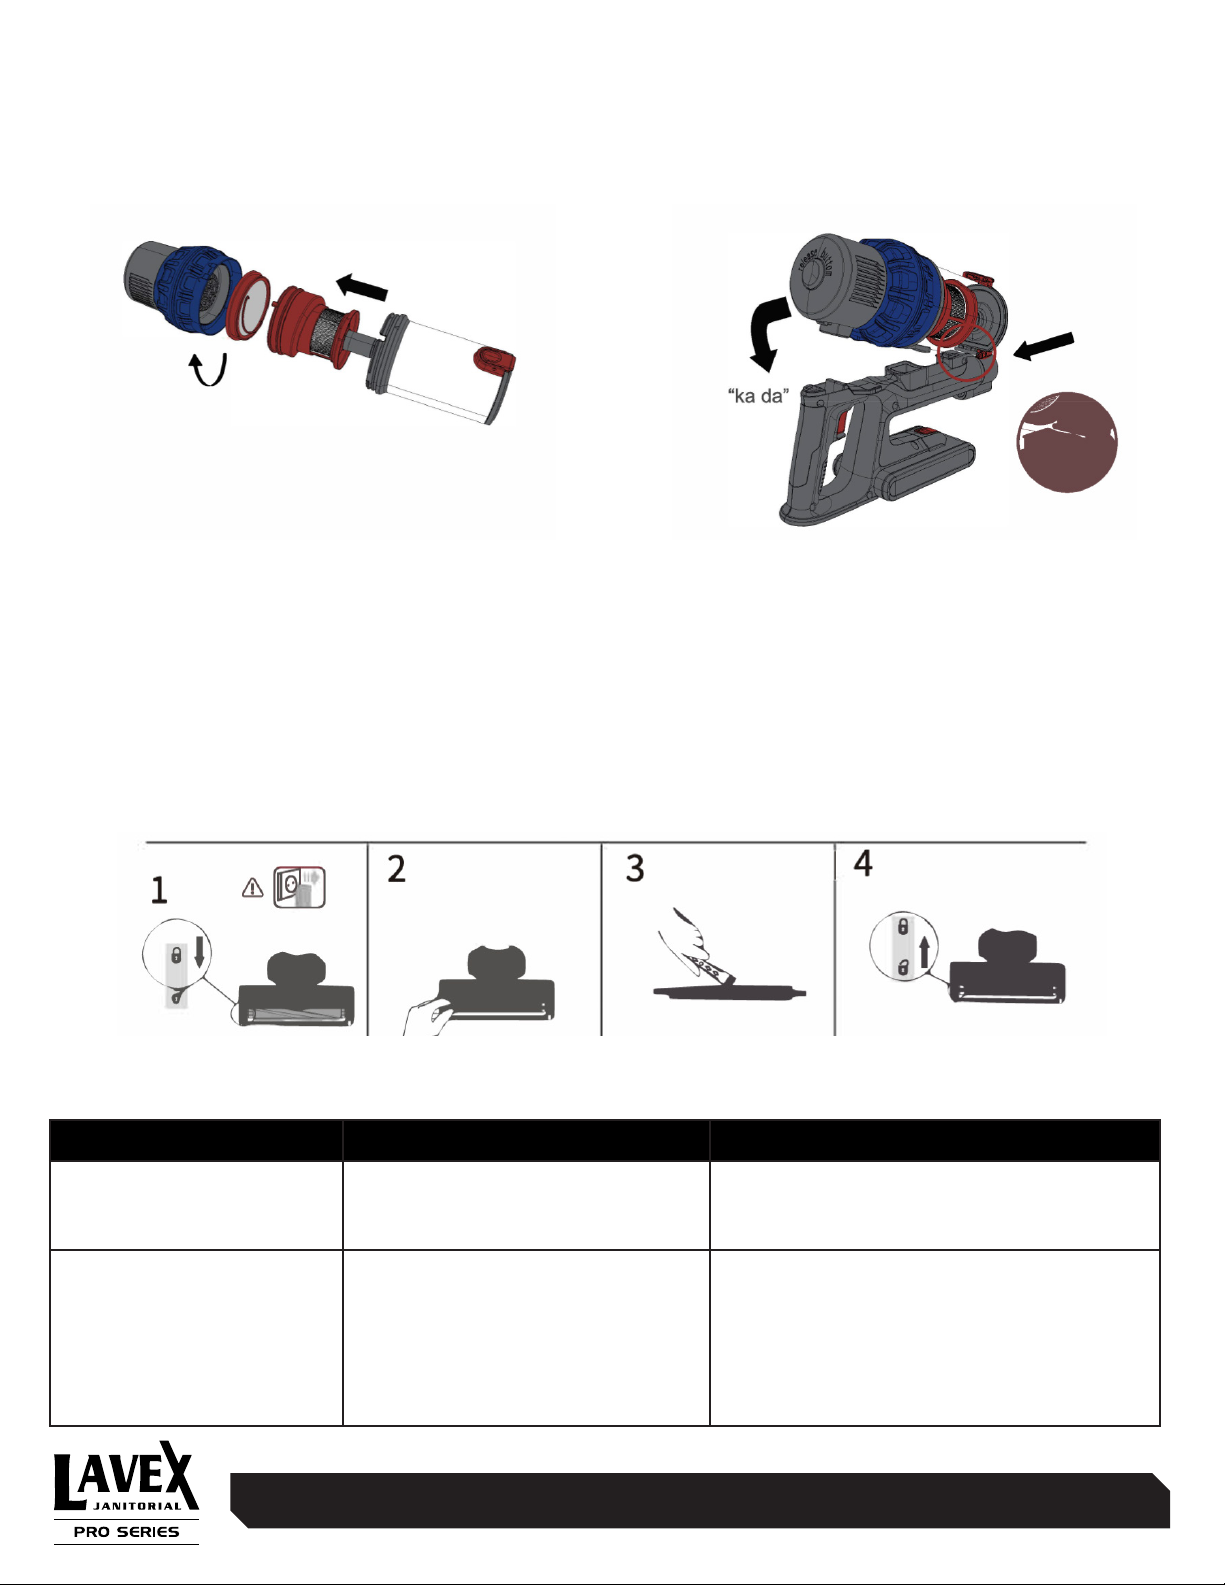
5. Reinstall the filter by turning
clockwise along with the buckles of
the unit before twisting shut.
6. Reinstall the main body by putting
the hook into the hole. Push from
the rear, stopping when you hear the
mechanism lock.
5.3 BRUSH ROLLER CLEANING
1. Twist the button on the electric brush head counterclockwise and pull out the brush
roller.
2. Tilt and shake the brush roller to pour out dirt, then use the brush cleaning tool to
remove any leftover detritus.
3. The brush roller is washable. Before replacing, check that the brush roller is
completely dry.
4. Push in and twist the button clockwise to reinstall the brush roller
6. TROUBLESHOOTING
COMMON TROUBLE POSSIBLE CAUSES SOLUTIONS
Main unit not working
• Low Battery power
• Suction inlet blocked
• Charge the unit before use
• Remove blockage in suction inlet
Weak suction
• Dust bin or filters blocked
with dust
• Rolling brush is jammed with
hair or long straps
• Remove the dust inside the bin or
filters
• Remove hair or long straps from
rolling brush

INSTRUCTION MANUAL • 9
CUSTOMER SERVICE
Dear customer,
Thank you for purchasing our product. If you are satisfied with your
purchase, please leave us a review to share your feedback with
other customers and let us know if we can oer better service. If you
encounter problems, please email us so that we can oer you the
service you require.
Thank you again for your purchase.

INSTRUCTION MANUAL • 10
LIMITED WARRANTY
WHAT THIS WARRANTY DOES NOT COVER:
Lavex will not warrant coverage for product failure or damages that arise under the following conditions:
• Parts of the vacuum that require replacement under normal use, such as bumpers, brushrolls,
belts, and filters.
• Damages or malfunctions caused by negligence, abuse, improper use, or actions not in
accordance with the User Manual.
• Equipment used for residential or other non-commercial purposes.
• Defects or damages caused by improper maintenance, use of any replacement parts other than
Lavex Janitorial original parts, wear and tear, misuse, abuse, vandalism, or Act of God.
Lavex Janitorial will, at its option, repair or replace a defective vacuum or vacuum part that is covered by
this warranty. As a matter of warranty policy, Lavex Janitorial will not refund the consumer’s purchase price.
Lavex Janitorial does not recognize third-party sales; the warranty is null and void if the unit is purchased
from any non-authorized dealer.
The seller shall in no event be liable for direct, indirect, or consequential damages in connection with
Lavex Janitorial products.
This warranty explicitly does not apply to, and Lavex Janitorial is not responsible for, any warranty claims
made on products sold or used outside of the United States.
Lavex Janitorial attempts to ensure that their products comply with codes and regulations dictating sales,
construction and use. However, Lavex Janitorial cannot guarantee compliance, and cannot be responsible
for their products’ use. Be sure to review product application as well as local and national codes and
regulations to ensure compliance before use.
Any action for breach of this warranty must be commenced within 1 year of the date on which the breach
occurred. No modification of this warranty, or waiver of its terms, shall be eective unless approved in a
writing signed by the parties. The laws of the Commonwealth of Pennsylvania shall govern this warranty
and the parties’ rights and duties under it. Lavex Janitorial shall not under any circumstances be liable for
incidental or consequential damages of any kind, including but not limited to loss of profits.
FOR WARRANTY INQUIRIES OR SERVICE:
To obtain warranty service, contact the location where you purchased the product:
www.WebstaurantStore.com:
The Restaurant Store:
If you purchased this product from your local store location, please contact your store directly.
www.TheRestaurantStore.com:
If you purchased this product online, call 717-392-7261.
You must have your order number ready when contacting.
Clark Food Service Equipment, PRO Marketplace, Hometown Provisions:
Please contact your account manager directly. If you do not know your account manager,
please call 717-392-7363 for CFSE and Pro Marketplace or 717-464-4165 for Hometown Provisions
Failure to contact the designated location prior to obtaining equipment service may void your warranty.
Lavex Janitorial makes no other warranties, express or implied, statutory or otherwise, and
HEREBY DISCLAIMS ALL IMPLIED WARRANTIES, INCLUDING THE IMPLIED WARRANTIES OF
MERCHANTABILITY AND OF FITNESS FOR A PARTICULAR PURPOSE.
Other manuals for PRO Series
1
This manual suits for next models
2
Table of contents
Other Lavex Vacuum Cleaner manuals

Lavex
Lavex 944BJ14121G User manual

Lavex
Lavex 457LAVBP10QT User manual

Lavex
Lavex 944BJ1235G User manual

Lavex
Lavex 457LAVEXDM15 User manual

Lavex
Lavex 457LAVBP6QT User manual

Lavex
Lavex 457LAVBP8QT User manual

Lavex
Lavex 944BJ162213G User manual

Lavex
Lavex 457VC8002BL User manual

Lavex
Lavex PRO Series User manual

Lavex
Lavex 457PRO9GAL User manual


