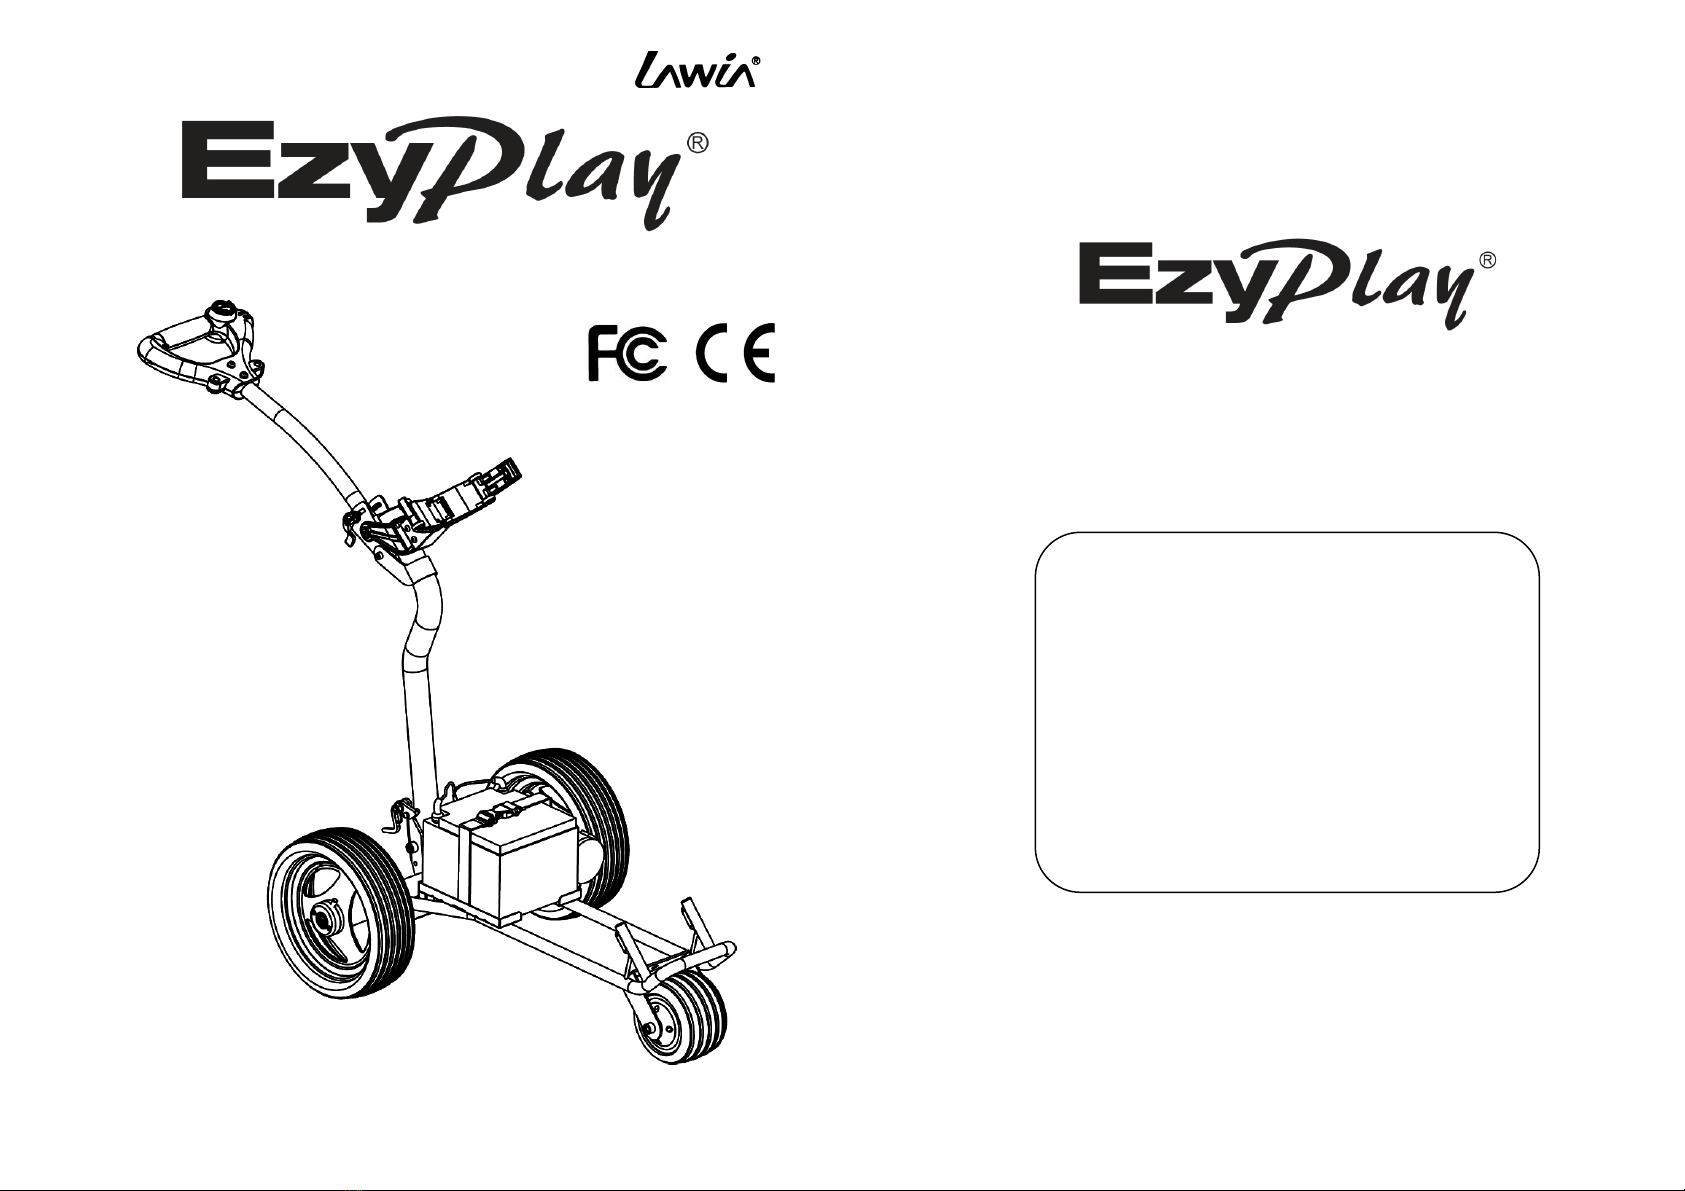
Lawia Ezyplay 89061 Manual
DIRECTIONS FOR USE
Distributor:
MODEL:# 89061
P/N: 906116

FEDERAL COMMUNICATION COMMISSION
INTERFERENCE STATEMENT
This equipment has been tested and found to comply with the limits for
a Class B digital device, pursuant to Part 15 of the FCC Rules. These
limits are designed to provide reasonable protection against harmful
interference in a residential installation. This equipment generates,
uses and can radiate radio frequency energy and, if not installed and
used in accordance with the instructions, may cause harmful
interference to radio communications. However, there is no guarantee
that interference will not occur in a particular installation. If this
equipment does cause harmful interference to radio or television
reception, which can be determined by turning the equipment off and
on, the user is encouraged to try to correct the interference by one of
the following measures:
- Reorient or relocate the receiving antenna.
- Increase the separation between the equipment and receiver.
- Connect the equipment into an outlet on a circuit different from that
to which the receiver is connected.
- Consult the dealer or an experienced radio/TV technician for help.
This device complies with Part 15 of the FCC Rules. Operation is
subject to the following two conditions: (1) This device may not cause
harmful interference, and (2) this device must accept any interference
received, including interference that may cause undesired operation.
FCC Caution: Any changes or modifications not expressly approved by
the party responsible for compliance could void the user's authority to
operate this equipment.
This transmitter must not be co-located or operating in conjunction with
any other antenna or transmitter.

Table of contents
NOTE
Battery, Scorecard holder and Wheels may vary from each market.
SAVE THIS MANUAL FOR FUTURE REFERENCE.
- 1 -
REMOTE CONTROL IMPORTANT
(For Distance Remote model)
Keeping extra care while use this distance remote caddy, be careful
to avoid mis-press from the buttons of remote transmitter and always
dis-connect main battery connector while not in use.
Read this manual before you start to use this trolley.
This remote control was preset in factory for full speed.
Do not operate around cars or building with remote control.
Do not direct trolley towards to other players or carts with remote
control.
Always keep watch while operating remote control.
Don’t operate remote control while unattended.
The remote distance may be reduced by possible effected of
Electromagnetic Interference on your remote golf trolley.
Do not operate remote control when up and down slopes.
Use manual mode in car parks, down steep hills, confined space or
where there are lots of peoples.
Do not operate in indoor with remote control.
It is recommend to use remote control within 50 yards, this trolley is
designed to operate within range of 50 yards.
The remote distance may be reduced by possible effected of
Interference on your remote golf trolley. Interference can be included
electromagnetic, high voltage power lines, cellular phones or CB
radios, or certain obstructions such as mounds, clusters of trees, will
possible reduce the distance of transmission.
Keep shipping carton in dry place after unpacking your unit for in case
should need to be shipped for service.
- 2 -
Contents Pages
Remote Control Important - - - - - - - - - - - - - - - - - - - - - - - - - - -2
Electromagnetic Interference - - - - - - - - - - - - - - - - - - - - - - - - -3
Release and Assemble the Wheels - - - - - - - - - - - - - - - - - - - - 4
Assemble Upper Bag Holder - - - - - - - - - - - - - - - - - - - - - - - - -5
Opening the Trolley - - - - - - - - - - - - - - - - - - - - - - - - - - - - - - - - 6
Handle Height adjustment- - - - - - - - - - - - - - - - - - - - - - - - - 8
Precaution - - - - - - - - - - - - - - - - - - - - - - - - - - - - - - - - - - - - - 9
Auto. Switch Off / Electronic System - - - - - - - - - - - - - - - -- - 10
Direction for use - Distance remote - - - - - - - - - - - - - - - - - 11
How to pair remote transmitter with your caddy- - - - - - - - - - - - 12
Battery for remote transmitter - - - - - - - - - - - - - - - - - - - - 13
Motor brake – option model - - - - - - - - - - - - - - - - 14
Folding the trolley- - - - - - - - - - - - - - - - - - - - - - - - - - - - - - - 15
Battery and Charger- - - - - - - - - - - - - - - - - - - - - - - - - - - - - - 18
Battery Charger - - - - - - - - - - - - - - - - - - - - - - - - - - - - - - - - - 19
Battery Care & Maintenance - - - - - - - - - - - - - - - - - - - - - - - 20
How to Move the Trolley to Your Car - - - - - - - - - - - - - - - - -- - 21
Repackaging Instruction - - - - - - - - - - - - - - - - - - - - - - - - - - - 22
ELECTROMAGNETIC INTERFERENCE
(For Distance Remote model)
: It is very important that you notice and understand
this information regarding the possible effects of Electromagnetic
Interference on your remote golf trolley.
Electric remote golf trolley may be susceptible to electromagnetic
interference (EMI), which is interfering electromagnetic energy (EM)
emitted from sources such as radio stations, TV stations, amateur radio
(HAM) transmitters, two-way radios, and cellular phones. The
interference (from radio wave sources) can cause the remote golf
trolley, reduced its remote distance, move by itself, or move in
unintended directions.
It is recommended to do following when your trolley is unattended:
Always disconnect main battery connector before leaving your trolley
or while unattended.
This trolley complies with current telecommunications regulations for
conforms to CE and FCC, but we strong recommend you read this
manual completely before you start to use your trolley.
- 3 -
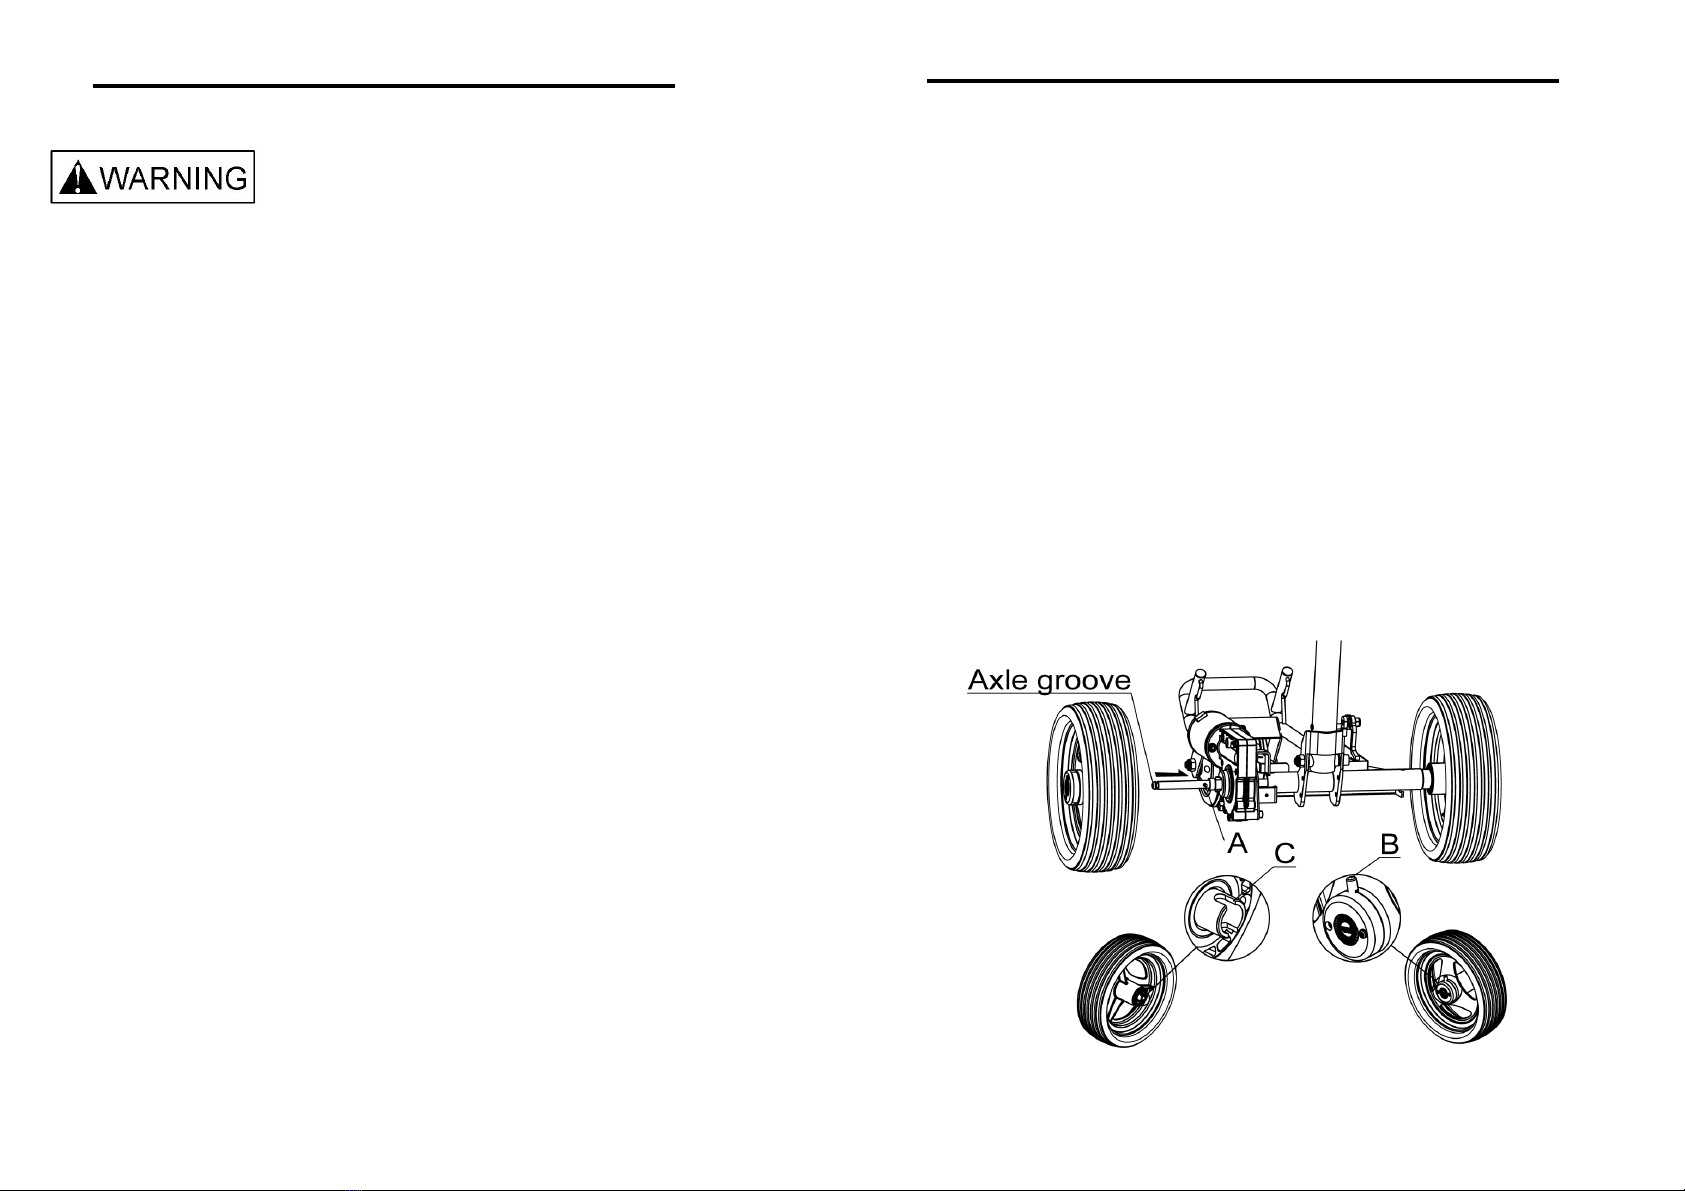
RELEASE AND ASSEMBLE THE WHEELS
To assemble the wheels:
Insert the wheel on the axle in the direction of the arrow.
Open the locking system B, then insert onto the axle, put slot C onto
the pin A.
Release locking system B and make sure the wheels have been
locked.
On the inside of the wheel, there is a color mark, the red dot for the
right side and blue dot on the left side.
Free wheeling: (for Motor brake model)
In case of power failure, for easier to push your trolley, the wheels can
be disengaged from motor by putting the locking system on outside of
axle groove.
To release the wheels:
Open the locking system B, then pull out the wheel.
Inflate the air tire model to a maximum of 1.2 bar (18 PSI) for air tire.
- 4 -
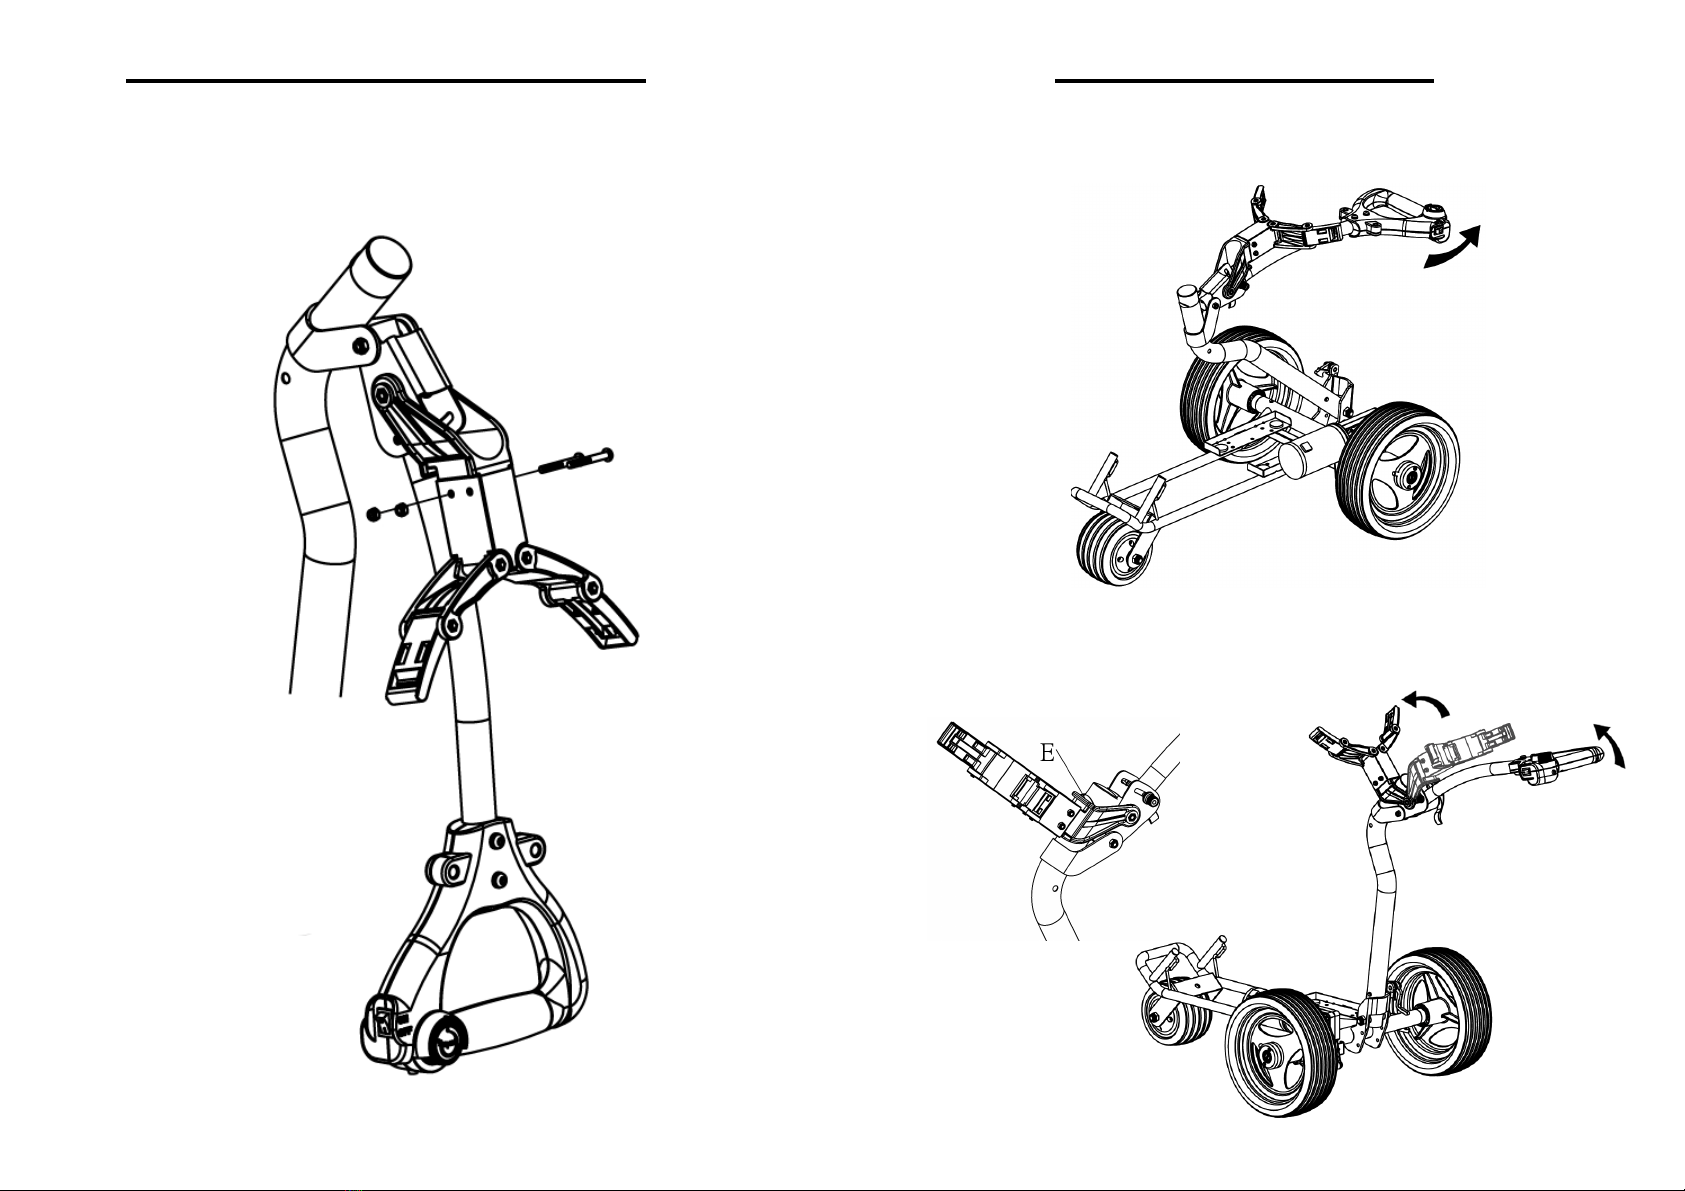
ASSEMBLE UPPER BAG HOLDER
Before you start to use your trolley, please assemble the upper bag
holder as per illustrated.
- 5 -
OPENING THE TROLLEY
Pull the handle upward in the direction of the arrow, until you hear the
“click” of it locking into position of main frame mechanism.
Pull the handle upward and press the upper bag holder downward (in
the direction of the arrow), to let the upper bag holder lock into
position E.
- 6 -
To extend 4
th
wheel (for distance remote model)
Pull the knob G with one hand and pull the 4
th
(back) wheel backward
with your other hand until you hear it “click” of locking into position.
Install the battery and fasten it securely.
Load golf bag on bag holder and fasten straps correctly.
Plug in the battery connector.
- 7 -
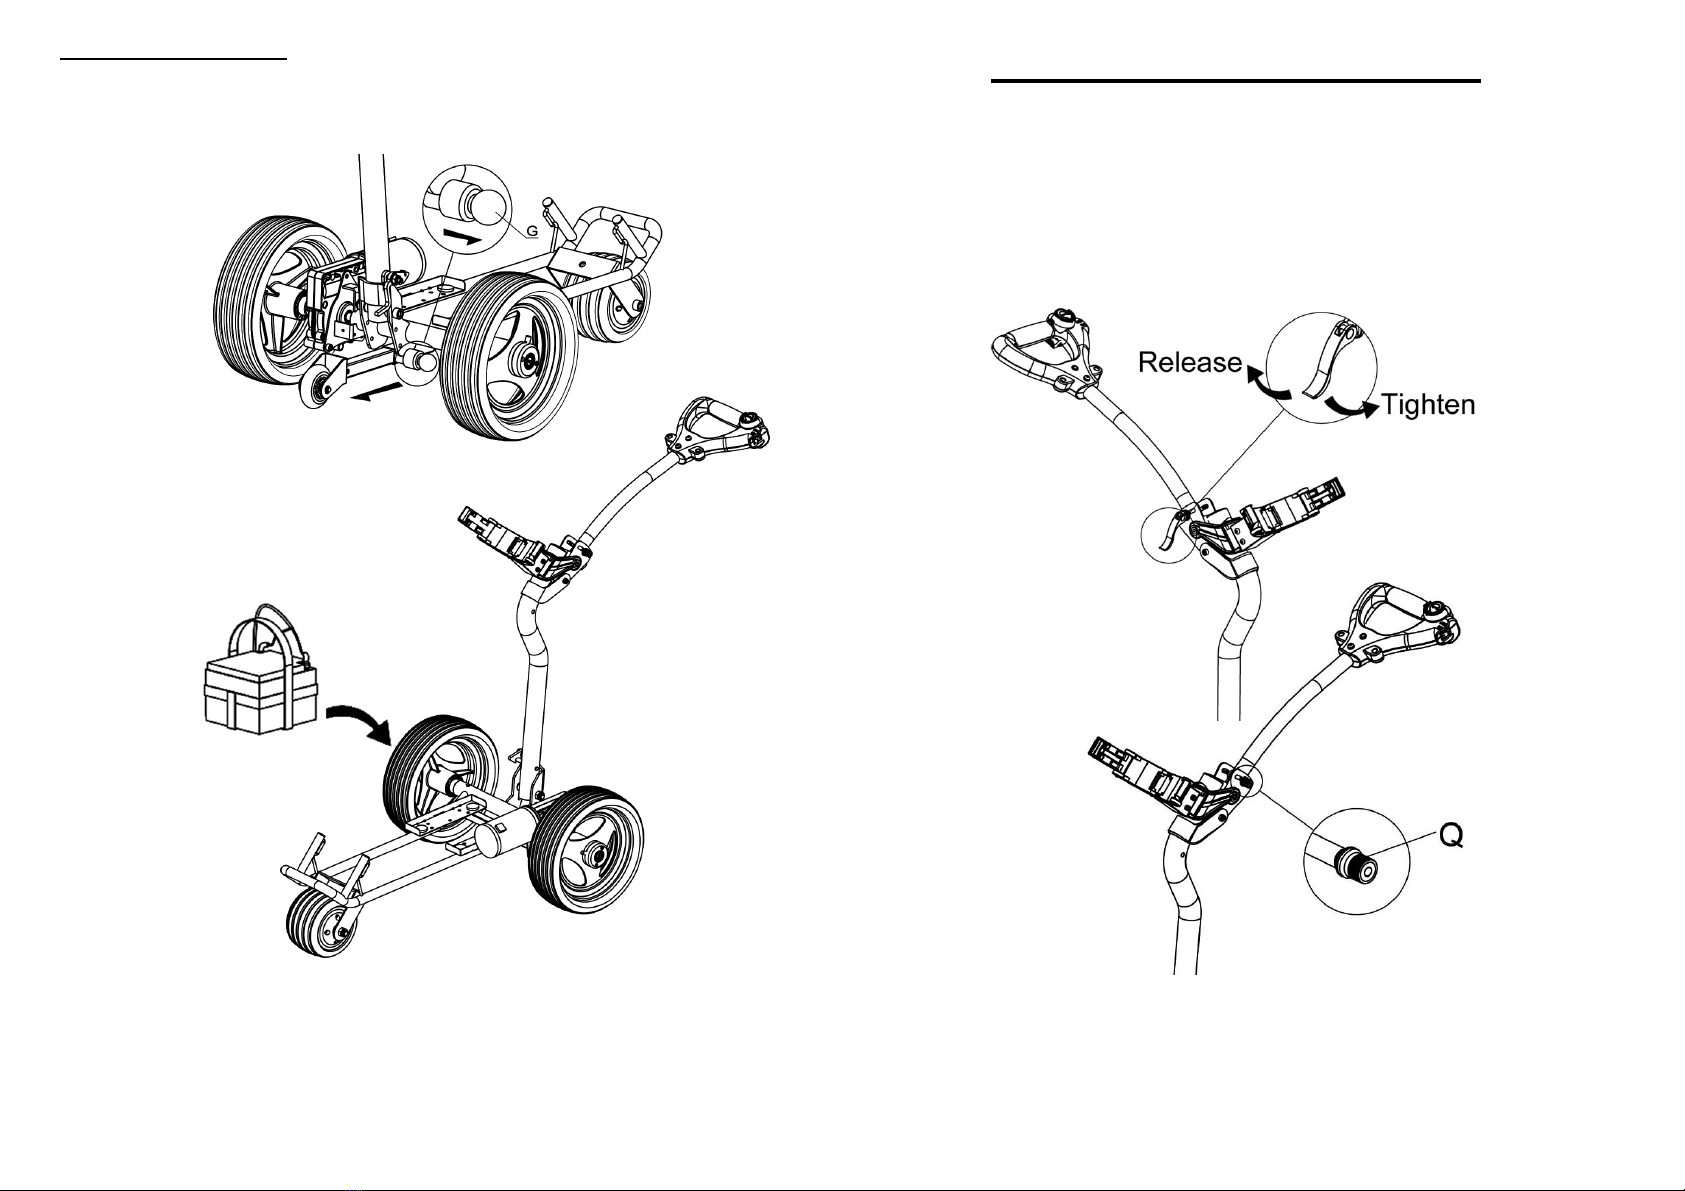
HANDLE HEIGHT ADJUSTMENT
Adjust the height of the handle where you find most comfortable to
operate.
Adjust nut (Q) and press the lever to tighten the handle.
- 8 -
PRECAUTION
Take extra care to practice for operation in the spacious area.
Do not overload the base pockets of your golf bag, the more weight
on the trolley will result in less maneuverability and will use more
power from the battery.
Always switch power off and pull off the battery connection before
leaving your trolley or while unattended.
Never use this trolley for carry anything other than a golf bag and
clubs.
It is recommend to use manual mode and take extra care to operate
for narrow paths on up and down slope, and it is best to hold the
handle grip.
Always walk with your trolley, maintaining a reasonable distance of
within 50 yards between you and trolley at all time.(For Distance
Remote model)
Do not store your trolley outside without adequate protection.
Keep shipping carton in dry place after unpacking your unit in case it
should need to be shipped for service.
NOTE: Please be aware that should the trolley hit any obstruction, you
will need to help it out manually. Continuing to attempt the power
output when the trolley is stuck will result in damage.
Avoid power spray water washing on trolley as this could cause
damage to the wire connectors and electronic system.
Completely dry off the trolley, if necessary, use a dry cloth to clean your
trolley.
- 9 -
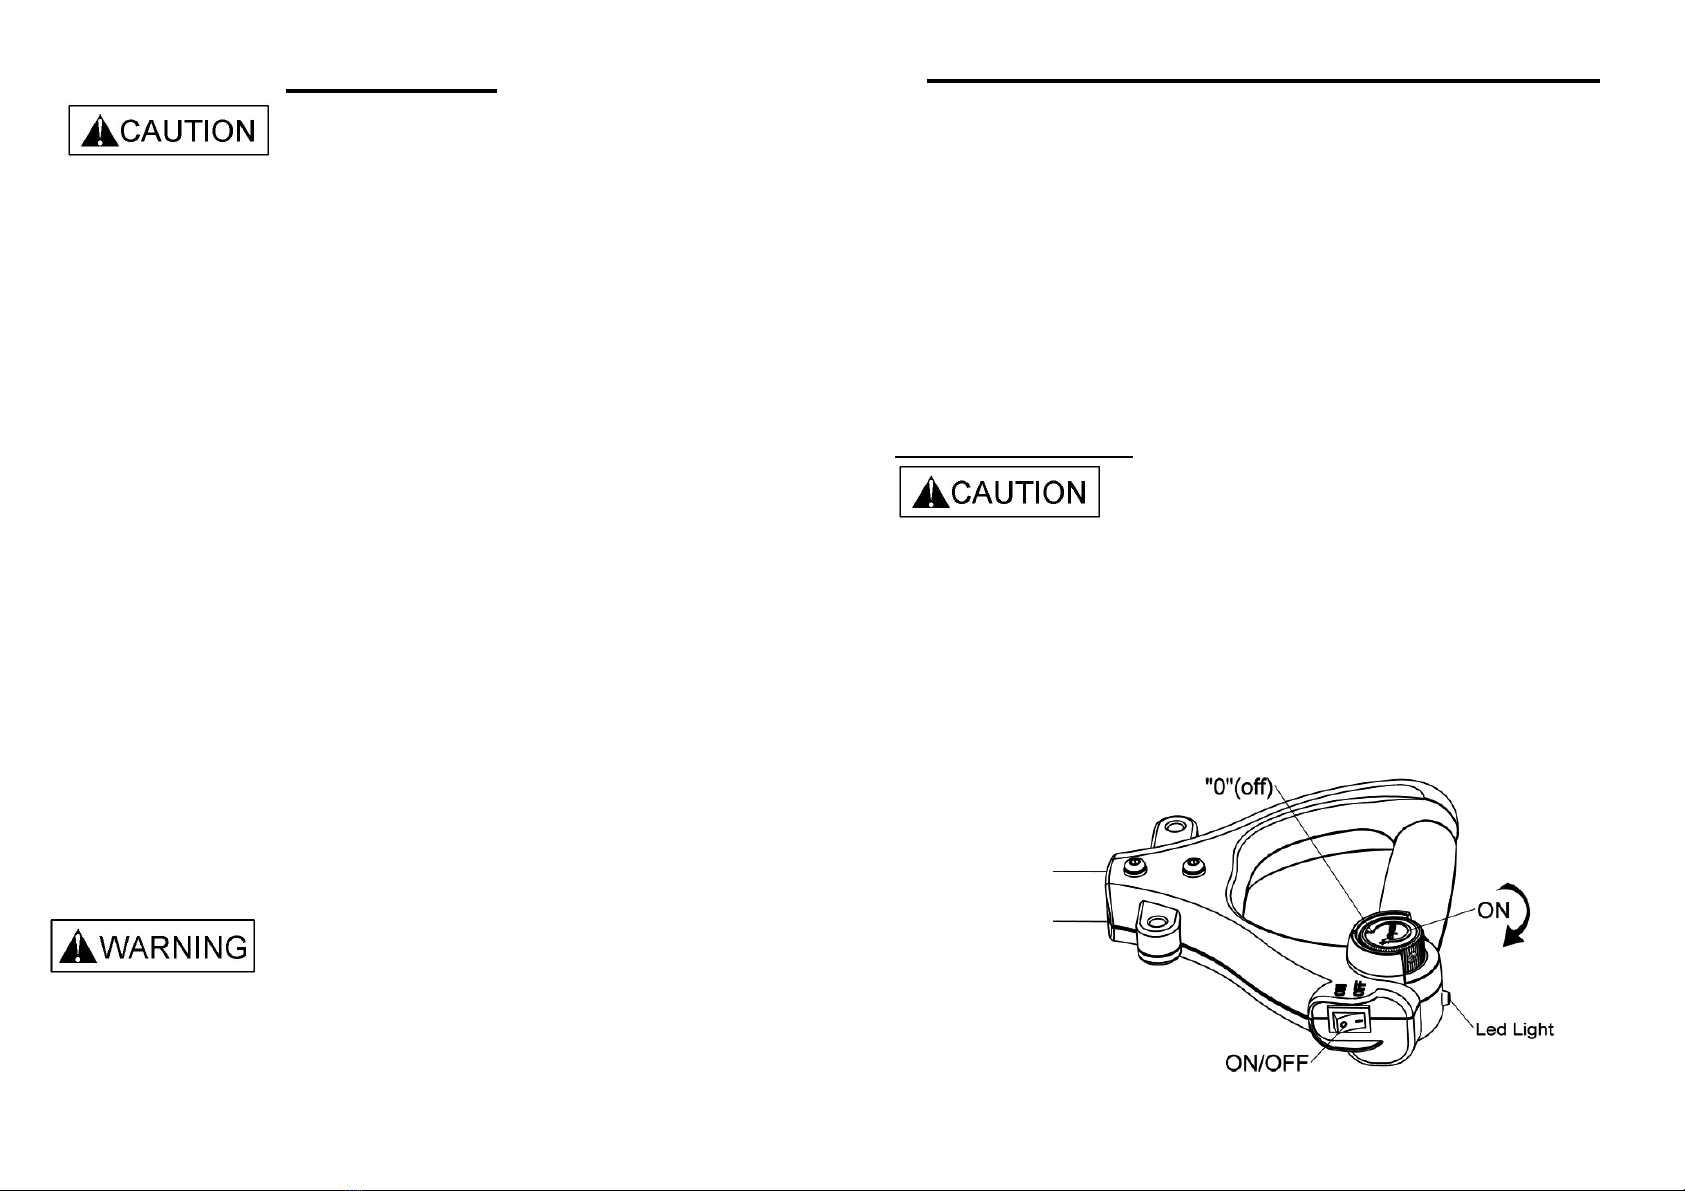
AUTO. SWITCH OFF/ ELECTRONIC SYSTEM
The electronic system of this trolley is protected by a digital current
cut-off system. In case your trolley stops, you must turn the main
ON/OFF switch (on handle grip) to the OFF position, then switch to
the ON-position to continue.
When trolley stops by digital cut-off system, the green and red led
light (on handle grip) will flash intermittently.
If this happened, the led light can be reset by ON/OFF switch on
handle grip.
IMPORTANT NOTICE
When operating from the handle grip, before you switch to ON
position, the potentiometer button must be turned back to “0” (zero)
position.
Always switch power off and keep potentiometer on “0” (zero) position
(on handle grip) before leaving your trolley or while unattended.
- 10 -
DIRECTION FOR USE – DISTANCE REMOTE
Indicators On Handle
LED Color
Green... Remote on
Yellow... 10 Second Distance Timer on
Red Flashing... Battery level Low
Red Continuous... Battery Level Critical
Green Flashing... Reset from On/Off switch to continue OR
Red Flashing... Press any button on remote transmitter
Remote Operation
Large Button... Stop/Start the Caddy
(
Factory pre set
speed ,maximum 1 minute run time for user safety
)
Small Triangular
Button...
10 Second Distance Timer
(
caddy will run for 10
second and then stop
)
Switch from Hand
Control to Remote... Press any button on Remote Fob
Switch from Remote to
Hand Control... Switch use on/off switch on handle
- 11 -
NOTE
The large button on transmitter will be disregarded if press twice
within one second.
HOW TO PAIR REMOTE TRANSMITTER WITH YOUR
CADDY.
For occasions where the transmitter is replaced.
1. Start with ON/OFF switch (on handle grip) in OFF position,
switch potentiometer in “0” zero position and re-connect the
battery.
2. Switch to ON and back to OFF position 3 times within one
minute from the battery re-connection.
3. Confirm green LED light on Handle is quick flashing.
4 Push any button on remote transmitter - the LED light will
steady on and the caddy will start.
The new transmitter is now been paired successfully.
This remote control was preset in factory for full speed.
It is recommend to use remote control within 50 yards, this trolley is
designed to operate within range of 50 yards. It may lose control from
remote transmitter if over 50 yards.
- 12 -
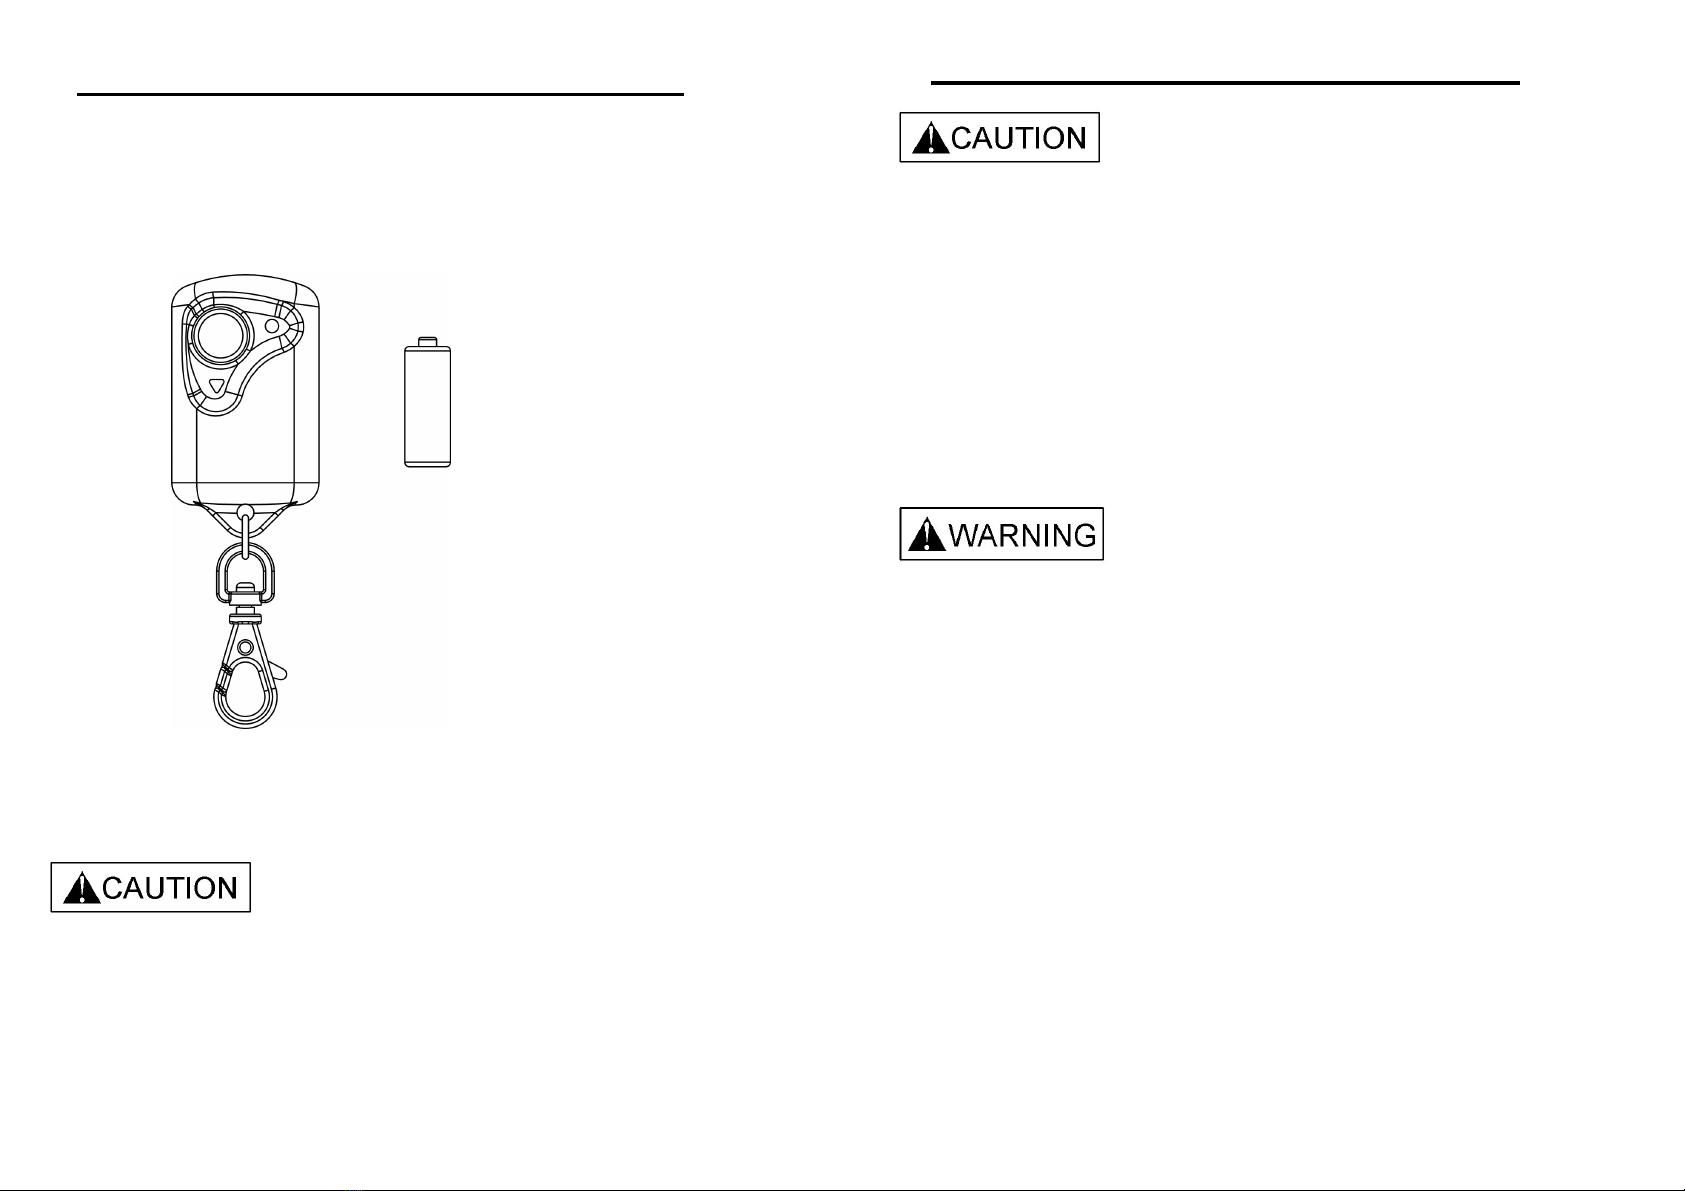
BATTERY FOR REMOTE TRANSMITTER
(DISTANCE REMOTE MODEL)
Your remote transmitter is contained with 12V 23a battery.
The battery contained in the remote transmitter need be replaced when
the operation of remote distance reduced and /or led light becoming
lower.
- 13-
MOTOR BRAKE – OPTION MODEL
This motor brake trolley have equipped with differential gear box for
making easier turn, you must push the handle to let front wheel up
before turning direction.
The motor brake model is equipped and control the brake function by
digital electronic system, you just need to set the speed through
potentiometer.
The differential gear may easier to wear off when in heavy turn and or
over weight loading.
- 14 -

FOLDING THE TROLLEY
Undo the bag strap and unload golf bag.
Pull the knob G with one hand and push the 4
th
(back) wheel forward
with your other hand until you hear it “click” of locking into position.
Unplug the connector from battery, undo the strap and remove the
battery.
- 15 -
Hold the handle up with one hand and have your other hand to pull
the upper bag holder upwards.
Push down the locking lever T and push the upper frame downward
to fold the trolley.
- 16 -
Pull away

Do not forget to recharge your battery.
The battery must be installed last and taken out first.
- 17-
BATTERY AND CHARGER
When you get your brand new
battery, put it on charge for at
Least 24 hours.
Leave your battery recharging
for at least 12 hours after every
round of golf.
Do not leave your battery on the
trolley for recharging. (Remove
battery from the trolley for recharging)
The negative and positive pole of the
battery must be in the upright position
for recharging.
To ensure that the battery is fully charged, it is recommended to leave the
charger connected to the battery with the mains switched on until the
battery is needed.
Study charger instruction (on back side of charger) before charging your
battery.
IMPORTANT NOTICE:
Please DO NOT leave your battery near metal parts in the free position which
might touch on the positive and negative pole of the battery. If this happens it
might spoil and explode the battery. DO NOT dispose of battery in fire.
Improper storage and disposal of the battery could result in explosion causing
injury and or property damage.
- 18 -
Pull away

BATTERY CHARGER
Before charging, read the instructions. (on back side of charger)
For indoor use only, do not expose to rain.
If the supply cord is damaged, it must be replaced by the
manufacturer, its service agent or similarly qualified persons in order
to avoid a hazard.
Disconnect the supply before making or breaking the connections to
the battery.
Batteries contain explosive gases. Prevent flames and sparks.
Provide adequate ventilation during charging.
This appliance is not intended for use by persons (including children)
with reduced physical, sensory or mental capabilities, or lack of
experience and knowledge, unless they have been given supervision
or instruction concerning use of the appliance by a person
responsible for their safety. Children should be supervised to ensure
that they do not play with the appliance.
This charger is not for recharging non-rechargeable batteries.
During charging, the battery must be placed in a well ventilated area.
The battery charger must only be plugged into an earthed
socket-outlet.
Do not use for charge any other batteries not specified by the
manufacturer.
- 19 -
BATTERY CARE & MAINTENANCE
TO prolong the life span of the battery:
•Before the first time use of your battery, put it on charge for 24 hours
even if the battery is already fully charged.
•Do not place the battery on a concrete floor for charging, have the
battery raised off the floor on wooden blocks or place the battery on a
shelf.
•For fully charge the battery, choose a place where ambient
temperature is above 10 degrees Celsius (+10ºC).
•Always recharge your battery as soon as possible after use.
•Always keep your battery on charge between games, if you play golf
regularly every week.
•Never play 18 holes without fully recharging. You will discharge the
battery below its designated voltage and damage it.
•Do not drop the battery. Avoid storing the battery in the trunk of your
car as it might roll around and be damaged.
•STORAGE: (This also applies for new batteries kept in stock)
If you know that you will not be playing for next 3 weeks or so.
REMOVE BATTERY FROM THE CHARGER AND STORE IN A
PLACE WHERE THE AMBIENT TEMPERATURE IS ABOVE 10
DEGREES AND LOWER THAN 30 DEGREES CELSIUS. Recharge it
before your next round or every 3 months (No more than 3 months)
if it is not used in that period.
Disconnect charger from power supply.
•
Always contact our service agent before you try to replace the battery
or the charger. Using an incompatible battery or charger may damage
the trolley and void your warranty.
- 20 -

HOW TO MOVE THE TROLLEY TO YOUR CAR
Remove the battery from trolley.
Fold the trolley.
Using the strap from battery tray for tighten the handle bar.
- 21 -
REPACKAGING INSTRUCTION
Keep shipping carton in dry place after unpacking your unit.
Follow the way and position as illustrated above to do repacking your
unit for in case should need to be shipped for service or whatever
purpose.
- 22 -
Table of contents


