LawnMaster FD2402 User manual

Instruction Manual
2400W Garden Shredder FD2402
WARNING: Read all safety instructions carefully before assembling and operating this
machine. Ensure the machine has been assembled correctly and safely. Keep the instructions
safe and pass them on to any subsequent user so that the information is always available.
Original Instructions

8
7
34
25
1
6
16
17
19
18
20
21
9
10
11 12
13
14
15

4
TABLE OF CONTENTS
Section Page
Symbols
Safety Information
In the Box
Assembly
Operation
Maintenance
Troubleshooting
Technical Data
Recycling and Disposal
5
6-12
13
13-14
14-17
17-18
19
20
20
5
SYMBOL DESIGNATION/EXPLANATION
Caution
Read instruction manual.
Wear eye and ear protection.
Wear hand protection.
Do not expose to rain.
Switch off and remove the plug from the mains before adjusting, cleaning or if
the cord is entangled or damaged.
Danger! Rotating blades. Keep hands and feet out of openings while the
machine is running.
WARNING! Danger from ying objects. Keep your distance from the funnel and
ejection area. Keep bystanders away.
Wait until all machine components have completely stopped before touching
them.
Do not use as a step.
Noise level specication Lwa in dB(A).
Protection class II (Double insulation).
Do not dispose of electrical equipment in domestic waste.
Protection against contact with the ngers and solid foreign bodies with
Ø≥12.5mm, as well as protection against splashed water from all directions.
Machine operated intermittently each cycle comprising a period of operation of
40s at rated power input and a period of 60s with the machine at no load.
SYMBOLS
The following warning symbols appear throughout this manual and indicate the
appropriate safety measures you should take when operating and maintaining the
appliance.
IP24
P40
107
6
■ Read the instructions carefully. Be familiar with the controls
and the proper use of the machine.
■Never allow people unfamiliar with these instructions or
children to use the machine. Local regulations may restrict
the age of the operator.
■The operator or user is responsible for accidents or
hazards occurring to other people or their property.
■Keep this manual in a safe place so that the information is
available at all times.
SYMBOLS
To avoid serious personal injury, do not attempt to use this product until you read thoroughly and
understand completely the instruction manual.
If you do not understand the warnings and instructions in the instruction manual, do not use this
product.
WARNING
SAFETY INFORMATION
When using this equipment, the following safety precautions
must be followed to avoid injuries and damage.
IMPORTANT!
READ CAREFULLY BEFORE USE. KEEP FOR FUTURE
REFERENCE.
IMPORTANT

7
■If you give the equipment to any other person, give them
these operating instructions as well.
■We accept no liability for damage or accidents which result
from non-compliance with these instructions.
■Observe local noise and other regulations.
Preparation
■ This appliance must not be used by people (including
children) with reduced physical, sensory or mental
capabilities, or lack of experience and knowledge, unless
they have been given supervision or instruction concerning
use of the appliance by a person responsible for their
safety.
■Children must be supervised to ensure that they do not
play with the appliance.
■Never operate the shredder while people, especially
children, or pets are nearby.
■Wear appropriate ear and eye protection at all times when
operating the shredder.
■Wear appropriate protective clothing, such as protective
gloves, rm footwear and long trousers. Do not operate the
shredder when barefoot or wearing open sandals. Do not
wear loosely tting clothes, or clothes with dangling cords
or belts.
■ Only use the shredder in the open (that is, away from walls
or other rigid structures) and on a rm, level surface.
■Do not operate the shredder on a paved or gravel surface
where ejected material could cause injury.
■Before use, always visually inspect to see that the
shredding means, all of the nuts, bolts and other fastenings
are tight. Covers and shields must be fastened properly
SAFETY INFORMATION

8
SAFETY INFORMATION
and in good working order. Replace any damaged or
illegible stickers.
■Before use, check the power supply and extension
cord for signs of damage or aging. If the cord becomes
damaged during use, disconnect the cord from the supply
immediately. DO NOT TOUCH THE CORD BEFORE
DISCONNECTING THE SUPPLY. Do not use the machine
if the cord is damaged or worn.
■For your personal safety use replacement parts
and accessories supplied and recommended by the
manufacturer.
■Only supply power to the machine through a circuit
protected by a residual current device (RCD) with a tripping
current of not more than 30mA.
■Keep all guards and shields in place and in good working
condition.
Operational Safety
■ Before starting the shredder, make sure that the hopper
funnel is empty.
■Keep your head, hair and body away from the intake
opening.
■Do not reach into the hopper funnel during operation.
The shredder will continue to run for a short period after
switching it off.
■Keep hands, other body parts and clothing out of the
lling chamber and ejection channel, and away from other
moving parts.
■ Always make sure you are standing in a rm, balanced
position. Do not overreach. Do not lean forwards, and

9
SAFETY INFORMATION
never stand above the shredder when inserting materials.
■Always stand clear of the discharge zone when operating
this machine.
■Make sure that the material inserted into the shredder does
not contain hard objects made of metal, stone, glass or
similar.
■Do not use the shredder in the rain or in bad weather. Work
in daylight or under good articial lighting conditions.
■Do not operate the shredder when you are tired or
distracted, or under the inuence of alcohol or medication.
Always take a break when you need one and be sensible
about how you work.
■Do not leave the shredder working unattended.
■Shut off the shredder before attaching or removing the
collection bag.
■If the shredder is making unfamiliar noises or vibrations,
or the cutting mechanism has struck any foreign objects,
immediately switch it off, and allow the shredder to stop.
Disconnect the power cable and take the following steps
before starting up again:
- inspect for damage,
- replace or repair any damaged parts,
- check for and tighten any loose parts.
■Switch off the shredder and remove the plug from the
power supply under the following circumstances:
- when you are not using the shredder,
- transporting it or leaving it unattended,
- before releasing a jammed blade,
- when you are checking the shredder, cleaning it or
removing blockages,
- when you are carrying out cleaning or maintenance work or

10
SAFETY INFORMATION
replacing accessories,
- before moving or lifting the shredder.
■Do not transport or tilt the shredder with the motor running.
■Do not allow shredded material to accumulate near the
ejection area. This may otherwise hinder proper ejection
and force the material back up through the funnel.
■In the event of blockages in the machine intake or ejection
channel, switch off the motor and disconnect the machine
from the mains before removing leftover material in the
intake opening or ejection channel.
■ Ensure that the motor is free of rubbish and other
accumulations in order to safeguard the motor from
damage or possible re.
CAUTION
The following states how damage to the shredder and
possible injury to people can be avoided:
■ Handle the unit with care. Clean the ventilation slots
regularly and follow the maintenance instructions.
■ Do not overload your device. Work only within the indicated
range of performance. Do not use low power machines for
heavy-duty work. Do not use your device for purposes for
which it has not been designed.
■ Only switch the shredder off once the hopper funnel is
completely empty. The shredder may otherwise clog up
and not be able to start afterwards.
■ Do not attempt to repair the shredder yourself unless you
are qualied to do so.

11
SAFETY INFORMATION
Maintenance and Storage Safety
■ When the shredder is stopped for servicing, inspection,
or storage, or to change an accessory, shut off the power
source, disconnect the plug from the supply and make
sure that all moving parts have come to a complete stop.
Allow the shredder to cool before making any inspections,
adjustments, etc. Maintain the machine with care and keep
it clean.
■Store the shredder in a safe, dry place out of the reach of
children.
■Always allow the shredder to cool before storage.
■When servicing the shredder blade, be aware that even
though the power source is switched off due to the interlock
feature of the guard, the shredder blade can still be moved.
■Replace worn or damaged parts for safety. Use only
genuine replacement parts and accessories.
■Never attempt to override the interlocked feature of the
guard.
Electrical safety
CAUTION
The following states how to avoid accidents and injuries due
to electric shock:
■Only use extension cables that have been approved for
outdoor use and are earthed and splash-proof. The core
diameter for extension cables measuring up to 25m must
be at least 1.5mm2, and 2.5mm2for cables longer than
25m. Always roll the whole cable off the reel before use.
Check the cable for damage. If the cable is damaged whilst

12
SAFETY INFORMATION
the shredder is working, disconnect the mains plug from
the power supply immediately and then check the extent of
the damage. Never use the shredder if the cable is not in
perfect condition.
■Do not unplug the shredder by pulling on the cable, only
pull the plug itself. Keep the cable away from heat, oil and
sharp edges.
■Do not use the appliance if the on/off switch does not work
properly. Always have a damaged switch repaired by a
qualied technician.
■Do not touch the mains power supply cable under any
circumstances.
■If the power cable for this equipment is damaged, it must
be replaced by a qualied person in order to prevent
hazards.
Intended Use
This shredder is designed for domestic use only:
■ The shredder is intended for shredding brous and
wood-related materials such as hedge and tree cuttings,
branches, bark and pine cones. Any use not expressly
permitted in this manual may damage the shredder and
pose a serious danger to the user.
■ This product is intended for private domestic use only,
not for any commercial trade use. It must not be used for
any purposes other than those described. Any use of the
machine that deviates from its intended use and is not
included in these instructions is considered unauthorised
use and relieves the manufacturer from his or her legal
liability.
13
Assembly Preparation
■ Carefully remove all contents from the product packaging.
■ Ensure you have all the accessories and tool(s) needed for assembly and operation. This also
includes suitable personal protective equipment.
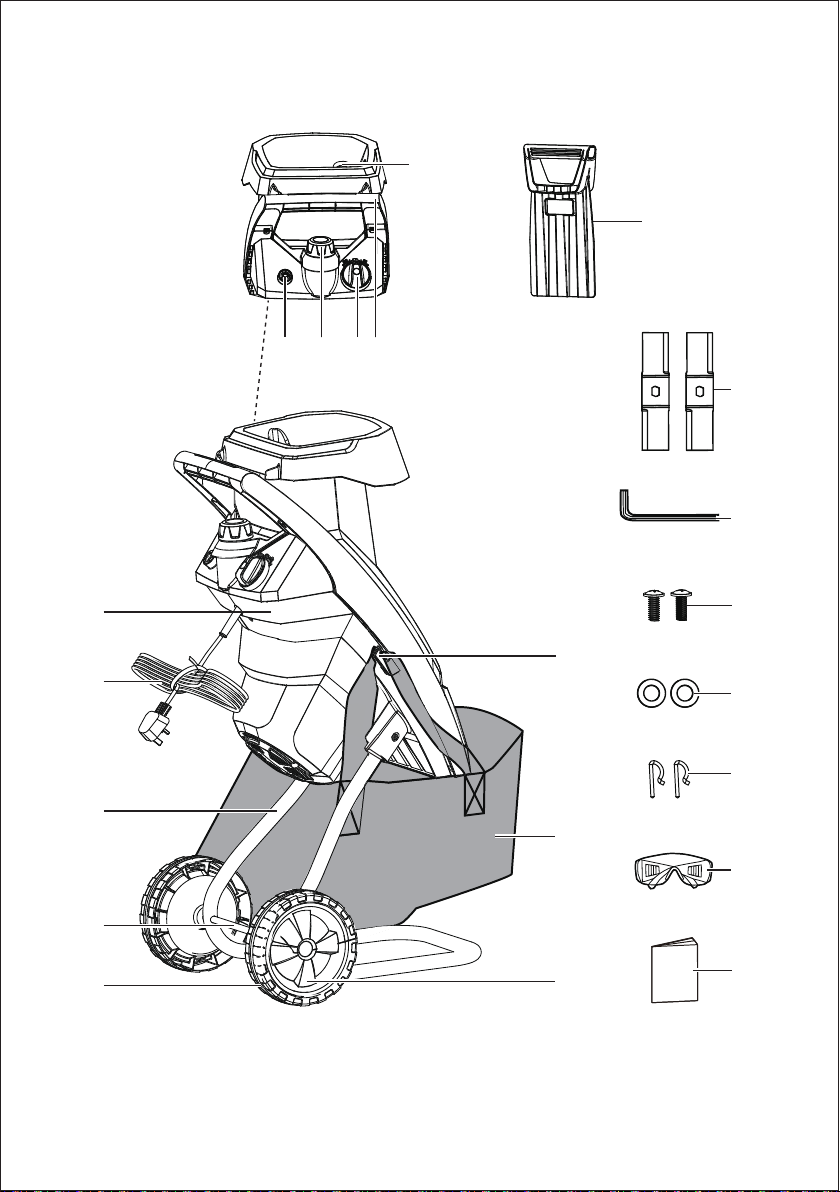
IN THE BOX
1. Hopper
2. Reset Button
3. Housing Interlock
4. On/Off Switch
5. Handle
6. Pusher
7. Shredder Unit
8. Power Cord
9. Chassis
10. Axle
11. Wheel
12. Wheel Cover
13. Collection Bag
14. Bag Mount
15. Blade (x2, With 1 Blade Pre-Installed inside
the Shredder Unit )
16. Allen Key (Stored Inside the Shredder)
17. Screw (x2)
18. Washer (x2)
19. Split Pin (x2)
20. Safety Glasses
21. Instruction Manual
ASSEMBLY
If any parts are damaged or missing do not operate this product until the parts are replaced.
Failure to pay attention to this warning could result in serious personal injury.
WARNING
Do not attempt to modify this product or create accessories not recommended for use with this
product. Any such alteration or modication is misuse and could result in a hazardous condition
leading to possible serious personal injury.
WARNING
Do not connect to power supply until assembly is complete. Failure to comply could result in
accidental starting and possible serious personal injury.
WARNING
14
OPERATION
ASSEMBLY
Never operate the shredder without the proper safety devices in place and in correct working
order. Never operate the shredder with damaged safety devices. Failure to pay attention to this
warning can result in serious personal injury. Make sure all packing is removed from product parts
before starting assembly.
WARNING
Assembling the Wheels (See Fig. 1)
■ Slide the axle into the chassis.
■ Slide the two wheels onto the chassis axle. Slip the washers ( ①) onto the axle and push the
split pins ( ②) through the appropriate holes in the axle (Fig. 1).
■ Clip the wheel covers onto the wheels.
Assembling the Chassis to Shredder Unit (See Figs. 2&3)
■ Rest the shredder unit on the hopper (upside down). Push the wheel chassis into the 2 holes in
the plastic housing of shredder. Secure with 2 screws provided (Fig. 2 & 3).
Attaching the Collection Bag (See Fig. 4)
■ Stand the shredder upright and hook the collection bag into the bag mounts as shown (Fig. 4).
Do not allow familiarity with this type of product to make you careless. Always pay attention when
operating this product, not doing so can result in serious injury.
WARNING
Always use protective equipment when working with the shredder. Do not use any attachments
or accessories not recommended by the manufacturer of this product. The use of attachments or
accessories not recommended can result in serious personal injury.
WARNING

15
Starting/Stopping the Shredder (See Fig. 5)
NOTE: Make sure that the hopper funnel is empty before starting. Starting the hopper when full
may result in the machine jamming.
■ Connect the machine to a suitable power supply.
■ Set the On/Off switch to “ON” to turn on the shredder (Fig. 5). Feed the material to be shredded
into the opening of the hopper. The material is drawn in and shredded.
■ Set the On/Off switch back to “OFF” to turn off the shredder (Fig. 5). It will continue to run for a
few seconds after switching off.
Clearing a Blockage (See Figs. 6-8)
Before starting to service or cleaning, turn off the shredder, disconnect the power plug, and wait
until the blade comes to a standstill.
■ Check that the power plug is removed from the power supply.
■ Unscrew the housing interlock anticlockwise.
■ Tip forward the front part of the shredder housing. Remove it completely and put it aside. You
now have full access to the blades (Fig. 6 & 7).
■ Remove any blockages.
■ Re-install the front part of the shredder housing onto the main housing securely. The bottom of
the front part of the shredder housing should be hooked into the main housing for a correct t
(Fig. 8). Tighten the shredder housing by tightening the housing interlock clockwise. The
shredder may not start if the housing has not been correctly tted.
Emptying the Collection Bag
■ Turn off the shredder.
■ Remove and empty the collection bag.
Keep proper balance and footing at all times. Do not overreach. Never stand at a higher level than
the base of the machine when feeding material into it.
WARNING
Avoid lling the collection bag too much. Mind that the bag will ll unevenly under the discharge
duct.
WARNING
OPERATION

16
Overload Protection
To reset the shredder: Wait a few minutes to let the motor cool down. Remove the blockages if
necessary. Press the reset button, and then turn on the unit.
Restart Prevention
The shredder will not automatically restart when the power returns after a power cut. To restart the
shredder, turn the On/Off switch to “OFF” then back to “ON”.
General Operation
OPERATION
Always switch off the shredder before emptying the collection bag.
WARNING
Keep your body at a safe enough distance from the shredder as long branches may be spun round
while being drawn into the shredder.
WARNING
■ When feeding branches into the shredder, keep holding them rmly until they are automatically
drawn in.
■ Adapt to the speed of the shredder and avoid overloading it. Overloading will cause it to slow
down, possibly overheat and shut down.
■ To avoid the shredder clogging up, mix freshly cut branches or leafy material with drier materials
such as twigs.
■ To prevent the blades from becoming blunt quickly, remove mud and stones from the roots
before shredding.
In the event of the shredder being overloaded, e.g. due to that branches are too thick, the shredder
will automatically switch off.
WARNING
Always wear eye protection, ear protection and hand protection when operating the shredder.
WARNING
17
OPERATION
■ Do not shred but directly compost all soft and wet material such as kitchen waste.
■ Keep a couple of dry branches to run through the shredder at the end of the shredding session.
These will help to clean the blade of plant material.
■ Do not turn off the shredder until all the material has passed the blades. Remaining material
may otherwise block the blade when you restart the shredder.
General Maintenance
■ Clean the shredder thoroughly after every use. In this way, you extend the life of the machine
and avoid accidents.
■ Always keep the shredder, wheels and air vents clean. Use a brush or cloth to clean it. Avoid
cleaners and solvents.
■ Always check that the shredder and especially the guards are not worn down or damaged but
rmly attached before use. Check that the nuts, bolts and screws are tight.
MAINTENANCE
Always switch the product off, disconnect it from the power supply and let the product cool down
before performing inspection, maintenance and cleaning work!
WARNING
Do not use any attachments or accessories not recommended by the manufacturer of this product.
The use of attachments or accessories not recommended can result in serious personal injury.
WARNING
Do not use any attachments or accessories not recommended by the manufacturer of this product.
Always wear protective, heavy gloves and use protective safety equipment when performing
blade maintenance. Ensure the power plug is disconnected from the power supply. Failure to pay
attention to this warning could result in serious personal injury.
WARNING

18
MAINTENANCE
■ Do not spray water onto the shredder. Electric shock hazard.
■ Check the covers and guards for damage and improper attachment. If necessary, contact the
After Sales Helpline.
Reversing, Sharpening & Replacing the Blade (See Figs. 9&10)
■ Remove the front part of the shredder housing. Refer to step 1-3 of Clearing a Blockage section
on page 15.
■ Use a screwdriver (not provided) to block the blade plate ( ③). First, slot the screwdriver into
the access hole ( ④). Then carefully turn the blade plate until one of the two blocking apertures
appears and aligns with the access hole. Block the blade plate by slotting the screwdriver right
through it (Fig. 9).
■ Take out the Allen key ( ⑤) from the recess in the housing inside the shredder. Use the Allen
key to loosen the Allen bolt ( ⑥) anticlockwise in the center of the blade plate. Remove the
Allen bolt and the washer ( ⑦). Remove the blade ( ⑧) from its seat (Fig. 10).
■ The blade can be reversed, otherwise sharpen or replace any blunt or damaged blade as
necessary.
■ Ret the blade onto the blade plate ensuring it is seated in its correct position. Ret the washer
and Allen bolt and tighten securely clockwise.
■ Re-install the front part of the shredder housing onto the main housing securely. Ensure the
housing interlock is tightened. Refer to step 5 of Clearing a Blockage section on page 15.
Storage
■ Clean the shredder thoroughly before putting it away.
■ Store the shredder in a safe, dry place well out of reach of children. Do not cover the shredder
in nylon bags, as moisture may develop
■ Always allow the machine to cool before storing.
■ The ideal storage temperature is between 10°C and 30°C. Avoid extremes of cold and heat
during storage.

19
TROUBLESHOOTING
PROBLEM POSSIBLE CAUSE SOLUTION
The shredder will not
start.
No power supply.
Check the socket, fuse, cable, wire
and plug and have any repairs carried
out by a qualied person.
Overload protection tripped.
Wait until the motor has cooled down.
Press the reset button, and then
restart the shredder.
Lid of shredder housing is not
secured properly.
Tighten the housing interlock to
correctly secure the shredder housing.
Garden waste is not
drawn in.
Shredding material is too soft. Use the pusher or add dry twigs/
branches.
Shredder is blocked. Refer to Clearing a Blockage section
on page 15.
Shredding material is in discharge
duct.
Remove shredding material from
discharge duct.
The shredder will not
shred properly. Blades are blunt.
Check the blades. Turn, sharpen or
replace blades as necessary. Refer to
Reversing, Sharpening & Replacing
the Blades section on page 18.
Only perform the steps described within these instructions! All further inspection, maintenance and
repair work must be performed by a qualied specialist.
Gloves and appropriate protective clothing must be worn when performing these instructions.
Always turn off the machine, disconnect it from the power supply, and let the product cool down
before making any adjustment.
WARNING

20
TECHNICAL DATA
2400W Garden Shredder FD2402
Nominal Voltage
Nominal Power Intake
Protection Class
Degree of Protection
Idling Speed
Feed Capacity
Collection Bag Capacity
Weight
Measured Sound Pressure Level (LPA)
Sound Power Level (LWA) Guaranteed
Sound Power Level (LWA) Measured
220-240V~ 50Hz
2400W (P40)
/ II
IP24
3940/min
Max. 40mm
Approx. 50L
12kg
84dB(A)
107dB(A)
104dB(A) K=3.41dB(A)
RECYCLING AND DISPOSAL
This marking indicates that this product should not be disposed with other household
wastes. The machine must be delivered in rigid packaging to avoid damage during
transportation. The packaging and the machine itself are manufactured from recyclable
materials and should be disposed of accordingly.
The maximum Feed Capacity that can be shredded is dependent on the type of wood and the
quality of the material being cut.
For hard wood (e.g. oak/beech branches), the maximum Feed Capacity that can be shredded is
less than for soft wood (e.g. pine/spruce wood). For dry or knotted wood, the cutting thickness may
also be less.
The equipment is intended only for use in premises in which the current bearing capacity of the
network is >=100 A per phase and which are supplied by a distribution grid with a nominal voltage
of 220-240V~50 Hz. You may need to check with your electricity provider if in any doubt.
If in doubt, check with your local electricity provider to verify that your mains socket has enough
continuous current carrying capacity for this unit.
Noise and vibration values were determined according to the standards and stipulations mentioned
in the declaration of conformity.
Technical or visual modications may be carried out during our continuous product improvement
programmes. All dimensions, references and information of this instruction manual are therefore
subject to change without prior notice. Legal claims, which are made on the basis of the instruction
manual, cannot thus be considered as valid.
Table of contents
Other LawnMaster Paper Shredder manuals


