LCI Solera Classic Awning User manual

ĔđĊėĆ®đĆĘĘĎĈĜēĎēČ
More information https://www.caravansplus.com.au

Rev: 02.03.20 Page 2 CCD-0001361
Introduction
The Solera Classic Awning is designed for use on most recreational vehicle units and is available in a variety
of sizes to fit even the largest unit.
Additional information about this product can be obtained from www.lci1.com/support or by downloading
the free myLCI app. The app is available on iTunes for iPhone and iPad and also on Google Play™ for
Android™ users.
iTunes, iPhone, and iPad are registered trademarks of Apple Inc. Google Play™ and Android™ are trademarks
of Google Inc.
For information on the assembly or individual components of this product, please visit:
https://support.lci1.com/solera-classic-awning .
NOTE: Images used in this document are for reference only when assembling, installing and/or operating
this product. Actual appearance of provided and/or purchased parts and assemblies may differ.
Table of Contents
Introduction 2
Safety 3
Operation 3
Extending the Awning 3
Optional Car Port Position 4
Retracting the Awning 4
Fabric Replacement 4
Fabric Removal 4
Installing Replacement Fabric 6
Maintenance - Solera Awnings 9
Fabric Care 9
More information https://www.caravansplus.com.au

Rev: 02.03.20 Page 3 CCD-0001361
The “WARNING” symbol above is a sign that a procedure has a safety risk involved and may cause
death or serious personal injury if not performed safely and within the parameters set forth in
this manual.
Failure to follow the instructions provided in this manual may result in death, serious injury,
unit damage, or voiding of the component warranty.
The “CAUTION” symbol above is a sign that a safety risk is involved and may cause personal injury
and/or product or property damage if not safely adhered to and within the parameters set forth
in this manual.
Moving parts can pinch, crush or cut. Keep clear and use caution.
Safety
Read and understand all instructions before installing or operating this product. Adhere to all safety labels.
This manual provides general instructions. Many variables can change the circumstances of the instructions,
i.e., the degree of difficulty, operation and ability of the individual performing the instructions. This
manual cannot begin to plot out instructions for every possibility, but provides the general instructions,
as necessary, for effectively interfacing with the device, product or system. Failure to correctly follow the
provided instructions may result in death, serious personal injury, severe product and/or property damage,
including voiding of the LCI limited warranty.
Operation
Extending the Awning
1. Make sure the black locking knobs on the mount/rafter arm upper channel (channel #3) (Fig. 1) are
loosened and pinch the travel locks together to release the outer arm from the mount/rafter arm.
2. Flip the cam lock down to the roll out position.
3. Using the pull rod, start pulling the awning outward until full extension is complete.
4. Slide the mount/rafter arms all the way to the top of the outer arm and make sure they lock into place.
Fig. 1
Channel
1
Channel
2
Locking
Knob
Channel
4
Channel
3
More information https://www.caravansplus.com.au

Rev: 02.03.20 Page 4 CCD-0001361
5. Pull on the mount/rafter arm to ensure the fabric is taut and tighten the black locking knob to lock it
into place.
6. Raise the outer arms to the desired height by releasing the support arm assembly handle and allow
the outer arm upper channel (channel #1) (Fig. 1) to slide on the outer arm lower channel (channel #2)
(Fig. 1). Once to the desired height let go of the support arm assembly handle to lock the arm at this
position.
7. Slide the pull strap to one end or the other and wrap it around the arm to get it out of the way.
Optional Car Port Position
1. Once all the above steps are complete, remove the outer arm from the side of the unit by releasing the
lever on the lower mounting bracket.
2. Walk the awning out until the outer arm is straight up and down and let it set on the ground.
3. Make sure to secure the foot of the outer arm to the ground with the provided stakes.
Retracting the Awning
1. If in car port mode, remove the stakes from the foot of the outer arm. Then walk the outer arm back to
the unit and secure it to the lower mounting bracket on the sidewall of the unit. Do this for both ends.
2. Take the awning pull strap and return it to the center of the awning roll tube.
3. Lower the roll tube by holding the outer arm and releasing the support arm assembly handle on the
side. Let the outer arm upper channel (channel #1) (Fig. 1) slide down the outer arm lower channel
(channel #2) (Fig. 1) until it rests on the acorn nut. Repeat this for the other end.
4. Loosen the black locking knob and unlock the mount/rafter arm by releasing the spring clip from the
top of the head assembly. Allow the mount/rafter arm to slide all the way down toward the bottom of
the outer arm. Repeat this for both ends.
5. Take a firm hold on the awning strap and release the tension on the springs by flipping the cam lock
up to the roll in position.
6. Walk the awning in toward the unit. Hook the pull rod into the pull strap before the strap gets too high.
Using the pull rod, walk the awning to the fully-closed position.
7. Lock the arms for travel mode by compressing the outer arm and mount/rafter arm together until the
red tab disappears. Then tighten the black locking knob.
Fabric Replacement
Fabric Removal
1. Remove the drip cap (if equipped) from the end the fabric will be removed from.
2. Remove the #6 x 1/2” hex head screws located on the awning rail (2 total). Set screws aside.
3. Extend the awning out completely by sliding the mount/rafter arms all the way to the top of the outer
arm and make sure they lock into place and insert cotter pins (Fig. 2).
Fig. 2
Cotter
Pin
Idler Side
More information https://www.caravansplus.com.au

Rev: 02.03.20 Page 5 CCD-0001361
NOTE: If the awning is 6’ in length it will only need one cotter pin for the drive side end cap.
4. Pull on the mount/rafter arm to ensure the fabric is taut and tighten the black locking knob to lock it
into place. As a precaution, tape the cam lock in the roll out position.
5. On the end of the awning rail the fabric will be removed from, remove the upper mounting bracket
from the unit wall. Allow the mount/rafter arm to pivot out of the way.
6. Remove the drive head assembly and idler head assembly retaining fasteners from the outer arms to
separate the components (Fig. 3).
7. Working together, remove the roll tube assembly (which includes the drive/idler head assemblies)
from the awning rail and support arms by sliding the assembly along the awning rail until clear.
Fig. 3
Fastener
Failure to support the roll tube, fabric and drive/idler head assemblies during removal may result in
serious injury or property damage.
Failure to maintain control of the roll tube, fabric and drive/idler head may result in
serious injury or property damage.
8. Place the removed assembly onto a level area.
9. Have someone securely hold the idler head and roll tube.
10. Hold the drive head assembly securely (there will be tension to be released) and remove the drive
head assembly cotter pin.
11. Flip the cam lock to the roll in position. Slowly rotate the drive head assembly clockwise to release
tension.
12. Mark the cam lock position on the roll tube.
13. Remove the three screws holding the drive head assembly end cap on the roll tube and set the drive
head assembly aside.
14. Mark the roll tube grooves containing the polycords prior to removing the fabric from the roll tube.
15. Remove the two screws holding the fabric in place on the roll tube.
16. To remove the fabric, gently pull the roll tube from one end, while another person holds the fabric in
place.
More information https://www.caravansplus.com.au

Rev: 02.03.20 Page 6 CCD-0001361
Fig. 4
Fabric Polycord
in
Roll
Tube
Channel
Slide
Fig. 5
Roll
Roll
Tube
Fabric
Installing Replacement Fabric
1. Unroll the replacement fabric so that the polycords are parallel with the roll tube.
2. Gently slide the roll tube on to the two polycords of the fabric, making sure that the non-printed side is
touching the roll tube (Fig. 4).
3. Center the fabric on the roll tube.
4. Apply the screws that were holding the polycords in place on the roll tube.
5. Roll the fabric onto the roll tube (Fig. 5). Make sure the fabric stays snug and flat to the roll tube with
the printed side facing away.
Fig. 6
6. Using the three screws previously removed from the end caps, attach the drive head assembly to the
roll tube, making sure the orientation is the same.
NOTE: Be sure the drive head assembly with the cam lock is on the right-hand side of the awning.
7. Secure the idler head and roll tube.
8. Rotate the drive head assembly counterclockwise the number of turns stated on the turn chart (Fig. 6).
Insert a cotter pin into the end cap into the shaft on the drive head assembly.
9. Working together, install the roll tube assembly (which includes the drive/idler head assemblies) to the
awning rail by sliding the assembly along the awning rail. Make sure the awning will unroll with the
printed side of the fabric up.
Classic Awnings Fabric
Replacement Turn Chart
Size Turns
6 ft to 10 ft 12
11 ft to 14 ft 13
15 ft to 18 ft 14
19 ft and up 16
Failure to maintain control of the roll tube, fabric and drive/idler heads may result in
serious injury or property damage.
More information https://www.caravansplus.com.au

Rev: 02.03.20 Page 7 CCD-0001361
Fig. 7
Awning
Rail 1"
Fabric
Stitching
10. Unroll the fabric from the roll tube to allow the drive/idler head assemblies to be installed into the
outer arms.
11. Install the previously-removed drive head assembly and idler head assembly retaining bolts into the
outer arms to secure the components.
12. Reinstall the previously-removed support arm upper mounting bracket to the unit wall.
13. Make sure the cam lock is in the roll out position and remove cotter pins from the awning heads.
14. Retract and extend the awning several times (see Operation section of manual) to ensure that the
fabric is square on the roll tube.
15. Secure the fabric in the awning rail no more than 1” inside the edge of the fabric on both ends using a
#6 x 1/2” hex head screw. Install the screw down through awning rail into fabric and polycord (Fig. 7).
16. Reinstall the drip cap if previously equipped.
More information https://www.caravansplus.com.au
Rev: 02.03.20 Page 8 CCD-0001361
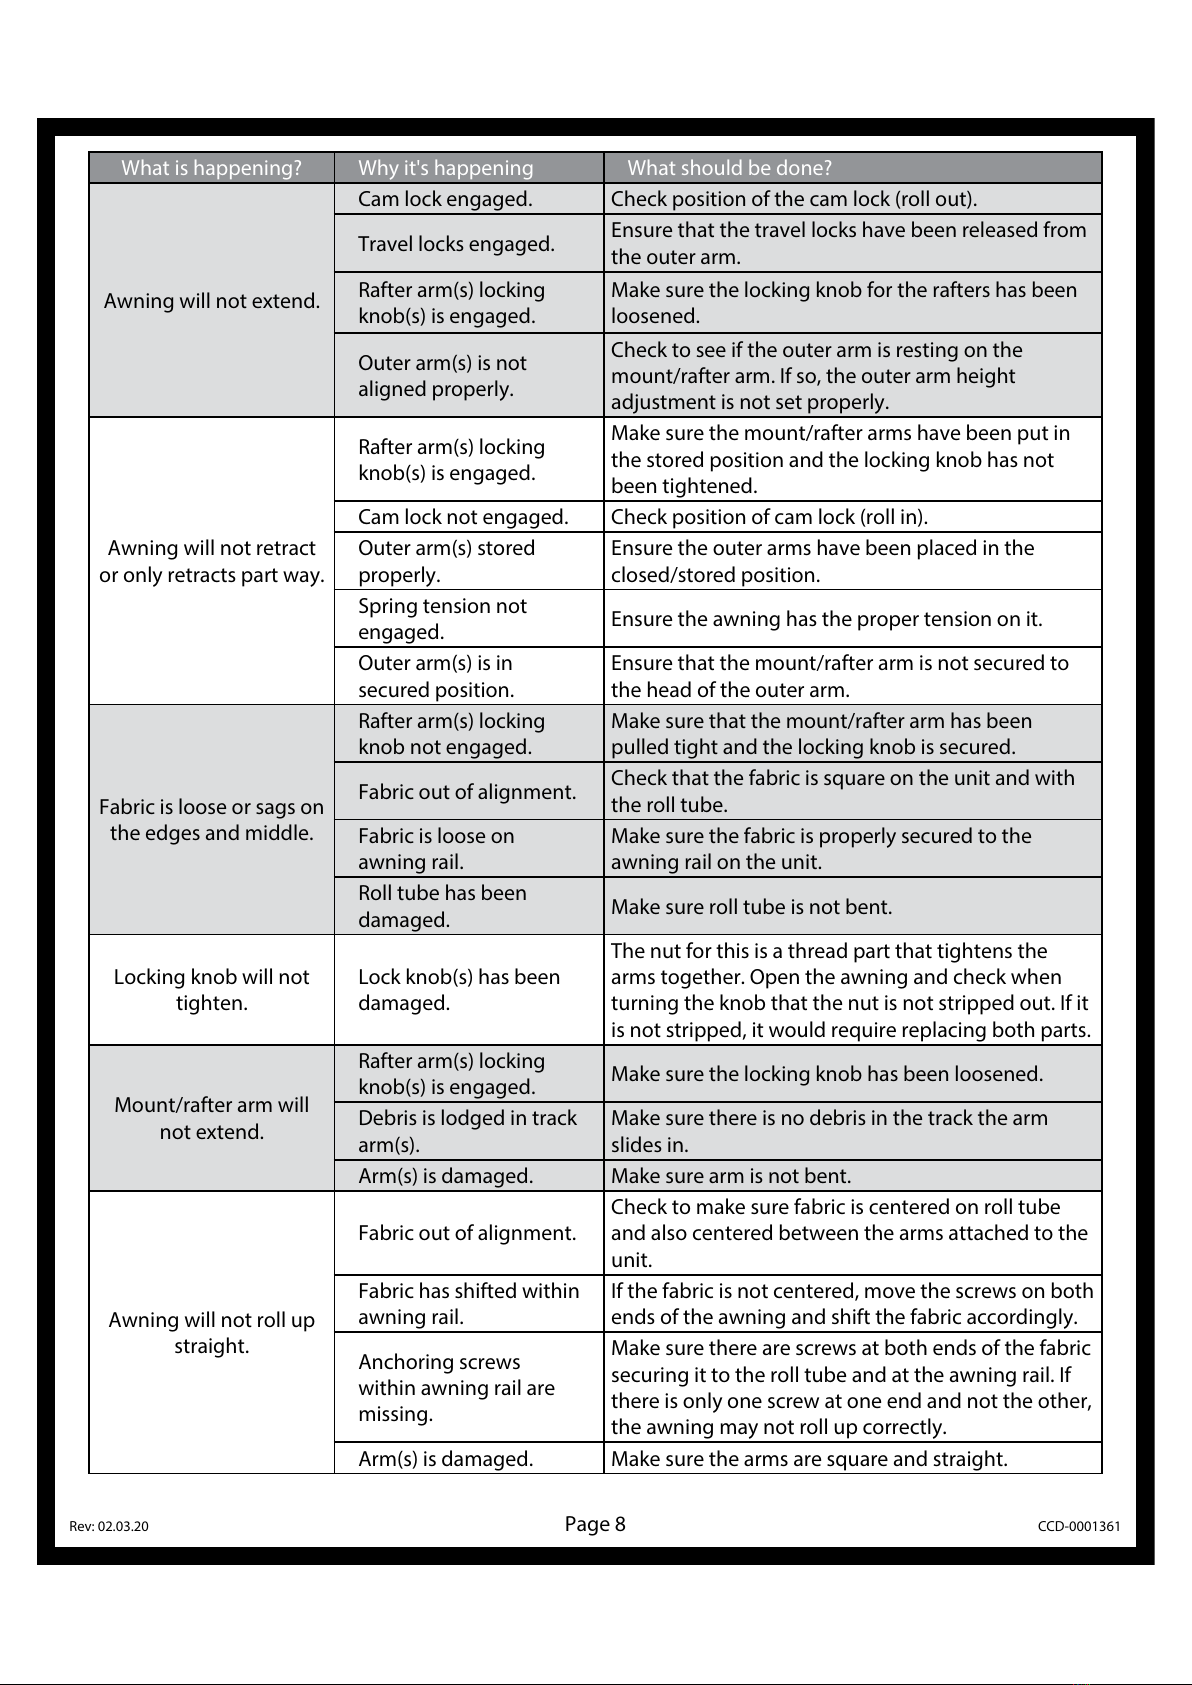
What is happening? Why it's happening What should be done?
Awning will not extend.
Cam lock engaged. Check position of the cam lock (roll out).
Travel locks engaged. Ensure that the travel locks have been released from
the outer arm.
Rafter arm(s) locking
knob(s) is engaged.
Make sure the locking knob for the rafters has been
loosened.
Outer arm(s) is not
aligned properly.
Check to see if the outer arm is resting on the
mount/rafter arm. If so, the outer arm height
adjustment is not set properly.
Awning will not retract
or only retracts part way.
Rafter arm(s) locking
knob(s) is engaged.
Make sure the mount/rafter arms have been put in
the stored position and the locking knob has not
been tightened.
Cam lock not engaged. Check position of cam lock (roll in).
Outer arm(s) stored
properly.
Ensure the outer arms have been placed in the
closed/stored position.
Spring tension not
engaged. Ensure the awning has the proper tension on it.
Outer arm(s) is in
secured position.
Ensure that the mount/rafter arm is not secured to
the head of the outer arm.
Fabric is loose or sags on
the edges and middle.
Rafter arm(s) locking
knob not engaged.
Make sure that the mount/rafter arm has been
pulled tight and the locking knob is secured.
Fabric out of alignment. Check that the fabric is square on the unit and with
the roll tube.
Fabric is loose on
awning rail.
Make sure the fabric is properly secured to the
awning rail on the unit.
Roll tube has been
damaged. Make sure roll tube is not bent.
Locking knob will not
tighten.
Lock knob(s) has been
damaged.
The nut for this is a thread part that tightens the
arms together. Open the awning and check when
turning the knob that the nut is not stripped out. If it
is not stripped, it would require replacing both parts.
Mount/rafter arm will
not extend.
Rafter arm(s) locking
knob(s) is engaged. Make sure the locking knob has been loosened.
Debris is lodged in track
arm(s).
Make sure there is no debris in the track the arm
slides in.
Arm(s) is damaged. Make sure arm is not bent.
Awning will not roll up
straight.
Fabric out of alignment.
Check to make sure fabric is centered on roll tube
and also centered between the arms attached to the
unit.
Fabric has shifted within
awning rail.
If the fabric is not centered, move the screws on both
ends of the awning and shift the fabric accordingly.
Anchoring screws
within awning rail are
missing.
Make sure there are screws at both ends of the fabric
securing it to the roll tube and at the awning rail. If
there is only one screw at one end and not the other,
the awning may not roll up correctly.
Arm(s) is damaged. Make sure the arms are square and straight.
More information https://www.caravansplus.com.au
Rev: 02.03.20 Page 9 CCD-0001361
Maintenance - Solera Awnings
Fabric Care
NOTE: If the awning is retracted while wet, extend the awning and let it dry as soon as conditions allow
before retracting. This will help prevent the formation of mildew and add greatly to the life of the
awning. Mildew does not form on the fabric itself, but on the accumulated dust, dirt and grime.
NOTE: Periodically clean vinyl or woven acrylic fabric using a mixture of ¼cup of dish soap and 5 gallons
of warm water. Liberally apply the mixture on the top of the fabric and retract the awning for 5
minutes. This will apply the mixture to the bottom of the fabric as well. Extend the awning and hose
off with fresh water. Repeat if necessary. Allow to dry before retracting.
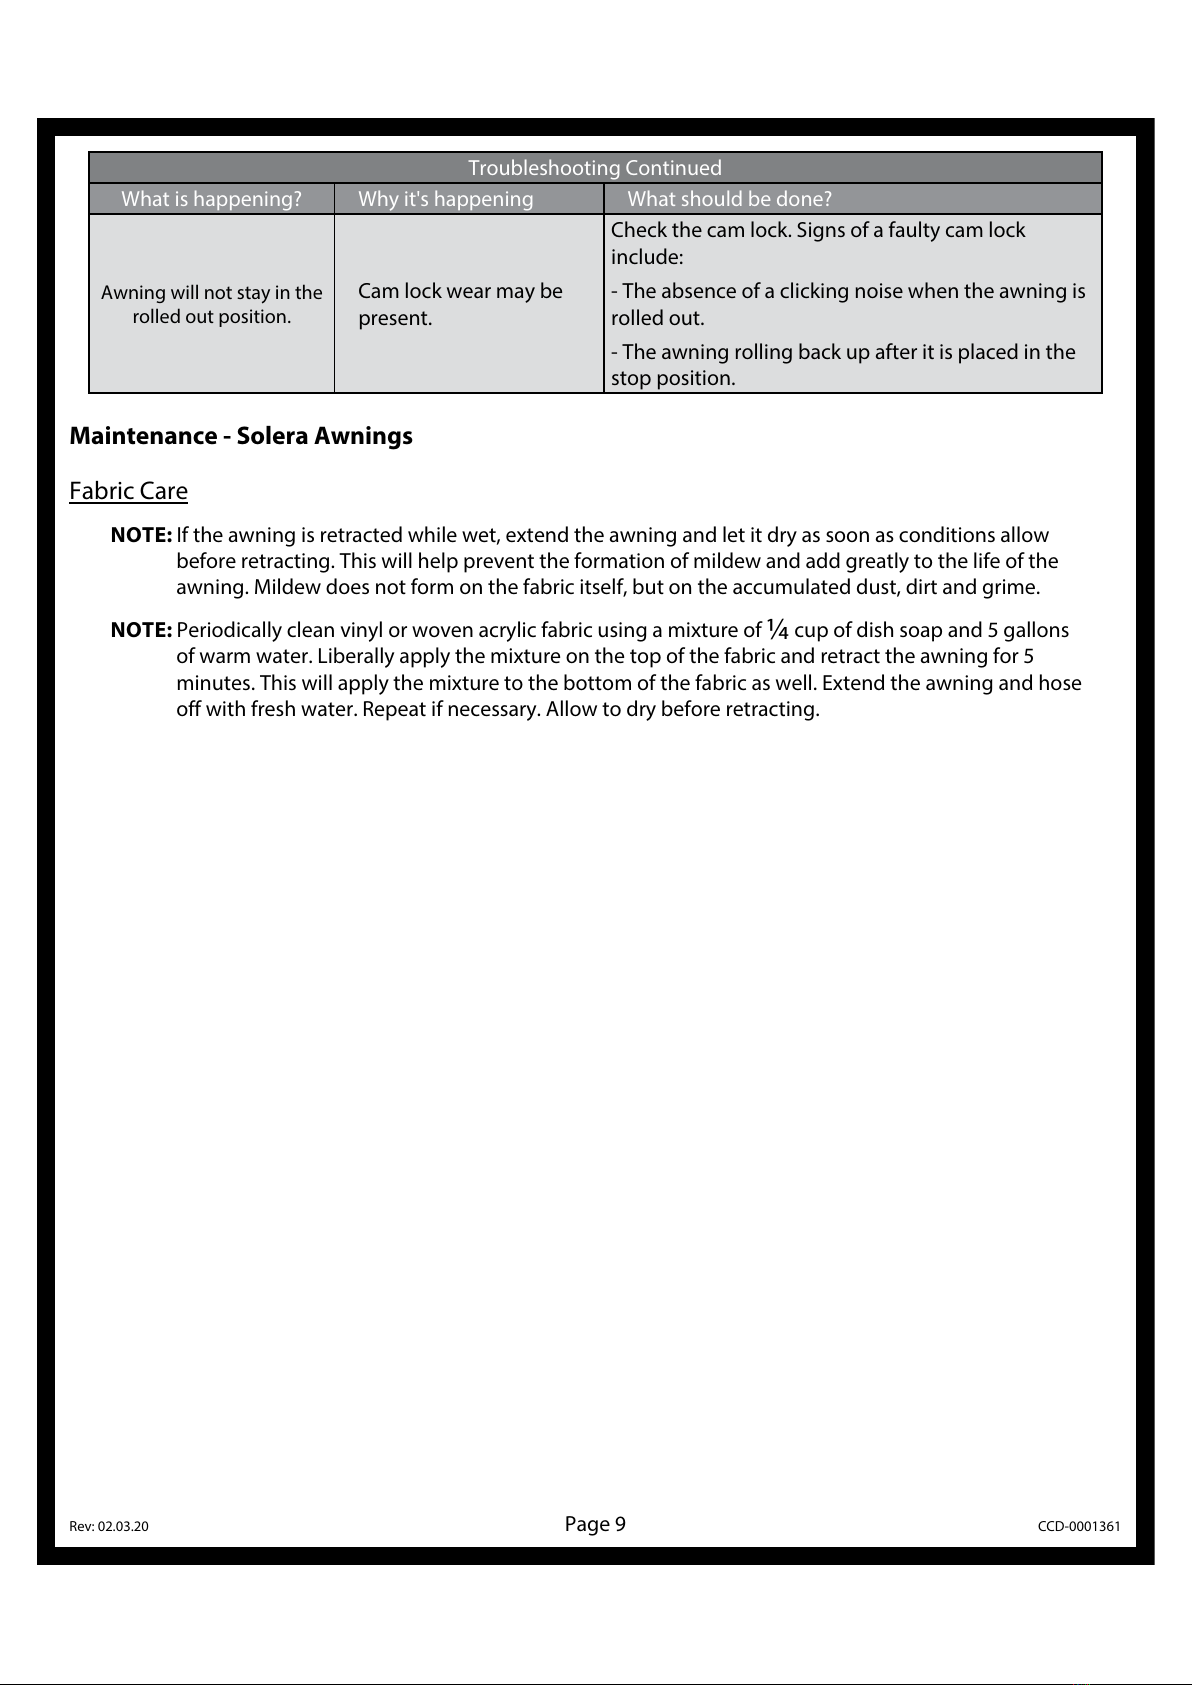
Troubleshooting Continued
What is happening? Why it's happening What should be done?
Awning will not stay in the
rolled out position.
Cam lock wear may be
present.
Check the cam lock. Signs of a faulty cam lock
include:
- The absence of a clicking noise when the awning is
rolled out.
- The awning rolling back up after it is placed in the
stop position.
More information https://www.caravansplus.com.au

The contents of this manual are proprietary and copyright protected by Lippert Components, Inc. (“LCI”).
LCI prohibits the copying or dissemination of portions of this manual unless prior written consent from an
authorized LCI representative has been provided.Any unauthorized use shall void any applicable warranty.
The information contained in this manual is subject to change without notice and at the sole discretion of LCI.
Revised editions are available for free download from lci1.com.
Please recycle all obsolete materials.
For all concerns or questions, please contact
Lippert Components, Inc.
More information https://www.caravansplus.com.au
Table of contents
Other LCI Accessories manuals


