LDR Astro 250W plus 3200K 100/260V DMX512+RDM User manual

01207170
01207180
Astro250Wplus3200K
100/260VDMX512+RDM
Astro250Wplus5600K
100/260VDMX512+RDM
istruzioniperl'uso
operatinginstructions
Bedienungsanleitung
instruccionesdemanejo
moded'emploi
gebruiksaanwijzing
LucidellaRibaltasrl,ViaBerna14,46042CastelGoffredomnItaly.tel+390376771777‐fax+390376772140‐email[email protected]

Astro 250 3200K and 5600K, DMX 512+ RDM LED followspot -User’s Manual – 1.0
Luci della Ribalta srl, Via Berna 14, 46042 Castel Goffredo (MN) Italy
Tel. +39 0376 771 777 – fax +39 0376 772 140 – email info@ldr.it – web www.ldr.it
1
ENGLISH – TABLE OF CONTENTS
1.Important safety norms ……………………………………………………………………….page 2
2.Check packing content………………………………………………………………………… page 3
3.Mounting the spigot…………………………………………………..…….................... page 3
4.Mounting the colour changer …………………………………………..………………… page 3
5.Mounting the iris diaphragm …………………………………………….………………. page 4
6.Shutter blades ………………………………………………………………………….……….. page 4
7.Adjusting the yoke ……………………………………………………………………..…….. page 4
8.Wiring ………….…………………………………………………………………………………… page 4
9.Voltage ………………………………………..…….……………………………………………. page 5
10.Local Control panel and operation……………………………………….…………… page 5
11.Menu ………………………………………………………………………………………………...page 5
11.1 DMX or manual page 6
11.2 DMX address page 6
11.3 Dimmer Resolution page 6
11.4 Lost DMX Signal page 6
11.5 Strobe page 7
11.6 Strobe Speed page 7
11.7 Dimming curve page 7
11.8 Cut off dimming response page 7
11.9 Dimming behaviour page 8
11.10 Fan Setting page 8
11.11 LCD Screen Illumination page 8
11.12 Temperature Control page 9
11.13 Software Version page 9
11.14 Manual Dimmer Type page 9
11.15 Pro or Basic Control page 9
11.16 Factory Settings page 9
11.17 ID for REMOTO page 10
11.18 Calibration page 10
11.19 Exit Hidden Menu page 10
12.Focusing…………………………………………………………………………...…….………….page 10
13.Cleaning and maintenance………………………………………………..………………..page 10
14. Spare parts…………………………………………………………………………………………page 11
15. Warranty.…..………………………………………………….…………………………………..page 11
16. Available accessories ………………………… …………………………………………….page 11
17. Summary of Controls and function.……………………………………………………page 12
LDR Conformity Certificate – Certificato di Conformità – Konformitätserklärung page 16
Complaint form – Modulo di reclamo – Reklamationsformular ………………………….Page 17
WEEE Directive – Direttiva RAEE – WEEE Richtlinie …………………………………………… Page 18

Astro 250 3200K and 5600K, DMX 512+ RDM LED followspot -User’s Manual – 1.0
Luci della Ribalta srl, Via Berna 14, 46042 Castel Goffredo (MN) Italy
Tel. +39 0376 771 777 – fax +39 0376 772 140 – email info@ldr.it – web www.ldr.it
2
ENGLISH
Thank you for choosing a quality product from Luci della Ribalta srl. We trust our products and
services meet your requirements, but if not please contact us directly using the attached feedback
form to help us improve our service quality.
This product has been manufactured with great care and left our factory in perfect conditions, but if
it has been damaged in transport please contact your dealer in the first instance. A feedback form is
appended. Our warranty covers all manufacturing and component defects for one year from the
date you purchased the product.
Our products are designed for the use of professional technicians, and the instructions provided here
ensure safe and correct operation of this product. Luci della Ribalta srl will not accept any
responsibility where damage has been caused to the product or persons through improper use of
the product and/or non-compliance with the regulations described herein.
IMPORTANT: Read these user instructions before using the lighting unit
The instructions given here ensure a safe and correct usage of this product. A user’s failure to
comply with the installation, operating, maintenance and safety procedures mentioned in this
manual, as well as those generally applicable to this lighting equipment, may cause the unit not to
perform as expected.
Luci della Ribalta accepts no liability for direct, indirect, incidental, special, or consequential damages
resulting from the customer’s failure to follow the installation, operating, maintenance and safety
procedures in this manual or those generally applicable to lighting equipment.
The limitation extends to damages for personal injury, property damage, loss of operations, loss of
profits, loss of product or loss of time, whether incurred in by the customer, the customer’s
employees or a third party.
Apart from the instructions given on this manual, all relevant safety and health standards of the
appropriate EU Directives must be complied with.
1. IMPORTANT SAFETY NORMS
•Warning, high voltage ignition. Disconnect the unit from power before servicing
•Continuous mains power is required for this spotlight as an internal dimmer controls the
intensity via DMX or local rotary knob. An accessory moving manual dimmer is furthermore
available for positioning on the side grab handles.
•Use of a phase control dimmed mains supply may damage the internal electronics.
•This product features fan-assisted ventilation. Make sure you do not cover the fans or
obstruct the air flow at any one time.
•Make sure the fans are working correctly. Should you detect even the slightest malfunction,
switch the luminaire off and carry out the necessary servicing. Replace the fans if necessary.
•This product is rated IP 20 and is therefore designed for interior use only. For details on
maximum ambient temperature, minimum distance from flammable objects and tilt angle,
please refer to what indicated on the product label.
•Repairing and replacement of any component of this product must be carried out exclusively
by professional personnel in conformity with the relevant safety and health standards and
only with original Luci della Ribalta srl components.

Astro 250 3200K and 5600K, DMX 512+ RDM LED followspot -User’s Manual – 1.0
Luci della Ribalta srl, Via Berna 14, 46042 Castel Goffredo (MN) Italy
Tel. +39 0376 771 777 – fax +39 0376 772 140 – email info@ldr.it – web www.ldr.it
3
•Replacement of any part of the wiring system must be carried out exclusively by professional
personnel in compliance with the original wiring diagram and with components identical to or
compatible with those originally fitted.
•Installation of this product must be exclusively carried out by professional personnel in
compliance with the safety norms in force in the country where the product is used.
2. CHECK PACKING CONTENT
A. Standard followspot B. Kit followspot
Astro followspot in the chosen model Astro f.spot in the chosen model in flight case
Separate mains power cable with PowerCon Fitted colour-changer unit
Ø28mm spigot for followspot Separate mains power cable with PowerCon
Iris diaphragm Ø28mm spigot for followspot
Iris diaphragm
Black follow-spot tripod
Clamp-on mobile digital dimmer
3. MOUNTING THE SPIGOT
A spigot is supplied in standard delivery for you to tripod-mount your followspot.
•Make sure the tripod you are going to use can withstand the product load as indicated on the
product’s label
•Make sure the tripod you are going to use features a top aperture over 28mm dia.
•Remove the M12 nut and the washer from the spigot.
•Insert the spigot in the central hole of the yoke of the followspot from beneath the yoke.
•Add the plain screw and the M12 self- locking nut and tighten the nut with a suitable tool.
•Mount the followspot on the tripod.
4. MOUNTING THE COLOUR CHANGER (accessory, part nr. 20105106)
This section only applies in case you bought the followspot and the colour changer separately. In
case you bought a kit model the colour changer will be already fitted.
•Mount the colour filters on the colour changer unit. See relevant instructions supplied with
the colour changer.
•At the front of the followspot, slacken the 3 cross-head black M4 screws (two at the top
angles, one at the bottom, left-hand side angle) so that they remain inserted approximately
half-way through.
•Position the colour changer unit on the front plate of the follow spot, making sure that the
colour levers are positioned on the left-hand side of the follow spot when viewed from the
front and hang it to the previously positioned screws.
•Release the colour filters of the colour changer by pressing the black, flat lever in order to
have access to the screws

Astro 250 3200K and 5600K, DMX 512+ RDM LED followspot -User’s Manual – 1.0
Luci della Ribalta srl, Via Berna 14, 46042 Castel Goffredo (MN) Italy
Tel. +39 0376 771 777 – fax +39 0376 772 140 – email info@ldr.it – web www.ldr.it
4
•Insert a Phillips screws driver at least 12cm long in each one of the holes provided at the
front of the colour changer and tighten each screw
•Ensure the colour changer unit is secure, and all three screws are tight.
5. MOUNTING THE IRIS DIAPHRAGM - supplied
The iris diaphragm supplied with the followspot has 20 leaves to size the beam from a maximum
aperture of 68mm to a minimum of 5mm. A black-out iris diaphragm is available to special order.
•Using a Phillips screw-driver remove the two cross-head screws from the sides of the iris
plate.
•Slide the diaphragm in the gate area.
•Fix the iris in position by tightening the previously removed screws
Important notice: do not leave the iris closed for over 5 minutes while the LED is on
FAILURE TO COMPLY WITH THE ABOVE NOTICE MAY CAUSE THE IRIS AND THE FOLLOWSPOT TO
SUFFER MAJOR HEAT DAMAGES AND WILL INVALIDATE THE PRODUCT WARRANTY
6. SHUTTER BLADES (accessory, part nr. R80208019 x 4)
Shutter blades are not supplied with the unit but are available as separate accessory. They are sold
as single items and relevant part number is R80208019, 4 are required.
7. ADJUSTING THE YOKE
This followspot is provided with a yoke balancing adjustment. The balancing point is factory set for
the standard product configuration supplied (without colour changer for standard units, with colour
changer for the kit version). However, should you need to adjust the balancing, please follow the
procedure here below:
•The followspot must be mounted on the tripod stand with all relevant accessories attached.
•Using a Phillips screw driver, loosen the 2 M5 screws on each side of the yoke.
•Gently slide the followspot backwards or forwards to the required position.
•Make sure the yoke is correctly aligned horizontally.
•Tighten the 4 M5 screws
8. WIRING
Before being connected to the mains power, this unit may need to be wired with a suitable plug if
not already installed. Make sure the plug you are using is rated for the proper power load.
This fixture must be grounded

Astro 250 3200K and 5600K, DMX 512+ RDM LED followspot -User’s Manual – 1.0
Luci della Ribalta srl, Via Berna 14, 46042 Castel Goffredo (MN) Italy
Tel. +39 0376 771 777 – fax +39 0376 772 140 – email info@ldr.it – web www.ldr.it
5
Ensure the plug conforms to the relevant EU/UL or local electrical standards
To perform a correct wiring, please note that the cores in this mains lead are colour-coded as
follows:
Ground: green+yellow –Neutral: blue -Phase: brown
In case the colours of the wires do not correspond to the colour of the connection points on your
plug, please proceed as follows:
•The green or green and yellow wire must be connected to the connection point marked with
the letter E or with the symbol or coloured in green or in green-yellow
•The blue wire must be connected to the connection point marked with the letter N or
coloured in black
•The brown wire must be connected to the connection point marked with the letter L or
coloured in red
Before you finally position this product for use, temporarily connect it to a properly fused power
supply to check the unit works correctly.
9. VOLTAGE
Before operating this unit please refer to the product label mounted at the back of the luminaire to
check you are operating with the correct voltage. The Astro 250 LED can be operated between 100V
and 260 VAC.
10. LOCAL CONTROL PANEL AND OPERATION
OPERATION: LCD display for DMX address, system setup and status details.
POWER: power LED status indicator , red color. ON= power
DMX: DMX LED status indicator, green color. LED OFF = DMX OFF and manual control activated ,
LED ON = DMX MODE activated with no DMX signal, FLASHING LED = receiving DMX
MENU: rotary switch selector to select and modify the operational modes. Turn left or right to
navigate through the menu and press to select or to confirm
DMX IN: input DMX signal (pin1=0 , pin2= DATA- , pin3=DATA+ ).
DMX OUT : Loop through DMX signal output
POWER IN: Mains power input
POWER OUT: Mains power output
11. MENU
There are fourteen different menus to control the settings of the ASTRO LED. The rotary selector is
used to adjust the settings and to navigate through the menu. Turn left or right to select the menu
and push to access or to confirm the selected data or functions. To exit the selected menus without
saving the data, press the rotary selector for at least 1 second.

Astro 250 3200K and 5600K, DMX 512+ RDM LED followspot -User’s Manual – 1.0
Luci della Ribalta srl, Via Berna 14, 46042 Castel Goffredo (MN) Italy
Tel. +39 0376 771 777 – fax +39 0376 772 140 – email info@ldr.it – web www.ldr.it
6
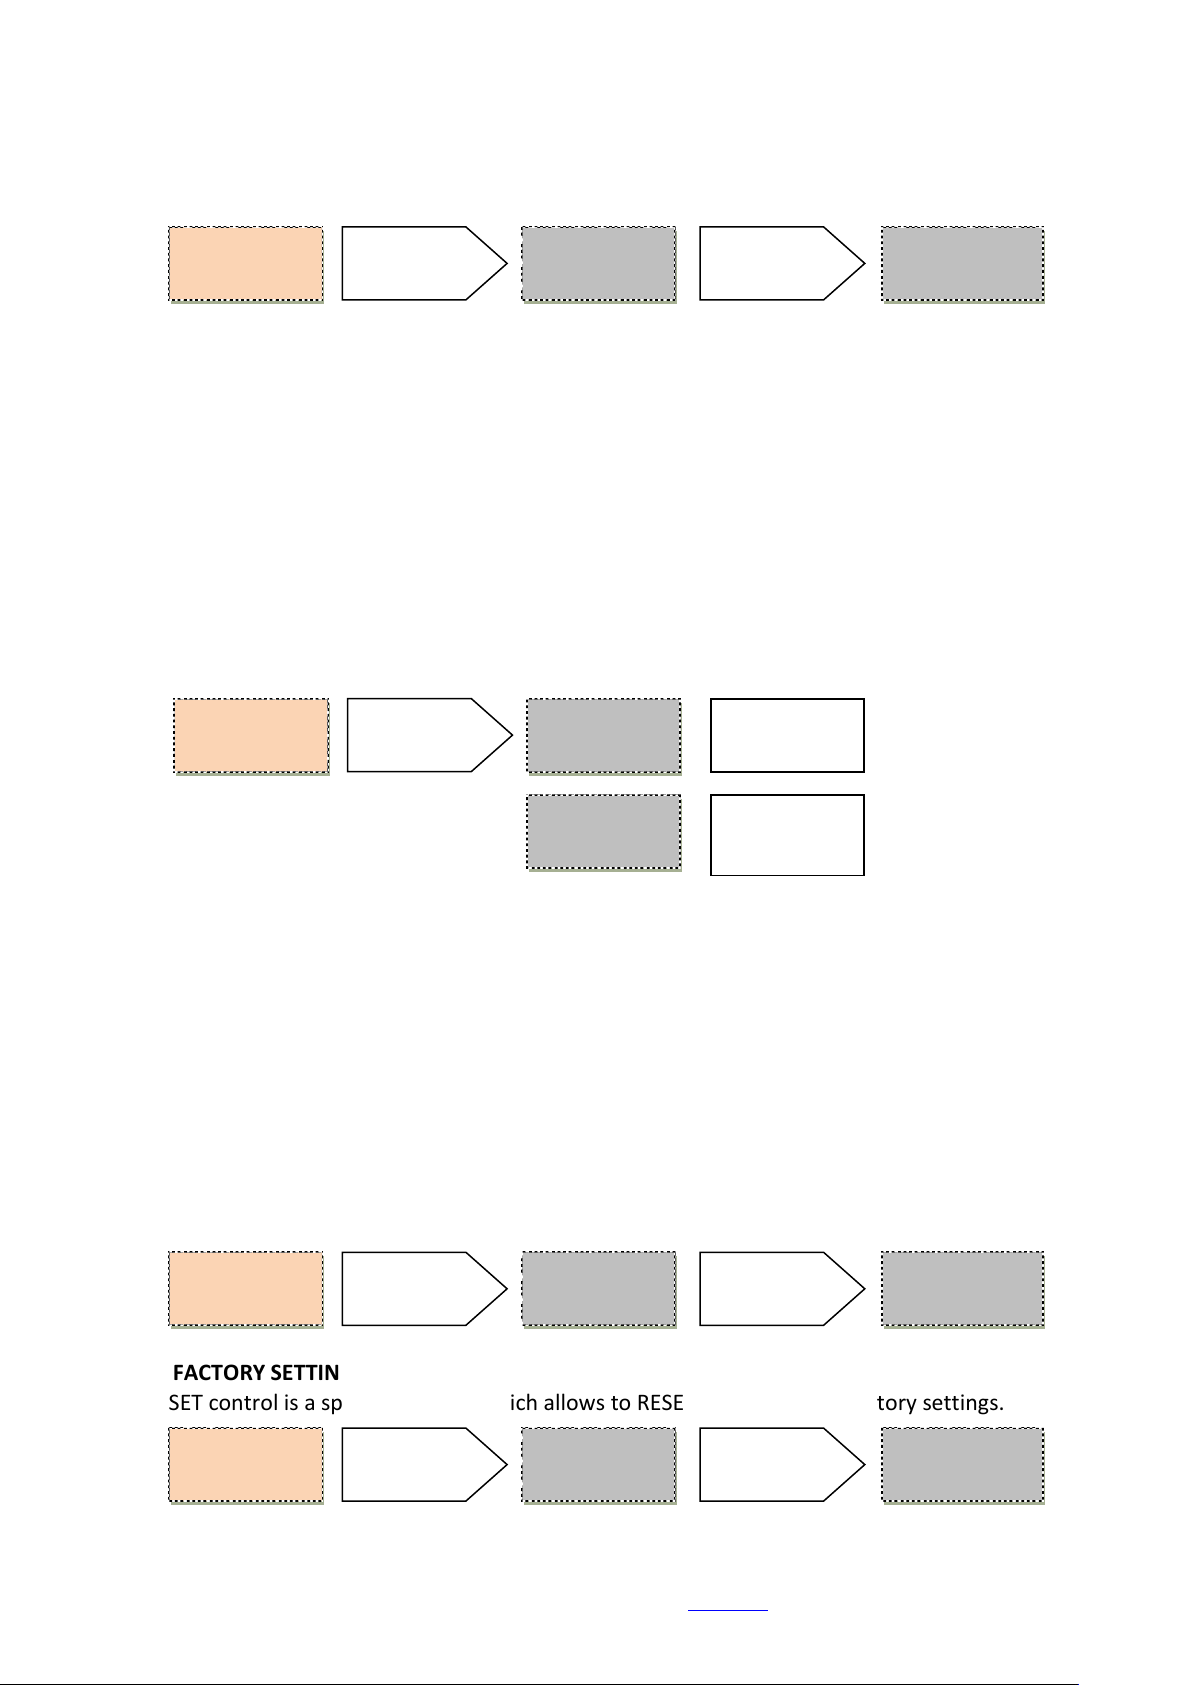
11.1 DMX OR MANUAL (Mode):
Select the LED control mode between DMX (factory setting) and manual. To change the control
mode press once the rotary selector until an arrow () appears on the menu. Turn the selector to the
right or the left to select the desired mode of operation and press to confirm your selection.
Tap the rotary selector and the LCD screen will display the mode status and the current value :
11.2 DMX ADDRESS (Addr):
It allows to select the initial DMX starting address to remotely control the LED functions. To change
the initial DMX address press the rotary switch until an arrow appears, then turn to change to the
desired DMX starting address. Press to confirm your selection. Factory setting is 001.
11.3 DIMMER RESOLUTION (8/16b):
The dimming resolution can be controlled at 8 bits from one DMX channel or 16 bits with 2 DMX
channels.
Factory setting is 8 Bit.
11.4 LOST DMX SIGNAL (DMXMem):
In case of signal failure this function allows to store in memory the last DMX value.
Factory setting is ON. Three options are available :
M:Manual
XX % XXX
M: DMX
XX %
1 Mode
DMX
1 Mode
MANUAL
TAP THE ROTARY
SELECTOR TO DISPLAY
THE VALUE
TAP THE ROTARY
SELECTOR TO DISPLAY
THE VALUE
00 % = LED OFF
100 % = LED FULL
00 % (000) = LED OFF
100% (FFF) = LED FULL
2 Addr
001
PRESS TO ACTIVATE
THE MENU
AN ARROW SHOULD
APPEAR
1 Mode
DMX
1 Mode
DMX ←
1 Mode
MANUAL ←
TURN TO SELECT
MANUAL OR DMX
AND PRESS TO
CONFIRM
2 Addr
001 ←
2 Addr
### ←
TURN TO ASSIGN THE
DMX ADDRESS AND
PRESS TO CONFIRM
3 8/16b
8 BITS
PRESS THE ROTARY
SELECTOR TO
ACTIVATE
3 8/16b
8 BITS ←
3 8/16b
16 BITS ←
TURN TO SELECT 8
OR 16 BITS AND
PRESS TO CONFIRM
PRESS TO ACTIVATE
THE MENU
AN ARROW SHOULD
APPEAR
PRESS TO ACTIVATE
THE MENU
AN ARROW SHOULD
APPEAR
4DMXMem
ON
LAST SCENE HOLD
4DMXMem
ON ←
4DMXMem
OFF=80% ←
DIM THE LED TO 80%
OF ITS MAXIMUM
POWER
4DMXMem
OFF=00% ←
DIM THE LED TO 0%

Astro 250 3200K and 5600K, DMX 512+ RDM LED followspot -User’s Manual – 1.0
Luci della Ribalta srl, Via Berna 14, 46042 Castel Goffredo (MN) Italy
Tel. +39 0376 771 777 – fax +39 0376 772 140 – email info@ldr.it – web www.ldr.it
7
11.5 STROBE (Strobe):
This function enables to activate the strobe function. Factory setting is DISABLE.
11.6 STROBE SPEED (SetStr) :
It allows to set the strobe speed. This menu is not active when the strobe function is disabled or
when it is remotely controlled through DMX. Factory setting is OPEN.
11.7 DIMMING CURVE (Curves)
This function allows to select a response curve for the Astro LED. A choice of two curves is available:
Square and Linear. Factory setting is SQUARE.
11.8 CUT OFF DIMMING RESPONSE (CutOff) :
This function allows to select the LED behaviour simulating a tungsten or halogen lamp during the
dimming cut off.
Factory setting is SLOW.
5Strobe
DISABLE
5Strobe
DISABLE ←
5Strobe
ENABLE ←
TURN TO ENABLE OR
DISABLE STROBE AND
PRESS TO CONFIRM
PRESS TO ACTIVATE
THE MENU
AN ARROW SHOULD
APPEAR
PRESS TO ACTIVATE
THE MENU
AN ARROW SHOULD
APPEAR
6 SetStr
OPEN
PRESS TO ACTIVATE
THE MENU
AN ARROW SHOULD
APPEAR
7 Curves
SQUARE
PRESS TO ACTIVATE
THE MENU
AN ARROW SHOULD
APPEAR
8 CutOff
SLOW
WITH STROBE ENABLE
THE LIGHT IS SET TO ON
6 SetStr
OPEN ←
6 SetStr
SPEED # ←
CHOOSE THE STROBE
SPEED VALUE FROM
1(SLOW) TO 10 (FAST)
6 SetStr
CLOSED ←
WITH STROBE ENABLE
THE LIGHT IS SET TO
OFF
SQUARE TO INCREASE
VOLTAGE RESPONSE AT
LOWER VALUE
7 Curves
SQUARE ←
7 Curves
LINEAR ←
LINEAR DIMMING
CONTROL
SOFT LED DIMMING AT
SHUT DOWN
8 CutOff
SLOW ←
8 CutOff
FAST ←
DIRECT DIMMING
RESPONSE AT SHUT
DOWN

Astro 250 3200K and 5600K, DMX 512+ RDM LED followspot -User’s Manual – 1.0
Luci della Ribalta srl, Via Berna 14, 46042 Castel Goffredo (MN) Italy
Tel. +39 0376 771 777 – fax +39 0376 772 140 – email info@ldr.it – web www.ldr.it
8
11.9 DIMMING BEHAVIOUR (Smooth) :
This function allows to set the LED dimming response. Factory setting is NORMAL.
11.10 FAN SETTING (Fan) :
This function allows to set the fan response. A choice of three modes is available: Automatic, Silent
or Steady. When the fan is in Auto mode, the speed is regulated by the LED temperature. When in
Silent mode, the fan runs slowly to reduce the noise. When in Steady mode the fan runs at constant
speed, halfway between the minimum and maximum speed. In all cases, if the LED temperature
exceeds the maximum admitted value, the LED is protected by a derating security system.
Factory setting is AUTO .
11.11 LCD SCREEN ILLUMINATION (BackL) :
This function allows to turn off the LCD backlight, the LED POWER and LED DMX after 1’30” from last
setting. Factory setting is AutoOFF.
PRESS TO ACTIVATE
THE MENU
AN ARROW SHOULD
APPEAR
9 Smooth
NORMAL
11 BackL
AutoOFF
11 BackL
AutoOFF ←
PRESS TO ACTIVATE
THE MENU
AN ARROW SHOULD
APPEAR
9 Smooth
FAST ←
IMMEDIATE DIMMING
RESPONSE
LCD BACKLIGHT OFF
AFTER 1 MINUTE AND
30 SECONDS
FAST DIMMING
RESPONSE = 150ms
9 Smooth
NORMAL ←
9 Smooth
SLOW ←
SLOW DIMMING
RESPONSE = 300ms
PRESS TO ACTIVATE
THE MENU
AN ARROW SHOULD
APPEAR
10 Fan
AUTO
10 Fan
STEADY ←
CONSTANT FAN SPEED
FAN SPEED IS
REGULATED BY LED
TEMPERATURE
10 Fan
AUTO ←
10 Fan
SILENT ←
SLOW FAN SPEED TO
REDUCE THE NOISE
11 BackL
ON ←
LCD BACKLIGHT
ALWAYS ON
Astro 250 3200K and 5600K, DMX 512+ RDM LED followspot -User’s Manual – 1.0
Luci della Ribalta srl, Via Berna 14, 46042 Castel Goffredo (MN) Italy
Tel. +39 0376 771 777 – fax +39 0376 772 140 – email info@ldr.it – web www.ldr.it
9
11.12 TEMPERATURE CONTROL (Tled) :
This function allows to visualize the LED temperature. Factory setting is °C.
11.13 SOFTWARE VERSION (SwVer) :
This function allows to visualize the software version.
11.14 MANUAL DIMMER TYPE (Manu) :
This function allows to select the manual dimmer type. An additional movable manual dimmer,
which can be clamped-on in any position of each of the side control handles, is available as an
additional accessory as follows
A20702071 ASTRO SIDE-HANDLE CLAMP-ON MANUAL DIMMER
Factory setting is ENCODER.
There are also four different hidden menus to select the advanced settings of the ASTRO LED. To
activate this function turn OFF and ON the Astro by pressing the rotary switch at power on.
11.15 PRO or BASIC CONTROL (ProBasic) :
The PRO-BASIC control is a special function which allows to limit the access to the control menu.
Select ProBasic with the rotary switch and press to access the menu. Select :
PRO, to enable access to all the functions
BASIC, to limit access to functions 5.1 DMX or MANUAL MODE, 5.2 DMX ADDRESS, 5.12 Temperature
Control and 5.13 Software version.
Factory setting is PRO.
11.16 FACTORY SETTINGS (Reset) :
The RESET control is a special function which allows to RESET the product to factory settings.
12 Tled
##°C
12 Tled
##°C ←
12 Tled
###°F ←
TURN TO SELECT °C
OR °F AND PRESS TO
CONFIRM
PRESS TO ACTIVATE
THE MENU
AN ARROW SHOULD
APPEAR
14 Manu
ENCODER
14 Manu
ENCODER←
PRESS TO ACTIVATE
THE MENU
AN ARROW SHOULD
APPEAR
MANUAL DIMMING BY
ROTARY SWITCH
14 Manu
POTENT ←
MANUAL DIMMING BY
EXTERNAL SLIDER
(OPTIONAL)
Choose
ProBasic
MenuType
PRO ←
MenuType
BASIC ←
TURN TO SELECT PRO
OR BASIC MENU AND
PRESS TO CONFIRM
PRESS TO ACTIVATE
THE MENU AN
ARROW SHOULD
APPEAR
Choose
Reset
Are You
SURE ?
MenuType
BASIC ←
PRESS TO CONFIRM
THE RESET
PRESS TO ACTIVATE
THE MENU
Astro 250 3200K and 5600K, DMX 512+ RDM LED followspot -User’s Manual – 1.0
Luci della Ribalta srl, Via Berna 14, 46042 Castel Goffredo (MN) Italy
Tel. +39 0376 771 777 – fax +39 0376 772 140 – email info@ldr.it – web www.ldr.it
10
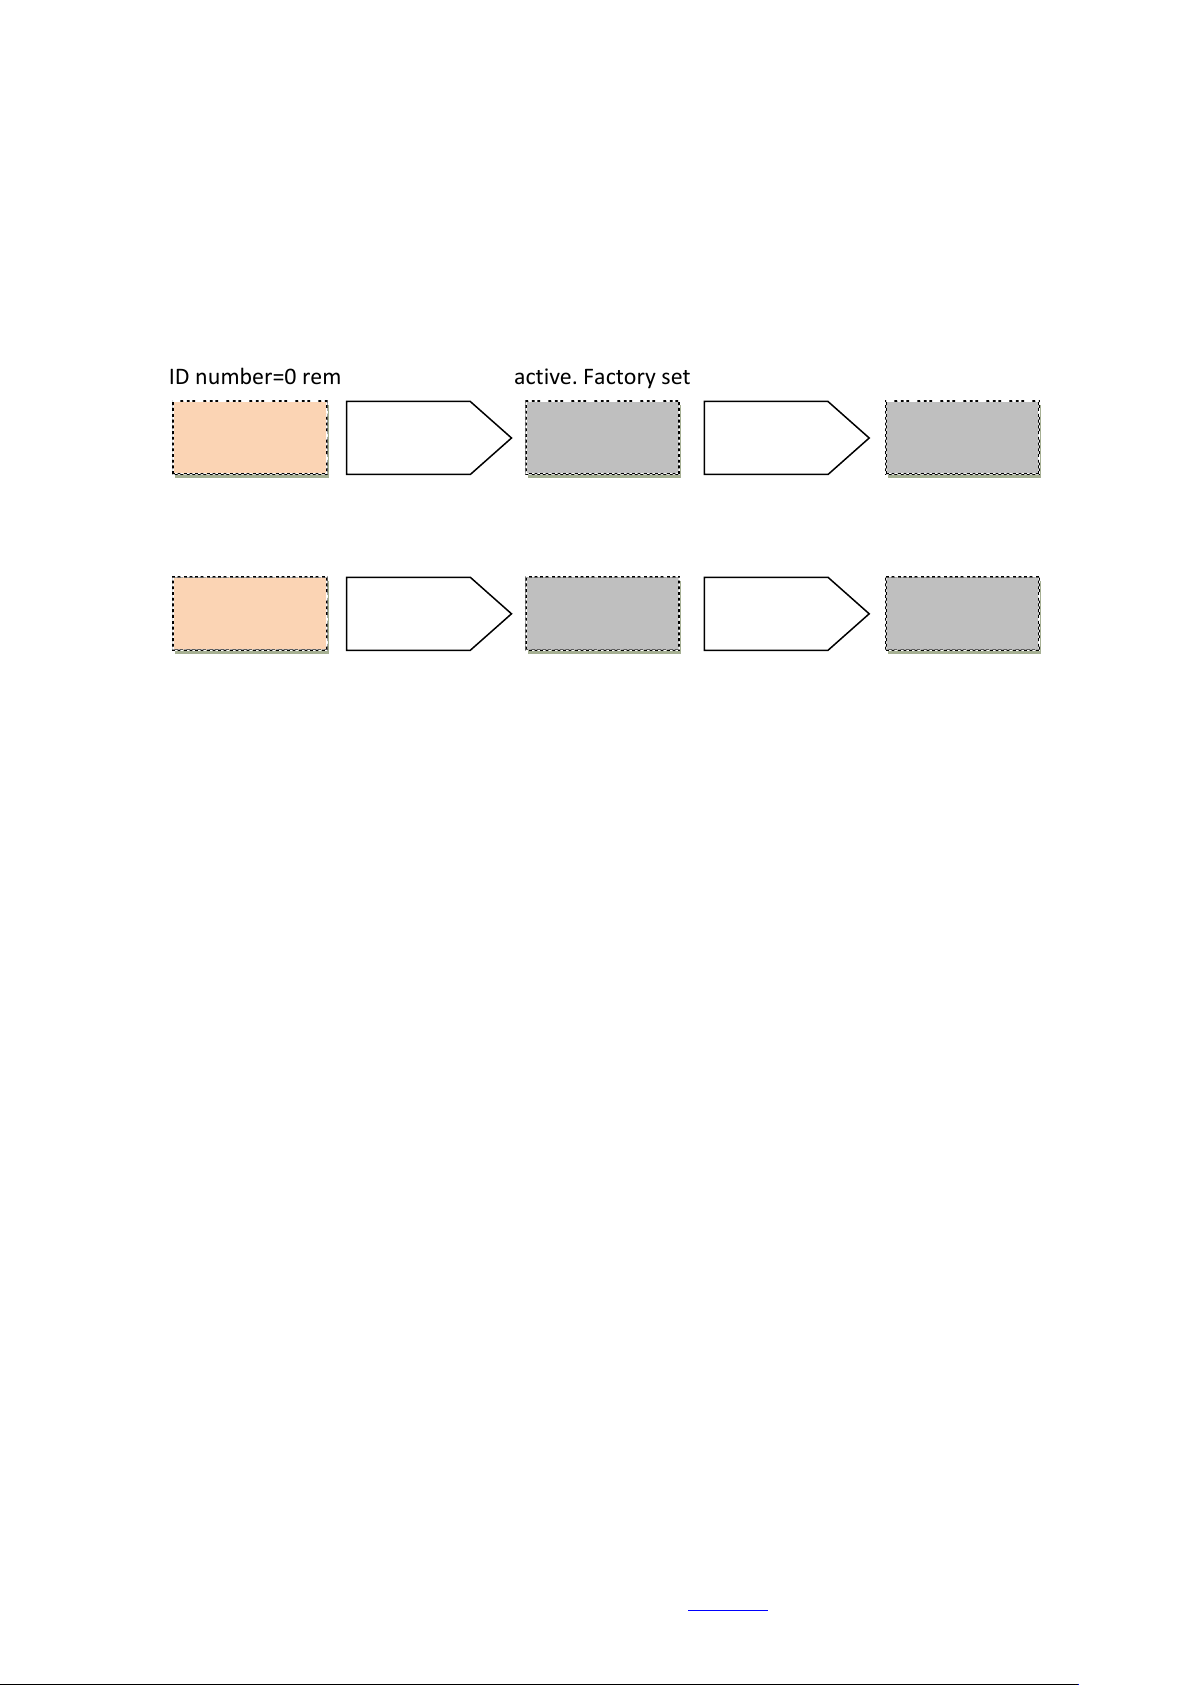
11.17 ID for REMOTO (ID Rem):
Remoto is a control device which allows to upgrade your Astro with the latest software version or to
load and download stored info. It is available as an optional accessory as follows
A20702072 REMOTO control unit
To change the initial ID press the rotary switch until an arrow appears, then turn to change to the
desired ID number. Press to confirm your selection. It is possible to select an ID number from 0 to
250. If ID number=0 remote control is not active. Factory setting is 000.
11.18 CALIBRATION (Set Min):
It allows to calibrate the minimum level of the output.
11.19 EXIT HIDDEN MENU (Exit):
It allows to exit from hidden menus.
12. FOCUSING
This fixture features a variable beam angle from 8° to 23°. The variable beam is modified by adjusting
the front and rear zoom lenses in relation to each other.
The front lens defines the beam spread, the rear lens defines the focus degree of ‘softness’ or
‘hardness’ of the beam edge or shutters.
13. CLEANING AND MAINTENANCE
To ensure maximum performance of the product, a regular maintenance service should be carried
out. Please make sure the product is cold and disconnected from power supply when doing this.
General maintenance
* Clean all reflective parts such as lenses opening the product, if necessary.
* Check the lenses and replace any visibly damaged component.
* Clean air ducts and fans in order to allow a proper ventilation activity on the product.
* Check internal and external wiring and replace any cable which should be damaged by heat or
mechanical agents.
Cleaning of optical components
LEDhouse lenses:
Open the lens compartment door by removing the two M4 cross head screws on the top of the
ledhouse tube and slide the top cover free
Choose
ID Rem
ID Rem
000 ←
ID Rem
### ←
TURN TO ASSIGN THE
ID NUMBER AND
PRESS TO CONFIRM
PRESS TO ACTIVATE
THE MENU
AN ARROW SHOULD
APPEAR
Choose
Set Min
Set Min
#### ←
Set Min
#### ←
TURN TO ASSIGN
THE CALIBRATION
VALUE AND PRESS TO
CONFIRM
PRESS TO ACTIVATE
THE MENU
AN ARROW SHOULD
APPEAR

Astro 250 3200K and 5600K, DMX 512+ RDM LED followspot -User’s Manual – 1.0
Luci della Ribalta srl, Via Berna 14, 46042 Castel Goffredo (MN) Italy
Tel. +39 0376 771 777 – fax +39 0376 772 140 – email info@ldr.it – web www.ldr.it
11
Remove the condensor lenses assembled block by removing the two M5 cross head screws.
Clean the lenses with a soft cloth and re-position
Zoom lenses:
Slide the front zoom panels positioned at the bottom of the lens tube and clean with a soft cloth.
14. SPARE PARTS
All components are available as spare parts. We strongly recommend you always use original LDR
components as spare parts. Please refer to our technical assistance should you need to order and/or
replace any part of the unit.
15. WARRANTY
Our warranty covers all structural and manufacture defects for one year from the date you
purchased this product. In case of complaints we strongly recommend you use the complaint form at
the end of this manual or contact the local dealer who supplied the product to you. In any case
please report the serial number of the product.
16. AVAILABLE ACCESSORIES
A20100106 185x185mm colour frame
A20109106 Kit 185x185mm colour frame + front runners
A20105106 5-colour colour changer magazine
A20105206 6-colour colour changer magazine
A20100707 Spare iris diaphragm
A20100807 A-size gobo holder
A20102100 Fluid-head spigot for followspot tripod
A20102200 Spare spigot for tripod
A20102311 HD steel tripod with fluid head
A20102401 Black followspot tripod
A20102402 Chrome-plated followspot tripod
A20107180 Flight-case with braking wheels, stackable
A20202401 Set of 3 braking wheels for followspot tripod
A20702071 Side-handle clamp-on manual dimmer
A20702072 Remoto control unit for software upgrade
V90MLRT100FR Braking wheel (1pc) for flight case
R80208019 1x black shutter blade

Astro 250 3200K and 5600K, DMX 512+ RDM LED followspot -User’s Manual – 1.0
Luci della Ribalta srl, Via Berna 14, 46042 Castel Goffredo (MN) Italy
Tel. +39 0376 771 777 – fax +39 0376 772 140 – email info@ldr.it – web www.ldr.it
12
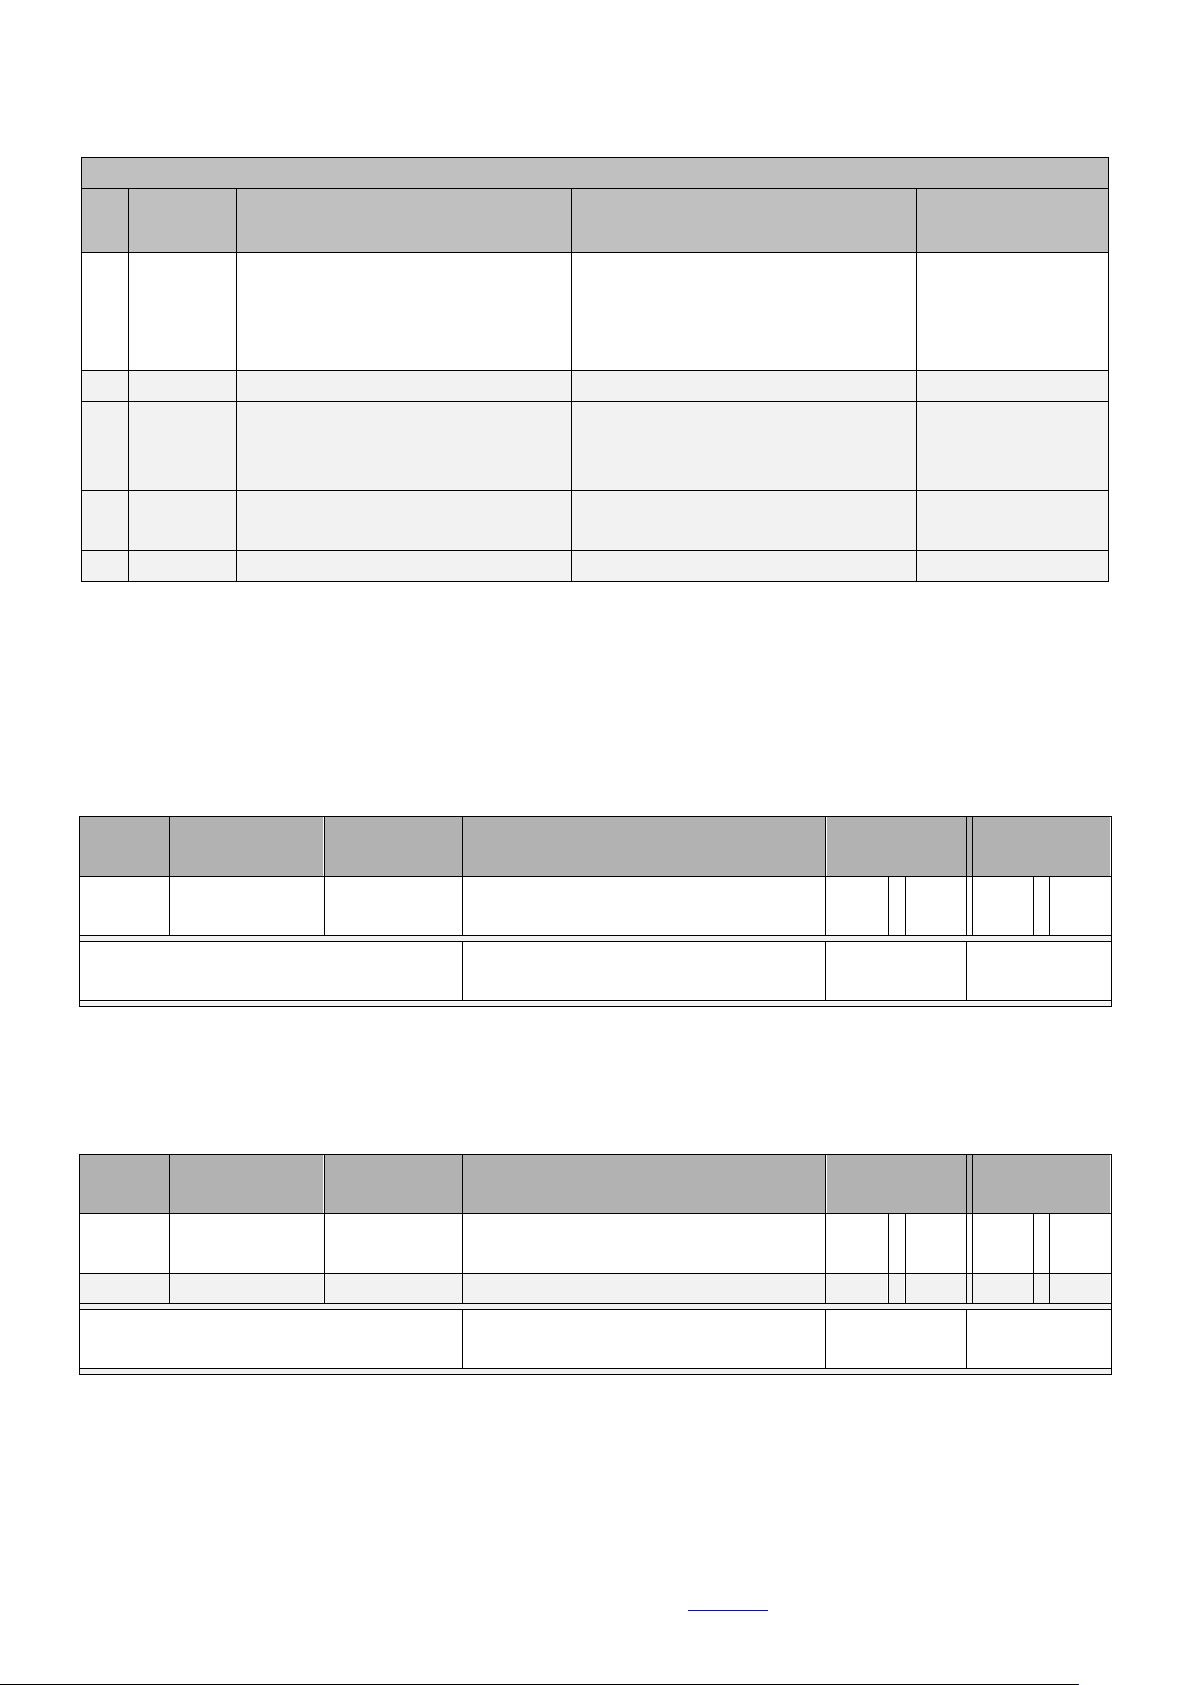
17. SUMMARY OF CONTROLS AND FUNCTIONS
# Function Description Available Options Factoring Setting
1 Mode MANUAL or DMX control
MANUAL (controlled from the
rotary switch or clamp-on
manual dimmer) ; DMX
DMX
2 Addr
Selects the DMX starting
address other remotely
controlled functions are
assigned in sequence to the 1st
assigned DMX address
From 001 to 512 001
3 8/16b 8 or 16 Bits dimming resolution
8 BITS on 1 channel ; 16 BITS on 2
channels
8 BITS
4 DMXMem
Sets the behaviour of the unit in
case of DMX failure
ON = last dmx value ; OFF=80%
fade to 80% after 1,5 Sec ;
OFF=0%
ON
5 Strobe Activates the Strobe function ENABLE ; DISABLE DISABLE
6 SetStr
Selects the Strobe speed.
This menu is not active when
the Strobe function is disabled
or when is remotely controlled
through DMX
OPEN = ON ; SPEED = ## (select
value from 01 slowest to 10
fastest); CLOSED = OFF
OPEN
7
Curves
Selects the dimming curve
SQUARE ; LINEAR
SQUARE
8 CutOff
Replicates the halogen lamp
dimming behaviour at cut off
FAST = NOT ACTIVE ;
SLOW = ACTIVE
SLOW
9 Smooth Dimmer response
NORMAL = 150ms ; SLOW =
300ms FAST = Immediate
response
NORMAL
10 Fan Fan setting
AUTO = regulated by Tled ;
SILENT = slow speed, low noise ;
SILENT = constant speed
AUTO
11 BackL LCD screen retro-illumination
ON ; AutoOFF = LCD light off after
1'30" AutoOff
12
Tled
Visualizes the LED temperature
Select the LED Temp in °C or F°
°C
13
SwVer
Visualizes the software version
---
14 Manu Selects the manual dimmer type
ENCODER = Rotary switch ;
POTENT = External slider
ENCODER
Astro 250 3200K and 5600K, DMX 512+ RDM LED followspot -User’s Manual – 1.0
Luci della Ribalta srl, Via Berna 14, 46042 Castel Goffredo (MN) Italy
Tel. +39 0376 771 777 – fax +39 0376 772 140 – email info@ldr.it – web www.ldr.it
13
SPECIAL FUNCTIONS : to activate these functions press the rotary switch at power on
# Function Description Available Options Factoring Setting
A ProBasic Sets the functions available from
the control menu
PRO = Enable acces to all
functions ; BASIC = Limit the
access to: 1 Mode, 2 Addr, 12
Tled and 13 SwVer
PRO
B
RESET
Factory RESET
Return to factory settings
---
C ID Rem
Sets the ID number to activate
the Remoto control to upload
and download firmware
From 000 (no remote control) to
250 000
D Set Min
Sets the minimum level of the
output
From 000 to 9999 ---
E
Exit
Exits from hidden menus
---
19. DMX CHARTS
19.1 DMX chart 1 (16 bit dimmer and strobe disabled)
This DMX chart refers to the followspot set at default parameters.
DMX
Channel
Function
Type of
Control
Effect
Decimal
Percenta
ge
1
Master
Dimmer
Proportional
Adjusts luminous output intensity
from 0 to 100%
0
-
255
0%
-
100%
Projector: Ast
ro White
Table name: DMX512 Functions
chart 1 (default)
Edition: 1
Date:
16/05/2018
19.2 DMX chart 2 (16 bit dimmer enable, strobe disabled)
This DMX chart refers to the followspot set at 16 bits resolution (See chapter 12.3 of this user guide).
DMX
Channel
Function
Type of
Control
Effect
Decimal
Percentage
1
Master
Dimmer
Proportional
Adjusts luminous output intensity
from 0 to 100%
0
-
255
0%
-
100%
2
Dimmer Fine
Proportional
Fine dimmer control 16 bit
0
-
255
0%
-
100%
Projector: Astro
White
Table name: DMX512 Functions
chart 2 (16 bits)
Edition: 1
Date:
16/05/2018

Astro 250 3200K and 5600K, DMX 512+ RDM LED followspot -User’s Manual – 1.0
Luci della Ribalta srl, Via Berna 14, 46042 Castel Goffredo (MN) Italy
Tel. +39 0376 771 777 – fax +39 0376 772 140 – email info@ldr.it – web www.ldr.it
14
19.3 DMX chart 3 (Strobe function enable, 8 bit dimmer) :
This DMX chart refers to the followspot set at strobe function on (See chapter 5.5 of this user guide).
DMX
Channel
Function
Type of
Control
Effect
Decimal
Percentage
1
Master
Dimmer
Proportional
Adjusts luminous output intensity
from 0 to 100%
0
-
255
0%
-
100%
2
Spare Channel
Step
No effect
0
-
255
0%
-
100%
3
Strobe
Step
Open
0
-
20
0%
-
8%
Step
Strobe speed 1 (minimum
frequency)
21
-
40
9%
-
15%
Step
Strobe speed 2
41
-
60
16%
-
24%
Step
Strobe speed 3
61
-
80
25%
-
31%
Step
Strobe speed 4
81
-
100
32%
-
39%
Step
Strobe speed 5
101
-
120
40%
-
47%
Step
Strobe speed 6
121
-
140
48%
-
55%
Step
Strobe speed 7
141
-
160
56%
-
63%
Step
Strobe speed 8
161
-
180
64%
-
71%
Step
Strobe speed 9
181
-
200
72%
-
78%
Step
Strobe speed 10 (maximum
frequency)
201
-
220
79%
-
86%
Step
Closed
221
-
255
87%
-
100%
P
rojector: Astro White
Table name: DMX512 Functions
chart 3 (Strobe)
Edition: 1
Date:
16/05/2018

Astro 250 3200K and 5600K, DMX 512+ RDM LED followspot -User’s Manual – 1.0
Luci della Ribalta srl, Via Berna 14, 46042 Castel Goffredo (MN) Italy
Tel. +39 0376 771 777 – fax +39 0376 772 140 – email info@ldr.it – web www.ldr.it
15
10.4 DMX chart 4 (16 bits dimmer and Strobe enabled) :
This DMX chart refers to the followspot set at 16 bits resolution and strobe function on (See chapter
12.3 and 12.5 of this user guide).
DMX
Channel
Function
Type of
Control
Effect
Decimal
Percentage
1
Master
Dimmer
Proporti
onal
Adjusts luminous output intensity
from 0 to 100%
0
-
255
0%
-
100%
2
Dimmer Fine
Proportional
Fine dimmer control 16 bit
0
-
255
0%
-
100%
3
Strobe
Step
Open
0
-
20
0%
-
8%
Step
Strobe speed 1 (minimum
frequency)
21
-
40
9%
-
15%
Step
Strobe speed 2
41
-
60
16%
-
24%
Step
Strobe speed 3
61
-
80
25%
-
31%
Step
Strobe speed 4
81
-
100
32%
-
39%
Step
Strobe speed 5
101
-
120
40%
-
47%
Step
Strobe speed 6
121
-
140
48%
-
55%
Step
Strobe speed 7
141
-
160
56%
-
63%
Step
Strobe speed 8
161
-
180
64%
-
71%
Step
Strobe speed 9
181
-
200
72%
-
78%
Step
Strobe speed 10 (maximum
frequency)
201
-
220
79%
-
86%
Step
Closed
221
-
255
87%
-
100%
Projector: Astro White
Table name: DMX512 Functions
chart 4 (16 bits + Strobe)
Edition: 1
Date:
16/05/2018
Luci della Ribalta srl reserves the right to modify the present document without prior notice.

certificatodiconformità
certificateofconformity
Konformitätserklärung
certificatdeconformité
certificadodeconformidad
01207170
01207180
Astro250Wplus3200K
100/260VDMX512+RDM
Astro250Wplus5600K
100/260VDMX512+RDM
INoisottoscrittidichiariamo,sottolanostracompletaresponsabilità,cheiprodotti:
GBWeherebydeclareunderourownresponsibility,thattheproductslistedherebelow:
DWirbeglaubigen,daßdienachfolgendgenanntenProdukte:
FNouscertifionssousnotreresponsabilitè,quelesproduitsmentionnésci‐dessous:
ELosquesubscriben,declaran,bajosuresponsabilidad,quelosproductosaquìlistados:
IsonoconformialleseguentinormeedairequisitidelleseguentidirettiveCEE:
GBconformtothefollowingstandardsandtotherequirementsoffollowingEECdirectives:
DdennachfolgendaufgeführtenNormenundEEC‐Vorschriftenentsprechen:
FsontconformesauxnormesetprescriptionsCEEci‐aprés:
EcumplendehechoconlassiguientesnormasydirectivasCEE:
EN61000‐3‐2,EN61000‐3‐3,EN55024,EN55022
EN60‐598‐2‐171989includingamendments1/2
EN60‐598‐11992includingamendment1
CEmarkingdirective93/68EEC
Lowvoltagedirective73/23/EECasamendedbydirective93/98/EEC
EMCdirective89/336/EECasamendedbydirective91/263/EECand92/31/EEC
LucidellaRibaltasrl
LisaPapi,President
modulodireclamo‐complaintform
Reklamationsformular‐formulairederéclamation‐
hojadereclamaciones
01207170
01207180
Astro250Wplus3200K
100/260VDMX512+RDM
Astro250Wplus5600K
100/260VDMX512+RDM
AziendaedIndirizzo‐Company'snameandaddress‐FirmennameundAddresse‐Nometadresse‐
Nombreydirecciòn
_______________________________________________________________________________________________________
_______________________________________________________________________________________________________
Nomedelrivenditoredacuiilprodottoèstatoacquistato‐Nameofthedealerwhereyouhavepurchased
theproduct‐NamenderFirma,dieIhnendasProduktverkaufthat‐Nomdelasociétéquivousavenduce
produit‐Nombredelacompañiadondehancompradoelproducto:
____________________________________________________________________________________________________
Prodottodifettoso
Faultyproduct
DefektesProdukt
Produitdéfectueux
Productodefectuoso
Descrizionedelproblema/Problemfound/BeschreibungdesDefekts/Descriptiondudéfaut/Descripciòndelproblema
________________________________________________________________________________________________________
________________________________________________________________________________________________________
________________________________________________________________________________________________________
________________________________________________________________________________________________________
Datad'acquisto‐Dateofpurchase‐Kaufdatum‐Datedel'achat‐Fechadecompra________________________
Sipregadiallegareprovad'acquisto‐Pleaseattachcopyofpurchaseinvoice‐BitteKaufnachweisbeilegen‐
Veuillezjoindreunequittanced'achat‐Lesrogamosincluyanlcopiadelafacturadecompra.
Nomeequalifica‐Nameandposition‐NameundFunktion‐Nometfonction‐Nombreycargo
____________________________________________________________________
Data‐Date‐Datum‐Date‐Fecha_____________________________
email:[email protected]

IT
Direttiva 2002/96/CE (Rifiuti di Apparecchiature
Elettriche ed Elettroniche - RAEE):
informazioni agli utenti: ai sensi dell’art. 13 del
Decreto Legislativo 25 luglio 2005, n.
151"Attuazione delle Direttive 2002/95/CE,
2002/96/CE e 2003/108/CE, relative alla riduzione
dell'uso di sostanze pericolose nelle
apparecchiature elettriche ed elettroniche, nonché
allo smaltimento dei rifiuti" questo prodotto è
conforme.
Il simbolo del cassonetto barrato riportato
sull’apparecchiatura o sulla sua confezione indica che
il prodotto alla fine della propria vita utile deve essere
raccolto separatamente dagli altri rifiuti. L’utente dovrà,
pertanto, conferire l’Apparecchiatura giunta a fine vita
agli idonei centri di raccolta differenziata dei Rifiuti
Elettronici ed Elettrotecnici, oppure riconsegnarla al
rivenditore al momento dell’acquisto di una nuova
apparecchiatura di tipo equivalente, in ragione di uno a
uno. L’adeguata raccolta differenziata per l’avvio
successivo dell’apparecchiatura dismessa al
riciclaggio, al trattamento ed allo smaltimento
ambientalmente compatibile contribuisce ad evitare
possibili effetti negativi sull’ambiente e sulla salute e
favorisce il reimpiego e/o riciclo dei materiali di cui è
composta l’apparecchiatura. Lo smaltimento abusivo
del prodotto da parte dell’utente comporta
l’applicazione delle sanzioni amministrative previste
dalla normativa vigente.
ES
Directiva 2002/96/EC (Residuos de aparatos
eléctricos y electrónicos - RAEE):
Información para el usuario.
Este producto es conforme con la Directiva EU
2002/96/CE. El simbolo de la papelera barrada situado
sobre el aparato indica que este producto, al final de
su vida útil, debe ser tratado separadamente de los
residuos domésticos. El usuario es responsable de la
entrega del aparato al final de su vida útil a los centros
de recogida autorizados. El adecuado proceso de
recogida diferenciada permite dirigir el aparato
desechado al reciclaje, a su tratamiento y a su
desmantelamiento de una forma compatible con el
medio ambiente, contribuyendo a evitar los posibles
efectos negativos sobre el ambiente y la salud,
favoreciendo el reciclaje de los materiales de los que
está compuesto el producto. Para información más
detallada inherente a los sistemas de recogida
disponibles, dirigirse al servicio local de recogida o al
establecimiento donde se adquirió el producto.
FR
Directive 2002/96/CE (Déchets d’équipements
électriques et électroniques - DEEE):
informations aux utilisateurs.
Ce produit est conforme à la Directive ED 2002/96/CE.
Le symbole de la corbeille barrée reporté sur l’appareil
indique que ce dernier doit être éliminé à part lorsqu’il
n’est plus utilisable et non pas avec les ordures
ménagéres. L’utilisateur a la responsabilité de porter
l’appareil hors d’usage à un centre de ramassage
spécialisé. Le tri approprié des déchets permet
d’acheminer l’appareil vers le recyclage, le traitement
et l’élimination de façon écologiquement compatible. Il
contribute à éviter les effets négatifs possibles sur
l’environnement et sur la santé, tout en favorisant le
recyclage des matériaux dont est constitué le produit.
Pour avoir des informations plus détaillées sur les
systèmes de ramassage disponibles, s’adresser au
service local d’élimination des déchets ou au
revendeur.
DE
Richtlinie 2002/96/EU (Elektro- und Elektronik-
Altgeräte - WEEE):
Benutzerinformationen.
Dieses Produkt entspricht der EU Richtlinie
2002/96/EU. Das Symbol des auf dem Gerät
dargestellten, durchgestrichenen Korbes gibt an, dass
das Produkt am Ende seiner Nutzungsdauer
gesondert vom Hausmüll zu behandeln ist. Am Ende
der Nutzungsdauer ist der Benutzer für die
Überantwortung des Geräts an geeignete
Sammelstellen verantwortlich. Die angemessene,
getrennte Müllsammlung zwecks umweltkompatibler
Behandlung und Entsorgung für den anschließenden
Recycling beginn des nicht mehr verwendeten Geräts
trägt zur Vermeidung möglicher schädlicher
Wirkungen auf Umwelt und Gesundheit bei und
begunstigt das Recycling der Materialien, aus denen
das Produkt zusammengesetzt ist. Für nähere
Informationen bezüglich der zur Verfügung stehenden
Sammelsysteme, wenden Sie sich bitte an den
örtlichen Müllentsorgungsdienst oder an das Geschäft,
in dem der Kauf getäligt worden ist.
UK
Directive 2002/96/EC (Waste Electrical and
Electronic Equipment - WEEE):
information for users.
This product complies with EU Directive 2002/96/EC.
The crossed-out wastebasket symbol on the appliance
means that at the end of its useful lifespan, the product
must be disposed of separately from ordinary
household wastes. The user is responsible for
delivering the appliance to an appropriate collection
facility at the end of its useful lifespan. Appropriate
separate collection to permit recycling, treatment and
environmentally compatible disposal helps prevent
negative impact on the environment and human health
and promotes recycling of the materials making up the
product. For more information on available collection
facilities, contact your local waste collection service or
the shop where you bought this appliance.
NL
Richtlijn 2002/96/EG (Afgedankte Elektrische en
Elektronische Apparaten - AEEA):
informatie voor de gebruikers.
Dit product voldoet aan de richtlijn EU 2002/96/EG.
Het symbool van de vuilnisbak met een streep erdoor,
dat op het apparaat staat, geeft aan dat het product,
wanneer het wordt afgedankt, niet met het huisvuil kan
worden meegegeven. Het is de verantwoordelijkheid
van de gebruiker het product, op het moment dat dit
wordt afgedankt, in te leveren bij een centrum voor
gescheiden afvalverwerking. Een correcte gescheiden
afvalverwerking, die gericht is op de recycling van het
afgedankte product en die een milieuvriendeiijke
behandeling en vernietiging mogelijk maakt, draagt
ertoe bij mogelijk negatieve effecten op het milieu en
op de gezondheid te voorkomen en bevordert het
hergebruik van de materialen waaruit het product
bestaat. Voor meer gedetailleerde informatie met
betrekking tot de voorhanden zijnde
afvalverwerkingsystemen dient u zich te wenden tot de
plaatselijke vuilnisdienst of tot de winkelier waar u het
product heeft gekocht.
PT
Directiva 2002/96/CE (Residuos de equipamentos
eléctricos e electrónicos REEE):
informações para os utilizadores.
Este produto é conforme á Directiva EU 2002/96/CE.
O simbolo do cesto barrado marcado no aparelho
indica que o produto, no fim da própria vida útil, deve
ser tratado separadamente do lixo doméstico. O
utilizador é responsável pela entrega do aparelho. no
fim da vida do mesmo, às apropriadas estruturas de
recolha. A adequada recolha diferenciada para o
encaminhamento sucessivo do aparelho à reciclagem,
ao tratamento e ao escoamento ambientalmente
compativel, contribui para evitar possiveis efeitos
negativos sobre o ambiente e a saúde e favorece a
reciclagem dos materiais que compõem o produto.
Para informações mais detalhadas inerentes aos
sistemas de recolha disponiveis, dirija-se ao serviço
local de escoamento de residuos, ou a loja na
qual efectuou a compra.
NO
WEEE-symbolet (Waste Electrical and
Electronic Equipment).
Bruken av WEEE-symbolet indikerer at dette
produktet ikke kan behandles som
husholdningsavfall. Du vil bidra til å beskytte
miljøet ved å sørge for at dette produktet blir
avhendet på en forsvarlig måte. Ta kontakt med
kommunale myndigheter, renovasjonsselskapet
der du bor eller forretningen hvor du kjøpte
produktet for å få mer informasjon om
resirkulering av dette produktet.
S
Symbol för avfall från elektrisk och
elektronisk utrustning (WEEE).
Märkning med WEEE-symbolen visar att
produkten inte får behandlas som hushållsavfall.
Genom att slänga den här produkten på rätt sätt
bidrar du till att skydda miljön. Mer information
om återvinning av produkten kan du få av de
lokala myndigheterna, din renhållningsservice
eller i affären där du köpte produkten.
FI
WEEE-merkintä (sähkö- ja
elektroniikkalaiteromu).
WEEE-merkintä osoittaa, että tätä tuotetta ei voi
käsitellä kotitalousjätteen tavoin. Kun huolehdit
tämän tuotteen asianmukaisesta hävittämisestä,
autat suojelemaan ympäristöä. Lisätietoa tämän
tuotteen kierrättämisestä saat
paikallisviranomaisilta, jätehuoltoyhtiöltäsi tai
myymälästä josta ostit tämän tuotteen.
DK
Symbol for affald af elektrisk og elektronisk
udstyr (WEEE)
Brugen af WEEE-symbolet betyder, at dette
produkt ikke må behandles som
husholdningsaffald. Ved at sørge for korrekt
bortskaffelse af produktet medvirker du til at
beskytte miljøet. Du kan få flere oplysninger om
genbrug af dette produkt hos de lokale
myndigheder, dit renovationsselskab eller i
forretningen, hvor du har købt produktet.
HU
Hulladék elektromos vagy elektronikus
készüléket jelölö szimbòlum.
Ez a szimbólum azt jelöli, hogy a terméket nem
szabad háztartási hulladékként kezelni. A
hulladékká valt termék megfeleló elhelyezésével
hozzájárul a környezet védelméhez. A termék
újrafelhasználásával kapcsolatban a helyi
szerveknél háztartási hulladékokat elszállító
vállalatnál vagy a terméket értékesítö üzletben
tájékozódhat.
CZ
Symbol pro odpadní elektrický a elektronický
materiál (WEEE).
Použití symbolu WEEE označuje, že tento
produkt nelze likvidovat jako domovní
odpad.Správnou likvidaci tohoto produktu
přispějete k ochraněživotního prostředí.
Podrobnější informace o likvidaci tohoto produktu
vám podaji místní úřady, společnost pro likvidaci
komunálního odpadu nebo obchod, kde jste
zboži zakoupili.

LucidellaRibaltasrl,ViaBerna14,46042CastelGoffredomnItaly.tel+390376771777‐fax+390376772140‐email[email protected]
This manual suits for next models
3
Table of contents
Other LDR Spotlight manuals


Popular Spotlight manuals by other brands


brennenstuhl
brennenstuhl professionalLINE X 8000 M operating instructions

Wetelux
Wetelux 80 35 67 instruction manual

KRAFTWERK
KRAFTWERK 32039 instruction manual

Cooper Lighting
Cooper Lighting MS180 instruction manual

Niethammer
Niethammer HPZ 112 D instruction manual

EuroLite
EuroLite LED PS-46 user manual

Original BTC
Original BTC DAVEY LIGHTING 0755 instruction manual

thomann
thomann Stairville Wild Wash Pro 648 LED White DMX user manual

Princeton Tec
Princeton Tec SECTOR 5 Operating and maintenance instructions

DFA
DFA SoRi Installation and operating instructions

EuroLite
EuroLite AKKU IP Tourlight 200 user manual

PRG
PRG ReNEW quick start guide