LDR Astro 250 User manual

01207190 Astro250Wi‐fiRGBW
DMX512+RDMLED
istruzioniperl'uso
operatinginstructions
Bedienungsanleitung
instruccionesdemanejo
moded'emploi
gebruiksaanwijzing
LucidellaRibaltasrl,ViaBerna14,46042CastelGoffredomnItaly.tel+390376771777‐fax+390376772140‐email[email protected]

Astro 250 Wi-Fi RGBW, DMX 512+ RDM LED followspot -User’s Manual – 1.0
Luci della Ribalta srl, Via Berna 14, 46042 Castel Goffredo (MN) Italy
Tel. +39 0376 771 777 – fax +39 0376 772 140 – email info@ldr.it – web www.ldr.it
1
ENGLISH – TABLE OF CONTENTS
01. Important safety norms page 3
02. Check packing content page 4
03. Mounting the spigot page 4
04. Mounting the iris diaphragm page 4
05. Black Shutter blades page 5
06. Adjusting the yoke page 5
07. Wiring page 5
08. Voltage page 6
09. Local Control panel and operation page 6
10. Menu page 6
10.1 DMX or manual mode page 6
10.2 DMX address page 7
10.3 Dimmer Resolution page 7
10.4 Lost DMX Signal page 7
10.5 Strobe page 8
10.6 Strobe Speed page 8
10.7 Dimming curve page 8
10.8 Cut off dimming response page 9
10.9 Dimming behaviour page 9
10.10 Fan Setting page 9
10.11 LCD Screen Illumination page 10
10.12 Red colour intesity page 10
10.13 Green colour intensity page 10
10.14 Blue colour intensity page 10
10.15 White colour intensity page 10
10.16 Temperature control page 11
10.17 Software version page 11
10.18 Net page 11
10.19 Sub-Net page 11
10.20 Universe page 11
10.21.Manual dimmer Type page 11
10.22-A Pro or basic control page 12
10.23-B Factory setting page 12
10.24-C ID REMOTO page 12
10.25-D Calibration page 13
10.26-E IP address page 13
10.27-F Subnet Mask page 13
10.28-G Service set identifier (SSID) page 13
10.29-H Password page 14
10.30-I Exit Hidden menu page 14
11. App settings from LDR mobile controller page 15
12. App settings and operations from user’s Android mobile controller page 16
12.1 Settings page 16
12.2 Operating the Astro Wi-Fi page 20
12.3 Creating, storing and deleting colours page 21

Astro 250 Wi-Fi RGBW, DMX 512+ RDM LED followspot -User’s Manual – 1.0
Luci della Ribalta srl, Via Berna 14, 46042 Castel Goffredo (MN) Italy
Tel. +39 0376 771 777 – fax +39 0376 772 140 – email info@ldr.it – web www.ldr.it
2
13.App settings and operations from user’s IOs mobile controller page 23
13.1 Operating the Astro Wi-Fi page 24
13.2 Creating, storing and deleting colours page 24
14. Universal 360° rotating mobile device holder, supplied page 26
15. Positioning your device mobile page 27
16. Recharging your mobile battery page 27
17. Clamp-on mobile digital dimmer page 27
18. Focusing page 27
19. Cleaning and maintenance page 27
20. Spare sparts page 28
21. Warranty page 28
22. Available accessories page 28
23. Summery of controls and functions page 30
24. DMX charts page 32
24.1 DMX CHART 1 ( 16 bit dimmer and strobe disabled) page 32
24.2 DMX CHART 2( 16 bit dimmer inabled, strobe disabled) page 32
24.3 DMX CHART 3( strobe functions inabled, 8 bit dimmer) page 33
24.4 DIMX CHART 4 ( 16 bit dimmer and strobe inabled) page 34
LDR Conformity Certificate – Certificato di Conformità – Konformitätserklärung page 35
Complaint form – Modulo di reclamo – Reklamationsformular ………………………….page 36
WEEE Directive – Direttiva RAEE – WEEE Richtlinie …………………………………………… page 37

Astro 250 Wi-Fi RGBW, DMX 512+ RDM LED followspot -User’s Manual – 1.0
Luci della Ribalta srl, Via Berna 14, 46042 Castel Goffredo (MN) Italy
Tel. +39 0376 771 777 – fax +39 0376 772 140 – email info@ldr.it – web www.ldr.it
3
ENGLISH
Thank you for choosing a quality product from Luci della Ribalta srl. We trust our products and
services meet your requirements, but if not please contact us directly using the attached feedback
form to help us improve our service quality.
This product has been manufactured with great care and left our factory in perfect conditions, but
if it has been damaged in transport please contact your dealer in the first instance. A feedback form
is appended. Our warranty covers all manufacturing and component defects for one year from the
date you purchased the product.
Our products are designed for the use of professional technicians, and the instructions provided
here ensure safe and correct operation of this product. Luci della Ribalta srl will not accept any
responsibility where damage has been caused to the product or persons through improper use of
the product and/or non-compliance with the regulations described herein.
IMPORTANT: Read these user instructions before using the lighting unit
The instructions given here ensure a safe and correct usage of this product. A user’s failure to
comply with the installation, operating, maintenance and safety procedures mentioned in this
manual, as well as those generally applicable to this lighting equipment, may cause the unit not to
perform as expected.
Luci della Ribalta accepts no liability for direct, indirect, incidental, special, or consequential
damages resulting from the customer’s failure to follow the installation, operating, maintenance
and safety procedures in this manual or those generally applicable to lighting equipment.
The limitation extends to damages for personal injury, property damage, loss of operations, loss of
profits, loss of product or loss of time, whether incurred in by the customer, the customer’s
employees or a third party.
Apart from the instructions given on this manual, all relevant safety and health standards of the
appropriate EU Directives must be complied with.
1. IMPORTANT SAFETY NORMS
•Warning, high voltage ignition. Disconnect the unit from power before servicing
•Continuous mains power is required for this spotlight as an internal dimmer controls the
intensity via DMX or local rotary knob. An accessory moving manual dimmer is furthermore
available for positioning on the side grab handles.
•Use of a phase control dimmed mains supply may damage the internal electronics.
•This product features fan-assisted ventilation. Make sure you do not cover the fans or
obstruct the air flow at any one time.
•Make sure the fans are working correctly. Should you detect even the slightest malfunction,
switch the luminaire off and carry out the necessary servicing. Replace the fans if necessary.
•This product is rated IP 20 and is therefore designed for interior use only. For details on
maximum ambient temperature, minimum distance from flammable objects and tilt angle,
please refer to what indicated on the product label.
•Repairing and replacement of any component of this product must be carried out exclusively
by professional personnel in conformity with the relevant safety and health standards and
only with original Luci della Ribalta srl components.

Astro 250 Wi-Fi RGBW, DMX 512+ RDM LED followspot -User’s Manual – 1.0
Luci della Ribalta srl, Via Berna 14, 46042 Castel Goffredo (MN) Italy
Tel. +39 0376 771 777 – fax +39 0376 772 140 – email info@ldr.it – web www.ldr.it
4
•Replacement of any part of the wiring system must be carried out exclusively by
professional personnel in compliance with the original wiring diagram and with components
identical to or compatible with those originally fitted.
•Installation of this product must be exclusively carried out by professional personnel in
compliance with the safety norms in force in the country where the product is used.
2. CHECK PACKING CONTENT
A. Standard followspot B. Kit followspot
Astro Wi-Fi in box Astro Wi-Fi in flight case
Separate mains power cable with PowerCon Separate mains power cable with PowerCon
Ø28mm spigot for followspot Ø28mm spigot for followspot
Iris diaphragm Iris diaphragm
Clamp-on digital dimmer A20702071 Clamp-on digital dimmer A20702071
Universal mobile device holder A20702073 Universal mobile device holder A20702073
3. MOUNTING THE SPIGOT
A spigot is supplied in standard delivery for you to tripod-mount your followspot.
Make sure the tripod you are going to use can withstand the product load as indicated on the
product’s label
Make sure the tripod you are going to use features a top aperture over 28mm dia.
Remove the M12 nut and the washer from the spigot.
Insert the spigot in the central hole of the yoke of the followspot from beneath the yoke.
Add the plain screw and the M12 self- locking nut and tighten the nut with a suitable tool.
Mount the followspot on the tripod.
4. MOUNTING THE IRIS DIAPHRAGM - supplied
The iris diaphragm supplied with the followspot has 20 leaves to size the beam from a maximum
aperture of 68mm to a minimum of 5mm. A black-out iris diaphragm is available to special order.
Using a Phillips screw-driver remove the two cross-head screws from the sides of the iris plate.
Slide the diaphragm in the gate area.
Fix the iris in position by tightening the previously removed screws
Important notice: do not leave the iris closed for over 5 minutes while the LED is on
FAILURE TO COMPLY WITH THE ABOVE NOTICE MAY CAUSE THE IRIS AND THE FOLLOWSPOT TO
SUFFER MAJOR HEAT DAMAGES AND WILL INVALIDATE THE PRODUCT’S WARRANTY
Astro 250 Wi-Fi RGBW, DMX 512+ RDM LED followspot -User’s Manual – 1.0
Luci della Ribalta srl, Via Berna 14, 46042 Castel Goffredo (MN) Italy
Tel. +39 0376 771 777 – fax +39 0376 772 140 – email info@ldr.it – web www.ldr.it
5
5. BLACK SHUTTER BLADES (accessory, part nr. R80208019 x 4)
Black shutter blades are not supplied with the unit but are available as separate accessory. They are
sold as single items and relevant part number is R80208019, 4 are required.
6. ADJUSTING THE YOKE
This followspot is provided with a yoke balancing adjustment. The balancing point is factory set for
the standard product configuration supplied (without colour). However, should you need to adjust
the balancing, please follow the procedure below:
•The followspot must be mounted on the tripod stand with all relevant accessories attached.
•Using a Phillips screw driver, loosen the 2 M5 screws on each side of the yoke.
•Gently slide the followspot backwards or forwards to the required position.
•Make sure the yoke is correctly aligned horizontally.
•Tighten the 4 M5 screws
7. WIRING
Before being connected to the mains power, this unit may need to be wired with a suitable plug if
not already installed. Make sure the plug you are using is rated for the proper power load.
•This fixture must be grounded
•Ensure the plug conforms to the relevant EU/UL or local electrical standards
To perform a correct wiring, please note that the cores in this mains lead are colour-coded as
follows:
Ground: green+yellow –Neutral: blue -Hot: brown
In case the colours of the wires do not correspond to the colour of the connection points on your
plug, please proceed as follows:
The green or green and yellow wire must be connected to the connection point marked with the
letter E or with the symbol or coloured in green or in green-yellow
The blue wire must be connected to the connection point marked with the letter N or with the
symbol or coloured in black
The brown wire must be connected to the connection point marked with the letter L or with the
symbol or coloured in red
Before you finally position this product for use, temporarily connect it to a properly fused power
supply to check the unit works correctly.

Astro 250 Wi-Fi RGBW, DMX 512+ RDM LED followspot -User’s Manual – 1.0
Luci della Ribalta srl, Via Berna 14, 46042 Castel Goffredo (MN) Italy
Tel. +39 0376 771 777 – fax +39 0376 772 140 – email info@ldr.it – web www.ldr.it
6
8. VOLTAGE
Before operating this unit please refer to the product label mounted at the back of the luminaire to
check you are operating with the correct voltage.
The Astro 250 LED can be operated between 100V and 260 VAC.
9. LOCAL CONTROL PANEL AND OPERATION
OPERATION: LCD display for DMX address, system setup and status details.
POWER: power LED status indicator , red colour. ON= power
DMX: DMX LED status indicator, green colour. LED OFF = DMX OFF and manual control activated ,
LED ON = DMX MODE activated with no DMX signal, FLASHING LED = receiving DMX
MENU: rotary switch selector to select and modify the operational modes.
Turn left or right to navigate through the menu and press to select or to confirm
DMX IN: input DMX signal (pin1=0 , pin2= DATA- , pin3=DATA+ ).
DMX OUT : Loop through DMX signal output
POWER IN: Mains power input
POWER OUT: Mains power output
10. MENU
There are twenty-one different menus to control the settings of ASTRO RGBW LED. The rotary
selector is used to adjust the settings and to navigate through the menu. Turn left or right to select
the menu and push to access or to confirm the selected data or functions. To exit the selected
menus without saving the data, press the rotary selector for at least 1 second.
10.1 Wi-Fi, DMX OR MANUAL (Mode)
Colour control of the Astro is achieved through a totally innovative technology. The Astro Wi-Fi
generates a proprietary Wi-Fi access which will recognize one device only and whose range reaches
15m approximately in obstacle-.free environments. Access to the Wi-Fi access is protected by
password. A universal mobile phone holder (3.5/6.5in), rotatable over 360°, supplied with the Astro
and clamped on one of the side bars, allows the installation of a mobile device, either IOS or
Android to take control of the followspot.
If the Astro was purchased complete with the LDR controller A20702074 (available as an optional
accessory) Smartphone Honor 75 Black, pre-loaded with the Android Art-Net Controller app,
relevant settings and libraries, it is ready to be operated.
In case you are using your own mobile device, please refer to chapter 12 and 13 of this manual for
all the necessary steps needed to set up the control system.
Select the LED control mode between Wi-Fi (factory setting – if you want to control the colour
mixing through a mobile device), DMX and manual. To change the control mode press once the
rotary selector until an arrow appears on the menu. Turn the selector to the right or the left to
select the desired mode of operation and press to confirm your selection.

Astro 250 Wi-Fi RGBW, DMX 512+ RDM LED followspot -User’s Manual – 1.0
Luci della Ribalta srl, Via Berna 14, 46042 Castel Goffredo (MN) Italy
Tel. +39 0376 771 777 – fax +39 0376 772 140 – email info@ldr.it – web www.ldr.it
7
In order to work properly with an external mobile device the Astro must be set in Wi-Fi mode at the
default settings. If default settings have been changed, please refer to chapter 10.23-B to reset the
product to factory settings.
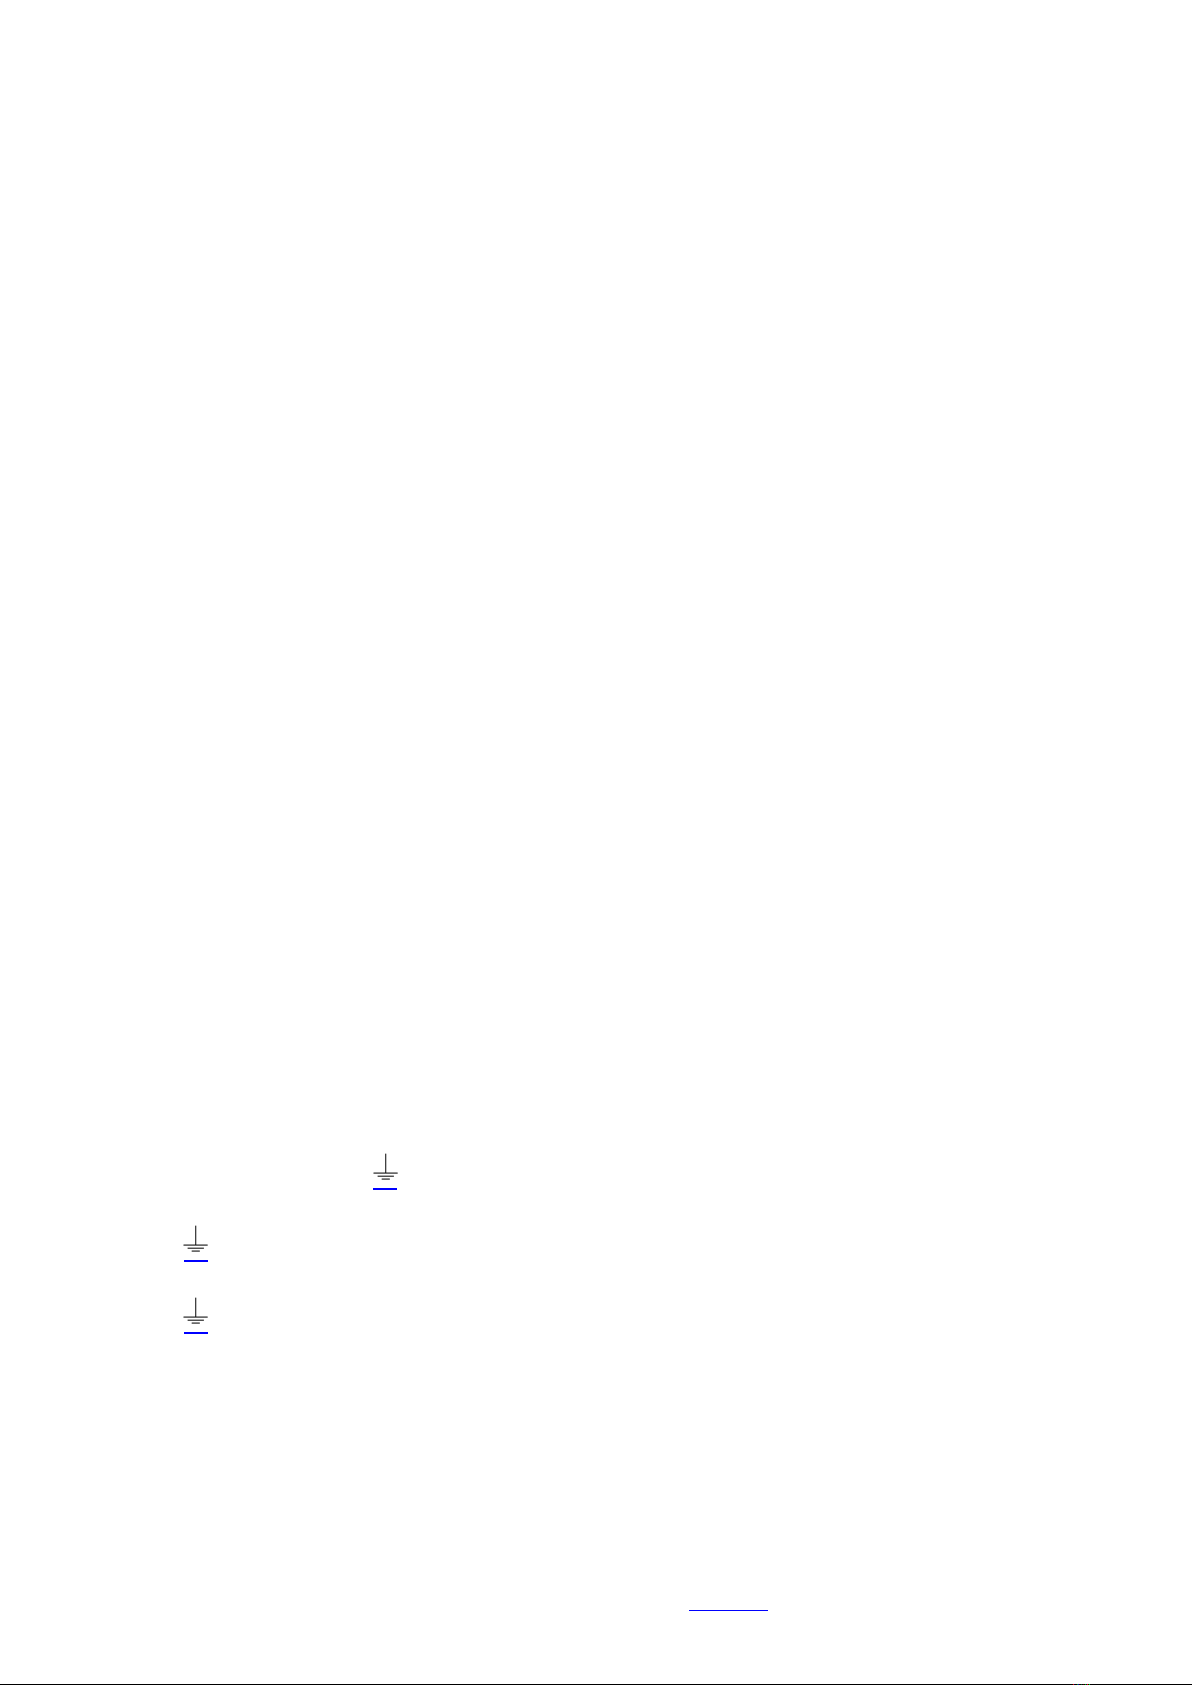
Tap the rotary selector and the LCD screen will display the mode status and the current value:
10.2 DMX ADDRESS (Addr) :
It allows to select the initial DMX starting address to remotely control the LED functions. To change
the initial DMX address press the rotary switch until an arrow appears, then turn to change to the
desired DMX starting address. Press to confirm your selection. Factory setting is 001.
10.3 DIMMER RESOLUTION (8/16b) :
The dimming resolution can be controlled at 8 bits from one DMX channel to 16 bits with 2 DMX
channels.
Factory setting is 8 Bit.
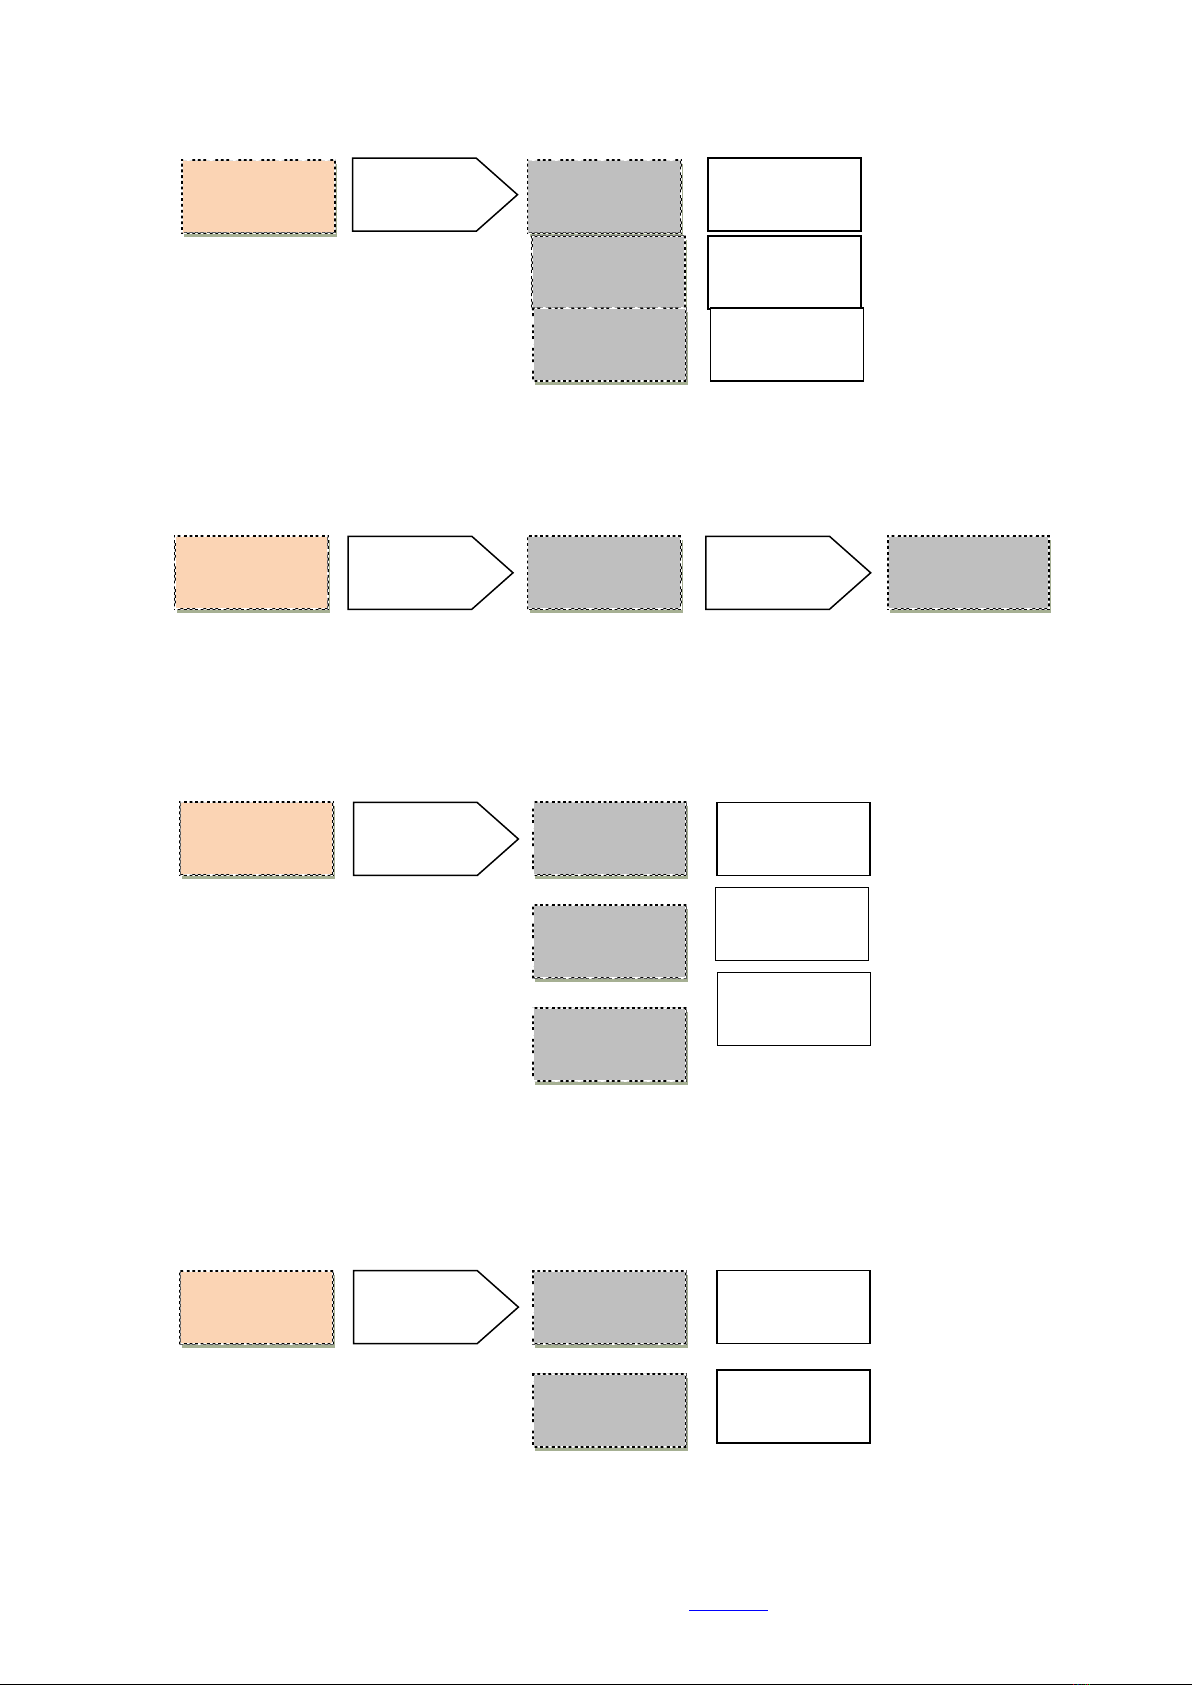
10.4 LOST DMX SIGNAL (DMXMem) :
In case of signal failure this function allows to store in memory the last DMX value. This function is
forced ON in Wi-Fi mode. Factory setting is ON.
Three options are available :
2 Addr
001
PRESS TO ACTIVATE
THE MENU AN
ARROW SHOULD
APPEAR
1 Mode
WIFI_D
1 Mode
WIFI_D ←
1 Mode
DMX ←
TURN TO SELECT
Wi-Fi, MANUAL OR
DMX AND PRESS TO
CONFIRM
2 Addr
001 ←
2 Addr
### ←
TURN TO ASSIGN THE
DMX ADDRESS AND
PRESS TO CONFIRM
3 8/16b
8 BITS
PRESS THE ROTARY
SELECTOR TO
ACTIVATE
3 8/16b
8 BITS ←
3 8/16b
16 BITS ←
TURN TO SELECT 8
OR 16 BITS AND
PRESS TO CONFIRM
PRESS TO ACTIVATE
THE MENU AN
ARROW SHOULD
APPEAR
M: DMX
XX %
M: WIFI_D
XX %
1 Mode
WIFI_D
1 Mode
DMX
TAP THE ROTARY
SELECTOR TO DISPLAY
THE VALUE
TAP THE ROTARY
SELECTOR TO DISPLAY
THE VALUE
00 % = LED OFF
100 % = LED FULL
00 % = LED OFF
100 % = LED FULL
M:Manual
XX % XXX
1 Mode
MANUAL
TAP THE ROTARY
SELECTOR TO DISPLAY
THE VALUE
00 % (000) = LED OFF
100% (FFF) = LED FULL
Astro 250 Wi-Fi RGBW, DMX 512+ RDM LED followspot -User’s Manual – 1.0
Luci della Ribalta srl, Via Berna 14, 46042 Castel Goffredo (MN) Italy
Tel. +39 0376 771 777 – fax +39 0376 772 140 – email info@ldr.it – web www.ldr.it
8
10.5 STROBE (Strobe) :
This function allows to activate the strobe function . Factory setting is DISABLE.
10.6 STROBE SPEED (SetStr) :
It allows to set the strobe speed. This menu is not active when the strobe function is disabled or
when it is remotely controlled through DMX. Factory setting is OPEN .
10.7 DIMMING CURVE (Curves) :
This function allows to select a response curve for the Astro. A choice of two curves is available:
Square and Linear. Factoring setting is SQUARE .
5 Strobe
DISABLE
5 Strobe
DISABLE ←
5 Strobe
ENABLE ←
TURN TO ENABLE OR
DISABLE STROBE AND
PRESS TO CONFIRM
PRESS TO ACTIVATE
THE MENU AN
ARROW SHOULD
APPEAR
PRESS TO ACTIVATE
THE MENU AN
ARROW SHOULD
APPEAR
6 SetStr
OPEN
PRESS TO ACTIVATE
THE MENU AN
ARROW SHOULD
APPEAR
7 Curves
SQUARE
WITH STROBE ENABLED
THE LIGHT IS SET TO ON
6 SetStr
OPEN ←
6 SetStr
SPEED # ←
CHOOSE STROBE’S
SPEED VALUE FROM
1(SLOW) TO 10 (FAST)
6 SetStr
CLOSED ←
WITH STROBE ENABLED
THE LIGHT IS SET TO
OFF
SQUARE TO INCREASE
VOLTAGE RESPONSE AT
LOWER VALUE
7 Curves
SQUARE ←
7 Curves
LINEAR ←
LINEAR DIMMING
CONTROL
PRESS TO ACTIVATE
THE MENU AN
ARROW SHOULD
APPEAR
4 DMXMem
ON
LAST SCENE HOLD
4 DMXMem
ON ←
4 DMXMem
OFF=80% ←
DIM THE LED TO 80%
OF ITS MAXIMUM
POWER
4 DMXMem
OFF=00% ←
DIM THE LED TO 0%
Astro 250 Wi-Fi RGBW, DMX 512+ RDM LED followspot -User’s Manual – 1.0
Luci della Ribalta srl, Via Berna 14, 46042 Castel Goffredo (MN) Italy
Tel. +39 0376 771 777 – fax +39 0376 772 140 – email info@ldr.it – web www.ldr.it
9
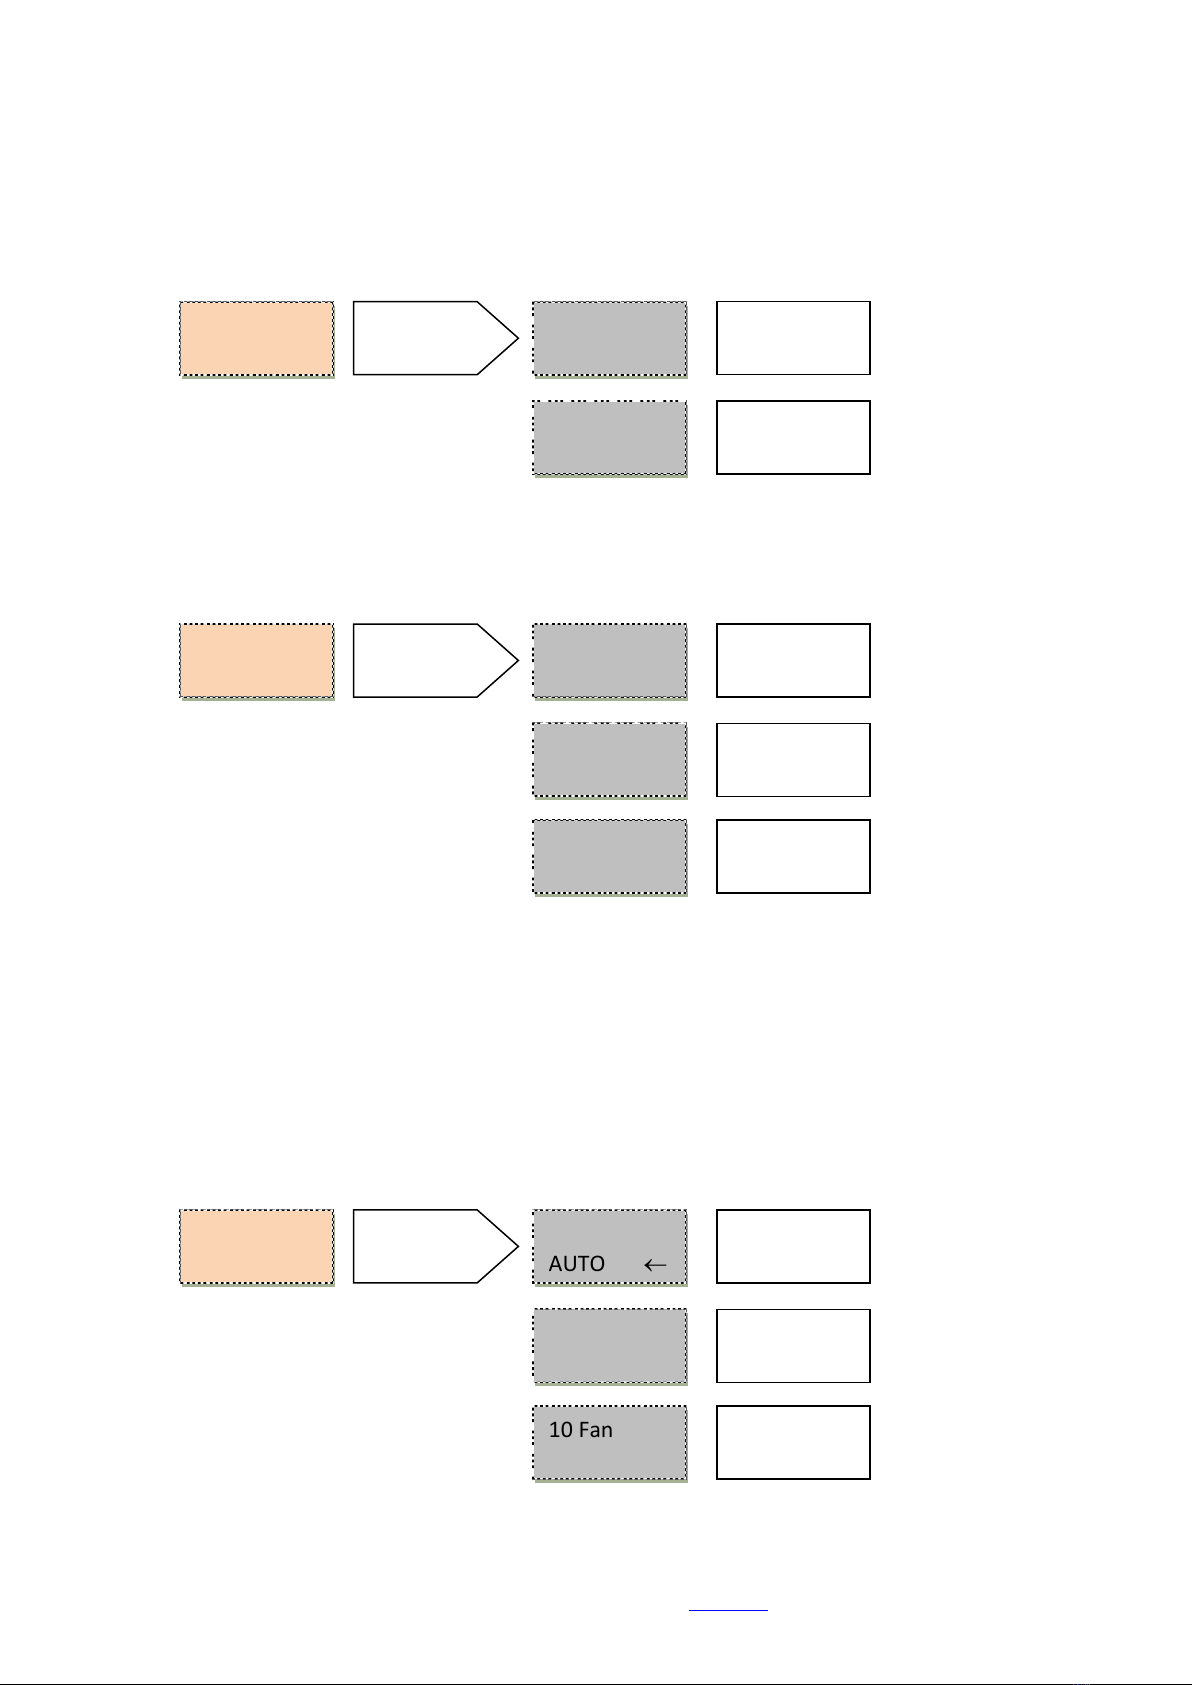
10.8 CUT OFF DIMMING RESPONSE (CutOff) :
This function allows to select a LED behaviour simulating a tungsten-halogen lamp during the
dimming cut off. Factory setting is SLOW.
10.9 DIMMING BEHAVIOUR (Smooth) :
This function allows to set the LED dimming response. Factory setting is NORMAL .
10.10 FAN SETTING (Fan) :
This function allows to set the fan’s response. A choice of three modes is available: Automatic,
Silent or Steady. When fan is in Auto mode, the speed is controlled by the LED temperature. In
Silent mode the fan runs slowly to reduce noise. In Steady mode the fan runs at constant speed,
halfway between the minimum and maximum speed. In all cases, if the LED temperature exceeds
the maximum admitted value, the LED is protected by a de-rating security system.
Factory setting is AUTO .
PRESS TO ACTIVATE
THE MENU AN
ARROW SHOULD
APPEAR
8 CutOff
SLOW
PRESS TO ACTIVATE
THE MENU AN
ARROW SHOULD
APPEAR
9 Smooth
NORMAL
9 Smooth
FAST ←
IMMEDIATE DIMMING
RESPONSE
SOFT LED DIMMING AT
SHUT DOWN
8 CutOff
SLOW ←
8 CutOff
FAST ←
DIRECT DIMMING
RESPONSE AT SHUT
DOWN
FAST DIMMING
RESPONSE = 150ms
9 Smooth
NORMAL ←
9 Smooth
SLOW ←
SLOW DIMMING
RESPONSE = 300ms
PRESS TO ACTIVATE
THE MENU AN
ARROW SHOULD
APPEAR
10 Fan
AUTO
10 Fan
STEADY ←
CONSTANT FAN SPEED
FAN SPEED IS
REGULATED BY LED’S
TEMPERATURE
10 Fan
AUTO ←
10 Fan
SILENT ←
SLOW FAN SPEED TO
REDUCE THE NOISE
Astro 250 Wi-Fi RGBW, DMX 512+ RDM LED followspot -User’s Manual – 1.0
Luci della Ribalta srl, Via Berna 14, 46042 Castel Goffredo (MN) Italy
Tel. +39 0376 771 777 – fax +39 0376 772 140 – email info@ldr.it – web www.ldr.it
10
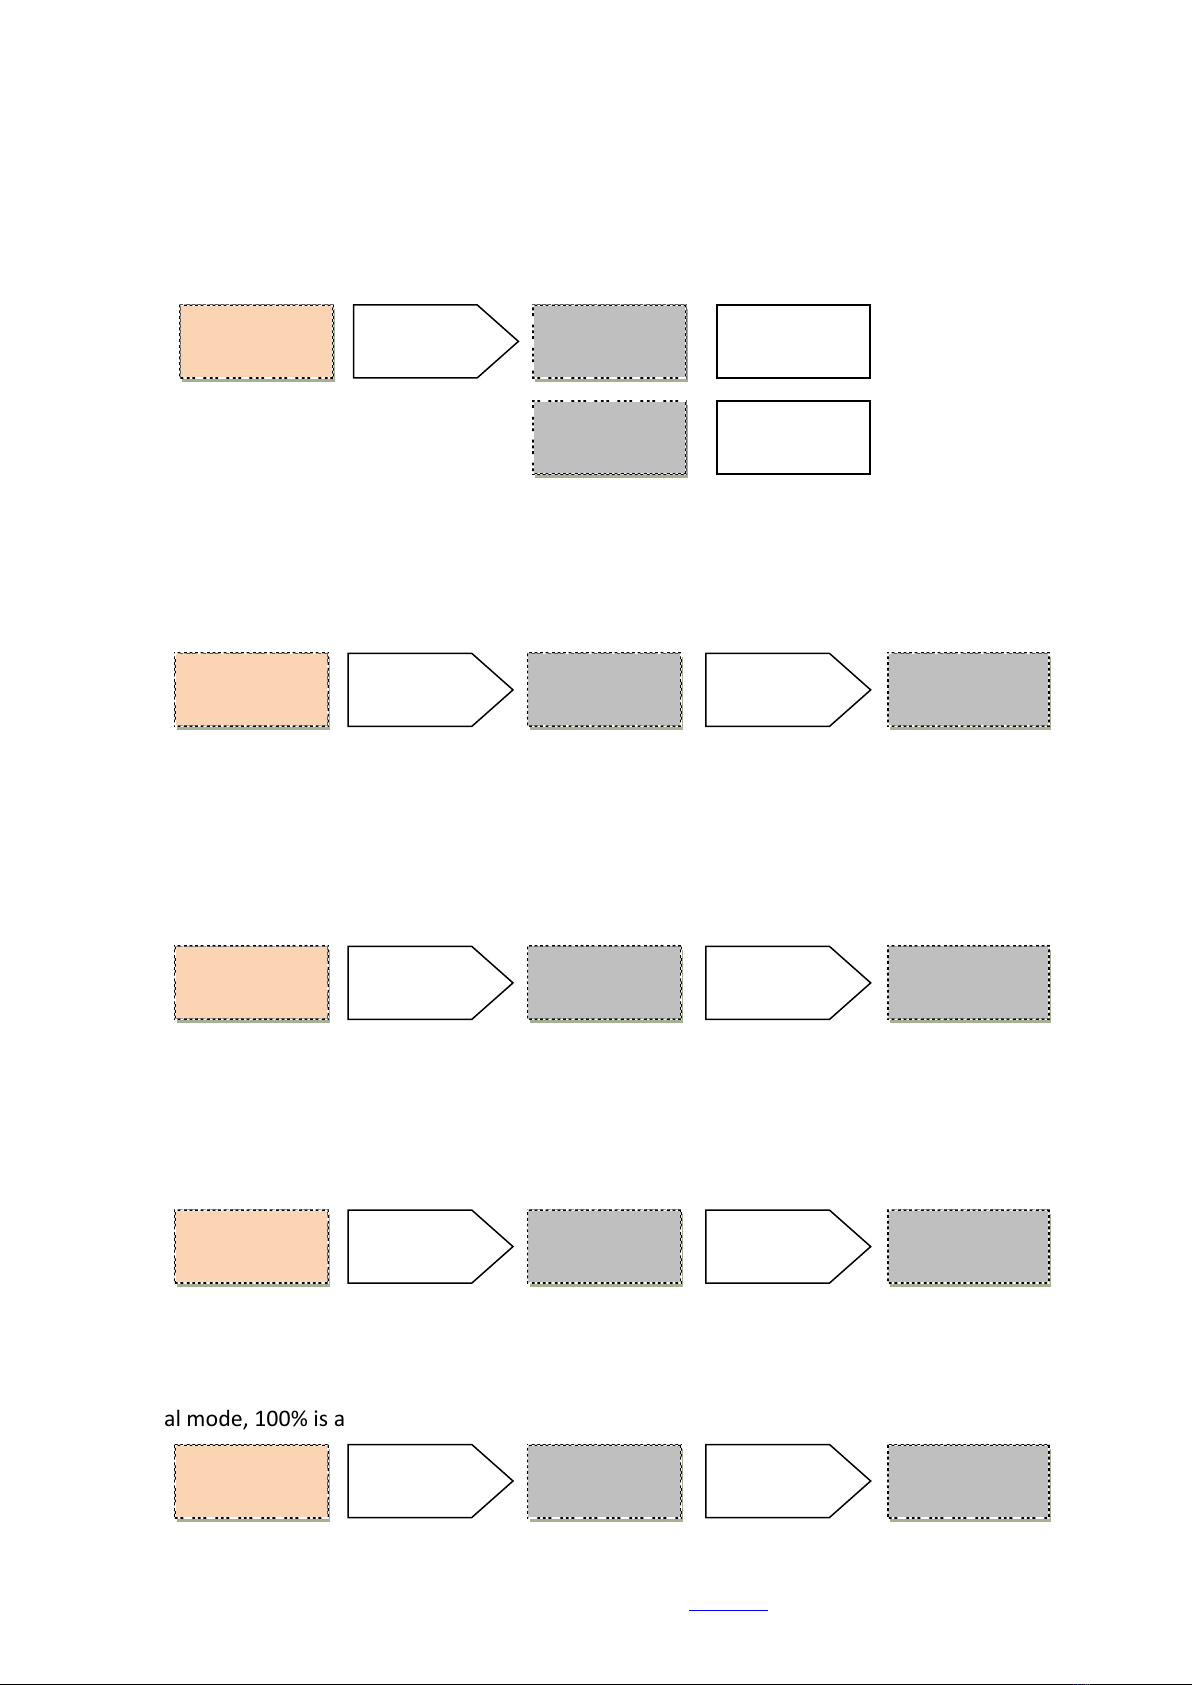
10.11 LCD SCREEN ILLUMINATION (BackL) :
This function allows to turn off the LCD backlight, the POWER led and the DMX led light after 1’30”
from the last setting. Factory setting is AutoOFF.
10.12 RED COLOUR INTENSITY (Red) :
This function allows to set the intensity of the red color for the manual mode. By selecting the
manual mode, 100% is automatically set.
10.13 GREEN COLOUR INTENSITY (Green) :
This function allows to set the intensity of the green color for the manual mode. By selecting the
manual mode, 100% is automatically set.
10.14 BLUE COLOR INTENSITY (Blue) :
This function allows to set the intensity of the blue color for the manual mode. By selecting the
manual mode, 100% is automatically set.
10.15 WHITE COLOR INTENSITY (White) :
This function allows to set the intensity of white color for the manual mode. By selecting the
manual mode, 100% is automatically set.
11 BackL
AutoOFF
11 BackL
AutoOFF ←
PRESS TO ACTIVATE
THE MENU AN
ARROW SHOULD
APPEAR
LCD BACKLIGHT OFF
AFTER 1 MINUTE AND
30 SECONDS
11 BackL
ON ←
LCD BACKLIGHT
ALWAYS ON
12 Red
###%
12 Red
###% ←
12 Red
###% ←
TURN TO SELECT THE
RED INTENSITY AND
PRESS TO CONFIRM
PRESS TO ACTIVATE
THE MENU AN
ARROW SHOULD
APPEAR
13 Green
###%
13 Green
###% ←
13 Green
###% ←
TURN TO SELECT
THE GREEN INTENSITY
AND PRESS TO
CONFIRM
PRESS TO ACTIVATE
THE MENU AN
ARROW SHOULD
APPEAR
14 Blue
###%
14 Blue ###%
←
14 Blue ###%
←
TURN TO SELECT THE
BLUE INTENSITY AND
PRESS TO CONFIRM
PRESS TO ACTIVATE
THE MENU AN
ARROW SHOULD
APPEAR
15 White
###%
15 White
###% ←
15 White
###% ←
TURN TO SELECT
THE WHITE INTENSITY
AND PRESS TO
CONFIRM
PRESS TO ACTIVATE
THE MENU AN
ARROW SHOULD
APPEAR

Astro 250 Wi-Fi RGBW, DMX 512+ RDM LED followspot -User’s Manual – 1.0
Luci della Ribalta srl, Via Berna 14, 46042 Castel Goffredo (MN) Italy
Tel. +39 0376 771 777 – fax +39 0376 772 140 – email info@ldr.it – web www.ldr.it
11
10.16 TEMPERATURE CONTROL (Tled) :
This function allows to visualize the LED temperature. Factory setting is °C.
10.17 SOFTWARE VERSION (SwVer) :
This function allows to visualize the software version.
10.18 NET (Net) :
The apps used in Wi-Fi mode work with Art-Net 3 protocol. The Port-Address is composed of three
separate fields: NET, SUB-NET and UNIVERSE. This function allows to set the NET field, in a range
between 0 and 128. Factory setting is 000.
10.19 SUB-NET (SubNet) :
This function allows to set the SUB-NET field of Art-Net 3 Port-Address, in a range between 0 and
15. Factory setting is 00.
10.20 UNIVERSE (Univ) :
This function allows to set the UNIVERSE field of Art-Net 3 Port-Address, in a range between 0 an
15. Factory setting is 00.
10.21 MANUAL DIMMER TYPE (Manu) :
This function allows to select the manual dimmer type, when Astro is set in Manual mode (see
chapter 10.1). When in Wi-Fi mode this setting is disregarded, as dimming on the Astro will be
achieved through the manually operated Digital Clamp-on Dimmer A20702071, supplied, or
through the dimming function on the App loaded on the controlling mobile device.
For full details on the Digital Clamp-on Dimmer please refer to chapter 12 of this manual
16 Tled
##°C
16 Tled
##°C ←
16 Tled
###°F ←
TURN TO SELECT °C
OR °F AND PRESS TO
CONFIRM
PRESS TO ACTIVATE
THE MENU AN
ARROW SHOULD
APPEAR
18 Net
000
18 Net
### ←
18 Net
### ←
TURN TO SELECT THE
NET NUMBER AND
PRESS TO CONFIRM
PRESS TO ACTIVATE
THE MENU AN
ARROW SHOULD
APPEAR
19 SubNet
00
19 SubNet
## ←
19 SubNet
## ←
TURN TO SELECT
THE SUBNET
NUMBER AND PRESS
TO CONFIRM
PRESS TO ACTIVATE
THE MENU AN
ARROW SHOULD
APPEAR
20 Univ
00
20 Univ
## ←
20 Univ
## ←
TURN TO SELECT
THE UNIVERSE
NUMBER AND PRESS
TO CONFIRM
PRESS TO ACTIVATE
THE MENU AN
ARROW SHOULD
APPEAR
Astro 250 Wi-Fi RGBW, DMX 512+ RDM LED followspot -User’s Manual – 1.0
Luci della Ribalta srl, Via Berna 14, 46042 Castel Goffredo (MN) Italy
Tel. +39 0376 771 777 – fax +39 0376 772 140 – email info@ldr.it – web www.ldr.it
12
Factory setting is ENCODER.
HIDDEN MENUS
There are furthermore nine different hidden menus which allow to select the advanced settings of
the ASTRO WI-FI RGBW. To activate this function turn OFF and then ON again the Astro while
keeping the rotary switch pressed.
10.22-A PRO or BASIC CONTROL (ProBasic) :
The PRO-BASIC control is a special function which allows to limit the access to the control menu.
Select ProBasic with the rotary switch and press to access the menu. Select :
PRO, to enable access to all available functions
BASIC, to limit the access to functions 10.1 Wi-Fi, DMX or MANUAL MODE, 10.2 DMX ADDRESS,
10.12 - 10.13 - 10.14 - 10.15 RGBW Colour intensity in manual mode, 10.16 Temperature Control,
10.17 Software version and 10.18 - 10.19 - 10.20 Net, Sub-Net and Universe for Art-Net Port-
Address.
Factory setting is PRO.
10.23-B FACTORY SETTINGS (Reset) :
The RESET control is a special function which allows to RESET the product to factory settings.
10.24-C ID REMOTO (ID Rem) :
It allows to select the ID number to connect the Wi-Fi Astro to the REMOTO gateway to upload and
download firmware. To change the initial ID press the rotary switch until an arrow appears, then
turn again to change to the desired ID number. Press to confirm your selection. It is possible to
select an ID number’s value between 0 an 250. If the ID number=0, remote control is not active.
Factory setting is 000.
Choose
ProBasic
MenuType
PRO ←
MenuType
BASIC ←
TURN TO SELECT PRO
OR BASIC MENU AND
PRESS TO CONFIRM
PRESS TO ACTIVATE
THE MENU AN
ARROW SHOULD
APPEAR
Choose
Reset
Are You SURE
?
MenuType
BASIC
←
PRESS TO CONFIRM
THE RESET
PRESS TO ACTIVATE
THE MENU
Choose
ID Rem
ID Rem
000 ←
ID Rem
### ←
TURN TO ASSIGN THE
ID NUMBER AND
PRESS TO CONFIRM
PRESS TO ACTIVATE
THE MENU AN
ARROW SHOULD
APPEAR
14 Manu
ENCODER
14 Manu
ENCODER←
PRESS TO ACTIVATE
THE MENU AN
ARROW SHOULD
APPEAR
MANUAL DIMMING BY
ROTARY SWITCH
14 Manu
POTENT ←
MANUAL DIMMING BY
EXTERNAL SLIDER
Astro 250 Wi-Fi RGBW, DMX 512+ RDM LED followspot -User’s Manual – 1.0
Luci della Ribalta srl, Via Berna 14, 46042 Castel Goffredo (MN) Italy
Tel. +39 0376 771 777 – fax +39 0376 772 140 – email info@ldr.it – web www.ldr.it
13
10.25-D CALIBRATION (Set Min):
It allows to calibrate the minimum output level of each colour.
NOTICE: Reset doesn’t restore the default settings of minimum levels.
IMPORTANT NOTICE
If the Astro is used in Wi-Fi mode, DO NOT CHANGE the default output levels because the colours
generated by the controlling App depend on these.
10.26-E IP ADDRESS (IP Addr) :
It allows to view the Astro IP address when operating in Wi-Fi mode. The IP address cannot be
changed and is required to correctly connect the external mobile controller to the ASTRO
10.27-F SUBNET MASK (Net Mask) :
It allows to view the Astro Subnet Mask when operating in Wi-Fi mode. The Subnet Mask cannot be
changed.
10.28-G SERVICE SET IDENTIFIER (SSID) :
It allows to set the name of the network generated by the Astro.
Default SSID is “Astro###”, where “###” is a value between “000” and “254”. Because the SSID is
assigned randomly, you might experience the unlikely case of receiving different fixtures with
identical SSID. In order to avoid conflicts, we strongly recommend you change the SSID name of
Choose
IP Addr
2.xxx.xxx.
xxx
TAP THE ROTARY
SELECTOR TO DISPLAY
THE IP ADDRESS
Choose
Net Mask
255.255.
255.0
TAP THE ROTARY
SELECTOR TO DISPLAY
THE SUBNET MASK
Choose
Set Min
Min RED
#### ←
Min RED
#### ←
TURN TO ASSIGN
THE CALIBRATION
VALUE AND PRESS TO
CONFIRM
PRESS TO ACTIVATE
THE MENU. TURN
AND PRESS TO SELECT
THE COLOR TO SET
Min BLUE
#### ←
Min GREEN
#### ←
Min WHITE
#### ←
Min GREEN
#### ←
TURN TO ASSIGN
THE CALIBRATION
VALUE AND PRESS TO
CONFIRM
Min BLUE
#### ←
TURN TO ASSIGN
THE CALIBRATION
VALUE AND PRESS TO
CONFIRM
Min WHITE
#### ←
TURN TO ASSIGN
THE CALIBRATION
VALUE AND PRESS TO
CONFIRM
Astro 250 Wi-Fi RGBW, DMX 512+ RDM LED followspot -User’s Manual – 1.0
Luci della Ribalta srl, Via Berna 14, 46042 Castel Goffredo (MN) Italy
Tel. +39 0376 771 777 – fax +39 0376 772 140 – email info@ldr.it – web www.ldr.it
14
your Astro should you have purchased more than one unit. You will be allowed to create an 8 digit
SSID of your choice.
NOTICE: Reset (see chapter 10.23-B) doesn’t restore the default settings of the SSID.
10.29-H PASSWORD (PassWord) :
It allows to set the password to connect the controller to the network generated by Astro.
Default password is “AstroNet”
We strongly recommend you change the password of your Astro should you have purchased more
than one unit. You will be allowed to create an 8 digit password of your choice.
NOTICE: Reset (see chapter 10.23-B) doesn’t restore the default settings of the password.
10.30-I EXIT HIDDEN MENU (Exit) :
It allows to exit from hidden menus.
Choose
SSID
SSID
Astro###
SSID
########
TURN TO ASSIGN
THE LETTER, NUMBER
OR SYMBOL AND
PRESS TO CONFIRM
PRESS TO ACTIVATE
THE MENU
Choose
PassWord
PASSW
AstroNet
PASSW
########
TURN TO ASSIGN
THE LETTER, NUMBER
OR SYMBOL AND
PRESS TO CONFIRM
PRESS TO ACTIVATE
THE MENU

Astro 250 Wi-Fi RGBW, DMX 512+ RDM LED followspot -User’s Manual – 1.0
Luci della Ribalta srl, Via Berna 14, 46042 Castel Goffredo (MN) Italy
Tel. +39 0376 771 777 – fax +39 0376 772 140 – email info@ldr.it – web www.ldr.it
15
11. APP SETTINGS AND OPERATION FROM LDR MOBILE CONTROLLER
SMARTPHONE HONOR 7S BLACK – # A20702074 – optional accessory
If the Astro was purchased complete with the LDR controller A20702074 Smartphone Honor 75
Black , (available as an optional accessory), pre-loaded with the Android Art-Net Controller app,
relevant settings and libraries, it is ready to be operated.
In case you are using your own mobile device, please refer to chapter 12 and 13 of this manual for
all the necessary steps needed to set up the control system under either Android or IOS.
•Set the Operation Mode of the ASTRO to WI-FI (refer to chapter 10.1)
•Make sure the controller is connected to the network generated by Astro. From the home
screen, tap Settings Wi-Fi and check that the controller is connected to the Wi-Fi network
“Astroxxx”.
•Make sure the clamp-on digital dimmer is connected and its fader above zero. Please see
relevant instruction manual supplied with the item.
Click on the Art-Net Controller icon: from the home screen, tap Pb 0v, which will bring you to the
existing library of colours, which also includes 3 whites (2700K, 3200K and 5600K) and a black-out
option. Click on the chosen colour to have it on.
Art-Net
Controller

Astro 250 Wi-Fi RGBW, DMX 512+ RDM LED followspot -User’s Manual – 1.0
Luci della Ribalta srl, Via Berna 14, 46042 Castel Goffredo (MN) Italy
Tel. +39 0376 771 777 – fax +39 0376 772 140 – email info@ldr.it – web www.ldr.it
16
In order to change colour simply click on the following one.
Please refer to chapter 12.2 of this manual for detailed operating instructions
Should you need to create and store more cues, please refer to chapter 12.3 of this manual.
12. APP SETTINGS AND OPERATION FROM USER’S ANDROID MOBILE CONTROLLER
If you are planning to use an ANDROID mobile device of your own to control the ASTRO WI-FI,
please carefully follow the here-below described steps to ensure a correct configuration of your
mobile device.
12.1 SETTINGS
From the Play Store, download and install Art-Net Controller and Art-Net Controller Libraries Apps.
On the App’s screen, tap Settings Flight mode. Drag the Flight mode switch to the right.
Select Settings Wi-Fi. Drag the Wi-Fi mode switch to the right, select “Astroxxx” from the list of
detected Wi-Fi networks and tap CONNECT.

Astro 250 Wi-Fi RGBW, DMX 512+ RDM LED followspot -User’s Manual – 1.0
Luci della Ribalta srl, Via Berna 14, 46042 Castel Goffredo (MN) Italy
Tel. +39 0376 771 777 – fax +39 0376 772 140 – email info@ldr.it – web www.ldr.it
17
Enter the password (default AstroNet) and press CONNECT. When the device is connected to the
network, exit from the Wi-Fi settings and tap on the Art-Net Controller Libraries icon.
Please refer to chapter 10.28G and 10.29H to reset your SSID code and password, if desired (not
complusory)
Tap Create/Update Fixtures Library and wait until loading is completed.

Astro 250 Wi-Fi RGBW, DMX 512+ RDM LED followspot -User’s Manual – 1.0
Luci della Ribalta srl, Via Berna 14, 46042 Castel Goffredo (MN) Italy
Tel. +39 0376 771 777 – fax +39 0376 772 140 – email info@ldr.it – web www.ldr.it
18
Open the Art-Net Controller app: by default the app displays the Prog (Programmer) window. Tap
the three dots located on the upper left corner (or lower right corner – depending on models) of
the screen to open the main menu and select Patch Lib.
Scroll the fixtures library and select GENERIC_RGBW.D4. Insert “1” in the following fields: Start
DMX, n° Fixtures and Start ID. Tap Patch it and then exit the Patch menu.

Astro 250 Wi-Fi RGBW, DMX 512+ RDM LED followspot -User’s Manual – 1.0
Luci della Ribalta srl, Via Berna 14, 46042 Castel Goffredo (MN) Italy
Tel. +39 0376 771 777 – fax +39 0376 772 140 – email info@ldr.it – web www.ldr.it
19
Open the main menu and select Options Play ‘Pb 0v’ by Fixture.
Open the main menu and select Settings.
Enter your ASTRO’s IP address in the “Art-net broadcast/unicast to:” fields.
Please refer to chapter 10.26-E of this user guide to know the IP address to be used.
Scroll the Settings window downwards, enter “99” in the PlayBacks fields and confirm (Apply).
In order to load on your device the LDR colour libraries and settings the
“Astro RGBW-LDR revxxx.show.zip” file is needed.
The file can be obtained by email or WhatsApp directly from LDR or your dealer.
Table of contents
Other LDR Spotlight manuals


Popular Spotlight manuals by other brands


GTD
GTD LYS200CW user manual

Silicon Solar
Silicon Solar PatioPal-GS-SpotLight-36 operating instructions

BRINKMAN
BRINKMAN Mini-Q-Beam Owner's manual & operating instructions

Clas Ohlson
Clas Ohlson SW12270 manual

Elation
Elation PROTHEUS HYBRID user manual

JB Systems
JB Systems Theatre Spot 500W Operation manual