Le Panyol LIBERTE Series User manual

LIBERTE RANGE
Model 100
ASSEMBLY INSTRUCTIONS
17/11/2020

OVEN PARTS LIST
2
Modèle 66
Modèle 66x99
Modèle 83
Modèle 100
Basic Formula
Refractory
terracotta tiles 33x33x6cm –white color
9
12
16
20
Refractory
terracotta tiles 33x16,5x6cm –white color
0
0
0
5
Refractory
terracotta shleve board 36x21,3cm –stone color
3
3
3
3
Oven
-entry
1
1
1
1
Pillar
2
2
2
2
Pediment
1
1
1
1
Conical
voussoir
12
12
12
12
Small voussoir
4
4
4
4
Straight voussoir
0
4
4
8
Keystone
1
1
1
1 in 2 parts
Smoke
adaptor Ø180 mm + Hardware
1
1
1
1
Refractory
mortar for the oven dome - bags 25kg
1
2
2
3
Grog to place
under the tiles - bags 25kg
2
2
3
4
Metal
pins to fix the iron wire around the oven dome
2
2
2
2
Insulated
door
1
1
1
1
Oven
peel
1
1
1
1
Assembly
instructions
1
1
1
1
Warranty
1
1
1
1
Complete Formula Grog
Fbasic
Formula
+ Grog to
insulate the oven dome - bags 25kg
12
17
18
23
+ essential
accessories kit
(1 laser thermometer+1
brush +1 scraper+1 wood peel)
1
1
1
1
Complete Formula
Blanket
Basic Formula
+
Refractory Insulating Blanket - roll 3m² - thickness 38mm
1
1
1
2
+ essential
accessories
kit
(1 laser thermometer+1
brush +1 scraper+1 wood peel)
1
1
1
1

TOOLS
•Spirit level
•Tape mesure
•Spatula
•Trowel
•Rubber Mallet
•Jack
•Wood specer
•Iron wire
•Drill
•Gloves
3

FOREWORD
Le Panyol ovens are made exclusively of Refractory White Earth, a 100% natural clay from our own quarry.
As the material is irregular by nature and the production methods are based partly on craft skills, you may find that there
are gaps between the parts when it comes to assembling them. These will be filled in when you apply the refractory
mortar.
These gaps allow the oven to expand.
The keystone may be slightly higher or lower than the dome of the oven.
The edges of the parts may crumble slightly if they are handled repeatedly.
THESE DIFFERENCES WILL IN NO WAY IMPAIR THE OPERATION OF YOUR OVEN OR SHORTEN ITS LIFE
The oven must be built under cover.

1. Choose a site for the oven
2. Build a base on which to sit the oven
3. Insulate the base
4. Assemble the oven floor –see also the video
5. Assemble the oven dome - see also the video
6. Apply the mortar
7. Insulate the oven dome
8. Connect the oven to a chimney pipe
9. Surround / decorate the oven
THE KEY STAGES OF ASSEMBLY

Before you start to assemble the oven, you’ll need to decide where you’re going to place it and work out exactly how much
space you’ll need to install it.
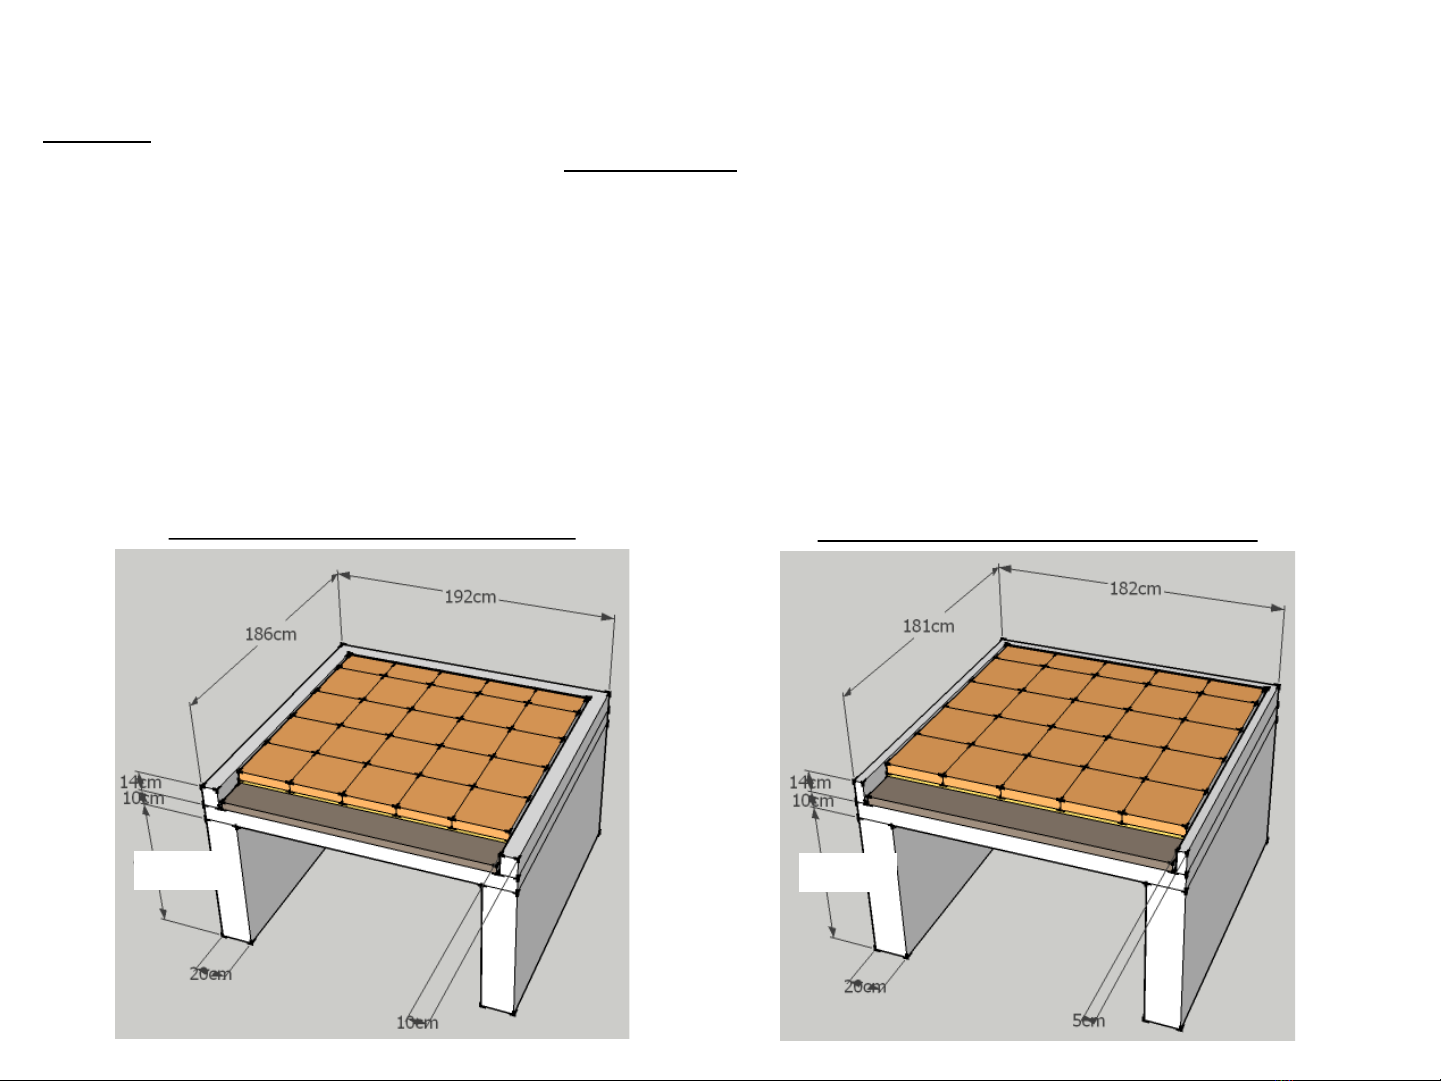
Check in particular that the floor can bear the weight of the finished oven (base + oven + insulation + surround + roof). The floor
must be flat and should not subside under the weight of the construction.
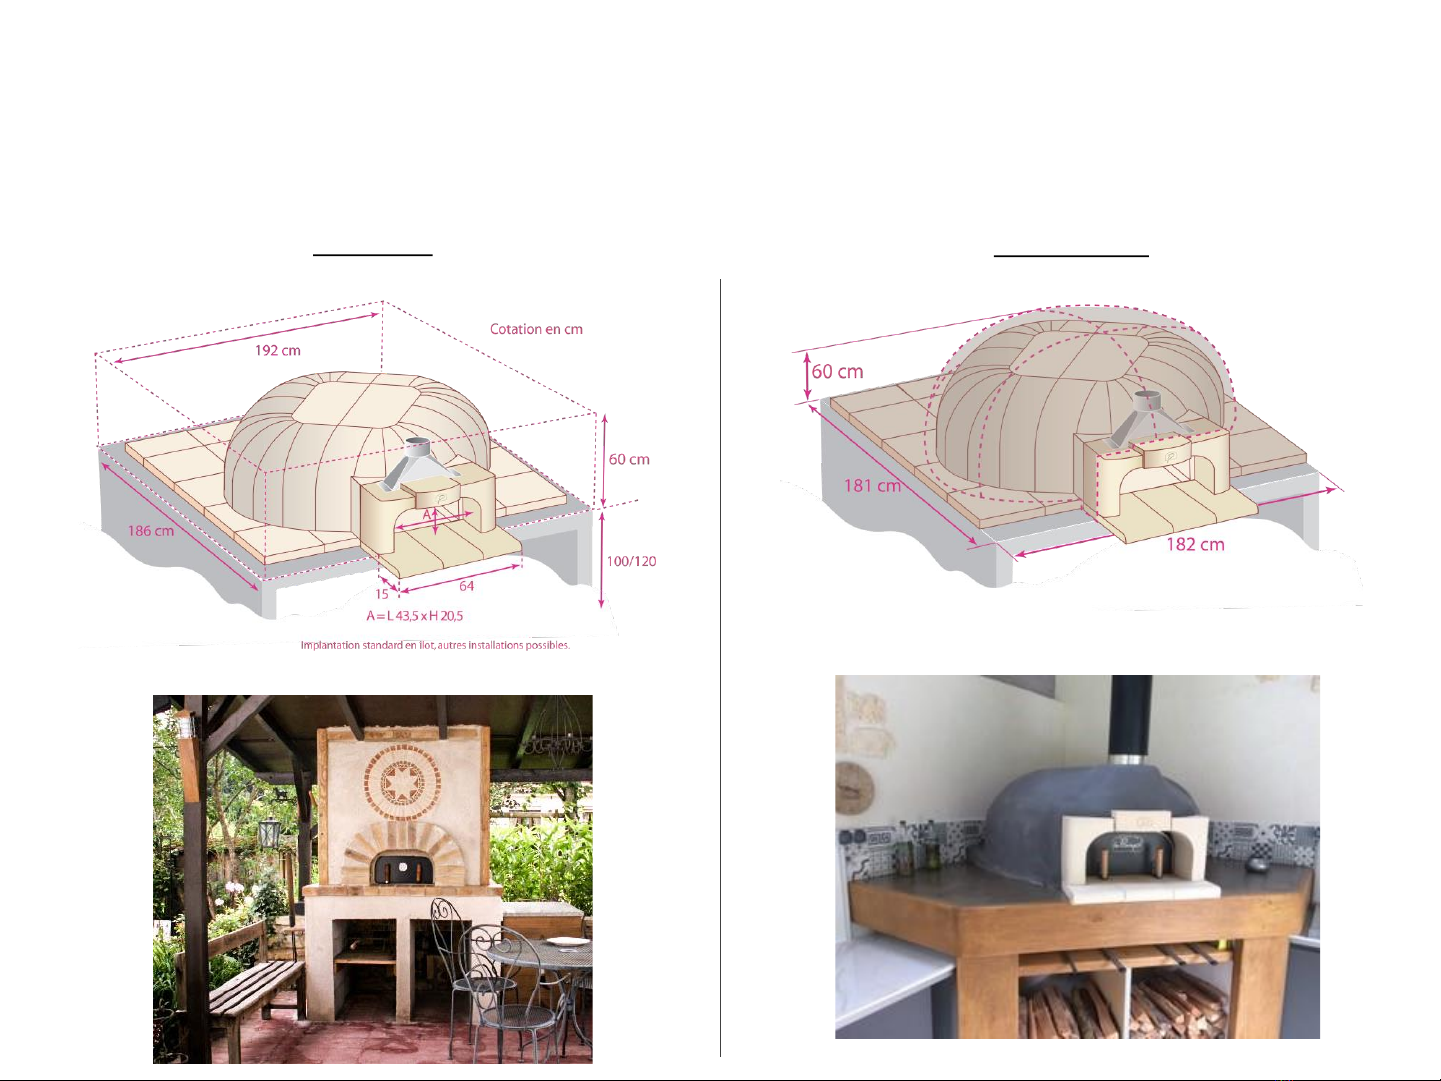
The oven may be installed indoors or outdoors, stand-alone or incorporated into an existing building, near the pool, under a
veranda or in the kitchen. A wide range of installations are possible. See our “Gallery” page on our website or ask the retailer in
your region.
Outdoor Installation
The Le Panyol oven must be protected against bad weather by a roof wide enough to prevent the oven and hearth tiles from
getting wet. It must be kept dry in winter as, if it absorbs water, frost would make it unusable. If the oven is stand-alone, the
pipe must be approximately 1m long. However, if the oven is backed on to a wall or built into the home, the pipe must be long
enough to go 40cm beyond the roof ridge (in accordance with DTU standard 24.1).
Indoor Installation
The Le Panyol oven must be connected to an existing or future-build chimney pipe, in accordance with DTU standard 24.1
(Unified Technical Document). Do not connect more than one apparatus to the same chimney pipe.
The pipe should be:
•180 mm in diameter (the stainless steel smoke adaptor supplied with the oven is 180mm in diameter)
•Made up of a maximum of 2 x 45° bends
•Removable
•With a double skin if an indoor installation
To prevent moisture and rainwater from getting into the pipe, you’ll need to fit a rain cap on the top of the stack.
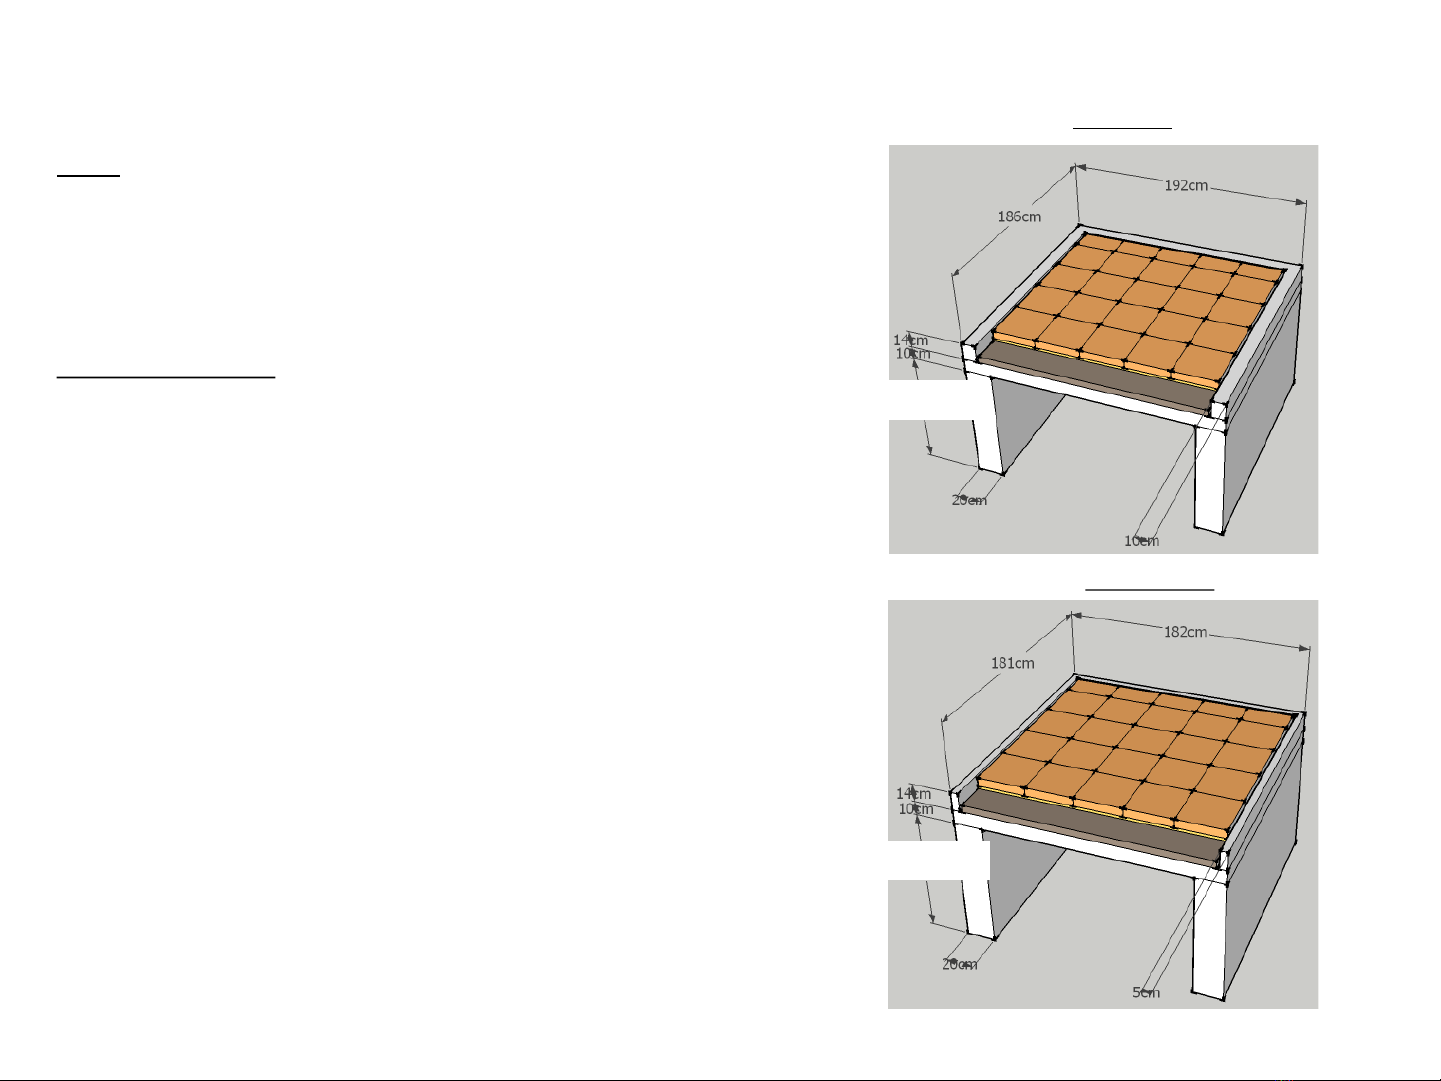
STEP 1 : Choosing a site

STEP 1 : Choose the final shape of the oven
7
There are 2 kinds of shape for the oven : cubic and rounded. In terms of the shape, the insulation materials and the size of the base
are different. For a rounded shape, there’s no need to build a surrounding wall and therefore the size of the base is smaller.
Cubic shape Rounded shape

STEP 2 : Building a base to support the oven
8
Foreword :
Before building the base, it is important to define the oven floor height (where the fire will be laid and the cooking done). This height
defines the pillars’ height of the base.
The oven floor is generally between 100 and 120 cm high, depending on the user’s height and comfort requirements.
To calculate the pillars’ height, subtract 24 cm to the oven floor height :
•the oven tiles : 6 cm thick
•the grog insulation under the oven tiles (included with the oven) : 3 cm thick
•The insulating plates (not provided with the oven) : 5 cm thick
•Reinforced concrete slab: 10 cm thick
Example : you want an oven floor height equal to 118 cm; then the pillars’ height will be equal to 118-24=94 cm
Dimensions of the base for a cubic shape Dimensions of the base for a rounded shape
variable variable

STEP 2 : Building a base to support the oven
9
Build :
•3 breeze-block pillars 20 cm thick
•1 reinforced concrete slab 10 cm thick
•1 level (14 cm) of surrounding wall on the 3 sides using Siporex-
type insulation blocks 10 cm thick if cubic shape and 5 cm thick if
rounded shape. This wall will stem the grog under the floor tile.
Base width and depth
The dimensions include:
•Dimensions of the oven
•Thickness of the insulation
•Thickness of the surrounding wall
•Surround : rendering (i.e. a few millimeters thick)
If the surround material is much thicker (bricks, stones,), you must
add this thickness to the above dimensions
Warning:
These dimensions are minimum for a simple standard installation.
These dimensions are calculated with specific materials.
If you make any changes, you will have to calculate the dimensions of your
base in terms of your choices.
Cubic shape
Rounded shape
variable
variable

STEP 3 : Insulating the base
10
Once you have built the base :
1/ Insulate the reinforced concrete slab using dry Siporex-type insulation blocks 5 cm thick. Do not seal.
2/ Draw a line at 21 cm from the edge of the base and place siporex block 3 cm thick in order to contain the grog. Cut properly
because the tiles will be put on these blocks.
21 cm
Pour out one bag of grog.
First, spread with the trowel to get an homogeneous bed of grog.
Check that the thickness is between 2 and 3 cm. Level.
Warning : The photos are matching the model 83. For the model 100, there are 5 tiles/row but the process is exactly the same.

STEP 4 : Assembling the oven floor
11
The tiles must be laid against each other without sealing. Handle gently.
Draw the axis of the base and place the first tile to the right of this axis.
Warning : there is a way for the tiles. SMOOTH side on front and back, ROUGH side on left and right.
Check that the tile is laid flat.
If necessary, even out the differences in thickness of the tiles by placing a bit more or less grog where required.
Place the second tile to the left of the axis.
Consult
the video

STEP 4 : Assembling the oven floor
12
Finish the first row. Then place the other tiles on the same process.
Once all the tiles are placed, check the level with your hand. Check that the oven floor is as flat as possible to avoid the pizza peel
bumps during charging.
Consult
the video

STEP 5 : Assembling the oven dome
13
Consult
the video
Warning :
In this step, some photos are matching the model 83 and some others the model 100. The assembly instructions are still the
same, the process is not changing.
In the same way, the shape of the keystone is different but the process is the same.

Phase 1 : Placing the oven entry
14
Centre the oven entry on the floor tiles.
Two persons are required to place this piece.
Lift it slightly rather slither it in order not to damage it.
Consult
the video

Phase 2 : Placing the first two “voussoirs” (arch stones)
15
Place a straight voussoir (non conical) on each side of the oven entry
Spot the Bottom of the voussoir thanks to the letter B marked on it..
Wedge the 2 voussoirs in position.
Firstly, adjust their inner faces to that of the oven
entry.
It is possible that we move a little bit these
voussoirs later in the assembling.
B
Consult
the video

Phase 3 : Placing the keystone
16
Place the jack and the wood specers in the center of the oven floor and aligned with the
axis.
These wood specers will facilitate the withdrawal of the jack when the dome will be
assembled. We will refine the position of the jack in next steps.
Check that the total height of the jack is 34 cm.
Axis
34 cm
Position the keystone on the jack.
Consult
the video
The keystone is in 2 parts.
You have to assemble the 2 parts thanks to
the 2 provided spindles. Insert them in the
pre drilled holes.
To maintain the keystone, use a jack and 4
wedges like on the photo.

Phase 4 : Place the 4 small voussoirs
17
Place the small voussoirs on the oven entry..
These 4 pieces help you to define the good position of the keystone, that is to say the good distance between the oven entry and
the keystone.
If there is too much gap between the 4 small voussoirs and if they go past the entry, it means that you have to move back the
keystone. Do this :
oRemove the keystone of the jack.
oPush a little bit the 2 straight voussoirs inside the oven and push back the 4 small voussoirs so that they go past the entry no
more.
oReplace the keystone on the jack. Level.
Consult
the video

Phase 5 : Place the last voussoirs
18
Place the last 6 straight voussoirs (non conical) as in the picture below.
Match the axis of the voussoirs with the axis of the keystone.
Inside the oven, the bottom of the voussoirs must match
with the bottom of the keystone.
Check regularly the keystone with the spirit level.
Divide uniformly the gaps between the voussoirs so that there
is not 1 cm on one side and no gap at all on the other side.
Consultez
la vidéo tuto

Phase 5 : Place the last voussoirs
19
Position the conical voussoirs in the remaining spaces as below.
Firstly, place them and in a second time you will do the adjustments.
Consult
the video

Phase 6 : Final adjustment
20
Use a spatula. It permits to move the pieces easlier by pushing or raising.
Divide uniformly the gaps between the pieces.
Check to have an hamonious oven inside. The voussoirs must be aligned on their bottom.
One people can check the inside and tell another one which piece to move.
Gaps between the
voussoirs will be
filled later with the
mortar.
Circle the whole
construction with metal
wire (non included with
the oven).
Remove the jack
supporting the keystone
and the wedges.
Consult
the video
Other manuals for LIBERTE Series
1
This manual suits for next models
9