leadsun AE3 Series User manual

Made in China
Address: 1920 S. Archibald Ave.
Suite I, Ontario, CA 91761
Phone: 909.476.0900
Fax: 909.466.0130
Email: [email protected]
LEADSUN Australia Pty Ltd LEADSUN Global Ltd
Solar Light
User Manual
AE3 SERIES
LEADSUN INC.
Address: 42 Greens Road,
Dandenong South, Victoria 3175
Phone: +61 1300 281 005
Fax: +61 3 8610 0393
Email: sales@leadsun.com.au
Address: NO.1 Pingdong 1st Rd,
Nanping Science & Technology
Industrial Park, Zhuhai, China 519060.
Phone: +86-756-2289712
Fax: +86-756-8682090
Email: sales@leadsunglobal. com
A3C.041-A
Troubleshooting
No. Symptoms Troubleshooting steps Process
1No light at night Check that the lamp can be manually
activated.
Refer to “Activation and Installation” section
on this user guide and run activation tests.
Check if the solar panel is blocked
from the sunlight by houses, trees and
other obstacles.
Clear obstructions or change installation
location.
Check if there is any artificial light
source(s) shining on the solar panel
during the night.
Remove the artificial light source(s) of
interference or change the installation
location.
Examine status of each component
based on the repair guide. Replace the damaged component(s).
2A serious shortage
of working time
Check if the solar panel is blocked
from the sunlight by houses, trees and
other obstacles.
Clear obstructions or change installation
location.
Check if the surface of the solar panel
is dusty or covered.
Clean the surface of solar panels as
detailed above.
Examine if the battery pack is
damaged as per the repair guide
instructions.
Replace damaged battery.
3
Lighting does not
follow the normal
operating mode of
turning on and off
Confirm with supplier that the correct
working mode was used.
4Lights fail to turn
on properly when
humans approach
Check if the air temperature close to
human body temperature.
When the air temperature is close to human
temperature, motion detection may slow
down. It will return to normal after the air
temperature changes.
Check if the installation height is too
high.
It is out of motion detection range when
installation height exceeds 8m. It is
recommended to reduce the height or use
other operating modes.
Replace damaged motion sensor or
controllers.
www.leadsun.com.au

Warning and Caution Parts List
The parts of each
type are listed below:
“All-in-one”:
“Split Type”:
LED light M8×90 screw 4pcs
M8 nuts 4pcs
4pcs
Waterproof
cables
User manual
×
M8× 16 screw 6pcs
M4×8 screw 3pcs
12
2
34
56
78
9
10 11
34567
11
2345678
9
10 11
Transportation and storage
Working condition
Attention
Please read the below cautions carefully before using the AE6 series solar
street light to avoid physical injury and product failure caused by improper use.
Product protection grade Ip65
High tensile structure design can withstand level 3 typhoon (58m/s), beyond this level
might cause damage to the street light.
Working temperature range from -20°C to 60°C (charging temperature is limited within
0°C to 60°C). The product with heating function can work under -40°C to 60°C.
The product contains high capacity lithium-ion battery components, please follow the
aviation transport law. Please regard the product as the flammable and explosive
hazardous substance and store it separately from other goods.
The solar panel of the product is fragile, tier limitation is two layers. No stacking out of
limits and No press with heavy stuff.
Store the product under the temperature from 0°C to 45°C.
It should be charged every six months if the product is stored for long time. please use
the special charger to charge the product (the charger needs additional purchase) in
order to avoid battery or device damage.
A licensed electrician is required to install the unit with an AC power supply.
If this product contains the main power supply it must be installed by a licensed electrician.
Please ensure this light fixture is installed in accordance to local regulations.
Product maintenance
In order to assure that the solar panel receive the light efficiently, please use clear water
to clean the dirt mark on the surface of the panel regularly and prohibit the use of
chemical or abradant which includes chlorobenzene.
Only manufacturer, service agent or qualified personnel can replace the light source or
other circuit components of the lighting device. Without authorization, using the third
party component to replace is prohibited or it would cause serious damage to the
product. if the user disassembles the product without authorization, warranty becomes
void.
.
Product recycling
The product is made of recyclable high-performance materials and components, please
don't dispose with other household garbage.
Please understand the local rules about the separate collection of electronics and
electrical products, dispose the waste products in the right way that avoids potential
negative effects to environment and human health.
11
Antenna (optional)
with
EDGE

2
3
10
8
2
3
14
13
9
11 12
5
6
7
4
14
Standard
Gateway system
NODE System
1
LED street light
No. Name Brief Function
1Solar module To absorb solar energy and convert into electricity
2PIR sensor Motion detection
3LED module Illumination
4Heat-sink hole Heat dissipation
5Type B USB connector female For programming
6Switch button ON/OFF or Turn ON/OFF the light
7Type A USB connector female For battery charging via 14VDC 1.5A power supply
8Bird spike Prevents solar panel contamination from bird droppings
9Mounting bracket Fix AE3C to pole
10 Anti-thief bracket Fix LED street light to pole
11 Reset butt on Reset the gateway *EDGE Only
12 SIM card slot Insert 4G card *EDGE Only
13 4G Antenna Wireless network communication
14 NODE Antenna Network group communication
Part Description
34
The Part list is the whole product series functions instruction. The user can look up the corresponding
function according to the purchased product.

Operation Instruction
Overview
1. Selective Mode
OFF mode: The system will not work, charge or
discharge.
Transport (idle) mode: the system will power off in
an hour and goes to the OFF mode.
ON mode: the system will work normally, charging
in the daytime and discharging at night.
2. Start up
Daytime start-up: when the lighting condition is
sufficient (>30lx), the light will illuminate for 20
second and then turn off. The light will function
as normal from that night. If there is not
sufficient lighting using the Night start-up
mode is required.
Night start-up: hold button down for 5 seconds
After the light goes off, if it meets the normal lighting
condition the light will function as normal from that
night.
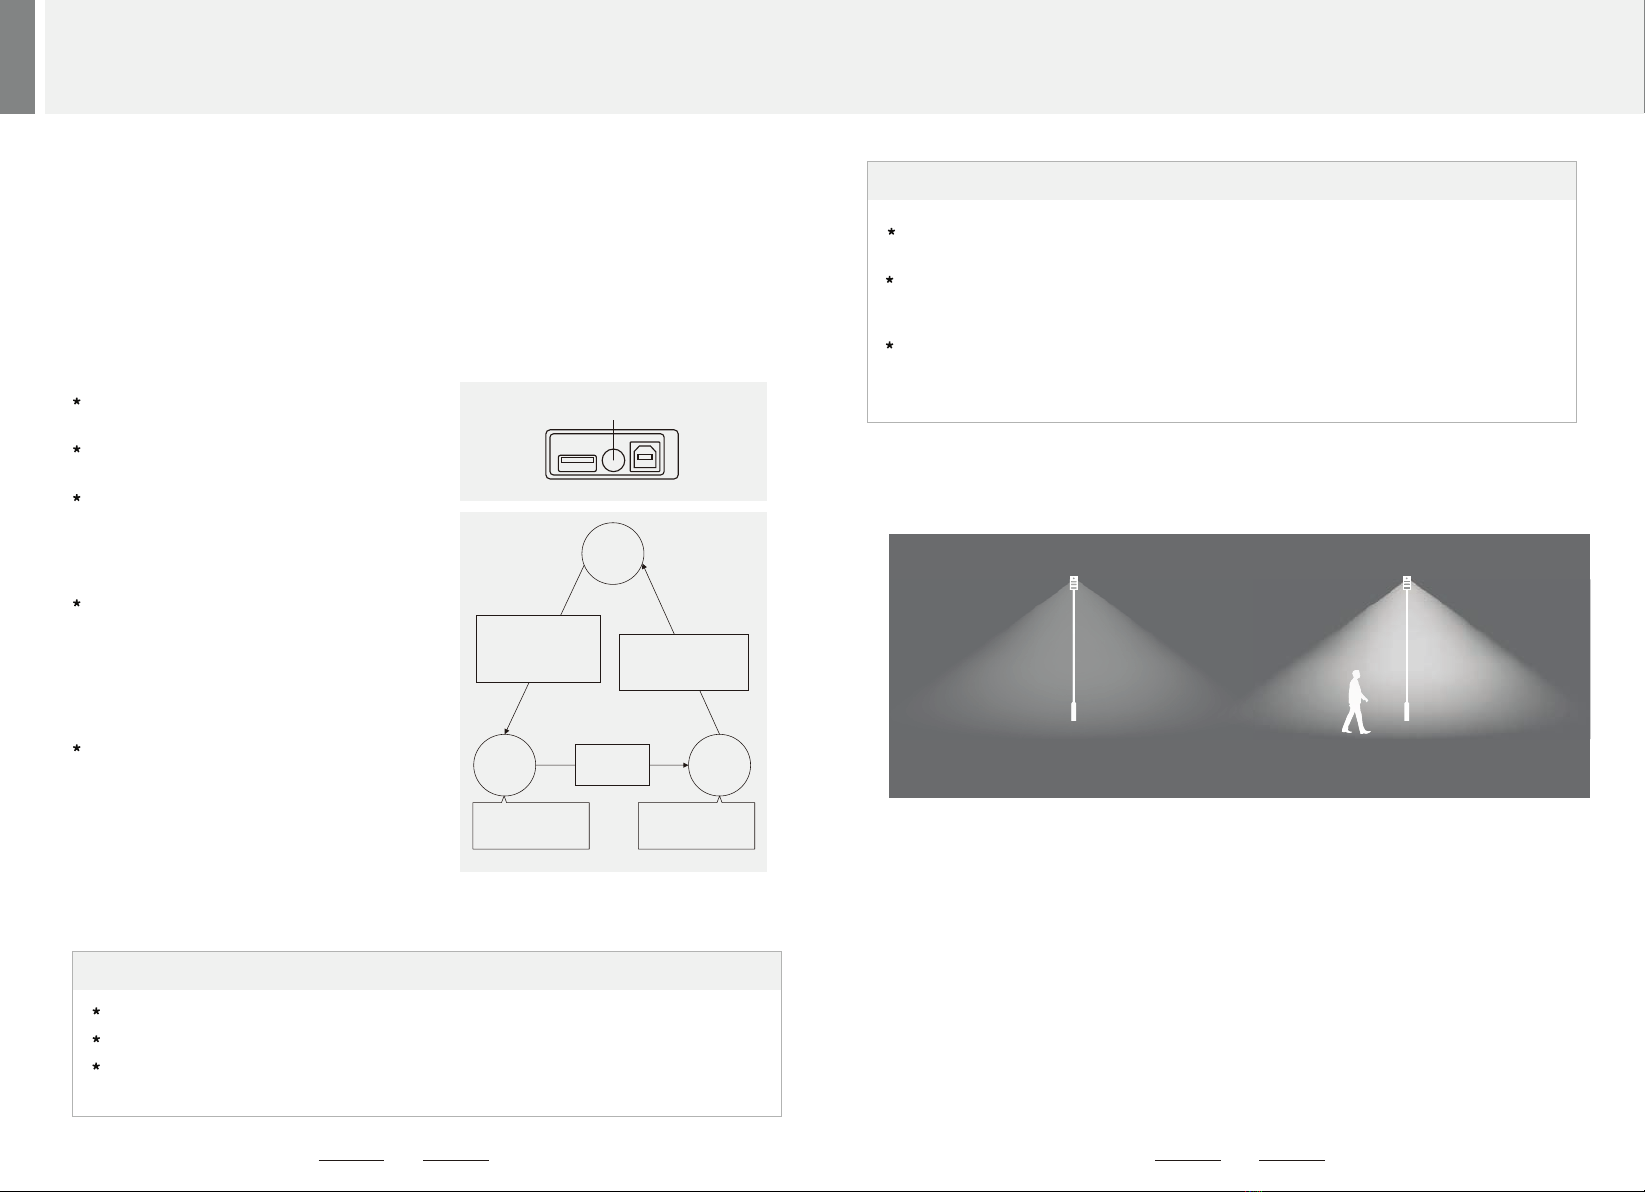
3. Button instructions
Short press the button, if the lighting status does not change, it is in the OFF mode.
Short press the button, if the light flash and then off, it is in transport (idle) mode;
Short press the button, if the light switch between ON and OFF directly, it is in ON mode, In
this mode, it can switch the light ON by short press the button.
Short press the button (1s) to find out the current product mode:
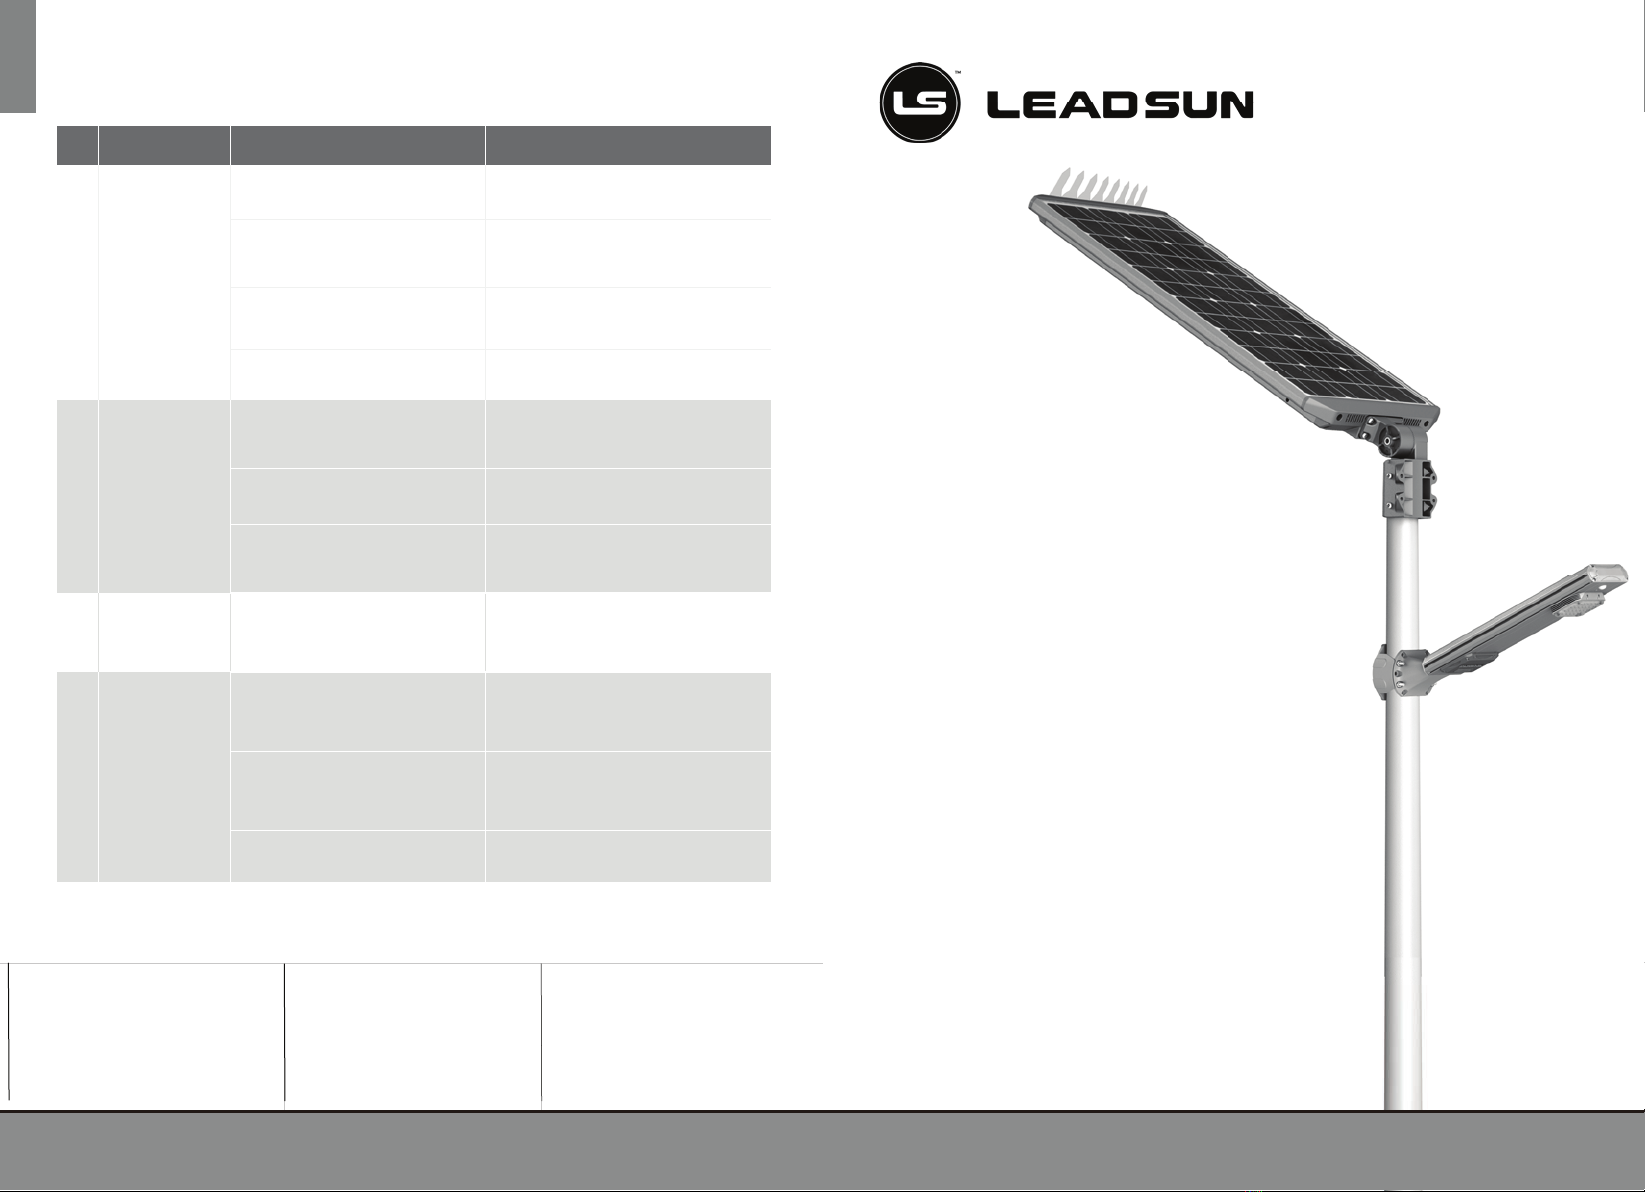
The AE3 Series Solar System is a versatile, robust Solar Light. With an integrated Photovoltaic
module, lithium battery, infrared sensor and highly efficient controller. This system produces high
illuminance, has a long lifespan, is easy to install and is virtually maintenance free.
Long press the button for (5s) to switch the working modes:
In the OFF mode, if the lighting condition is normal the light will start up automatically; or long
press the button 5s, if the light is ON and then OFF, the product will go into the ON mode.
In the ON mode, long press the button 5s, the light flash 3 times then off, the product will go
into the transport (idle) mode; if the light is disconnected from the solar panel, the product
will go into the OFF mode directly;
In the transport (Idle) mode, long press the button 5s, if the light flash one time and then off,
the product will go into the OFF mode; or without any operation after an hour, the product
will go into OFF mode automatically.
Dim mode
(X% Brightness)
Full Brightness
(100% brightness)
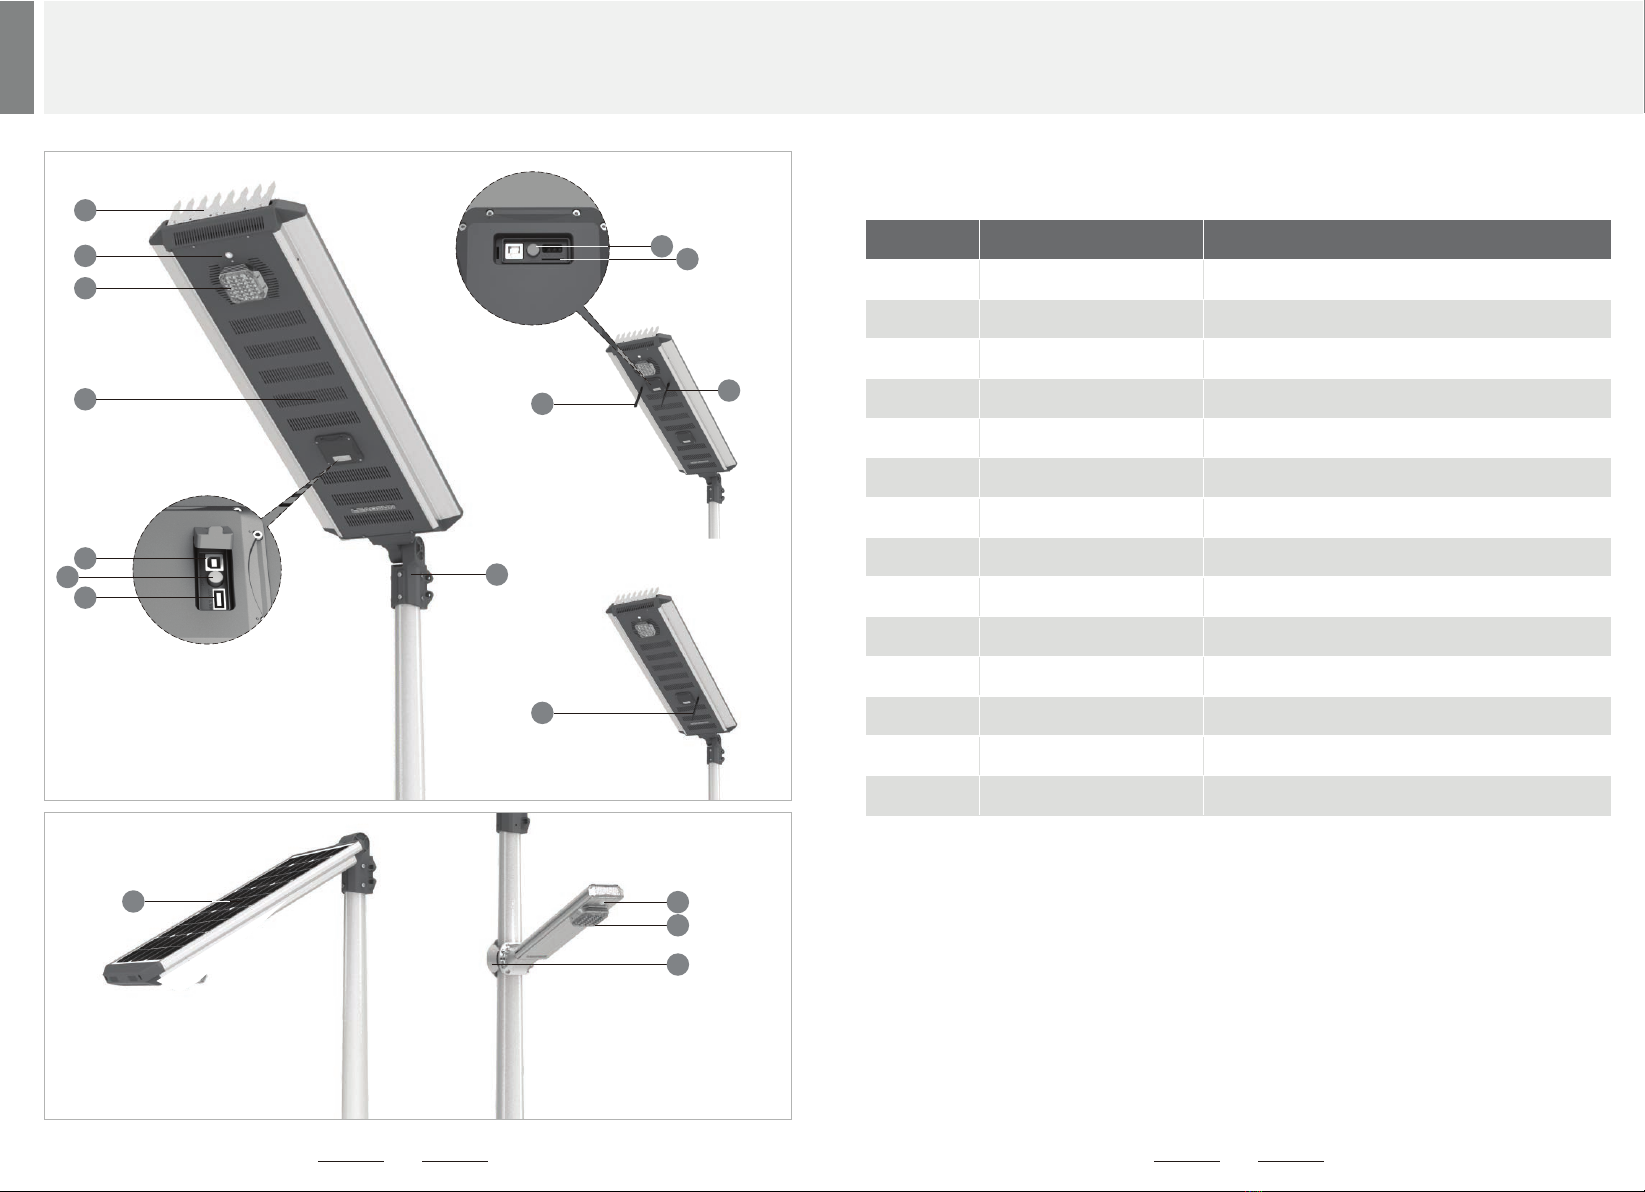
5. All internal parts are waterproof and rated to IP65. Holes and slits on the luminaires are designed
for heat dissipation and drainage. Metal parts are made of anodized rustproof aluminum, which
withstands high temperatures and humid weather. However, it is recommended that you avoid
areas with heavy acid mist or salt influx. The strong structural design can withstand the wind
speed up to 180km/hr.
4. At factory setting the units turn on at dusk and off at dawn automatically (light photosensitivity is
around 30lx). Depending on the programming mode how the system operates will depend on what
working mode was selected.
6
5
OFF
mode
ON
mode
Button Switch
Short press, the
light will switch
between on and off
Transport
mode
Short press, the
light will flash then
off
Long press till the
light is on or lighting
condition is sufficient
in daytime.
Long press 5 seconds
or if no operation
for more than an hour
Long press
5 seconds
and release, the light will turn on. Pressing the
button once will turn the light off.

Lorem ipsum
2.All-in-one activation and installation:
Bird spike: Use 3 sets M4×8 , lock washer and flat washer to fix the bird spike along thescrew
rim of the top of the light. (See Picture 3)
Install the bracket: Attach the bracket to the AE3 unit and set a proper angle that solar panel
can obtain maximum energy from the sun (each scale is 6 degree). Recommended installation angle
of the solar panel for Australian southern states is 43° and for Australian northern states is 23°.
Fix the bracket by fastening a M12 x 85 bolt. (See Picture 4)
Picture 3
Picture 4
1
2
If the installation site is on the northern hemisphere, the solar panel should face to the south
and if it is on the southern hemisphere, the panel should face to the north. (See Picture 1)
1. Installation conditions
Make sure the sun is not blocked by any buildings or trees during the installation or it will
affect the charging and discharging efficiency of the solar power system and the operation of the
street light. (See Picture 2)
Picture 1
Product Installation
1
2
Equator
Picture 2
Angle mark
8
7

Installation of the system:
Place the solar panel to the pole and fasten lightly with 6pcs M8 ×16 screws.
Product Installation
3
4
Ø76±2
Ø25
600
1
2
3
4
5
Face solar panel in the desired direction and fasten the M8 x 16 screews.
Picture 6
3. Split type activation and installation:
Drill holes on the pole. Firstly, determine
and mark the AE3 panel and LED light
position according to the optimum sun
radiation. Drill a Ф25mm hole approximately
600mm down from the top of the pole, where
the light is to be installed. (See Picture 8)
Attach the bracket to the AE3 unit. Thread
the cables from the hole on the bracket and set
the proper angle in which the solar panel can
obtain maximum energy from the sun (each
scale on the bracket is 6 degree). Fix the bracket
to the solar panel by fastening a M12 × 85 bolt.
(See Picture 9)
Thread 2 pieces of 2m waterproof cables through the Ф25mm hole which was made in step one
and then out from the top of the pole.
Mount the LED light: Mount the LED light onConnect the LED light with corresponding cables.
the pole by 4pcs M8 90 bolts.× The maximum torque for those M8 bolts is 14Nm. Do not surpass
this torque specification. (See Picture 10)
Mount the AE3 panel: Connect the two cables from the top of the pole to the solar panel and install
the solar panel ensuring you do not pinch any cables use 6pcs M8 x 16 screws to secure the bracket
to the pole.(See Picture 10)
Picture 9
Picture 8
10
9
Picture 10
5Activate solar panel as per Operation Instructions (Page 5)

Product Installation
1. Please ensure you have a Sim Datacard which support 4G Network.
2. Is the operators responsability to ensure that is enough data to operate wireless communications.
It is suggested that a minimun of 100mb a month is available for wireless communication
(data used is dependent on the amount of times the user interacts with the system).
.
Caution:
4. Wireless system installation EDGE Application scenarios
Road installation
Linear installation is adopted on the road. It is possible to consider installing multiple
lights with several gateways if the communication sigmal may be weak.
Decentralized installation in Factory/Park
In the situation of decentralized installation, the gateway system is recommended to be
installed in the center of all the street lights.
12
11
NODE Antenna
4G Antenna
NODE antenna installation
Gateway antenna intallation
Insert SIM Card
Insert the 4G SIM card into the slot according to the picture. Press the button next to it to
restart the gateway and cover the waterproof plug.
Connect the antenna to the corresponding position according to the
picture below, (Please pay attention to the difference of 4G antenna
and LORA antenna.)
Antenna installation
1
2
3
Gateway street light
120 street lights 120 street lights
NODE Antenna
The SIM card cutting edge is face down and the magnetic
stripe is away from the indicator light.
Cautions:
Each wireless street light communication distance range from 800 to 3000m. One gateway street
light can remote control 120 street lights.
Gateway street light

Lorem ipsum
Lorem ipsum
Software operation instruction
14
13
4
With LEADSUN EDGE APP, you can do the following operation:
1. Register to become a member
2. Lighting control
3. History data query
4. Working mode configuration
5. Real-time view.
For detail instructions, please see the "APP User Guide" under "More Functions" in the
software.
To use LEADSUN EDGE to control the light, visit www.leadsun.com.au and follow
the steps to Download the LEADSUN EDGE APP.
A. iPhone please go to the App Store searching 'LEADSUN EDGE APP' then click
install.
B. Android cellphone please visit www.leadsun.com.au or go to the software
platforms like Google Play to download and install 'LEADSUN EDGE APP'.
C. PC App please visit http://47.52.88.104:8083/Home/Login
Product Installation
Transportation and Storage
· This product contains lithium batteries. Please follow air transport regulations when shipping. It
should be regarded as potentially flammable and explosive, and be isolated from other goods
when stored, so as to avoid any damage.
· The solar panels should be considered as fragile. There should never be more than 4 layers
of boxes when stacked. To avoid damage to the panels, make sure no heavy pressure is
applied to the boxes.
· Please store the product in temperature between 0°C to 45°C.
· If stored for a long period, the product should be recharged every 3 months. Please only use the
special charger (purchased from manufacturer) to avoid damage to the battery or place the solar
panel in the sun for at least 4 hours.
· When repackaging the product after inspection or charging, set the light into sleep mode by
holding the On/Off button for 5 sec. The light will flash three times to signal that it has properly
entered sleep mode. You may now repackage the product into its box. To exit sleep mode, either
press the On/Off button one more time, or wait an hour for the light to reboot automatically
through contact with sunlight.
Clean
To clean, apply mild detergent with a damp cloth and gently wipe the surface of the solar panel.
Replacement of Parts / Spare Parts:
Please contact LEADSUN or your local distributor/dealer.
Maintenance and Products Care
Table of contents
Popular Inverter manuals by other brands

Solectria Renewables
Solectria Renewables PVI 15KW Installation and operation manual

Xantrex
Xantrex HI400 owner's guide

SOLIS
SOLIS RHI Series instruction manual

Goodwe
Goodwe A-BP Series user manual

Northern Lights
Northern Lights L944D, M944W, NL944D2, M30CW, M944T, NL944T2, and... Operator's manual

Agilent Technologies
Agilent Technologies 16522A user guide

Baldor
Baldor IDLC1600-2M installation manual

Subaru
Subaru SGX3500 Instructions for use

Kaco
Kaco Powador 1501xi Operator instructions

Generac Power Systems
Generac Power Systems ECOGEN 005818-0 Features & specifications

Generac Power Systems
Generac Power Systems 004912-0, 004912-1, 004913-0, owner's manual

Omron
Omron SYSDRIVE 3G3FV user manual