NEC DS1000 User manual

For additional resources, visit our Technical Support site on the web at
http://ws1.necii.com/ds2000
.
1. Start-up
Programming
3. Additional
Resources
• To use the IntraMail enhancements provided by software versions 03.2*.** and
higher, you must use the
NEC IntraMail Utility
version 1.2 to upgrade your Intra-
Mail CompactFlash card. If you don’t upgrade your card, the new features will not
be available.
• If upgrading from version 3 software prior to 03.10.08 using telephone program-
ming, you must reprogram the options in
1808-IntraMail Subscriber Mailbox
Options
,
8005-IntraMail Master Mailbox Options
, and
8006-IntraMail Rout-
ing Mailboxes
after the upgrade.
• To avoid having to reprogram the above options, use the latest version of the
DS1000/2000 System Administrator to backup and restore the site database.
• Go to
http://ws1.necii.com/ds2000
to download the latest versions of the Update
Utility, IntraMail Utility, System Administrator, and system software.
2. Customizing
Features
Quick Setup Guide
(03.2*.**)

This manual has been developed by NEC Unified Solutions, Inc. It is intended for the use of its customers and service
personnel, and should be read in its entirety before attempting to install or program the system. Any comments or suggestions
for improving this manual would be appreciated. Forward your remarks to:
NEC Unified Solutions, Inc.
4 Forest Parkway
Shelton, CT 06484
www.necunifiedsolutions.com
Nothing contained in this manual shall be deemed to be, and this manual does not constitute, a warranty of, or representation
with respect to, any of the equipment covered. This manual is subject to change without notice and NEC Unified Solutions,
Inc. has no obligation to provide any updates or corrections to this manual. Further, NEC Unified Solutions, Inc. also reserves
the right, without prior notice, to make changes in equipment design or components as it deems appropriate. No
representation is made that this manual is complete or accurate in all respects and NEC Unified Solutions, Inc. shall not be
liable for any errors or omissions. In no event shall NEC Unified Solutions, Inc. be liable for any incidental or consequential
damages in connection with the use of this manual. This document contains proprietary information that is protected by
copyright. All rights are reserved. No part of this document may be photocopied or reproduced without prior written consent
of NEC Unified Solutions, Inc.
©2004 by NEC Unified Solutions, Inc. All Rights Reserved.
Printed in U.S.A.

Table of Contents
DS1000/2000 Quick Setup Guide
Table of Contents
◆
i
Table of Contents
Section 1: Start-up Programming . . . . . . . . . . . . . . . . . . . . . . . . . . . . . . . . . . . . . . . . . . . . . . 1-1
Default Feature Setup . . . . . . . . . . . . . . . . . . . . . . . . . . . . . . . . . . . . . . . . . . . . . . . . 1-1
Trunks . . . . . . . . . . . . . . . . . . . . . . . . . . . . . . . . . . . . . . . . . . . . . . . . . . . 1-1
Keysets . . . . . . . . . . . . . . . . . . . . . . . . . . . . . . . . . . . . . . . . . . . . . . . . . . . 1-1
Frequently Asked Programming Questions . . . . . . . . . . . . . . . . . . . . . . . . . . . . . . . 1-2
Expanded Database . . . . . . . . . . . . . . . . . . . . . . . . . . . . . . . . . . . . . . . . . . . . . . . . . 1-3
Default Numbering in DS1000 . . . . . . . . . . . . . . . . . . . . . . . . . . . . . . . . 1-4
Default Numbering in DS2000 . . . . . . . . . . . . . . . . . . . . . . . . . . . . . . . . 1-4
Automatic Slot Configuration (DS2000) . . . . . . . . . . . . . . . . . . . . . . . . . . . . . . . . . 1-5
Programming the System . . . . . . . . . . . . . . . . . . . . . . . . . . . . . . . . . . . . . . . . . . . . . 1-5
How to Enter the Programming Mode. . . . . . . . . . . . . . . . . . . . . . . . . . . 1-5
How to Exit the Programming Mode. . . . . . . . . . . . . . . . . . . . . . . . . . . . 1-6
Using Keys to Move Around in the Programs. . . . . . . . . . . . . . . . . . . . . 1-6
Setting a Trunk’s Circuit Type . . . . . . . . . . . . . . . . . . . . . . . . . . . . . . . . . . . . . . . . . 1-7
Programming Ringing . . . . . . . . . . . . . . . . . . . . . . . . . . . . . . . . . . . . . . . . . . . . . . . 1-7
Changing Ringing Assignments Using the System Programming . . . . . 1-7
Changing Ringing Assignments With User Programmable Features . . . 1-8
Placing Outgoing Calls from Single Line Telephones . . . . . . . . . . . . . . . . . . . . . . . 1-8
Setting Up Trunk Access Restrictions . . . . . . . . . . . . . . . . . . . . . . . . . . . . . . . . . . . 1-9
Voice Mail Setup . . . . . . . . . . . . . . . . . . . . . . . . . . . . . . . . . . . . . . . . . . . . . . . . . . 1-11
Basic IntraMail and UltraMail Programming . . . . . . . . . . . . . . . . . . . . 1-11
Basic External Voice Mail Programming . . . . . . . . . . . . . . . . . . . . . . . 1-11
Set Voice Mail to Answer at Night . . . . . . . . . . . . . . . . . . . . . . . . . . . . 1-14
Having Voice Mail Pick Up Unanswered Calls. . . . . . . . . . . . . . . . . . . 1-15
Changing the System Password . . . . . . . . . . . . . . . . . . . . . . . . . . . . . . . . . . . . . . . 1-16
Reloading the System Default Settings . . . . . . . . . . . . . . . . . . . . . . . . . . . . . . . . . 1-17
Call Coverage . . . . . . . . . . . . . . . . . . . . . . . . . . . . . . . . . . . . . . . . . . . . . . . . . . . . . 1-17
User Programmable Features . . . . . . . . . . . . . . . . . . . . . . . . . . . . . . . . . . . . . . . . . 1-18
Section 2: Customizing Features. . . . . . . . . . . . . . . . . . . . . . . . . . . . . . . . . . . . . . . . . . . . . . . 2-1
Attendant Call Queuing . . . . . . . . . . . . . . . . . . . . . . . . . . . . . . . . . . . . . . . . . . . . . . 2-1
Operator Call Key . . . . . . . . . . . . . . . . . . . . . . . . . . . . . . . . . . . . . . . . . . 2-1
Attendant Position . . . . . . . . . . . . . . . . . . . . . . . . . . . . . . . . . . . . . . . . . . . . . . . . . . 2-1
Barge In (Intrusion) . . . . . . . . . . . . . . . . . . . . . . . . . . . . . . . . . . . . . . . . . . . . . . . . . 2-2
Call Waiting / Camp-On. . . . . . . . . . . . . . . . . . . . . . . . . . . . . . . . . . . . . . . . . . . . . . 2-3
Caller ID . . . . . . . . . . . . . . . . . . . . . . . . . . . . . . . . . . . . . . . . . . . . . . . . . . . . . . . . . . 2-5
Direct Station Selection (DSS) Console. . . . . . . . . . . . . . . . . . . . . . . . . . . . . . . . . 2-10
Door Box (DS1000) . . . . . . . . . . . . . . . . . . . . . . . . . . . . . . . . . . . . . . . . . . . . . . . . 2-14
Flash . . . . . . . . . . . . . . . . . . . . . . . . . . . . . . . . . . . . . . . . . . . . . . . . . . . . . . . . . . . . 2-18
Group Call Pickup . . . . . . . . . . . . . . . . . . . . . . . . . . . . . . . . . . . . . . . . . . . . . . . . . 2-18
Hotline . . . . . . . . . . . . . . . . . . . . . . . . . . . . . . . . . . . . . . . . . . . . . . . . . . . . . . . . . . 2-20
Night Service / Night Ring . . . . . . . . . . . . . . . . . . . . . . . . . . . . . . . . . . . . . . . . . . . 2-21
Off-Hook Signaling . . . . . . . . . . . . . . . . . . . . . . . . . . . . . . . . . . . . . . . . . . . . . . . . 2-23
Off-Hook Signaling for Trunk Calls . . . . . . . . . . . . . . . . . . . . . . . . . . . 2-23
Off-Hook Signaling for Intercom Calls . . . . . . . . . . . . . . . . . . . . . . . . . 2-23
Off-Hook Signaling for Hotline Calls . . . . . . . . . . . . . . . . . . . . . . . . . . 2-23
Programmable Function Keys . . . . . . . . . . . . . . . . . . . . . . . . . . . . . . . . . . . . . . . . 2-24
Speed Dial . . . . . . . . . . . . . . . . . . . . . . . . . . . . . . . . . . . . . . . . . . . . . . . . . . . . . . . 2-28
System Speed Dial . . . . . . . . . . . . . . . . . . . . . . . . . . . . . . . . . . . . . . . . . 2-28
Personal Speed Dial . . . . . . . . . . . . . . . . . . . . . . . . . . . . . . . . . . . . . . . . 2-28
Unique Speed Dial Entries. . . . . . . . . . . . . . . . . . . . . . . . . . . . . . . . . . . 2-28

Table of Contents
ii
◆
Table of Contents
DS1000/2000 Quick Setup Guide
Storing Trunk Routing in a Speed Dial Bin. . . . . . . . . . . . . . . . . . . . . . 2-28
Centrex Compatibility . . . . . . . . . . . . . . . . . . . . . . . . . . . . . . . . . . . . . . 2-28
Voice Mail . . . . . . . . . . . . . . . . . . . . . . . . . . . . . . . . . . . . . . . . . . . . . . . . . . . . . . . 2-32
Call Forwarding to Voice Mail . . . . . . . . . . . . . . . . . . . . . . . . . . . . . . . 2-32
Leaving a Message. . . . . . . . . . . . . . . . . . . . . . . . . . . . . . . . . . . . . . . . . 2-32
Transferring to Voice Mail . . . . . . . . . . . . . . . . . . . . . . . . . . . . . . . . . . 2-32
Conversation Record . . . . . . . . . . . . . . . . . . . . . . . . . . . . . . . . . . . . . . . 2-32
Personal Answering Machine Emulation. . . . . . . . . . . . . . . . . . . . . . . . 2-32
Voice Mail Overflow . . . . . . . . . . . . . . . . . . . . . . . . . . . . . . . . . . . . . . . 2-32
Message Center Mailbox . . . . . . . . . . . . . . . . . . . . . . . . . . . . . . . . . . . . 2-33
Interactive Soft Key Shows New Messages. . . . . . . . . . . . . . . . . . . . . . 2-33
Section 3: Additional Resources . . . . . . . . . . . . . . . . . . . . . . . . . . . . . . . . . . . . . . . . . . . . . . 3-1
On the Web. . . . . . . . . . . . . . . . . . . . . . . . . . . . . . . . . . . . . . . . . . . . . . . . . . . . . . . . 3-1
Printed System Documentation . . . . . . . . . . . . . . . . . . . . . . . . . . . . . . . . . . . . . . . . 3-2
On Your System Document CD . . . . . . . . . . . . . . . . . . . . . . . . . . . . . . . . . . . . . . . . 3-3

Section 1: Start-up Programming
DS1000/2000 Quick Setup Guide
Section 1: Start-up Programming
◆
1-1
1
Section 1:
Start-up Programming
Section 1: Start-up Programming
Default Feature Setup
This is how your system operates on initial power-up:
Trunks
In DS1000, trunks 1-6 (if installed) ring line keys 1-6 and single line telephones.
●
Trunks 4-6 will only work if you have an Expansion Board installed.
In DS2000, trunks 1-12 ring on line keys 1-12 for extensions 300-315.
●
All other extensions are lamp-only for trunks 1-12 on line keys 1-12.
●
Trunks 13-64 do not appear on line keys.
●
Single line sets do not ring for incoming trunk calls. See
Programming Ringing
on page 1-7.
All trunks (outside lines) on ATRU PCBs are loop start DTMF.
●
If you have Dial Pulse lines, you’ll have to reprogram the trunk circuit type. See
Setting a Trunk’s Cir-
cuit Type
on page 1-7. For T1 trunks, see the
Software Manual
on your
System Document CD
.
Keysets
The circuit types for extensions are automatically set when the extension is plugged in.
Keyset users can place outside calls by pressing a line key and dialing the outside number.
●
Extension users can also place outside calls by dialing 9 plus the outside number.
At the attendant’s extension (300), key 11 is the Night Key and the last key on the phone (12
or 24 - depending on telephone model) is the Operator Call Key.
●
Pressing the Night Key puts the system in the night mode. See
Night Service / Night Ring
on page 2-21.
●
Use the Operator Call Key to answer incoming Intercom calls queued at the attendant’s extension. See
Attendant Call Queuing
on page 2-1.
If you need to modify your system’s default feature setup:
• First, turn to
Frequently Asked Programming Questions
on the next page.
• Next, if you can’t find the feature you want to change in the list of questions, refer to the
additional features in
Section 2: Customizing Features
on page 2-1. You may also find the
Table of Contents at the beginning of this guide a handy reference.
• Finally, if you need more detailed information, go to the
Software Manual
on your
System
Document CD
.

Section 1: Start-up Programming
1-2
◆
Section 1: Start-up Programming
DS1000/2000 Quick Setup Guide
Frequently Asked Programming Questions
If you have this question: Go here:
General
How do I enter the Programming Mode and
change the system’s options?
Programming the System
on page 1-5.
I want to default the system. What are the steps?
Reloading the System Default Settings
on page 1-17.
Can I change the system password?
Changing the System Password
on page 1-16.
Trunks and Ringing
How do I turn trunk ringing on or off for certain
extensions?
Programming Ringing
on page 1-7.
In DS2000, how can I make single line telephones
ring for incoming calls?
Programming Ringing
on page 1-7.
I have DP (Dial Pulse) trunks, but the system
default is DTMF. How do I make my trunks DP?
Setting a Trunk’s Circuit Type
on page 1-7.
How do I place outgoing calls from single line
telephones?
Placing Outgoing Calls from Single Line Telephones
on page 1-8.
Extension Setup
What do I program to restrict access
from
certain
extensions
to
certain trunks?
Setting Up Trunk Access Restrictions
on page 1-9.
We have a group of phones that should ring for
each other’s calls. How do I set this up?
Call Coverage
on page 1-17.
How do the User Programmable Features work?
User Programmable Features
on page 1-18.
Voice Mail Setup
How do I set up Voice Mail?
Basic External Voice Mail Programming
on page 1-11.
Can I make the Voice Mail answer only at night?
Set Voice Mail to Answer at Night
on page 1-14.
If a call rings an extension and does not get
picked up, can I have Voice Mail answer it?
Having Voice Mail Pick Up Unanswered Calls
on
page 1-15.

Section 1: Start-up Programming
DS1000/2000 Quick Setup Guide
Section 1: Start-up Programming
◆
1-3
1
Expanded Database
The Expanded Database is a new database method that provides database records (memory) for all possible
extensions, trunks, Hunt Groups, Ring Groups, and Voice Mail ports. This new capability allows for:
●
Automatic Slot Configuration in DS2000.
●
Simplified installation of Voice Mail, Hunt Groups, and Ring Groups.
●
Support for built-in UltraMail (DS2000 only) and IntraMail Voice Mail
●
Introduction of the DS Series System Administrator (PC Program).
To understand the Expanded Database, you’ll need to keep track of three things: port, station (or trunk) num-
ber, and extension number.
●
Port
The port is where the device you are programming connects to the system. For example, in DS2000
each 16DSTU PCB has 16 ports which can connect up to 16 digital telephones.
- In DS2000, ports are numbered consecutively for each slot, and only exist when you plug in the
PCB to which the device should connect.
- In DS1000, there is a separate set of ports for digital stations, analog stations, analog Door Boxes,
and trunks.
●
Station Number and Trunk Number
The station or trunk number is the element in software that keeps track of the connected devices’s pro-
gramming. Station and trunk numbers (and associated database records) exist for all possible devices you
can connect to the system, even if you don’t have any ports installed to connect them. You can’t call sta-
tion and trunk numbers directly – you need the associated extension numbers to do that (see below).
●
Extension Numbers
Extension numbers allow you to access the stations and trunks. By default, each station and trunk num-
ber has an extension number assigned to it. You can change these assignments if you want to.
- Digital station ports have primary and secondary station numbers. The primary station’s extension
number is used to call the device connected to the port. The secondary station’s extension number
calls the second channel on 2-channel devices such as 2-OPX Modules and Digital VANGARD
Voice Mail ports.
When setting up your system, do not exceed the system’s Load Factor capacity.
Review your system’s
Hardware Manual
for more on the Load Factor.

Section 1: Start-up Programming
1-4
◆
Section 1: Start-up Programming
DS1000/2000 Quick Setup Guide
Default Numbering in DS1000
Default Numbering in DS2000
Default Numbering in DS1000
Stations (Telephones) Ports Station Numbers Extension Numbers
Digital Station
1-16 1-16
300-315
Analog Station
1-8 17-24
316-323
Door Box
1, 2 25-26
324, 325
Unassigned
1
- 27-34
326-333
Total Station Ports
34
--
•Tofind out the default extension number for any station number,
add 299
to the station number.
- For example, station number
1
uses extension number
300
(1 + 299).
Trunks Ports Trunk Numbers Extension Numbers
Trunk Ports
1-6
1-6 101-106
Total Trunk Ports
6
--
•Tofind out the default extension number for a trunk number,
add 100
to the trunk number (e.g., 1+100=101).
Voice Mail Ports Ports Station Numbers Extension Numbers
-
201-208 500-507
UCD Groups Total Groups UCD Group Master Extension Numbers
8 700-707
Ring Groups Total Groups Ring Group Master Extension Numbers
Ring Group Masters 8 600-607
1
Available for the second channels on 2-OPX Modules and Digital VANGARD Voice Mail.
Default Numbering in DS2000
Stations (Telephones) Ports Station Numbers Extension Numbers
Station
Set by installed PCB 1-96
300-395
Unassigned
1
32 97-128
396-427
Total Station Ports
128
--
•Tofind out the default extension number for any station number,
add 299
to the station number.
- For example, station number
1
uses extension number
300
(1 + 299).
Trunks Ports Trunk Numbers Extension Numbers
Trunk Ports
Set by installed PCB
1-64 101-164
Total Trunk Ports
64
--
•Tofind out the default extension number for a trunk number, add 100 to the trunk number (e.g., 1 + 100=101).
Voice Mail Stations Station Numbers Extension Numbers
201-208 500-507
UCD Groups Total Groups UCD Group Master Extension Numbers
8 700-707
Ring Groups Total Groups Ring Group Master Extension Numbers
Ring Group Masters 8 600-607
1Available for the second channels on 2-OPX Modules and Digital VANGARD Voice Mail.

Section 1: Start-up Programming
DS1000/2000 Quick Setup Guide Section 1: Start-up Programming ◆1-5
1
Automatic Slot Configuration (DS2000)
DS2000 Automatic Slot Configuration automatically sets up station and trunk PCBs when you initially
power up the system. This simplifies installation because you no longer have to use system programming to
activate station and trunk PCBs after you plug them in. Here’s how Automatic Slot Configuration works:
●With power off, install your station and trunk PCBs.
With the system powered down, install the station and trunk PCBs from left to right in the order you
want your extension and trunk numbers set up.
-Be sure to install a 16DSTU PCB in the first slot (CN1).
-
You don’t have to group your station and trunk PCBs together, although it may be more convenient to do
so. For example, when setting up a 16x32 system, you can install the 2nd DSTU PCB and your two
ATRU PCBs in any slot, in any order. Automatic Slot Configuration will properly handle the numbering.
●Power up the system.
On power up, the system scans the PCBs from left to right and sets up the extension and trunk number-
ing as follows.
- Extension numbers will begin with 300 in the first slot and increment from left to right.
- Trunk numbers will begin with 101 (starting from the first installed ATRU PCB) and will also incre-
ment from left to right.
Notes:
●System reset does not cause reconfiguraton. Automatic Slot Configuration is temporarily disabled dur-
ing a system reset.
●For more, see Automatic Slot Configuration (DS2000) and 9902 - Set Up Stations (DS2000) in the
Software Manual on your System Document CD.
Programming the System
How to Enter the Programming Mode
To enter the programming mode:
1. Go to any working display telephone.
2. Do not lift the handset.
3. Press ICM.
4. Dial # * # *
5. Dial the system password + HOLD.
Refer to the following table for the default system passwords.
See the Software Manual on your System Document CD for more on password levels.
6. Enter the number of the program you want to change (e.g., 1801) + HOLD.
DSnnnn VER nn.nn.nn
PASSWORD:
Password Level Password Level
System Administrator 1 0000 1
System Administrator 2 9999 2
Installer 372000 3
USER: nnn
ENTER PROGRAM?

Section 1: Start-up Programming
1-6 ◆Section 1: Start-up Programming DS1000/2000 Quick Setup Guide
How to Exit the Programming Mode
To exit the programming mode:
1. When you see:
Press and release the hookswitch, or press SPK.
If you don’t see one of the above prompts, press CONF until you do. When you exit program-
ming, the system automatically stores your entries in Random Access Memory (RAM).
Using Keys to Move Around in the Programs
Once you enter the programming mode, use the keys in the following chart to enter data, edit data and move
around in the menus.
USER: nnn
ENTER PROGRAM?
OR
DS1000 VER nn.nn.nn
PASSWORD:
Use this key: When you want to:
0-9, # and * Enter data into the program.
HOLD
Complete the programming step you just made (like pressing
Enter
on a PC keyboard). When a program entry displays, press
HOLD
to
accept the entry (i.e., bypass the entry without changing it).
CONF Complete the programming step you just made (like pressing
Enter on a PC keyboard) and back up one step in the program.
LND
Delete the entry to the left (like pressing
Backspace
on a PC key-
board). To delete an entire name entry (without backspacing over
each letter), just reenter the name without pressing
LND
first.
CLEAR Erase the entire command line you just entered and undefine the
entry.
CHECK Erase the entry you just made and replace it with the prior stored
entry.
VOL Up Scroll forward through a list of entries in a program. If you enter
data and then press this key, the system accepts the data before
scrolling forward to the next entry.
VOL Down Scroll backward through a list of entries in a program. If you
enter data and then press this key, the system accepts the data
before scrolling backward to the previous entry.
ICM Enable the scroll mode. When you press this key and it lights,
you can then press VOL Up and VOL Down to scroll through the
options. To choose the displayed value, press HOLD.

Section 1: Start-up Programming
DS1000/2000 Quick Setup Guide Section 1: Start-up Programming ◆1-7
1
Setting a Trunk’s Circuit Type
To set a trunk’s circuit type:
1. Enter the programming mode. You see:
2. Enter 1001 + HOLD. You see:
3. Enter the number of the trunk you want to program (1-6 in DS1000, 1-64 in DS2000) +
HOLD
. You see:
4. Enter the trunk circuit type (0=uninstalled, 51=loop start DTMF, 52=loop start DP) + HOLD. You see:
For additional T1 circuit types, see T1 Trunking in the Software Manual on the System Docu-
ment CD that came with your system.
5. Enter a different circuit type for the trunk (if you made a mistake).
OR
Press CONF to select another trunk.
OR
Press CONF twice to exit program 1001.
Programming Ringing
In DS1000 by default:
●Trunks 1-6 appear and ring on line keys 1-6 on every keyset. In addition, line keys ring for each incom-
ing call on that key. This means that every keyset rings for each incoming call.
●Single line telephones also ring for each incoming trunk call.
In DS2000 by default:
●Trunks 1-12 appear and ring on line keys 1-12 for extensions 300-315. All other extensions are lamp-
only for trunks 1-12 on line keys 1-12.
●Trunks 13-64 do not appear on line keys.
●Single line telephones do not ring for incoming trunk calls.
There are two ways to change the ringing assignments: using the system programming or the User Program-
mable Features.
Changing Ringing Assignments Using the System Programming
To change ringing:
1. Enter the programming mode. You see:
2. Enter 1805 + HOLD. You see:
3. Enter the number of the extension you want to program + HOLD. You see:
USER: nnn
ENTER PROGRAM?
1001:TRK DESCRIPTION
TRUNK PORT?n
1001:TRUNK PORT:n
TYPE?nnnn nnnnnn nn
1001:TRUNK PORT:n
TYPE?(your selection)
USER: nnn
ENTER PROGRAM?
1805:RING ASSIGNMENT
EXTENSION #?nnn
1805:EXT:nnn
LINE NUMBER?n

Section 1: Start-up Programming
1-8 ◆Section 1: Start-up Programming DS1000/2000 Quick Setup Guide
4. Enter the number of the trunk you want to program (e.g., 1) + HOLD. You see:
The currently programmed ringing option for the trunk selected displays.
5. For the extension and trunk selected, enter the ring option + CONF:
1 = Lamp only (no ringing)
2 = Ringing day and night
3 = Ringing at night, lamp only during the day
4 = Delayed ringing day and night
6. Go back to step 4 and enter the number of another trunk to program for the selected extension.
OR
Press CONF and go back to step 3 to select another extension.
OR
Press CONF twice to exit program 1805.
Changing Ringing Assignments With User Programmable Features
A keyset user can change line key ringing right from their phone.
To change line key ringing with the User Programmable Features:
1. Dial #RAL.
Your line keys flash. The flash rate shows the type of ringing enabled:
On red = lamp only day and night
On green = immediate ring day and night
Fast flash green = delay ring day and night
Slow flash green = immediate ring at night, lamp only during the day
2. Press the line key to change its ringing mode.
3. Press SPK when you are done.
See User Programmable Features on page 1-18 for more.
Placing Outgoing Calls from Single Line Telephones
By default, single line telephone users can dial 9 for an outside line.
If your single line telephone users can’t dial 9 to place outgoing calls, you need to check the following:
●Part I: Assign some trunks to Trunk Group 90 (which is the default dial 9 group).
●Part II: Allow analog ports to have full or outgoing access to the trunks in group 90.
Part I: Assign Trunks to Trunk Group 90.
1. Enter the programming mode. You see:
2. Enter 1002 + HOLD. You see:
3. Press HOLD to select Trunk Group 90. You see:
4. Dial 1and press VOL Up. (This assigns trunk 1 as your first outgoing trunk in group 90.) You see:
1805:EXT:nnn LINE:n
nnnnnnn
1805:EXT:nnn
LINE NUMBER?n
USER: nnn
ENTER PROGRAM?
1002:TRUNK GROUPS
TRUNK GROUP?90
1002:TRUNK GROUP:90
ORDR 1:TRK NUM?UND
1002:TRUNK GROUP:90
ORDR 2:TRK NUM?UND

Section 1: Start-up Programming
DS1000/2000 Quick Setup Guide Section 1: Start-up Programming ◆1-9
1
5. Go back to step 4 and add another trunk to group 90.
OR
Press HOLD to save your entries.
OR
Press HOLD + CONF to exit program 1002.
Part II: Allow Analog Ports to have Full or Outgoing Access to group 90 Trunks.
1. Enter the programming mode. You see:
2. Enter 1803 + HOLD. You see:
3. Enter the extension number for the single line telephone you want to program (e.g., 319) +
HOLD
. You see:
4. Enter the number of the trunk you want to program + HOLD. You see (for the trunk selected):
The previously programmed access setting for the selected trunk displays.
5. Enter access option 2 (outgoing only) or 3 (full/both ways access) for the selected trunk + VOL Up. You
see (for the next trunk):
6. Press CONF to return to step 4 and select another trunk to program.
OR
Press CONF twice to return to step 3 and select another extension to program.
OR
Press CONF three times to exit program 1803.
Setting Up Trunk Access Restrictions
The system allows you to set up an “access matrix” for each trunk at each extension. With access restriction,
for example, you could restrict a lobby phone from being able to place outside calls on certain trunks.
To set up trunk access restrictions:
1. Enter the programming mode. You see:
2. Enter 1803 + HOLD. You see:
3. Enter the number of the extension for which you want to set up access restrictions + HOLD. You see:
4. For the extension selected, enter the number of the trunk for which you want to set up access restric-
tions + HOLD. You see:
The previously programmed access setting displays.
USER: nnn
ENTER PROGRAM?
1803:LINE ACCESS
EXTENSION #?nnn
1803:EXT:nnn
LINE NUMBER?n
1803:EXT:nnn LINE:n
nnnnnnnnnn
1803:EXT:nnn LINE:n
nnnnnnnnnn
USER: nnn
ENTER PROGRAM?
1803:LINE ACCESS
EXTENSION #?nnn
1803:EXT:nnn
LINE NUMBER?n
1803:EXT:nnn LINE:n
nnnnnnnnnnn

Section 1: Start-up Programming
1-10 ◆Section 1: Start-up Programming DS1000/2000 Quick Setup Guide
5. Enter the access option for the selected trunk + VOL Up.
0 = No access
1 = Incoming only
2 = Outgoing only
3 = Full access (both incoming and outgoing)
6. Enter the access option for the next consecutive trunk.
OR
Press CONF to go back to step 4 and select another trunk.
OR
Press CONF twice to go back to step 3 and select another extension.
OR
Press CONF three times to exit program 1803.

Section 1: Start-up Programming
DS1000/2000 Quick Setup Guide Section 1: Start-up Programming ◆1-11
1
Voice Mail Setup
Basic IntraMail and UltraMail Programming
IntraMail and UltraMail built-in Voice Mail systems automatically set up without any required programming.
Basic External Voice Mail Programming
Prior to programming, follow the instructions that came with your external Voice Mail and connect the Voice
Mail to your system. If you are using the DS1000 PFT/MDM port for a Power Failure Telephone or
Modem Cut-through, do not use extension 316 for external Voice Mail.
The system provides a predefined set of Voice Mail station numbers (201-208), which have a predefined set
of corresponding Voice Mail extension numbers (500-507). In addition, the Voice Mail extension numbers
are already designated as Voice Mail ports and assigned to a predefined UCD Hunting Group (with 700 as
the master number).
The basic external Voice Mail programming is divided into three parts:
●Part I: Enable External Voice Mail
●Part II: Assign the external Voice Mail ports to the Voice Mail station numbers.
●Part III: Program the external Voice Mail system.
Part 1: Enable External Voice Mail
1. Enter the programming mode. You see:
2. Enter 8001 + HOLD. You see:
3. Enter E(3) + HOLD. You see:
4. Press CONF to exit program 8001.
Part II: Assign the External Voice Mail Ports to the Voice Mail Station Numbers
(DS2000)
For Analog Voice Mail (such as analog VANGARD and NVM-2e)
1. Enter the programming mode. You see:
2. Enter 9902 + HOLD. You see:
3. Enter the slot number (2-8) that contains the ASTU PCB to which your analog Voice Mail is connected
+ HOLD. You see:
4. Enter P(7). You see:
5. Press VOL Up until you select the first (lowest numbered) port to which your Voice Mail is connected.
USER: nnn
ENTER PROGRAM?
8001:V-MAIL SETUP
V-MAIL TYPE?NONE
8001:V-MAIL SETUP
V-MAIL TYPE?EXTERNAL
USER: nnn
ENTER PROGRAM?
9902:STATION CARDS
SLOT?
9902:SLOT:n:nASTU
V-RMV/P-PORTS/X-SWAP
9902:SLOT:n:nASTU
PORT:nn STATION:nnn

Section 1: Start-up Programming
1-12 ◆Section 1: Start-up Programming DS1000/2000 Quick Setup Guide
6. Enter 201 + HOLD twice. You see:
7. Press VOL Up, then repeat step 6 to assign additional Voice Mail stations (202-208) to the remaining
installed Voice Mail ports.
8. Press CONF to go back to step 4.
OR
Press CONF twice to go back to step 3 and select another slot to program.
OR
Press CONF three times to exit program 9902.
For Digital VANGARD
Each Digital VANGARD connection is a two-channel device that represents two Voice Mail ports (stations).
In programming, you assign a separate Voice Mail station (201-208) to each channel. The first channel is
called the primary station; the second channel is called the secondary station.
1. Enter the programming mode. You see:
2. Enter 9902 + HOLD. You see:
3. Enter the slot number (1-8) which contains the DSTU PCB to which your digital Voice Mail is con-
nected + HOLD. You see:
4. Enter P(7). You see:
5. Press VOL Up until you select the primary station for the first (lowest numbered) port to which your
Digital VANGARD is connected.
6. Enter 201 + HOLD twice. You see:
7. Press VOL Up. You see:
8. Enter 202 + HOLD twice. You see:
9. Repeat steps 6-8 to assign Voice Mail stations to the remaining installed Digital VANGARD Voice
Mail ports.
10. Press CONF to go back to step 4.
OR
Press CONF twice to go back to step 3 and select another slot to program.
OR
Press CONF three times to exit program 9902.
9902:SLOT:n:nASTU
PORT:nn STATION:nnn
USER: nnn
ENTER PROGRAM?
9902:STATION CARDS
SLOT?
9902:SLOT:n:16DSTU
V-RMV/P-PORTS/X-SWAP
9902:SLOT:n:16DSTU
PORT:nn PRI STA?:nnn
9902:SLOT:n:16DSTU
PORT:nn PRI STA?:201
9902:SLOT:n:16DSTU
PORT:nn SEC STA?:UND
9902:SLOT:n:16DSTU
PORT:nn PRI STA?:201

Section 1: Start-up Programming
DS1000/2000 Quick Setup Guide Section 1: Start-up Programming ◆1-13
1
(DS1000)
For Analog Voice Mail (such as analog VANGARD and NVM-2e)
1. Enter the programming mode. You see:
2. Enter 9902 + HOLD. You see:
3. Enter A(2). You see:
4. Press VOL Up until you select the first (lowest numbered) analog port to which your analog Voice Mail
is connected.
5. Enter 201 + HOLD twice. You see:
6. Press VOL Up, then repeat step 5 to assign additional Voice Mail stations (202-208) to the remaining
installed Voice Mail ports.
7. Press CONF to go back to step 3.
OR
Press CONF twice to exit program 9902.
For Digital VANGARD
Each Digital VANGARD connection is a two-channel device that represents two Voice Mail ports (stations).
In programming, you assign a separate Voice Mail station (201-208) to each channel. The first channel is
called the primary station; the second channel is called the secondary station.
1. Enter the programming mode. You see:
2. Enter 9902 + HOLD. You see:
3. Press D(3). You see:
4. Press VOL Up until you select the first (lowest numbered) digital port to which your Digital VAN-
GARD is connected.
5. Enter 201 + HOLD. You see:
6. Press HOLD again + VOL Up. You see:
7. Enter 202 + HOLD twice. You see:
8. Repeat steps 4-8 to assign Voice Mail stations to the remaining installed Digital VANGARD Voice
Mail ports.
9. Press CONF to go back to step 3.
OR
Press CONF twice to exit program 9902.
USER: nnn
ENTER PROGRAM?
9902:STATION CARDS
D-DGTL/A-ANLG/X-DBOX
9902:ANALOG PORTS
PORT:17 STATION:17
9902:SLOT:n:nASTU
PORT:17 STATION:201
USER: nnn
ENTER PROGRAM?
9902:STATION CARDS
D-DGTL/A-ANLG/X-DBOX
9902:STATION CARDS
PORT:01 PRI STA?1
9902:STATION CARDS
STATION ASSIGNED
9902:STATION CARDS
PORT:nn SEC STA?UND
9902:SLOT:n:16DSTU
PORT:nn SEC STA?202

Section 1: Start-up Programming
1-14 ◆Section 1: Start-up Programming DS1000/2000 Quick Setup Guide
Part III: Program the External Voice Mail System
VANGARD Mail
To set up VANGARD Mail for DS1000/2000:
1. Following the instructions in your VANGARD Mail manual, connect the Voice Mail system.
2. From the VANGARD Mail Main Menu, enter IN + Enter.
3. Enter the VANGARD Mail password (CTL) + Enter.
4. When you see the Install System Menu, enter 7+ Enter (to select DS2000) and follow the prompts.
NVM-2e
To set up NVM-2e for DS1000/2000:
1. Following the instructions in your NVM-2e manual, connect the Voice Mail system.
The steps that follow assume your NVM-2e still has its default programming.
2. From any extension:
- Press ICM.
- Dial the Voice Mail master number (e.g., 700)
- (NVM-2e version 2.0 or higher) Dial 301, wait for the main menu.
- (NVM-2e version prior to 2.0) Dial 10, wait for the main menu.
3. At the Main Menu, dial DM (36) for the Database Management Menu.
4. Dial SI (74) for System Initialization.
5. Dial 3to initialize the Voice Mail database.
6. Dial 4to install the database for DS1000/2000.
7. Press #, then follow the voice prompts to exit.
Set Voice Mail to Answer at Night
To have the Voice Mail Automated Attendant answer a trunk at night, you program the trunk as a night mode DIL
to the Voice Mail master number. When the attendant presses the NIGHT key, the system switches to the night
mode and the Voice Mail Automated Attendant answers the trunk. During the day, the trunk rings normally.
To set up a Night Mode DIL to Voice Mail:
1. Enter the programming mode. You see:
2. Enter 1003 + HOLD. You see:
3. Enter the number of the trunk you want to program (e.g., 1) + HOLD. You see:
4. Press VOL Up until you see:
5. Enter the Voice Mail master number (e.g., 700) + HOLD.
6. Press CONF to go back to step 3 and enter another trunk.
OR
Press CONF twice to exit program 1003.
Important
When setting up external Voice Mail, the Trunk Mailbox numbers
must be 101-106 for DS1000 and 101-164 for DS2000.
USER: nnn
ENTER PROGRAM?
1003:TRUNK OPTION
TRUNK PORT?n
1003: TRUNK PORT?:n
PICK-UP GROUP?n
1003: TRUNK PORT?:n
NIGHT TERM?nnn nnnn

Section 1: Start-up Programming
DS1000/2000 Quick Setup Guide Section 1: Start-up Programming ◆1-15
1
Having Voice Mail Pick Up Unanswered Calls
There are two ways to set this up:
●Method I: Use the system’s trunk overflow capabilities.
●Method II: Set up Terminal Hunting to Voice Mail.
Method I: Trunk Overflow to Voice Mail
With Method I, an outside call will ring a keyset for 15 seconds and then divert to Voice Mail. You set up
Method I on a trunk-by-trunk basis. Method I is a trunk-based overflow method. You can use Method I in
combination with Method II.
To set up trunk overflow to Voice Mail:
1. Enter the programming mode. You see:
2. Enter 1003 + HOLD. You see:
3. Enter the number of the trunk you want to program (e.g., 1) + HOLD. You see:
4. Press VOL Up until you see:
5. Dial 9(for yes) and press VOL Up. You see:
6. Enter the Voice Mail master number (e.g., 700) + HOLD.
If you don’t want to use Voice Mail, the overflow destination can be another extension or the
system attendant (e.g., 300).
7. Press CONF to go back to step 3 and enter another trunk.
OR
Press CONF twice to exit program 1003.
The length of time a call rings before diverting to Voice Mail is set by the Trunk Revert interval in
program 0401. Refer to the Software Manual on your System Document CD for more on this timer.
Method II: Terminal Hunting to Voice Mail
If an outside call rings an extension and the extension is not answered, is busy, or is in Do Not Disturb, Voice
Mail can pick up the call. To do this, you set up Terminal Extension Hunting to Voice Mail at each extension.
In the default system, this method is primarily used for transferred calls. If an outside call is transferred to an
extension that is unanswered, busy, or in DND, the call will automatically go to the called user’s mailbox.
The extension user can just press DND to have their calls go to their mailbox.
You set up Method II on an extension-by-extension basis. Method II is an extension-based overflow method.
You can use this method in combination with Method I.
To set up Terminal Hunting to Voice Mail:
1. Enter the programming mode. You see:
2. Enter 1807 + HOLD. You see:
3. Enter the number of the extension you want to set up for Terminal Hunting to Voice Mail + HOLD.
You see:
USER: nnn
ENTER PROGRAM?
1003:TRUNK OPTION
TRUNK PORT?n
1003:TRUNK PORT?:n
PICK-UP GROUP?n
1003:TRUNK PORT?:n
DAY OVERFLOW?nn
1003:TRUNK PORT?:n
DAY OVRFLW DEST?nnn
USER: nnn
ENTER PROGRAM?
1807:EXT OPT PART II
EXTENSION#?nnn
1807:EXT:nnn
STA VOICE CALL?nnn

Section 1: Start-up Programming
1-16 ◆Section 1: Start-up Programming DS1000/2000 Quick Setup Guide
4. Press VOL Up until you see:
5. Dial 3(Busy/Ring No Answer Hunting for All Calls) and press VOL Up. You see:
6. Enter the Voice Mail master number + HOLD.
If you don’t want to use Voice Mail, the overflow destination can be another extension or the
system attendant (e.g., 300).
7. Press CONF and go back to step 3 to program another extension.
OR
Press CONF twice to exit program 1807.
Changing the System Password
The default system passwords are:
To change the system password:
1. Enter the programming mode. You see:
2. Enter 9905 + HOLD. You see:
3. Enter the level (1-3) for the password you want to change + HOLD. You see:
4. Enter the new password for the level selected (up to 8 digits) + HOLD. You see:
5. Reenter the password you entered in step 4 above + HOLD. You see:
6. Press CONF to return to step 3 and select another password to change.
OR
Press CONF twice to exit program 9905.
1807:EXT:nnn
HUNT TYPE?nnnn
1807:EXT:nnn
HUNT DEST?nnn
Password Level Password Level
System Administrator 1 0000 1
System Administrator 2 9999 2
Installer 372000 3
USER: nnn
ENTER PROGRAM?
9905:PASSWORD PROG
PASSWORD LVL?
9905:PASSWORD PROG
NEW PASS?
9905:PASSWORD PROG
CONFIRM?
9905:PASSWORD PROG
PASSWORD ACCEPTED
Other manuals for DS1000
15
This manual suits for next models
1
Table of contents
Other NEC Telephone manuals

NEC
NEC XN120 Vision User manual

NEC
NEC DT300 Series User manual

NEC
NEC SV8500 User manual

NEC
NEC Aspire User manual

NEC
NEC Univerge SV9300 User manual

NEC
NEC DS2000 IntraMail User manual

NEC
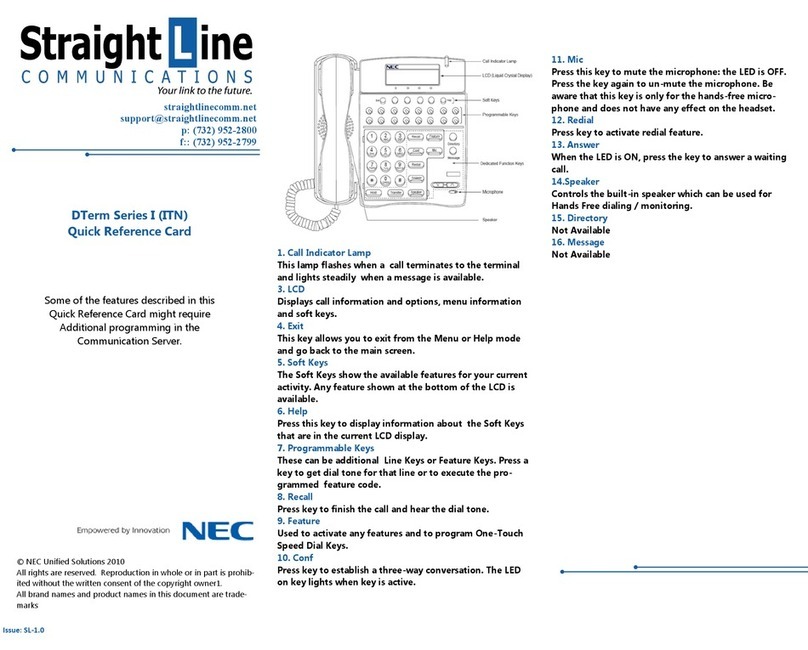
NEC Dterm Series i User manual

NEC
NEC Dterm Series i User manual

NEC
NEC XEN IPK DIGITAL TELEPHONE User manual

NEC
NEC DS2000 IntraMail User manual