Lean Quad BMD0906 User manual

INSTALLATIONANDOPERATING
INSTRUCTIONS
Photos are for reference ONLY.
Assembly by an adult.
This toy is unsuitable for children under
3 years due to its maximum speed.
!WARNING:
Executive standard:
En71 and En62115
ASTM F963-17
A/F

1 2
INSTALLATION INSTRUCTION
In order to improve the quality, we may change part of the structure and
appearance of the product without an advance notice.
Please read the instructions carefully before use, it will tell you the
right operation method and installation steps . Incorrect operation may
damage the product, or even hurt your child. Please keep this instruction
ready and easy to find.
The illustrations in this instruction are used for easier understanding of the
operation method of the product and the product structure. Please note there
may be differences between the pictures and the physical item.
!

34
0
37-96 months
Before using the vehicle the child should understand the vehicle controls
and safety issues. They must also demonstrate the capability to handle the
vehicle and operate its controls.
It is the responsibility of the adult to educate the child and supervise the
vehicles use. Read the following safety warnings to any child using the
vehicle before riding.

1
2
4
1
1
1
E(handlebar)
G(front axle)
B(Front wheel)
D(Wheel cover)
C(Rear wheel)
F(Lazy back)
2
A(Rear axle)
Step 1: Open the packaging box, take out all components. Components
include Instruction, front wheels, rear wheels, charger, handlebar,
wheel covers, instrument board, M8 spanner, M5 spanner, seat,
tapping screws, and rear axle which is fixed on the car body as
figure1 (please take it down for later installation) .
Step 2: Find the Instruction, it will tell you the right operation method and
installation program.
1
Specification
*The above parameters contain optional features, specific parameters
please refer to our samples.
Name specification
Battery
Motor
Suitable age
Maxweight
Body size
Speed
Hours of use
Charger
Double drive (12V7AH/12V10AH)
37-96 months
30KG
3-6KM/h
charging8-12hours,using1 to 2 hours
Input:110V~240V
Mainmaterial PP(polypropylene) and iron
Double drive 12V 12V
Output:DC 12V 1000MA
1030*680*730MM
56
Parts List
*Photos are for reference ONLY.
A (rear axle)
1
1
H(Remote control)
1
I(Charger) J(Instruction)
(optional)
1
K(M8 spanner)
(optional)
NO. PICTURE
NO. PICTURE
3
5
1
7
9
11
2
4
6
8
10
12
Double drive motor 12V
Steering motor 12V
4
S3(big flat head tapping
screws 4*12mm)

Installation Steps
S4
G
L
S5
B:Find the corresponding position on the car body as shown, use 4 S3( big
flat head tapping screws 4*12mm) to fix the G(front axle) into this
position. (Note: the L(steering yoke) need to be pointed at the Steering
hole ). Put the S5(M8*16 gasket)on the L(Steering yoke) first, then fix it
by S4(M8 nut).
S3
step2:Install the rear axle
First press and firm the K(rear suspension pivot) into the corresponding
position as shown. Then press the A(rear axle) through the hole as shown
in figure (Keep the same length on both sides ).
step3:Install the front and rear wheel
A. Install the front wheel: Install the B(front wheel) into the G(front axle),
two S1(M8*22 gasket) need to be placed out of the B(front wheels) and
securely fix them with S4(M8 nut).
B. Install the rear wheel: Install the C(rear wheel) into the both sides of
the A(rear axle). (Note: the convex side of the C(rear wheel) is inside)
then put two S1(M8*22 gasket) out of the C(rear wheels) securely fix
them with S4(M8 nut).
C. Press and fix 4 D(Wheel cover) onto the corresponding position on
wheels.
S4
S4
S1
S1 D
D
S4
S1
DD S4
S1
CC
BB
G
A
78
A
K
A: Use K(M8 spanner) to loosen S4(M8 nut) , one on L(steering yoke), two
on G(front axle) ,and two on A (rear axle), then take off S5 (M8*16
gassket) and S1 (M8*22 gasket).(Note: Front axle need to retain two
gaskets, as shown in figure)
step1:Install the front axle
S4
S4 S1 S1
S4
S5
G
A
S4 S1 S4
S1

step4:Install
handlebar
Press E(handlebar) into
the Q(Steering yoke), use
N(screw) and M(nut) to fix
it.(Note: place M(nut) on
the hexagonal hole side,
insert N(screw) to the
round hole side)
step5:Install
lazyback
Press and fix the
F(lazyback) on the
corresponding position on
the car body.
910
1. The installation and replacement of the batteries
in the remote control:
Direction for use
Use a screwdriver to remove the battery cover of the remote control, insert
two AAA 1.5V dry batteries in correct polarity. Close the battery cover and
fix it with the screw. (Battery replacement also according to the above steps)
1.All batteries should be inserted in the correct polarity.
2.Non-rechargeable battery cannot be recharged
3.Before charging, the rechargeable battery must be taken out from the toys.
4.Take out and properly deal with the dead battery. To avoid injury, please
keep kids away from the battery.
5.The direct contact between the positive and negative terminals may result
in fire or explosion. Avoid direct connect between the terminals.
6.Do not mix old and new batteries.DO not mix alkaline, standard(carbon-
zinc),or rechargeable(nickel-cadmium) batteries.
7.Only an adult who has read and understood the safety warnings can
recharge the battery.
+ A A A -
A A A DC1.5 V
+-
+ A A A -
M
N
E
Q
F
2.Matching the frequency of car and remote control
See more details of the remote control please refer to the outer packing
box of the remote control.
step7:Power
connection
1.Find the positive
polarity the red port), then (
Remove the plastic cover
from the red terminal
(attention: put it at the safe
place where far from the
children to prevent the risk of
asphyxiation) , Find the
positive electrode (the red
port showed by arrow in
figure), connect power port to
the red terminal.
2.Then install the seat.
positive polaritypositive polarity
red wire
black wire
red terminalred terminal
step6:Take off the
seat
use tool to remove screw
from seat, and take off the
seat. Take out the charger,
instruction book and
remote control(optional)
inside.

11 12
Mp3 multifuctional player (optional)
Music/horn buttons
Forward/backward switch
lighting switch
power switch
4.Operation guide for remote control (forward,
backward , speed control and lighting switch):
Remote control prior to manual control (the car will follow the instructions
from remote control when the remote control and manual control are both
in operation). Press forward key, car will move forward. Press backward
key, car will move backward. Press “P” key, the car will stop (at this time,
manual control function is invalid). Press “P” key again to lift the state of
emergency. The “S” key is speed control key, one light on represents a low
speed, two lights on represents an intermediate speed, three lights on
represents a high speed.
The switch of 1/0 is the light switch, turn the switch to “1” the lights on,
turn the switch to “0” the lights off.
5.Remote control in change direction:
Press Steer Left, the car will turn left; press steer right, the car will turn
right.
7.The usage of the music switch and the horn button
Press the music switch to play different music. Press the horn button
to play trumpet sound.
8.Instructions of the recoverable fuse
6.Instruction for MP3 multifunction player
a)The usage of button: button:short press to play the last
music,long press to decrease volume. button:short press to
play the next music,long press to increase volume. button:pause
button,in FM mode press this button will automatically search channel.
(MODE)button:mode switch button,can switch among USB,TF ,FM and
the conventional music mode.
b)Instruction for USB port:Plug USB into the USB port,the car will read and
play the music in USB.
c)Instruction for TF card slot:Plug TF card into the TF card slot,the car will
read and play the music in TF card.
d)Instruction for FM :Press MODE button switch mode to FM,the light of
FM will on.
Then press button,the car will automatically search channel and will
play the first channel after searching.Press button to play the
last channel,press to play the next channel.(the music switch
button has the same function)
Mp3 multifuctional player (optional)
Music/horn buttons
Forward/backward switch
High low speed switch
power switch
3.Operation guide for Manual control (forward,
backward and speed control):
After the driver is seated, press the power switch, the car will send out a
starting sound (2-5seconds). Put the Forward/Stop/Backward switch into
the position of “forward” (Press forward), the hi/lo speed switch into the
position of “low speed”, step on the foot switch the car will move forward
slowly, loosen the pedal the car will stop. Put the hi/lo speed switch into the
position of “high speed”, step on the foot switch the car will move forward
fast, loosen the pedal the car will stop. Put the Forward/Stop/Backward
switch into the position of “Backward”, step on the foot switch the car will
move backward fast, loosen the pedal the car will stop. Put the hi/lo speed
switch into the position of “low speed”, step on the foot switch the car will
move backward slowly, loosen the pedal the car will stop. Put the
Forward/Stop/Backward switch into the position of “stop”, the car can not
move forward and backward.
Resettable fuse: when
the current exceeds a certain rating,
the recoverable fuse will automatically
cut off the power supply for 5-
10seconds, then the current will be
resupplied.
Configuration A
Configuration B

14
9.Charging instructions.
1
2
5
4
13
3
Trouble elimination methods
The motor
does not
rotate
1. Is the fuse overloaded?
2. The pedal switch connector is
good?
3. The welding of motor electric
terminal is good?
4. The connector of the motor wire
is good?
5. Remove the motor's plug-in,
change to connect battery directly,
then check if it rotate or not.
1.Yes, the fuse cuts off the power
automatically by 5-20 seconds, then
restart; No, check next reason analysis
2.No, repair foot switch ; Yes, check next
reason analysis
3. No, weld the terminal wire ; Yes, check
next reason analysis
4.No, plug in the plug-in ; Yes, check next
reason analysis
5.Still no rotation, change the motor; If
rotates, it means driving circuit board
needs professional maintenance, please
contact with agent
Only move
frontwards,
or only move
backwards
1. Check the frontward/backward
switch, check the connector is
good or not by multimeter
2. Check the drive line cycle of
frontward/bckwards is workable or
not?
1.No, change the frontward /backward
switch;
Yes, check next reason analysis
2.No, connect the line; Yes, it means
driving circuit board needs professional
maintenance, please contact with agent
slow speed
1. Check the battery voltage is ok
or not.
2. Connect the motor (including
the driving gearbox) to the
battery, then check the speed can
be accelerated or not.
1.No, charger the battery ; Yes it's ok,
check next reason analysis
2. No, check next reason analysis ; Yes, it
means driving circuit board needs
professional maintenance, please
contact with agent
The battery
can not be
recharged
1. The battery connector fall off or
loosened.
2. The charger has a slight heat
when it is charged
1. Yes, reconnect it, No, check next
reason analysis
2.No, the charger is broken, replace it
When car is
moving, the
sound and
light are
useless
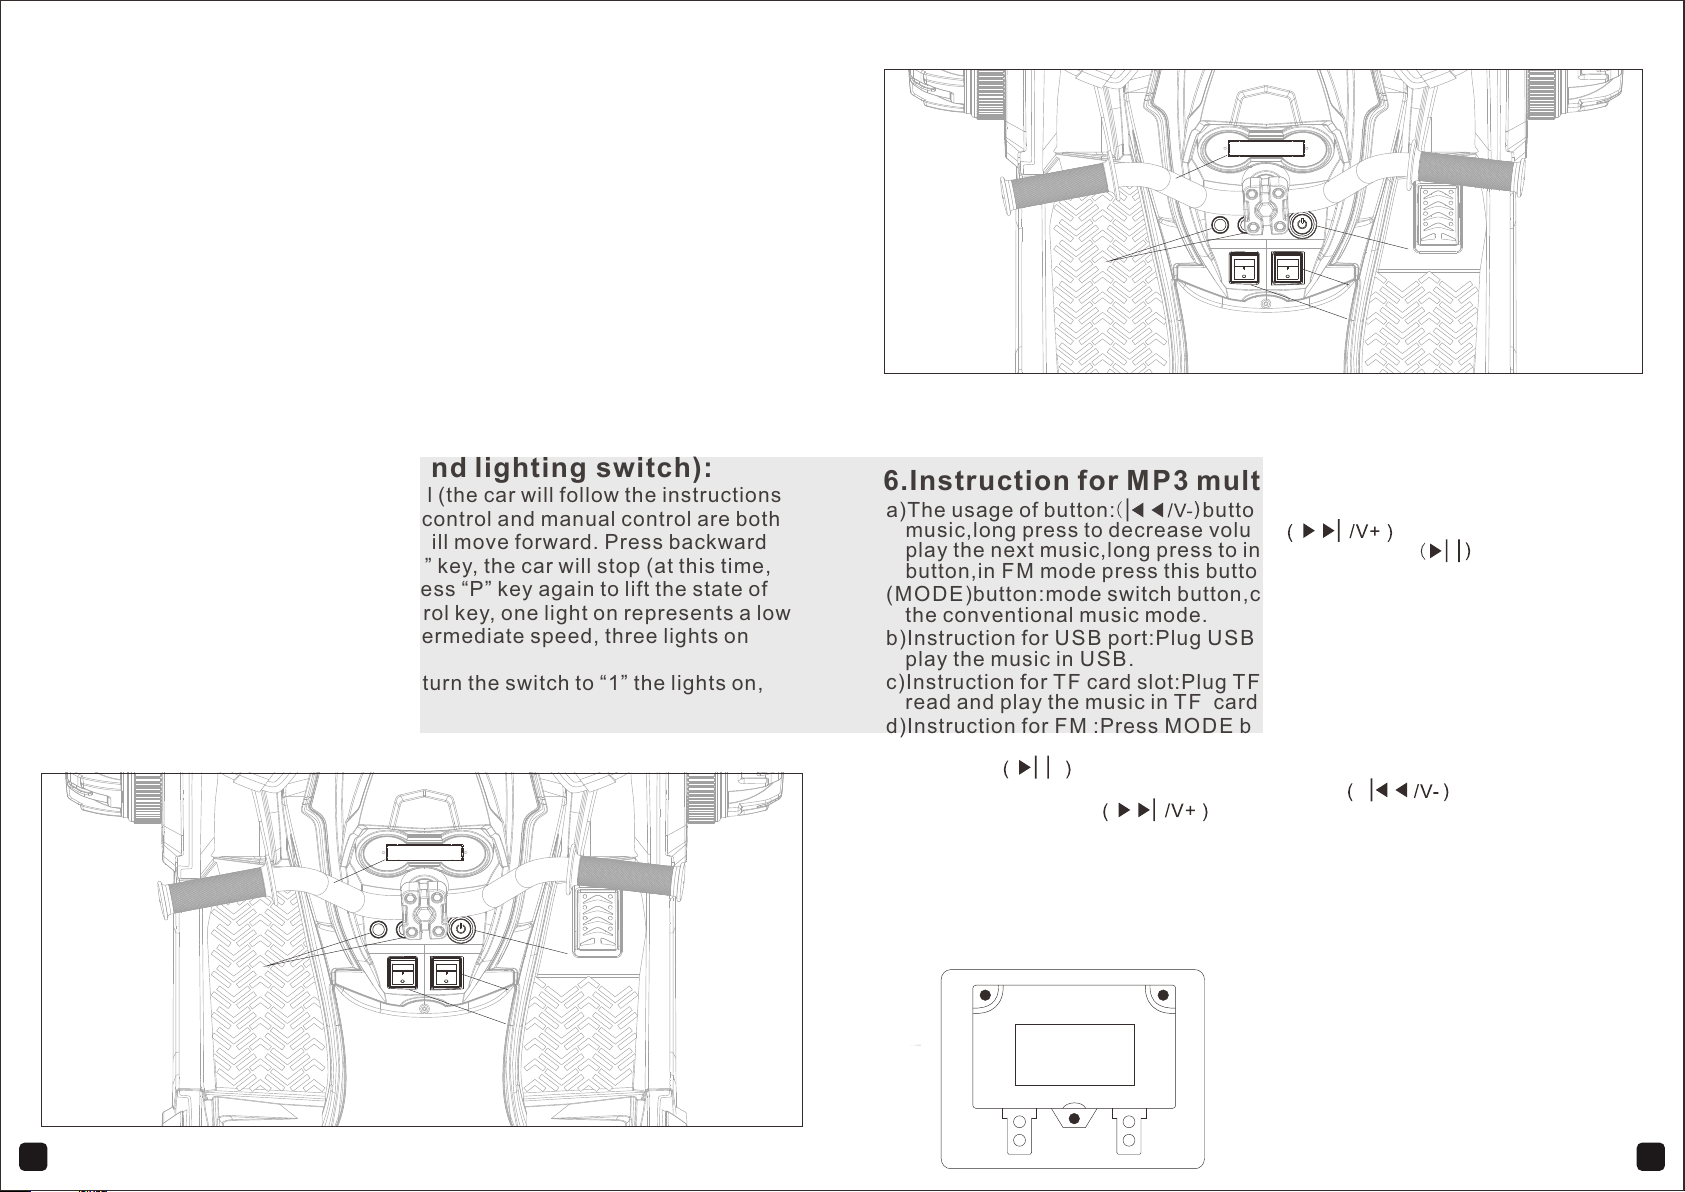
1. check the sound/light switch
is ok or not.
2. check the electric wire
connection (from battery to
headstock) is good or not?
1.No, replace the switch; Yes,
check next reason analysis
2. No, reconnect; Yes, check next
reason analysis
When wheel
running, the
car does not
move
1. check the driving wheel can
be rotated or not?
2. Check the gearbox, if any
gear is damaged?
1.Yes, lay the wheel to the ground; No,
checks the next reason analysis
2.Yes, replace the gear box; No,
checks the next reason analysis
Car is
unstable,
moving on
and off
1. Does the driver exceed the
maximum load weight?
2. Does the driver ride on the
rugged road?
3. Check the wheel can rotate
freely?
1.Yes, should follow the instruction, the
car unsuitable for exceed maxweight;
No, check the next reason analysis
2.Yes, should follow the instruction, ride
on the flat cement road ; No, check the
next reason analysis No,
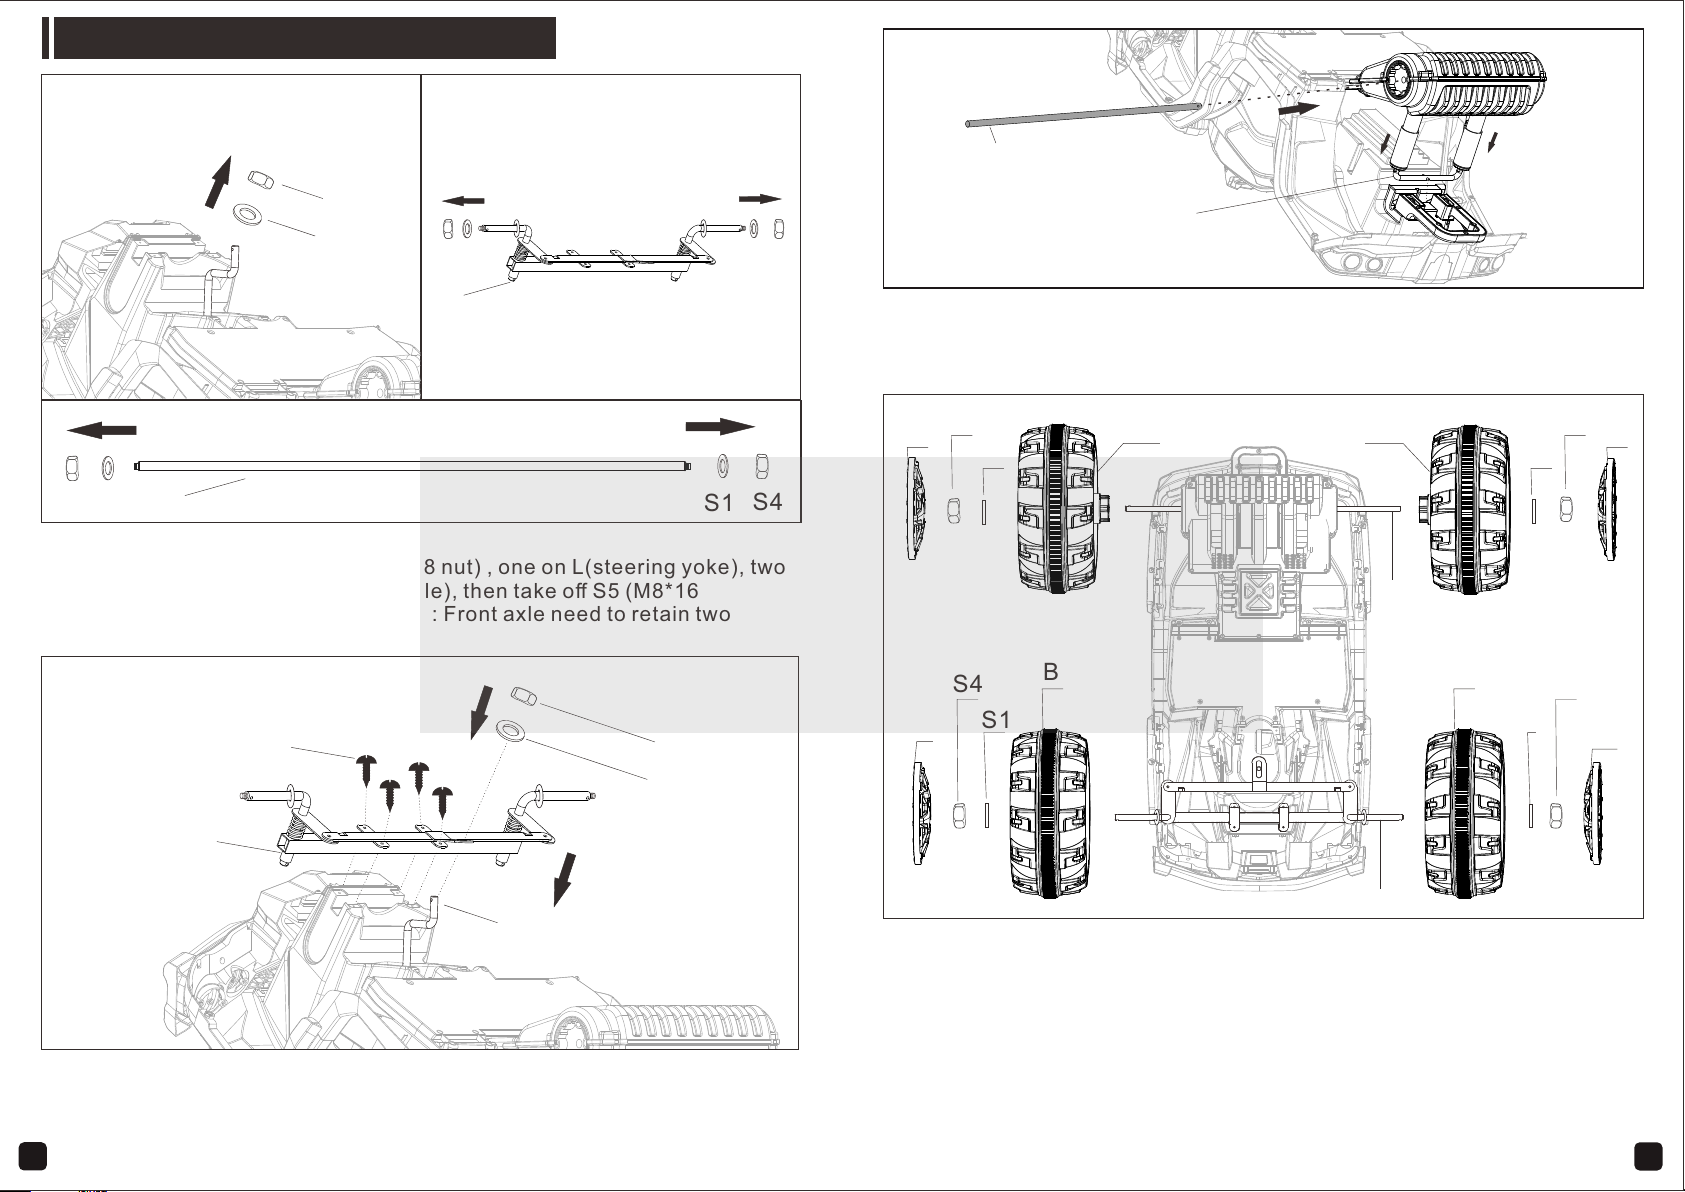
Troubleshooting wheel and axle
When battery power is low, please charge it immediately. The charging port
is under the seat. (Note: toys can not be operated in the charging state.
Toys should be recharged by adult) .
Table of contents