Tesla Model 3 User manual

MODEL 3
OWNER'S MANUAL
Software version: 2020.44
North America

SAFETY INFORMATION
The Model 3 Owner's Manual is available on the touchscreen. To view it, touch Controls > Service > Owner's Manual.
For detailed information about your Model 3, go to www.tesla.com, and log on to your Tesla Account, or sign up to get
an account.
If you have any questions or concerns about your Model 3, call 1-877-79TESLA (1-877-798-3752).
DOCUMENT APPLICABILITY
Features released in the most recent versions of software may not be described in this document but are described in
Release Notes. Display Release Notes on the touchscreen by touching the Tesla T at the top center of the touchscreen,
then touching the Release Notes link. If information provided in this document conflicts with information in the Release
Notes, the Release Notes take precedence. ILLUSTRATIONS The illustrations provided in this document are for
demonstration purposes only. Depending on vehicle options, software version and market region, the information
displayed on the touchscreen in your vehicle may appear slightly dierent.
PRODUCT SPECIFICATIONS
All specifications and descriptions contained in this document are verified to be accurate at the time of printing.
However, because continuous improvement is a goal at Tesla, we reserve the right to make product modifications at any
time. To communicate any inaccuracies or omissions in this document, please send an email to:
ownersmanualf[email protected]om.
© 2012-2020 TESLA, INC.
All information in this document and all vehicle software is subject to copyright and other intellectual property rights of
Tesla, Inc. and its licensors. This material may not be modified, reproduced or copied, in whole or in part, without the
prior written permission of Tesla, Inc. and its licensors. Additional information is available upon request. The following are
trademarks or registered trademarks of Tesla, Inc. in the United States and other countries:
TESLA, TESLA MOTORS, MODEL S, MODEL X, ROADSTER, MODEL 3, MODEL Y

Overview................................................................ 2
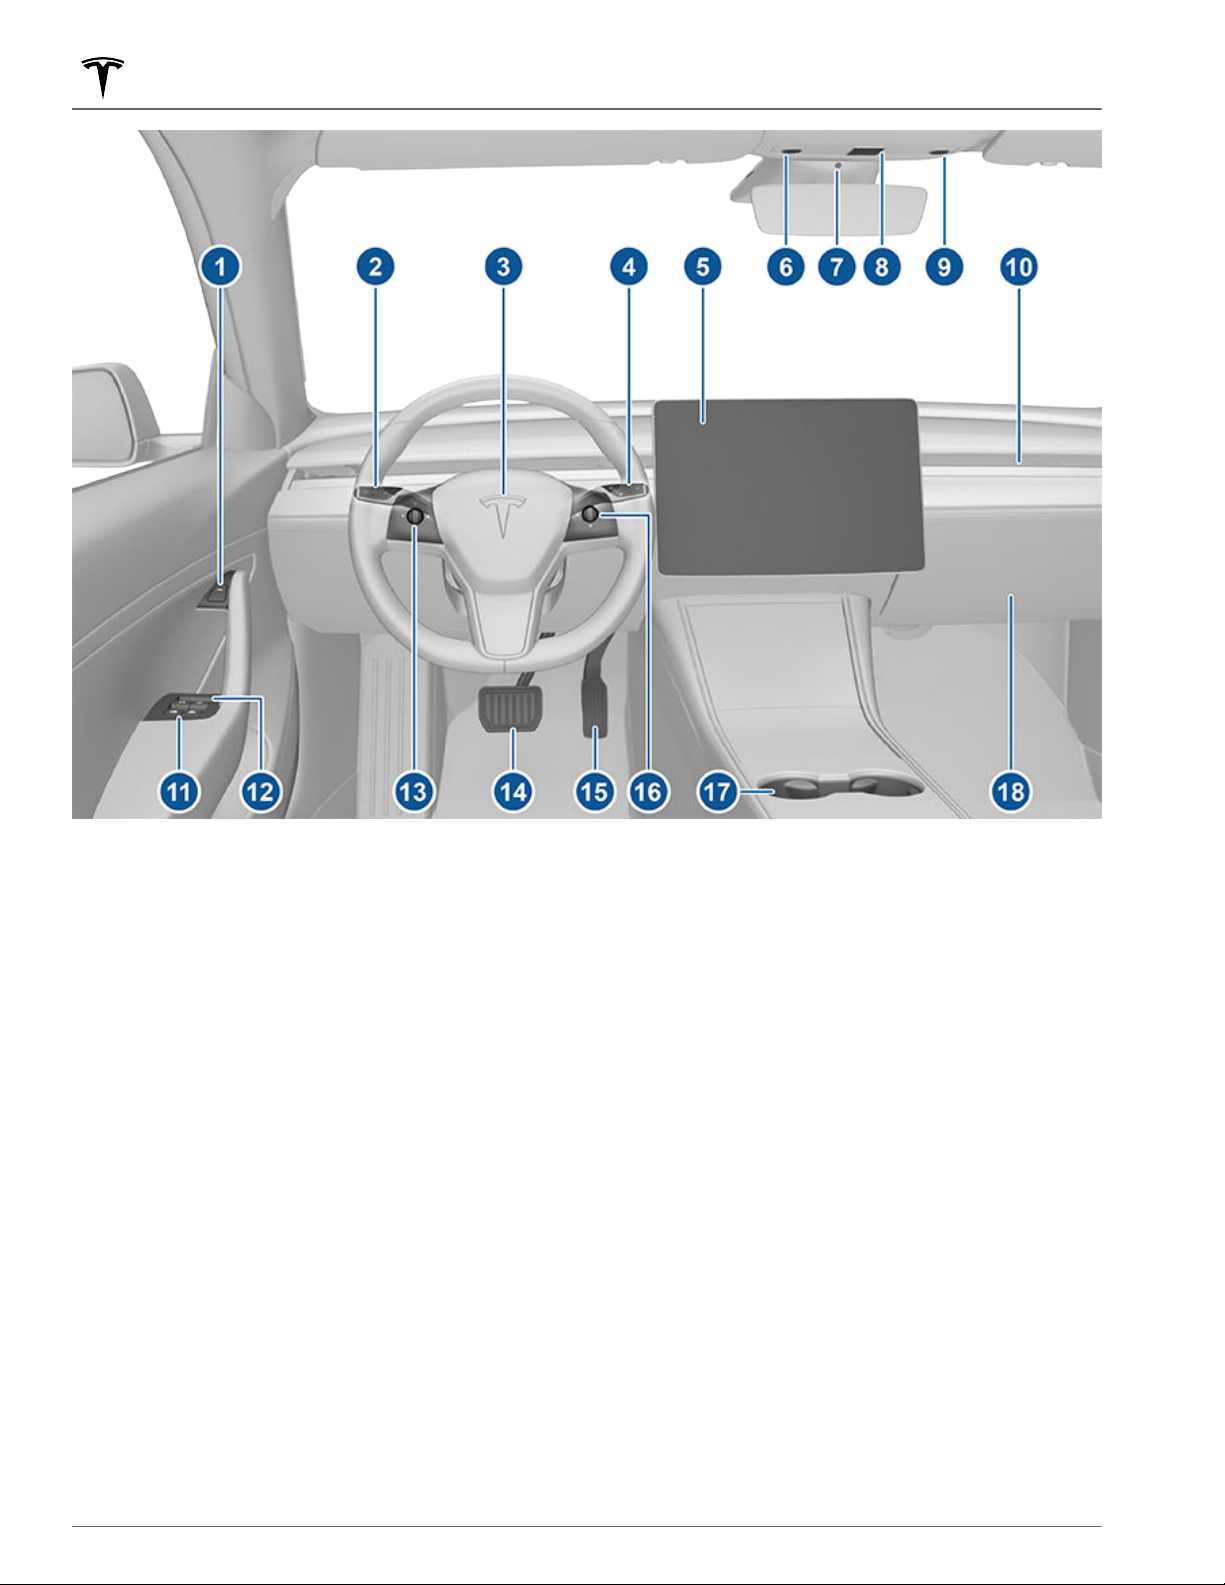
Interior Overview............................................................................. 2
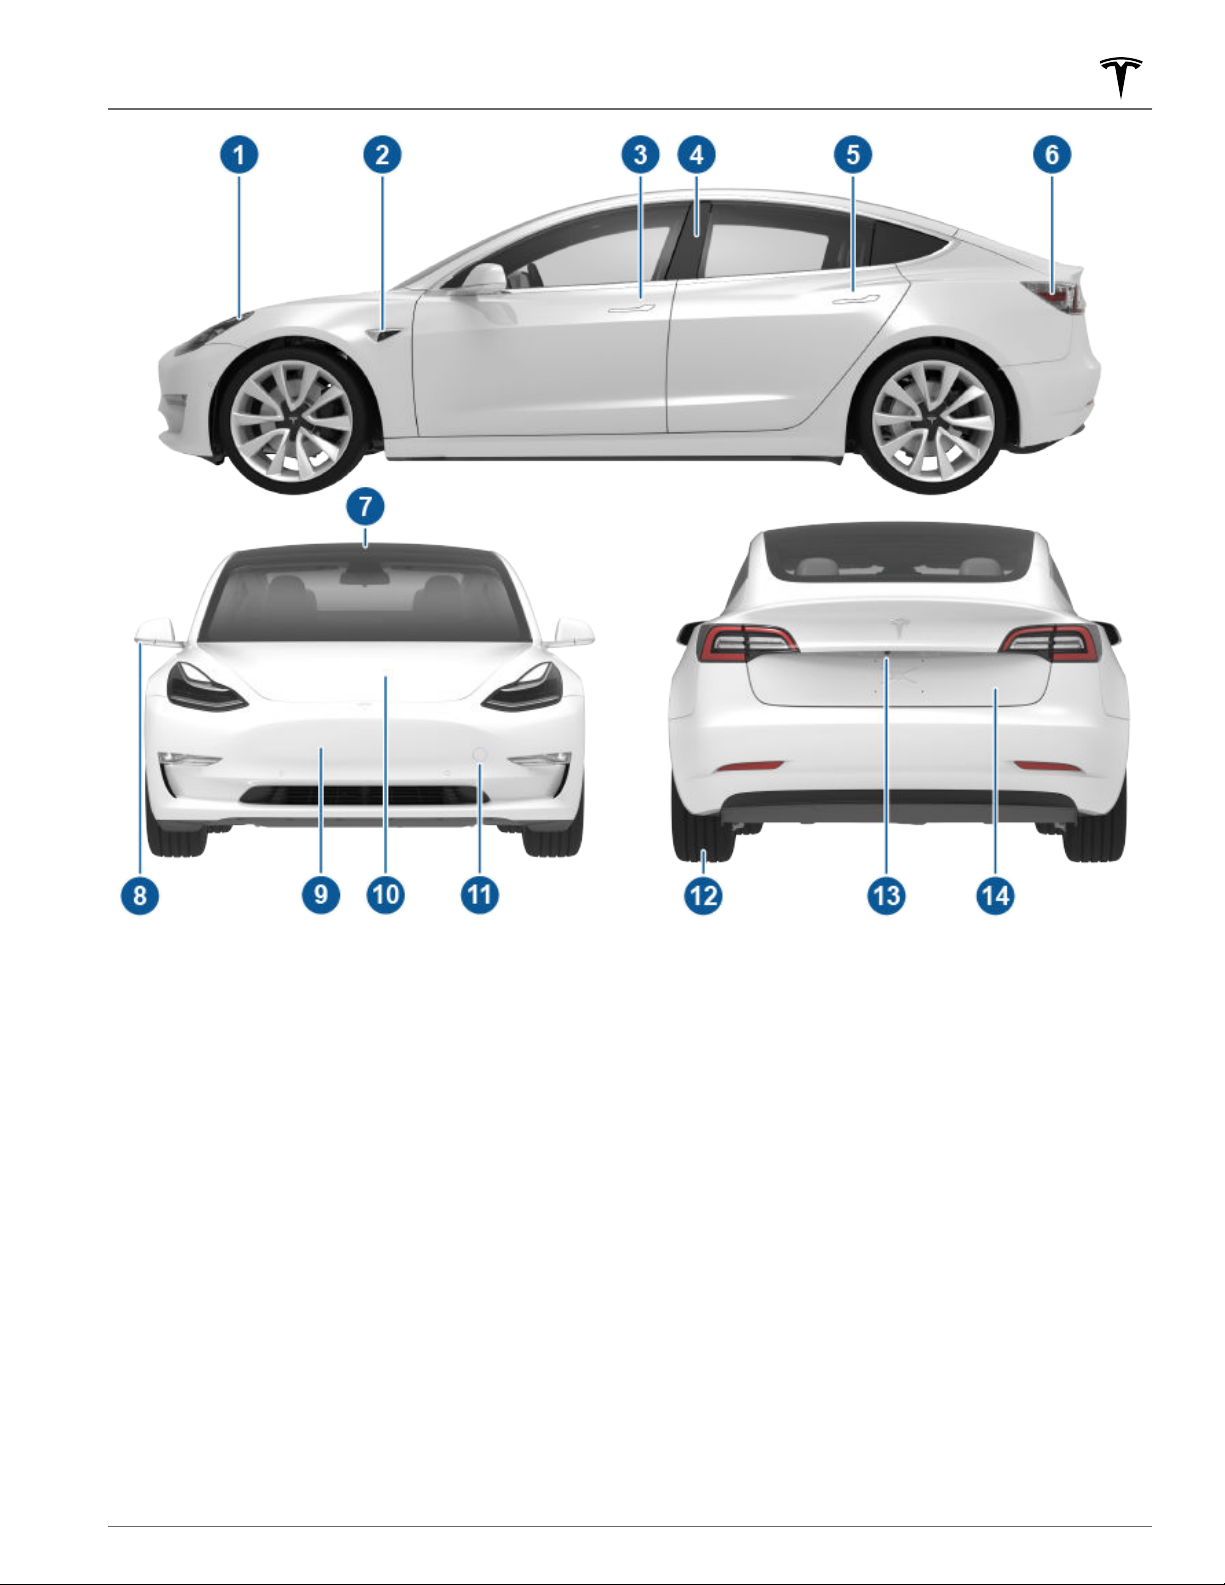
Exterior Overview............................................................................3
Touchscreen Overview.................................................................. 4
Opening and Closing.........................................8
Keys.......................................................................................................8
Doors...................................................................................................13
Windows............................................................................................15
Rear Trunk.........................................................................................16
Front Trunk....................................................................................... 18
Interior Storage and Electronics...............................................21
Seating and Safety Restraints..................... 25
Front and Rear Seats................................................................... 25
Seat Belts......................................................................................... 29
Child Safety Seats.........................................................................32
Airbags..............................................................................................38
Driving.................................................................. 45
Driver Profiles.................................................................................45
Steering Wheel.............................................................................. 47
Mirrors............................................................................................... 49
Starting and Powering O..........................................................51
Gears.................................................................................................. 53
Lights.................................................................................................54
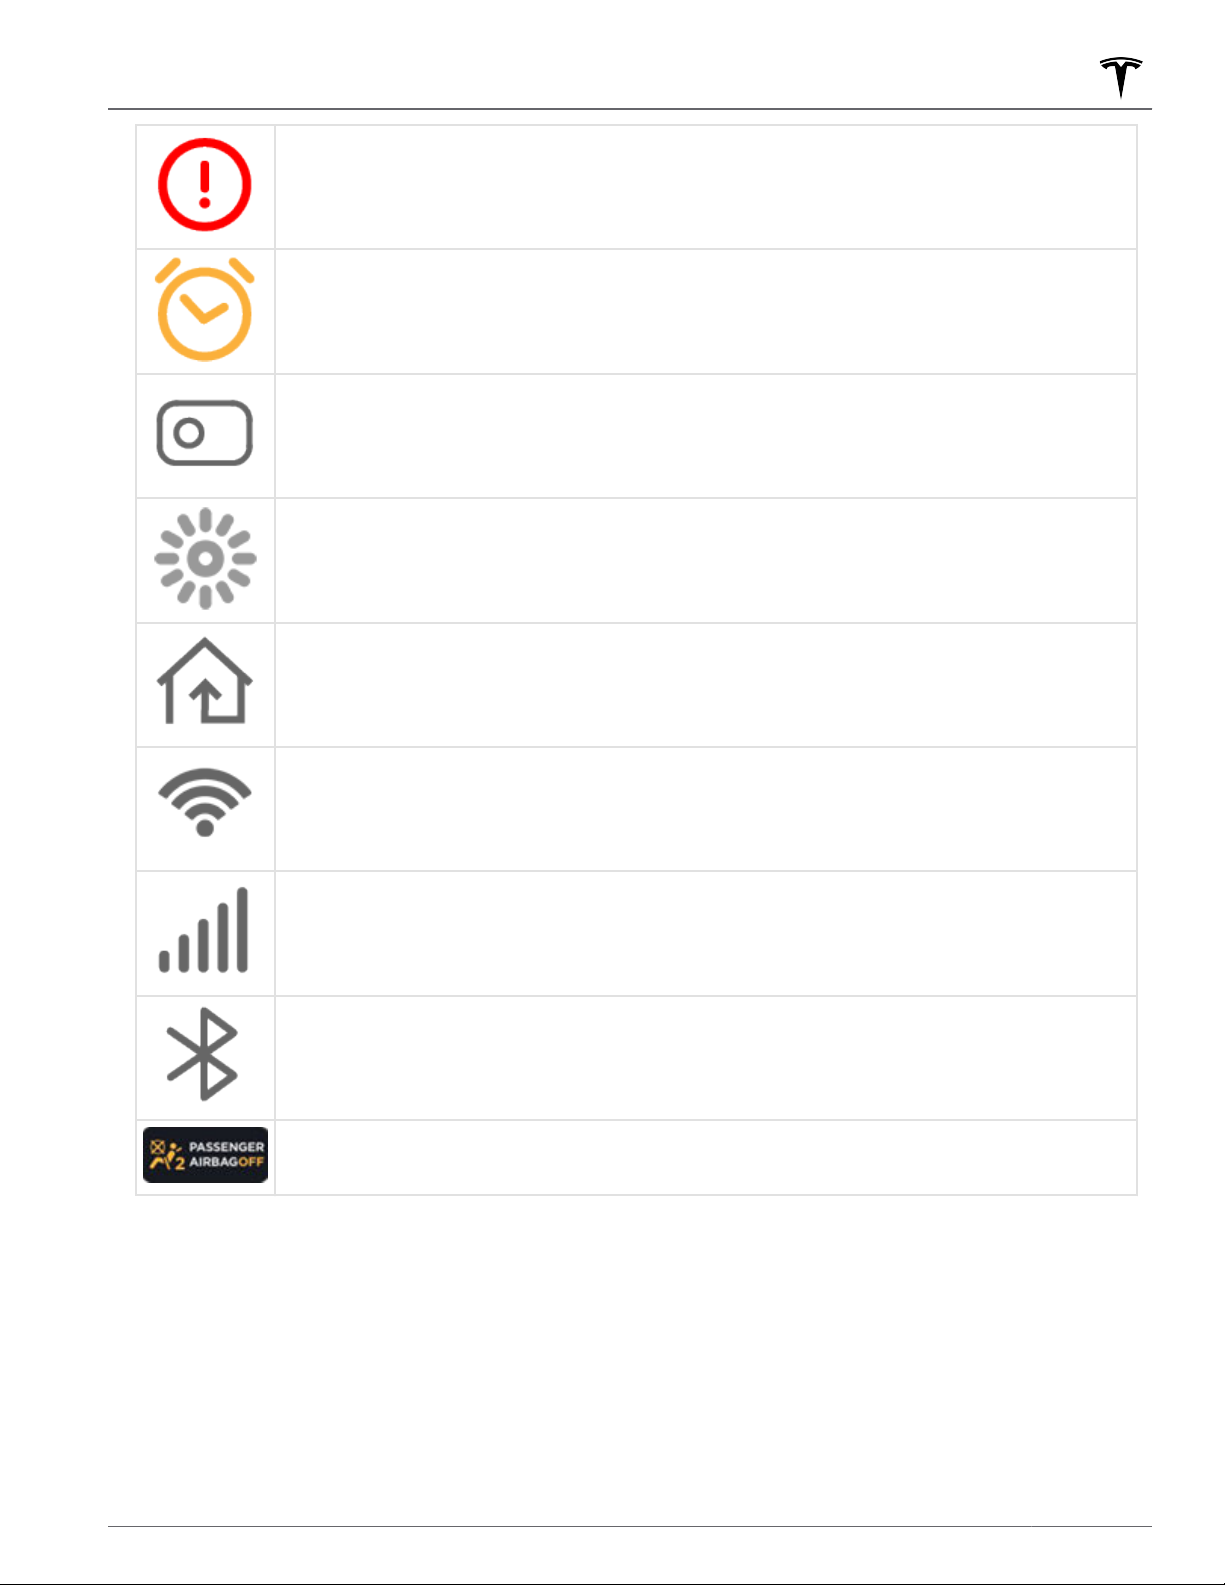
Car Status.........................................................................................57
Wipers and Washers....................................................................60
Braking and Stopping...................................................................61
Traction Control.............................................................................65
Park Assist....................................................................................... 66
Vehicle Hold.................................................................................... 68
Track Mode...................................................................................... 69
Getting Maximum Range.............................................................71
Rear View Camera........................................................................ 73
Dashcam...........................................................................................74
Pedestrian Warning System......................................................76
Cold Weather Best Practices.................................................... 77
Autopilot............................................................. 80
About Autopilot............................................................................ 80
Trac-Aware Cruise Control.................................................... 83
Autosteer..........................................................................................88
Navigate on Autopilot.................................................................92
Trac Light and Stop Sign Control....................................... 95
Autopark.........................................................................................102
Summon..........................................................................................104
Smart Summon............................................................................ 107
Lane Assist......................................................................................110
Collision Avoidance Assist.........................................................113
Speed Assist................................................................................... 116
Using the Touchscreen...................................118
Controls............................................................................................ 118
Climate Controls.......................................................................... 124
Maps and Navigation..................................................................129
Media and Audio..........................................................................134
Phone............................................................................................... 137
Calendar..........................................................................................139
Using Voice Commands............................................................140
Security Settings.......................................................................... 141
HomeLink Universal Transceiver............................................145
Connecting to Wi-Fi................................................................... 147
Software Updates........................................................................148
Mobile App.................................................................................... 150
Charging.............................................................153
Electric Vehicle Components.................................................. 153
Battery Information.................................................................... 155
Charging Instructions.................................................................156
Maintenance.......................................................161
Maintenance Schedule................................................................161
Tire Care and Maintenance...................................................... 163
Cleaning.......................................................................................... 169
Wiper Blades and Washer Jets.............................................. 172
Fluid Reservoirs............................................................................ 173
Jacking and Lifting......................................................................175
Parts and Accessories................................................................176
Specifications.................................................... 181
Identification Labels.................................................................... 181
Vehicle Loading............................................................................182
Dimensions and Weights..........................................................184
Subsystems....................................................................................186
Wheels and Tires..........................................................................188
Roadside Assistance......................................195
Contacting Tesla Roadside Assistance................................195
Instructions for Transporters...................................................196
Consumer Information..................................199
Easter Eggs....................................................................................199
About this Owner Information..............................................200
Disclaimers.....................................................................................201
Reporting Safety Defects........................................................203
Declarations of Conformity....................................................204
Troubleshooting Alerts............................................................ 206
Index................................................................... 225
Contents

1. Door open button (Opening Doors from the Interior on page 13)
2. Turn signal stalk (High Beam Headlights on page 55), Turn Signals on page 56, and Wipers and Washers on
page 60)
3. Horn (Horn on page 48)
4. Drive stalk (Shifting Gears on page 53, Trac-Aware Cruise Control on page 83, and Autosteer on page
88)
5. Touchscreen (Touchscreen Overview on page 4)
6. Driver dome light (Lights on page 54)
7. Cabin camera (Cabin Camera on page 23)
8. Hazard warning flashers (Hazard Warning Flashers on page 56)
9. Passenger dome light (Lights on page 54)
10. Climate control vent (see Climate Controls on page 124)
11. Power window switches (Windows on page 15)
12. Manual door release (Opening Doors from the Interior on page 13)
13. Left scroll button (Scroll Buttons on page 47)
14. Brake pedal (Braking and Stopping on page 61)
15. Accelerator pedal (Regenerative Braking on page 62)
16. Right scroll button (Scroll Buttons on page 47)
17. Center console (Interior Storage and Electronics on page 21)
18. Glovebox (Glovebox on page 21)
Interior Overview
2 MODEL 3 OWNER'S MANUAL

1. Exterior lights (Lights on page 54)
2. Autopilot camera (About Autopilot on page 80)
3. Front door handle (Using Exterior Door Handles on page 13)
4. Key card sensor (Keys on page 8), Autopilot camera (About Autopilot on page 80)
5. Rear door handle (Using Exterior Door Handles on page 13)
6. Charge port (Charging Instructions on page 156)
7. Autopilot cameras (About Autopilot on page 80)
8. Exterior mirrors (Mirrors on page 49)
9. Radar sensor (hidden from view) (About Autopilot on page 80)
10. Hood/front trunk (Front Trunk on page 18)
11. Tow eye cover (Instructions for Transporters on page 196)
12. Wheels and tires (Wheels and Tires on page 188)
13. Rear view camera (Rear View Camera on page 73)
14. Rear trunk (Rear Trunk on page 16)
Exterior Overview
3Overview

The features and information you need to drive Model 3 are displayed on the touchscreen. When driving, the
touchscreen displays driving-related information such as driving speed, vehicle range, warnings, etc. The
touchscreen is used to control many features that, in traditional cars, are controlled using physical buttons (for
example, adjusting mirrors). You can also use the touchscreen to customize Model 3 to suit your preferences.
WARNING: Always pay attention to road and trac conditions when driving. To minimize driver distraction
and ensure the safety of vehicle occupants as well as other road users, avoid using the touchscreen to adjust
settings while the vehicle is in motion.
NOTE: The image below is provided for demonstration purposes only. Depending on vehicle options, software
version and market region, your touchscreen may appear slightly dierent.
1. This area on the top of the touchscreen displays useful information and provides shortcuts to various features.
In addition to the time of day and the current outside temperature, this area displays the following icons:
Touch to lock/unlock all doors and trunks.
Access information about your Model 3. See The Tesla "T" on page 7.
Add, configure, or quickly switch driver profiles (including Valet Mode and Easy Entry). See
Driver Profiles on page 45.
Touchscreen Overview
4 MODEL 3 OWNER'S MANUAL

Displays when a notification is in eect. Touch to display information about the notification. To
display a list of the most recent notifications, with the most recent listed first, you can also
touch Service > Notifications. See Troubleshooting Alerts on page 206.
Displays when a software update is available (see Software Updates on page 148).
Displays when Dashcam is ready to be used (you have inserted a supported flash drive into the
USB port). Touch to operate Dashcam. When in Park, touch the Dashcam icon and select
"Launch Viewer" to watch your saved Dashcam and Sentry Mode clips (see Dashcam on page
74).
Touch to enable or disable Sentry Mode to actively monitor the vehicle's surroundings (see
Sentry Mode on page 141).
Control or program HomeLink devices (if equipped) (see HomeLink Universal Transceiver on
page 145).
Connected to a Wi-Fi network.
Connected to cellular network. Touch to connect to Wi-Fi (see Connecting to Wi-Fi on page
147).
Connect to a Bluetooth device (see Pairing a Bluetooth Phone on page 137).
Displays the status of the front passenger airbag (applicable only in regions where the airbag
can be disabled, as described in Airbags on page 38).
2. Car Status. This area dynamically displays the current status of Model 3 as you drive, park, open doors, turn lights
on, etc. Monitor this area when driving as it displays important information such as driving speed and warning
messages (see Car Status on page 57). When the car is in Park, you can open the trunks or charge port door.
3. Cards. This area automatically updates to display information such as incoming calls, seat belt reminders, current
state of the wipers, etc. It also provides easy access to the rear view camera (see Rear View Camera on page
73), charging status (see Charging Instructions on page 156), voice commands (see Using Voice Commands on
page 140), wiper controls (see Wipers on page 60), and seat belt reminders (see Seat Belt Reminders on page
29). Swipe to the right or left to access:
◦ Trips. You can display distance driven, energy usage and energy eciency starting at any time, or since Model
3 was last charged. You can also display this information for up to two trips. Touch ... in the top right corner of
a trip to rename or reset a trip.
Touchscreen Overview
5Overview

◦ Tire Pressures. Display tire pressures or view cautions or warnings related to pressures that are not within
acceptable limits (see Tire Care and Maintenance on page 163).
4. Controls. Touch to control features and customize Model 3 to suit your preferences (see Controls on page 118).
5. Media Player (see Media and Audio on page 134).
6. Touch the app launcher then choose from the following apps:
Call. See Phone on page 137.
Calendar. See Calendar on page 139.
Camera. Display the area behind Model 3. This area also displays automatically whenever you
shift into Reverse. See Rear View Camera on page 73.
Energy. See Getting Maximum Range on page 71.
Charging. See Charging Instructions on page 156.
Web. Access the Internet using the web browser (if equipped with premium connectivity).
Entertainment. Browse the full library of games and access video streaming services, all from
your vehicle's touchscreen. To launch, Model 3 must be in Park.
NOTE: Due to vehicle configuration or market region, Entertainment, Arcade, and/or Theater
may not be available on your vehicle.
Toybox. Display Easter Eggs (see Easter Eggs on page 199).
NOTE: Swiping up on the app launcher displays the most recently used app (provided an app is not currently
being displayed).
NOTE: Depending on the market region and vehicle options, your vehicle may not be equipped with some
features.
7. Climate Controls (see Climate Controls on page 124).
8. Volume Control (see Volume Control on page 134).
9. The map displays on the touchscreen at all times (see Maps and Navigation on page 129).
Touchscreen Overview
6 MODEL 3 OWNER'S MANUAL

NOTE: When you touch Controls, choose an app, or
expand Media Player, the window displays on top of
the map. To close the Controls window, touch
Controls again or touch the Xin the top corner of the
window. To close an app, touch the Xin the top
corner of the window. To close Media Player, drag it
all the way down to the bottom of the touchscreen or
touch the icon again.
The Tesla "T"
Touch the Tesla "T" at the top center of the touchscreen
as a one-touch shortcut to the Controls > Software tab,
which displays:
• Vehicle name (see Naming Your Vehicle on page
122).
• Vehicle configuration.
• Odometer.
• Vehicle Identification Number (VIN).
• Version of software currently installed on your Model
3.
• Access to release notes associated with the currently-
installed software version.
• Access to this owner's manual.
• One-touch access to call Tesla Customer Support and
Roadside Assistance (if available in your market
region).
Touchscreen Overview
7Overview

Three Types of Keys
Model 3 supports three types of keys:
• Authenticated phone - You can set up your personal
smartphone to communicate with Model 3 using
Bluetooth. Supports automatic locking and
unlocking as well as several other functions using the
Tesla mobile app.
• Key card - Tesla provides a key card that
communicates with Model 3 using short range radio-
frequency identification (RFID) signals. The key card
is used to "authenticate" your phone to work with
Model 3 and to add or remove other key cards,
phones, or key fobs. In situations where your
authenticated phone has a dead battery, or is lost or
stolen, use your key card to unlock, drive, and lock
Model 3.
• Key fob - The key fob allows you to press buttons to
open the front and rear trunks, and unlock, lock, and
drive Model 3. The key fob also supports automatic
locking and unlocking, if available in your region (see
Passive Key Fob on page 10). This is an accessory
sold separately.
Model 3 supports a total of 19 keys, which can include
authenticated phones, key cards, and up to four key
fobs.
CAUTION: Remember to bring a key with you
when you drive. Although you can drive Model 3
away from its key, you will be unable to power it
back on after it powers o.
Authenticated Phone
Using your phone is a convenient way to access your
Model 3. As you approach, your phone's Bluetooth
signal is detected and doors unlock when you press a
door handle. Likewise, when you exit and walk away
with the phone, doors automatically lock (provided the
Walk-Away Door Lock feature is turned on, as
described in Walk-Away Door Lock on page 14).
Before you can use a phone to access Model 3, follow
these steps to authenticate it:
1. Download the Tesla mobile app to your phone.
2. Log into the Tesla mobile app using your Tesla
Account user name and password.
NOTE: You must remain logged in to your Tesla
Account to use your phone to access Model 3.
3. Ensure that your phone's Bluetooth settings are
turned on.
You must have your phone's Bluetooth setting
turned on AND you must also ensure that Bluetooth
is turned on within your phone's global settings for
the Tesla mobile app. For example, on your phone,
navigate to Settings, choose the Tesla mobile app,
and ensure the Bluetooth setting is enabled.
NOTE: Model 3 communicates with your phone
using Bluetooth. To authenticate your phone or use
it as a key, the phone must be powered on and
Bluetooth must be enabled. Keep in mind that your
phone must have enough battery power to run
Bluetooth and that many phones disable Bluetooth
when the battery is low.
4. Ensure that Allow Mobile Access (Controls > Safety
& Security > Allow Mobile Access) is enabled.
5. In the Tesla mobile app, touch PHONE KEY then
touch START to search for your Model 3.
When your Model 3 is detected, the mobile app asks
you to tap your key card.
6. Tap the key card against the Model 3 card reader on
the door pillar or center console (see Key Card on
page 9).
When Model 3 detects your key card, the mobile app
confirms that your phone has been successfully
authenticated. Touch DONE.
If the key card is not successfully scanned within
approximately two minutes, the mobile app displays an
error message. Touch PHONE KEY on the app again to
retry.
To view a list of keys that can currently access Model 3,
or to remove a phone, touch Controls > Locks (see
Managing Keys on page 11).
NOTE: Authenticating your phone allows you to use it
as a key to access Model 3. To use the phone hands-
free, access your phone's contacts, play media from it,
etc., you must also pair and connect to it using the
Bluetooth settings (see Phone on page 137).
NOTE: Model 3 can connect to three phones
simultaneously. Therefore, if more than one phone is
detected and you want to use, or authenticate, a
dierent phone, move the other connected phone(s)
out of range or turn o its Bluetooth setting.
NOTE: Unlike the mobile app, once a phone has been
authenticated, it no longer requires an internet
connection to communicate with Model 3.
Authenticated phones communicate with Model 3 using
Bluetooth.
NOTE: Although Bluetooth typically communicates over
distances of up to approximately 30 feet (9 meters),
performance can vary based on the phone you are
using, environmental interference, etc.
Keys
8 MODEL 3 OWNER'S MANUAL

NOTE: If multiple vehicles are linked to the Tesla
Account, you must switch the mobile app to the vehicle
that you want to access before you can use the phone as
a key.
Key Card
Tesla provides you with two Model 3 key cards, designed
to fit in your wallet. Tap your Model 3 key card on one of
its card readers, located on the driver's side door pillar
and on the center console.
To use a key card to unlock or lock Model 3, position the
card as shown and tap it against the card reader located
just below the Autopilot camera on the driver's side
door pillar. When Model 3 detects the key card, the
exterior lights flash, the mirrors unfold or fold (if Fold
Mirrors is on), the horn sounds (if Lock Sound
Confirmation is on), and the doors unlock or lock.
NOTE: You may need to physically touch the center
console or driver's side door pillar with the key card, and
you may need to hold it against the transmitter for one
or two seconds.
Once inside, power up Model 3 by pressing the brake
pedal within two minutes of scanning the key card (see
Starting and Powering O on page 51). If you wait
longer than two minutes, you must re-authenticate by
placing the key card near the card reader located behind
the cup holders on the center console. When your key
card is detected, your two minute authentication period
restarts.
NOTE: Walk-Away Door Lock operates only when using
an authenticated phone or passive key fob. When you
walk away from Model 3 carrying your key card, Model 3
does not automatically unlock/lock, even if this feature
is turned on (see Walk-Away Door Lock on page 14).
CAUTION: Always carry your key card with you in
your purse or wallet to use as a backup in case
your authenticated phone has a dead battery, or is
lost or stolen.
Key fob
If you have purchased the key fob accessory (available
for purchase from Tesla stores or online at http://
www.tesla.com/shop), you can quickly familiarize
yourself with this key by thinking of it as a miniature
version of Model 3, with the Tesla badge representing
the front. The key has three buttons that feel like softer
areas on the surface.
1. Front trunk - Double-click to open the front trunk.
Keys
9Opening and Closing

2. Lock/Unlock All - Single-click to lock doors and
trunks (all doors and trunks must be closed).
Double-click to unlock doors and trunks.
3. Rear trunk - Double-click to open the rear trunk.
Hold down for one to two seconds to open the
charge port door.
Once inside, power up Model 3 by pressing the brake
pedal within two minutes of pressing the unlock button
on the key fob (see Starting and Powering O on page
51). If you wait longer than two minutes, you must
press the unlock button again, or place the key fob near
the card reader located behind the cup holders on the
center console. When your key fob is detected, the two
minute authentication period restarts.
When approaching or leaving Model 3 carrying the key
fob, you do not need to point the key fob at Model 3 as
you press a button, but you must be within operating
range.
Radio equipment on a similar frequency can aect the
key. If this happens, move the key at least one foot
(30 cm) away from other electronic devices (phone,
laptop, etc.).
If the key fob does not work (for example, its battery is
dead), you can touch its flat side against the card
reader on the driver's side door pillar (like the key card).
Instructions for changing the battery are provided in
Replacing the Key Fob Battery on page 10.
NOTE: You can use the same key fob with multiple
Model 3 vehicles provided you authenticate it (see
Managing Keys on page 11). However, key fob works
with only one Model 3 at a time. Therefore, to use a key
fob for a dierent Model 3, touch its flat side against
the card reader on the driver's side door pillar.
NOTE: Model 3 supports up to four dierent key fobs.
CAUTION: Protect the key from impact, high
temperatures, and damage from liquids. Avoid
contact with solvents, waxes and abrasive
cleaners.
Passive Key Fob
Due market region or vehicle configuration, Passive Key
Fob may not be available for your vehicle.
Locking and unlocking Model 3 with your key fob is
conveniently hands-free. Although you must be
carrying a paired key fob, there is no need to use it.
Model 3 has sensors around the vehicle that can
recognize the presence of a key fob within a range of
approximately three feet (one meter). Therefore, you
can keep your key fob in your pocket or purse and
simply pull on the door handle to unlock. When
carrying your key fob with you, you can also open the
trunk without having to use the key by pressing the
trunk's exterior door handle. If Walk-Away Lock is on,
your vehicle automatically locks when you exit and
senses that the key fob is no longer in range (see Walk-
Away Door Lock on page 14). Passive key fob is
automatically enabled when you pair your key fob to
your vehicle.
The key fob can only be paired to one vehicle at a time.
If you want your key fob to passively lock and unlock
for a dierent vehicle, touch the flat side of the key fob
onto the driver's side door pillar or center console card
reader. You only need to do this once to pair it to your
desired vehicle. You must pair your key fob every time
you use it with a dierent vehicle.
NOTE: Only key fobs with the TESLA logo printed on
the flat side have the passive locking and unlocking
functionality. Key fobs with the MODEL 3 logo printed
on the flat side cannot passively lock and unlock your
vehicle.
NOTE: For increased security, your key fob disables
itself after five minutes of being stationary while in
range but the vehicle is not in use. The vehicle will not
lock or unlock passively when this occurs. Shake or
press a button on your key fob to wake it up.
Replacing the Key Fob Battery
Under normal use, the accessory key fob (available at
https://shop.tesla.com) has a battery that lasts for up
to five years, depending on key fob version and
selected vehicle settings. When the battery is low, a
message displays on the touchscreen.
To replace the key fob battery:
1. With the key fob placed button side down on a soft
surface, release the bottom cover.
2. Remove the battery by lifting it away from the
retaining clips.
Keys
10 MODEL 3 OWNER'S MANUAL

3. While avoiding touching the battery's flat surfaces,
insert the new battery (type CR2032) with the ‘+’
side facing up.
NOTE: CR2032 batteries can be purchased through
online retailers, local supermarkets, and drug stores.
4. Holding the bottom cover at an angle, align the tabs
on the cover with the corresponding slots on the key
fob, then press the cover firmly onto the key fob until
it snaps into place.
5. Test that the key fob works by unlocking and locking
your vehicle.
Attaching a Lanyard
To attach a lanyard, release the bottom cover as
described above. Place the lanyard over the pin located
between the slots on the widest side of the key fob. Re-
align the cover and snap into place.
Managing Keys
To display a list of all keys (phones, key cards, and key
fobs) that can access your Model 3, touch Controls >
Locks. An icon displays next to each key to indicate
whether the key is a phone, key card, or key fob. Use this
list to manage keys that have access to your vehicle. To
add or delete keys, see Adding and Removing Keys on
page 11.
NOTE: You can use the same key for more than one
Model 3. This prevents you from having to deal with
multiple keys when you switch vehicles. If you customize
the name of an authenticated key card or key fob on one
Model 3 (by touching the pencil icon), any other Model 3
to which the key card or key fob is authenticated also
displays the same customized name.
NOTE: Model 3 supports up to 19 keys. When you reach
this limit, you must delete a key before adding a new
one.
Adding and Removing Keys
Adding a new key card or key fob:
NOTE: If adding a key fob, ensure the key fob is at room
temperature. Pairing may be unsuccessful if the key fob
is cold.
1. On the touchscreen, touch Controls > Locks then
touch +in the Keys section.
2. Scan your new key card or key fob on the key reader
behind the cup holders on the top of the center
console. After the new key card or key fob is
recognized, remove it from the key reader.
3. Scan an already-authenticated (i.e. already has access
to the vehicle) key card or key fob on the key reader
behind the cup holders on the top of the center
console.
4. When complete, the key list on the touchscreen
displays the newly-authenticated key. You can
customize its name by touching the associated pencil
icon.
Adding a new phone key:
NOTE: To add a new phone key, Bluetooth must be
enabled and the phone must have the Tesla mobile app
installed and connected to the vehicle’s Tesla account.
1. While sitting in the vehicle, open the Tesla mobile app
and select the appropriate vehicle (if there are
multiple vehicles associated with the account), then
touch Phone Key > Start.
2. Scan an already-authenticated key card or key fob on
the key reader behind the cup holders on the top of
the center console.
3. When the mobile app notifies you that the pairing
was successful, touch Done. The key list on the
touchscreen (Controls > Locks) displays the new
phone key. The name of the phone key is determined
by the name used in the phone’s settings.
Removing a key:
When you no longer want a key to access your vehicle
(for example, you lost your phone or key card, etc.), you
can remove the key.
1. On the touchscreen, touch Controls > Locks.
2. Find the key that you would like to delete in the key
list, then touch the key’s associated trash icon.
3. When prompted, scan an already-authenticated key
card or key fob on the key reader behind the cup
holders on the top of the center console to confirm
the deletion. When complete, the key list no longer
includes the deleted key.
Keys
11Opening and Closing

NOTE: Your vehicle requires at least one authenticated
key card or key fob at all times. If only one key card is
included on the key list, this key cannot be deleted.
Keys
12 MODEL 3 OWNER'S MANUAL

Keyless Locking and Unlocking
Locking and unlocking Model 3 is easy and convenient.
Just carry your authenticated phone or paired key fob
with you. Model 3 recognizes the presence of an
authenticated phone or paired key fob and
automatically unlocks when you press a door handle,
and locks when you leave (see Walk-Away Door Lock
on page 14).
NOTE: If you don't have your authenticated phone or
paired key fob with you (or if the phone's battery is
dead or its Bluetooth setting is turned o), place the
key card against the driver's side door pillar to manually
unlock or lock Model 3 (see Keys on page 8).
NOTE: Due to market region or vehicle configuration, an
authenticated phone or Passive Key Fob may not be
available for your vehicle.
NOTE: Your key fob (https://shop.tesla.com) also allows
you to press buttons to lock and unlock Model 3.
NOTE: Walk-Away Door Lock operates only when using
an authenticated phone or paired key fob. When you
walk away from Model 3 carrying a key card or unpaired
key fob accessory, Model 3 does not automatically
unlock/lock, even if this feature is turned on (see Walk-
Away Door Lock on page 14).
NOTE: Accessory key fobs manufactured before
approximately October, 2019 are not equipped with
passive functionality.
Using Exterior Door Handles
Use your thumb to push the wide part of the door
handle. The handle pivots toward you, and you can
open the door by pulling the handle or pulling the edge
of the door.
The handle retracts automatically.
When a door or trunk is open, the
touchscreen displays the Door Open
indicator light.
NOTE: See Cold Weather Best Practices on page 77
to ensure the vehicle's door handles function properly
in cold weather.
Opening Doors from the Interior
Model 3 doors are electrically powered. To open a door
while sitting inside, press the button located at the top
of the interior door handle and push the door open.
NOTE: To prevent children from opening the rear doors,
turn on child-protection locks (see Child-Protection
Lock on page 14).
In the unlikely situation that Model 3 has no power,
these electrically powered buttons at the top of the
door handles no longer work. Instead, pull up the
manual door release located in front of the window
switches on the front doors.
To open a front door when Model 3 has no power, pull
up the manual door release located in front of the
window switches.
Doors
13Opening and Closing

NOTE: Only the front doors are equipped with a manual
door release.
CAUTION: Manual door releases are designed to
be used only in situations when Model 3 has no
power. Whenever Model 3 has power, use the
button located at the top of the interior door
handle.
Interior Locking and Unlocking
While sitting inside Model 3, you can lock and unlock all
doors and trunks by touching the lock icon on the
touchscreen.
The icon changes to indicate whether
doors are locked or unlocked.
You can also unlock the doors by pressing the Park
button on the end of the drive stalk a second time.
Pressing this button once engages the Park gear and
pressing it again unlocks the doors.
Walk-Away Door Lock
Doors and trunks can automatically lock whenever you
walk away carrying your authenticated phone or paired
key fob (if ordered after approximately October 1,
2019). To turn this feature on or o, touch Controls >
Locks > Walk-Away Door Lock.
When the doors lock, the exterior lights flash once and
the mirrors fold (if Fold Mirrors is on). To also hear a
confirmation sound whenever Model 3 locks, touch
Controls > Locks > Lock Confirmation Sound > ON.
Model 3 does not automatically lock if:
• You check the Exclude Home checkbox and Model 3
is parked at the location you have designated as
Home. For details on how to designate a location as
Home, see Recent, Favorite, Home and Work
Destinations on page 132.
• An authenticated phone or paired key fob is
detected inside Model 3.
• You are not using an authenticated phone or paired
key fob as the key, and walk away carrying the key
card or unpaired key fob (see Passive Key Fob on
page 10). When using the key card you must
manually lock Model 3 by tapping the key card
against the door pillar. When using an unpaired key
fob (sold as an accessory), you must manually lock
Model 3 by pressing the lock button. See Keys on
page 8.
• A door or trunk is not fully closed.
• The phone's Bluetooth setting is turned o.
NOTE: If all doors are closed and Model 3 was
automatically unlocked by your authenticated phone or
paired key fob, walk-away locking is temporarily
suspended for one minute. If you open a door within
this minute, it will not re-lock until all the doors are
closed and you have walked away with the
authenticated phone or paired key fob.
NOTE: If Model 3 detects an authenticated key for five
minutes after you exit the vehicle and close all doors,
Walk-Away Lock disables and doors do not lock when
you walk away. In this case, you must manually lock
your vehicle until after your next drive.
Drive Away Locking
Model 3 automatically locks all doors (including the
trunks) whenever your driving speed exceeds 5 mph
(8 km/h).
Child-Protection Lock
Model 3 has child-protection locks on the rear doors to
prevent them from being opened using the interior
release buttons. On the touchscreen, touch Controls >
Locks > Child Lock.
NOTE: It is recommended that you turn child-protection
locks on whenever children are seated in the rear seats.
Unlock on Park
When you stop Model 3 and engage the Park gear, you
can choose to unlock all doors. To turn this feature on
or o, touch Controls > Locks > Unlock on Park.
NOTE: If set to OFF, you can unlock all doors by
pressing the Park button a second time after engaging
the Park gear.
Doors
14 MODEL 3 OWNER'S MANUAL

Opening and Closing
Press down on a switch to lower the associated window.
Window switches operate at two levels:
• To lower a window fully, press the switch all the way
down and immediately release.
• To lower a window partially, press the switch gently
and release when the window is where you want it.
Similarly, pull a switch to raise the associated window:
• To raise a window fully, pull the switch all the way up
and immediately release.
• To raise a window partially, pull the switch gently
and release when the window is where you want it.
NOTE: See Cold Weather Best Practices on page 77
for information on preparing windows for cold weather.
CAUTION: When exiting the vehicle, be careful
not to unintentionally press the window switches,
as they may lower the windows on the driver or
other doors.
CAUTION: Closing the door while the window is
fully raised (for example, if manually raised) can
damage the windows or the vehicle. Ensure the
window is slightly lowered before closing the
door.
WARNING: Before closing a window, it is the
driver’s responsibility to ensure that all occupants,
especially children, do not have any body parts
extended through the window’s opening. Failure
to do so can cause serious injury.
Locking Rear Windows
To prevent passengers from using the rear window
switches, touch Controls > Quick Controls > Window
Lock. To unlock the rear windows, touch Window Lock
again.
WARNING: To ensure safety, it is recommended
that you lock the rear window switches whenever
children are seated in the rear seats.
WARNING: Never leave children unattended in
Model 3.
Calibrating Windows
In the unlikely event that a window behaves
unexpectedly (touches the bright molding, fails to open
or close properly, goes down more than normal when
the door opens, etc.), you can calibrate it to potentially
fix the issue.
To calibrate a window:
1. Close the door with the aected window.
2. Sit in the driver's seat and close the driver door.
3. Use the driver window switch to raise the aected
window until it stalls.
4. Use the driver window switch to lower the aected
window until it stalls.
5. Use the driver window switch to raise the aected
window until it stalls.
The window should now be calibrated. If the issue
continues after attempting the calibration procedure a
couple times, contact Tesla.
Windows
15Opening and Closing

Opening
To open the rear trunk, ensure the vehicle is in Park,
then do one of the following:
• Touch the associated OPEN button on the
touchscreen.
• Double-click the rear trunk button on the key fob
accessory.
• Touch the rear trunk button on the mobile app.
• With Model 3 unlocked, press the switch located
under the rear trunk's exterior handle.
When a door or the rear trunk is open,
the touchscreen displays the Door Open
indicator light. The image of your Model
3 on the touchscreen also displays the
open trunk.
WARNING: Before opening or closing the rear
trunk, it is important to check that the area
around the trunk is free of obstacles (people and
objects).
To open the rear trunk from inside Model 3 in the
unlikely situation that Model 3 has no power, see
Interior Emergency Trunk Release on page 17.
Load Limits
Secure all cargo before moving Model 3, and place
heavy cargo in the lower trunk compartment.
CAUTION: To avoid damage, never load more
than 130 lbs (60 kg) on the rear load floor (above
the lower trunk compartment), or more than 285
lbs (130 kg) in the large lower trunk compartment.
Doing so can cause damage.
Closing
To close the rear trunk, push it downward until you hear
the latch click into place. Model 3 is equipped with pull
cups to assist with lowering the rear trunk.
WARNING: Before driving, ensure that the trunk is
securely latched in the fully-closed position by
lifting up on the bottom edge and confirming
there is no movement.
Accessing the Cargo Area
To access the cargo area inside the rear trunk, pull up
the strap at the rear of the cargo cover. You can then
fold the cargo cover forward or remove it from Model 3.
CAUTION: Never load more than 130 lbs (60 kg)
on the rear load floor (above the lower trunk
compartment) or more than 285 lbs (130 kg) in
the lower trunk compartment. Doing so can cause
damage.
Rear Trunk
16 MODEL 3 OWNER'S MANUAL

Interior Emergency Trunk Release
An illuminated mechanical release located inside the
rear trunk allows you to open the rear trunk from the
inside if Model 3 has no electrical power. This mechanical
release also allows a person locked inside to get out.
1. Firmly push the illuminated button in the direction of
the arrow to release the latch.
2. Push the rear trunk open.
NOTE: The button glows for several hours after a brief
exposure to ambient light.
WARNING: Do not allow children to play inside the
trunk or become locked inside. An unrestrained
child could suer serious injury or death in a crash.
A child could suer heat exhaustion if trapped in
the vehicle, especially without climate control on.
Rear Trunk
17Opening and Closing

Opening
To open the front trunk:
1. Ensure that the area around the hood is free of
obstacles.
2. Touch the associated OPEN button on the
touchscreen, double-click the front trunk button on
the key fob accessory, or touch the front trunk button
on the mobile app.
3. Pull the hood up.
When a door or trunk is open, the
touchscreen displays the Door Open
indicator light. The image of your Model 3
on the touchscreen also displays the
open front trunk.
WARNING: Before opening or closing the hood, it
is important to check that the area around the
hood is free of obstacles (people and objects).
Failure to do so may result in damage or serious
injury.
NOTE: The front trunk locks whenever closed and you
lock Model 3 using the touchscreen, mobile app, key
card, you leave Model 3 carrying your authenticated
phone (if Walk-Away Door Lock is turned on), or if Valet
mode is active (see Valet Mode on page 45).
Closing
The Model 3 hood is not heavy enough to latch under its
own weight and applying pressure on the front edge or
center of the hood can cause damage.
To properly close the hood:
1. Lower the hood until the striker touches the latches.
2. Place both hands on the front of the hood in the
areas shown (in green), then press down firmly to
engage the latches.
3. Carefully try to lift the front edge of the hood to
ensure that it is fully closed.
CAUTION: To prevent damage:
• Apply pressure only to the green areas shown.
Applying pressure to the red areas can cause
damage.
• Do not close the hood with one hand. Doing so
applies concentrated force in one area and can
result in a dent or crease.
• Do not apply pressure to the front edge of the
hood. Doing so can crease the edge.
• Do not slam or drop the hood.
WARNING: Before driving, you must ensure that
the hood is securely latched in the fully closed
position by carefully trying to lift the front edge of
the hood upward and confirming there is no
movement.
Interior Emergency Release
An illuminated interior release button inside the front
trunk allows a person locked inside to get out.
Front Trunk
18 MODEL 3 OWNER'S MANUAL
Other manuals for Model 3
5
Table of contents
Other Tesla Electric Vehicle manuals