LED Lights Canada CCT Wall Mount Touch Panel User manual

Operation Instructions of Controller
I. Specifications:
Working temperature: -20- 60 C Supply voltage: DC12~24V
Output: TWO CMOS drain- open output Connecting Mode: Common anode
Max load current: 4A each color Net weight: 140g
Dimension: L120*W74*H38mm Structure: 120-type US standards
RF frequency: 2.4GHz
II. Control Method:
1. Function of the touch panel
Name
Description
Note
ON/OFF
Turn on/off the light.
This button is backlit in blue making it easy to see in
the dark
Brightness +
Tap to increase brightness
Long- press for fast dimming
Brightness -
Tap to decrease brightness
Long-press for fast dimming
CW balance key
Balance to cool white
Long-press for fast adjusting.The sum of two channels
output power remains constant when CCT balanced.
WW balance key
Balance to warm white
Delay off
Activates 30 second delay off
Night light
Night light hot key, the Brightness
is adjustable from 1%-10%.
The brightness of night light can ONLY can be set
through the RF remote control.

2. Each of the functions of the optional RF remote control is listed in the table below:
Name
Description
Set button
For setting the night light and matching code with receiver. Under night light mode, press “Set
button”and hold on for 10 seconds will go into the night light setting. Press the set button again to
save the setting and quit out.
ON
Turn on
OFF
Turn off
Brightness +
The brightness will increase 1 level with each button press. Long-press for fast light increase.
Brightness -
The brightness will decrease 1 level with each button press. Long-press for fast light decrease.
CW balance key
Balance to cool white. Long-press for fast adjusting.
WW balance key
Balance to warm white. Long-press for fast adjusting.
Mode
Hot key for 3 CCT full-light: 100% CW, 100% WW, 100%CW+100%WW, and 4 dynamic modes.
Night light
Press the button go to night light mode(night light Setting:Under night light mode, press “Set
button”and hold on for 10 seconds will go into the night light setting, press the left button to down
the brightness, press the right button to up the brightness. Adjustable range: 1%-10%.)
Speed +
Increase the speed of the dynamic mode. Long-press for fast adjustment
Speed -
Reduce the speed of the dynamic mode. Long-press for fast adjustment
Delay button
The light will turn off after a 30 second delay
Tips: Wall-panel can be controlled by any one the same remote as factory default; RF BTremote control delivered with
unique RF code as factory default; if unique-control is needed, please matching the code before installation and using.
Matching code operation
If unique-control or new-coded-remote is needed, pairing the remote and the receiver as below operation
instruction before using:
1. Step 1: Pressing key “set” and hold on, power on the controller, the load LEDs will be 50% brightness
white as responding.
2. Step 2: Continuously to press the key “Mode“for 3 times within 5 seconds after step 1 ,the brightness
of LEDs will change from 25% -10% as responding.
3. Code learning successfully, the LEDs will be back to the status before the power off, and the receiver
only can be control by the remote.
4. If not, please re-operate from step 1 to 2.
Clear code operation
Back to factory default, wall-panel can be controlled by any one the same remote control.
1. Step 1: Pressing key “set” and hold on, power on the controller, the load LEDs will be 50% brightness
white as responding.
2. Step 2: Continuously to press “Delay button“3 times within 5 seconds after step 1 ,the brightness of
LEDs will change from 25% -10% as responding.
3. Code clearing successfully, the LEDs will be back to the status before the power off, and the receiver
can be controlled by any remote control(any one the same remote control can be used to clear the
code).
4. If not, please re-operate from step 1 to 2.
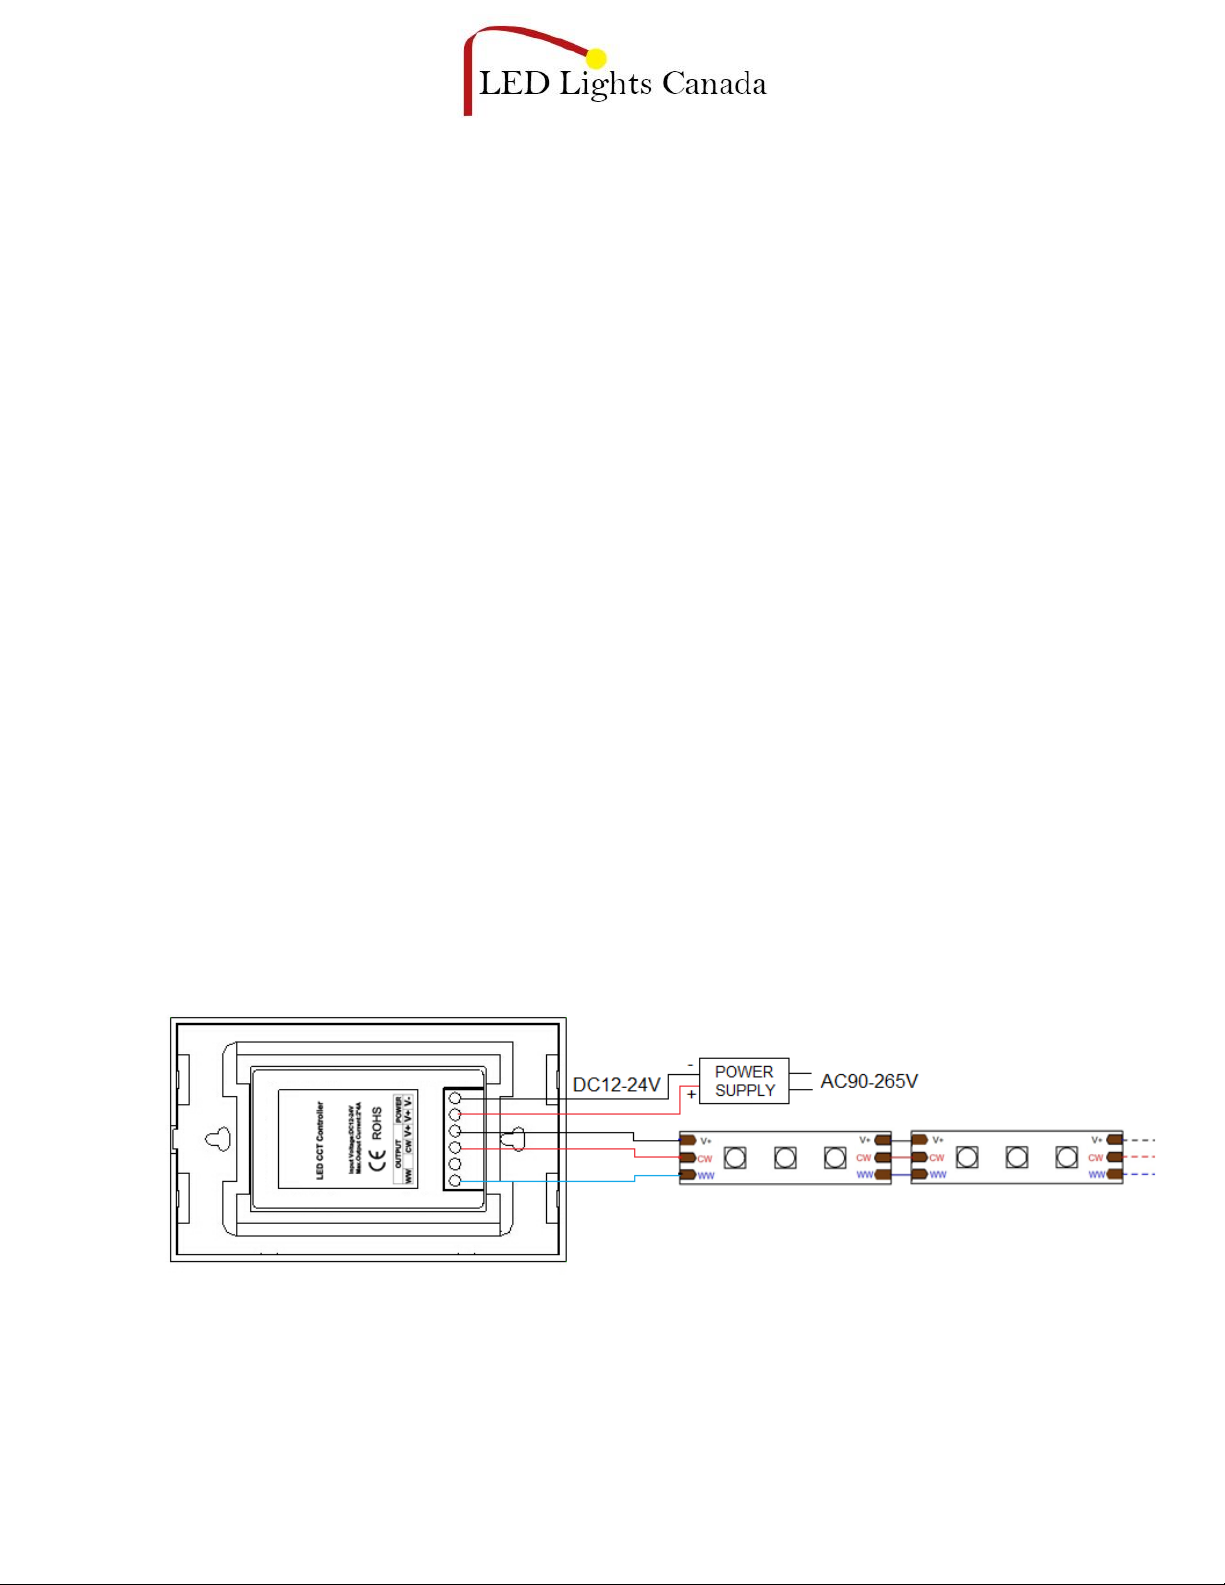
III. Panel specification and connecting drawing as follows:
IV. Warning:
1. Supply voltage of this product is DC12~24V, never connect toAC120V.
2. Lead wire should be connected correctly according to colors that the wiring diagram shows.
3. Warranty of this product is one year, but exclude the artificial situation of damaged or overload working.
Other LED Lights Canada Controllers manuals


Popular Controllers manuals by other brands

Digiplex
Digiplex DGP-848 Programming guide

YASKAWA
YASKAWA SGM series user manual

Sinope
Sinope Calypso RM3500ZB installation guide

Isimet
Isimet DLA Series Style 2 Installation, Operations, Start-up and Maintenance Instructions

LSIS
LSIS sv-ip5a user manual

Rockwell Automation
Rockwell Automation 1769-L31 installation instructions


