manuals.online logo
Brands
  1. Home
  2. •
  3. Brands
  4. •
  5. LEDISONS
  6. •
  7. Lighting Equipment
  8. •
  9. LEDISONS LDM43-1250-ZI User manual

LEDISONS LDM43-1250-ZI User manual

Function introduction
Important: Read All Instructions Prior to Installation
Wiring Diagram
Zigbee 12V Driver
LDM43-1250-ZI
•DO NOT install with power applied to device.
•DO NOT expose the device to moisture.
Safety & Warnings
Product Data
Voltage Range 200-240V AC
Power Factor (Typ.) >0.9
Input Current 0.27A @ 230VAC
Efficiency (Typ.) 85% @ 230VAC
Frequency 50/60Hz
Input
Rated Power max. 50W
Output
Over Current Yes, auto recovery after fault removed
Over Temperature Yes, auto recovery after fault removed
Protection
Working Temp. -20°C ~ +45°C
Working Humidity 10% ~ 95% RH non-condensing
Storage Temp. &
Humidity -40℃ ~ +80℃, 10% ~ 95% RH
Max. Case Temp.
Environment
MTBF
Dimension 210*50*32mm (L*W*H)
Others
Max. Current Max. 4.16A/ch
DC Voltage 12V DC
Max. 2.08A/ch
24V DC
88% @ 230VAC
• Max. output power 50W total
•Can directly pair to a compatible ZigBee remote via Touchlink
•Supports zigbee green power and can bind max. 20 zigbee green power remotes
•Compatible with universal ZigBee gateway products
•ZigBee CC LED light device based on ZigBee 3.0 protocol
•Compatible with universal ZigBee remotes
•Supports find and bind mode to bind a ZigBee remote
• High power factor and efficiency
• Class II power supply, full isolated plastic case
• 1 channel 12/24V DC constant voltage output
• Deep and smooth dimming to 0.1%
•Dimmable LED driver
•Enables to control ON/OFF, light intensity of connected LED lights
•ZigBee end device that supports Touchlink commissioning
•5 years warranty
•Waterproof grade: IP20
Safety Standards ENEC EN61347-1, EN61347-2-13 approved
EMC Emission EN55015, EN61000-3-2, EN61000-3-3
EMC Immunity EN61547, EN61000-4-2,3,4,5,6,8,11, surge immunity Line-Line 1KV
Withstand Voltage I/P-O/P: 3.75KVAC
Safety&EMC
emc
300MHz
Inrush Current (Typ.) COLD START Max. 2A @ 230VAC
LED output
+
NC
-
AC 200-240V input
ZigBee LED Driver
SELV
Prog key
NC
NC
AC INPUT
Program Key: short press to switch on/off load,
press and hold down to increase/decrease light intensity
85°C (Ta=”45°C”)
190300H, MIL-HDBK-217F @ 230VAC at full load and 25°C
ambient temperature
LED
ZigBee LED Driver
+
NC
SELV
-
NC
NC
AC INPUT
Pro g key
N
L
Anleitung
Manuel
Handleiding
Operation
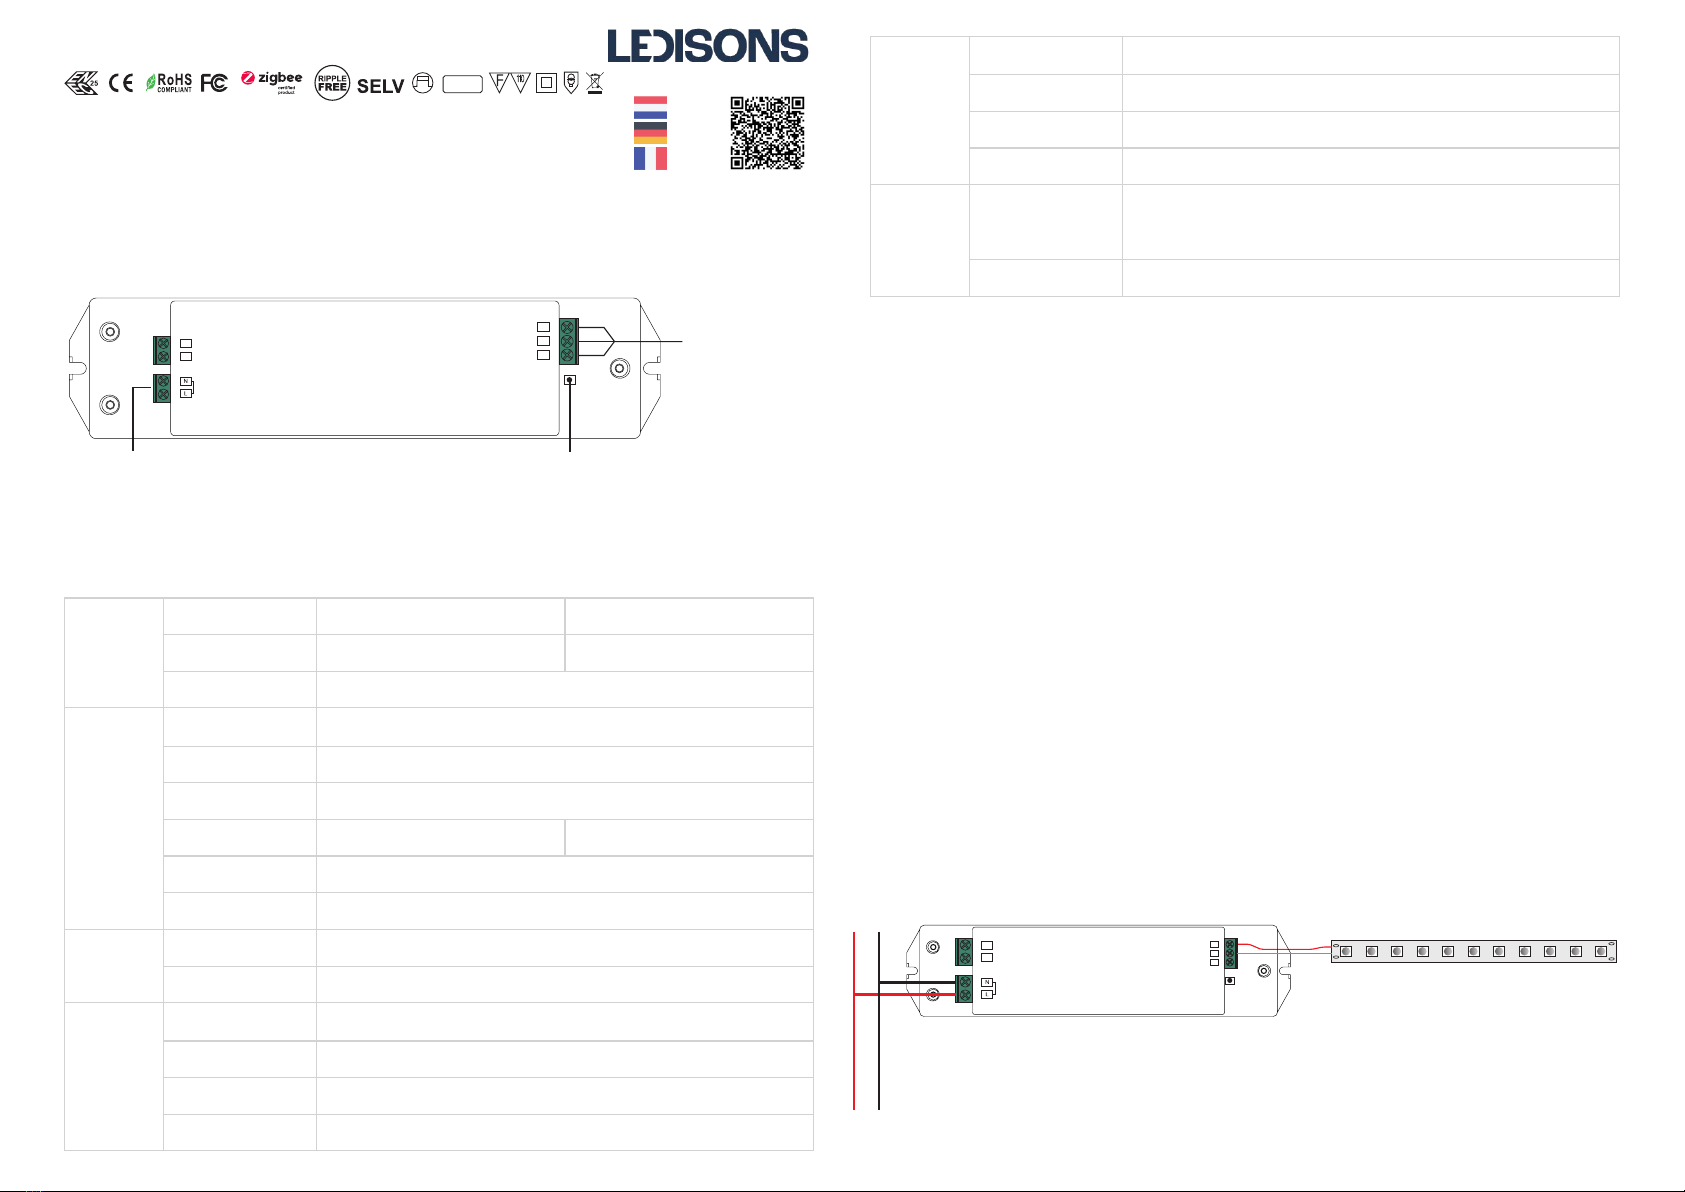
1.Do wiring according to connection diagram correctly.
2.This ZigBee device is a wireless receiver that communicates with a variety of ZigBee compatible
systems. This receiver receives and is controlled by wireless radio signals from the compatible ZigBee
system.
3. Zigbee Network Pairing through Coordinator or Hub (Added to a Zigbee Network)
4) After TouchLink, the device can be controlled by the linked remotes.
3) For Hue Bridge & Amazon Echo Plus, add remote and device to network first then TouchLink.
2) TouchLink after both added to a ZigBee network, each device can link with max. 30 remotes.
Note: 1) Directly TouchLink (both not added to a ZigBee network), each device can link with 1 remote.
Step 1: Remove the device from previous zigbee network if it has already been added to, otherwise pairing will
fail. Please refer to the part "Factory Reset Manually".
Step 2: From your ZigBee Controller or hub interface, choose to add lighting device and enter Pairing mode as
instructed by the controller.
Step 4: Connected light will blink 5 times and then stay
solid on, then the device will appear in your controller's
menu and can be controlled through controller or hub
interface.
5. Removed from a Zigbee Network through Coordinator or Hub Interface
From your ZigBee controller or hub interface, choose to delete or reset the
lighting device as instructed. The connected light blinks 3 times to indicate
successful reset.
Step 4: There shall be indication on
the remote for successful link and
connected light will flash twice.
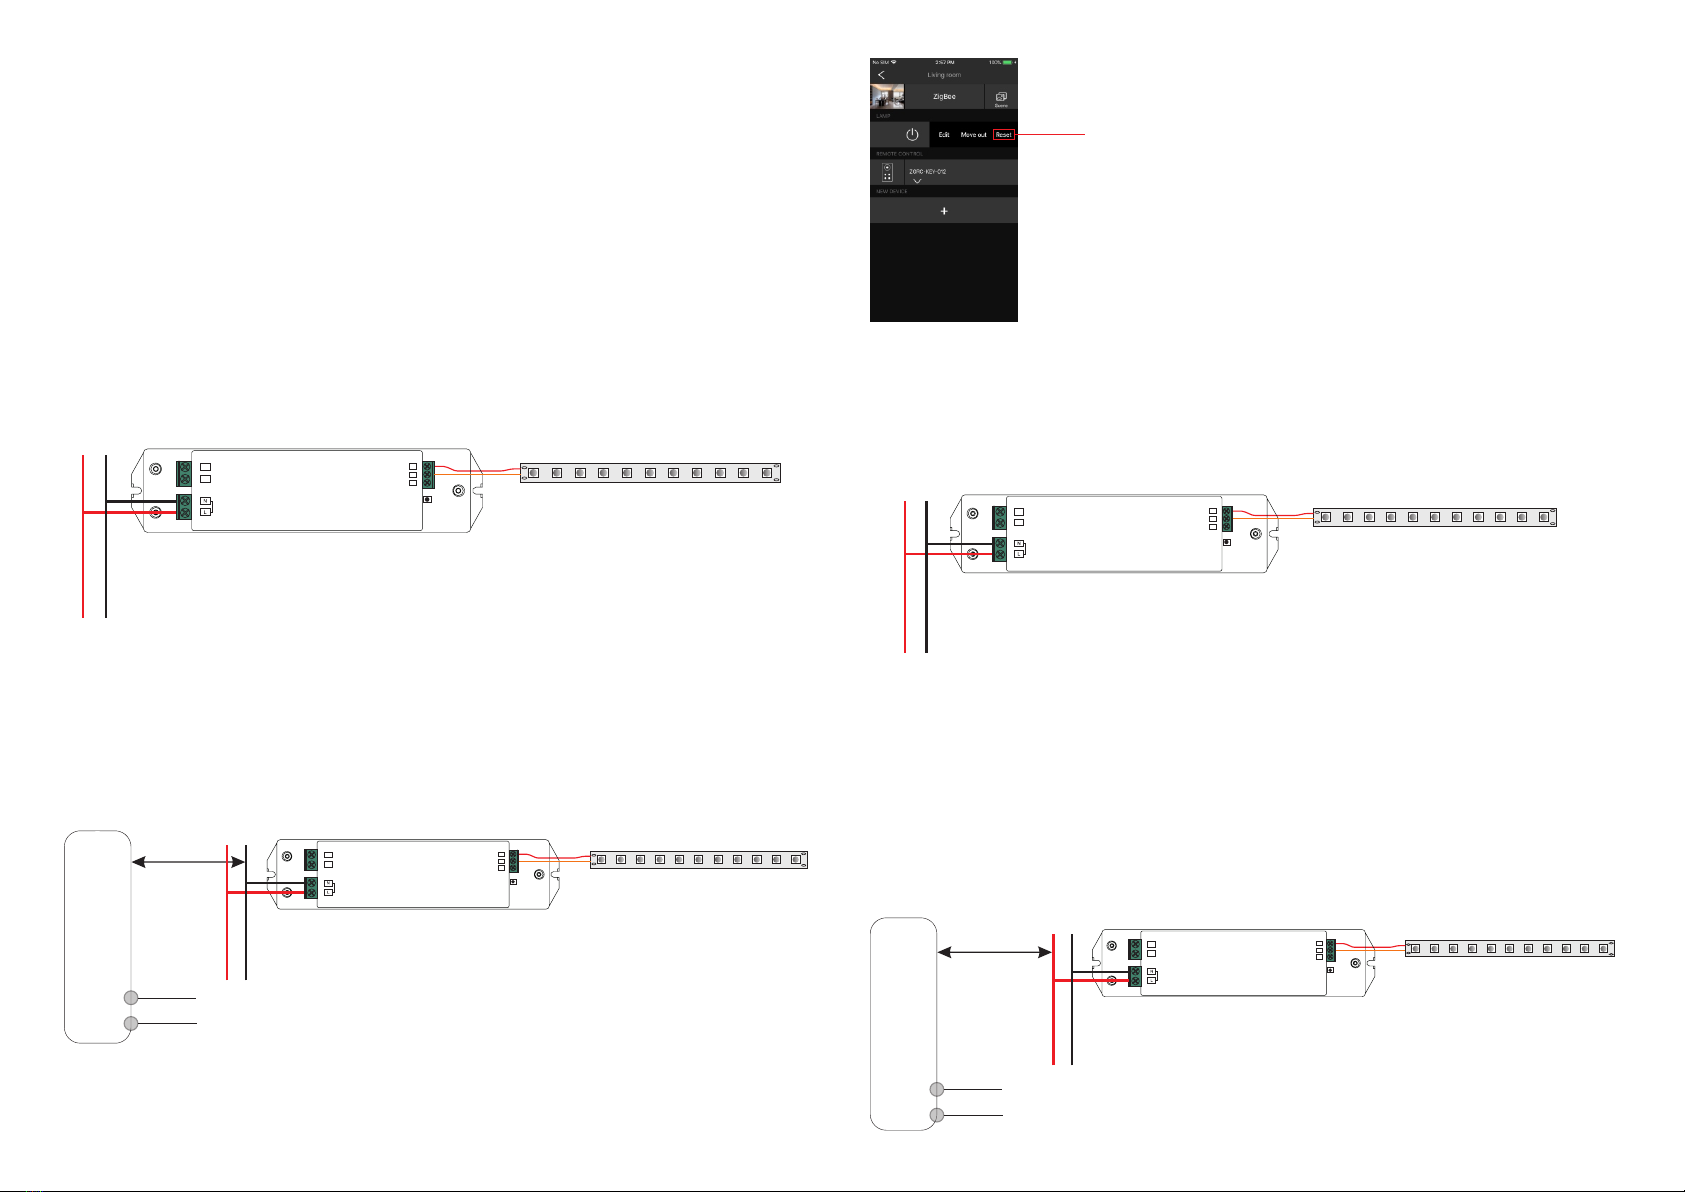
< 10cm
Zigbee
Remote
Step 2: Bring the remote or touch panel within 10cm of the lighting device.
Step 3: Set the remote or touch panel into Touchlink commissioning,
please refer to corresponding remote or touch panel manual to learn how.
6. Factory Reset Manually
Note: All configuration parameters will be reset after the device is reset or removed from the network.
Step 1: Short press “Prog.” key for 5 times continuously or re-power on the device for 5 times continuously if
the “Prog.” key is not accessible.
Step 1: Re-power on the device to start TouchLink Commissioning, 180 seconds timeout, repeat the operation.
7. Factory Reset through a Zigbee Remote (Touch Reset)
Note: Make sure the device already added to a network, the remote added to the same one or not added to any
network.
Step 2: Bring the remote or touch panel within 10cm of the lighting device.
Step 3: Set the remote or touch panel into Touch Reset procedure to reset the
device, please refer to corresponding remote or touch panel manual to learn how.
Step 2: Connected light will blink 3 times to indicate
successful reset.
Step 4: There shall be indication on
the remote and connected light
flashes 3 times for successful reset.
< 10cm
Zigbee
Remote
4. TouchLink to a Zigbee Remote
Method 2: If the device is already added to a network, it will be set into Touchlink commissioning immediately,
180S timeout. Once timeout, re-power on the device to set it into touchlink commissioning again.
Step 1: Method 1: Short press “Prog” button (or re-power on the device) 4 times to start Touchlink
commissioning immediately, 180S timeout, repeat the operation.
Step 3: power on the device, it will be set into network pairing mode (connected light flashes twice slowly), the
network pairing mode will last until the device is added to a zigbee network.
LED
ZigBee LED Driver
+
NC
SELV
-
NC
NC
AC INPUT
Pro g key
N
L
LED
ZigBee LED Driver
+
NC
SELV
-
NC
NC
AC IN PUT
Prog k ey
N
L
LED
ZigBee LED Driver
+
NC
SELV
-
NC
NC
AC IN PUT
Pro g key
N
L
LED
ZigBee LED Dr iver
+
NC
SELV
-
NC
NC
AC IN PUT
Prog k ey
N
L
ZigBee LED Driver
SELV
NC
NC
AC INP UT
8. Find and Bind Mode
Step 1: Short press “Prog.” button 3 times (Or re-power on the device (initiator node) 3 times) to start Find and
Bind mode (connected light flashes slowly) to find and bind target node, 180 seconds timeout, repeat the operation.
9. Learning to a Zigbee Green Power Remote
Step 1: Short press “Prog.” button 4 times (Or re-power on the device 4 times) to start Learning mode (connected
light flashes twice), 180 seconds timeout, repeat the operation.
10. Delete Learning to a Zigbee Green Power Remote
Step 2: Set the paired green power remote into
Learning mode, please refer to its manual.
Step 1: Short press “Prog.” button 3 times (Or re-power on the device 3 times) to start delete Learning mode
(connected light flashes slowly), 180 seconds timeout, repeat the operation.
11. Setup a Zigbee Network & Add Other Devices to the Network (No Coordinator Required)
Step 2: Set another device or remote or touch panel
into network pairing mode and pair to the network,
refer to their manuals.
Step 3: Pair more devices and remotes to the network
as you would like, refer to their manuals.
Step 4: Bind the added devices and remotes through
Touchlink so that the devices can be controlled by the
remotes, refer to their manuals.
Step 1: Short press “Prog.” button 4 times (Or re-power on the device 4 times) to enable the device to setup a
zigbee network (connected light flashes twice) to discover and add other devices, 180 seconds timeout, repeat
the operation.
Zigbee
Remote
Step 2: Set the remote or touch panel (target node) into find and bind mode, and enable it
to find and bind initiator, please refer to corresponding remote or touch panel manual.
Step 3: There shall be indication on the remote or touch panel that it bind the device
successfully and can control it then.
Zigbee
Green
Power
Remote
Step 3: Connected light will
flash twice to indicate
successful learning. Then the
remote can control the device.
Step 2: Set the green power
remote into Learning mode,
please refer to its manual.
Note: Each device can learn to
max. 20 zigbee green power remote.
Zigbee
Green
Power
Remote
Step 3: Connected light will
flash 4 times to indicate
successful deleting.
12. ZigBee Clusters the device supports are as follows:
13. OTA
The device supports firmware updating through OTA, and will acquire new firmware from zigbee controller or
hub every 10 minutes automatically.
Note: 1) Each added device can link and be controlled by max. 30 added remotes.
2) Each added remote can link and control max. 30 added devices.
Input Clusters
Output Clusters
• 0x0008: Level Control • 0x0300: Color Control • 0x0b05: Diagnostics
• 0x0000: Basic • 0x0003: Identify • 0x0004: Groups • 0x0005: Scenes • 0x0006: On/off
• 0x0019: OTA
Zigbee
Remote
< 10cm TouchLink
50.0
210.0
32.0
Product Dimension
Pro g key
LED
ZigBee LED Driver
+
NC
SELV
-
NC
NC
AC IN PUT
Prog k ey
N
L
LED
ZigBee LED Driver
+
NC
SELV
-
NC
NC
AC IN PUT
Prog k ey
N
L
LED
ZigBee LED Driver
+
NC
SELV
-
NC
NC
AC IN PUT
Prog k ey
N
L
LED
ZigBee LED Driver
+
NC
SELV
-
NC
NC
AC IN PUT
Prog k ey
N
L
+
NC
-

Other LEDISONS Lighting Equipment manuals

LEDISONS LDS15-WPF-ZWA User manual

LEDISONS

LEDISONS LDS15-WPF-ZWA User manual

LEDISONS LDS11-WU8-ZWA User manual

LEDISONS

LEDISONS LDS11-WU8-ZWA User manual

LEDISONS LDM30-02-WIT User manual

LEDISONS

LEDISONS LDM30-02-WIT User manual

Popular Lighting Equipment manuals by other brands

Omron F3SG-SR Series instruction sheet

Omron

Omron F3SG-SR Series instruction sheet

LIVARNO LG-9483 Instructions for use

LIVARNO

LIVARNO LG-9483 Instructions for use

Equinox Systems Cirrus user manual

Equinox Systems

Equinox Systems Cirrus user manual

Uplus Lighting MINI740 user manual

Uplus Lighting

Uplus Lighting MINI740 user manual

Techni-Lux DL-PAR38C75/B user manual

Techni-Lux

Techni-Lux DL-PAR38C75/B user manual

Himoinsa Apolo 8000 Handbook

Himoinsa

Himoinsa Apolo 8000 Handbook

Black & Decker BDXPA0071 instruction manual

Black & Decker

Black & Decker BDXPA0071 instruction manual

Light Emitting Designs RWL II Series installation guide

Light Emitting Designs

Light Emitting Designs RWL II Series installation guide

Xiaomi Yunmai user manual

Xiaomi

Xiaomi Yunmai user manual

Philips 17274/**/16 user manual

Philips

Philips 17274/**/16 user manual

Kasco LEDS19 Operation & maintenance manual

Kasco

Kasco LEDS19 Operation & maintenance manual

TP-Link KL420L5 user manual

TP-Link

TP-Link KL420L5 user manual

Portfolio HZA1601L-4 manual

Portfolio

Portfolio HZA1601L-4 manual

Beamz PS08S quick start guide

Beamz

Beamz PS08S quick start guide

FT S2 user manual

FT

FT S2 user manual

Prime CCLFLRGTR05 instruction manual

Prime

Prime CCLFLRGTR05 instruction manual

Genaray RGB Series user manual

Genaray

Genaray RGB Series user manual

Chauvet DJ ABYSS 2 Quick reference guide

Chauvet DJ

Chauvet DJ ABYSS 2 Quick reference guide

manuals.online logo
manuals.online logoBrands
  • About & Mission
  • Contact us
  • Privacy Policy
  • Terms and Conditions

Copyright 2025 Manuals.Online. All Rights Reserved.