Lee Valley Tools XB820 User manual

Fence-Mount Sprinkler Kit XB820
1
This sprinkler system lets you water your garden along a fence or wall. When the hose is
mounted and the sprayers inserted where needed, your fence sprinkler will accommodate the
specific watering needs of your garden.
Your kit contains the following parts:
• 50'of 1/2"header hose
• seven adjustable sprayers (two 90° and
five 180°)
• one compression end
• one hose connector with a filter washer
• a hole punch
• 10 hole plugs
• 10 mounting clips (with screws)
Planning Your Layout
Step 1: Warm the Hose
Uncoil your hose in a sunny spot and let it warm up for about 30 minutes. This will make your
hose more flexible and easier to work with.
Step 2: Sprinkler Hose Layout
Lay out the full length of the (warm) hose along the length of fence/wall where you want to
mount it. Decide exactly where it will be mounted. If you have plants in your garden that should
not get water on their leaves, set the hose close to ground level so only the soil gets sprayed.
If there is clearance behind the sprayers (e.g., on a chain-link fence, or between boards on a
staggered board fence), you can mount the hose lower to the ground, where it is less obtrusive,
and tip the sprayers back to maintain the range of spray. Figure 1 shows a typical installation.
If you are weaving the hose through a chain-link fence, you will have to keep the weave distance
at least several links apart in order to prevent crimping the hose. Also, keep in mind that the
sprinkler hose will need to be on the inside of the fence at the locations where the sprayers will
be placed.
Figure 1: Typical hose layout.

2
Figure 2: Minimum bend radius.
Minimum Radius
4"(10 cm)
Crimp
Figure 3: Spray density patterns at
full flow, and at a height of 31/2feet
(1 metre).
90˚ Sprayer
180˚ Sprayer
10 ft (3 m)
11 ft (3.3 m)
8 ft (2.5 m)
4 ft (1.2 m)
8 ft (2.5 m)
4 ft
(1.2 m)
Hose
Connector End
Plug
8 ft
(2.5 m)
10 ft
(3 m)
1 ft
(0.3 m)
Figure 4: Recommended sprayer spacing for straight lengths and even coverage
at full flow.
Notes:
1. Make sure that one end of the sprinkler
hose is within comfortable reach of the end
of your garden hose or faucet.
2. Do not bend the sprinkler hose too tightly
around corners; doing so will crimp
the hose.
3. Sections of the sprinkler hose can be
buried (e.g., in order to go under a gate).
4. You have the option of cutting off excess hose if you have decided that you do not need the
full 50 feet. Do not do this now. This should be done only after the sprinkler hose has been
permanently mounted.
Step 3: Sprayer Layout
With the hose layout established (but not yet
mounted), complete your plan by estimating
where the sprayers will be inserted.
Figure 3 indicates how the two sprayer types are
different as well as the spray coverage you may
expect. The maximum distances that the spray will
reach depend on the local water pressure and flow
as well as their height and angle. In our tests, we
have found that these distances are to be expected
with flow rates as low as 180 gallons per hour, with
all seven sprayers installed and fully opened.
Figure 4 shows the recommended sprayer spacing
for even coverage along the length of the fence
using a stretch of straight hose.

3
Figure 5: Examples of overlapping spray patterns.
90˚
Full Flow
180˚
Reduced
Flow
180˚
Full Flow 90˚
Reduced Flow
Fence
180˚
180˚
90˚ 90˚
G
a
r
d
e
n
E
d
g
e
Garden Hose or Faucet Filter Washer Hose Connector Sprinkler Hose
Figure 6: Hose connector connection.
Notes:
1. The 90° and 180° sprayers look virtually identical. The only visual difference is in the
small opening in the cap. The 180° sprayers have a wider opening.
2. The 180° sprayers put out a finer spray than the 90° sprayers, so their spray is slightly
more susceptible to being carried by the wind.
3. If you expect to operate any of the sprayers at less than full flow, you may want to
decrease the spacing between sprayers so that there is adequate overlap of spray to ensure
even watering.
Installation
Step 1: Hose Connector
Push the end of your sprinkler hose into the compression end of the hose connector (the plastic
fitting that attaches to your faucet) to a depth of at least 1"(2.5 cm). This will take some hand
pressure and a bit of wiggling of the hose. It will be difficult to remove the hose from the adapter
once you have connected them.
The hose connector threads onto a standard garden hose or faucet.
Step 2: Securing the Sprinkler Hose
Attach the sprinkler hose to your wall and/or fence. Start at the faucet/garden hose end of the
sprinkler hose and work your way weave by weave (or clip by clip) to the other end. If you are
using clips, the spacing that you use between clips will depend on your layout. For example, in
securing the hose in the shape of a curve, the clips will need to be closer together than if you are
securing a straight section of hose.

4
Figure 8: Using the hole punch and
the hole plugs.
X
Hole
Punch Hole
Plugs
Hole Plug
Min. 1/2"
offset
Do not
pierce
through.
Slip a clip around the hose and, while holding the hose in the desired place, screw the clip
in place.
Although you do not need to use the clips, the important thing to ensure is that the hose is held at
the desired height and is not free to rotate; otherwise, the sprayers will not be correctly oriented.
Step 3: Compression End
Cut off any excess sprinkler hose at the end of the system.
Press the compression end plug at least 1"(2.5 cm) onto the end of your sprinkler hose. Loosely
thread the cap onto the compression end.
Step 4: Punching your Holes
On your mounted hose, mark the locations where you are going to insert the sprayers. (White
chalk works well on the black hose.) Grab the hose firmly at the marked location. Punch a hole
using the hole punch provided. For most applications, you will want to punch the hole on the
exact top of the hose. Where the hose is low, and you plan to tip the sprayers back for increased
range, the holes should be angled back. Be careful not to punch through the opposite side of the
hose as well. Punch all the holes needed.
Remove the cap from the compression end. With the
front end firmly connected to the water source, open
the tap and flush water through the hose until the
water runs clear. Thread the cap back on, finger tight.
If you make a mistake when punching your holes,
do not fret. Hole plugs have been provided for
this situation. Simply press the hole plug into the
unwanted hole. However, a hole plug does not
work as well when it is on the opposite side of the
hose from the sprayer. Offset any new sprayer hole
slightly when opposite to a plugged hole.
Figure 7: Suggestions for securing the sprinkler hose.
Clips may be
wired in place.
Maximum 3 ft (1 m) between clips.
Sprayers on inside of fence.

5
Figure 9: Sprayer insertion and alignment.
• Sprayer fully inserted.
• Cap opening & dial aligned.
• Dial turned to full flow position.
Opening
Cap
Dial
Step 5: Sprayer Insertion
Press the threaded portion of the sprayer into the hole, keeping the sprayer in an upright
position. Turn the sprayer clockwise. Once the sprayer catches, you can then simply screw the
head in until it feels tight. Do not keep turning once it has been fully inserted into the hose or
the attachment will be weakened. Align the sprayer so that the opening in the cap is pointed in
the direction that you want it to spray.
If the sprayer opening is not aligned with the dial, and you want it to be, turn the cap to align
it. Just hold the cap firmly (with soft-jaw pliers), and rotate the body into alignment. This is
best done before the sprayer has been inserted into the hose.
Turn the dial on your sprayer to the full flow (“on”), position. The sprayer will spray at full
flow with the arrow on the dial pointing directly up or directly down. When the arrow is directly
sideways, the sprayer will not have any flow (i.e., it will be turned “off”). To adjust the flow
between on and off, simply adjust the dial in between points.
Move on to the next hole and insert the desired sprayer. Continue until all your sprayers are
inserted.
Step 6: Testing the System
Check that your sprayers are all turned to the “on” position and flush water through for a few
minutes, then shut the water off. Turn your sprayers to the “off” position and turn your water
source on. Look for any leaks in the sprinkler system.

Lee Valley Tools Ltd. Ottawa ON K2H 1C2 Canada leevalley.com
© Lee Valley Tools Ltd. 2018 442 INS-138_D
If the system has been off for a period of time and exposed to sunlight, the standing water in
the hose can get quite hot. We suggest running the water at partial pressure when the hose is
first turned on.
Sprayer Adjustment
Adjust the dials on your sprayers so the spray covers the desired area. You can also turn the
sprayer relative to the hose to adjust the direction of spray, as long as this adjustment is slight
and rarely done so as to avoid loosening the sprayer or stripping the hole.
Sprayers can be removed from a hole and replaced with one of another style (e.g., if you want
to switch from a 180° to a 90° sprayer). However, the holes in your hose can take only a certain
number of changes before they begin to leak.
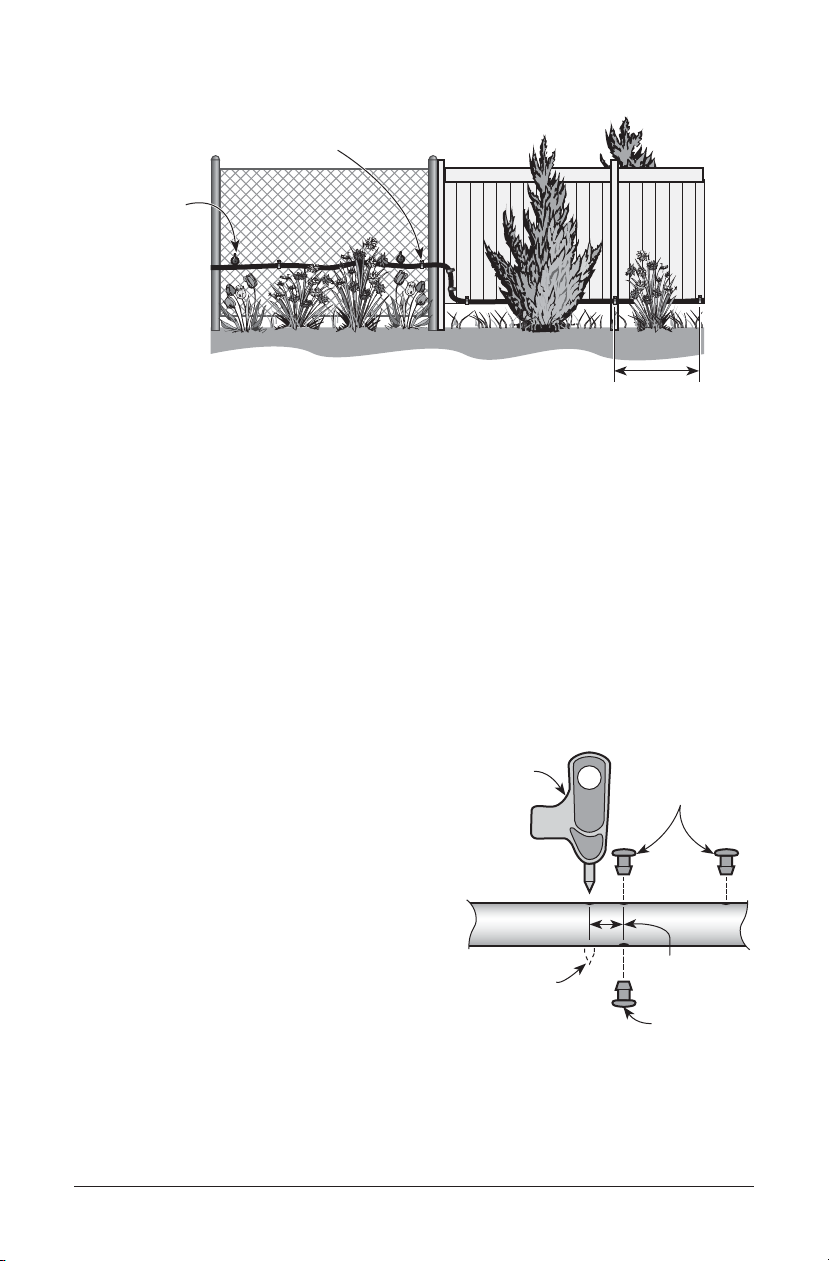
Adding to the System
Additional sprayers, sprinkler hose and hole plugs are available to let you expand your
sprinkling system to suit the changing needs of your garden. To add another length of hose,
simply unscrew the cap from the first compression end and attach it to the hose connector of
the second kit.
When adding to your system, keep in mind that, depending on the water pressure and flow
available, your water system will be able to support only a certain number of sprayers (at full
flow) before you experience decreased coverage.You can expect a slight decrease in coverage
after installing more than 7 sprayers, and a decrease to half of the range by the time you have
20 sprayers on a single water line.
Maintenance
Periodically check your filter washer and clean it of any dirt that may have accumulated. It is
also a good idea to flush your system once in a while.
You can leave your fence-mount sprinkler up over the winter. However, if you are in a region in
which the temperature can drop below freezing, you must properly drain your hose and sprayers
of any standing water.
If you decide to take the sprinkler down, keep in mind that when you go to remount your
hose, it may be difficult to realign it exactly as you had it previously positioned.
Accessories
XB829 Mounting Clips (with screws), pkg. of 10
XC311 Backflow Preventer
XB821 50'Hose with Connectors
XB823 90° Sprayers, pkg. of 2
XB825 180° Sprayers, pkg. of 5
XB827 Hole Plugs, pkg. of 10
Table of contents