Legamaster e-Screen PTX-9800UHD User manual

QUICK SETUP GUIDE
PTX-9800UHD
Version 1.0
ENGLISH |DEUTSCH |FRANÇAIS |NEDERLANDS |ESPAÑOL |TÜRK
LM-QSG_eScreen_PTX9800UHD-1606.indd 1 06.07.16 13:10

2
TABLE OF CONTENTS
LANGUAGES
PTX-9800UHD – QUICK SETUP GUIDE – ENGLISH
GB ENGLISH 2
DE GERMAN DEUTSCH 18
FR FRENCH FRANÇAIS 34
NL DUTCH NEDERLANDS 50
ES SPANISH ESPAÑOL 66
TR TURKISH TÜRKÇE 82
1. Important Information ...................................................................................................... 3
1.1. Use ..............................................................................................................................................3
1.2. Exemptions ..................................................................................................................................3
2. Safety Instructions............................................................................................................. 4
2.1. Safety Precautions........................................................................................................................4
2.2. Moving and Carrying Notice.........................................................................................................5
2.3. Installation ...................................................................................................................................5
2.4. Wall Mount Safety Notice.............................................................................................................6
2.5. Recommended Use ......................................................................................................................7
2.6. Cleaning ......................................................................................................................................8
3. Package Contents............................................................................................................. 8
3.1. Unpacking....................................................................................................................................8
3.2. Included Accessory....................................................................................................................... 9
4. Installation........................................................................................................................ 9
4.1. Environment State........................................................................................................................9
4.2. Power Input .................................................................................................................................9
4.3. EasyFix mounting solutions and Cable Management................................................................... 10
4.4. Control Panel .............................................................................................................................11
4.5. Status LED..................................................................................................................................11
4.6. Input and Output Connector...................................................................................................... 11
4.7. Remote Control..........................................................................................................................12
5. Operations...................................................................................................................... 13
5.1. Turning the Display On and Off ..................................................................................................13
5.2. Adjusting the Volume and Input Source.......................................................................................13
6. Touch Operation ............................................................................................................. 14
6.1. Touch USB Cable Connection .....................................................................................................14
6.2. Touch Screen Configuration .......................................................................................................14
7. Troubleshooting.............................................................................................................. 16
8. Compliance .................................................................................................................... 16
9. Appendix........................................................................................................................ 17
9.1. Dimensions ................................................................................................................................17
LM-QSG_eScreen_PTX9800UHD-1606.indd 2 06.07.16 13:10

3
WARNING:
TO PREVENT FIRE OR SHOCK HAZARDS, DO NOT EXPOSE THIS UNIT TO RAIN OR MOISTURE.
ALSO, DO NOT USE THIS UNIT‘S POLARIZED PLUG WITH AN EXTENSION CORD RECEPTABLE OR
OTHER OUTLETS UNLESS THE PRONGS CAN BE FULLY INSERTED.
REFRAIN FROM OPENING THE CABINET AS THERE ARE HIGH VOLTAGE COMPONENTS INSIDE.
CAUTION:
TO REDUCE THE RISK OF ELECTRIC SHOCK, MAKE SURE POWER CORD IS UNPLUGGED
FROM WALL SOCKET. TO FULLY DISENGAGE THE POWER TO THE UNIT, PLEASE DISCONNECT
THE POWER CORD FROM THE AC OUTLET. DO NOT REMOVE COVER (OR BACK). NO USER
SERVICEABLE PARTS INSIDE. REFER SERVICING TO QUALIFIED SERVICE
IMPORTANT INFORMATION
1. IMPORTANT INFORMATION
1.1. USE 1.2. EXEMPTIONS
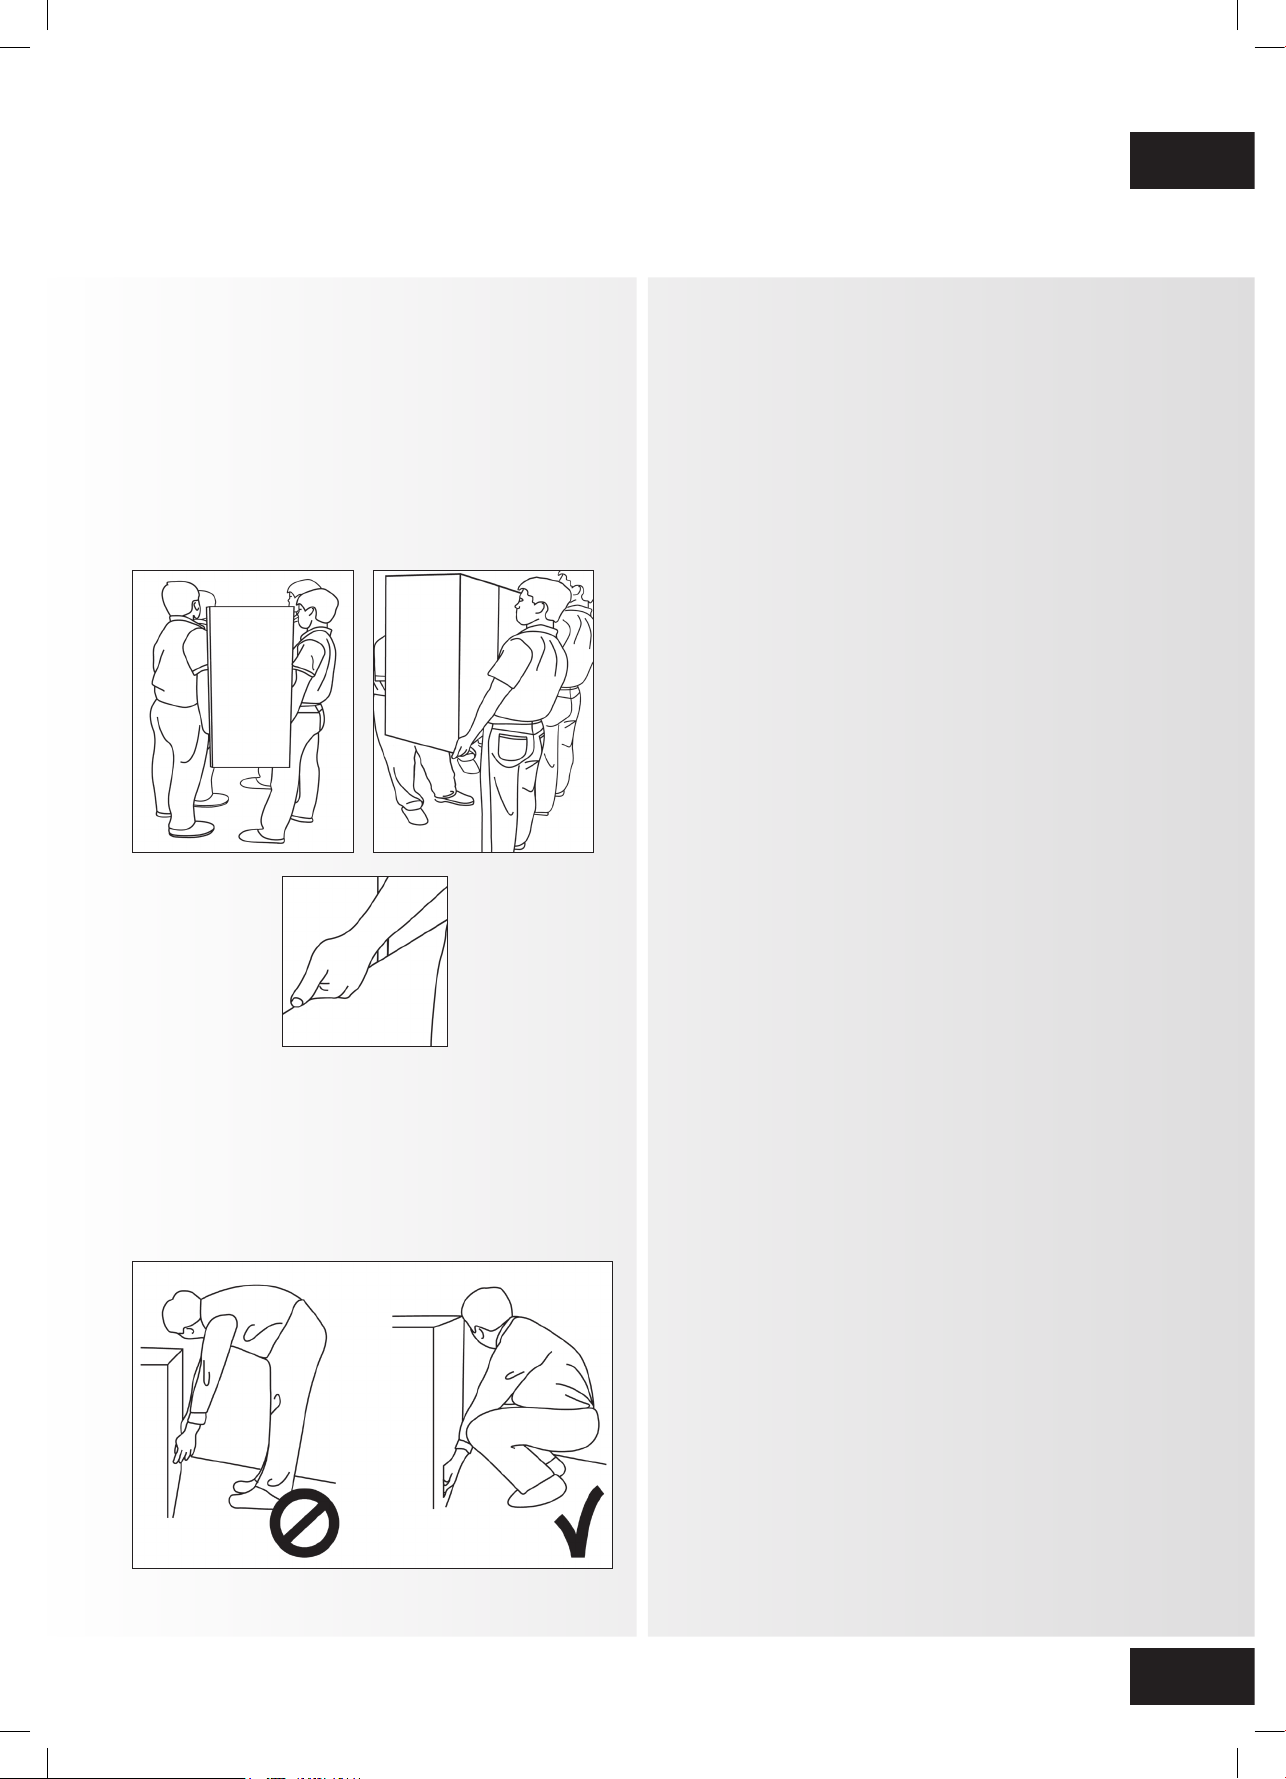
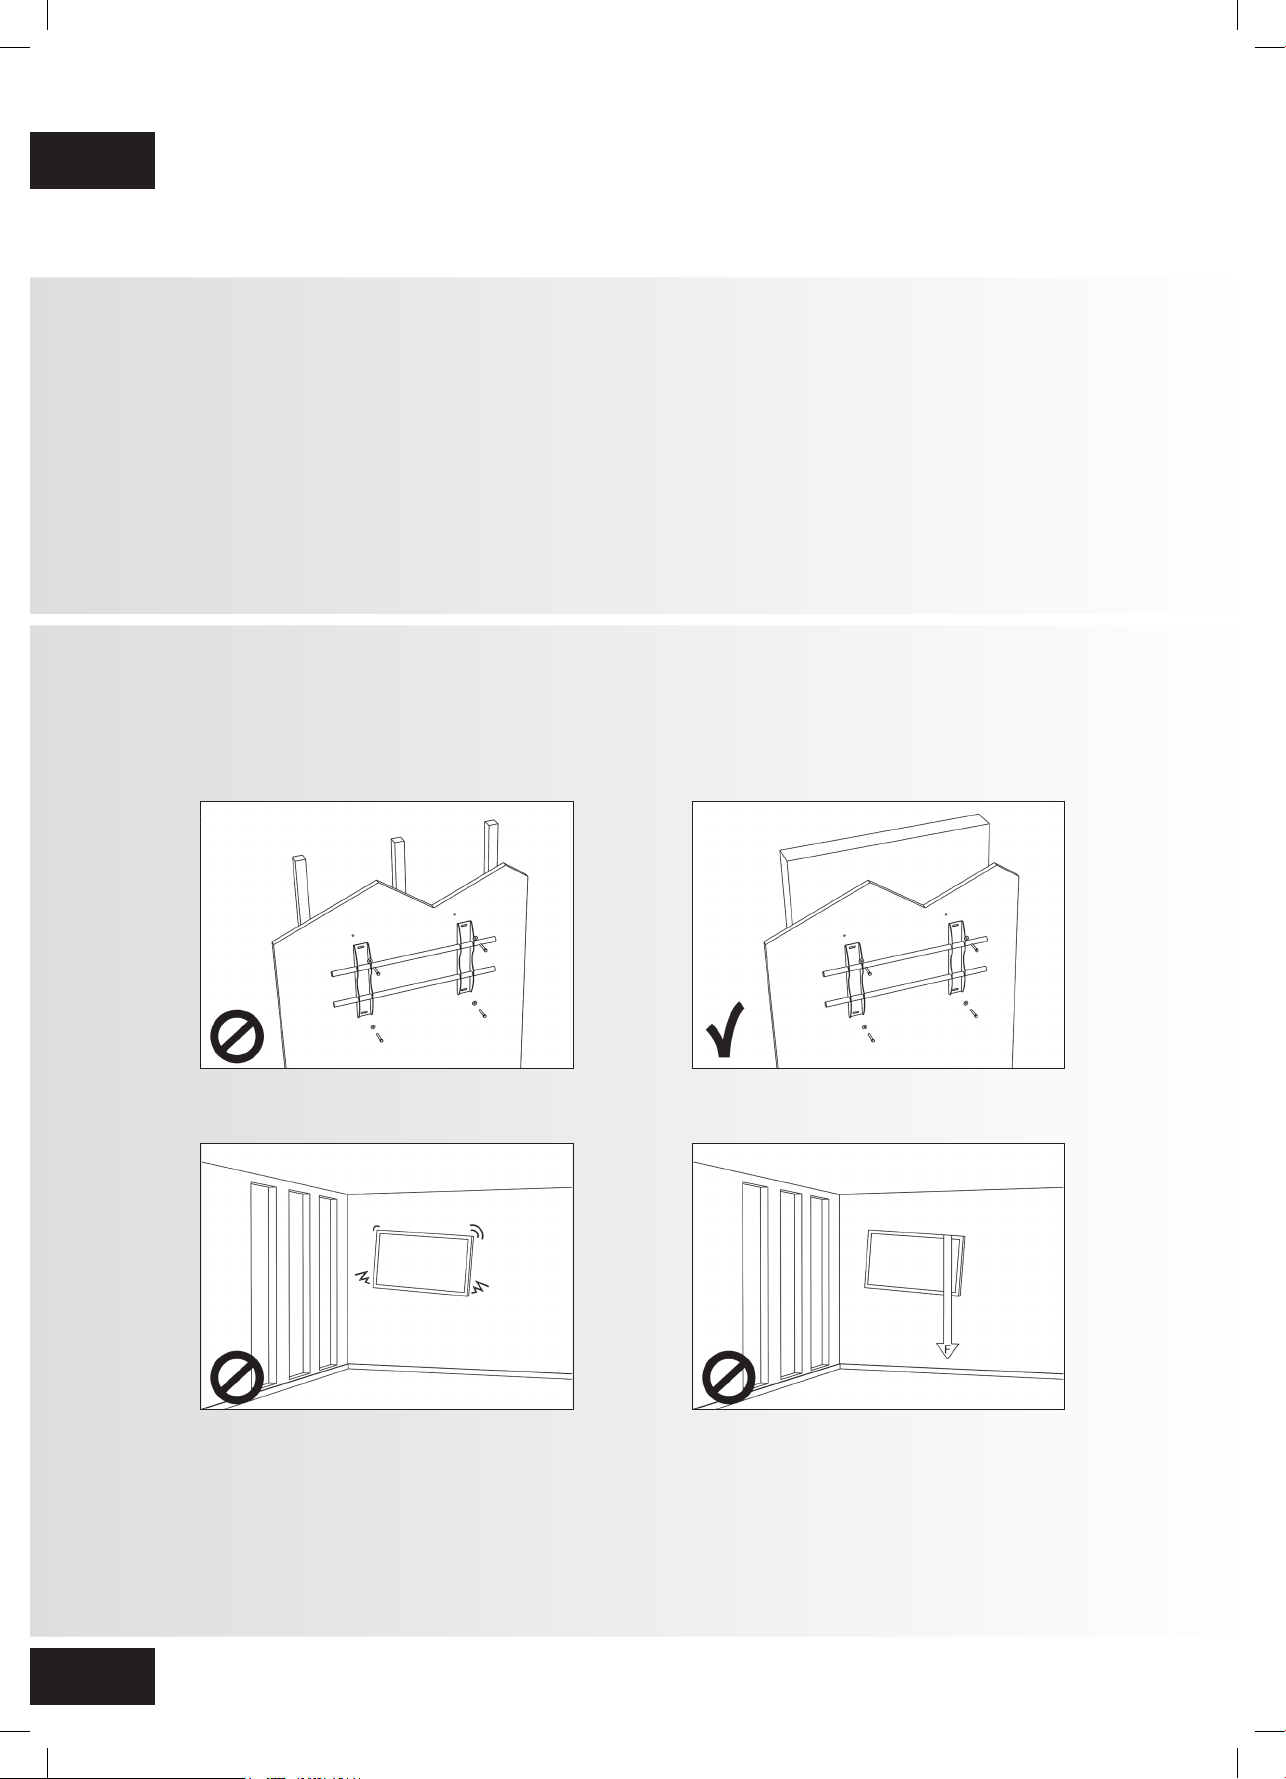
• Transport the display upright with proper
packaging. Avoid placing the display face up or
down. Be careful not to bump to the display.
• Do not send a static (non-moving) image to the
display, or it may cause image ‘burn-in’ or image
retention.
• “Burn in” and/or image retention is not covered
under warranty.
• Make sure to change the image on the display
periodically. It is recommended to (1) turn off the
display for at least 6 hours after 16 hours of usage
in a 24 hour period to help avoid image retention
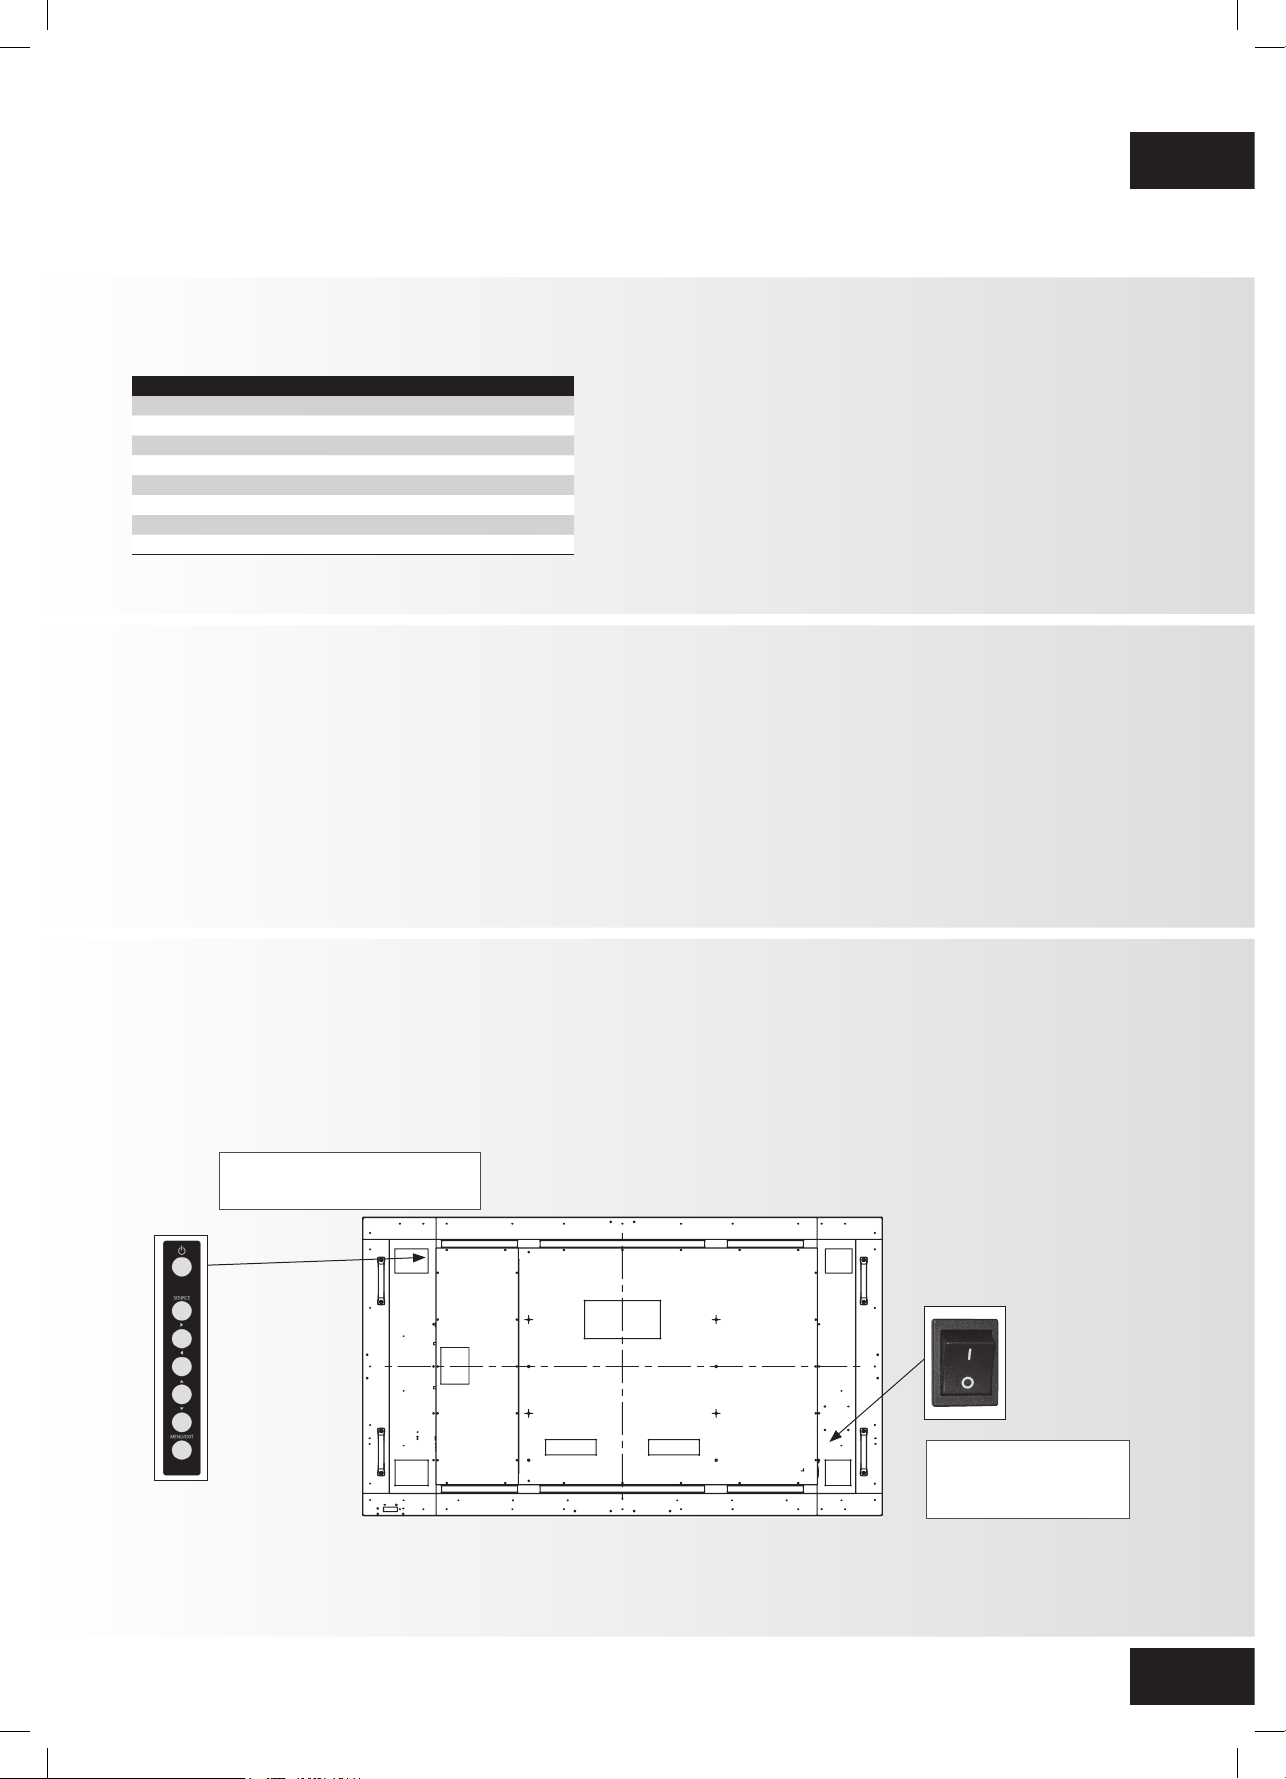
and (2) to turn the “IRFM” function to “ON” in
the OSD menu (under “Advanced Settings”).
• This product isn’t warranted for any damage
caused by natural disaster (such as earthquake,
thunder, etc.), fire, acts by third parties,
accidents, owner’s intentional misuse and fault,
or use in other improper conditions.
• This product isn’t warranted for incidental
damages (such as profit loss or interruption in
business, modification or erasure of record data,
etc.) caused by use or inability to use of this
product.
• This product isn’t warranted for any damage
caused by inappropriate operation, or from not
following the Quick Setup Guide.
• This product isn’t warranted for any damage
caused by misuse or malfunction through
simultaneous use of this product and the
connected equipment or software.
• This product isn’t warranted for any damage
caused by neglect of the instructions described
about installation.
• This product isn’t warranted for any damage
caused by improper installation.
• This product isn’t warranted for any damage
caused by disassembly, modification or repair by
non-authorized service center or people.
PTX-9800UHD – QUICK SETUP GUIDE – ENGLISH
LM-QSG_eScreen_PTX9800UHD-1606.indd 3 06.07.16 13:10

4
SAFETY INSTRUCTIONS
2. SAFETY INSTRUCTIONS 2.1. SAFETY PRECAUTIONS
Before using this display, please read this Quick
Setup Guide thoroughly to help protect against
property damage and to ensure your personal
safety and the safety of others.
• Be sure to observe the following instructions.
• For your safety, be sure to observe the warnings
located in this manual.
• For installation or adjustment, please follow the
instructions in this manual and refer all servicing
to qualified service personnel.
If smoke or a peculiar smell comes from the
display, remove the power plug from the outlet
immediately.
Failure to do so may result in fire or electrical shock.
Contact your dealer for inspection.
If the display has been turned on but there
isn’t a picture, remove the power plug from the
outlet immediately.
Failure to do so may result in fire or electrical shock.
Contact your dealer for inspection.
If water is spilled or objects are dropped inside
the display, remove the power plug from the
outlet immediately.
Failure to do so may result in fire or electrical shock.
Contact your dealer for inspection.
If the display is dropped or the cabinet is
damaged, remove the power plug from the
outlet immediately.
Failure to do so may result in fire or electrical shock.
Contact your dealer for inspection.
If the power cord or plug is damaged or
becomes hot, turn off the main power switch
of the display, make sure the power plug has
cooled down and remove the power plug from
the outlet.
If the display is still used in this condition, it may
cause fire or electrical shock. Contact your dealer for
replacement.
PTX-9800UHD – QUICK SETUP GUIDE – ENGLISH
LM-QSG_eScreen_PTX9800UHD-1606.indd 4 06.07.16 13:10

5
SAFETY INSTRUCTIONS
Carrying the display:
This display is heavy; please follow proper lifting
techniques, as pictured below. Failure to do so may
cause injury.
2.2. MOVING AND CARRYING
NOTICE
Moving the display:
Moving the display requires at least four people.
Attempting to move the display with one person may
result in dropping the display and/or serious injury.
When moving a display in its shipping carton, lift the
carton using the white handles.
2.3. INSTALLATION
Don‘t install in a high-temperature
environment.
If the display is used in high-temperature or in
direct sunlight, it may cause the case or other
parts to become distorted or damaged, resulting
in overheating or electrical shock.
Don‘t install in a high-humidity
environment.
This may cause overheating or electrical shock.
Don‘t install near any heat sources such as
radiators, heat registers, stoves, or other
apparatus that produce heat.
This may cause fire or electrical shock.
Don‘t overload outlets or cables beyond
electrical capacity.
Don‘t use extension cords as it may cause fire or
electrical shock.
Don‘t insert the power plug into an outlet
other than 100~240V AC.
This may cause fire or electrical shock.
• Don’t use a damaged power plug or worn
outlet.
• Don’t insert an improper power plug it may
cause fire or electric shock.
Don‘t place the display on an unstable shelf
or surface.
The display may fall, causing injury. Please install
on a horizontal, stable, level surface.
Don‘t place objects on the display.
• If the display is covered or the vents are
blocked, the display could overheat and
cause a fire.
• If metal or liquid gets into the display, it may
cause fire or electrical shock.
• Do not put heavy objects on the display as
they may fall, causing injury.
• Please keep a 10 cm minimum distance
between the display and the wall for
sufficient ventilation.
PTX-9800UHD – QUICK SETUP GUIDE – ENGLISH
LM-QSG_eScreen_PTX9800UHD-1606.indd 5 06.07.16 13:10

6
SAFETY INSTRUCTIONS
Don‘t move the display when it is connected
to the power cord and AV cables.
• When moving the display, make sure to remove
the power plug and cables from the outlet or
source.
• When unpacking or carrying the display, at least
2 people are needed. Make sure the display is
carried upright.
2.4. WALL MOUNT SAFETY NOTICE
1. Please make sure if the bracket is fixed to the solid wall / solid pillar for fear of falling due to
heavy weight.
2. After assembling, please don‘t pull or shake violently.
• Transport the display upright. Avoid placing the
display face up or down.
• Handle the display gently. Do not drop.
PTX-9800UHD – QUICK SETUP GUIDE – ENGLISH
LM-QSG_eScreen_PTX9800UHD-1606.indd 6 06.07.16 13:10

7
SAFETY INSTRUCTIONS
3. Please don‘t install the bracket directly under the sunshine or humidity / high temperature places for
fear that the quality is effected.
4. Installing the bracket over 10 cm from each wall side and begin vertical to the ground is the
suggested installing position.
2.5. RECOMMENDED USE
If you encounter a problem during installation,
please contact your supplier for assistance.
Don’t repair or open the display by yourself.
Failure to do so may result in fire or electrical shock.
Contact your dealer for inspection.
Protect and correctly use the power cord/plug.
• Don‘t pinch the power cord/plug between hard
surfaces.
• Don‘t step on the power cord/plug.
• Before inserting the power plug into the wall
outlet, connect the power cord to the display.
• Don‘t operate the display with a damaged
power cord or it may damage the display.
Using extension cords (not recommended)
If an extension cord must be used, ensure the voltage
rating exceeds the max power consumption of the
display. If the voltage rating is less than the display, it
will cause the extension cord to overheat.
If there is thunder or lightning, don’t touch the
display or the power plug.
This may cause an electric shock.
Don’t use any kind of liquid on the display.
• If liquid is spilled on the display, remove the power
and ask qualified service personnel to check the
display.
• If the liquid gets on the display’s screen, please clean
it with a dry and soft cloth immediately.
• Don’t use any harsh chemical on the display.
• If metal or liquid gets into the display, it may cause a
fire or an electrical shock.
PTX-9800UHD – QUICK SETUP GUIDE – ENGLISH
LM-QSG_eScreen_PTX9800UHD-1606.indd 7 06.07.16 13:10

8
SAFETY INSTRUCTIONS / PACKAGE CONTENTS
Precautions with the remote control batteries
• Please only use approved AAA type batteries.
• Please be sure to insert batteries by matching the +
and -.
• Don’t recharge, heat, disassemble, short or throw
batteries into a fire.
• Don’t mix a new battery with a used one.
• Don’t mix different types of batteries together (only
use the specified type). it may cause burn and injury.
2.6. CLEANING
Take off the power plug before cleaning.
Failure to do so may result in electrical shock or
damage.
Cleaning the surface of the display
• When the surface of the display becomes dirty,
please wipe the surface lightly with a soft clean
cloth.
• If the surface requires additional cleaning, lightly
moisten the cloth.
• Do not to let any kind of liquid enter the display as it
may cause electrical shock or damage.
• Do not clean the display with alcohol, solvents or
ammonia, as this could damage the display.
Don’t install or remove the power plug with
wet hands.
This may cause an electrical shock.
If the display will not be used for a long
period of time, unplug the display.
This may cause premature wear of electrical
components or fire.
Don‘t push or shake the display.
This may cause damage or injury.
• If the glass of the display panel is broken, liquid
may escape. Please don‘t touch the liquid.
• If liquid get into your eyes or touches your skin,
wash with the clean water and seek medical
attention immediately.
3. PACKAGE CONTENTS
• The e-Screen PTX display is packed using
cushions to protect the display during shipping.
• Before unpacking your display, prepare a stable,
level, and clean surface near a wall outlet.
• Set the display box in an upright position and
open from the top of the box before removing
the top cushions.
3.1. UNPACKING • Step 1: Remove the white handle and cut the
banding
• Step 2: Remove the top cushion and take the
accessory bag out.
Item Description Quantity
1Display 1
2Carton 1
3EPE Cushion Bottom 2
4Poly Bag 1
5Carton Lock 8
6Accessory Bag 1
PTX-9800UHD – QUICK SETUP GUIDE – ENGLISH
LM-QSG_eScreen_PTX9800UHD-1606.indd 8 06.07.16 13:10

9
PACKAGE CONTENTS / INSTALLATION
3.2. INCLUDED ACCESSORY
4. INSTALLATION
When operating the PTX series display, ambient room
conditions should not exceed the following:
4.1. ENVIRONMENT STATE
• Operating temperature: -5˚C to 45˚C
(41˚F to 104˚F)
• Humidity: less than 90% RH (Max)
OSD
Keypad
Main power –
Switch
AC In socket
Status LED / Light Sensor /
IR Receiver
“I“ is power on
“O” is power off
The power cord (shipped separately) is used to connect the display to an AC wall outlet. Plug the power cord
into the AC inlet on the side of the display. Locate the Main Power switch directly above the AC inlet and press
“-” to turn power on, and “O” to turn power off.
4.2. POWER INPUT
Item
IR Remote Control (Batteries Included)
IR Extender
HDMI Cable
USB Type B to A
Power Cord
USB Stick (Touch driver + VCOM driver + User Manual included)
Bag with EasyFix cable clips
Legamaster Ergonomic stylus
PTX-9800UHD – QUICK SETUP GUIDE – ENGLISH
LM-QSG_eScreen_PTX9800UHD-1606.indd 9 06.07.16 13:10

10
INSTALLATION
4.3. EASYFIX MOUNTING SOLUTIONS AND CABLE MANAGEMENT
Included accessory
EasyFix Cable Clips
Optional
EasyFix Soundbar bracket
Optional
Control button FLEX height
adjustable solutions
PTX-9800UHD – QUICK SETUP GUIDE – ENGLISH
LM-QSG_eScreen_PTX9800UHD-1606.indd 10 06.07.16 13:10

11
INSTALLATION
4.4. CONTROL PANEL
Key Descriptions
Power Power on/Power off
Source Source selection (toggle)
►Menu Right/Volume +
◄Menu Left/Volume -
▲Menu Up
▼Menu Down
Menu/Exit Menu/Exit selection
4.6. INPUT AND OUTPUT CONNECTOR
1 USB 3.0 (for OPS)
2 RS232
3 Ethernet
4 OPS slot
5 DisplayPort 1.2
7-9 HDMI 1.4
10 VGA
11 PC Audio In
4.5. STATUS LED
LED Illumination Condition
Green Normal operation
Blinking Orange No signal
Orange Power Saving
Off
Power off
AC off
Note:
If the Status LED is set to „Off“ in the OSD
menu, the Status LED will not operate.
12 IR Extender
13 Line Out
14 S/PDIF out (digital audio out)
15 Touch USB
16 AC switch
17 AC in
18-19 USB 2.0 (for OPS)
PTX-9800UHD – QUICK SETUP GUIDE – ENGLISH
12 18 191211435
61
716
OFF
ON
DisplayPort
Ethernet HDMI 1.4
7
HDMI 1.4
8
HDMI 1.4
9
HDMI 1.4 S/PDIF
VGA PC
Audio
In
IR
Extender
Line
OutOut
Touch
USB
USB 2.0USB 3.0 USB 2.0
13 14 15
10
OPS
RS232C
LM-QSG_eScreen_PTX9800UHD-1606.indd 11 06.07.16 13:10

12
INSTALLATION
4.7. REMOTE CONTROL
4.7.1. Changing the Remote Control Battery
1. Remove the battery
cover
Slide back and remove
the battery cover in the
direction of the arrow.
2. Insert the batteries
Align and insert two AAA
batteries according to their
plus and minus ports (as
indicated in the remote
control).
3. Close the battery cover
Replace the battery cover in
the direction of the arrow
and snap it back into place.
I. Used batteries needed to follow the city rule to be
discarded.
II. Avoid keeping used, old batteries inside the remote
control, causing leakage of internal liquid resulting
metal rust or fatal damage to the remote control
hand unit.
III. Battery to be used according to the instruction
CAUTION
About the remote control
• Don’t drop, shake or bump.
• Don’t place on wet materials.
• Don‘t dismantle.
• Don’t place in locations with exposure to
high-temperature or high-humidity levels.
PTX-9800UHD – QUICK SETUP GUIDE – ENGLISH
2
4
6
7
9
11
12
10
8
5
3
1
No Function Description
1Turns the monitor on and off
2 INFO Provides source and resolution information
3 VGA
DVI
HDMI 1
Selects the PC RGB source
Not available
Selects the HDMI source 1
4 COMP
AV (Video)
HDMI 2
Not available
Not available
Selects the HDMI source 2
5 PIP position
DisplayPort
Selects the HDMI source
Select the DisplayPort source
6
PIP
S-V
HD-SDI 2
opens the PIP settings menu
Hot Key for OPS source selection
not available
7 SWAP no function
8 P-SOURCE Selects the PIP source
9 MENU
, , ,
Opens the monitor’s on-screen menu system. If the
menu system is already open, pressing this button
will select the previous submenu
Navigates through submenus and settings
10 EXIT Closes the menu system
11 ENTER Selects highlighted menu choices
12 SCALING
FREEZE
MUTE
BRIGHT
CONTRAST
AUTO
SOURCE
VOLUME-
VOLUME+
Toggles between different aspect ratios (Auto,
Native, 4x3, 16x9, 16x10 and Letterbox)
Freezes the current source image
Turns off the sound
Adjusts the brightness
Adjusts the contrast
Synchronizes the monitor with the source
Allows selection of the different sources
Decreases the sound volume
Increases the sound volume
Hot Key:
OSD Menu Lock/
Unlock Control
Lock: Press Enter, Enter,
Exit, Exit, Enter and Exit
on the controller in
sequence to lock OSD
Unlock: Press Enter, Enter,
Exit, Exit, Enter and Exit
on the controller in
sequence to unlock OSD
LM-QSG_eScreen_PTX9800UHD-1606.indd 12 06.07.16 13:10

13
OPERATIONS
Adjusting the Volume
1. Using the remote, press the VOLUME- or VOLUME+ to increase or decrease the volume.
2. Press the MUTE button to temporarily turn off all sound. To restore the sound, press the MUTE button again.
Selecting the input source
1. Using the remote, press the desired source button (DISPLAYPORT, HDMI1, HDMI2, HDMI3, HDMI4, VGA)
2. Or press SOURCE on the display keypad, use the arrow buttons (▲▼) to navigate to the desired input source,
and press ENTER:
• DisplayPort
• HDMI 1
• HDMI 2
• HDMI 3
• HDMI 4
• VGA
• OPS
3. If the display cannot find a source, a “No signal” message will appear.
5.2. ADJUSTING THE VOLUME AND INPUT SOURCE
PTX-9800UHD – QUICK SETUP GUIDE – ENGLISH
5. OPERATIONS
Turning the display on
1. Connect the display to an AC power outlet
2. Ensure the AC switch is set to “—“.
3. Press the power button on the remote control or keypad.
Turning the display off
With the power on, press the power button on the remote control or keypad to put the display into standby
mode. To turn off power completely, turn the AC switch to “O” or disconnect the AC power cord from the
power outlet.
5.1. TURNING THE DISPLAY ON AND OFF
Note:
If there is no signal input for a period of time, the display will automatically go into power saving (sleep) mode.
LM-QSG_eScreen_PTX9800UHD-1606.indd 13 06.07.16 13:10

14
TOUCH OPERATION
6. TOUCH OPERATION
6.1. TOUCH USB CABLE CONNECTION
1. Connect the signal cable witch display, and then
turn on the display.
2. Connect the USB cable with display and the
computer; connect one side of USB cable (Type-B
USB connector) on the display side.
3. Connect the other side of USB cable (Type-A
USB) to the USB port on computer. See picture
below.
6.2. TOUCH SCREEN CONFIGURATION
From the Windows Start menu, choose Timelink -> TouchWin.
Product Information:
This area of the TouchWin configuration window
contains a variety of information about the touch
module: the product type, firmware version and
operating status. Should you ever need to contact
Technical Support, this information will help
them answer your questions or resolve product
performance issues.
Touch module information
Touch screen
configuration
settings
PTX-9800UHD – QUICK SETUP GUIDE – ENGLISH
4. Then turn on the computer.
5. When USB cable connected, then wait for 5 seconds
and the touch function is ready to go. It can be
activated by pen, finger, or any other pointer
Settings:
From this area of the TouchWin configuration window,
you can change settings, calibrate the touch screen or
reset the product to its factory-default state.
The following paragraphs describe these settings in
detail. When you are finished configuring the touch
screen, click Done to save your changes or Cancel
to discard them.
• Mode:
Choose one of the following, then click Done.
• MultiTouch:
This mode is available only in Windows operating
systems that support multi-touch; the user can
interact with the display using multiple fingers
simultaneously and independently of each other.
(Refer to Software Requirements (Multi-Touch
Operation), above.)
• Mouse:
This mode simulates the mouse to process the touch
points. Generally, this mode is single-touch. All of
the operating systems listed in the previous section
support mouse mode.
LM-QSG_eScreen_PTX9800UHD-1606.indd 14 06.07.16 13:10

15
PTX-9800UHD – QUICK SETUP GUIDE – ENGLISH
TOUCH OPERATION
Calibration:
If touching the screen does not place the cursor in the
desired position, you may be able to correct this by
performing a touch screen engine calibration. To do this:
a. Click Calibration. A red spot and eight white spots
against a black background appear on the screen.
b. Click the red spot by hand and follow the red spot
moving to finish the nine-point touch calibration.
c. When you complete the nine-point calibration, a
confirmation window appears. Click Done to accept
the calibration; click Cancel or do nothing (in which
case the calibration window automatically disappears
after five seconds) to cancel the calibration.
Advanced Setting:
Click Advanced Setting to display the Advanced Setting
window. When you are finished, select Done to save
your changes or Cancel to discard them.
Right Click Simulation: When this option is
enabled, pressing on the screen (as opposed to
tapping it) performs a “right-click” mouse button
action. The amount of time the finger must remain
on the touch screen to perform this action is
configurable; refer to Right Click Duration, below.
TUIO (Tangible User Interface Object) Support:
Certain applications require access to touch point
messages via the TUIO protocol. Also, certain
operating systems require TUIO to provide multi-
touch capability (refer to Software Requirements
(Single-Touch Operation) on page 20). Therefore, it
is recommended that you enable this option.
Right Click Duration: When Right Click
Simulation is enabled, this slider controls how long
a finger press action must be in order for it to be
interpreted as a “right-click” action.
Double Click Speed: This slider controls the
maximum duration between two touches in order
for them to be interpreted as a “double-click”
action.
Right/Double Click Range: This slider controls the
maximum distance between two touches in order
for them to be interpreted as a “double-click” or
“right-click” action.
Reset: To restore all TouchWin configuration
settings to their factory defaults and undo the
effects of any previous calibrations, click Reset.
LM-QSG_eScreen_PTX9800UHD-1606.indd 15 06.07.16 13:10

16 PTX-9800UHD – QUICK SETUP GUIDE – ENGLISH
TROUBLESHOOTING / COMPLIANCE
Before calling service personnel, please check the following chart for a possible cause to the trouble you are
experiencing.
• Perform the adjustments according to page 13 -“Operation“ and page 14 -“Touch Operation“.
• If the problem you have experienced isn’t described below or you can’t correct the problem, stop using the
display and call service personnel or your dealer.
FCC:
FCC CFR Title 47 Part 15 Subpart B Class A, CISPR 22
ANSI C63.4
ICES-003 Issue 5
CE:
EN 55022
EN 55024
EN 61000-3-2
EN 61000-3-3
cTUVus:
UL 60950-1
CAN/CSA-C22.2 No. 60950-1-07
CB:
IEC 60950-1
7. TROUBLESHOOTING
8. COMPLIANCE
PROBLEM CHECK THESE THINGS
No Display
Ensure the power plug is installed correctly on both ends
Check the main power switch is set to “—“
Check that source equipment is operating correctly
Check the input signal is compatible with this display
Check the LED light
The image is not centered Check the input signal is compatible with this display
The image is not locked correctly Check the input signal is compatible with this display
The remote control doesn’t work
Make sure the batteries fresh and are installed correctly
Ensure the remote is aimed at the IR sensor on the front of the display
Some functions are not available with this display, see page 12
The picture color looks poor Check the picture settings
Reset the display
Touch does not function Ensure the USB cable is installed correctly on both ends
Power the display off and on to recognize if a new PC is connected
Touch is not accurate Calibrate the touch screen as shown on page 14
LM-QSG_eScreen_PTX9800UHD-1606.indd 16 06.07.16 13:10

17
PTX-9800UHD – QUICK SETUP GUIDE – ENGLISH
APPENDIX
9. APPENDIX
9.1. DIMENSIONS
The following illustration shows the overall dimensions of the display:
LM-QSG_eScreen_PTX9800UHD-1606.indd 17 06.07.16 13:10

18
INHALTSVERZEICHNIS
DEUTSCH
PTX-9800UHD – KURZANLEITUNG ZUR INSTALLATION – DEUTSCH
1. Wichtige Hinweise .......................................................................................................... 19
1.1. Benutzung .................................................................................................................................19
1.2. Haftungsausschluss ....................................................................................................................19
2. Sicherheitsvorschriften .................................................................................................... 20
2.1. Vorsichtsmaßnahmen zur Sicherheit ...........................................................................................20
2.2. Hinweise zum Transportieren und Tragen des Gerätes...................................................................21
2.3. Installation .................................................................................................................................21
2.4. Sicherheitshinweise für die Wandmontage .................................................................................22
2.5. Empfehlungen für die Benutzung............................................................................................... 23
2.6. Reinigung...................................................................................................................................24
3. Packungsinhalt................................................................................................................ 24
3.1. Auspacken .................................................................................................................................24
3.2. Mitgeliefertes Zubehör ...............................................................................................................25
4. Installation...................................................................................................................... 25
4.1. Umgebungsbedingungen........................................................................................................... 25
4.2. Stromversorgung........................................................................................................................ 25
4.3. EasyFix-Montagelösungen und Kabelmanagement .....................................................................26
4.4. Bedienfeld..................................................................................................................................27
4.5. Status-LED..................................................................................................................................27
4.6. Eingangs- und Ausgangsanschlüsse............................................................................................27
4.7. Fernbedienung........................................................................................................................... 28
5. Betrieb............................................................................................................................ 29
5.1. Den Monitor ein- und ausschalten..............................................................................................29
5.2. Lautstärke und Eingangsquelle anpassen ..................................................................................... 29
6. Touch-Bedienung............................................................................................................ 30
6.1. USB-Kabelanschluss für die Touch-Funktion ................................................................................30
6.2. Konfigurieren des Touchscreens.................................................................................................. 30
7. Fehlersuche..................................................................................................................... 32
8. Konformität.................................................................................................................... 32
9. Anhang .......................................................................................................................... 33
9.1. Abmessungen ............................................................................................................................33
LM-QSG_eScreen_PTX9800UHD-1606.indd 18 06.07.16 13:10

19
WICHTIGE HINWEISE
1. WICHTIGE HINWEISE
WARNHINWEIS:
UM EINEN BRAND ODER STROMSCHLAG ZU VERMEIDEN, DARF DAS GERÄT NIEMALS DEM
REGEN ODER DER FEUCHTIGKEIT AUSGESETZT WERDEN. DER VERPOLUNGSSICHERE STECKER
DIESES GERÄTES DARF NIEMALS AN DIE ANSCHLUSSBUCHSE EINES VERLÄNGERUNGSKABELS
ODER ANDERE STECKDOSEN ANGESCHLOSSEN WERDEN, WENN DIE KONTAKTSTIFTE NICHT
VOLLSTÄNDIG EINGESTECKT WERDEN KÖNNEN.
ÖFFNEN SIE NIEMALS DAS GEHÄUSE DES GERÄTES, DA ES HOCHSPANNUNGSKOMPONENTEN
ENTHÄLT.
VORSICHT:
UM DIE UM DIE GEFAHR EINES STROMSCHLAGS ZU VERMEIDEN, ZIEHEN SIE STETS DAS
NETZKABEL VON DER WANDSTECKDOSE AB. UM DAS GERÄT VOLLSTÄNDIG VOM NETZ ZU
TRENNEN, ZIEHEN SIE BITTE DAS NETZKABEL VON DER NETZSTECKDOSE AB. NIEMALS DIE
ABDECKUNG (ODER RÜCKSEITE) DES GERÄTES ABNEHMEN. IM GERÄT BEFINDEN SICH KEINE
TEILE, DIE VOM BENUTZER GEWARTET WERDEN KÖNNEN. LASSEN SIE WARTUNGSARBEITEN NUR
VON QUALIFIZIERTEM SERVICEPERSONAL AUSFÜHREN.
1.1. BENUTZUNG 1.2. HAFTUNGSAUSSCHLUSS
• Den Monitor aufrecht in geeigneter Verpackung
transportieren. Den Monitor nicht mit der
Anzeigefläche nach oben oder unten abstellen.
Nicht gegen den Monitor stoßen.
• Verwenden Sie kein statisches (unbewegliches) Bild
auf diesem Monitor, da dies zum ‘Einbrennen’ oder
zu Nachbildeffekten führen kann.
• “Einbrennen” und/oder Nachbildeffekte sind nicht
von der Garantie abgedeckt.
• Achten Sie auf einen regelmäßigen Wechsel des
Bildes auf dem Monitor. Es wird empfohlen, (1.)
innerhalb eines Zeitraums von 24 Stunden den
Monitor nach 16 Stunden Betrieb mindestens
6Stunden lang ausgeschaltet zu lassen, um
Nachbildeffekte zu vermeiden, und (2.) im OSD-
Menü die “IRFM”-Funktion auf “EIN” zu stellen
(unter “Erweiterte Einstellungen”).
• Von der Produktgarantie ausgenommen
sind Schäden, die durch Naturkatastrophen
(Erdbeben, Gewitter usw.), Feuer, Handlungen
von Dritten, Unfälle, vorsätzlichen Fehlgebrauch
oder Verschulden des Besitzers oder durch
Benutzung unter ungeeigneten Bedingungen
verursacht wurden.
• Von der Produktgarantie ausgenommen sind
Nebenschäden (wie der Verlust von Gewinnen,
Betriebsunterbrechungen, Veränderung oder
Löschung von aufgezeichneten Daten usw.),
die durch die Nutzung oder Unfähigkeit zur
Nutzung dieses Produkts verursacht wurden.
• Von der Produktgarantie ausgenommen sind
Schäden, die durch unsachgemäßen Betrieb
oder durch Nichtbeachtung der Anweisungen
in der Kurzanleitung entstanden sind.
• Von der Produktgarantie ausgenommen
sind Schäden, die durch Fehlgebrauch oder
Fehlfunktionen bei gleichzeitiger Benutzung des
Produktes und der angeschlossenen Ausrüstung
oder Software verursacht wurden.
• Von der Produktgarantie ausgenommen sind
alle Schäden, die durch Nichtbeachtung der
Installationsanweisungen verursacht wurden.
• Von der Produktgarantie ausgenommen
sind alle durch unsachgemäße Installation
verursachten Schäden.
• Von der Produktgarantie ausgenommen
sind alle Schäden, die durch eine von nicht
autorisierten Servicezentren oder unbefugten
Personen durchgeführte Demontage,
Veränderung oder Reparatur verursacht wurden.
PTX-9800UHD – KURZANLEITUNG ZUR INSTALLATION – DEUTSCH
LM-QSG_eScreen_PTX9800UHD-1606.indd 19 06.07.16 13:10

20
SICHERHEITSVORSCHRIFTEN
2. SICHERHEITSVORSCHRIFTEN 2.1. VORSICHTSMASSNAHMEN ZUR
SICHERHEIT
Bitte lesen Sie diese Kurzanleitung zur Installation
sorgfältig durch, bevor Sie den Monitor in Betrieb
nehmen. So vermeiden Sie Schäden an eigenem
oder fremdem Eigentum und sorgen für Ihre
persönliche Sicherheit und die anderer Personen.
• Beachten Sie unbedingt die nachfolgenden
Anweisungen.
• Zu Ihrer Sicherheit beachten Sie unbedingt die
Warnhinweise in diesem Handbuch.
• Zur Installation oder Anpassung folgen Sie
bitte den Anweisungen in diesem Handbuch.
Sämtliche Wartungsarbeiten dürfen nur von
qualifiziertem Fachpersonal ausgeführt werden.
Wenn Rauch oder ein eigenartiger Geruch aus
dem Monitor strömt, ziehen Sie unverzüglich
den Netzstecker aus der Steckdose.
Bei Nichtbeachtung besteht die Gefahr eines Brandes
oder Stromschlags. Wenden Sie sich zur Überprüfung
des Gerätes an Ihren Händler.
Wenn bei eingeschaltetem Monitor kein
Bild erscheint, ziehen Sie unverzüglich den
Netzstecker aus der Steckdose.
Bei Nichtbeachtung besteht die Gefahr eines Brandes
oder Stromschlags. Wenden Sie sich zur Überprüfung
des Gerätes an Ihren Händler.
Wenn Wasser oder Gegenstände in den Monitor
gelangt sind, ziehen Sie unverzüglich den
Netzstecker aus der Steckdose.
Bei Nichtbeachtung besteht die Gefahr eines Brandes
oder Stromschlags. Wenden Sie sich zur Überprüfung
des Gerätes an Ihren Händler.
Wenn der Monitor fallen gelassen wurde oder
das Gehäuse beschädigt worden ist, ziehen Sie
unverzüglich den Netzstecker aus der Steckdose.
Bei Nichtbeachtung besteht die Gefahr eines Brandes
oder Stromschlags. Wenden Sie sich zur Überprüfung
des Gerätes an Ihren Händler.
Wenn das Netzkabel oder der Stecker
beschädigt ist oder sich stark erhitzt, schalten
Sie das Gerät über den Netzschalter aus.
Vergewissern Sie sich, dass der Stecker sich
abkühlt und ziehen Sie das Netzkabel aus der
Steckdose.
Wird der Monitor in diesem Zustand weiter benutzt,
besteht die Gefahr eines Brandes oder Stromschlags.
Wenden Sie sich wegen eines Austauschs an Ihren
Händler.
PTX-9800UHD – KURZANLEITUNG ZUR INSTALLATION – DEUTSCH
LM-QSG_eScreen_PTX9800UHD-1606.indd 20 06.07.16 13:10
Table of contents
Languages: