manuals.online logo
Brands
  1. Home
  2. •
  3. Brands
  4. •
  5. LEGRAND
  6. •
  7. Test Equipment
  8. •
  9. LEGRAND 3455 User manual

LEGRAND 3455 User manual

1
1
2
3
4
5
6
3455
Description
The outside temperature can be measured by means of this radio probe.The data is then
sent through radio waves to the receiving interface, and to the temperature control
system. 99-zone or 4-zone central units can simply display this data. The automations
are reserved just to the 99-zone central unit and can activate controls on the basis of
exceeding particular temperature thresholds set by means of theTiThermo software.
These automations also allow the management of enhanced systems with combination
boiler. Up to nine temperature probes can be installed in a system.
The radio probe is practically maintenance-free and is supplied by a small solar cell
installed on the device. Special care should be taken to install the solar cell in positions
which can guarantee sucient irradiation.
For applications in badly lit or dark places, where the solar cell cannot supply the
device, power can be supplied by means of a Lithium battery (type LS14250/1/2AA),
to be inserted in the battery compartment. To guarantee the operation of the
battery-supplied probe the battery should be replaced at least every 5 years.
The eective battery lifetime depends on the “data updating time” setting (see
conguration section).
On the probe printed circuit there is a small key to be used during programming and
when the receiving interface is acquiring the radio probe details.
Front view
Legend
1. Temperature sensor: to measure the temperature
2. Transmission key: allows the association between radio probe and receiving interface
3. Compartment: for lithium battery
4. Solar cell: supplies the entire device
5. Jumpers: to set the temperature update interval
6. IP65 enclosure
Technical data
- Power supply: - solar cell
- 3.6 V / 1.1Ah type LS14250/1/2AA lithium battery
- Operating temperature: (-25) – (+40) °C
- Measurement eld: (-20) – (+60) °C
- Radio frequency: 868 MHz
- Transmission power: < 10 mW
- Range: 70 m in free eld (metal and reinforced concrete walls reduce the range);
- Protection index: IP65
CE CONFORMITY
89/336/EWG – Electromagnetic compatibility
R&TTE 1999/5/EC – Directive on radio and telecommunication devices
CONFORMITY TO REGULATIONS
ETSI EN 301 489-3
ETSI EN 300 220-3
EN 60669-2-1
EN 60950
EN 60065
EN 60529
Side view
Probe installation
NOTE: the probe must be installed in a position away from direct sunlight, as
this may cause a false temperature reading. Avoid both excessively shady and
excessively bright areas.
MQ00182-c-EN 29/04/2014
Radio outdoor
temperature probe
2
OKC
1 2 3
45 6
7 8 9
0
OK
t < 3° C
t > 3° C
o
on
1 2 3
45 6
7 8 9
0
OK
T-1C -2C
T1C
2C
3455
LED
Temperature display
PROBE for temperature
detection and transmission
INTERFACE for
data reception
4-ZONE CENTRAL UNIT for outdoor
temperature display
99-ZONE CENTRAL UNIT for outdoor
temperature display
Probe for temperature
detection and transmission
Interface
for data reception
99-zone central unit Control implementation
actuator
TITHERMO for threshold setting
and automation
Automation - threshold exceeded LED
MQ00182-c-EN 29/04/2014
Radio outdoor
temperature probe
3
RISCALDAMENTO
BUS
1 2 3
45 6
7 8 9
0
OK
T-1C -2C
T1C
2C
}
}
T1
T2
T = 10 x 100 = 1000 sec
3455
chiller
switching
valve
integration
boiler
probe
interface actuator
99-zone
central unit
Setting the temperature update interval
The radio probe sends the “temperature” reading to the receiving interface at regular
intervals that can be manually set using the jumpers, which must be connected to the
T1 and T2 sockets. The update time is calculated following the formula below:T=T1xT2.
The correspondence between the settable times and the jumpers is shown on the
table. When the factory settings are used, the temperature will be updated every 1000
seconds. A change in the factory settings will also entail a variation on the solar cell
recharging time, or the duration of the battery (if applicable).
Jumper sockets
Factory settings
Automations - system with integration boiler
Jumper/time table
Jumpers T1/T2
1 sec.
10 sec.
100 sec.
MQ00182-c-EN 29/04/2014
Radio outdoor
temperature probe
4
P
M1
PL1/N1
A/-
A2/-
PL2/N2
M2
3455
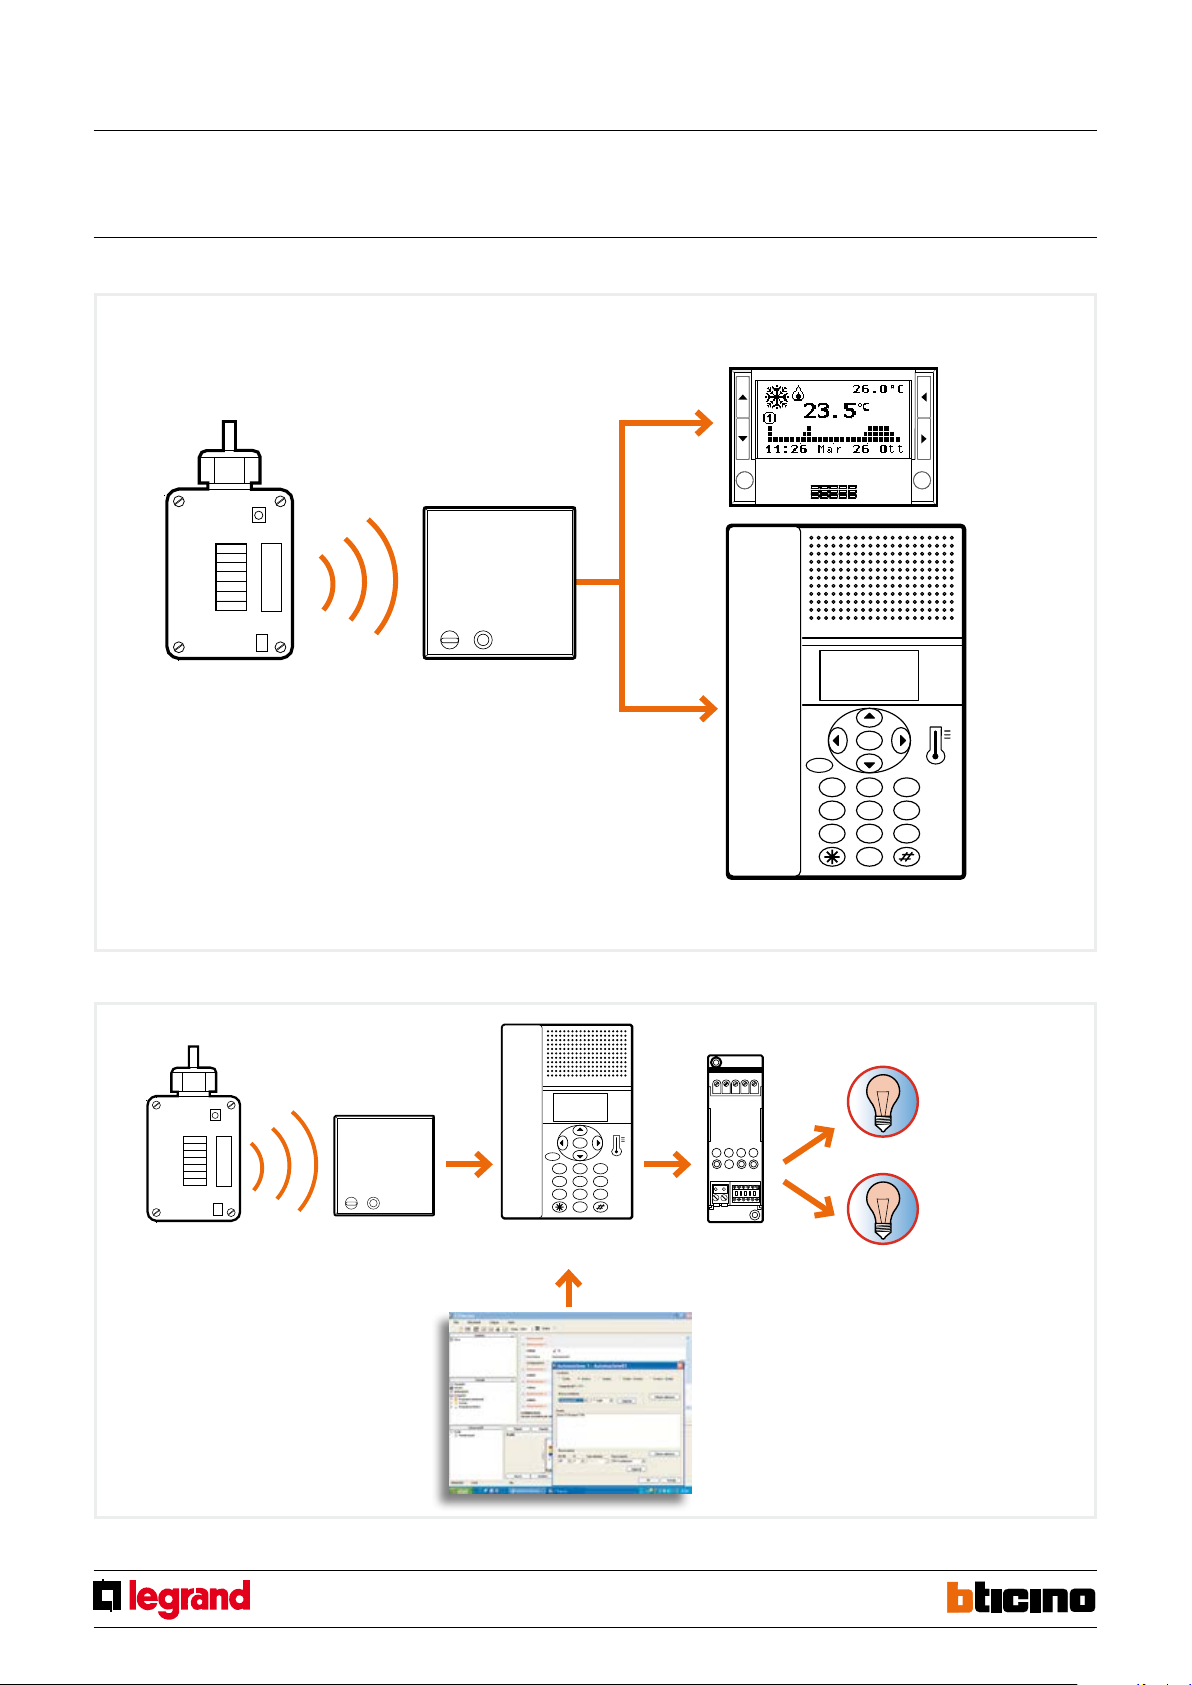
HC/HS 4577 and L/N/NT4577 receiving interface conguration
In order to use a receiving interface and radio probe, conguration must rst be
performed, followed by the programming procedure. Only the interface needs
conguring. Up to 2 probes may be combined with each interface, therefore providing
the system with two detection points for each interface. Up to a maximum of 9
temperature probes may be installed in one system.
The conguration sockets on the interface identify the radio probes addresses.They are:
A1/-, PL1/N1, M1 for the rst address, and A2/-, PL2/N2, M2 for the second address. The
two addresses must always be dierent from each other, PL1/N1 ≠ PL2/N2. Only one
radio probe may be associated to each address. Only used addresses must be congured.
The interface must be congured in temperature control mode by connecting
congurator 1 to M1 and M2. With this mode the A1/- and A2/- sockets are not
used, therefore no congurator needs to be connected.
Programming of devices:
After performing the conguration, it will be necessary to associate the radio probe to
the interface following the programming procedure:
1) Press the pin pushbutton of the interface for 5 seconds. The red LED turns on.
Release the pushbutton. The interface LED will ash every two seconds to conrm
that programming mode is active on the rst address (group of congurators PL1/
N1, M1). If the second address of the interface is not congured (no congurator is
connected to the PL2/N2, M2 positions), go to step 2 of the procedure.
However, if also the second address must be congured (group of congurators PL2/
N2, M2), simply press the pin pushbutton of the interface again.
The LED will ash twice in succession every two seconds.
Every time the pin pushbutton is pressed, the system will switch from the rst to the
second address and vice versa.
2) After choosing the address, The radio probe should be associated to, within 20
seconds press the transmission key of the probe itself. Pressing the transmission key
will send the probe serial code. After receiving the code through the radio signal, the
red LED of the interface will quickly ash for 2 seconds, conrming that programming
is complete, and the procedure has been terminated.
If necessary repeat the operation to save the code of another probe. If on the other hand
an address has already been associated and the procedure is repeated with another
probe, the interface performs an overwriting action, only keeping the last probe in
memory. During normal operation, the sending of information from the probe is
conrmed by the ashing of the red LED of the interface. A single ashing indicates that
the radio message has been received, and the“temperature”data has been sent through
the BUS by a probe associated to the PL1/N1, M1 address. A double ashing indicates
that the radio message has been received, and the “temperature” data has been sent
through the BUS by a probe associated to the PL2/N2, M2 address. To delete all codes
from the interface press the pin pushbutton for 12 seconds. After 5 seconds from pressing
the key, the LED will turn on steadily, and after a further 7 seconds, it will start ashing
quickly, conrming that all programs have been deleted.
NOTES:
- If the interface conguration is wrong, the red LED will ash. Correct the conguration.
- If the second interface address has not been congured (no congurator connected to
the PL2/N2, M2 sockets), during the programming procedure it will not be possible to
switch to this address, which therefore cannot be programmed.
Interface back view
Congurator
socket
MQ00182-c-EN 29/04/2014
Radio outdoor
temperature probe

Other LEGRAND Test Equipment manuals

LEGRAND Wattstopper LMCT-100-2 User manual

LEGRAND

LEGRAND Wattstopper LMCT-100-2 User manual

LEGRAND 682083 User manual

LEGRAND

LEGRAND 682083 User manual

LEGRAND 430 586 User manual

LEGRAND

LEGRAND 430 586 User manual

Popular Test Equipment manuals by other brands

Sealey BT105 instructions

Sealey

Sealey BT105 instructions

Benning ST 710 operating manual

Benning

Benning ST 710 operating manual

Hanna Instruments DiST 3 instruction manual

Hanna Instruments

Hanna Instruments DiST 3 instruction manual

Kett C-130 manual

Kett

Kett C-130 manual

Amprobe INSP-3 user manual

Amprobe

Amprobe INSP-3 user manual

TMB ProPlex IQ Two 66 2x user manual

TMB

TMB ProPlex IQ Two 66 2x user manual

Tecnolux 2019 Maintenance and operating manual

Tecnolux

Tecnolux 2019 Maintenance and operating manual

BASEWEST TS-420 operating & maintenance manual

BASEWEST

BASEWEST TS-420 operating & maintenance manual

Sage 925VST quick guide

Sage

Sage 925VST quick guide

PICO picoscope 3204 user guide

PICO

PICO picoscope 3204 user guide

Tektronix MB100 Programmer's manual

Tektronix

Tektronix MB100 Programmer's manual

METREL A 1322 instruction manual

METREL

METREL A 1322 instruction manual

AVYCON AIVO-70AET user manual

AVYCON

AVYCON AIVO-70AET user manual

YOKOGAWA AQ7280 OTDR Getting started guide

YOKOGAWA

YOKOGAWA AQ7280 OTDR Getting started guide

Megger PAT4DV/3 user guide

Megger

Megger PAT4DV/3 user guide

Clearaudio AC039 user manual

Clearaudio

Clearaudio AC039 user manual

Rigol 2000 Series user guide

Rigol

Rigol 2000 Series user guide

Sanwa SP20 instruction manual

Sanwa

Sanwa SP20 instruction manual

manuals.online logo
manuals.online logoBrands
  • About & Mission
  • Contact us
  • Privacy Policy
  • Terms and Conditions

Copyright 2025 Manuals.Online. All Rights Reserved.