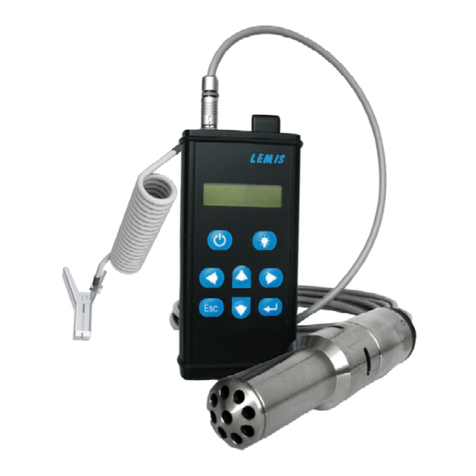
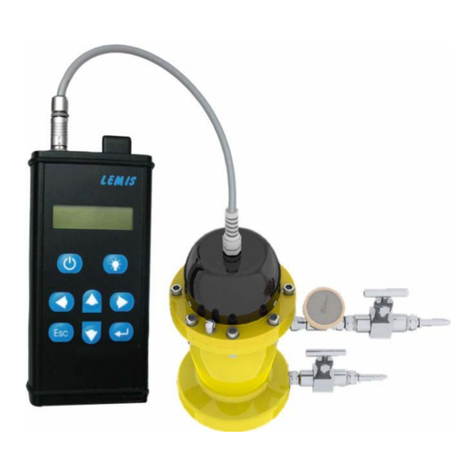
LEMIS DM-250.1 Series User manual

PORTABLE DENSITY METER
DM-250.1
Owner’s Manual
September 2016
Version_V1

2
CONTENTS
1. APPLICATION .............................................................................................................. 3
2. STANDARD COMPLETE.............................................................................................. 3
3. SPECIFICATIONS ........................................................................................................ 4
4. WARNINGS & OPERATOR SAFETY ........................................................................... 5
4.1. Special condition for safe use in hazardous area................................................... 5
5. CONSTRUCTION and OPERATING PRINCIPLE........................................................ 6
5.1. Control panel and Display ...................................................................................... 7
6. MENU............................................................................................................................8
7. SETTINGS .................................................................................................................... 9
7.1. “MEASURE” – selection of density measuring mode ........................................... 11
7.2. “TABLE” - Product Type setting ......................................................................... 11
7.3. “FORMAT” of Real and Relative Density Readings ............................................. 12
7.4. “DENSITY” Units setting ...................................................................................... 13
7.5. “TEMPERATURE” Units setting ........................................................................... 13
7.6. Bright – characters brightness setiing ................................................................. 13
7.7. “DATE” setting...................................................................................................... 14
7.8. “TIME” setting...................................................................................................... 15
7.9. “SHUTDOWN” setting ......................................................................................... 16
7.10. “BEEPER” setting................................................................................................ 16
7.11. “PASSWORD” setting .......................................................................................... 16
7.12. “TECH.CALIB” – device technical calibration mode ............................................. 17
7.13. “DEVICE INFO”.................................................................................................... 18
7.14. “BLUETOOTH PIN” setting .................................................................................. 19
7.15. “BLUETOOTH” ON / OFF setting......................................................................... 20
8. “PRINTER” setting....................................................................................................... 20
9. “CALIB” setting............................................................................................................ 23
10. OPERATING MODE ................................................................................................... 23
10.1. Preparations......................................................................................................... 23
10.2. Measuring Mode .................................................................................................. 24
10.3. Data Storage ........................................................................................................ 26
10.4. After Operation..................................................................................................... 27
11. OPERATIONS WITH SAVED DATA ........................................................................... 27
11.1. VIEW / Saved Data Browsing.............................................................................. 27
11.2. CLEAR / Saved Data Deleting ............................................................................. 28
11.3. Saved Data Printing ............................................................................................. 29
12. SERVICING ................................................................................................................ 30
12.1. After Use .............................................................................................................. 30
12.2. Cleaning............................................................................................................... 30
13. BATTERY.................................................................................................................... 31
13.1. Battery State Review............................................................................................ 31
13.2. Battery Charging .................................................................................................. 31
14. Testing ........................................................................................................................ 33
14.1. Calibration............................................................................................................ 33
15. STORAGE and TRANSPORTATION.......................................................................... 33
Appendix 1. The Density of Distilled Water with the Testing Temperature (Tt0) ................. 34
Appendix 2. Available troubles and trouble-shooting procedures....................................... 35

3
1. APPLICATION
The portable density meters DM-250.1 series (hereinafter: DM-250.1 or device)
are designed for density measurements of any pure liquids directly in tanks,
without sampling, at the depth up to 12 meters. The device allows readings of
relative density and volume concentration of alcohol in water solutions.
It may be used for qualitative and quantitative control of petroleum products in the
process of production, refining, transportation, storing and trading of petroleum
products.
The DM-250.1 has waterproof construction with enclosure IP67.
2. STANDARD COMPLETE
Density meter (consist from display unit (hereinafter: “device”), which is
fastened on holder with connected density and temperature sensor by cable
spooled on holder.
Charging device;
Belt;
Carrying case;
Manual;
Accessories :
Software: under WINDOWS.

4
3. SPECIFICATIONS
PERFORMANCES PARAMETERS
Measuring ranges
Density, g/сm3(kg/m3)
Temperature, С
0,6...1,1 (600 …1100)
-30...+50
Accuracy
Density, g/сm3(kg/m3)
Temperature, С
0.0003 (0.3) or 0.0005 (0.5)
0.2
Resolution
Density, g/сm3(kg/m3)
Temperature, С
0.0001 (0.1)
0.1
Depth of imbedding of the
sensor, M
Depends from cable length
Battery NiMH-accumulator
3,6 Volts - 1500 mAh
Enclosure IP67
Safety::
device
sensor
II 2G (1G) Ex ib [ia] IIB T4 (Ga)
II 1G Ex ia IIB T4 Ga
Ambient temperature -40... +50 C
Dimensions
density meter with sensor mm,
no more than
sensor mm, no more than
208 х246 х139
45 х210
Weight
density meter without sensor
kg, no more than
sensor kg, no more than
1.3
0.9

5
4. WARNINGS & OPERATOR SAFETY
Make sure you have read this manual carefully before operating the device.
Do not charge the battery or open the battery compartment in explosive zones!
Do not operate the device with mechanical or electronic defects.
The operator of the DM-250.1 must control good working order of the device
during its maintenance.
The device may be refitted and dismantled only by manufacturer or authorized
distributor’s company.
At all times use common sense.
It is important that only suitably trained personnel operate this equipment, in
accordance with the instructions contained in this manual and with general
safety standards and procedure.
If the equipment is used in a manner not specified by DM-250.1 the protection
provided by the equipment to the users might be impaired.
4.1. Special condition for safe use in hazardous area.
1. The equipment must only be charged and opened in a non-hazardous area.
2. Ambient temperature range: -30°C ≤Ta ≤+50°C
3. The Sensor DS 251 comprises light alloy parts. Therefore when it is used in
zone 0 it is necessary to avoid any impact or friction of sensors body

6
5. CONSTRUCTION
*and OPERATING PRINCIPLE
Density meter DM-250.1 consist from device control panel with OLED display and
density and temperature sensor (hereinafter: sensor), which connected by cable.
Device is portable with dust and waterproof keyboard and display, built-in
Bluetooth for data transfer to external devices (printer or PC). The device is
explosion-proof and self-powered (with built-in rechargeable battery with
intrinsically safe circuits).
The sensor (pic.1) is made from
stainless steel. The operating principle
of the density sensor based on the
measuring of resonant oscillation
frequency of mechanical oscillating
system, which is wholly immersed into
the liquid.
This method allows measure real
density of liquid without extraction of
samples, at any depth.
Pic.1. Sensor
*The manufacturer reserves the right to make some changes in construction and software
of the device, which will not adversely affect to the quality of the device.

7
5.1. Control panel and Display
Device control panel (pic.2) consist from 6 buttons and OLED (Organic Light
Emitting Diode) display.
Display (pic.3) show two lines with 12 characters each.
Рiс. 2. Device
– power switch ON/OFF
– 1) «cancel» current operation;
2) exit from current mode;
– “right” cursor key
– “up” cursor key
– “down” cursor key
– “Enter” Рiс. 3. Display

8
6. MENU
Switch ON the controller
. When the power is switched on, a
copyright / version notice similar to the one below is displayed
DM-250.1
Density Meter
After 1 second the line “Density Meter” will be changed to info travelling
line “www.lemis-process.com”. To escape the travelling line - press
.
The device begins testing:
Testing…
██∏∏∏∏∏∏
If the sensor is not well connected or it is defected, the display shows:
Sensor
not detected
If the clock must be reset display shows:
Year/Month/Date
2015/ Oct / 15
(See p.p. 7.7. and 7.8. to set date and time).
If it is all right – the operating modes menu will be displayed:
Measuring
Notes
:
Battery
Printers
:
Settings
Calib

9
To enter in menu – mark the required one by marker and press
Example:
/ Notes /
. :
Notes: View
Clear
where: View – viewing of the stored data (see p. 11.1.);
Clear – stored data clearing (password requested if password is set)
(see p.11.2.);
To enter in any above selection – mark the required one by marker and
press . To view stored data – mark “View” by marker , press
and then select searching way “By Date” or “By Number”. Searching stored
data by date should enter year, month and day; by number should enter
numbers of measurements (from… to…).
NOTE: to enter in MENU from the Notes Mode – press .
7. SETTINGS
Enter in MENU (see point 6)::
Printers
Settings
/ Settings /
:
Measure: Stabil
Table: Products
:
Format: D15
Density: kg/m3
:
Temperature: oC
Brightness: 4
:

10
Date: 25/Oct/13
Time: 15:04:33
:
Shutdown: Auto
Beeper: ON
:
Password
Tech.Calib
:
Device Info
Bluetooth: Pin
Bluetooth: ON
Where: Measure – selection of density measuring modes;
Table – selection of the liquid type for appropriate referred density calculation;
Format – setting of the required format of the referred density readings;
Density – setting of the density units;
Temperature – setting of the temperature units;
Brightness – display’s backlight brightness setting;
Date – date setting;
Time – time setting;
Shut down – ON / OFF setting;
Beeper – ON / OFF setting;
Password – setting of the password for enter in «Clear» mode;
Tech.Calib – enter to device technical calibration (access protected with
password)
Device Info – information about a copyright/version of the device.
Bluetooth PIN – PIN code for authorized PC connection;
Bluetooth – ON / OFF setting;
Mark the required selection with the marker and press .

11
7.1. “MEASURE” – selection of density measuring mode
7.1.1. Device has 2 types of density measuring: Stabil – Measuring mode when
temperature is stabile, Contin – continuous measuring mode.
7.1.2. Stabil measuring mode is produced to avoid errors in measuring, which
occurs due sensor insufficient warming/cooling, when it submerse into
tank with petroleum where sensor and petroleum temperature differ
greatly. In Stabil mode density measuring result considered incorrect and
blinks until temperature changing rate which determine temperature
sensor will be at least 0,5 ºСper minute. After reducing the rate of
temperature change to 0,5 º C per minute (but not earlier than 15 seconds
after the start of measurement), density results will stop blinking and
device beeps. After this measurement result is correct and can be saved.
If temperature rate will exceed 0,5 ºСper minute, results starts blink
again.
7.1.3. Contin measuring mode produce direct measuring without temperature
analyzing. In this case operator choose temperature stabilization and
fixing moment. This mode recommended for experienced operators.
7.1.4. To set measuring mode enter to the Settings and choose position
Measure:
Printers
Settings
/ Settings /
:
Measure.: Stabil.
Table: Products
:
Measure.: Contin.
Table: Products
7.1.5. To return in the Main Menu – press. .
7.2. “TABLE” - Product Type setting
7.2.1. Select the type of measured liquid before measurements: “Products”
(petroleum products: gasoline, jet, diesel). Enter in Settings Menu and
select “Table” position:
Printers
Settings
/ Settings /
:

12
Table: Products
Format: D15C
:
Table: Crude Oil
Format: Dt,20
7.2.2. This selection will be considered during the following calculation of the
relative density.
7.2.3. To return in the Settings Mode – press .
7.3. “FORMAT” of Real and Relative Density Readings
There are appropriate tables recorded in the program of the DM-250.1, which
allow calculating of referred density of crude oil and light petroleum products:
- correction of observed density of gasoline, jet, diesel to density at 200С– ASTM
D1250 Table 59B;
- correction of observed density of gasoline, jet, diesel to density at 150C – ASTM
D1250 Table 53B;
- correction of observed density of crude oil to density at 200С– ASTM D1250
Table 59A;
- correction of observed density of crude oil to density at 150C – ASTM D1250
Table 53A;
7.3.1. Find “Format” in the Settings mode by the aid of keys and .
There are several formats of observed results representation are available
Dt,15º - real density and temperature + referred density at 15°C;
Dt,20º - real density and temperature + referred density at 20°C;
7.3.2. Select the suitable format by the aid of key :
Table: Products
Format: Dt,20º
7.3.3. By the aid of the key - indicate the suitable format with the pointer
.
Table: Products
Format: Dt,15º
7.3.4. To return in the Settings Mode – press .

13
7.4. “DENSITY” Units setting
This selection allows setting of density units suitable for measurements
representation in “Measuring” mode.
7.4.1. Find “Density” in the Settings menu by the aid of keys and .
7.4.2. Select the suitable density units by the aid of key ::
Density: kg/m3
Temperature: oC
:
Density: g/cm3
Temperature: oC
7.4.3. To return in the Settings Mode – press .
7.5. “TEMPERATURE” Units setting
7.5.1. Find “Temperature” in the Settings menu by the aid of and keys.
Density: kg/m3
Temperature: oC
:
Density: kg/m3
Temperature: oF
7.5.2. To return in the Settings Mode – press .
7.6. Bright – characters brightness setiing
7.6.1. Find “Bright” in the Settings menu by the aid of keys and .
7.6.2. Select the suitable characters brightness by the aid of key :
Temperature: oC
Bright: 4

14
Temperature: oC
Bright: 1
:
Temperature: oC
Bright: 2
:
Temperature: oC
Bright: 3
7.6.3. To return in the Main Menu – press .
7.7. “DATE” setting
7.7.1. To adjust date and time – find “Date” in the Settings menu by the aid of
and keys:
Date: 25/Oct/13
Time: 15:04:33
7.7.2. Select required format with key:
Date: 25/Oct/13
Time: 15:04:33
:
Date: 10/25/13
Time: 15:04:33
:
Date: Oct/25/13
Time: 15:04:33
for other formats.

15
7.7.3. Select the suitable format by the aid of key and press to
enter correct year, month and date:
:
Year/Month/Date
2015/ Oct / 25
7.7.4. Adjust the date by the aid of , and keys and press .
7.7.5. To return in Settings Menu – press twice.
7.8. “TIME” setting
7.8.1. To adjust time – find “Time” in the Settings menu by the aid of and
keys
7.8.2. Select the suitable format by the aid of key :
Date: 25/Oct/13
Time: 12:35:57
:
Date: 25/Oct/13
Time: AM 12:35
:
Date: 25/Oct/13
Time: 12:35 AM
7.8.3. press to enter correct year, month and date:
:
Hour : Minute
12:35
Adjust the time by the aid of , and keys. Press .
7.8.4. To return in Settings Menu – press twice.

16
7.9. “SHUTDOWN” setting
7.9.1. Find “Shutdown” in the Settings menu by the aid of and keys:
Shutdown: Auto
Beeper: ON
7.9.2. Select the suitable position by the aid of key :
“AUTO” – the mode of automatic “Power OFF” if a device is not in use
for 20 minutes.
“MANUAL” – the mode of manual “Power OFF”.
Shutdown: Manual
Beeper: ON
7.9.3. To return in Settings Menu – press .
7.10. “BEEPER” setting
This mode serves enable (disable) sound accompany for every button pushing,
and sound indication in “stabil” measuring mode.
7.10.1. Find “Beeper” in the Settings menu by the aid of and keys
Shutdown: Auto
Beeper: ON
7.10.2. Select the suitable mode by the aid of key :
Shutdown: Auto
Beeper: OFF
7.10.3. To return in Settings Menu – press .
7.11. “PASSWORD” setting
The password (any 6 digits) may be set by user to prevent unauthorized access in
the «CLEAR» mode and Date/Time setting also.
7.11.1. Find “Password” in the Settings menu by the aid of and keys:

17
Beeper: OFF
Password
:
000000 000000
Old val New val
7.11.2. Enter the old password to the left side of the display (“Old val”) and press
. The manufacturer-defined password is “000000”.
A marker “0” indicates the digit to be changed by the keys or . The key
moves the marker from one digit to the other.
Enter the old password and press .
7.11.3. After correct old password was entered – the access to the “New value”
of password becomes available. Enter new password and press :
Are You sure?
yes →No←
To confirm new password – press , to mark ‘Yes’:
Are you sure?
→Yes←no
→Yes←/
.
7.12. “TECH.CALIB” – device technical calibration mode
Only distributor or manufacturer can produce technical calibration (using special
access password):
:
Tech.Calib
Device Info
:

18
Password: 000000
7.13. “DEVICE INFO”
7.13.1. To view the information about the device’s software – find “Device Info” in
the Settings menu:
Tech. Calib
Device Info
to see devise type:
Densimeter
DM-250.1
to see controller software version
Ver 2.01
09.12.2014
to see controller serial number and available memory
Nr: 015777
Memory: 1920
to see sensor number, type and firmware version
Sens. #001633
T:02h v5.01
7.13.2. To return in Settings Menu – press twice.

19
7.14. “BLUETOOTH PIN” setting
The Bluetooth PIN code (any 6 digits) may be set by user to prevent unauthorized
PC connection.
7.14.1. Find “Bluetooth PIN” in the Settings menu by the aid of and
keys
Bluetooth: OFF
Bluetooth PIN
:
000000 000000
Old PIN New PIN
7.14.2. Enter the old PIN code to the left side of the display (“Old PIN”) and press
. The manufacturer-defined password is “000000”.
A marker “0” indicates the digit to be changed by the keys or . The key
moves the marker from one digit to the other.
Enter the old PIN code and press .
7.14.3. After correct old PIN code was entered – the access to the “New PIN”
becomes available. Enter new PIN code and press :
Are You sure?
yes →No←
To confirm new PIN code – press , to mark ‘Yes’
Are you sure?
→Yes←no
→Yes←/
.

20
7.15. “BLUETOOTH” ON / OFF setting
7.15.1. Find “Bluetooth” in the Settings menu by the aid of and keys:
Bluetooth: ON
Bluetooth PIN
:
Bluetooth: OFF
Bluetooth PIN
Select the suitable mode by the aid of key .
Note! Bluetooth is auto off when device is turned off.
7.15.2. To return in Settings Menu – press .
8. “PRINTER” setting
8.1. This item supplies with printer Bluetooth setting. In additional operator
can add to printer list new printer, delete printer from printer list or
select concrete printer for printing. To see printer list:
:
Battery
Printers
:
View List
Add to List
:
List
1.XXX XXXX
1.XXX XXXX is a printer name. In device memory can save up to 3 printers.
8.2. This item supplies with printer selecting that is set as default printer.
Device prints all notes via default printer every time operator is
printing. If in the list is one printer, it is default printer. If there are
some printers, operator need to set concrete printer as default. Find
printer (see p.8.1.):
List
1.XXX XXXX
Other manuals for DM-250.1 Series
1
Table of contents
Other LEMIS Measuring Instrument manuals