LENCO DPA-24 User manual

2,4”(6,1CM) DIGITAL PHOTO ALBUM2,4”(6,1CM) DIGITAL PHOTO ALBUM
2,4”(6,1CM) DIGITAL PHOTO ALBUM
DPA-24

Table of Contents
Table ofContents........................................................................1
ENGLISH..............................................................................2-9
DEUTSCH...........................................................................10-17
Español..............................................................................18-25
NEDERLANDS....................................................................26-33
FRANCAIS..........................................................................34-41
1

SYSTEM REQUIREMENTS:
INSTALLATIONPROCEDURE:
Microsoft OS UserManual ENGLISH
DIGITAL PHOTO ALBUM
1. Windows 98 /2000 /ME /XP/Vista
2. Only support FAT Format
Read First
Quick Installation Guide
** Important: Install applicationsoftware before connect deviceto PC. **
1. Disconnect device USBcable from PC ifit is connected.
2. Insert CD andfollow the on-screen instructionto install “Photo
Album”.
3. After theapplication software has beensuccessfully installed,
you could connect deviceto PC with theprovided USB cable.
4. Windows OS willset up hardware driverautomatically.
5. Launch “Photo Viewer” and enjoy.
NOTE: The software can notinitialize with the unitif plugged in
while running in automaticslide show mode.
2

Important Safety Instructions
Introduction
This Digital PhotoAlbum is a stand-alonedevice that is designedto
transfer and store imagesfrom a PC andthen display the images.
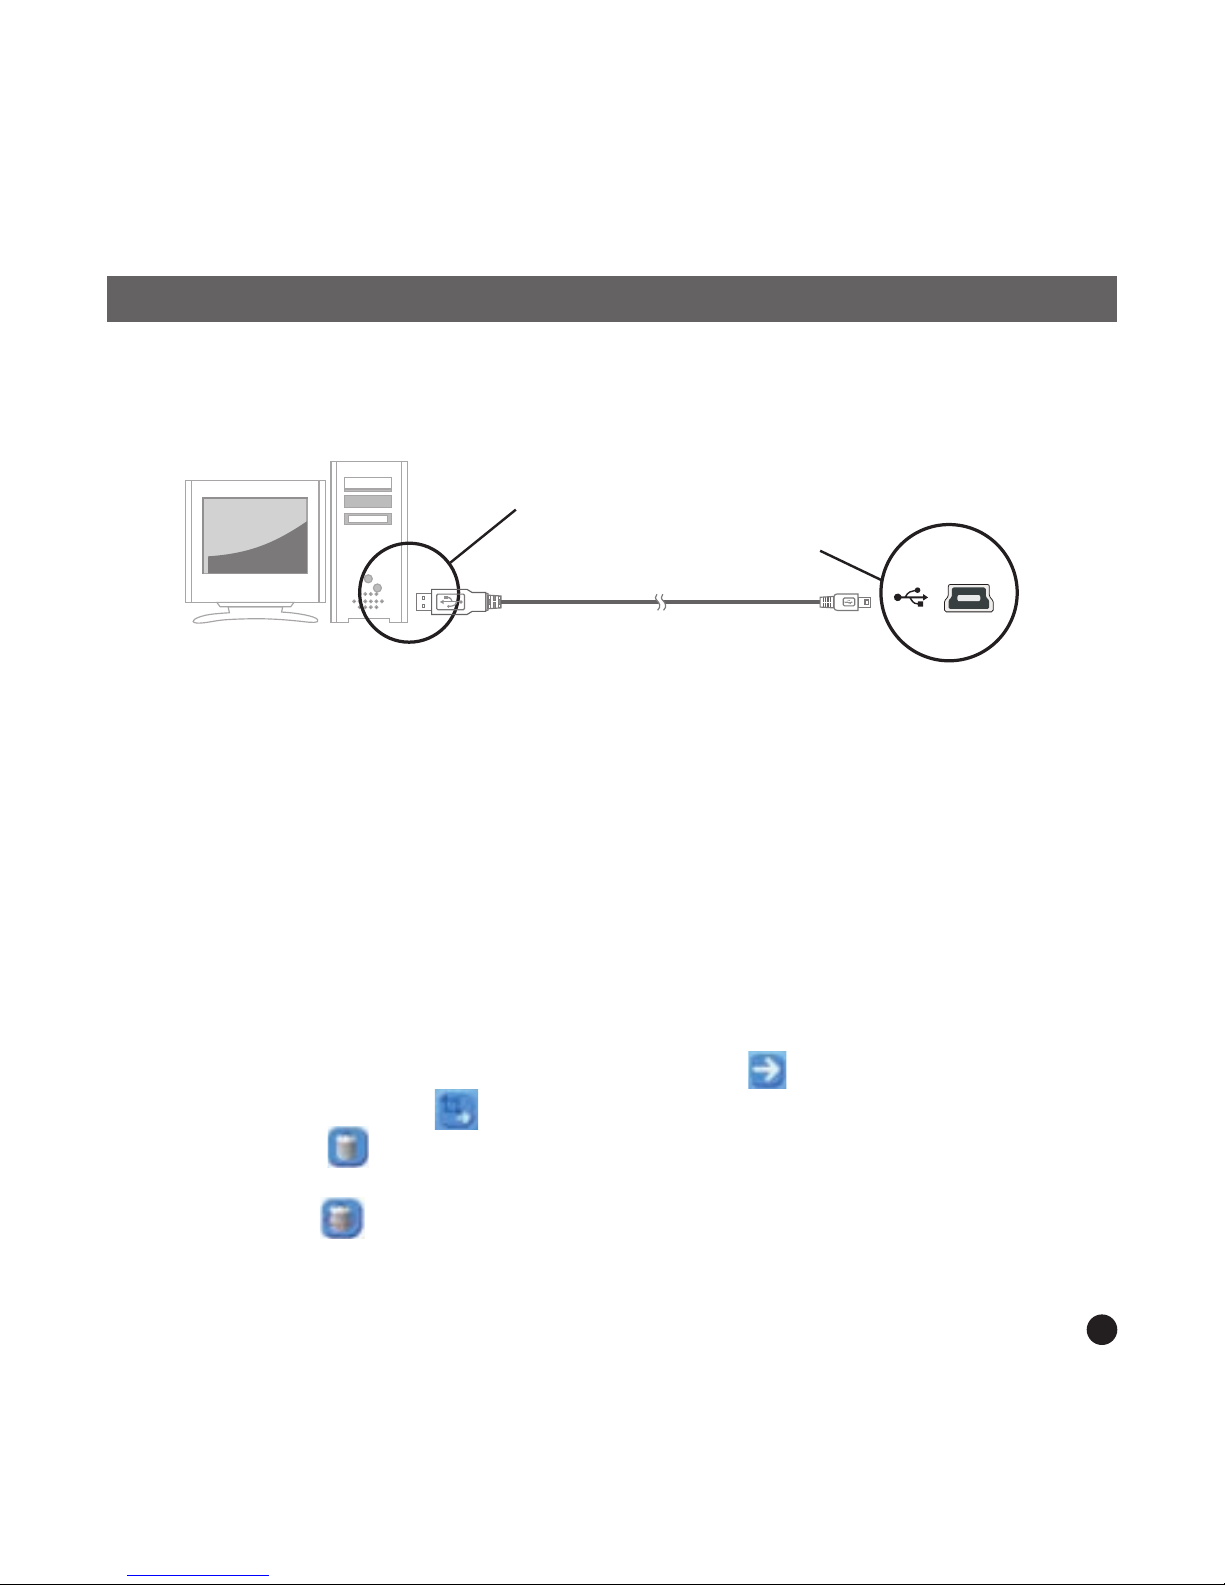
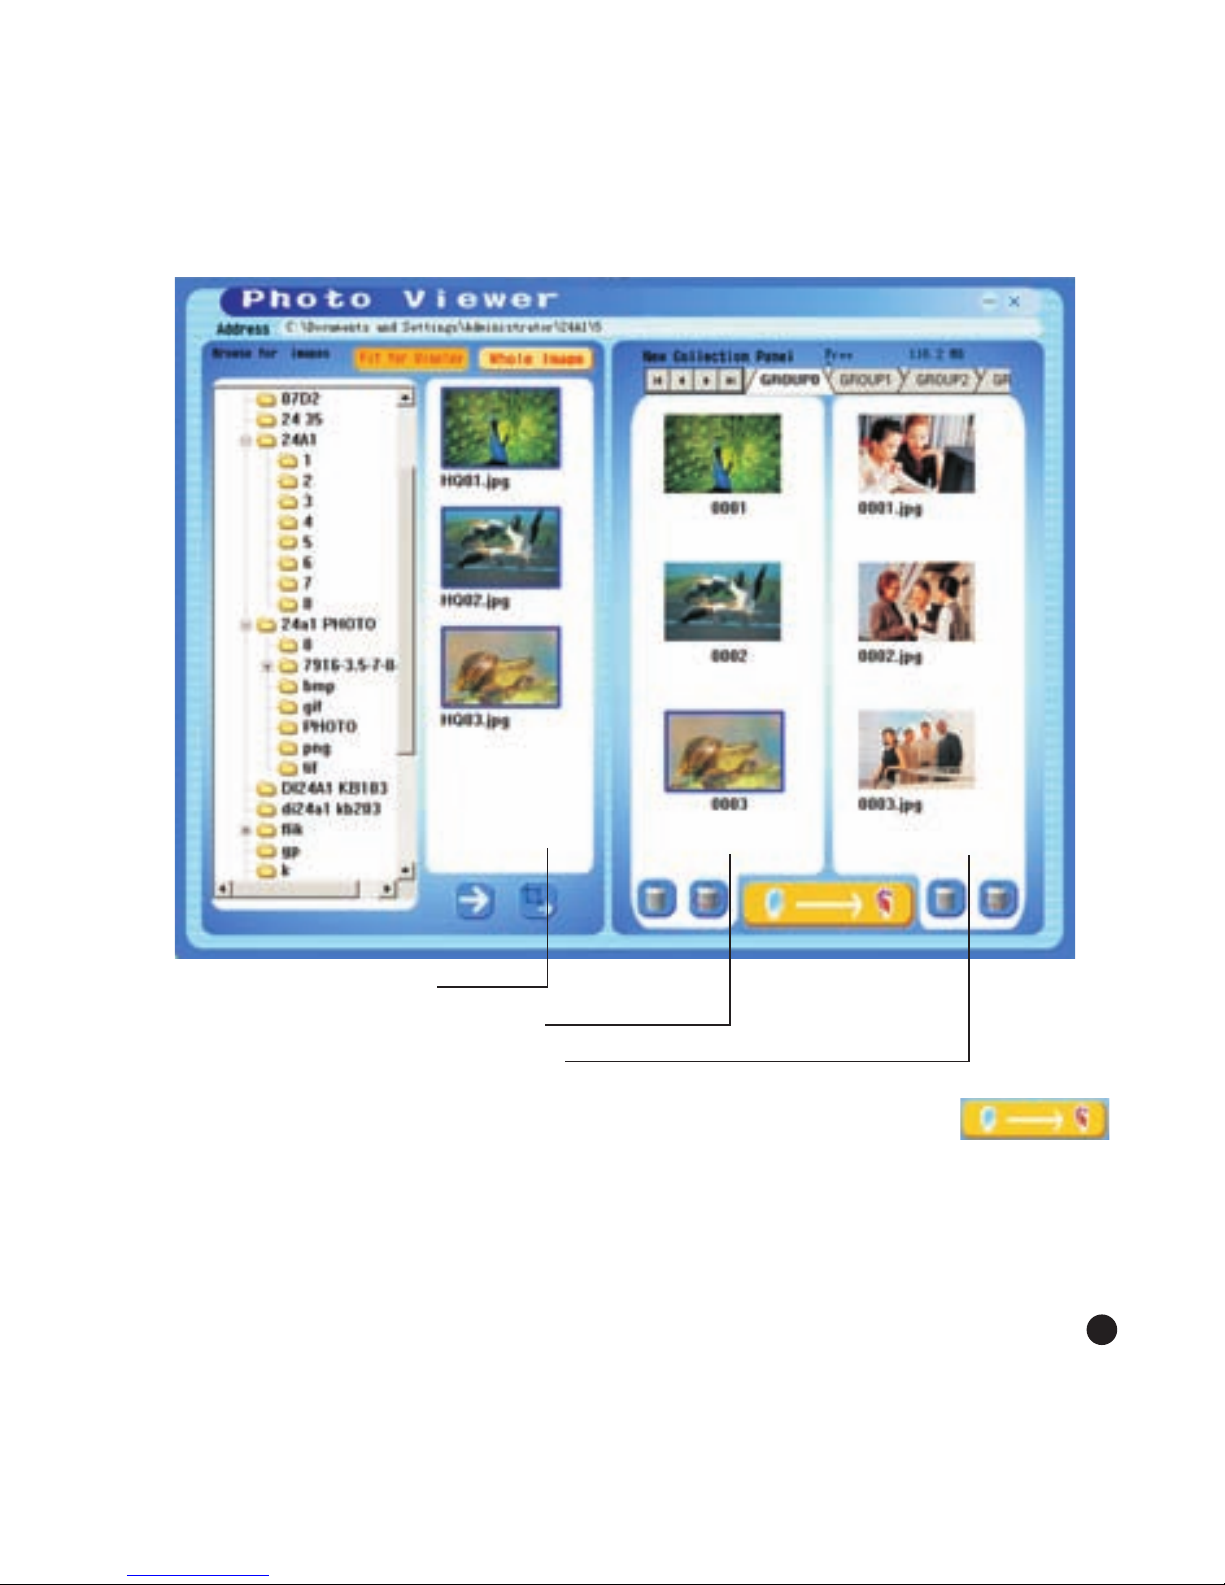
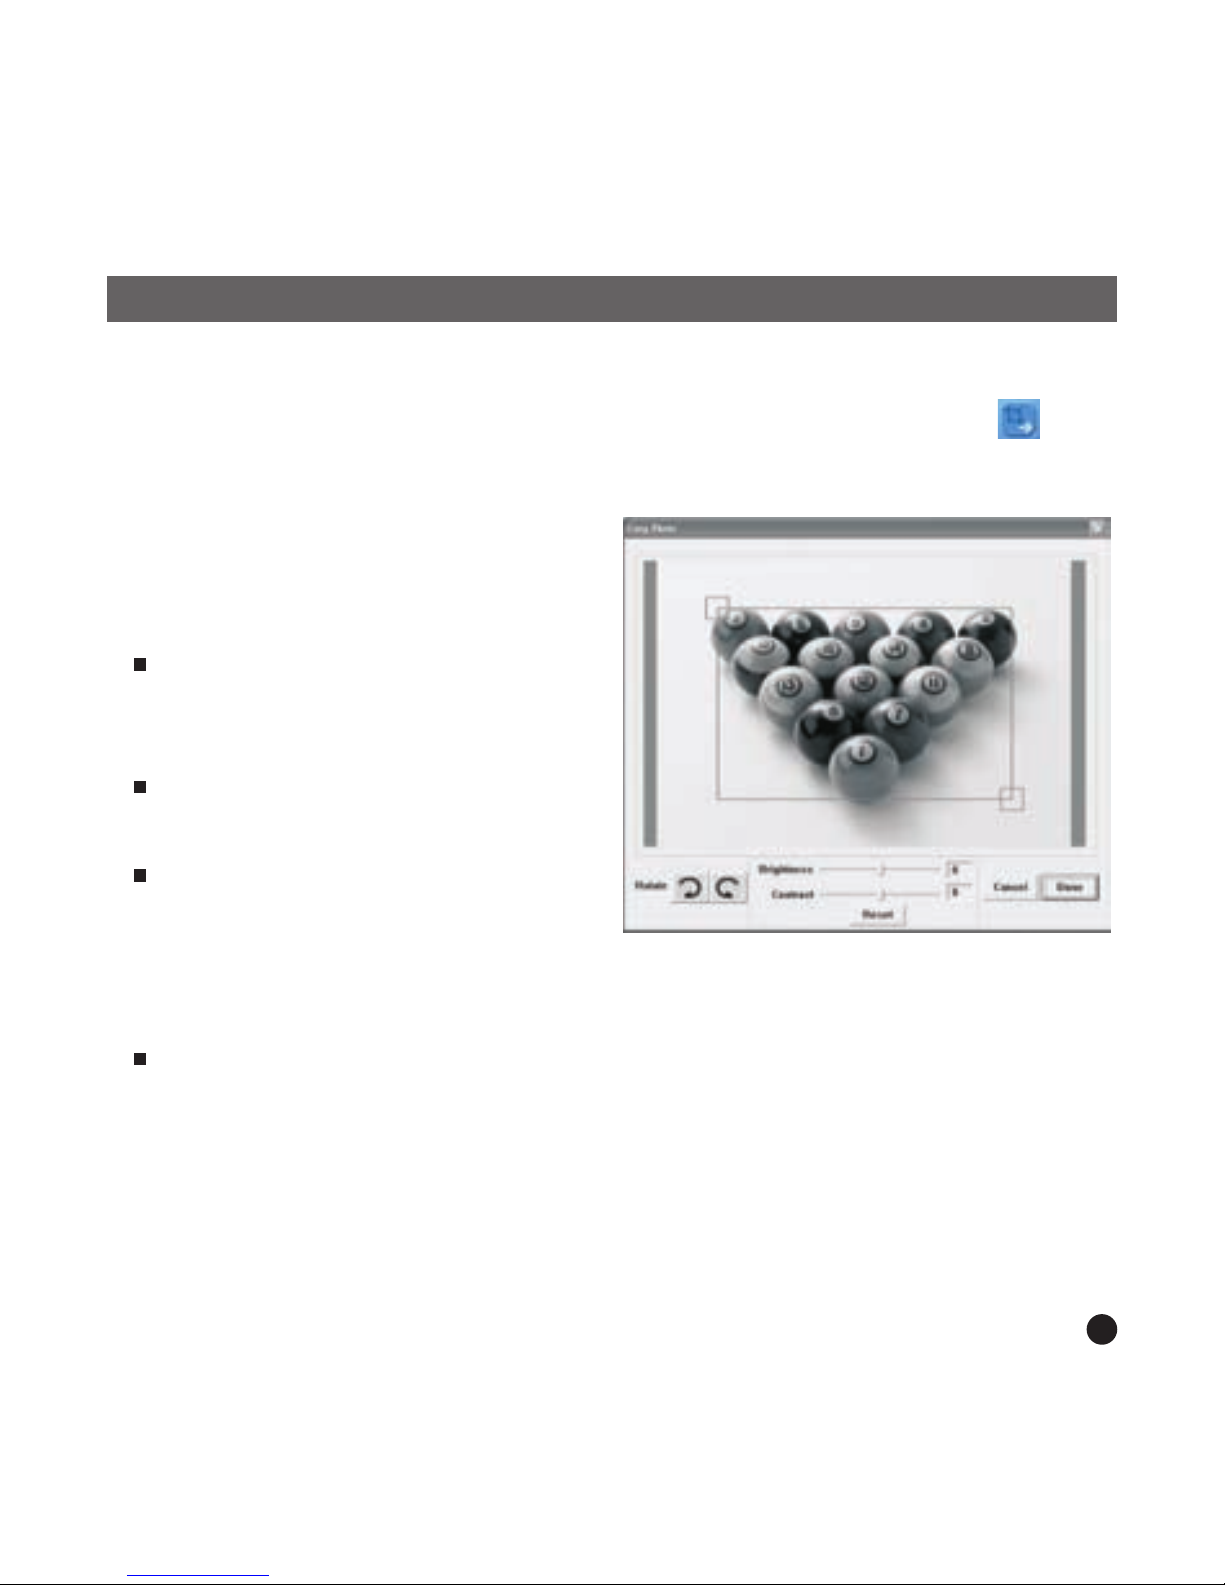
Using the application softwaresupplied with this device,you can
organize, edit, enhance anddownload the images inyour PC to this
device using USB.
WARNING:
This device will be fullycharged after three hours.Do notleave the
device connected to the USBfor longer than 12 consecutivehours
otherwise damage and overheating ofthe device may occur.
Do not expose this deviceto water or moisture.
The device should be situatedaway from sources of highheat such as
radiators or stoves.
The device should be connectedto a power supply onlyof the type
described in the operating instructionsor as marked on theunit.
Care should be taken sothat objects are not placedon, nor liquids
spilled on or inside thedevice.
The user should not attemptto service the device beyondthose means
described in these operating instructions.All other servicingshould
be referred to qualified servicepersonnel.
3
A fully chargedbattery gives about 2.5hours of playtime, whenthe
battery is low,"Low Battery" appears onthe display and thePhoto
Album shuts down inabout 10 seconds. Followingthese steps to
charge the battery.
Charging the Built-InBattery

Installing the Software/ Hardware
IMPORTANT: Youmust install the softwareto your computer before
connecting the device toyour computer for thefirst time.
1. Insert the CD-ROMand run the fileSETUP.EXE; Follow the
on-screen instructions.
2. The applicationPhoto Viewer willbe installed on yourcomputer and
a short cut tothe application will appearon your desktop.
DO NOT LAUNCH THESOFTWARE YET.
3. After thesoftware is installed, connectthe device to thecomputer
with the USB cablesupplied. The hardwaredrivers will be installed
automatically. Followthe on-screen instructions andaccept the
installation screens that appear.
4. After hardwareinstallation is complete, launchthe Photo Viewer
application from the shortcuton your PC desktop.
NOTE: If you are unableto launch the softwareor connect to your
Photo Album, goto the Troubleshooting of the manualfor
more information.
1. Insert one end of the USB cable into USB on PhotoAlbum and the
other end into your computer's USB port. The battery level indicator
flashes on the display.
2. Charging time is approximately three hours, when the battery is
fully charged,
the battery level indicator stops flashing.
4

Downloading Photos From PC to Digital Photo Album
1. Connect to PC
Usethe USBcable provided.Connect thelarge end tothe computerand the
smallend tothe device.
USB on computer
Mini Bon Photo Album
USB Cable
2. Launch the Photo Album Software
Double-click the Photo View shortcut on your desktop.
3. Browse images
Use the File Manager to browse photos on your PC.
NOTE: The device reads JPG/BMP/GIF/TIF and PNG images.
4. Select images and transfer to selected album
( I ). Selectthe album(Group 1, Group 2.....) InCollection Panelthat the
images will be transferred to.Youcan change theAlbum name by
double clicking theAlbum and entering a new name.
(ii). Select your desired photo(s)and click " "to transfer the photo(s)
as-is. Or click " " Toedit the photo(s) beforetransferring.
(iii). Click " " inthe Collection Panel toremove the selected photoin
the Collection Panel.
(iv). Click " " inthe Collection Panel toremove all the photos
in the Collection Panel.
5

Images on your PC
Images ready to download
Images on your PhotoAlbum
5. Transfer Collection Panel to Digital Photo Album Press “ ”
to transfer the images in the Collection Panel to the Digital Photo Album.
Important !
Do not disconnect the deviceuntil the download process iscomplete
and you have exited successfullyfrom the Photo ViewerProgram.
6

1. Select an image to Edit
Select aphoto you wish to edit in the image preview area.Click on " " to
edit selected image in the pop up window.
Editing Images
2. Edit Image
In the Edit Image Window you can do
the following:
Crop: click and drag the smaller
boxes (at the corners of the large
box) to increase or decrease the
area to be cropped.
Reposition: click and drag in the
center of the large box to change
the position of the crop.
Brightness /Contrast: click and
drag theslider bars.
NOTE: Images that are brighter and more contrast will look better on the
smaller monitor of the device.
Rotate: Use the Rotate arrows to rotate the image clockwise or
counterclockwise.
3. Click DONE
The edited image will be added to the collection panel.
7

POWER: Press and holdfor 3 seconds to turn on the Photo Album.
Press and holdfor 3 seconds againto turn off the power.
DELETE: Press once to delete the selected file.
ALBUMS: In browse mode, press to get access to different albums.
SLIDE SHOW: To start the slide show, repeatedly press and select
the dura tion of each slide(1s, 3s, 6s, 12s, 1min,
30 min) or select STOP
to
stop
the
slide
show. After
the
slide
show
is
on, to
stop
the
slide
show, simply
press .
ENTER: Press to confirm your selection.
UP: Press to select next image or folder.
DOWN: Press to select previous image or folder.
MINI-B: for USB cable connection
Using The FunctionKeys
( 2.4” LCD)
8

Troubleshooting For Installation
If the device displays error message “Device not connected”during
installation, follow these steps to resolve:
A.For Software issues (Photo Viewer software can not launch)
1. Re-insert and launch the installation CD and choose “Remove”or
“Uninstall” from the Installer Menu.
2. Disconnect the USB cable and device from the computer and restart.
3. After computer has restarted, launch the installer again and reinstall
the software.
NOTE: DO NOT connect the USB cable until after the software isinstalled.
B.For Hardware installation issues (Device not recognized)
1. With the Photo Album connected to the computerVia USB , go to the
Start Menu/ Control Panels/ Add Hardware.
2. When the Dialog box comes up, click the option that says
“Yes, I have already connected the hardware”.
3. In the list of Devices-Find “Photo Viewer” click NEXT andthis will give
the status of the device. If a warning icon appears next to the Photo
Album then double click the icon and select the option to “Reinstall
the software”.
9

SYSTEMANFORDERUNGEN:
SOFTWAREINSTALLATION:
Microsoft OS UserManual DEUTSCH
DIGITALES FOTOALBUM
1. Windows 98 /2000 / ME /XP/ Vista
2. Unterst tzt nur das FAT-Formatü
Bitte lesen!
Kurzinstallationsanleitung
** Wichtig: Installieren Siedie Software, bevor Siedas Gerät an
einen PC anschließen. **
1. Trennen Siedas Gerät vom USB-Kabelab, wenn es aneinen PC
angeschlossen ist.
2. Legen Sie dieCD ein und befolgenSie die
Bildschirmanweisungen zur Installation von„Photo Album“.
3. Nach erfolgreicher Installationder Software können Siedas
Gerät mithilfe des mitgeliefertenUSB-Kabels an den PC
anschließen.
4. Windows richtet danndie Hardware-Treiber automatischein.
5. Starten Sie dasProgramm und Sie könnenmit der Benutzung
anfangen.
HINWEIS: Die Software kann nichtinitialisiert werden, wenn das
Gerät im Diashowmodus ist.
10

Dieses digitale Fotoalbum istein eigenständiges Gerät, aufdas Sie
Bilder vom PC kopierenund dann damit betrachtenkönnen. Benutzen
Sie die mitgelieferte Softwarezum Verwalten, Bearbeiten,Verbessern
und Kopieren der Bildervom PC auf dasGerät.
WARNUNG:
Dieses Gerät ist nachdrei Stunden Ladezeit vollständigaufgeladen.
Achten Sie bitte darauf,dass es nicht längerals 12 Stunden am
USB-Port Ihres Computers angeschlossenbleibt, um zu vermeiden,
dass es sich überhitztund beschädigt wird.
Setzen Sie dieses Gerätniemals Wasser oderFeuchtigkeit aus.
Das Gerät sollte inausreichender Entfernung zu Hitzequellenwie
z. B. Heizkörpern bzw. Öfen aufgestellt werden.
Das Gerät sollte nurmit einem dafür vorgesehenenNetzteil betrieben
Werden.
Achten Sie darauf, dasskeine anderen Gegenstände aufdas Gerät
gestellt werden und dasskeine Flüssigkeiten auf bzw. in das Gerät
gelangen.
Der Benutzer sollte keineVersuche anstellen dasGerät eigenhändig
zu warten, es seidenn es wurde entsprechendin der
Bedienungsanleitung beschrieben. WendenSie sich bei weiterem
Wartungsbedarf immer anausgebildetes Wartungspersonal.
Wichtige Sicherheitshinweise
Einleitung
Aufladen des eingebautenAkkus
Ein vollständig aufgeladenerAkku ermöglicht eine Wiedergabedauer
von ca. 2,5 Stunden.Wenn die Kapazitätdes Akku sichzu Ende neigt,
erscheint in derAnzeige des Fotoalbums fürca. 10 Sekunden
“Low Battery”. Benutzen Siedie folgende Anleitungzum Aufladen
des Akkus.
11

Software- und Hardwareinstallation
1. Verbinden Sie daseine Ende des USB-Kabels mit demUSB-Anschluss
des Fotoalbums und das andere Ende mit demUSB-Port Ihres
Computers. Die Batteriestandsanzeige auf der Anzeigefängt dann an
zu blinken.
2. Das Gerät benötigt eine Ladezeitvon ca. drei Stunden. Wennder Akku
vollständig aufgeladen ist, hört die Batteriestandsanzeige aufzu blinken.
WICHTIG: Sie müssen die Softwareauf Ihrem Computer installieren,
bevor Sie das Gerätdas erste Mal amComputer anschließen.
3. Nach der Softwareinstallation können Sie dasGerät mit dem
mitgelieferten USB-Kabel am Computeranschließen. Die
Hardwaretreiber werden dann automatischinstalliert. Folgen Sie den
Bildschirmanweisungen und bestätigen Siedie folgenden
Installationsdialoge.
4. Nach der Hardwareinstallationkönnen Sie das Programm
“Photo Viewer”über den Shortcut aufIhrem Desktop starten.
HINWEIS: Wenn Sie dieSoftware nicht starten oderdas Fotoalbum
nicht anschließen können, gehenSie bitte zumAbschnitt
“Fehlerbehebung”am Ende dieserAnleitung.
1. Legen Sie die CD-ROM ein und starten Sie das ProgrammSETUP_.EXE.
Folgen Sie dann einfach den Bildschirmanweisungen.
2. Die Anwendung „Photo Viewer“ wird dannauf Ihrem Computer installiert
und ein Shortcut erscheint auf Ihrem Desktop.
STARTEN SIE DIE SOFTWARE NOCH NICHT
12

Kopieren von Fotos vom Ihrem PC auf das digitale Fotoalbum
1. Anschluss an denPC
Benutzen Sie das mitgelieferte USB-Kabel. VerbindenSie das große Ende
mit Ihrem Computer und das kleine Ende mit dem Gerät.
USB-Kabel
USB-Port am Computer
Mini-USB-Anschluss am Fotoalbum
2. Starten der Fotoalbumsoftware
Doppelklicken Sie auf den „PhotoView“-Shortcut auf Ihrem Desktop.
HINWEIS: Das Gerät unterstützt JPG-, BMP-,GIF-, TIF- und PNG-Bilder.
3. Bilder auswählen
Benutzen Sie den Dateimanager,um auf Ihrem PC nachden gewünschten
Bildern zu suchen.
(ii). Wählen Sie die gewünschten Bilder aus und klicken Sie auf " ",
um die Fotos unbearbeitet zu kopieren. Oder klicken Sie auf " ",
um die Fotos vor dem Kopieren zu bearbeiten.
(iii). Klicken Sie in der Bildauswahl auf " ", um die markierten Bilder
zu entfernen.
(iv). Klicken Sie in der Bildauswahl auf " ", um die alle markierten
Bilder zu entfernen.
4. Auswahl von Bildernund Kopieren zum Fotoalbum
(i). Wählen Sie das gewünschteAlbum (GROUP1, GROUP2, etc.).Wählen
Sie dann die Bilder aus, die Siekopieren möchten. Sie können den
Albumnamen bei Bedarfdurch Doppelklicken auf dasAlbum und
Eingeben eines neuen Namens,verändern.
13

Bilder auf Ihrem PC
Zum Kopieren markierte Bilder
Bilder in Ihrem Fotoalbum
5. Kopieren der ausgewählten Bilderauf das digitale Fotoalbum
Betätigen Sie " ",um die Bilder inder Bildauswahl auf das
digitale Fotoalbum zu kopieren.
Wichtig!
Trennen Sie dasGerät nicht vom Computer, bevor der Kopiervorgang
abgeschlossen ist und Siedas Programm „“ verlassenhaben.
14

Bearbeitung der Bilder
1. Auswahl vonBildern zum Bearbeiten
Wählen Sie in derVorschauauswahl ein Bildzur Bearbeitung aus. Klicken
Sie auf "", um das markierteBild im einem Fensterzu bearbeiten.
2. Bilder bearbeiten
Im Bearbeitungsfenster können
Sie folgende Aufgabendurchführen:
Bild ausschneiden (Crop): Klicken Sie
auf die kleinen Kästen (anden Ecken
des großen Kastens) und verändern
Sie die Position der Kästen,um den
gewünschten Ausschnitt zumarkieren.
Positionierung: Klicken Sie auf dieMitte
des großen Kastens, um diePosition
des Ausschnitts zuverändern.
Kontrast / Helligkeit: VerändernSie die
Position der Schieber.
HINWEIS: Hellere Bilder mit höheremKontrast sehen auf dem kleinen
Bildschirms des Geräts besseraus.
Bilder drehen: Benutzen Sie dieRotationspfeile, um das Bild nachlinks oder
rechts zu drehen.
3. Klicken Sie aufDONE
Das bearbeitete Bild wird dannder Bilderauswahl hinzugefügt.
15

Benutzung der Funktionstasten
POWER: Halten Sie die Taste für 3 Sekunden gedrückt, um das
Fotoalbum einzuschalten. HaltenSie die Taste für 3
Sekunden gedrückt, umdas Gerät wieder auszuschalten.
DELETE: Benutzen Sie die Taste zum Löschen der markierten Datei.
ALBUMS: Benutzen Sie dieTaste imAuswahlmodus, umdas
Album zu wechseln.
SLIDE SHOW: Um die Diashow zu starten betätigen Sie und wählen
Sie den gewünschtenIntervall für den Bildwechsel(1s,
3s, 6s, 12s,1min, 30 min)oder betätigenSie STOPzum
Stoppen der Diashow. Wenn dieDiashow bereits
gestartet wurde, könnenSie sie durch Betätigungvon
jederzeit stoppen .
ENTER: Benutzen Sie zur BestätigungIhrer Auswahl.
UP: Betätigen Sie , um zum nächsten Bild oder Verzeichnis zu gehen.
DOWN: Betätigen Sie , um zum vorigen Bild oder Verzeichnis zu gehen.
MINI-B: Zum Anschluss des USB-Kabels.
( 2.4” LCD)
16

Fehlerbehebung
Wenn während der Installation die Fehlermeldung „Device not connected“
erscheint, gehen Sie bitte auf folgendende Weise vor, um das Problem
zu beheben:
Erklärung zu elektromagnetischerStrahlung
Dieses Gerät erfüllt die Anforderungen des Paragrafen 15 der FCC-Verordnung und
die Anforderungen des CE-Standards. Zum Betrieb des Geräts müssen folgende
Bedingungenerfüllt sein:
(1)Das Gerät darf keine schädigenden Störstrahlungen verursachen.
(2)Das Gerät muss alle eingehenden Störstrahlungen tolerieren, einschließlich
solcher Störstrahlungen, durch die der Betrieb in ungewollter Weise
beeinträchtigt werden könnte.
This class b digital apparatus complies with canadian ices-003. / cet appareil
numÉrique de la classe b est conforme À la norme nmb -003 du canada.
HINWEIS: Schließen Sie das USB-Kabel NICHT an den Computer an,
bevor Sie die Software installiert haben.
B.Hardwareproblem (Gerät wird nicht erkannt)
1. Schließen Sie das Fotoalbum über das USB-Kabel an den Computer
und gehen Sie auf Start -> Systemkonfiguration -> Hardware hinzufügen.
2. Sobald ein Dialogfenster erscheint, klicken Sie auf die Option „Ja, die
Hardware ist bereits angeschlossen.“.
3. Klicken Sie in der Geräteliste auf „Photo Viewer“ und dann auf WEITER.
Danach erscheint der Status des Geräts. Wenn ein Warnsymbol neben
dem
Fotoalbum erscheint, klicken Sie auf das Symbol und wählen Sie
“Treiber neu installieren”.
A.Softwareproblem (die Photo Viewer Software kann nicht gestartet werden)
1. Legen Sie die Installations-CD erneut ein und wählen Sie im
Installationsmenü „Remove“ oder „Uninstall“.
2. Trennen Sie das USB-Kabel und das Gerät vom Computer und führen
Sie einen Neustart aus.
3. Nach dem Neustart des Computers starten Sie den Installationsdialog
und installieren Sie die Software erneut.
17

Lea Primero
Manual de Usuario Microsoft Español
Guía rápida de instalación
REQUISITOS DEL SISTEMA:
PROCEDIMIENTO DE INSTALACIÓN:
1.Windows 98/2000/ME/XP/VISTA
2.Sólo soporta formatoFAT.
**
**
Importante: instale el software deaplicación antes de conectar
el dispositivo al PC.
1.Desconecte el cable USBdel PC si estáconectado.
2.Inserte el CD ysiga las instrucciones enla pantalla para
instalar “Photo Album”.
3.Después de instalar elsoftware de aplicación, puedeconectar
el dispositivo al PCcon el cable USBproporcionado.
4.Windows OS instalará eldriver o controlador delhardware
automáticamente.
5.Ejecute “Photo Viewer”y disfrute.
NOTA: El software no puedeiniciarse con la unidadsi está
conectado mientras funciona enmodo de presentación
automática.
ALBUM DIGITAL DE FOTOS
18

CARGAR LABATERÍAINCORPORADA
Este álbum de fotos digitaleses un dispositivo que hasido diseñado
para transferir y almacenar imágenesdesde un PC y luegopoder
visualizar las imágenes. Usando elsoftware de la aplicación
proporcionado con este dispositivo, puedeorganizar, editar,mejorar
y descargar sus imágenes ensu PC hasta el dispositivousando el USB.
Instrucciones importantes deseguridad
INTRODUCCIÓN
ADVERTENCIA:
Este dispositivo será cargado completamentedespués de tres horas.
No deje este dispositivo conectadoal USB durante más de12 horas
consecutivas de lo contrario puededañar y sobrecalentar el dispositivo.
No exponga el dispositivo alagua o humedad.
El dispositivo tiene que estarsituado lejos de fuentes decalor tales
como radiadores o estufas.
El dispositivo debe estar conectadoa un tipo de tomade corriente que
se describe en las instruccionesde funcionamiento o como está
señalado en la unidad.
Tenga cuidadocon su dispositivo, no coloqueningún objeto en la parte
superior ni ningún líquido yaque podría dañar el dispositivo.
El usuario no debe intentarreparar el aparato más alláde los medios
descritos en este manual deinstrucciones. Refiérase a su personalde
servicio cualificado.
Una batería cargada completamente puedefuncionar durante 2,5
horas, cuando la batería estábaja, aparecerá el mensaje “LowBattery”
en la pantalla y elÁlbum de fotos se cerrarádurante 10 segundos.
Siga estos pasos para cargarla batería:
19
Other manuals for DPA-24
1
Table of contents
Languages:
Other LENCO Digital Photo Frame manuals

LENCO
LENCO DF-705 - V1.0 User manual

LENCO
LENCO DF-831 User manual

LENCO
LENCO DF 704 User manual

LENCO
LENCO DF-706 User manual

LENCO
LENCO DF-1520 User manual

LENCO
LENCO DF-1520 User manual

LENCO
LENCO DF-1020 User manual

LENCO
LENCO DF-711 W User manual

LENCO
LENCO DF-703 User manual

LENCO
LENCO DF-711B User manual