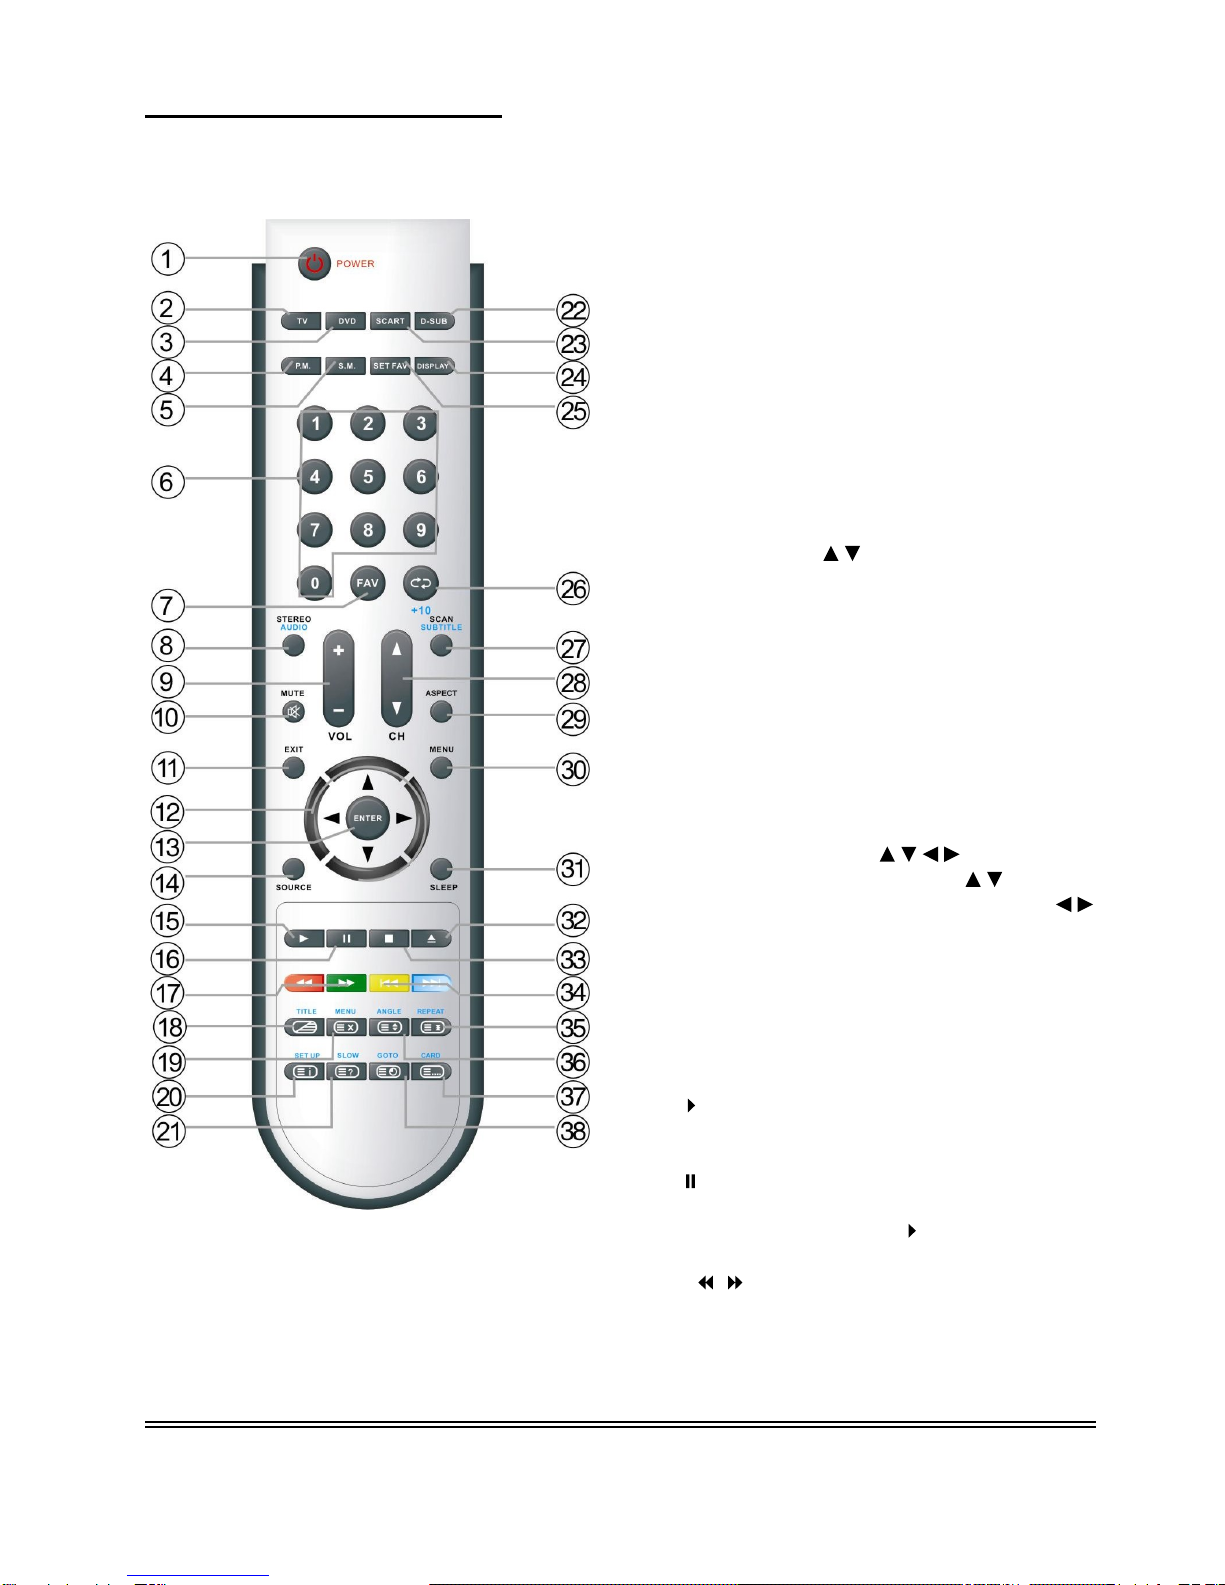
LENCO DVT-1901 User manual

Table Of Contents
Important
Safety Instructions
--------------------------------------------------
1
Characteristic Features
---------------------------------------------------------
3
Disc Information
--------------------------------------------------------
-----------
4
Front Panel
----
-------------------------
----------------------------------------------
5
Rear Panel
-----
--------------------------
---------------------------------------------
7
Remote Control
---
------------------------
--------------------------
----------------
8
System Connections
-------------
-------
-----------------------------
--------
---
11
Connecting to Power Supply
-------------------------
------------
-
--------------
11
Connecting to External AV Signal Source
-----
---
-----------
---------
--------
11
Connecting to External AV Signal Source (YPbPr)
--------
--------------
--
12
Connecting to External AV Signal Source (SCART)
--------
------------
--
12
Connecting to External AV Input Device (AV Output)
--------
-----------
--
13
Connecting to Earphone
--------
-------------------------
------------------------
13
Connecting to
PC
--------------------------------------
-----
---
------------------
--
14
Connecting to TV Antenna
-------------------------------------------------------
15
TV
Function
-
------
---------------
---
--------------
---------
--------------
--------
---
16
Preparations
-----------------------------------------------
--------------------------
16
Image Setting
---------------------------------------------
--------------------------
16
Audio Setting
-----------------
-----------------------------
--------------------------
18
Timer Setting
-------------------------------------------
-----------------------
--
----
19
Setup Setting
----------------------------------------------
--------------------------
19
NICAM Function
--------
-
-----
----------
------------
----
-----------
-----
---
-----
23
DVD Playback Operation
-----
----------
------------
----
-----------
-----
---
-----
24
USB and SD/MS/MMC Card
Function
-------------------------------------
29
DVD System Setup
------------------------------
---------------------------------
30
Other Functions
-------------------------------------------------------------------
38
External AV Input Function
--------------
----
-------------------------------------
38
Computer Screen Function
--------------------
-------
---------------------------
38
Troubleshooting
-
------
---------------------
-----------------
---------
------------
39
Specifications
-
------
----------
-----------------
---------
--------------
--------
---
-
40

- 1 -
Important Safety Instructions
Caution:
use of any controls, adjustments, or procedures other than those specified herein may
result in hazardous radiation exposure
.
Caution
1. The
product
contains
a low
-
power device. In order to ensure the safety of the laser device, do not
remove any cover and attempt to repair the unit. If any service needed, please contact the
distributor or its authorized service center.
2. To reduce the risk of electric shock, do not remove the cover (back). No user-serviceable parts
inside. Refer serving to qualified service personnel. Unplug the product from the wall outlet before
serving or when it is unused for a long period of time.
3.
The
manufacturer should not hold
responsibility
for the damage caused by any substitutions and
modification of the
product
without
authorization from the manufacturer
s or authorized unit.
WARNING
The apparatus shall not be exposed to dripping or
splashing and that no objects filled with liquids,
such as vases, shall be placed on the apparatus.
Copyright Protection
This product incorporates copyright protection technology that is protected by U.S. patents and
other intellectual property rights. Use of this copyright protection technology must be authorized
by Macrovision, and is intended for home and other limited viewing uses only unless otherwise
authorized by Macrovision. Reverse engineering or disassembly is prohibited.
This symbol indicates that dangerous voltage instituting a risk of electric shock is
present
within this unit.
This symbol indicates that there are i
mportant
operation and maintenance
instructions in the literature
accompanying
the appliance.
C
aution
:
Lase
r radiation when open. Do
not stare into
beam.

- 2 -
Important Safety Instructions
NOTES
1.
Read these
instructions
2.
Keep these instructions
3.
Heed all warnings.
4.
Following all instructions.
5.
Do not use this apparatus near water.
6.
Clean only with dry cloth.
7.
Do not block any ventilation openings.
8.
Install according to the manufacturer instructions. D
o not install near any heat sources
s
uch
as
radiators, heat registers, stoves or other
apparatus
(
including amplifiers) that produce
heat.
9.
Read, heed and follow all instructions to
ensure correct and safe installation and
interconnection of the apparatus;
10.
The apparatus shall not be exposed to dripping or
splashing and that no objects filled with
liquids,
such as vases, shall be placed on the apparatus.
11.
The mains socket
-
outlet shall be installed
near the apparatus and the mains plug shall
remain
readily operable.
12.
Protect the power cord from being walked on
or pinched particularly at
plugs, convenience
re
ceptacles, and the point where they exit
from the apparatus.
13.
Only use attachments/accessories specified
by the manufacturer.
14.
Use only with the cart, stand, tripod, bracket,
or table specified by the manufacturer, or
sold
with the apparatus. When a cart is
used,
use caution when moving the cart/apparatus
combination to avoid injury from tip
-
over.
15.
Unplug the apparatus during lightning storms
or when unused for long periods of time.
16.
Refer all servicing to qualified
service
personnel. Servicing is required whe
n the
apparatus has
been damaged in any way,
such as power
-
supply cord or plug is
damaged, liquid has been
spilled or objects
have fallen into the apparatus, the apparatus
has been exposed to rain or
moisture, does
not operate normally, or has been dropped
.
17.
The apparatus shall be connected to a mains
socket outlet with a protective earthing
connection
.
Note: D
o not touch the color TFT LCD screen by hand directly
.
IMPORTANT FOR LASER PRODUCTS
1. CLASS
1
LASER PRODUCT
2. DANGER: Visible laser radiation when open and
interlock failed or defeated. Avoid direct exposure to
beam.
3. CAUTION:
Do not open the top cover. There are
no
user serviceable parts inside the unit. Leave all
servicing to qualified service personnel.

- 3 -
Characteristic Features
This product incorporates DVD player, LCD disp
lay and TV receiver in one system.
Multiple Mode
TV mode
SCART mode
CVBS mode
S-
VIDEO mode
COMPONENT mode
VGA
mode
DVD mode
High Quality Properties
High Resolution
Adopt an MPEG2 decoding format to achieve
horizontal resolution more than 500 lines
.
LCD (Liquid Crystal Display)
Designed with
19"
color
TFT
liquid crystal
display clearly shows the data.
Stereo amplifier
Built
-
in
2x
3w speakers provide high quality
sound
.
AV and VGA Input
Can be connected to external audio and video
signal sourc
e and PC.
Special Function
Support sleep time setting function and favorite
channel setting function, etc.
Multi
-
audio and Multi
-
video modes
Support multi-audio and multi-video modes,
provide more selecting.
USB and CARD PORTS
Designed with USB and SD
/MS/MMC card port,
can be connected to USB device or
SD/MS/MMC Card.
Auto TV
S
earching Function
Can be connected to the TV antenna, support
Auto and manual TV programs searching
function.
NICAM Function
Supports the NICAM function.
According
to the
broadc
asting programs, you can choose the
corresponding
soundtrack.
Advanced Playing
Features
Auto DVD Function
Whether it is in DVD mode or not, when
inserting a disc into the disc tray, the unit will
shift to DVD mode and start playback
automatically; when ejecting the disc, it will
return to the prior mode automatically.
Compatibility
DVD,
CD
and JPEG
discs
compatible.
All Playback Functions
Fast forward and
backward
,
slow playback and
repeat playback.
Special
playback
.
Support
s multi-angle, multi-language and
multi
-
subtitle playback
.
NOTE:
It is normal for a TFT screen to display
some light or dark spots on the LCD screen.

- 4 -
Disc Information
Discs
Formats Supported By This Player
DISC
LOGO
CONTENTS
SIZE
MAXIMUM TIME
1
33min(SS
-
SL)
242min(SS
-
DL)
266min(DS
-
SL)
DVD
Audio
+
Video
(active picture)
12
cm
484min(DS
-
DL)
CD
Audio
12cm
74
min
JPEG
Still high resolution
12cm
The operating method of some DVD discs is specified by the software maker. Please refer to
the instruction manual of the disc.
About Disc Terms
Title
Generally, pictures or music compressed on a DVD are divided into several sections, title .
Chapter
Usually one title is comprised of one or more chapters and each of them is numbered for easy
searching. But some discs may not have a recording chapter.
Track
A segment of picture or music on a CD. Each track is numbered for easy searching.
Front Panel

- 5 -
1.
19" color TFT screen
19" color TFT screen clearly show
s
the data.
2.
SOURCE button
Press to select mode
among
TV,
SCART,
CVBS, S
-
VIDEO, Component, VGA
and
DVD.
3.
MENU button
Press to enter or exit setup menu.
4.
CH
/
button
In the TV mode, press to select channels.
In setup menu, the same function as
/
direction buttons.
5.
VOL
/
button
In the TV mode, press to decrease or increase the volume.
In setup menu, the same function as
/
direction buttons.
In setup m
enu, the
VOL
has
the same function as
the
ENTER button.
6.
PLAY
button
Press to play the disc
in
DVD mode.
Front Panel
7.
STOP
button

- 6 -
Press to stop disc
playback.
8.
Eject button
Press to
eject the disc.
9.
Power button
Press
to ente
r or exit the standby mode.
10.
SD/MS/MMC Card Port
Insert the SD, MS or MMC card into the port.
11.
Disc Tray Slot
Used to load disc.
12.
Earphone Jack
When connected to earphone, the internal speakers will
automatically
turn off.
13.
USB Connecting Port
Connecting to t
he USB device.
14.
Remote Sensor
Remote
sensor window for the remote control.
15.
Power Indicator
In normal playback status, it is blue; in standby mode, it turns red.
16.
Speakers
Two speakers output high quality stereo sound.
Rear Panel

- 7 -
1.
Y/Pb/Pr Input Jack
Connected
to the Y/Pb/Pr input in
COMPONENT
mode.
2.
Y/Pb/Pr L/R Audio Input Jack
Connected
to the L/R audio input in
COMPONENT
mode.
3.
Composite
Audio/Video Output Jack
In the CVBS mode, connected to output
the Audio/Video signals.
4. S-
VIDEO
and CVBS Audio/Video Input
Jack
Connected
to the S-
VIDEO
input in
S-VIDEO mode or CVBS input in the
CVBS mode. The L/R audio input jacks
can be used in the both S-VIDEO and
CVBS
modes.
5.
SCART Input J
ack
Connected
to the SCART input in
SCART
mode.
6.
TV Signal Input Jack
Connected
for the external TV signal input.
7.
DC 12V Input Jack
Connect the power adaptor or the car
adaptor.
8.
VGA
Input Jack
Connect
ed to the VGA output jack on a
personal computer.
9.
PC AUD
IO Input Jack
Connected to
the PC audio output jack
.
Remote Control

- 8 -
Remote Control Drawing
1.
POWER button
Press on or off to turn this unit on or off
2.
TV
button
Press to
shift to T
V mode
.
3.
DVD
button
Press to shift to DVD mode.
4.
P.M.
button
Press to shift the screen picture modes
among User, Standard, Soft, Brightness
and Shine.
5.
S.M.
button
Press to shift the sound modes among
User, Standard, Music, Movie and Speech.
6.
0~9 Number button
s
Press to select numbers such as TV
channel.
7.
FAV
button
Press to access to
favorite
channels and
press the CH
buttons to select.
8.
STEREO/Audio
button
Press to shift sound track when in TV
mode (Please see P24 for details).
Press to select audio language or audio
track when in DVD mode.
9.
VOL
+/
-
button
Press to increase or decrease the
volume.
10.
MUTE button
Press to
turn on or off speaker output.
11.
EXIT
button
Press to exit from
the
setup menu.
12.
Direction buttons (
)
In the setup menu, press the
button to
select a desired item and press the
button to adjust or set.
13.
ENTER button
Press to confirm your selection.
14.
S
OURCE button
Press to select mode
among
TV,
SCART,
CVBS, S-VIDEO, Component, VGA and
DVD.
15.
PLAY
button
Press to play a disc when in the DVD
mode.
16.
PAUSE button
When in DVD mode, press to pause
playback. Press the
PLAY button to
resume normal pla
yback.
17.
/
button
Press to search backward or forward when
in DVD mode.
Remote Control

- 9 -
18.
TITLE button
When a DVD is playing, press the TITLE
button to go to the title menu and display
disc contents.
Under TV
or SCART vid
eo
mode, press to
display/close the teletext or display mixed
mode.
19.
MENU button
(under DVD mode)
Press to enter disc menu when in DVD
mode.
In teletext mode, press to exit from the
teletext mode
.
20.
SETUP button
Press to open DVD setup menu when in
D
VD mode.
In
Teletext
mode, press to display page
100.
21.
SLOW button
Press to activate slow playback function
when in
DVD mode
.
Under
Teletext
mode
,
press once to
display
the
concealed information, such as
solution of riddles or puzzles; press again
to move the riddles information from the
display.
22. D
-
SUB
button
Press to
shift to VGA
mode
.
23.
SCART
button
Press to
shift to SCART
mode.
24.
DISPLAY
buttons
Press to
display
the reference information
of the current program.
25.
SET FAV
button
Press to
set
the current channel as a
favorite channel
.
26. /+
10
buttons
When in TV mode, press to return to the
channel previously viewed. When in DVD
mode, press to select numbers greater
than
10.
27.
SCAN
/SUBTITLE
button
When in TV mode, press to scan the
programs
and press again to stop scanning.
When in
DVD
mode, press to select
alternate subtitle languages during
playback of a multiple language DVD disc.
28
. CH +/
-
button
When in TV mode, press to select
channel.
29.
ASPECT
button
Press to shift the aspect ratio
of the screen
between Fill Screen and Aspect
Normal .
30.
MENU button
Press to enter or exit the setup menu.
31.
SLEEP
button
This feature allows
you to set up sleep time
when in TV mode. Press the button and
then press the ENTER button to activate
thi
s function. Then press the
direction
buttons to select the desired time to sleep.
32.
Eject button
Press to eject the disc from the unit.
33.
STOP button
Press to stop disc playback when in DVD
mode.
34. /
Next Skip button
Press to skip to the previ
ous
or
next
chapter/track when in DVD mode.
35.
REPEAT button
Press to repeat a chapter, track, title or all
content when in DVD mode.
In
Teletext
mode, press to stop the
automatic
changing of pages consisting of
two or more sub pages.
36.
ANGLE button
Press to select various camera angles (if
the DVD supports multiple camera angles)
when in DVD mode
.
Under
Teletext
mode, Press button A first
time
to
double
the
size
of
teletext
letters in
the upper half of the screen,
a second time
to do
uble
the
size
of
te
letext letters in the
lower half of the screen
and
a third time to
resume normal
status
.
37.
CARD
button
Press to shift among disc playback, USB
playback and SD/MS/MMC playback.
Under
Teletext
mode, press to select
four
groups
3-digit numbers that are disp
layed
in different colors at the bottom of the
screen.
Press the colored buttons on the
remote control to select, then use the
number buttons to input the
corresponding
number
to display
the page.
Repeat
the above procedures for each
page to be stored, usi
ng a different colored
button
accordingly
each time.
Remote Control

- 10 -
38.
GOTO
button
Press to select the desired disc starting
time, title or chapter when in DVD mode.
In teletext mode, press to select a sub
page number,
it will
d
isplay at the bottom of
a screen.
Preparation
of
Remote Control
Softly push the back cover to open the battery
compartment.
Insert two batteries (1.5V, size AAA), please
make sure the polarity matches the marks
inside the compartment.
Soft
ly press the back cover to close it.
Under normal use the battery will last for
six months.
Take out battery when the remote is not in
use for a long time.
Using the Remote control
Point the remote control unit from no more than
about
7m
from the remote control sensor and
within about 60 degrees of the front of the unit.
The operating distance may vary
depending
on the amount of light in the
invironment
.
Notes:
Do not point bright lights
directly
at the
remote control sensor.
Do
not place objects between the remote
control unit and the remote control sensor.
Do not use this remote control unit while
simultaneously operating the remote
control unit of any other equipment.
System Connections

- 11 -
Do not connect the power cord until all other connections have been made.
Ensure that you observe the color
of the connectors
when connecting audio and video cables.
Connecting to Power Supply
Power is supplied through the provided appropriative power adapter, one end is connected to the
DC 12V IN jack on the side panel of the unit, the
other
end to the AC100~240V wall outlet.
Connecting to External AV Signal Source
Use the audio and video cable to connect the AV input jacks on the rear panel of the unit to the
external AV signal source. Use the S-VIDEO cable to connect the S-VIDEO input jack on the rear
panel of the unit to the external AV signal source.
After connection, turn on the power of the unit and the external AV si
gnal source and then press the
SOURCE button to shift to CVBS or S
-
VIDEO mode.
Note: the L/R audio input jacks can be used in the both CVBS and
S-
VIDEO
modes.
System Connections

- 12 -
Connecting to Ext
ernal AV Signal Source
YPbPr
Use the audio and video cables to connect the Y/Pb/Pr input Jacks on the rear panel of the unit to
the external AV signal source.
After connection, turn on the power of the unit and external AV signal source and then press the
SOURCE button to shift to
Component
mode.
Connecting to External AV Signal Source
SCART
Use the SCART cable to connect the SCART input Jacks on the rear panel of the unit to the
external AV signal source.
After connection, turn on the power of the unit and external AV signal source and then press the
SOURCE button to shift to
SCART
mode.
System Connections

- 13 -
Connecting to External AV Input Device
AV Output
Use the audio and video cable to connect the AV output jacks on the side panel of the unit to the
external AV input device.
After connection, turn on the power of the unit and external AV input device and then press the
SOURCE button to shift to
CVBS
mode.
Connecti
ng to Earphones
This unit can be connected to an earphone for listening
to
music privately. See the figure
below
for
details:
After
connecting to the earphone
s
, the internal speakers will turn off automatically.
System Connections

- 14 -
Connecting to PC
The unit can be connected to
a
PC (person computer) via the VGA cable
.
Follow the
steps and the
figure below to connect:
1.
Connect one end of the
VGA cable
to the VGA input jack on the rear panel of the unit.
2.
Connect the other end to the PC.
3. Connect
one end of the audio cable to the PC audio input jack on the rear panel of the u
nit.
4. Connect
the other end to the PC audio output jack.
5. Please set the PC s resolution at 1024x768@60Hz
After connection, turn on the unit and the PC and then press the SOURCE button to shift to VGA
mode.
System Connections
Connecting to TV Antenna

- 15 -
This unit can be connected to the TV signal input source via the TV jack on the rear panel.
After connection, turn on the power of the
unit.
Then press the SOURCE button to shif
t to TV mode.
After connecting to the antenna, turn on the unit, and go on with program searching, you can
follow the below steps to select channels:
1.
For 0~9 channel:
Press
the number buttons to select the channel X, wait several seconds and it will go to the
selected channel.
Or press the number button to select channel X, and then press the /+10 to go to the
selected channel immediately.
Or press the number buttons to input
00X
, it will go to the selected channel
immediately
.
2.
For
10~99 channel:
Press
the number buttons to select channel
XX
, wait three seconds and it will go to the selected
channel.
Press
the number buttons to select channel
XX
, and then press the
/+10 button to enter the
selected channel.
Or press the number bu
ttons to input
0XX
, it will go to the selected channel
immediately
.
3.
For
100~199 channels:
Press
the number buttons to select channels
XXX
, and it will go to the selected channel.
* X is the channel number.
TV Function

- 16 -
Preparations
1. After connection, press the POWER button to turn on the power. (
If
it is turned on, the power
indicator is blue.)
2.
Press
the SOURCE button to shift to TV mode. You can go on with the follo
wing operations:
Image Setting
Note:
This item is only available when there is signal input.
TV Function
Scheme Setup
Press the
button to select
Scheme
and
press the ENTER button to enter. Press the
button to select the desired
item and press
th
e ENTER button to confirm your selection.
Press
the
MENU
button to return to the previous
menu.
Picture Setup
Press the
button to select
Picture
and
press the ENTER button to enter. Press the
button to select the desired
item and press
the ENTER button to confirm your
selection.
Press
the
MENU
button to return to the previous
menu.
Press the MENU button once to enter the setup
menu.
Press
the
button to select
Image
and
press the ENTER button to enter the menu
shown on the right.
In the
Image
setup menu, press the
button
to select the desired item. Press the ME
NU
button to return to the previous menu.

- 17 -
Contrast Setup
Press the
button to select
Contrast
and p
ress
the
button to adjust the value. Press the
MENU
button to return to the previous menu.
Hue Setup
Press the
button to select
Hue
and
press the
button to adjust the value.
Press
the
MENU
button to return to the previous
menu.
Note:
This item is only available
in
SCART,
CVBS, S
-
VIDEO
and
Componen
t modes.
Saturation Setup
Press the
button to select
Saturation
and press the
button to adjust the value.
Press
the
MENU
button to return to the previous menu.
Sharpness S
etup
Press the
button to select
Sharpness
and press the
button to adjust the value.
Press
the
MENU
button to return to the previous menu.
Advanced Setup
Press the
button to select
Advanced
and
press the ENTER button to enter.
In the menu, press
the
button to select the desired item and then press the ENTER button to
confirm.
Press
the
MENU
button to return to the previous menu.
Note:
This item is only available
in
SCART,
CVBS, S
-
VIDEO
and
Componen
t modes.
TV Function
Brightness Setup
Press the
button
to select
Brightness
and p
ress
the
button to adjust the value. Press
the MENU button to return to
the previous menu.

- 18 -
Audio Set
ting
Volume Setup
Press the
button to select
Volume
and press the
button to adjust the level.
Press
the
MENU
button to return to the previous menu.
Bass Setup
Press the
button to select
Bass
and
press the
button to adjust the level.
Press
the
MENU
button to return to the previous menu.
Treble Setup
Press the button to select
Treble
and press the
button to adjust the level. Press the
MENU
button to return to the previous menu.
Balance
Setup
Press the
button to select
Balance
and press the
button to adjust the level.
Press
the
MENU
button to return to the previous menu.
Auto Volume Setup
Press the
button to select Auto Volume and press the ENTER button to access
the
menu.
Press t
he
button to select
On
or
Off
and press
the
ENTER button to confirm.
Press
the
MENU
button to return to the previous menu.
TV Function
Press the MENU
button once to enter the setup
menu.
Press
the
button to select
Audio
and
press the ENTER button to enter the menu
shown on the right.
In the
Audio
setup menu, press the
button
to select the desired item. Press the MENU
button to return to the previo
us menu.
Sound Mode Setup
Press the
button to select Sound Mode
and press the ENTER button to enter.
Press
the
button to select the
desired
item and
then press the ENTER button to confirm your
selection. Press the
MENU button to return to
the previous menu.

- 19 -
Timer Setting
Setup Setting
TV Function
Press the
MENU
button once to enter the setup
menu. Press the
button to select
Timer
and
press the ENTER bu
tton to enter the menu
shown on the right.
In the
Timer
setup menu, press the
button
to select Off, 15Min, 30Min, 45Min, 60Min,
75Min, 90Min, 105Min or 120Min. Press the
MENU button to return t
o the previous menu
Press the
MENU
button once to enter the setup
menu. Press the
button to select
Setup
and
press the ENTER button to enter the m
enu
shown on the right.
In the
Setup
menu, press the
button to
select the desired item. Press the
MENU
button to return to the previous menu.
Tuner/Channel
Press
the
button to select the
Tuner/Channel
and press the ENTER
button to enter the menu shown on the
right. Press the
button to select the
desired item. Press the
MENU button to
return to the previous menu.
Other manuals for DVT-1901
1
Table of contents
Other LENCO TV DVD Combo manuals

LENCO
LENCO DVT-1932 User manual

LENCO
LENCO DVT-2422 User manual

LENCO
LENCO DVT-1901 User manual

LENCO
LENCO DVL-2455 User manual

LENCO
LENCO DVT-1941 User manual

LENCO
LENCO DVT-194 User manual

LENCO
LENCO DVT-2681 User manual

LENCO
LENCO DVT-1541 User manual

LENCO
LENCO DVP-730 User manual

LENCO
LENCO DVL-1953 BLACK User manual

LENCO
LENCO DVL-2440 User manual

LENCO
LENCO DVT-1936 User manual

LENCO
LENCO DVT-2621 User manual

LENCO
LENCO DVT-2441 User manual

LENCO
LENCO DVT-224 User manual

LENCO
LENCO DVT-1001 User manual

LENCO
LENCO DVL-2253 BLACK User manual

LENCO
LENCO DVT-221 User manual

LENCO
LENCO DVT-1941 User manual

LENCO
LENCO DVT-2441 User manual