Lenoxx Healthy Choice PM85 User manual

Model No: PM85
Batch No: PR3565
Please&read&and&retain&these&instructions&for&your&reference.&

&
Introduction:&
Bring&the&authentic&flavours&of&Italy&to&your&kitchen.& &
&
The&opportunities&are&endless&with&our&automatic&pasta&makers,&but&one&thing&is&certain–&preparing&fresh,&
homemade&pasta&has&never&been&simpler.&Our&pasta&makers&have&a&huge,&600&gram&capacity&for&flour,&allowing&you&
to&create&large&portions&to&keep&the&whole&family&satisfied.& &
&
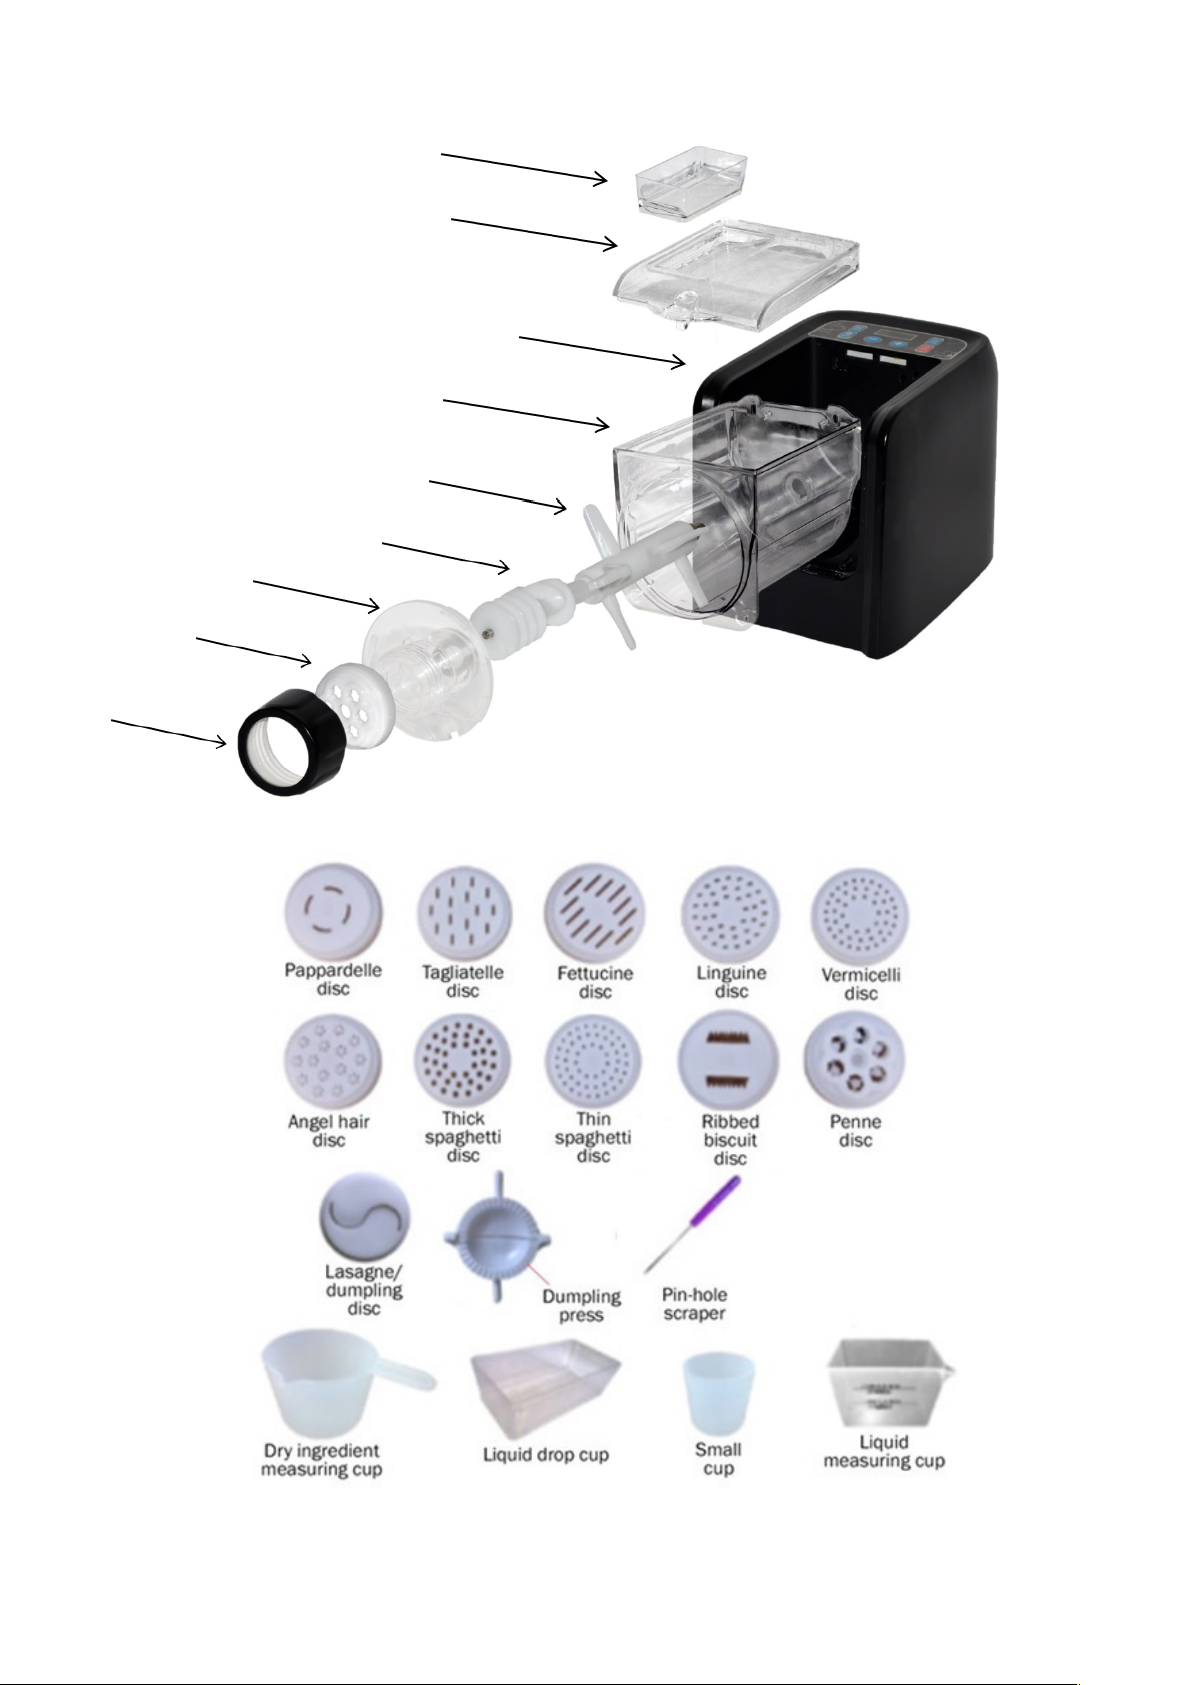
Each&automatic&pasta&maker&also&contains&a&dumpling-making&tool,&assisting&you&in&preparing&delicious&pouches&
ready&for&your&choice&of&succulent&dumpling&fillers–&create&your&own&raviolis,&pierogis,&and&so&much&more.&
&
There’s¬hing&like&a&home-cooked&meal.&Add&an&authentic&addition&to&a&mealtime&favourite&with&your&fantastic,&
new&automatic&pasta&maker.&
Important&Safeguards:&
When&operating&this&electrical&appliance,&basic&safety&instructions&should&always&be&followed&to&reduce&the&risk&of&
fire,&electrical&shock,&and/or&injury.&
&
• Read&all&the&instructions&carefully,&even&if&you&feel&familiar&with&the&appliance.&Save&these&instructions&for&
future&reference.&
• Before&connecting&the&appliance&to&the&mains,&check&the&type&of&supply&and&the&mains&voltage&corresponds&
with&the&appliance.&This&appliance&is&to&be&used&in&a&standard&domestic&outlet&only.&
• Always&switch&OFF&and&pull&the&plug&out&of&the&socket&after&using&the&appliance&and&before&cleaning&it.&
• Never&pull&the&plug&from&the&cord,&always&pull&directly&on&the&plug.&
• Do¬&carry&the&appliance&by&the&cord.&
• Do¬&immerse&housing&body,&cord,&or&plug&in&water&or&any&other&liquids.&
• Do¬&use&the&appliance&with&wet&hands&or&standing&on&wet&floor.&
• Do¬&let&the&cord&hang&over&the&edge&of&a&table&or&touch&hot&surfaces&such&as&the&stove.&
• Do¬&operate&the&appliance&with&a&damaged&cord,&after&the&appliance&malfunctions,&or&after&damage.&
Contact&customer&service&immediately.&
• Do¬&allow&the&cord&to&become&kinked&or&trapped.&The&cord&should&be&laid&so&that&there&will¬&be&any&
risk&of&anyone&pulling&it&inadvertently&or&tripping&over&it.&
• If&the&supply&cord&is&damaged,&the&cord&must&be&replaced&by&the&manufacturer,&its&service&agent,&or&similarly&
qualified&persons&to&avoid&a&hazard.&
• This&appliance&is&intended&to&be&used&in&household&and&similar&applications&such&as:& &
– staff&kitchen&areas&in&shops,&offices&and&other&working&environments;& &
– farm&houses;& &
– by&clients&in&hotels,&motels&and&other&residential&type&environments;& &
– bed&and&breakfast&type&environments.&
• This&product&has¬&been&designed&for&any&uses&other&than&those&specified&in&this&booklet.&
• Do¬&use&or&store&the&appliance&outdoors.&Store&it&in&a&dry&location.&
• Set&up&and&store&the&appliance&out&of&reach&of&children.&Children&shall¬&play&with&the&appliance.&
• This&appliance&can&be&used&by&persons&with&reduced&physical,&sensory,&or&mental&capabilities,&or&lack&of&
experience&and&knowledge&if&they&have&been&given&supervision&or&instruction&concerning&use&of&the&
appliance&in&a&safe&way&and&if&they&understand&the&hazards&involved.&
• Set&up&the&appliance&on&a&flat,&non-slip&surface&close&to&an&electrical&socket.&A&short&power&supply&cord&is&
provided&to&reduce&the&risk&resulting&from&becoming&entangled&or&tripping&over&a&long&cord.&
• Avoid&using&the&appliance&on&metal&surfaces&such&as&the&sink.&

• When&using&the&appliance,&ensure&that&there&is&sufficient&air&space&above&and&around&all&sides&for&air&
circulation.&
• Make&sure&the&appliance&is&properly&and&completely&assembled&before&turning&it&on.&
• Do¬&move&the&appliance&when&it&is&in&operation.&
• Do¬&switch&on&the&appliance&when&it&is&upside&down&or&laid&on&its&side.&
• Do¬&use&any&accessory&attachments¬&provided&in&the&package&to&prevent&injury.&
• Switch&OFF&and&unplug&the&appliance&before&removing&or&inserting&the&provided&attachments.&Handle&the&
attachments&with&care.&
• No&claims&under&the&warranty&or&liability&will&be&accepted&if&result&from&improper&or&incorrect&use.&
• Check&the&appliance&and&its&components®ularly&for&damages.&Do¬&use&the&appliance&if&it&is&damaged&in&
any&way.&Have&it&immediately&repaired&at&an&authorized&service¢er.&Do¬&ever&attempt&to&repair&the&
unit&yourself.&There&is&danger&of&electrical&shock.&
• Keep&your&hair,&clothing,&and&jewelry&away&from&the&rotating&parts.&
• Do¬&leave&the&appliance&unattended&while&it&is&in&use.&
• Do¬&touch&the&moving&parts&of&the&appliance.&
• Do¬&operate&the&appliance&continuously&for&longer&than&20&minutes.&Allow&the&appliance&to&cool&
completely&before&using&it&again.&
• This&product&is¬&intended&to&be&operated&by&means&of&an&external&timer&or&separate&remote&control&
system.&
• When&storing&the&appliance&wrap&the&cord&neatly&to&avoid&unnecessary&strain&on&the&cord.&
Before&first&use:&
• Thoroughly&clean&all&parts&that&contact&food&using&hot&soapy&water.&
• Place&the&appliance&on&an&appropriate&work&surface.&
• Please&be&familiar&with&the&appliance&and&instructions&before&connecting&it&to&a&power&outlet.&
&
&
&
&
&
&
&
&
&
&
&
&
&

Parts included:
&Liquid drop cup
Lid
Unit base
Mixing container
Turbine
Screw
Evacuation tube
Pasta disc
Disc screw

Assembly:&
Place&the&unit&on&a&horizontal&and&stable&working&surface.&Insert&mixing&container&horizontally&onto&the&unit&base&by&
thoroughly&pushing&it&through&to&the&back&of&the&base,&with&the&large&round&opening&facing&out&and&the&square&
opening&on&top.&
&
Insert&the&screw&(spiral&rod)&into&the&evacuation&tube.&The&rod&on&the&screw&will&stick&out&of&the&hole&at&the&end&of&
the&evacuation&tube.&
&
Insert&the&turbine&onto&the&driving&rod&of&the&screw.& &
The&hole&in&the&turbine&shaft&connects&with&the&rod&of&the&screw.& &
&
Insert&the&turbine&into&the&mixing&container&through&the&large&round&opening.&
The&metal&end&on&the&turbine&connects&into&the&hole&at&the&rear&of&mixing&container&and&the&main&body&of&the&pasta&
maker.&
The&screw&and&evacuation&tube&will&need&to&remain&attached&to&the&turbine&when&you&do&this.&
&
Attach&the&evacuation&tube&to&the&mixing&container.&Lock&it&into&place&by&rotating&the&evacuation&tube&clockwise.& &
&
Choose&the&pasta&disc&that&you&would&like&to&use&and&add&it&onto&the&end&of&the&evacuation&tube.&
&
Lock&the&pasta&disc&onto&the&tube&feed&using&the&disc&screw.&Screw&the&disc&screw&clockwise.& &
&
Place&the&lid&on&top&of&the&mixing&container&into&which&all&of&the&parts&have&been&installed,&then&lock&the&lid&on&the&
container.&
&
Note:&The&pasta&maker&will¬&work&without&the&lid&correctly&in&place.&
When&you&need&to&disassemble&the&appliance,&please&remove&the&lid&first.&
&
When&the&unit&and&parts&have&been&assembled&correctly&and&the&lid&has&been&added&and&closed&into&the&correct&
position&(and&the&power&cord&is&connected&to&the&unit),&the&unit&will&beep&and&the&machine&will&be&‘on’.&There&will&be&
red&dashes&on&the&display&panel&of&the&unit.&
&
The$liquid$drop$cup:&The&liquid&drop&cup&sits&on&top&of&the&lid&of&the&pasta&maker.&The&small&holes&in&the&liquid&drop&
cup&allow&water&to&gradually&trickle&down&into&the&inner&body&(mixing&container)&and&then&be&mixed&gradually&into&
the& flour.& Adding& the& water& to& the& flour& mix& gradually& using& this& method& results& in& a& good& consistency& of& dough&
mixture.& &
&
The&unit&also&comes&with&a&dry&ingredient&measuring&cup,&small&cup&and&liquid&measuring&cup.&
&
The$dry$ingredient$cup&is&used&for&flour.&The&dry&ingredient&cup&measures&250g&of&flour.&
&
The$small$cup&is&for&water.&The&small&cup&measures&85ml&of&water.&
&
The&basic&pasta&recipe&included&with&this&unit&is&for&1&x&dry&ingredient&cup&(the&included&dry&ingredient&cup)&of&flour&
and& 1& x& small& cup& (the& included& small& cup)& of& water.& To& make& a& larger& quantity,& use& 2& x& dry& ingredient& cups& (the&
included&dry&ingredient&cup)&of&flour&and&2&x&small&cups&(the&included&small&cup)&of&water.&
&
If& using& your& own& fresh& pasta& making& recipe,& which& calls& for& measurements& of& ingredients,& please& use& your& own&

measuring&cup,&as&the&volume&of&the&ingredients&needed&may&differ.&
&
The$liquid$measuring$cup&is&an&additional&cup&you&could&use&to&add&multiple&water&cups&to&the&liquid&drop&cup.&
&
The&included&dumpling$press&can&be&used&with&dough&to&make&your&own&home&made&dumplings.&Extrude&from&the&
unit&with&the&lasagna/dumpling&disc.&Cut&the&extruded&dough&into&smaller§ions.&Lay&the§ions&of&dough&across&
the&dumpling&press.&Add&your&chosen&filling&into&the¢er&of&the&dumpling&press.&Then&fold&the&dumpling&press&in&
half&to&seal&the&dumpling.&Open&the&dumpling&press&to&remove&the&dumpling.&Cook&your&made&dumplings&in&boiling&
water.&
&
The&pin$hole$scraper&is&a&tool&which&can&assist&in&cleaning&the&pasta&discs.&Poke&the&pointy&end&of&the&pin&hole&scraper&
into&the&holes&or&groves&in&the&discs&to&remove&the&left&over&pieces&of&dough.&
&
Control&panel:&
&
&
Mix$button:& &
When&pressed,&the&time&on&the& panel& will&be&displayed&as& 04:00.&The&time& will&blink&on&the&screen& for& 4&seconds.&
Then&the&unit&will&enter&mixing&mode&and&count&down&from&4&minutes&of&time&while&mixing&your&added&ingredients.&
At& the& end& of& the&4& minutes& mixing&time,&the&unit&will&stop&mixing&and& beep&to&alert& you&that&the&mixing& time& has&
ended.&
The&mixing&time&can&also&be&adjusted.&
After&pressing&the&mix&button&(before&the&mixing&process&begins),&use&the&–&or&+&buttons&to&adjust&the&mixing&time.&
When&your&chosen&time&is&shown&on&the&display&screen,&do¬&press&anything.&The&time&will&blink&on&the&screen&for&
4&seconds&and&then&the&unit&will&enter&mixing&mode&and&count&down&from&your&chosen&time.& &
The&mixing&time&is&adjustable&in&10&second&intervals.&
The&minimum&mixing&time&which&can&be&selected&is&10&seconds.&
The&maximum&mixing&time&which&can&be&selected&is&20&minutes.&
&
Auto$button:$
When&pressed&once&or&twice&the&unit&will&be&able&to&operate&in&2&x&preset&modes.&
When&pressed&once,&“10:b1”&will&be&shown&on&the&screen.&
When&pressed&twice&“16:b2”&will&be&shown&on&the&screen&
$
“10:b1”:&This&mode&has&a&mixing&time&of&4&minutes&and&a&noodle&extrude&time&of&6&minutes&(it&can&be&selected&when&
making&1&cup&of&flour&noodles).&
“16:b2”:&This&mode&has&a&mixing&time&of&4&minutes&and&noodle&extrude&time&of&12&minutes&(it&can&be&selected&when&

making&2&cups&of&flour&noodles).&
&
When& your& chosen& mode& is& shown& on& the& screen,&no& not& press& anything& and& in& 4& seconds& the& unit& will& begin&
operation&in&that&mode.&
&
At&the&end&of&the&automatic&cycle,&the&unit&will&stop&operation&and&beep&to&alert&you&that&the&time&has&ended.&
&
Extrude$button:$
When&pressed,&the&time&on&the&panel&will& be&displayed&as&12:00.&The&time&will& blink&on&the& screen&for&4&seconds.&
Then&the&unit&will&enter&extrude&mode&and&count&down&from&12&minutes&of&time&while&extruding&pasta.&At&the&end&of&
the&12&minutes&extruding&time,&the&unit&will&stop&extruding&and&beep&to&alert&you&that&the&extruding&time&has&ended.&
The&extruding&time&can&also&be&adjusted.&
After& pressing& the& extrude& button& (before& the& extruding& process& begins),& use& the& –& or& +& buttons& to& adjust& the&
extruding&time.&When&your&chosen&time&is&shown&on&the&display&screen,&do¬&press&anything.&The&time&will&blink&on&
the&screen&for&4&seconds&and&then&the&unit&will&enter&extruding&mode&and&count&down&from&your&chosen&time.& &
&
The&extruding&time&is&adjustable&in&10&second&intervals.&
The&minimum&extruding&time&which&can&be&selected&is&10&seconds.&
The&maximum&extruding&time&which&can&be&selected&is&20&minutes.&
&
Cancel$button:$
This&button&is&used&to&cancel&a¤t&operation.&Press&the&cancel&button&when&the&unit&is&in&mix,&auto&or&extrude&
mode&to&stop&the&function.&
&
–$and$+$buttons:$ $
These&buttons&are&used&to&adjust&operation×&on&the&unit&when&the&unit&is&in&mixing&mode&or&extruding&mode.$
&
Process:&
***$Manually$make$1$cup$of$flour$noodles$
Preparation:& &
A) Assemble&the&pasta&maker&with&your&chosen&pasta&disc.&
B) Take&1&flat&cup&of&flour&with&the&dry&ingredient&measuring&cup,&take&1&cup&of&water&with&small&water&cup.&
&
Stir$Manually:$
A) Pour&1&flat&cup&of&flour&into&the&mixing&container.&
B) Close&the&lid&(Ensure&it&is&closed&and&locked&into&place).&
C) Assemble&the&liquid&drop&cup&onto&the&corresponding&position&on&the&lid.&
D) Connect&the&power&lead&(The&screen&display&will&show&“----”,&which&means&the&machine&is&on&idling&status).&
E) Press&the&mix&button.&The&display&will&blink&for&a&few&seconds&and&then&begin&operation.&
F) Once&upon&the&machine&starts&to&stir&the&flour,&immediately&pour&1&small&cup&of&water&into&the&water&drop∪&
G) Wait&until&the&completion&of&stirring.&
&
Compress$Noodle$Manually:$
Upon&completion&of&the&above&manually&stirring&(flour)&
A) Press&the&extrude&button.&
B) Set&timing&for&noodle&extrusion.&Use&the&+&and&–&buttons&to&increase&or&decrease&the&extrusion&time.&(Normally&
noodle&compression&for&1&cup&of&flour&can&be&completed&in&6&minutes).&When&your&chosen&time&is&shown&on&the&
screen,&do¬&press&anything.&The&time&will&blink&on&the&screen&and&then&the&pasta&maker&will&begin&extrusion.&
C) Wait&until&the&completion&of&noodle&extrusion.& &

$
***$Manually$make$2$cups$of$flour$noodles$
Preparation:& &
A) Assemble&the&pasta&maker&with&your&chosen&pasta&disc.&
B) Take&2&flat&cups&of&flour&with&the&dry&ingredient&measuring&cup,&take&2&cups&of&water&with&small&water&cup.&
&
Stir$Manually:$
A)&Pour&2&flat&cups&of&flour&into&the&mixing&container.&
B)&Close&the&lid&(Ensure&it&is&closed&and&locked&into&place).&
C)&Assemble&the&liquid&drop&cup&onto&the&corresponding&position&on&the&lid.&
D)&Connect&the&power&lead&(The&screen&display&will&show&“----”,& whic h&m ean s&th e&ma chi n e&is &on &i dlin g&statu s);&
E)&Press&the&mix&button.&The&display&will&blink&for&a&few&seconds&and&then&begin&operation.&
F)&Once&upon&the&machine&starts&to&stir&the&flour,&immediately&pour&1&small&cup&of&water&into&the&water&drop&cup.&
G)&Wait&until&the&completion&of&stirring.&
&
Compress$Noodle$Manually:$
Upon&completion&of&the&above&manually&stirring&(flour)&
A) Press&the&extrude&button.&
B) Set&timing&for&noodle&extrusion.&Use&the&+&and&–&buttons&to&increase&or&decrease&the&extrusion&time.&(Normally&
noodle&compression&for&2&cups&of&flour&can&be&completed&in&12&minutes).&When&your&chosen&time&is&shown&on&
the& screen,& do& not& press& anything.& The& time& will& blink& on& the& screen& and& then& the& pasta& maker& will& begin&
extrusion.&
C) Wait&until&the&completion&of&noodle&extrusion.&
&
***$Automatically$make$1$cup$of$flour$noodles$
Preparation:$Same$as$manually$make$1$cup$of$flour$noodles.$
Automatic&noodle&making:&
A) Pour&1&flat&cup&of&flour&into&the&mixing&container.&
B) Close&the&lid&(Ensure&it&is&closed&and&locked&into&place).&
C) Assemble&the&liquid&drop&cup&onto&the&corresponding&position&on&the&lid.&
D) Connect&the&power&lead&(The&screen&display&will&show&“----”,&w hic h&me ans &the &ma chin e&is &o n&id ling &status ).&
E) Press&the&auto&button&once&(display&10:&b1);&The&display&will&blink&for&a&few&seconds&and&then&begin&operation.&
F) Once&upon&the&machine&starts&to&stir&the&flour,&immediately&pour&1&small&cup&of&water&into&the&water&drop∪&
G) Wait&until&the&completion&of&automatic&noodle&making.&
(During&automatic&noodle&making,&the&machine&will&automatically&go&into&noodle&compression&upon&completion&of&
stirring.)&
$
***$Automatically$make$2$cups$of$flour$noodles$
Preparation:$Same$as$manually$make$2$cups$of$flour$noodles.$
Automatic&noodle&making:&
A) Pour&2&flat&cups&of&flour&into&the&mixing&container.&
B) Close&the&lid&(Ensure&it&is&closed&and&locked&into&place).&
C) Assemble&the&liquid&drop&cup&onto&the&corresponding&position&on&the&lid.&
D) Connect&the&power&lead&(The&screen&display&will&show&“----”,&w hic h&me ans &the &ma chin e&is &o n&id ling &status ).&
E) Press&the&auto&button&once&(display&16:&b2);&The&display&will&blink&for&a&few&seconds&and&then&begin&operation.&
F) Once&upon&the&machine&starts&to&stir&the&flour,&immediately&pour&2&small&cups&of&water&into&the&water&drop∪&
G) Wait&until&the&completion&of&automatic&noodle&making.&
(During&automatic&noodle&making,&the&machine&will&automatically&go&into&noodle&compression&upon&completion&of&
stirring.)&

Notes:&
l This&machine&has&a&short&time&memory&function:&During&the&process&of&stirring&or&noodle&extrusion,&if&instant&
power&off&occurs&or& the&lid&has& been&opened& and&closed&again& in&a& short&time,&the&machine&can&resume& the&
original& work& process.& If& you& want& to& stop&the& short& time& memory,& you& may& press& the& Cancel& key& once& with&
power&connected.&
l When&operation&nears&the&completion&of&noodle&making,&the&machine&will&stop&noodle&compression&more&than&
10& seconds& in& advance,& and& then&turn& reversely& for& several& seconds& to& return& the& possible& excessive& dough&
inside&the&mixing&container.&
l Upon& completion& of& noodle& extrusion,& if& there& is& dough&inside& the& mixing& container& or& evacuation& tube,& you&
may& remove& the& lid&and& use& suitable& tools& (chopsticks,& etc.)& scrape& the& dough& together,& and& then& continue&
noodle&extrusion&for&an&additional&one&or&two&minutes&more.&After&the&noodle&extrusion&is&finished,&you&should&
clean&the&relevant&components&of&the&pasta&maker&for&next&use.&
l If& you& want& to& make& noodles& with& suitable& softness,& the& proportion& of& water& and& flour& is& an& important&
parameter,&it&is&just&the&proportion&under&normal&condition&that&1&flat&cup&of&flour&to&mix&with&1&small&cup&of&
water,&2&flat&cups&of&flour&to&mix&with&2&small&cups&of&water.&It&may&vary&on&moisture&content&of&different&flours,&
weather&humidity,&personal&flavors,&etc.,&so&it&is&necessary&to&adjust&the&water&adding&proportion&appropriately&
according& to& the& actual& situations.& For&example,& add& less& water& if& the& flour& contains& more& moisture& and& add&
more&water&if&the&flour&contains&less&moisture.&Add&less&water&if&you&prefer&drier&noodles&and&add&more&water&if&
you&prefer&softer&noodles.&
l You&may& judge&whether&the&proportion&of& water& and&flour&is&suitable&by&observing&the&dough&during&the&mixing&
process&(see&pictures&below):&
&
Proportion&of&flour&and&water&is&
appropriate,& flour& is& in& loose&
like&grains.& &
&
Water& is& not& enough,& flour& is&
too& dry,& will& not& get& noodles&
extrusion!& Add& appropriate&
amount& of& water& into& the&
water& dipping& cup& and&
re-press&the&“Auto”&button.&
Water& is& too& much,& remove&
the& dough& stuck& on& the&
turbine,&then&add&appropriate&
amount& of& flour& and& re-press&
the&“Auto”&button.&
l One&of&the&protective&functions&of&this&pasta&maker&is&the&lid,&if&the&lid&is¬&closed&tightly,&the&pasta&maker&will&
not&go&the&modes&of&mixing&and&noodle&extrusion.&When&the&lid&is&closed&tightly&will&the&machine&will&operate.&
If&the&lid&is&opened&during&the&mixing&or&noodle&extrusion&modes,&the&operation&will&stop.&When&the&lid&is&closed&
again,&the&operation&will&resume.&
l Utilizing&the&protective&feature&of&the&lid,&you&may&add&appropriate&water&or&flour&during&the&mixing&process.&
The& method& is:& To& add& water,& add& directly& into& the& water& drop& cup;& To& add& flour,& open & lid&first,& add& in&
appropriate&flour&then&close&the&lid&again,&continue&mixing&or&re-start&mixing.&
l This& machine& may& automatically& identify& dry& flour.& If& the& flour& is& excessively& dry,& the& pasta& maker&will&
automatically&stop&noodle&extrusion&process&and&display&“EE”&with&a&beep&alert.&Set&the&pasta&maker&to&mix&for&a&
few&minutes&more&and&then&try&noodle&extrusion&again.& &
l Every&time&when&making&noodles&manually,&complete&a&mix&cycle&first&before&noodle&extrusion,&otherwise&the&
machine&may&be&damaged&because&the&dough&is&too&dry.&
&
&
&

Troubleshooting:&
PROBLEM&
SOLUTION&
The&machine&does¬&turn&on.&
Ensure&that&the&power&lead&is&connected&correctly.&
&
Ensure&that&the&lid&is&closed&tightly.&
&
Ensure&that&the&lid&is&latched&securely&to&mixing&container&correctly.&
&
Ensure&that&the&mixing&container&has&been&fitted&firmly&to&the&back&wall&of&
the&unit&base&correctly,& &
Hold&the&mixing&container&up&against&the&back&wall&of&the&unit&base.& &
There&is&an&interlocking&safety&switch&which&may&have&been&triggered&if&the&
container&or&lid&was¬&fitted&properly.&
Delayed&starting.&
The&motor&has&a&slight&inbuilt&delay&system&to&get&
the&unit&functioning&prior&to&parts&moving.&This&is&
completely&normal.&
Appliance& stops& while& mixing& or&
extruding&
&
EEEE& –& Error& message& is& shown&
on&the&screen.&
Ensure&that&the&mixing&container&has&been&fitted&firmly&to&the&back&wall&of&
the&unit&base&correctly.&
Hold&the&mixing&container&up&against&the&back&wall&of&the&unit&base.& &
There&is&an&interlocking&safety&switch&which&may&have&been&triggered&if&the&
container&or&lid&was¬&fitted&properly.&
&
If&the&unit&stops&while&mixing,&you&can&also&turn&the&unit&off,&open&the&lid&
and&remove&any&pasta&dough&stuck&under&it.&Refit&and&close&the&lid&properly&
and&switch&the&unit&back&on.&
&
Ensure&that&the&lid&is&latched&securely&to&the&mixing&container&correctly.&
The& lid& and& inner& body& plastic&
container& are& ‘bulging’& during&
the&pasta&making&process.&
Reduce&the&amount&of&ingredients&in&the&mixing&container.&
&
For&optimal&mixing&results,&we&advise¬&to&exceed&500g&of&flour.& &
The&unit&has&a&maximum&capacity&of&600g&of&flour.&
If&more&than&500g&of& flour&is&added,&the& mixture&may&become&stuck&near&
the&lid.&Open&the&lid&and&remove&any&pasta&dough&stuck&under&it.&Refit&and&
close&the&lid&properly&and&switch&the&unit&back&on.&
&
Ensure&that&the&lid&is&closed&tightly.&
&
Ensure&that&the&lid&is&latched&securely&to&mixing&container&correctly.&
Ensure&that&the&mixing&container&has&been&fitted&to&the&unit&base&correctly.&
The&dough&cannot&be&extruded.&
The&consistency&of&the&dough&is¬&right.&If&it&seems&too&wet,&add&more&
flour;&if&it’s&too&dry,&add&more&water.&
Slow& extrusion& or& no& pasta&
extruding&at&all.&
Dough&needs&to&be&the&correct&consistency.&Place&the&pasta&disc&in&warm&
water&for&several&minutes&prior&to&making&pasta.&

There& is& too& much& dough& left& in&
the&mixing&container.&
Complete&another&extrude&cycle&with&more&time&to&extrude&more&pasta.&
&
Use&a&smaller&quantity&of&flour&and&water.&
Appliance&is&noisy.&
The&general&operation&of&this&unit&will&create&noise,&however&loud&clunks&or&
thumping&are¬&normal.&Turn&the&unit&off&and&check&that&the&appliance&is&
assembled&correctly.&
There&is&steam&coming&out&of&the&
unit&near&the&evacuation&tube&or&
pasta&disc.&
There&may&be&some&hot&steam&escaping&from&the&tube&feed.&This&is&
completely&normal.& &
Do¬&touch&the&evacuation&tube,&screw&or&pasta&disc&when&hot&and&
immediately&after&extrusion.&
The&metal&point&on&the&screw&may&also&be&hot&after&extrusion.&Take&care&
not&to&handle&it&when&hot.&
A&small&amount&of&flour&or&water&
has& come& out& from& the& bottom&
of&the&mixing&container.&
This&is&normal&as&mixing&container&and&evacuation&tube&are¬&sealed.&
Cannot&remove&the&disc&screw.&
Put&the&unit&in&mix&mode&for&a&few&seconds.&This&will&relieve&pressure&on&
the&disc&screw&and&pasta&disc.&
Cleaning&problems&-& &
You&will&find&the&parts&easier&to&clean&if&you&leave&the&
parts&to&dry&in&the&air&for&one&hour.&
Disposal:&
At&the&end&of&the&product’s&life-cycle,&it&should&go&directly&to&a&specially&adapted&waste-recycling¢re.&
• This&product&may¬& be&treated&as&household&waste.&Instead&it& should&be&handed& over&to&the&applicable&
collection&point&for&the&recycling&of&electrical&and&electronic&equipment.&
• By&ensuring&this&product&is&disposed&of&correctly,&you&will&help&prevent&potential&negative&consequences&for&
the&environment&and&human&health,&which&could&otherwise&be&caused&by&inappropriate&waste&handling&of&
this&product.& For&more&detailed&information& about& the&recycling& of&this&product,&please& contact&your&local&
council&office&or&your&household&waste&disposal&service.& &
Cleaning&and&storage:&
After&use,&unplug&the&appliance,&wait&for&unit&to&shut&down&completely&then&remove&all&accessories.&Clean&all&the&
accessories&thoroughly&with&hot&soapy&water.&Thoroughly&rinse&all&flour,&pasta&and&soap&from&all&the&parts&and&allow&
to&dry&completely&before&storing.&
&
If&necessary,&the&housing&body&can&be&cleaned&with&a&slightly&moist&cloth.&Never&allow&water&to&seep&into&the&interior&
of&the&unit&base.&
&
Store&the&appliance&in&a&cool&and&dry&place,&away&from&direct&sunlight&and&out&of&reach&of&children.&
&
Specifications:$
Product&Name&
Pasta&Maker&
Product&Model&
PM85&
Rated&Voltage&
220-240V&
Rated&Frequency&
50Hz& &
Rated&Power&
180W&
This manual suits for next models
1
Table of contents